Catalog Permissions
Overview
Currently, for websites that have some pages, you want to create their own promotion or restrict some customer groups to visit these pages. With the Mageplaza Catalog Permissions extension, admins can restrict access to catalogs with Category, Product Detail, and Static Page/Block pages by customer groups and IP addresses. In particular, you can redirect customers to another page when accessing restricted pages or hiding restricted pages on the frontend.
Outstanding Features
| Outstanding Features | Description | |
|---|---|---|
| 1 | Restrict products/ categories by specified customer groups | To prevent frustration or confusion, this module allows admins to redirect customers to other pages and display messages to explain when they click on restricted products/categories. This is to increase customer experience. |
| 2 | Limit access to Static Page/ Static Block | This helps the admin manage item access for different customer segments, such as B2B customers, VIP members, or employees. |
| 3 | Edit Category/ Product/Pages/ Block | Admins can edit categories and products flexibly along with their restrictions through an easy-to-use interface. This is helpful when stores need to limit access in specific cases, such as special holidays, peak seasons, or times when product availability is limited. |
Installation Guide
We offer two methods for installing our plugins: the Copy & Paste method and the Composer method. Please follow the detailed instructions provided below.
Method 1: Installation via Copy & Paste
To install our plugins using the Copy & Paste method, kindly follow the instructions at the link below:
How to Install Magento 2 Extension via Copy & Paste
Method 2: Installation via Composer
Composer name: mageplaza/module-catalog-permissions
To install our extensions using Composer, please refer to the comprehensive guide at the link below:
How to Install Magento Extension via Composer
By following these guides, you can ensure that the installation process is handled correctly, allowing you to fully utilize the features and benefits of our plugins.
Module Update Guide
Keeping your module updated ensures optimal performance. Follow one of these steps to update your module:
- By Account Dashboard: Log in to your
Mageplaza account > go to the My Licenses section > click on the Download button > choose the latest version from the popup. - By composer: Kindly use the following commands to update the module via composer
composer require mageplaza/module-catalog-permissions
php bin/magento setup:upgrade
php bin/magento setup:di:compile
Updating a module by Composer ensures efficient dependency management, version control, and integration with development tools, making the process faster and more reliable.
How to configure
1. Configuration
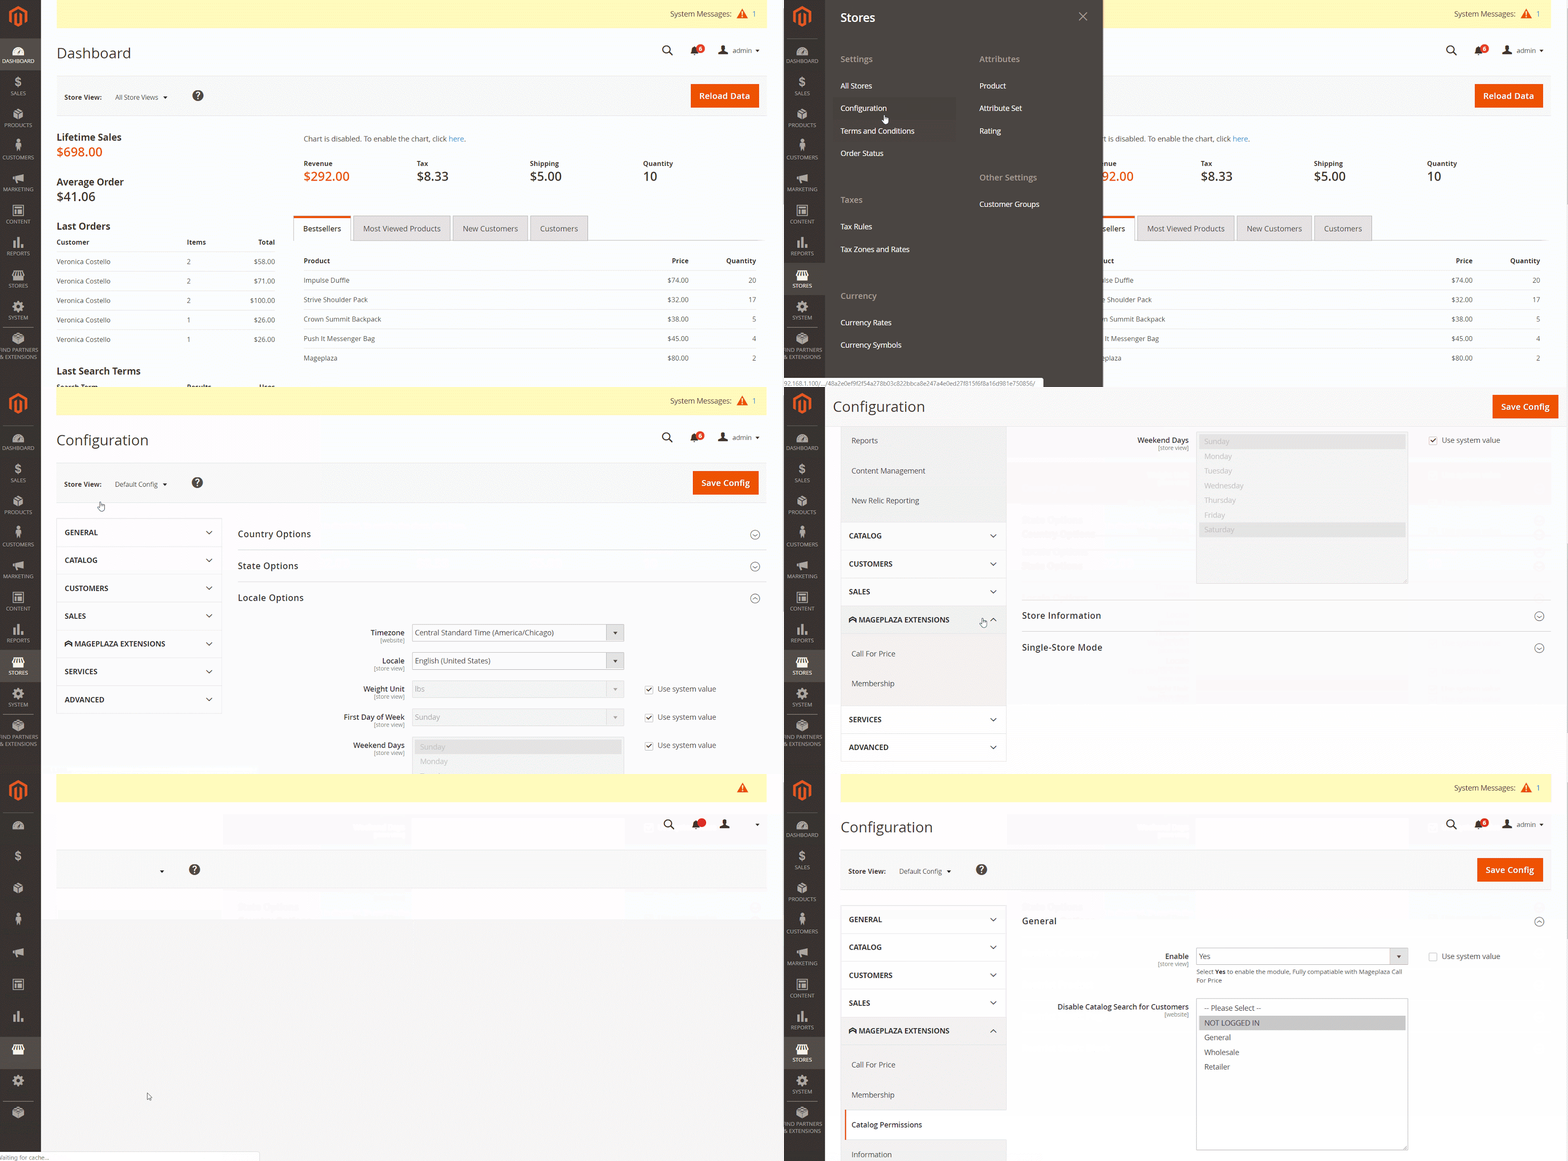
Login to the Admin Magento, choose Stores> Configuration> Catalog Permissions
1.1. General
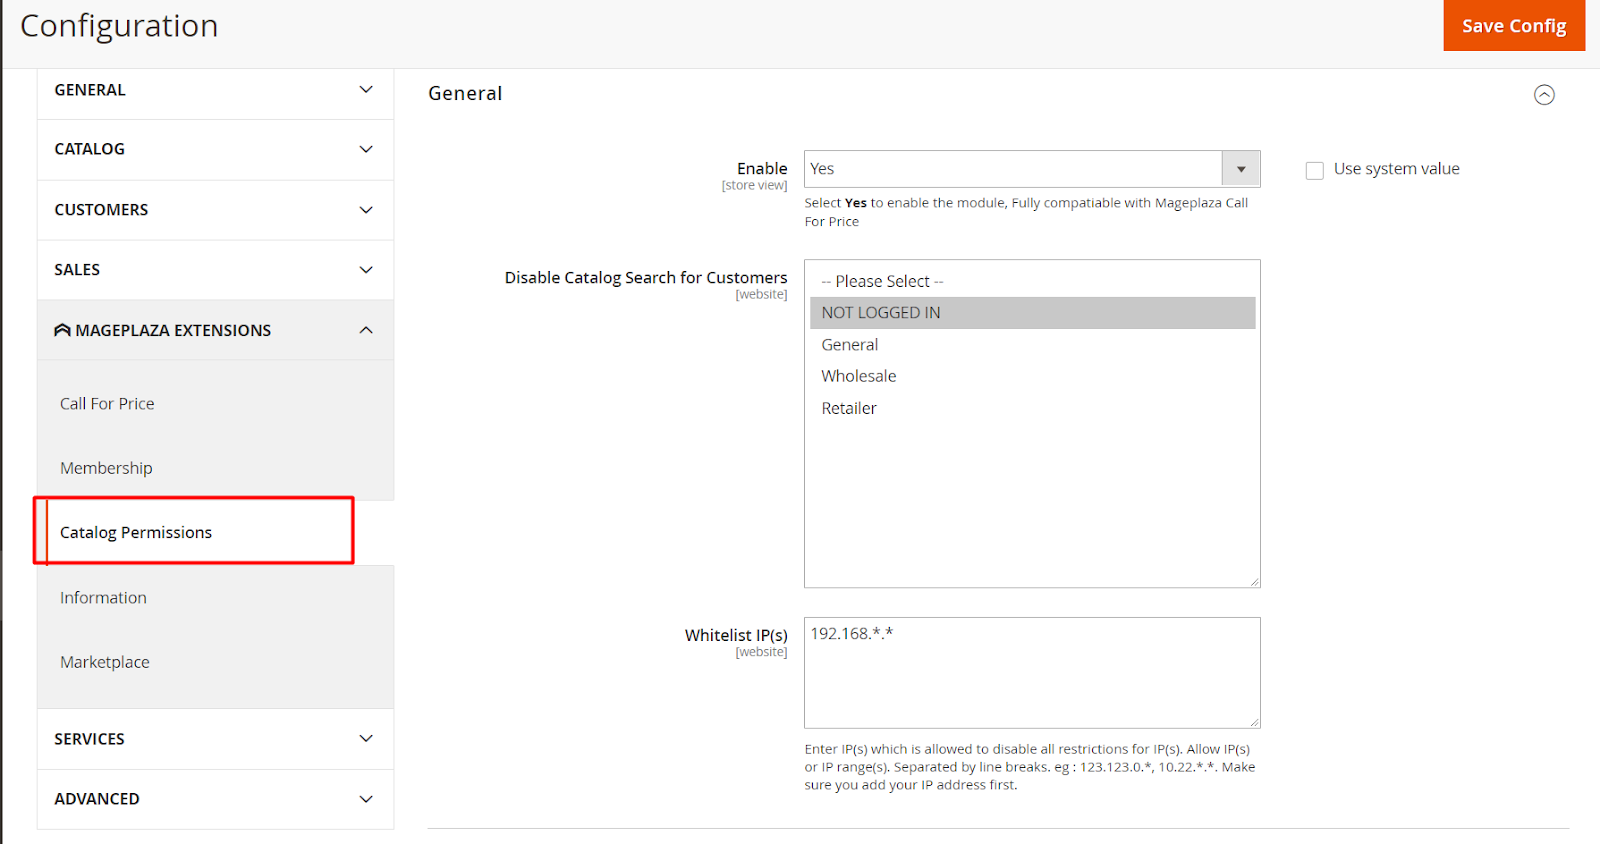
- Enable: Select
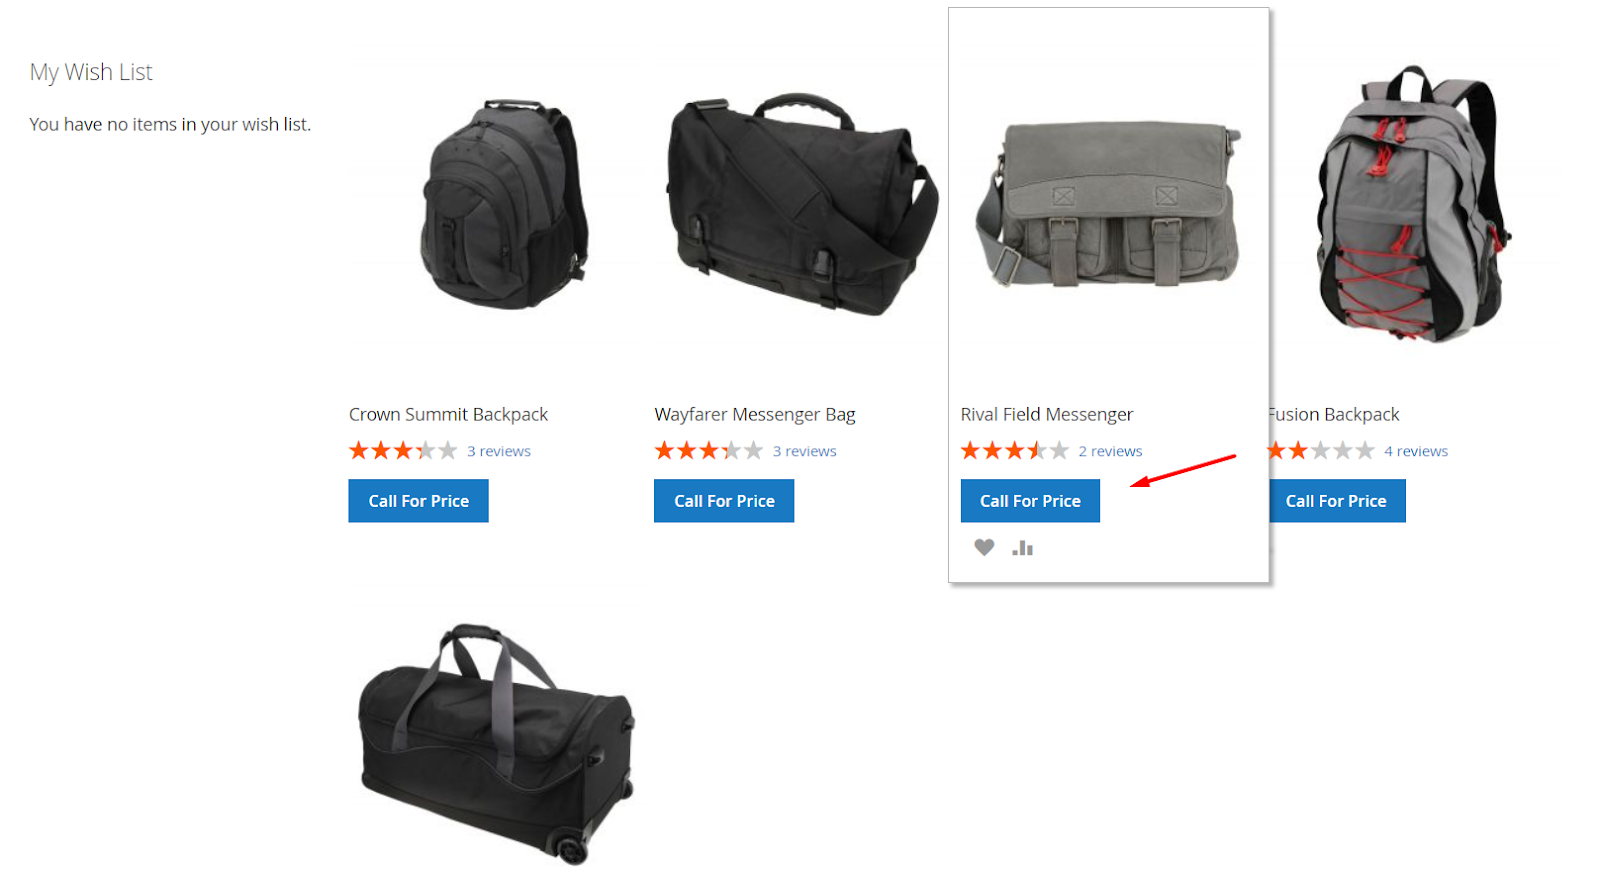
Yesto enable the module. You can install the Call for Price extension of Mageplaza to contact the store to ask for price or product information or ask for the restricted page you want to access.
Disable Catalog Search for: Select customers from whom you want to restrict Catalog Search at all the pages having the search tab. You can choose to restrict multiple customer groups at the same time. The customer group that is not selected can use Catalog Search normally. If you do not want to restrict any customer group, you can leave this option blank. You can disable catalog search for the following customer groups:
- NOT LOGGED IN
- General
- Wholesale
- Retail
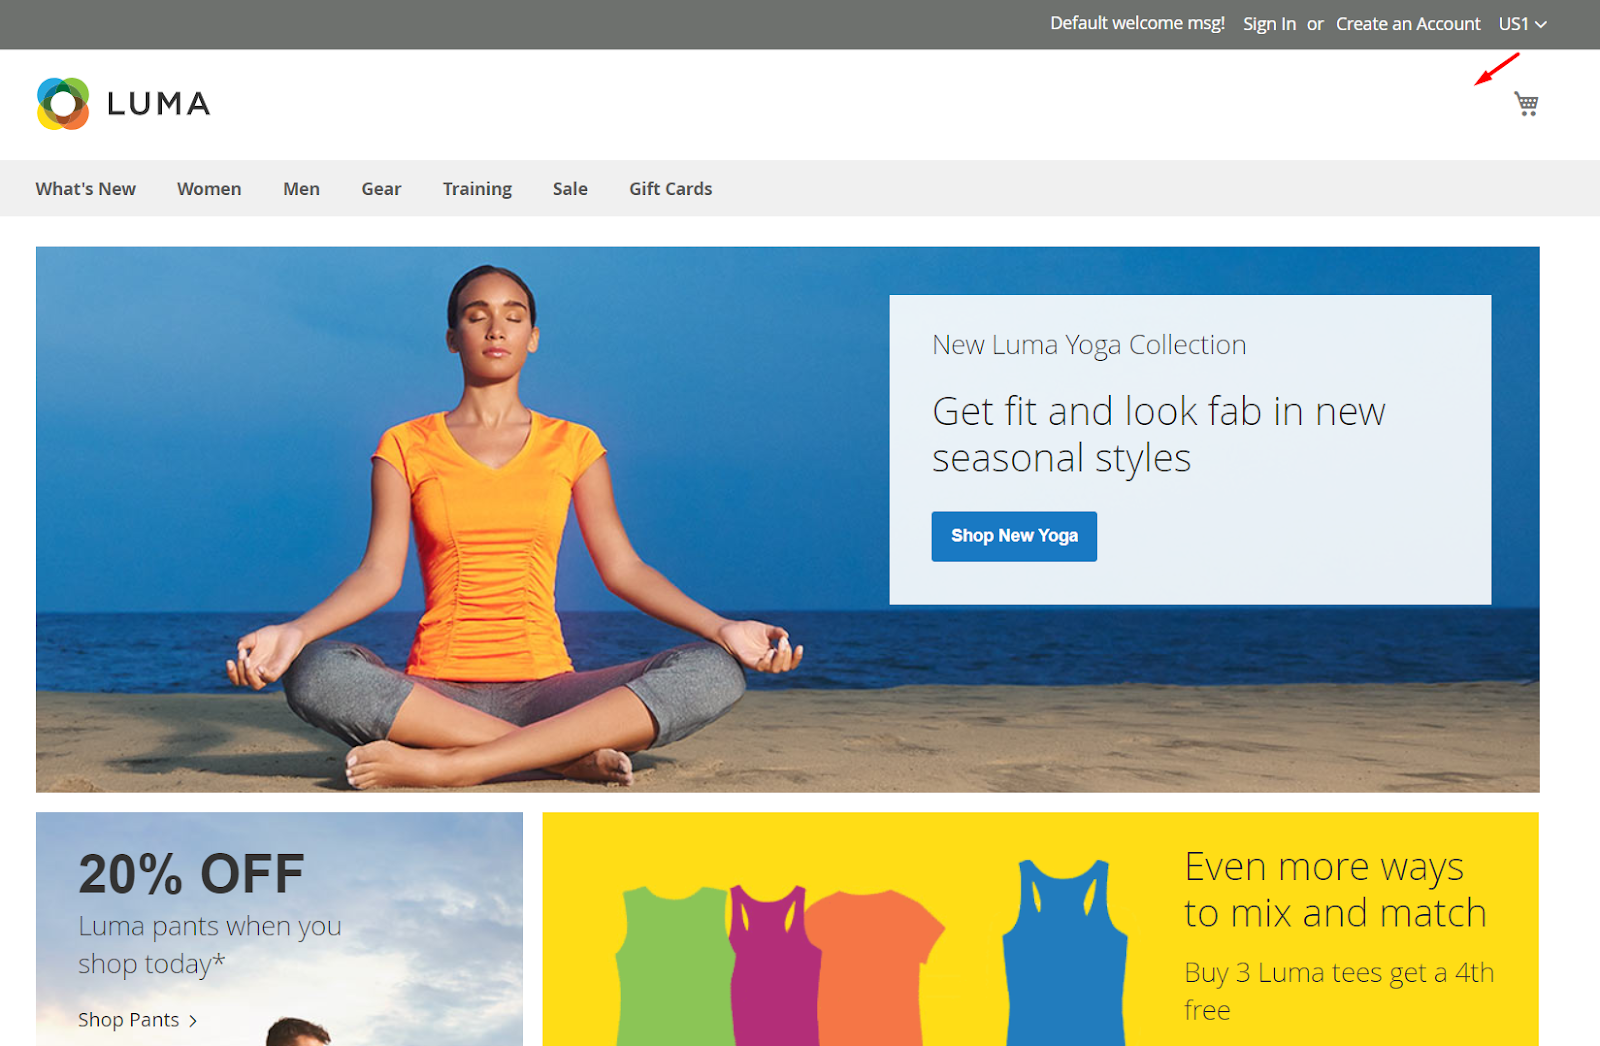
WhitelistIP(s):
- Enter the IP address you don't want to restrict them to specific pages. You can fill in multiple or one range of IP addresses separated by lines. For example: 123.16.32.1, 192.168.1., 192.168..*,...
- Other IP addresses not included in this field will be restricted to chosen pages.
- If left blank, it is restricted to all IP addresses when accessing the restricted site.
1.1.1. Restrict Category
Display a new field Customer Group Restriction, under the Content tab:
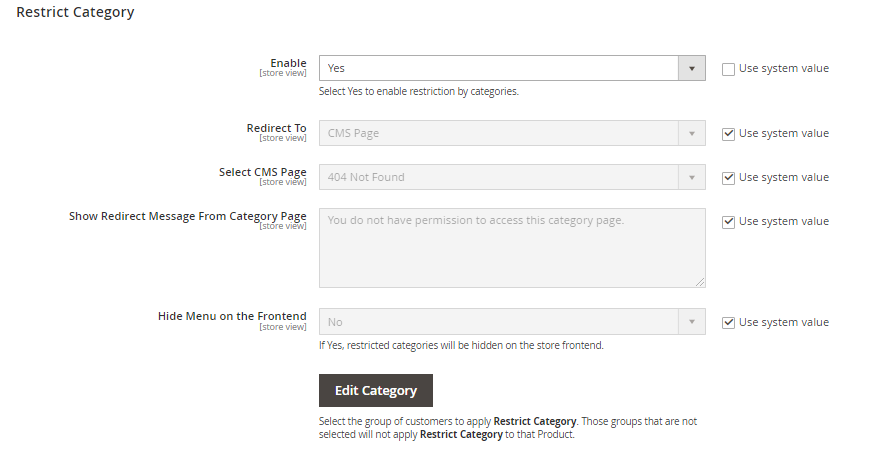
Enable: Select
Yesto enable Restrict Category and will display a new field Customer Group Restriction under the Content tab when accessing theCatalog> Categories.Redirect To: Select the page you want to redirect to after accessing the restricted category:
CMS Page: Display the Select CMS Page field to select the CMS Page to be redirected to when accessing the restricted category.
- Select CMS Page: Select CMS page. You can access
Content > Page, click Add New Page to create more pages you want to redirect to.

- Select CMS Page: Select CMS page. You can access
Select Specific URL: Display the Specific URL field to allow you to choose a specific URL to be redirected to when accessing the restricted category
- Specific URL: Enter Url for the Specific URL field. If left blank or incorrectly entered the URL format, it will redirect to the 404 page by default
Show Redirect Message From Category Page: Display the message to notify redirecting from the Category Page.
Hide menu on Frontend:
- If
Yesis selected, the Category will be hidden outside the Frontend. - And vice versa, selecting
Nowill not hide the Category outside the Frontend
- If
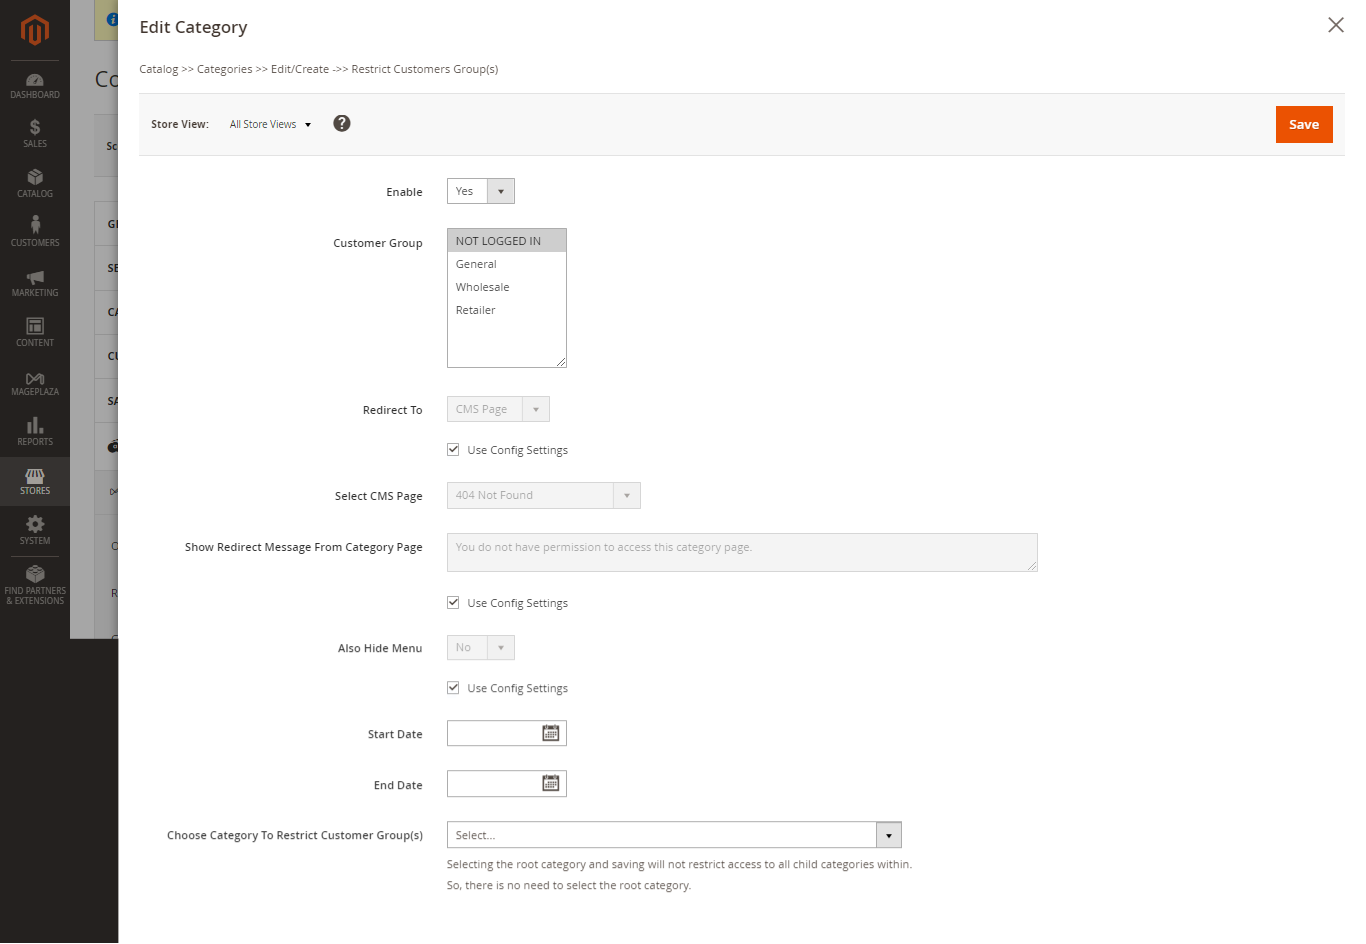
Edit Category button: When the button is clicked, a popup will appear, allowing the user to set access restrictions for one or more categories.
The popup includes the following information:
Enable button: Default value is Yes
Restrict Customers Group(s) item in Category: The default value is “NOT LOGGED IN” selected.
Redirect to, Select CMS Page, Show Redirect Message From Category Page, Also Hide Menu: Displays the default data of Config Setting and the checkbox “Use Config Settings” is ticked
Start Date and End Date show empty
Choose Category To Restrict Customer Groups(s) (At least one branch category is required)
(Not save the selected tick after clicking Save)
Category list:
- Tick each box to block customer groups from accessing the corresponding category
Save button: Click the button to save the data just installed and synchronize data for the selected categories
X button: Click to close the popup and navigate back to the Config screen
1.1.2. Restrict Product
Display a new field Customer Group Restriction under the Content tab:
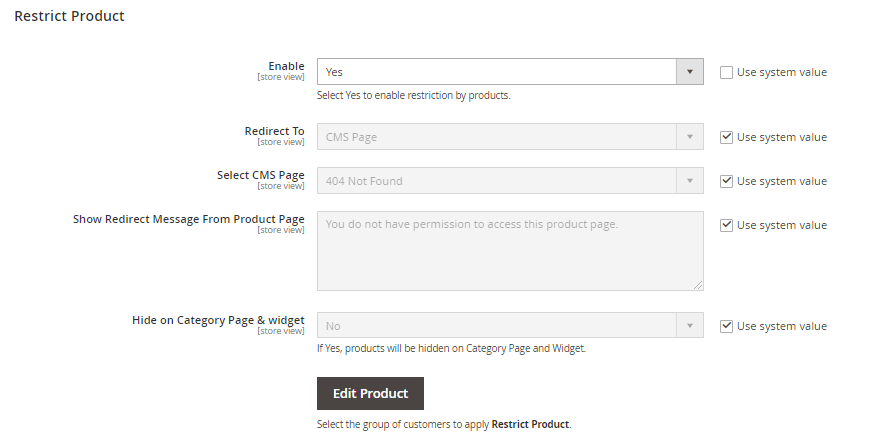
Enable: Select
Yesto enable Restrict Product and will display a new field Customer Group Restriction under the Content tab when accessing theCatalog> Products.Redirect To: Select the page you want to redirect to after accessing the restricted Product:
CMS Page: Display the Select CMS Page field to select the CMS Page to be redirected to when accessing the restricted Product.
- Select CMS Page: Select CMS page. You can access
Content > Page, click Add New Page to create more pages you want to redirect to.

- Select CMS Page: Select CMS page. You can access
Select Specific URL: Display the Specific URL field to allow you to choose a specific URL to be redirected to when accessing the restricted Product
- Specific URL: Enter Url for the Specific URL field. If left blank or incorrectly entered the URL format, it will redirect to the 404 page by default
Show Redirect Message From Product Page: Display the message to notify redirecting from the Product Page.
Hide on Category Page & widget:
- If
Yesis selected, the product will be hidden on the category page and widget. - If
Nois selected, it will not hide the Product on the category page and widget and will display the product as usual.
- If
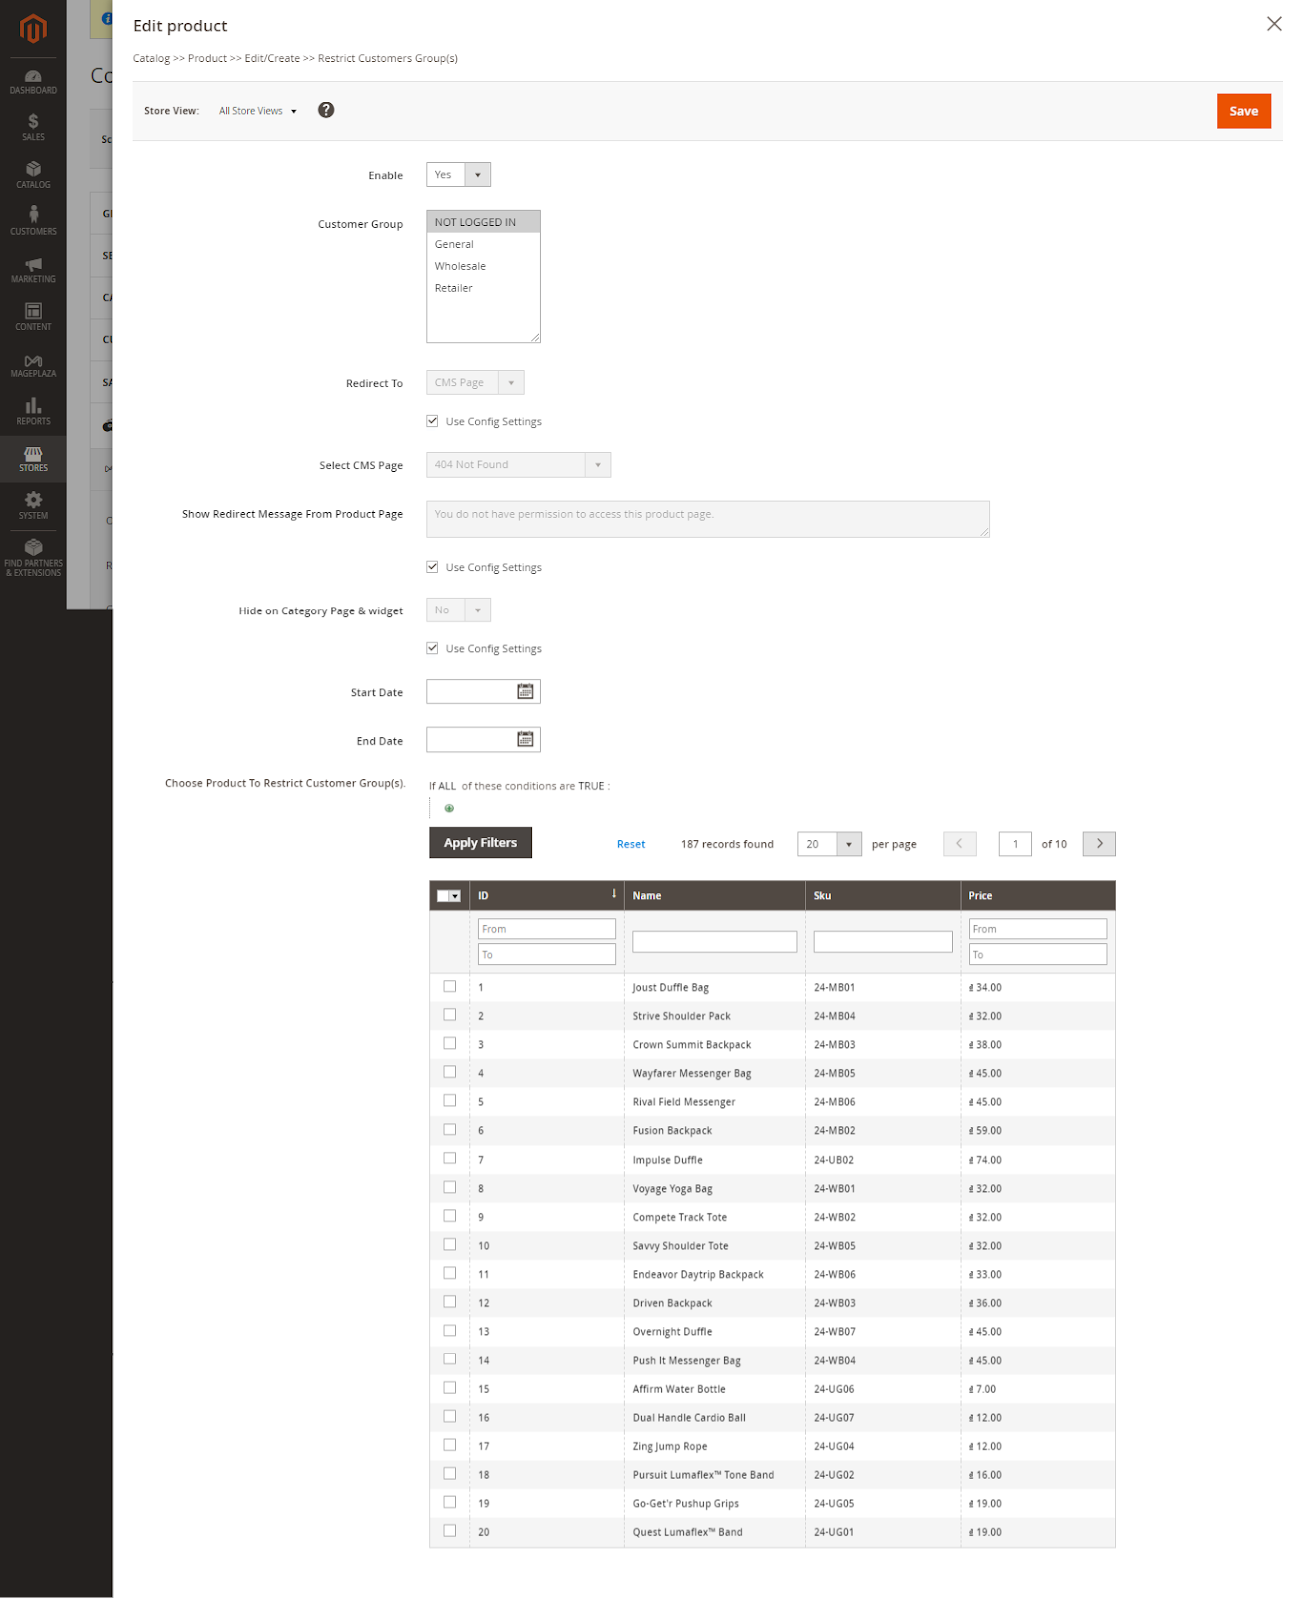
- The popup includes the following information:
Enable button: Default value is Yes
Restrict Customers Group(s) item in Product
Customer Group(s): Displays the default value of “NOT LOGGED IN” selected
Redirect to, Select CMS Page, Show Redirect Message From Category Page, Also Hide Menu shows default data of Config Setting and checkbox “Use Config Settings” is ticked
Start Date and End Date show empty
Filter: Empty
Product list: The product list only shows products (of all product types) whose [Visibility] field value is one of three values:
- Catalog
- Search
- Catalog, Search
Filters: Displays filters according to conditions according to “Product Attribute”
Choose Product To Restrict Customer Groups(s) (Required): Tick all Products that block “Not logged in” customer type.
(Not save the selected tick after clicking Save)
Tick each box to block customers from accessing the corresponding Product
Save button: Click the button to save the data just installed and synchronize data for the selected Products.
X button: Click to close the popup and navigate back to the Config screen
1.1.3. Restrict Static Page
Display a new field Customer Group Restriction under the Content tab:
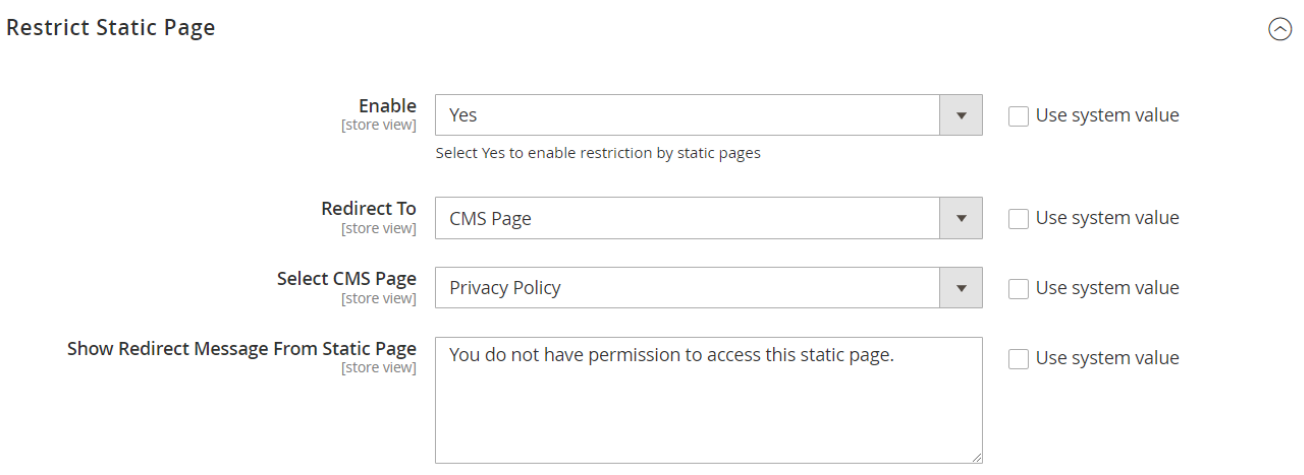
Enable: Select
Yesto enable Restrict Static Page and will display a new field Customer Group Restriction under the Content tab when accessing theCatalog> Page.Redirect To: Select the page you want to redirect to after accessing the restricted Static Page:
CMS Page: Display the Select CMS Page field to select the CMS Page to be redirected to when accessing the restricted Product.
- Select CMS Page: Select CMS page. You can access
Content > Page, click Add New Page to create more pages you want to redirect to.

- Select CMS Page: Select CMS page. You can access
Select Specific URL: Display the Specific URL field to allow you to choose a specific URL to be redirected to when accessing the restricted page
- Specific URL: Enter Url for the Specific URL field. If left blank or incorrectly entered the URL format, it will redirect to the 404 page by default
Show Redirect Message From Static Page: Display the message to notify redirecting from the Static Page.
1.1.4. Restrict Static Block

- Enable: select
Yesto enable Restrict Static Block and will display a new field Customer Group Restriction when accessingContent > Blocks.
2. Edit Category
- Login to the Magento Admin, choose
Catalog> Categories, select new/edit with a restricted category you want - This section applies the configuration when choosing new/edit for each Category.
- Note: If the Restrict Category in the Configuration section and for each Category here are different, priorities will be given to each category first.
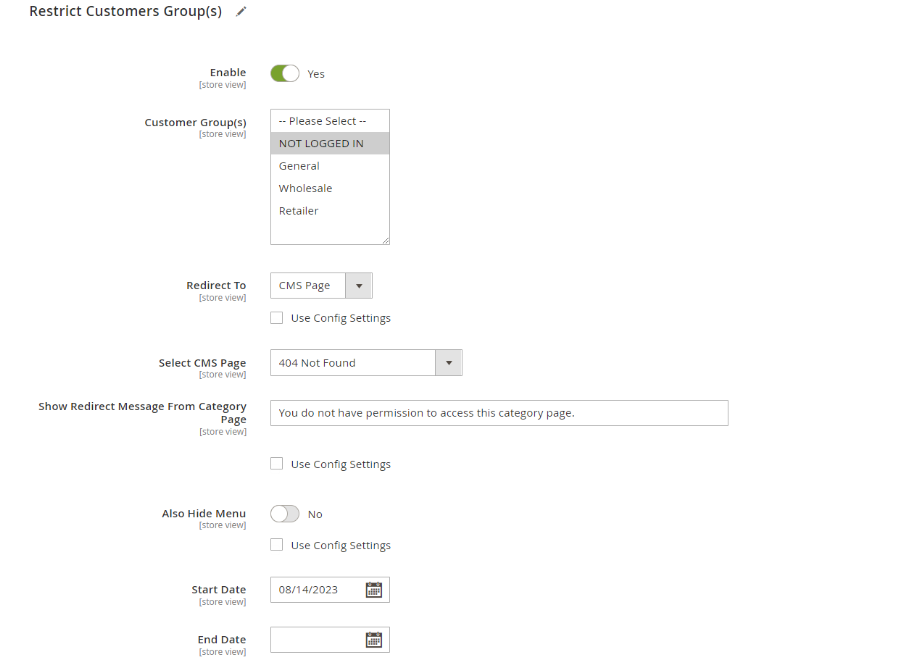
Enable:
- Default is
Noif Enable Restrict Category is enabled. - If
Yesis selected, it will enable Restrict Category with the category you choose. Show more fields: Restriction Customers Group(s), Redirect To fields, Also Hide Menu, Start Date, End Date. - Selecting
Nowill turn off Restrict Category with the category you do not want to restrict to customers.
- Default is
Customer Group: Select the group of customers to apply Restrict Category. Those groups that are not selected will not apply Restrict Category to that category. You can select multiple customer groups at the same time. With the following customer groups:
- NOT LOGGED IN
- General
- Wholesale
- Retail
Redirect To: Select the page you want to redirect to after accessing the restricted category:
CMS Page: Display the Select CMS Page field to select the CMS Page to be redirected to when accessing the restricted category.
- Select CMS Page: Select CMS page. You can access
Content > Page, click Add New Page to create more pages you want to redirect to.

- Select CMS Page: Select CMS page. You can access
Select Specific URL: Display the Specific URL field to allow you to choose a specific URL to be redirected to when accessing the restricted category
- Specific URL: Enter Url for the Specific URL field. If left blank or incorrectly entered the URL format, it will redirect to the 404 page by default
You can choose Use Config Settings to redirect to the default URL or CMS page that you set in Configuration Restrict Category, at Redirect To field.
Show Redirect Message From Category Page: Display the message to notify redirecting from the Category Page. If you put a tick on the Use Config Settings field, then the system will display the message set in the Module Configuration.
Also Hide Menu:
- Select
Yesto hide that category in Frontend. Otherwise, selectingNowill display that category in Frontend. - You can select
Use Config Settingsto default to use the configured value at Configuration Restrict Category with Hide menu on Frontend field.
- Select
Start Date:
- Click the Calendar box to select the start date for Restrict Category. - If you leave it blank, then applying Restrict Category will start from the date you enable until the End Date.
End Date:
- Click the Calendar box to select the end date for Restrict Category.
- If left blank in this field, it will start applying Restrict Category by the date selected in the Status Date field and will not end up applying Restrict Category until it is disabled for that category.
3. Edit Product
- Login to the Magento Admin, choose
Catalog > Products, select new/edit with a restricted Products you want - This section applies the configuration when choosing new/edit for each Product.
- Note: If the Restrict Products in the Configuration section and for each Product here are different, priorities will be given to each Product first.
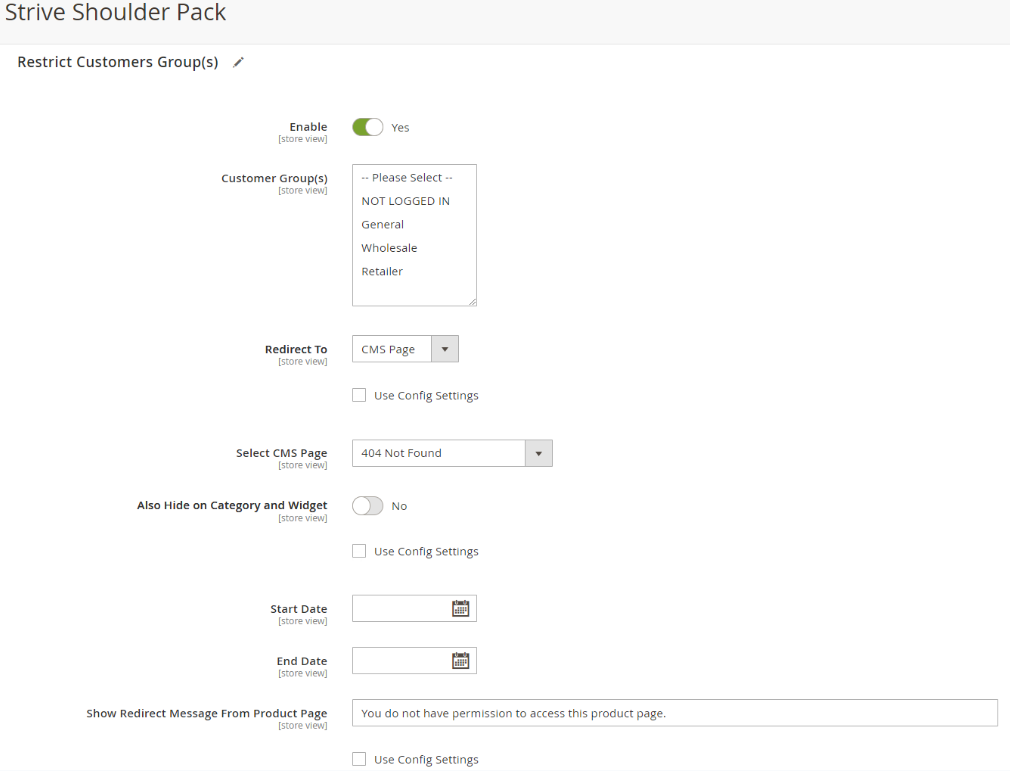
Enable:
- Default is
Noif Enable Restrict Product is enabled. - If
Yesis selected, it will enable Restrict Product with the Product you choose. Show more fields: Restriction Customers Group(s), Redirect To fields, Also Hide Menu, Start Date, End Date. - Selecting
Nowill turn off Restrict Product with the Product you do not want to restrict to customers.
- Default is
Customer Group: Select the group of customers to apply Restrict Product. Those groups that are not selected will not apply Restrict Product to that Product. You can select multiple customer groups at the same time. With the following customer groups:
- NOT LOGGED IN
- General
- Wholesale
- Retail
Redirect To: Select the page you want to redirect to after accessing the restricted Product
CMS Page: Display the Select CMS Page field to select the CMS Page to be redirected to when accessing the restricted Product.
- Select CMS Page: Select CMS page. You can access
Content > Page, click Add New Page to create more pages you want to redirect to.

- Select CMS Page: Select CMS page. You can access
Select Specific URL: Display the Specific URL field to allow you to choose a specific URL to be redirected to when accessing the restricted Product
- Specific URL: Enter Url for the Specific URL field. If left blank or incorrectly entered the URL format, it will redirect to the 404 page by default
You can choose Use Config Settings to redirect to the default URL or CMS page that you set in Configuration Restrict Product, at Redirect To field.
Also Hide Menu:
- Select
Yesto hide that Product in Frontend. Otherwise, selectingNowill display that Product on the Frontend. - You can select
Use Config Settingsto default to use the configured value at Configuration Restrict Product with Hide menu on Frontend field.
- Select
Start Date:
- Click the Calendar box to select the start date for Restrict Product. - If you leave it blank, then applying Restrict Product will start from the date you enable until the End Date.
End Date:
Click the Calendar box to select the end date for Restrict Product.
If left blank in this field, it will start applying Restrict Product by the date selected in the Status Date field and will not end up applying Restrict Product until it is disabled for that Product.
Show Redirect Message From Product Page: Display the message to notify redirecting from the Product page. If you put a tick on the Use Config Settings field, then the system will display the message set in the Module Configuration.
4. Edit Pages/Block
- Login to the Magento Admin, choose
Content > Elements > Pages/Blocks, select new/edit with a Restrict Static Page/Restrict Static Block you want. - This section applies the configuration when choosing new/edit for each Page/Block.
- Note: If the Restrict Static Page/Restrict Static Block in the Configuration section and for each Page/Block here are different, priorities will be given to each Page/Block first.
Page
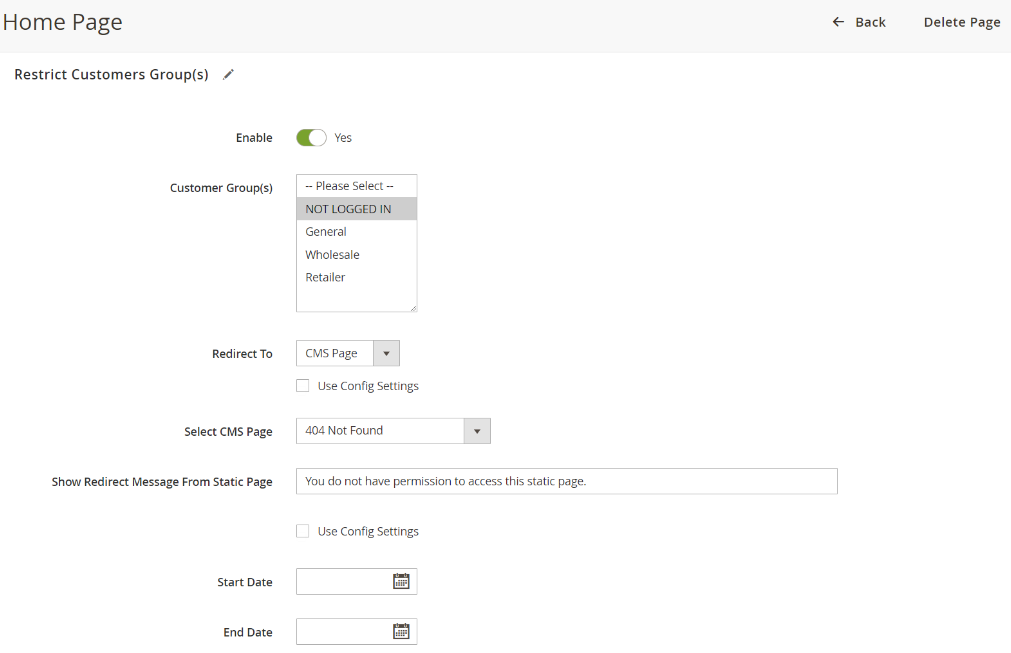
Block
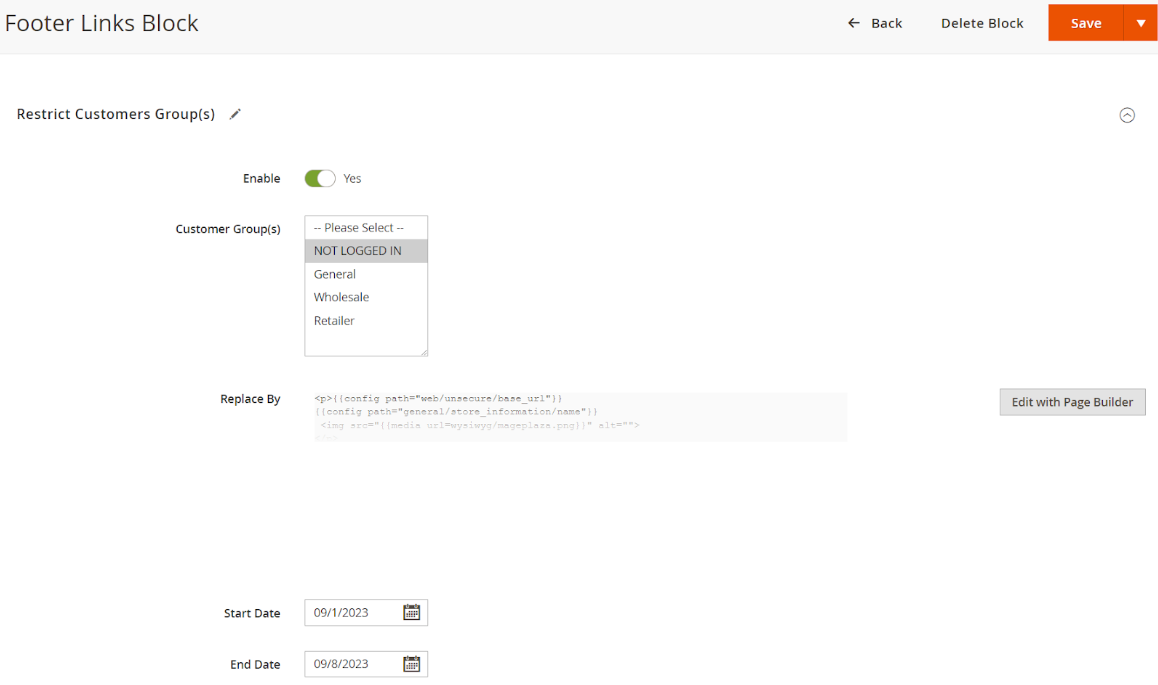
- Enable:
- Default is
Noif Enable Restrict Product is enabled. - If
Yesis selected, it will enable Restrict Product with the Product you choose. Show more fields: Restriction Customers Group(s), Redirect To fields, Also Hide Menu, Start Date, End Date. - Selecting
Nowill turn off Restrict Product with the Product you do not want to restrict to customers.
- Default is
- Customer Group: Select the group of customers to apply Restrict Product. Those groups that are not selected will not apply Restrict Product to that Product. You can select multiple customer groups at the same time. With the following customer groups:
- NOT LOGGED IN
- General
- Wholesale
- Retail
- Start Date:
- Click the Calendar box to select the start date for Restrict Product. - If you leave it blank, then applying Restrict Product will start from the date you enable until the End Date.
- End Date:
- Click the Calendar box to select the end date for Restrict Product.
- If left blank in this field, it will start applying Restrict Product by the date selected in the Status Date field and will not end up applying Restrict Product until it is disabled for that Product.
With Page
Redirect To: Select the page you want to redirect to after accessing the restricted Product:
CMS Page: Display the Select CMS Page field to select the CMS Page to be redirected to when accessing the restricted Product.
- Select CMS Page: Select CMS page. You can access
Content > Page, click Add New Page to create more pages you want to redirect to.

- Select CMS Page: Select CMS page. You can access
Select Specific URL: Display the Specific URL field to allow you to choose a specific URL to be redirected to when accessing the restricted Product
- Specific URL: Enter Url for the Specific URL field. If left blank or incorrectly entered the URL format, it will redirect to the 404 page by default
With Block:
- Replace By: Will be replaced by the Show/Hide Editor button. Here, it is possible to configure the block page and when accessing, the restricted Block page will be replaced by the block page you have configured.
- If left blank, Replace By will default to the Replace By content above.
Advanced Settings
Rest API
Mageplaza Catalog Permission extension supports Rest API to limit or redirect when accessing the Category page, Product page, Static Page, and Static Block.
For more details, please visit here.
Learn how to create Integration tokens here.
GraphQL
The mutations that Mageplaza supports are setting restrictions or redirects when accessing pages, blocks, etc. For more details, please visit here.
Support Query to show Catalog Permissions Config
Notation
When you want to remove the extension, you should use composer to run the command:
bin/magento module:uninstall Mageplaza_ CatalogPermissionsIf you delete the extension manually, you need to delete
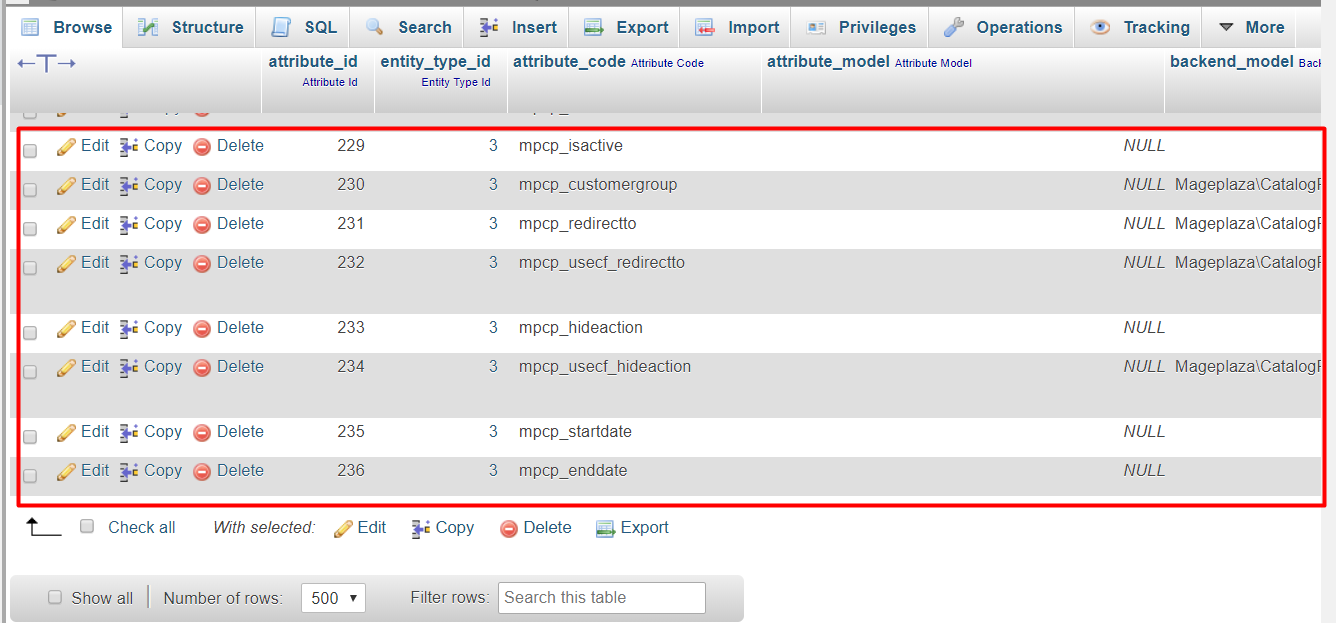
mpcp_isactive, mpcp_customergroup, mpcp_redirectto, mpcp_usecf_redirectto, mpcp_hideaction, mpcp_usecf_hideaction, mpcp_startdate, mpcp_enddateattribute in the database.- Access the database to delete: Access to
eav_attributetable. In theattribute_codecolumn, find and delete thempcp_isactive, mpcp_customergroup, mpcp_redirectto attribute, mpcp_usecf_redirectto, mpcp_hideaction, mpcp_usecf_hideaction, mpcp_startdate, mpcp_enddate.
- Access the database to delete: Access to
FAQs
Support and Assistance
1. Customer Support
For any assistance, please visit our Support page or email us at cs@mageplaza.com/ sales@mageplaza.com
2. Create a Ticket
If you have technical issues, please open a ticket at this link.
Operating Hours
Our support team is available during the following hours:
- Monday to Friday: 8:00 AM - 23:59 PM
- Saturday: 8:00 AM - 12:00 PM
- Sunday: Closed
Refund Policy
We understand that sometimes things don't go as planned. Please review our refund policy for detailed information: Refund Policy Link
Frequently Asked Questions (FAQ)
For quick answers to common questions, please visit our FAQ page: FAQ Page Link