Moneris
Moneris provides online payment services with different card types (debit, credit card, Visa), especially for customers in the USA and Canada. Mageplaza Moneris extension will help you integrate this payment gateway with your store. Customers can save and edit credit card information at the first payment to save time at the next purchase. In particular, admin can configure the module to redirect to Moneris payment gateway. Also, Moneris support authorizes, capture and 3D secure, AVS Verification.
Mageplaza Moneris extension is fully compatible with Mageplaza One Step Checkout
How to download and install
- Download Mageplaza Moneris
- How to Install
How to get the Moneris credentials
1. Register Moneris account
- To register the Moneris account, please access to this link
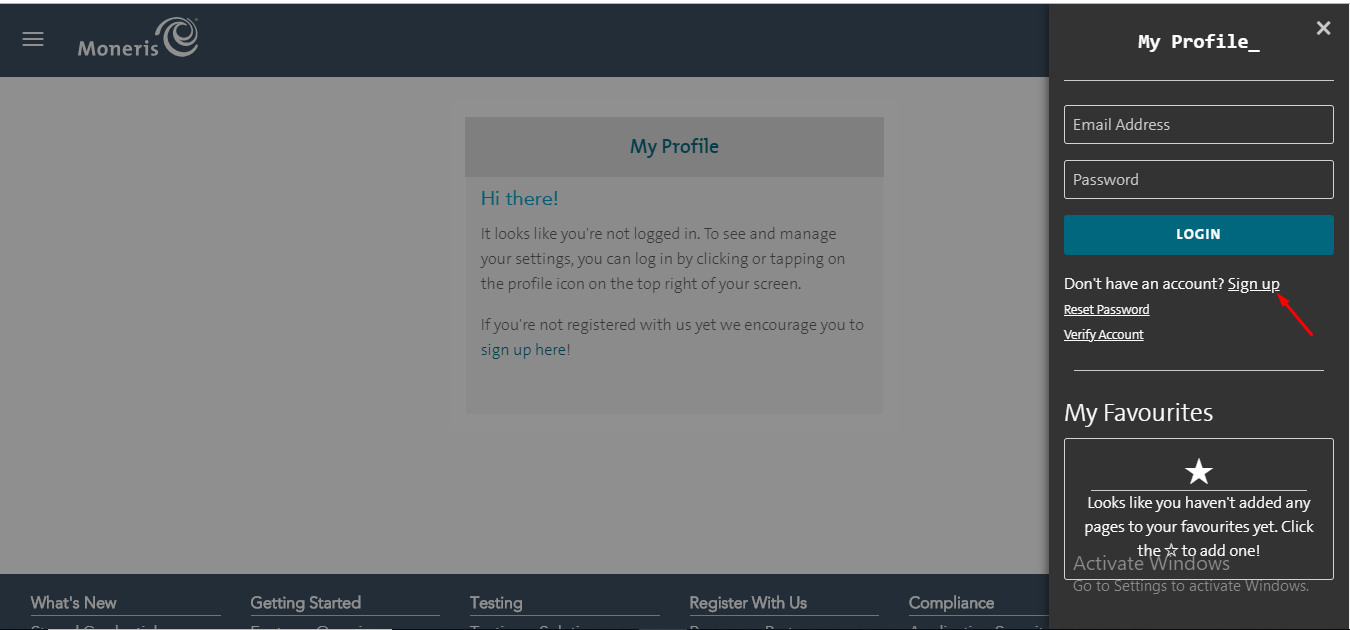
- After logging in the Moneris account, request to sign in information in USA or Canada by clicking to Full Profile
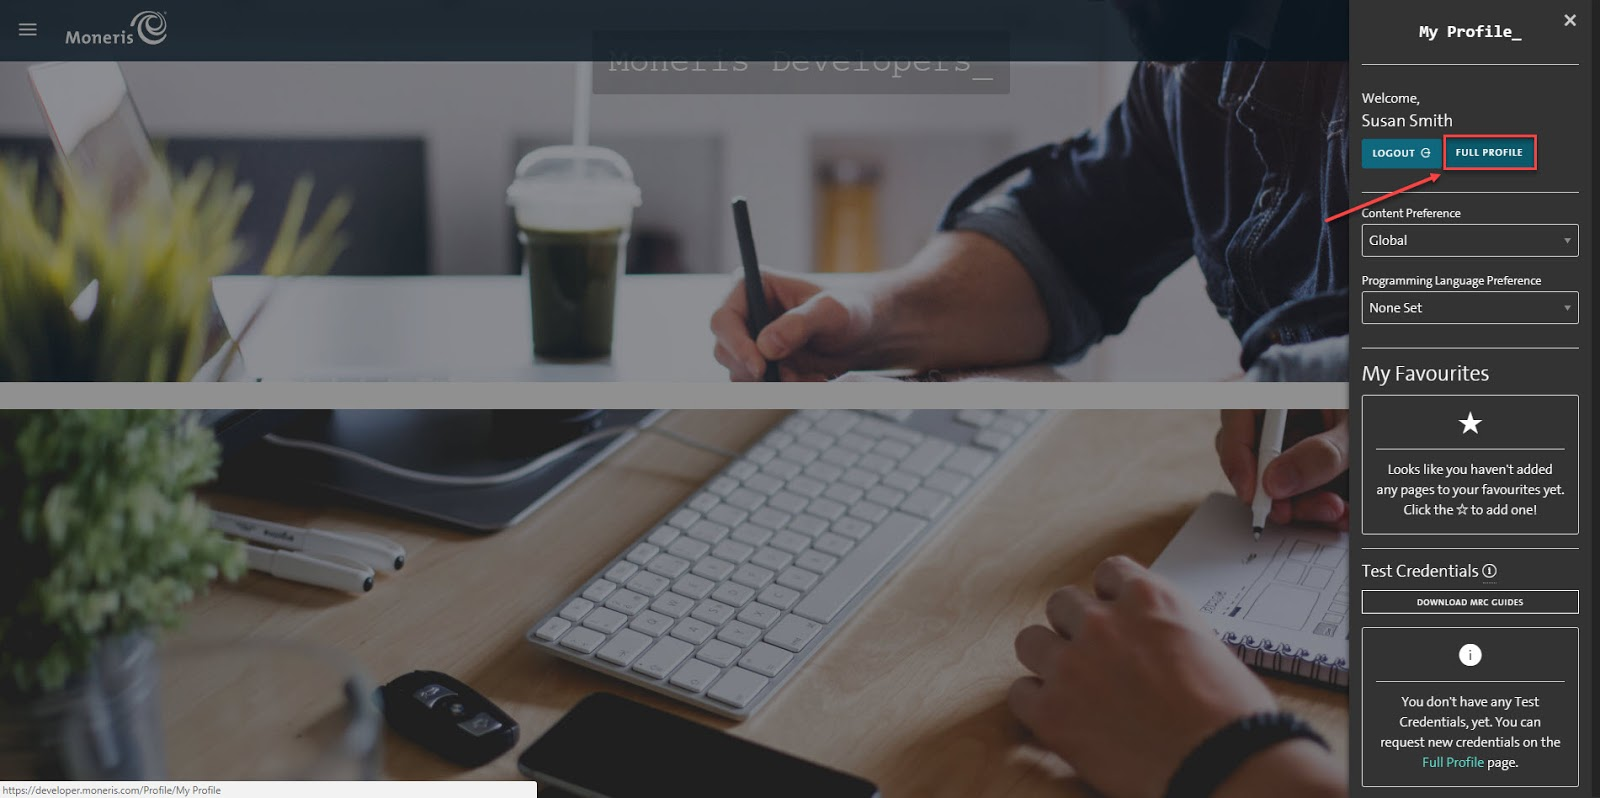
- At Full Profile, look at My Testing Credentials, click to Request Testing Credentials then a popup shown requires you to fill in your Password and Country to verify your test account.
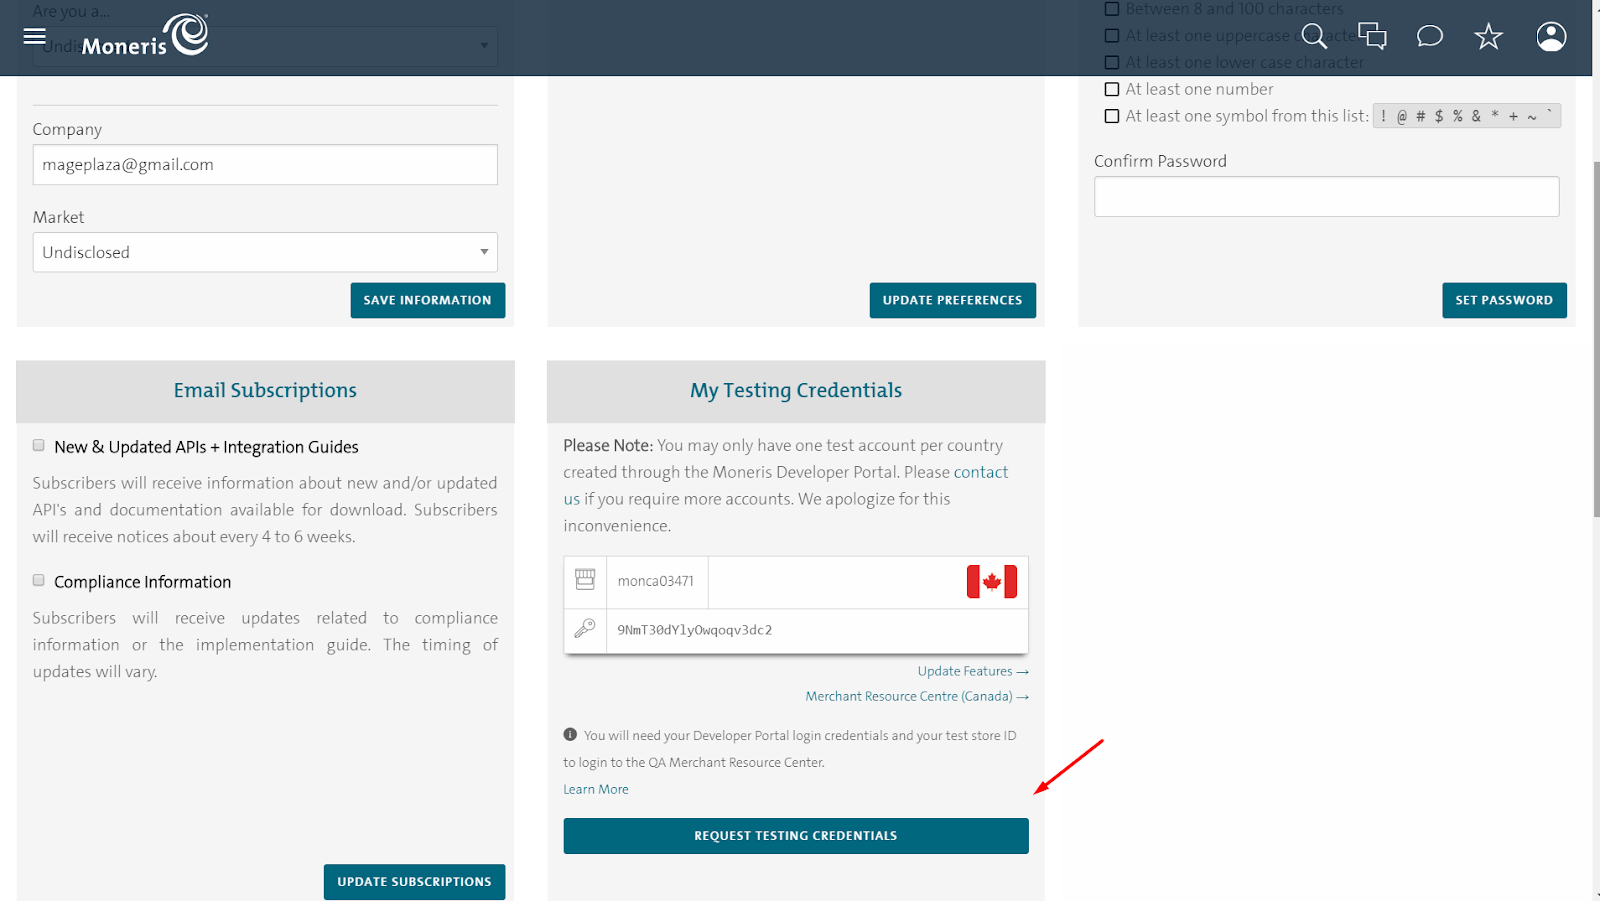
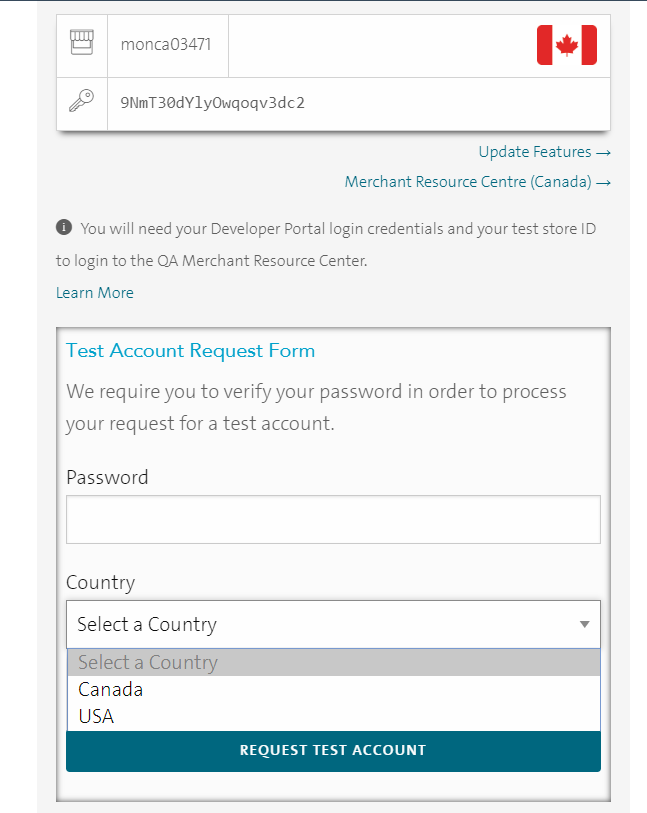
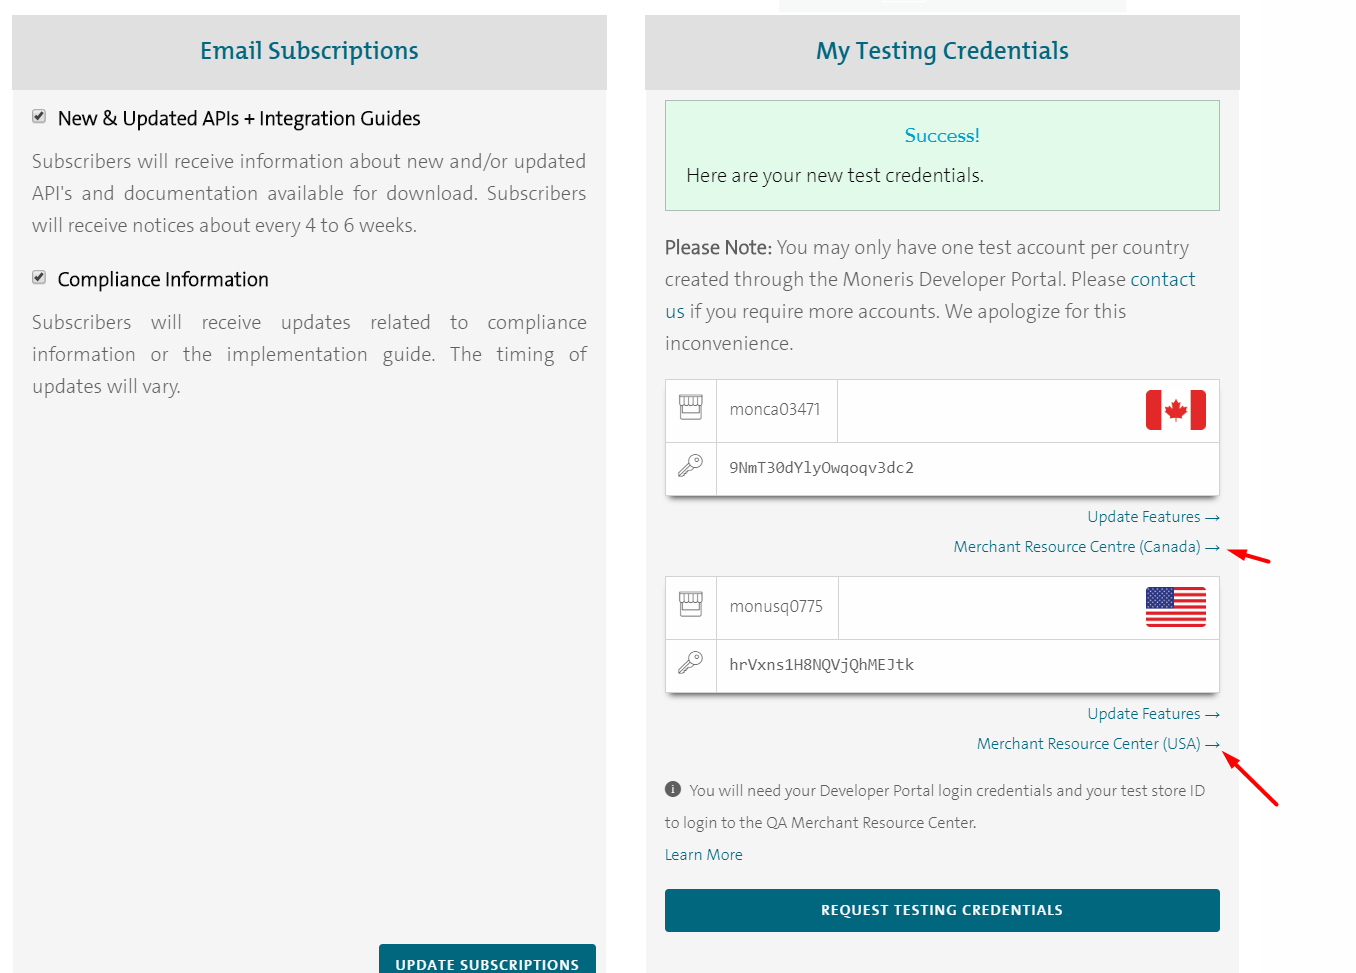
At homepage, Test Credentials is on the right bar menu. Store ID is at the first line (represented by store icon). The second line is API Token (represented by a key icon). Admin needs this two information to configure the module Moneris.
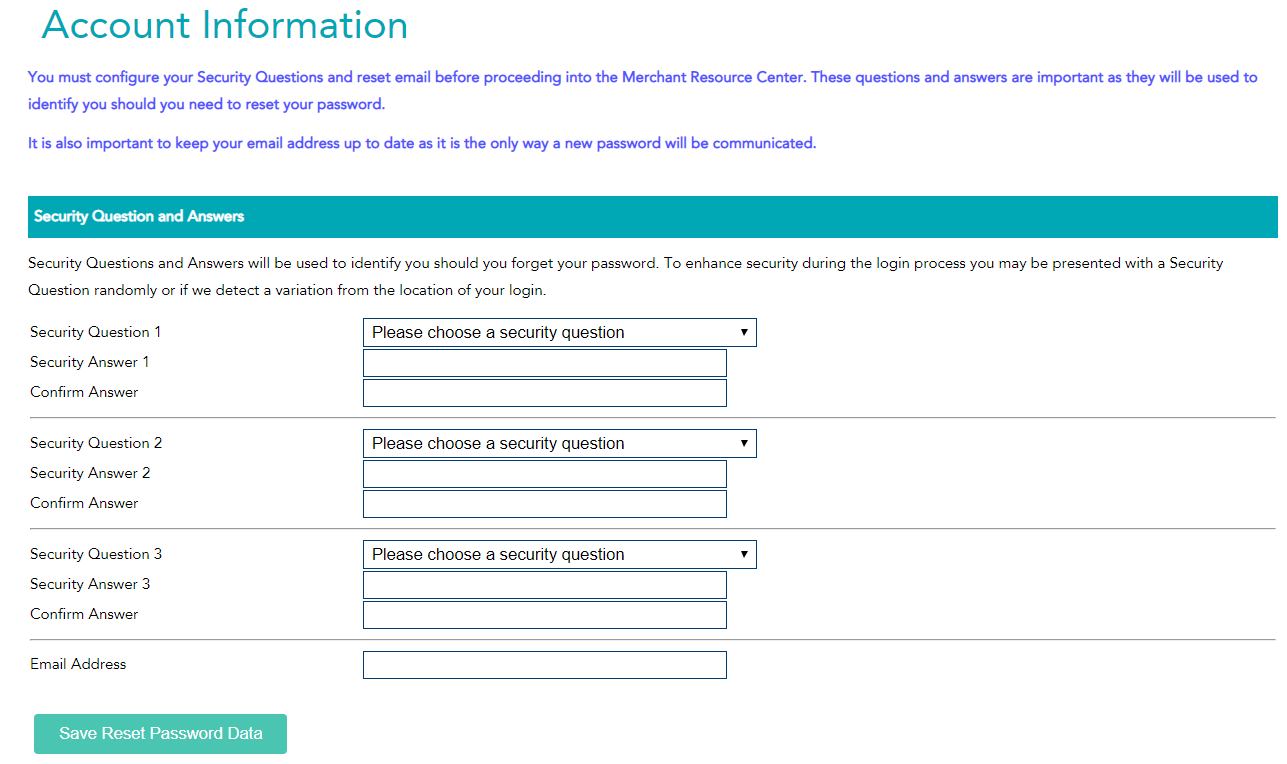
After logging in to your account, you need to fill in some account information and questions.
2. Configure Redirect Moneris Checkout
For USA:
At Moneris Page, please go to
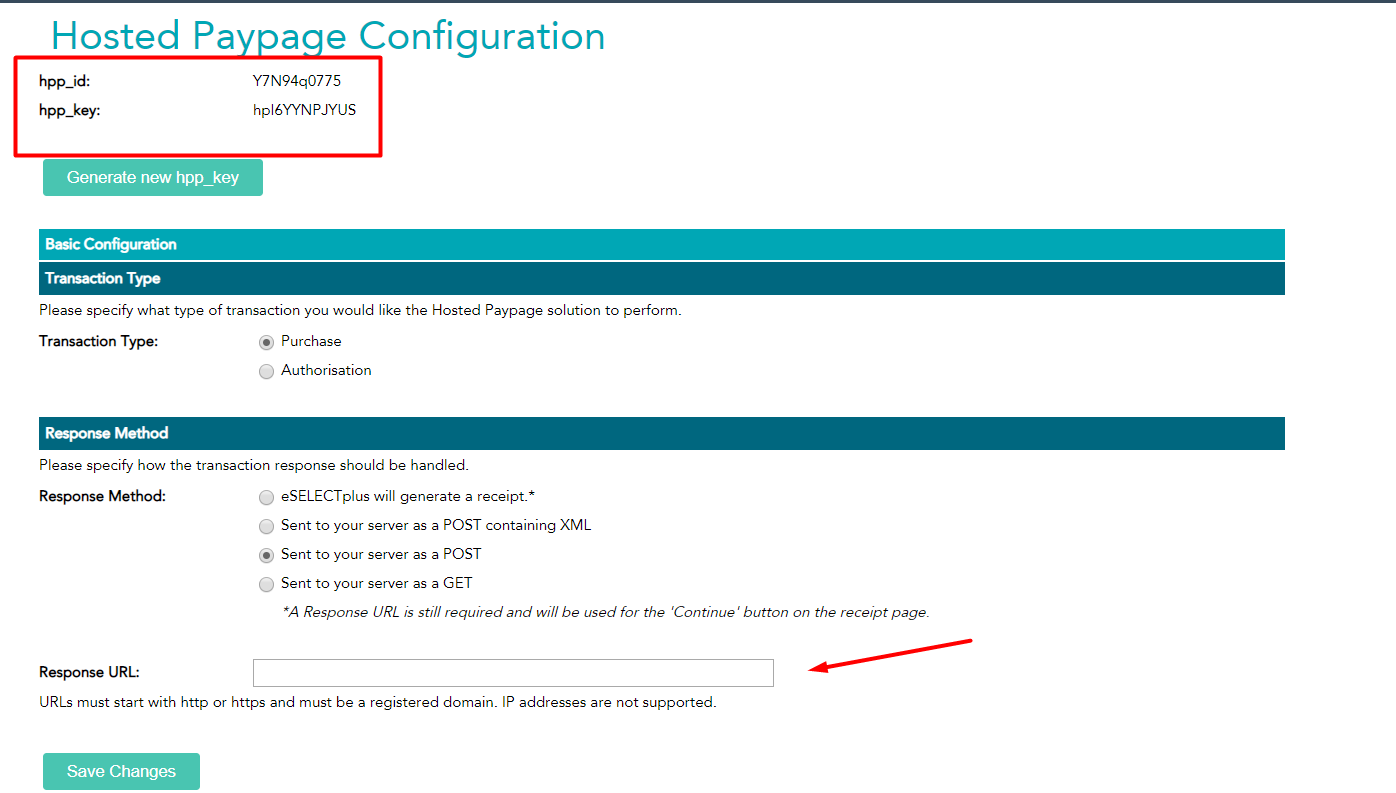
Admin > Hosted Config. You need to configure Magento 2 usinghpp_id,hpp_key. If you do not have these keys, please click toGenerate a New Configurationto create new keys.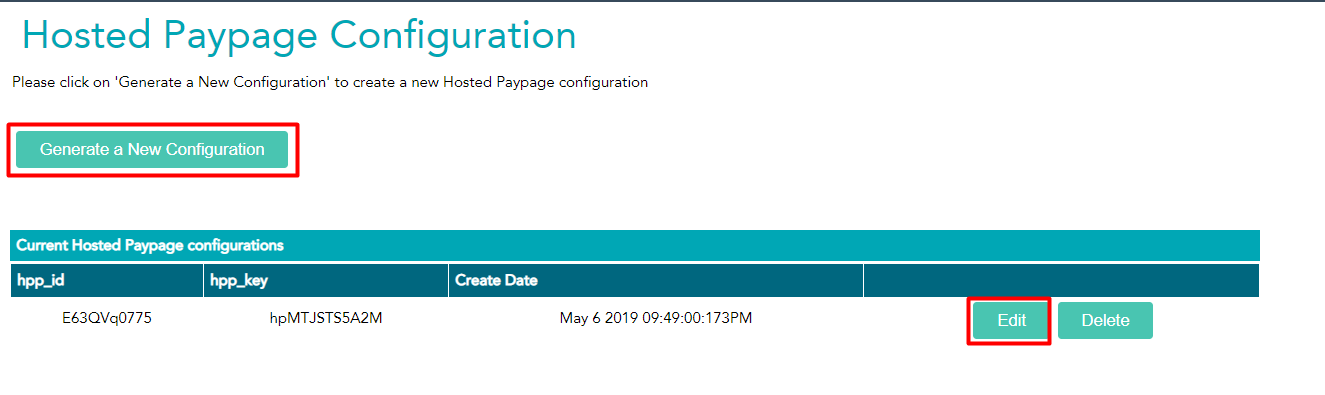
At Response Method, insert your Store Response URL then Save Changes. URLs must start with http or https and must be a registered domain. IP addresses are not supported here.
For Canada:
- Log in to your Moneris account and go to
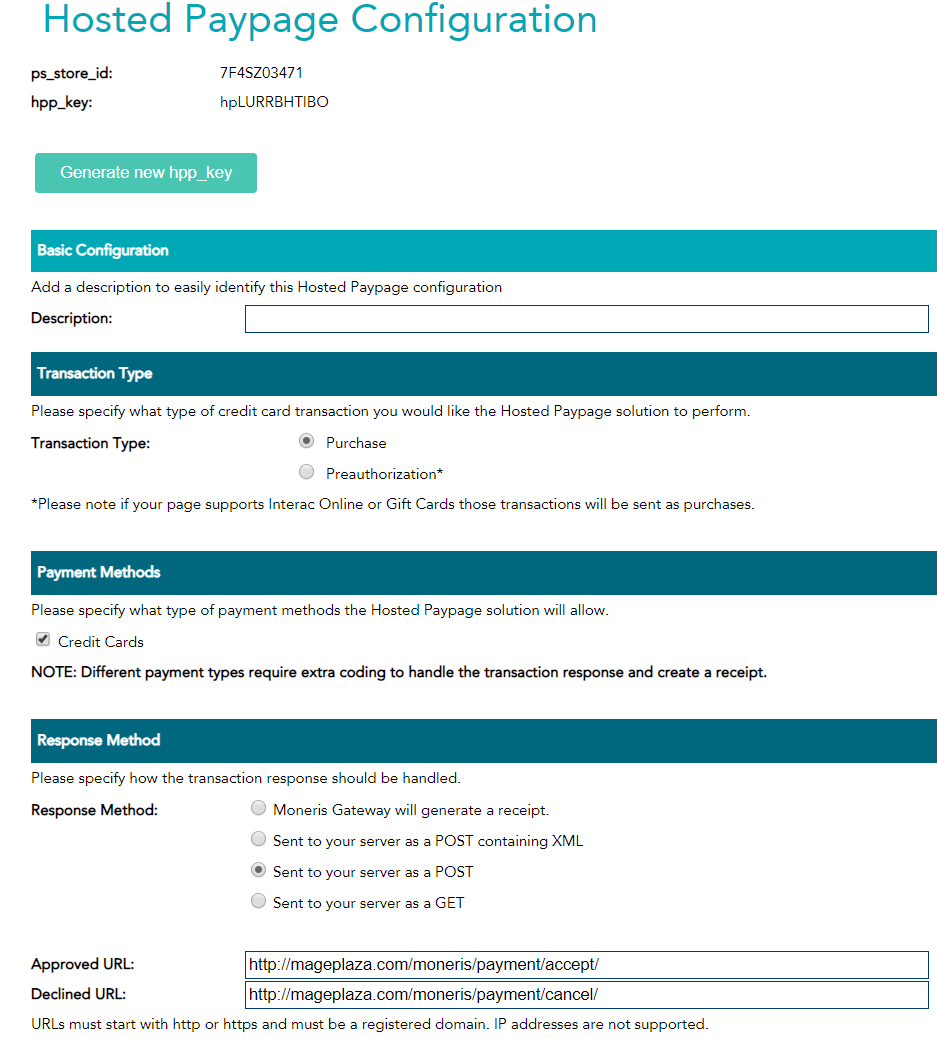
Admin > Hosted Paypage Config. You need to configure Magento 2 usingps_store_idandhpp_key. If you do not have those keys, please click toGenerate a New Configurationto create new keys.
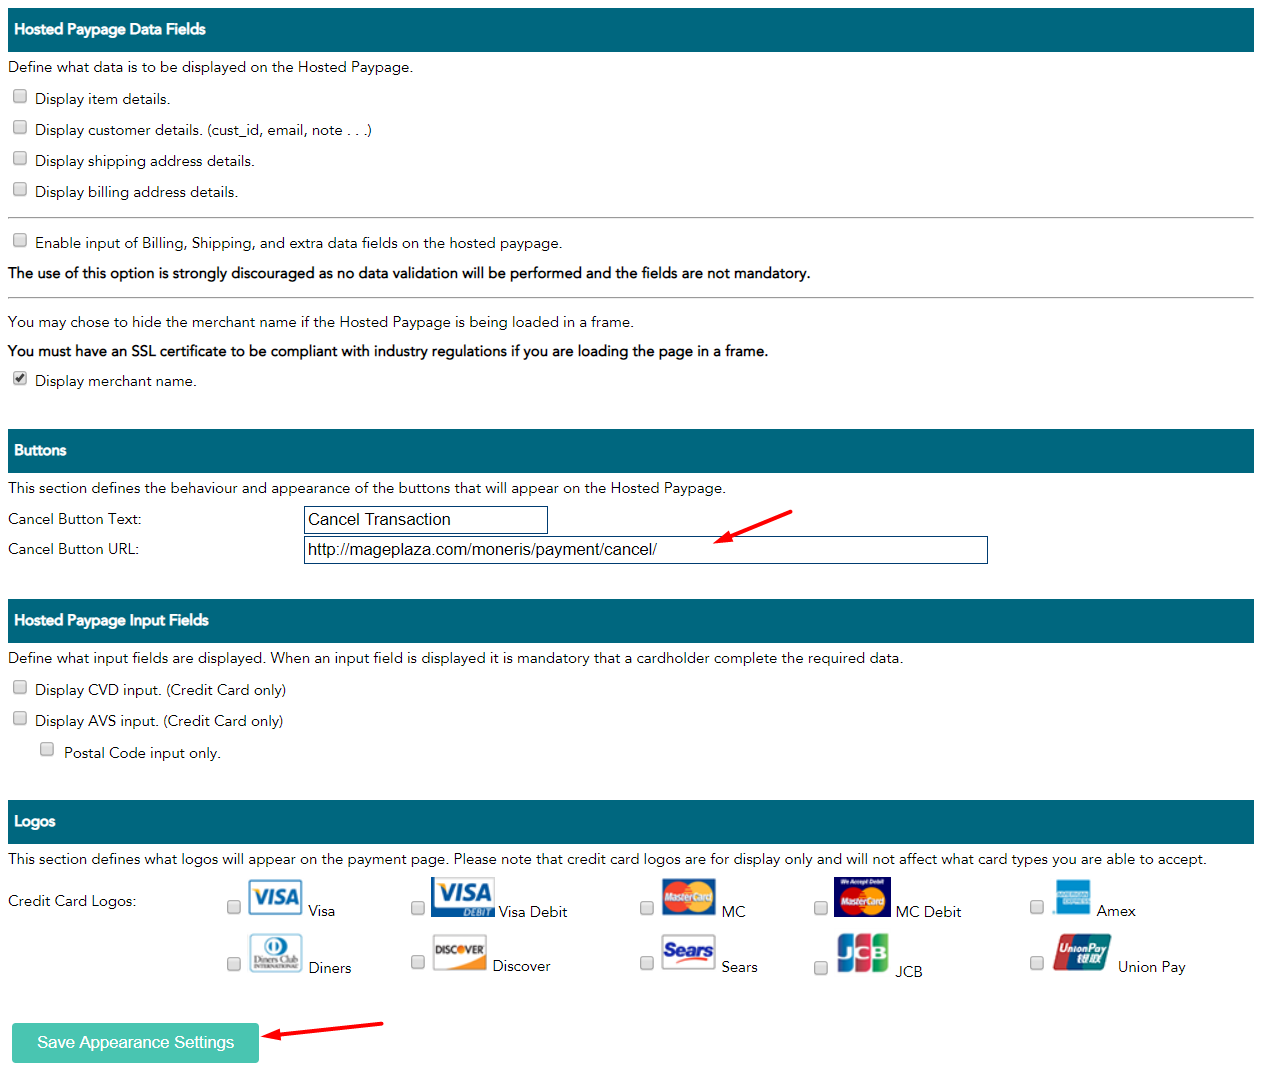
- At Paypage Appearance choose Configure Appearance to add the Cancel button Url.
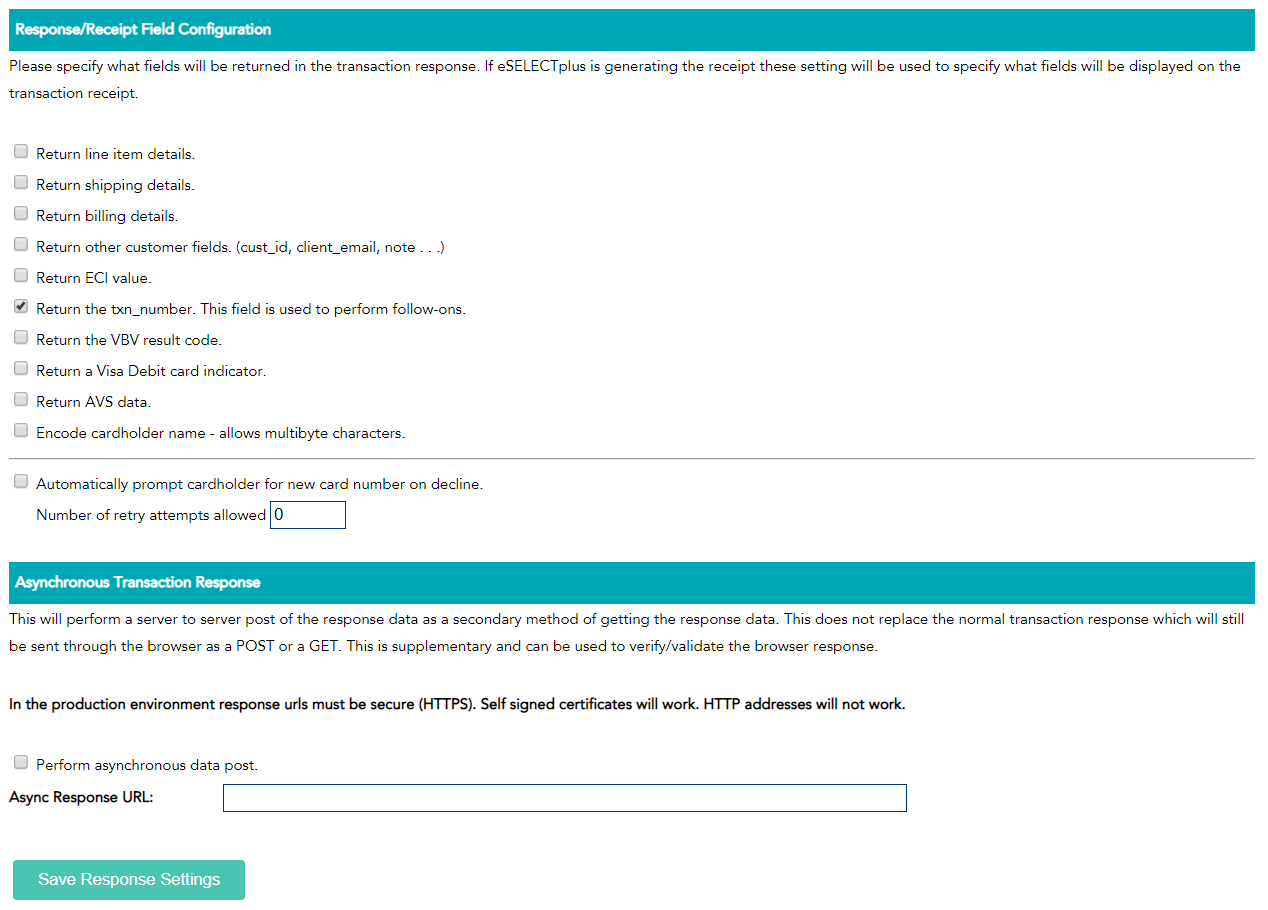
- At Response/Receipt Field Configuration, choose Return the txn_number. This is a required selection.
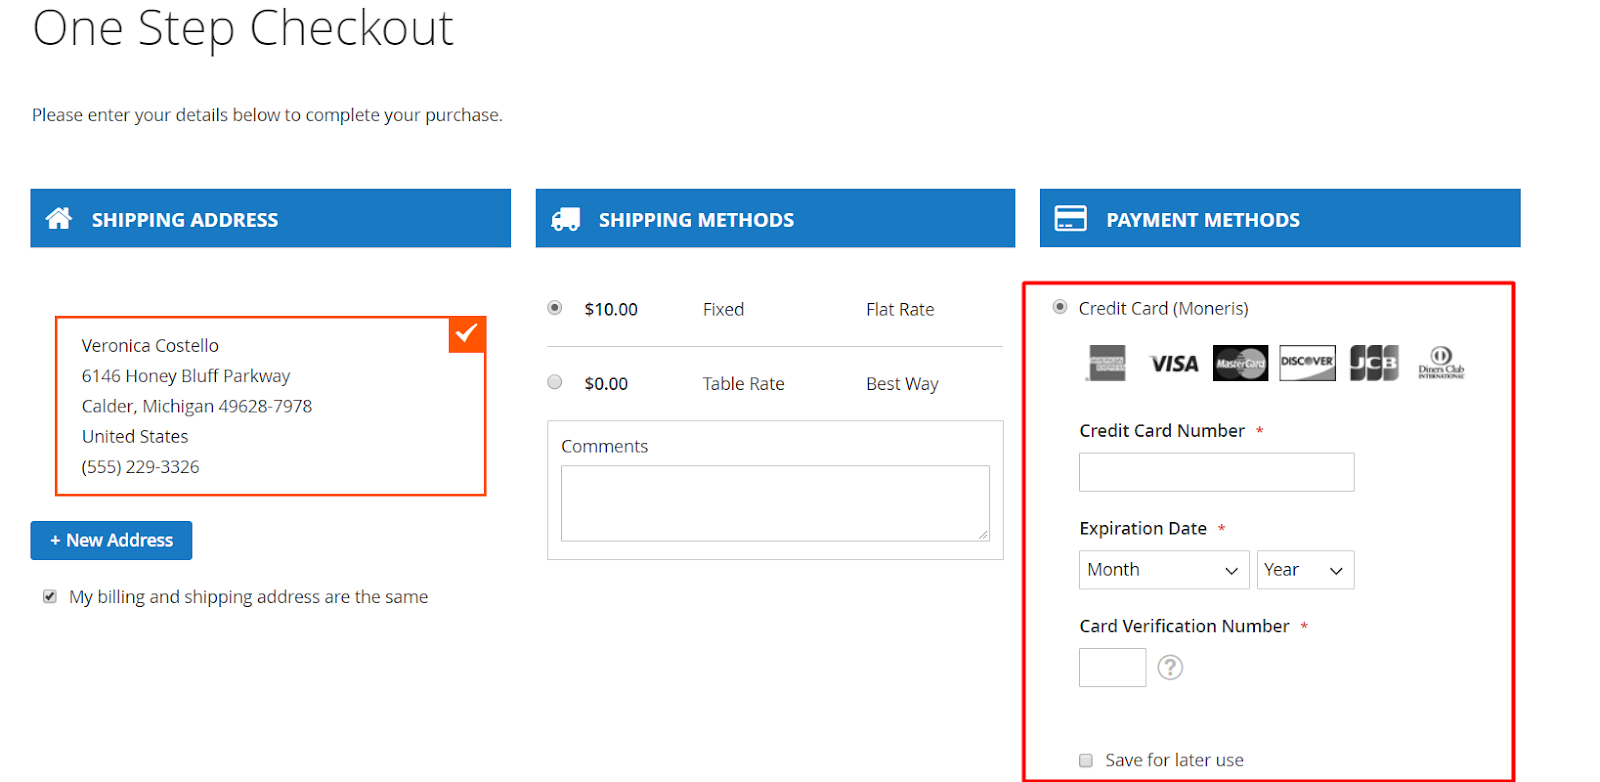
- Checkout page: Choose the Moneris Payment method. Fill in the credit card information: Credit Card Number, Expiration Date, Card Verification Number. Here, customers can save the credit card information for the next payments.
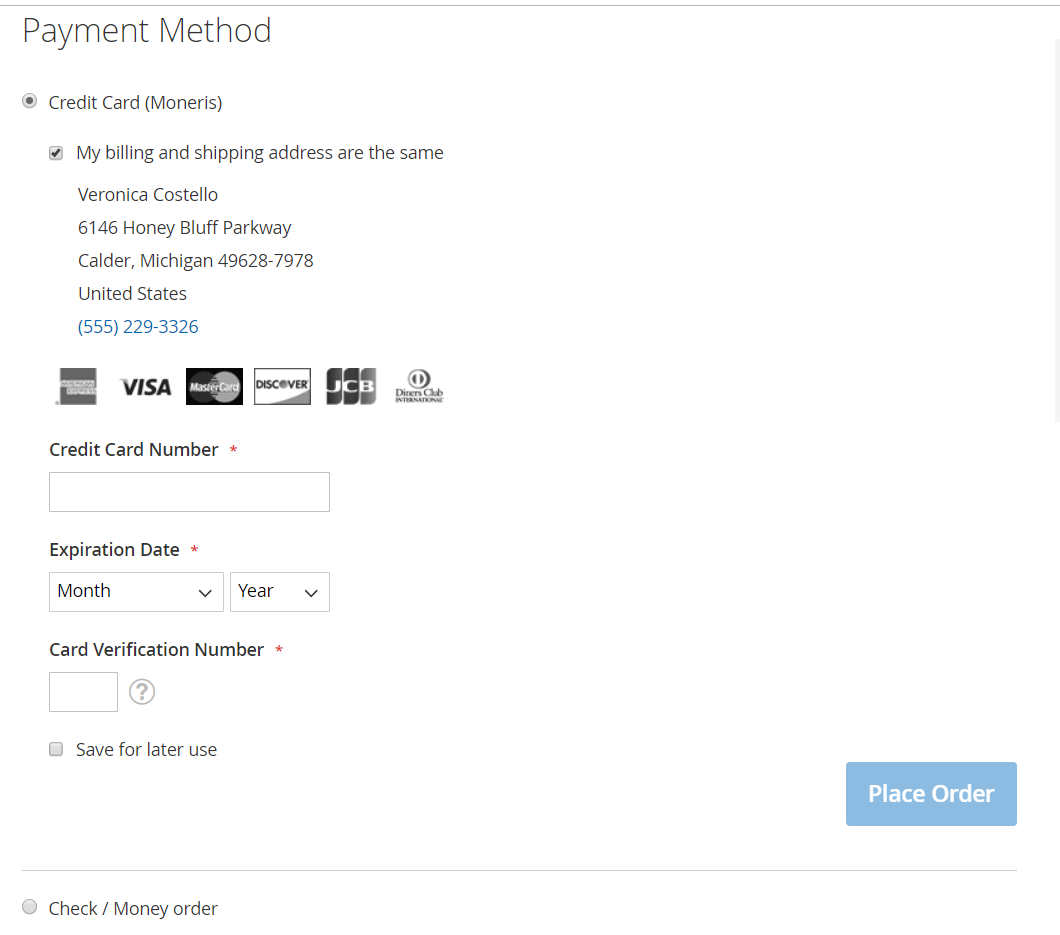
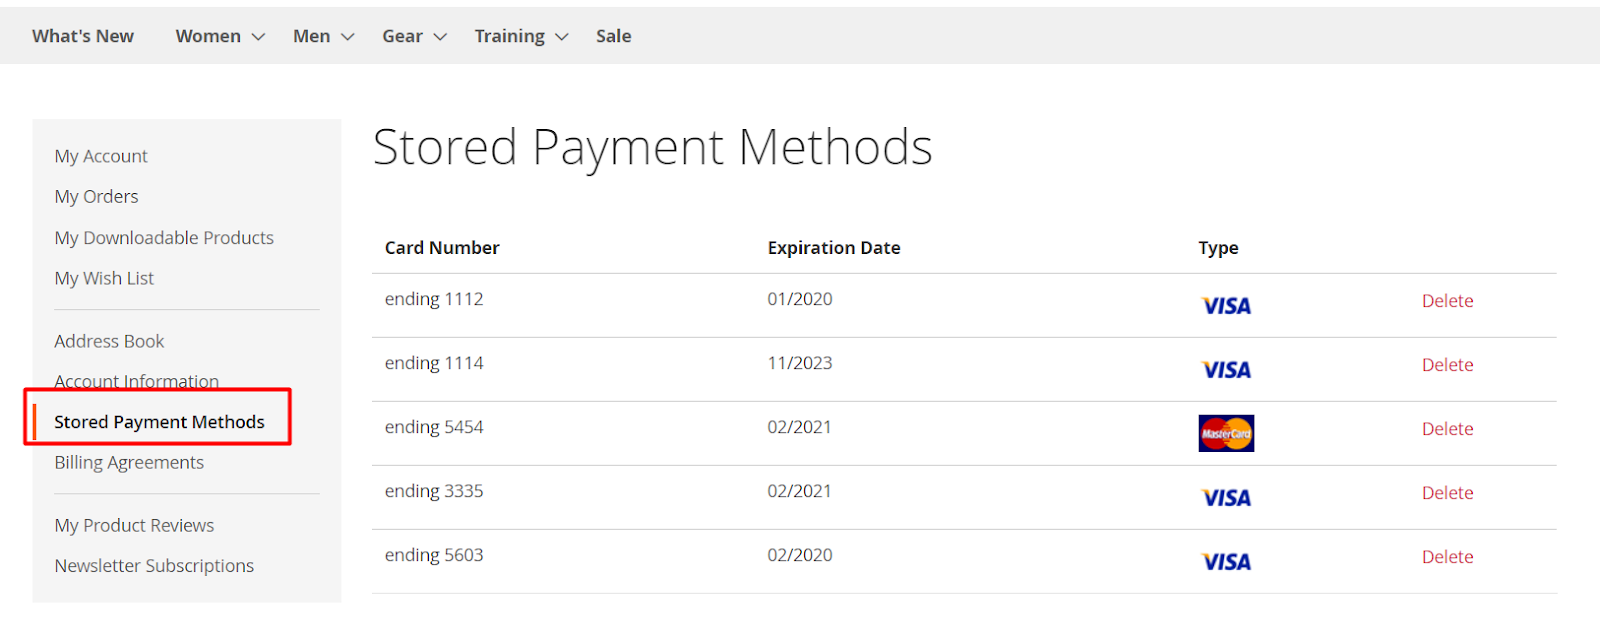
- Stored Payment Methods: Here saves the credit card info. Customers can delete the outdated/ no-longer-used credit card.
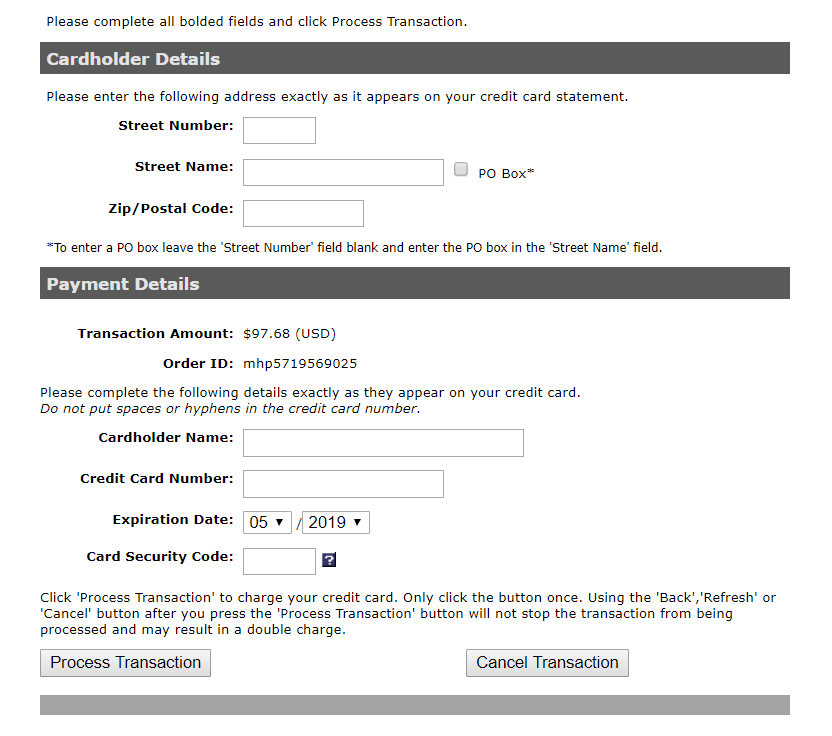
- Here is the USA Moneris Checkout Page after being redirected:
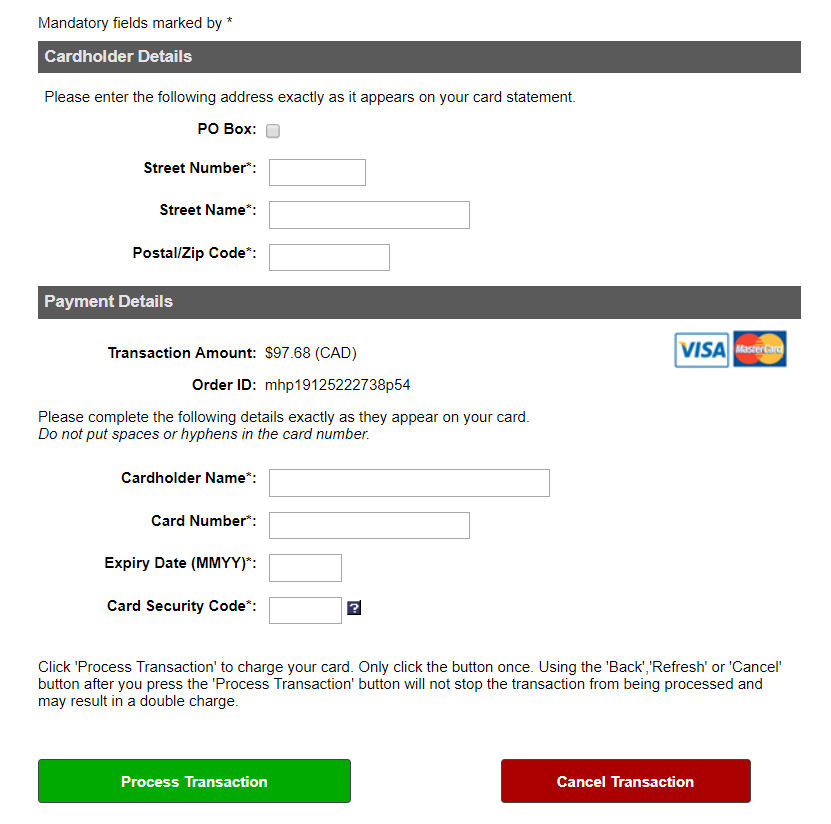
- Here is the Canada Moneris Checkout Page after being redirected:
- Test card numbers
Use any of the following test card numbers, a valid expiration date in the future, and any random CVC number, to create a successful payment. Each test card's billing country is set to U.S, Canada.
BRAND | NUMBER |
MasterCard | 5454545454545454 |
MasterCard (Bin2 CAN) | 2222400041240011 |
MasterCard (Bin2 US) | 2223000048400011 |
Visa | 4242424242424242 |
Amex | 373599005095005 |
JCB | 3566007770015365 |
Diners | 36462462742008 |
Discover | 6011000992927602 |
Track 2 | 5258968987035454=06061015454001060101? |
UnionPay | 6250944000000771 Expiry date: 12/49 (MM/YY), CVN2 value '371' |
- 3D Secure (MPI) test card numbers
When testing your implementation of the Moneris MPI, you can use the VISA/MasterCard/Amex PIT (production integration testing) environment.
May only be tested in the following test stores
CANADA | US | |
Store ID | store5 | monusqa002 |
API Token | yesguy | qatoken |
- Test Card numbers (Visa and MasterCard Only)
CARD NUMBER | VERES | PARES | ACTION |
4012001038443335 | N | NA | Send transaction to Moneris Payment Gateway using either the basic Purchase or the basic Pre-Authorization transaction. Set crypt_type = 6. |
4012001038488884 | U | NA | Send transaction to Moneris Payment Gateway using either the basic Purchase or the basic Pre-Authorization transaction. Set crypt_type = 7. |
4012001037141112 | Y | True | TXN – Call function to create inLine window. ACS – Send CAVV to Moneris Payment Gateway using either the Cavv Purchase or the Cavv Pre-Authorization transaction |
4005559876540 | Y | True | TXN – Call function to create inLine window. ACS – Send CAVV to Moneris Payment Gateway using either the Cavv Purchase or the Cavv Pre-Authorization transaction |
4012001037167778 | Y | True | TXN – Call function to create inLine window. ACS – Send CAVV to Moneris Payment Gateway using either the Cavv Purchase or the Cavv Pre-Authorization transaction |
4012001037461114 | Y | False | Card failed to authenticate. Merchant may choose to send transaction or decline transaction. If transaction is sent, use crypt type = 7. |
- Test Card numbers (AmEx Only)
CARD NUMBER AMEX ONLY | VERES | PARES | ACTION |
375987000000062 | Set crypt_type = 7 | ||
375987000000013 | Set crypt_type = 6 |
You can refer 3D secure testing here
- CVD & AVS test card numbers
Things to consider:
- CVD is only supported by Visa, MasterCard, Discover, JCB and American Express.
- AVS is only supported by Visa, MasterCard, Discover and American Express.
- Card verification transaction is only supported by Visa, MasterCard, Discover and American Express.
VISA Pre-Authorization/Purchase with AVS & CVD ( Applicable for card: 4242424242424242)
REQUEST | RESPONSE | ||
AMOUNT | RESPONSE | AVS | CVD |
AVS | |||
$10.10 | Approved | A | M |
$10.13 | Approved | D | M |
$10.24 | Declined | Y | M |
$10.26 | Declined | S | M |
CVD | |||
$10.30 | Approved | Y | P |
$10.36 | Declined | Y | M |
$10.37 | Declined | Z | M |
COMBO (AVS AND CVD) | |||
$10.40 | Approved | Z | S |
$10.41 | Approved | X | M |
- For other card types such as MasterCard, Discover, Visa, AMEX, please refer the testing here
- CVD result definitions
VALUE | DEFINITION |
M | Match |
N | No Match |
P | Not Processed |
S | CVD should be on the card, but Merchant has indicated that CVD is not present. |
U | Issuer is not a CVD participant |
Y | Match for AmEx/JCB only |
D | Invalid security code for AmEx/JCB |
Other | Invalid response code |
Table of CAVV Result Codes
RESULT CODE | MESSAGE | WHAT THIS MEANS TO YOU AS A MERCHANT… |
0 | CAVV could not be verified or CAVV data was not provided when expected | For this transaction you may not receive protection from chargebacks as a result of using VBV as the CAVV was considered invalid at the time the financial transaction was processed. Please check that you are following the VBV process correctly and passing the correct data in our transactions. |
1 | CAVV failed validation; authentication | Provided that you have implemented the VBV process correctly the liability for this transaction should remain with the Issuer for chargeback reason codes covered by Verified by Visa. |
2 | CAVV passed verification—authentication | The CAVV was confirmed as part of the financial transaction. This transaction is a fully authenticated VBV transaction (ECI 5) |
3 | CAVV passed verification—attempted authentication | The CAVV was confirmed as part of the financial transaction. This transaction is an attempted VBV transaction (ECI 6) |
4 | CAVV failed verification—attempted authentication | Provided that you have implemented the VBV process correctly the liability for this transaction should remain with the Issuer for chargeback reason codes covered by Verified by Visa. |
6 | CAVV not verified, issuer not participating in CAVV verification | CAVV value was not verified, because the issueing bank does not participate in VBV |
7 | CAVV failed verification—attempted authentication | Please check that you are following the VBV process correctly and passing the correct data in our transactions. Provided that you have implemented the VBV process correctly the liability for this transaction should be the same as an attempted transaction (ECI 6) |
8 | CAVV passed verification—attempted authentication | The CAVV was confirmed as part of the financial transaction. This transaction is an attempted VBV transaction (ECI 6) |
9 | CAVV failed verification—attempted authentication | Please check that you are following the VBV process correctly and passing the correct data in our transactions. Provided that you have implemented the VBV process correctly the liability for this transaction should be the same as an attempted transaction (ECI 6) |
A | CAVV passed verification—attempted authentication | The CAVV was confirmed as part of the financial transaction. This transaction is an attempted VBV transaction (ECI 6) |
B | CAVV passed verification—attempted authentication, no liability shift | The CAVV was confirmed as part of the financial transaction. However, this transaction does qualify for the liability shift. Treat this transaction the same as an ECI 7. |
C | CAVV was not verified—attempted authentication | If 3-D Secure Authentication Results Code value is 07 in the CAVV and the issuer did not return a CAVV results code in the authorization response, |
D | CAVV was not verified—cardholder authentication | If 3-D Secure Authentication Results Code value is 00 in the CAVV and the issuer did not return a CAVV results code in the authorization response |
How to Configure
1. Configuration
Login to the Magento Admin, choose Stores > Configuration > Sales > Payment Method > Moneris.
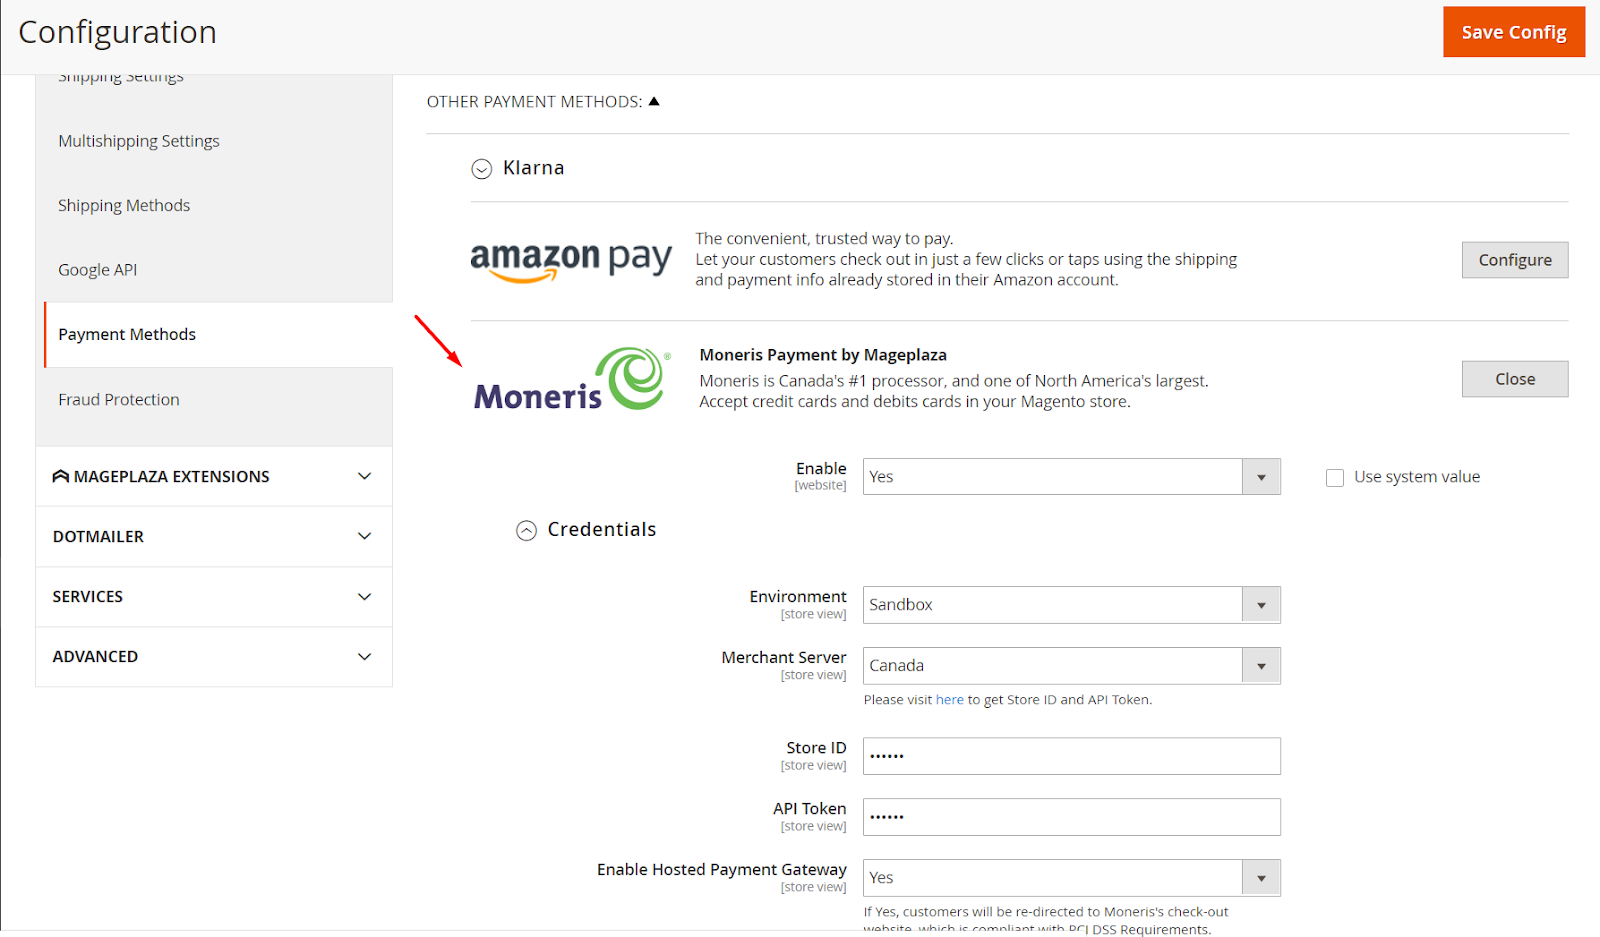
- Enable: Select Yes to activate the module.
1.1. Credentials

- Environment:
- Admin can choose Sandbox environment to test the payment by Moneris
- For real payment on your live site, change the environment to Production
- Merchant Server: Choose the Moneris Payment in:
- Canada:
- USA:
- Store ID:
- Insert the Store ID got after sign up the Moneris account above.
- If left blank or insert the wrong ID, you can not connect to Moneris.
- API Token:
- Insert the API Token got after sign up the Moneris account above.
- If left blank or insert the wrong ID, you can not connect to Moneris.
- Enable Hosted Payment Gateway:
- Select Yes, customers are redirected to Moneris Paypage. And show more fields following:
- For Canada users:
- PS Store ID: Insert the PS Store ID at configuration of Moneris hosted paypage to allow redirecting to Moneris Paypage.
- Accept URL: Use Accept URL to configure the Moneris Hosted Paypage
- Cancel URL: Use Accept URL to configure the Moneris Hosted Paypage
- HPP Key: Insert the HPP key from Moneris Hosted Paypage to HPP Key Field.
- For USA users:
- HPP ID: Insert the HPP ID at configuration of Moneris hosted paypage to HPP ID Field.
- Response URL: Use Response URL to configure the Moneris Hosted Paypage
- HPP Key: Insert the HPP key from Moneris Hosted Paypage to HPP Key Field.
- For Canada users:
- Select Yes, customers are redirected to Moneris Paypage. And show more fields following:
- Test Credential button: Admin can check your app by clicking to Test Credential.
1.2. Card
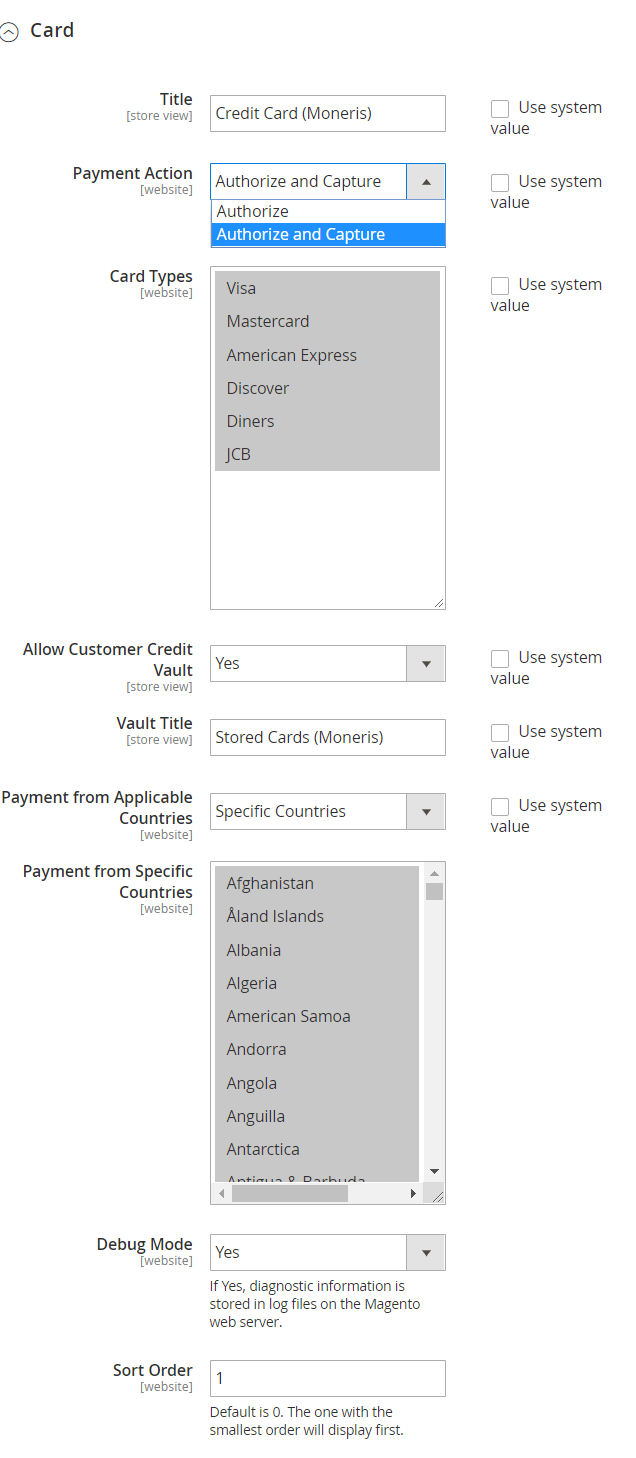
- Title: Add the Title of Payment Method, which will be shown at checkout page.
- Payment Action:
- Authorize and Capture: Payment is captured right after customers place order successfully. At that time, customers' credit card is used to pay before invoice is created then.
- Authorize: Payments captured only when Invoice is created.
- Card Types:
- You can choose one or several card types to use in payment.
- Cards will be authorized after customers fill in Card ID at checkout. For the unselected cards, there is an invalid message shown here.
- Allow Customer Credit Vault:
- Select Yes, Credit Card Information will be saved in Customer account and can use it for payment right after.
- You can tick on the tick box to save the credit card ino. Do not apppy for Not Logged In customers.
- Vault Title:
- Enter an alternate name in the Vault Title field. This name will be displayed when customer order is completed and using the previously saved credit card. - If left blank, use the default name
- Payment from Applicable Countries:
- Select All Countries to allow Card payment method available in all countries
- Select Specific Countries to restrict certain countries to use this payment method
- Payment from Specific Countries: Choose the countries that allow this Card payment method
- Debug Mode: If Yes, diagnostic information is stored in log file on Magento web server.
- Sort Order:
- Specify the display position of this payment method compared to other payment methods
- 0 is the largest number. The smaller the number, the more priority the country is displayed first.
1.3. Verification and Security
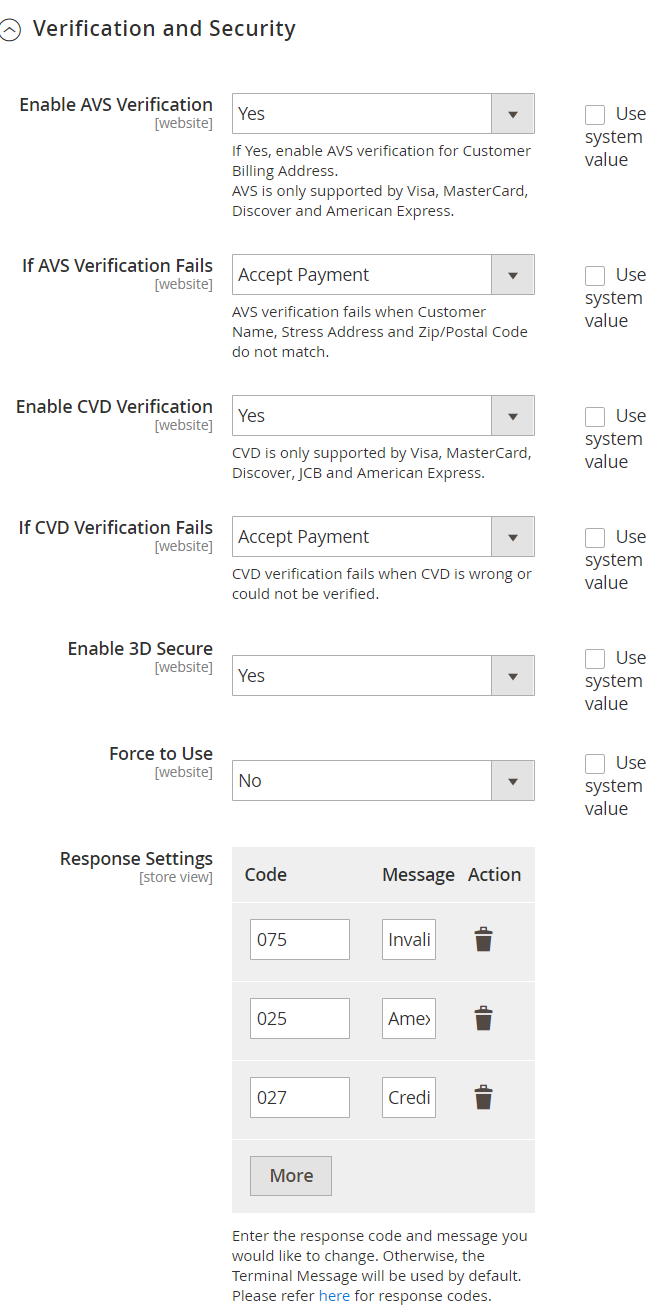
- Enable AVS Verification: Select yes to turn on AVS verification for Billing Address of customers. AVS is only supported by Visa, MasterCard, Discover and American Express.
- AVS verification failed: AVS verification for Billing Address failed when Customer Name, Street Address and Zip/ Postal Code do not match. In case AVS verification fails, you can:
- Reject Payment: deny payment and customers cannot continue making payments.
- Accept Payment: still accept payment for customers who want to keep making payments.
- Enable CVD verification: Select Yes to enable CVD verification for payment address (CVD is 3 digits on the back of the card). CVD is only supported by Visa, MasterCard, Discover, JCB and American Express.
- CVD verification failed: Verify CVD for Billing Address failed when CVD is wrong or unable to verify. In case CVD verification fails, you can:
- Reject Payment: deny payment and customers cannot continue making payments.
- Accept Payment: still accept payment for customers who want to keep making payments.
- Enable 3D secure: Select Yes to use 3D Secure to verify Customer's card, thereby preventing payment fraud. Display add Force To Use field.
- Force To Use: Select Yes to force user to verify their card. Only successful 3D Secure verified cards can process orders.
- Response Setting:
- Fill in the Code, Message fields to list the error cases that customer often encountered. Please refer here.
- Click the Add button to add the case, click the Delete icon to delete the error cases you want.
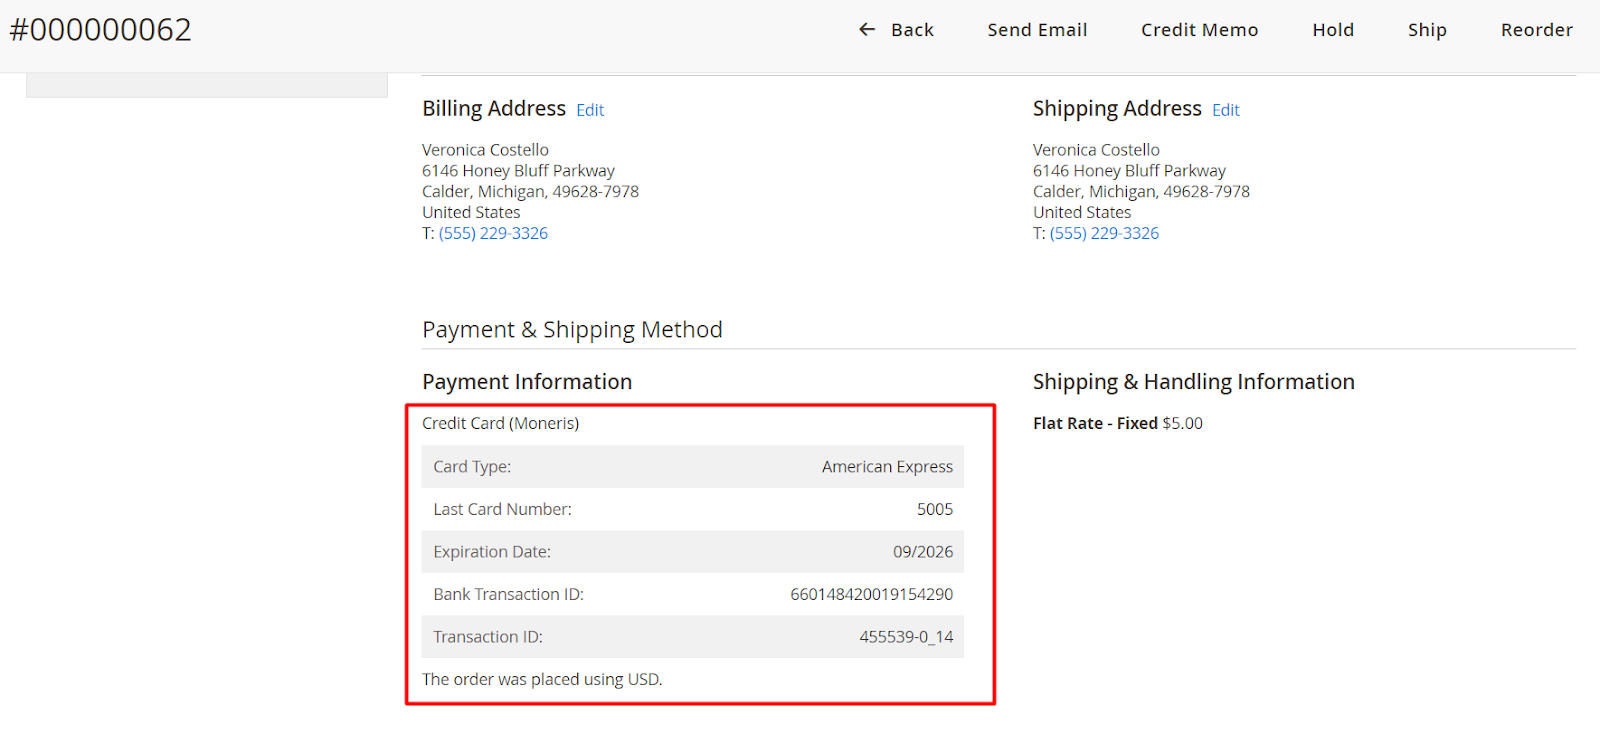
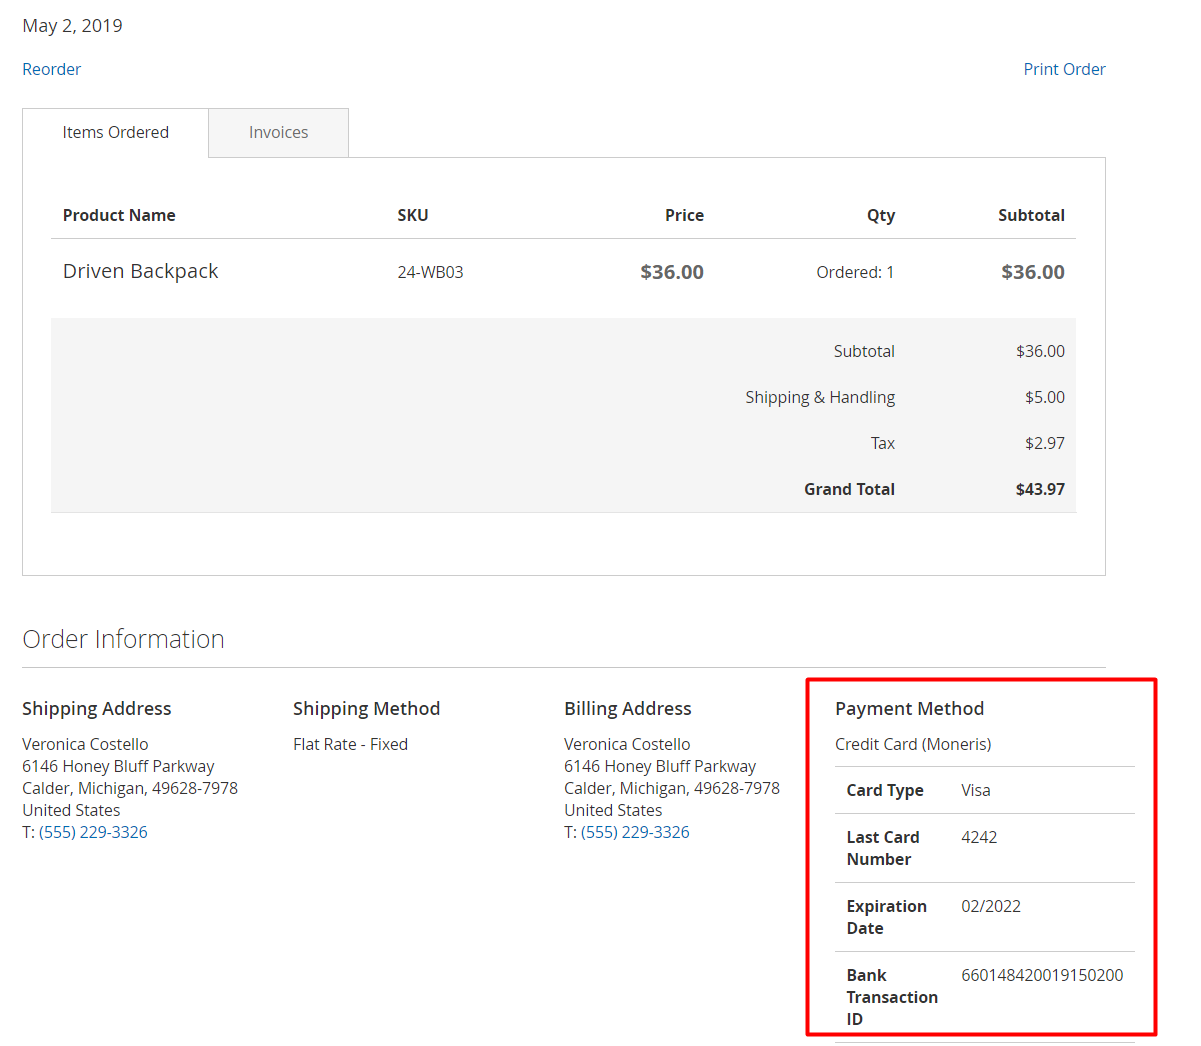
2. Admin order
This section records the Credit Card (Moneris) information that the customer has ordered and paid.
3. Order Frontend
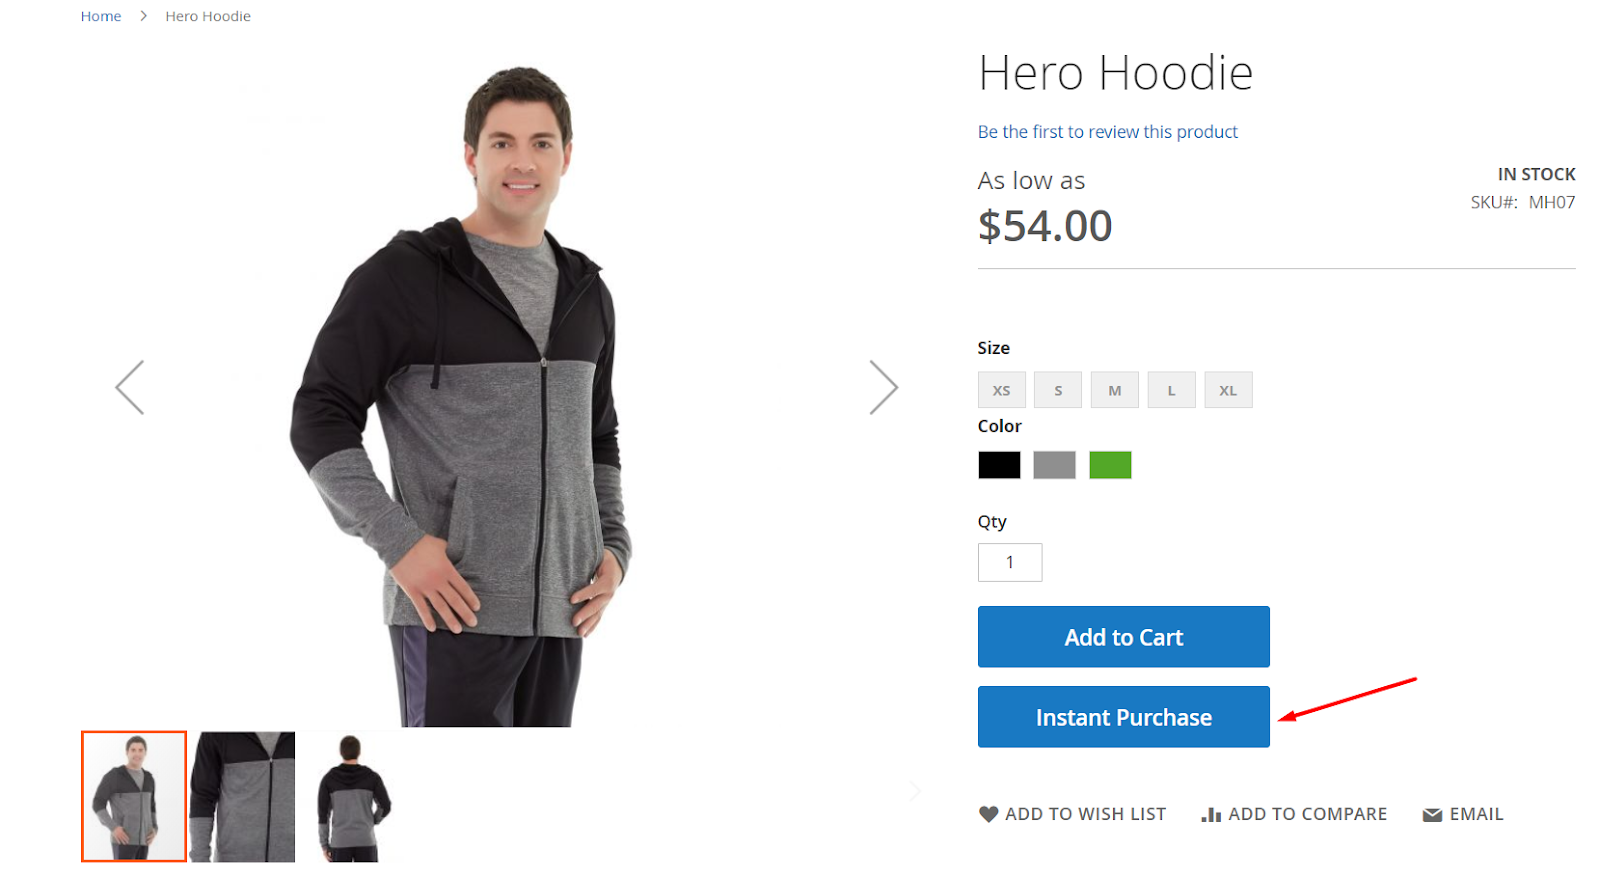
4. Compatible with Instant Purchase
- Customers can use Instant Purchase to place orders quickly.
- Note: Instant Purchase only shown when you have saved your payment cards. Also, you should disable 3D Secure because the card verification was done when customers fill in the payment card information.
- Compatible with One Step Checkout
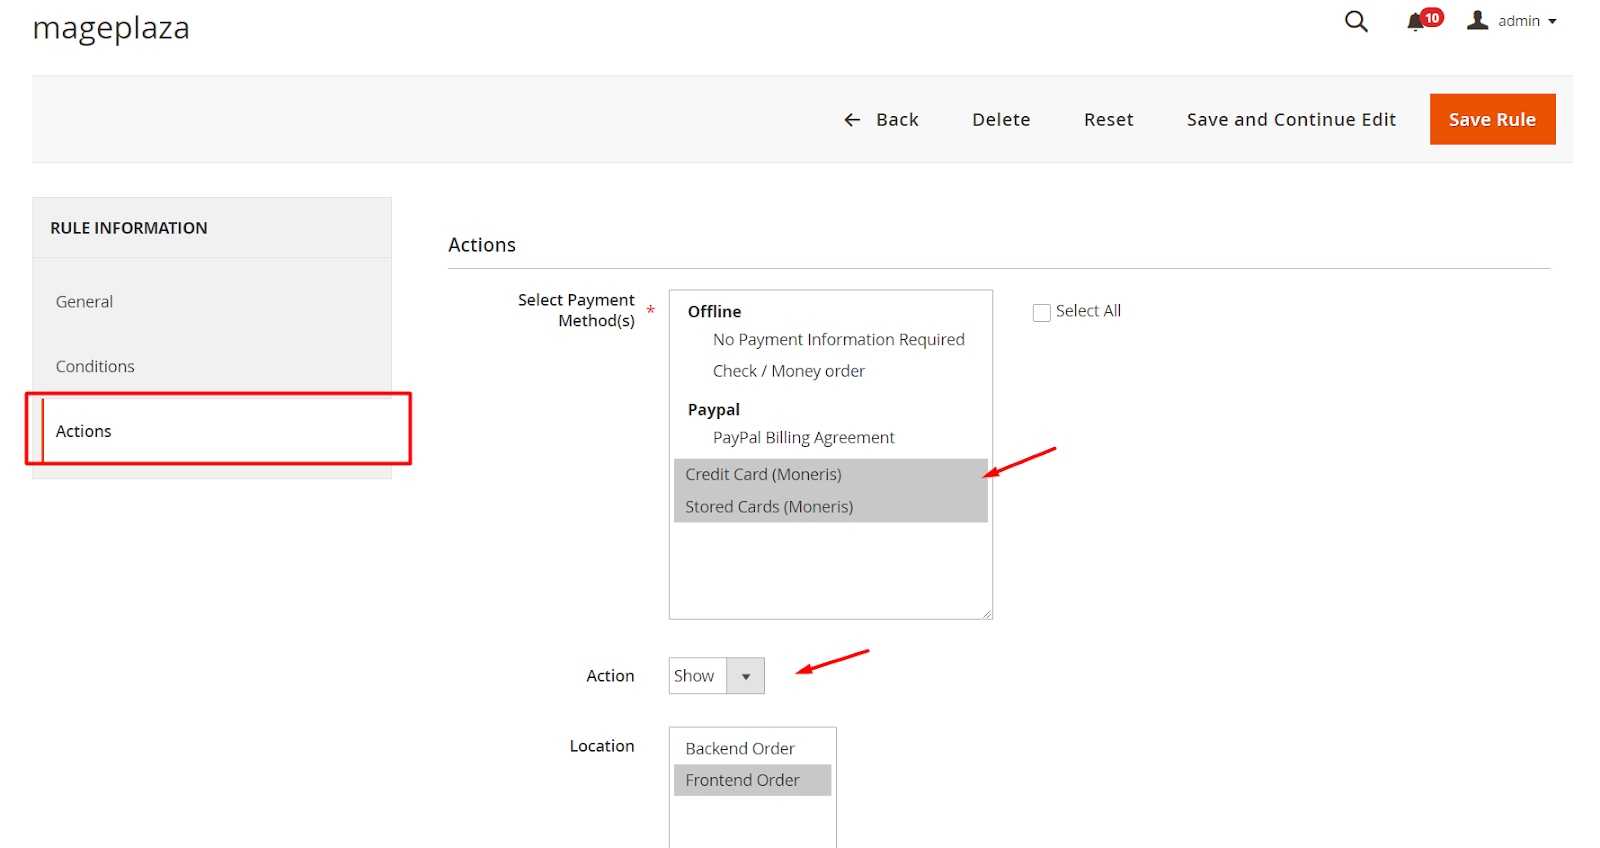
- Compatible with Mageplaza Payment Restriction: Payment Restriction extension supports hiding/showing Moneris at Frontend following admin configurations.
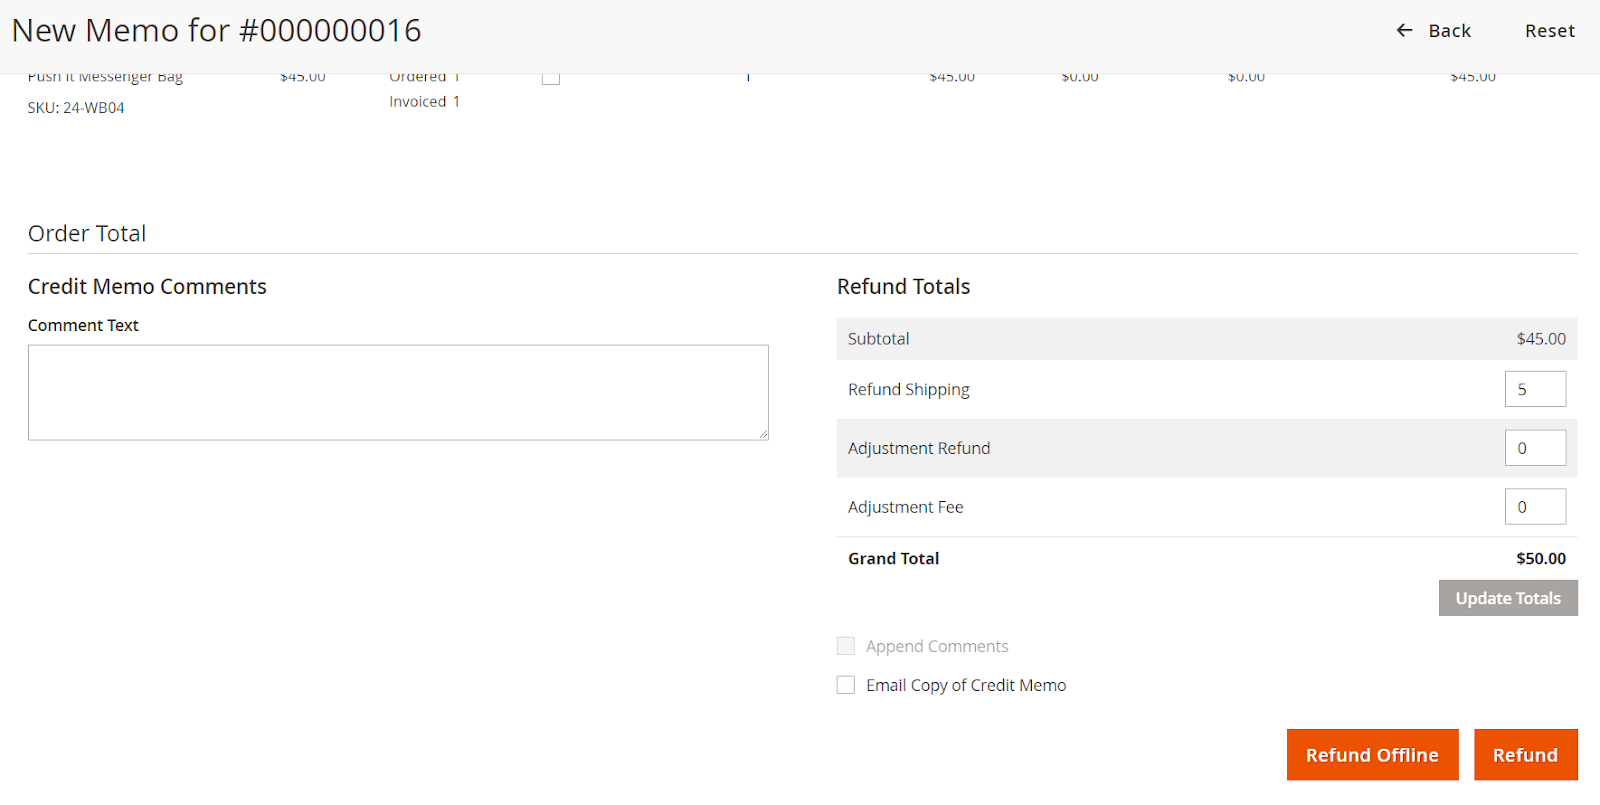
5. Refund Order
Here admin can Refund Online/ Offline individual or all orders.
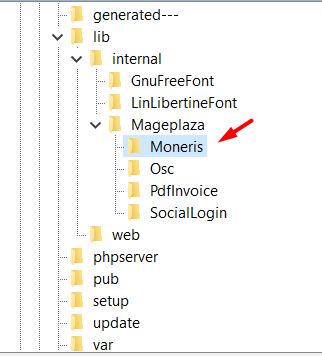
6. Instructions for installing the library
- Create directory:
lib/internal/Mageplaza - Visit the link to download the Moneris library here
- Extract the module-moneris-library into
lib/internal/Mageplazaand rename the file name you just extracted as: Moneris