Pre Order
Overview
In the e-commerce industry, many businesses want to promote their upcoming products, out of stock or with few instock products, bringing product information closer to customers. With Mageplaza Pre Order extension, it will help you support customers so that they can pre-order and back-order with products not yet available at the store, change the label of Add to cart button on any product pages that you want. With this tool, it will be more convenient to manage the store and increase consumption and sales significantly.
Download & Install
- Download Mageplaza Pre Order
- How to Install
How to use
- Pre order: configure with pre-order products

- Back order: configure with back-order products
How to configure
1. Configuration
Login to the Admin Magento, choose Stores > Configuration > Mageplaza > Pre Order.
1.1. General
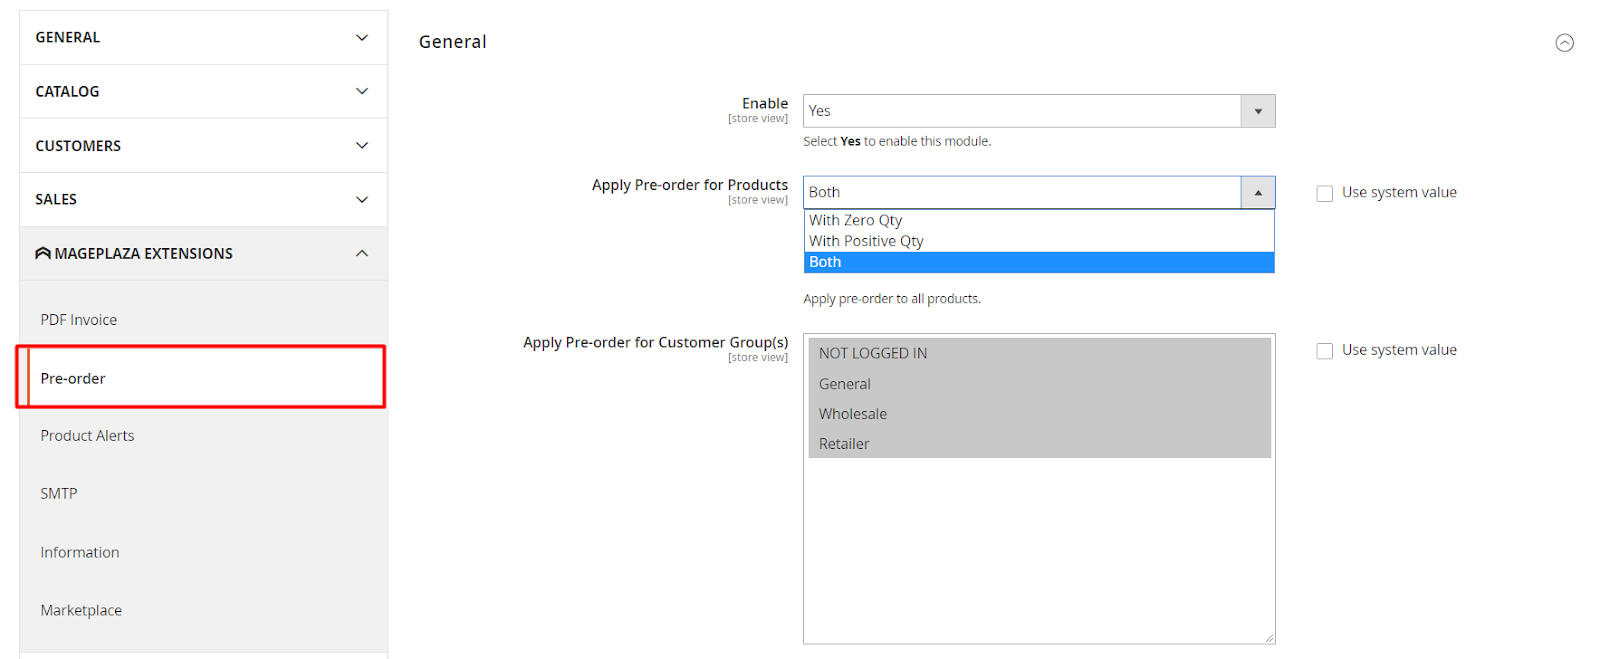
- Enable: Select
Yesto turn on the module and use the Pre Order or Back Order. - Apply Pre-order for Products:
- With Zero Qty: Only products with zero quantity can be pre-ordered
- With Positive Qty: Apply Pre Order with products have positive quantity in stock or greater than 0
- Both: All products can be pre-ordered
- Apply Pre-order for Customer Group(s): Select customer group(s) to apply Pre-order. You can choose multiple Customer Groups. Those groups that are not selected will not be appled the Pre Order.
1.2. Displaying Configuration
1.2.1. Pre-order Display Configuration
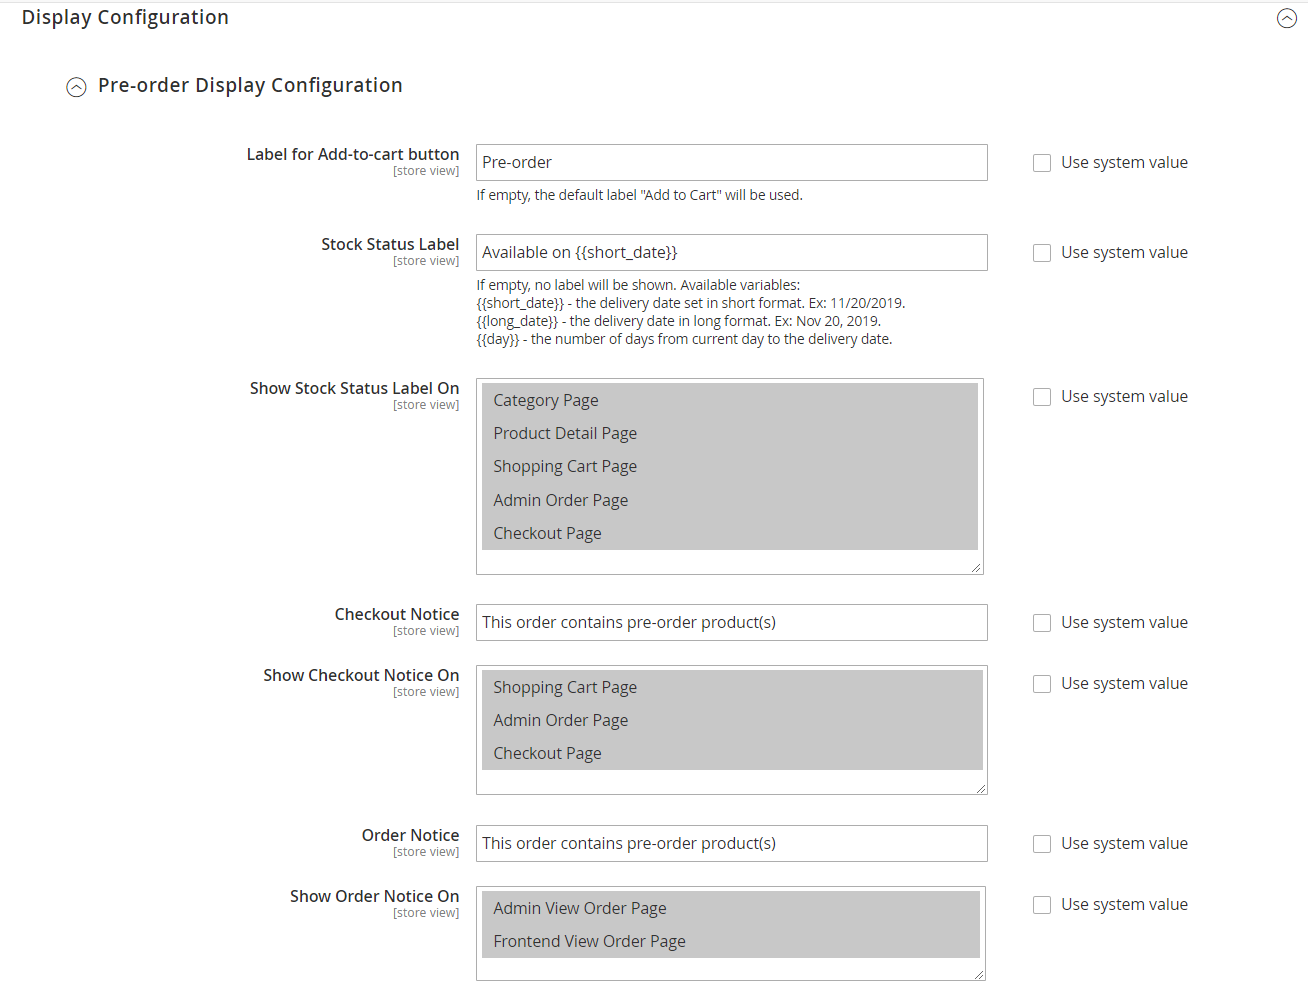
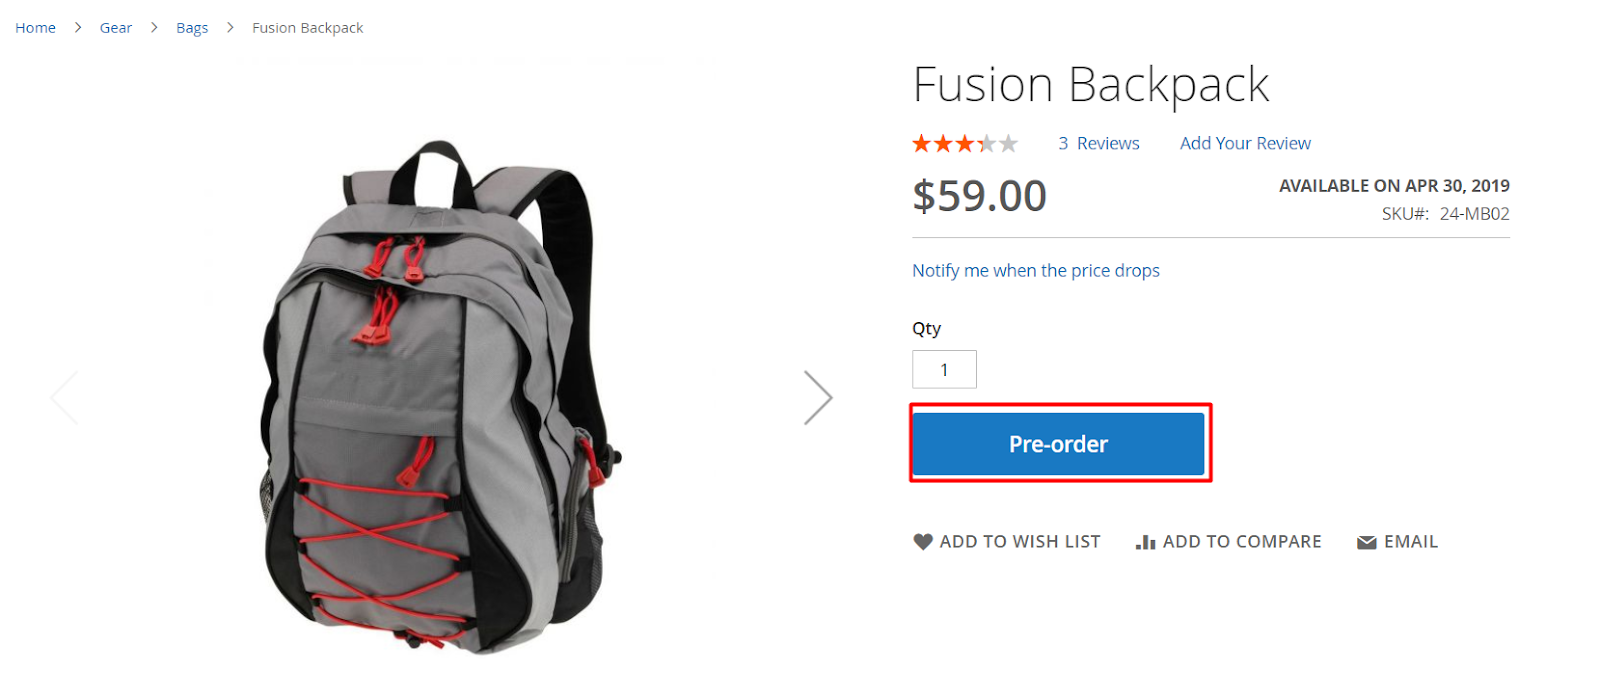
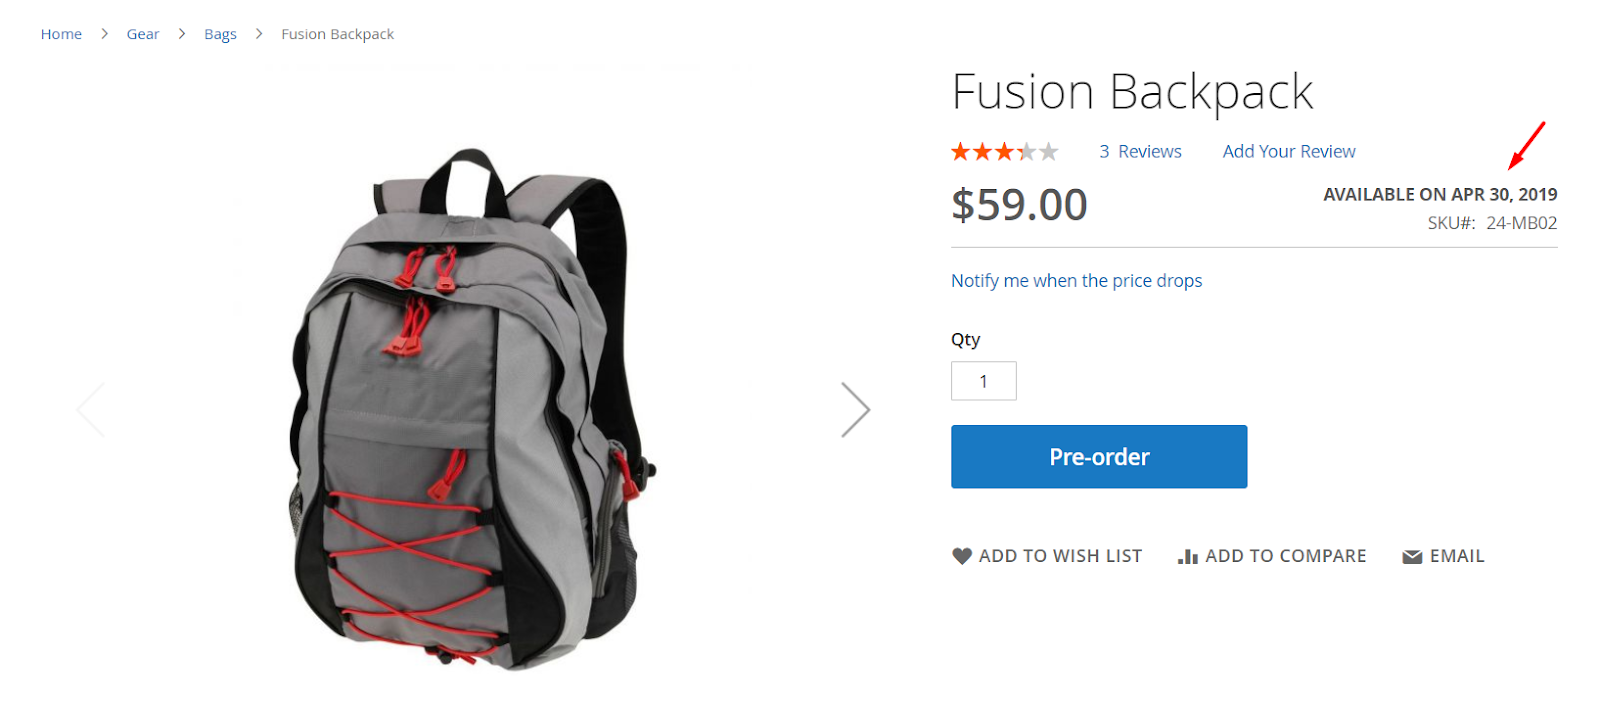
- Add to Cart Button Label:
- Enter the button Label to replace Add to cart button when you want to pre-order with products that are about to be launched or out of stock, with less quantity instock compared to the number that customers want to buy.
- If left blank, Add to cart button will be used.

Stock Status Label:
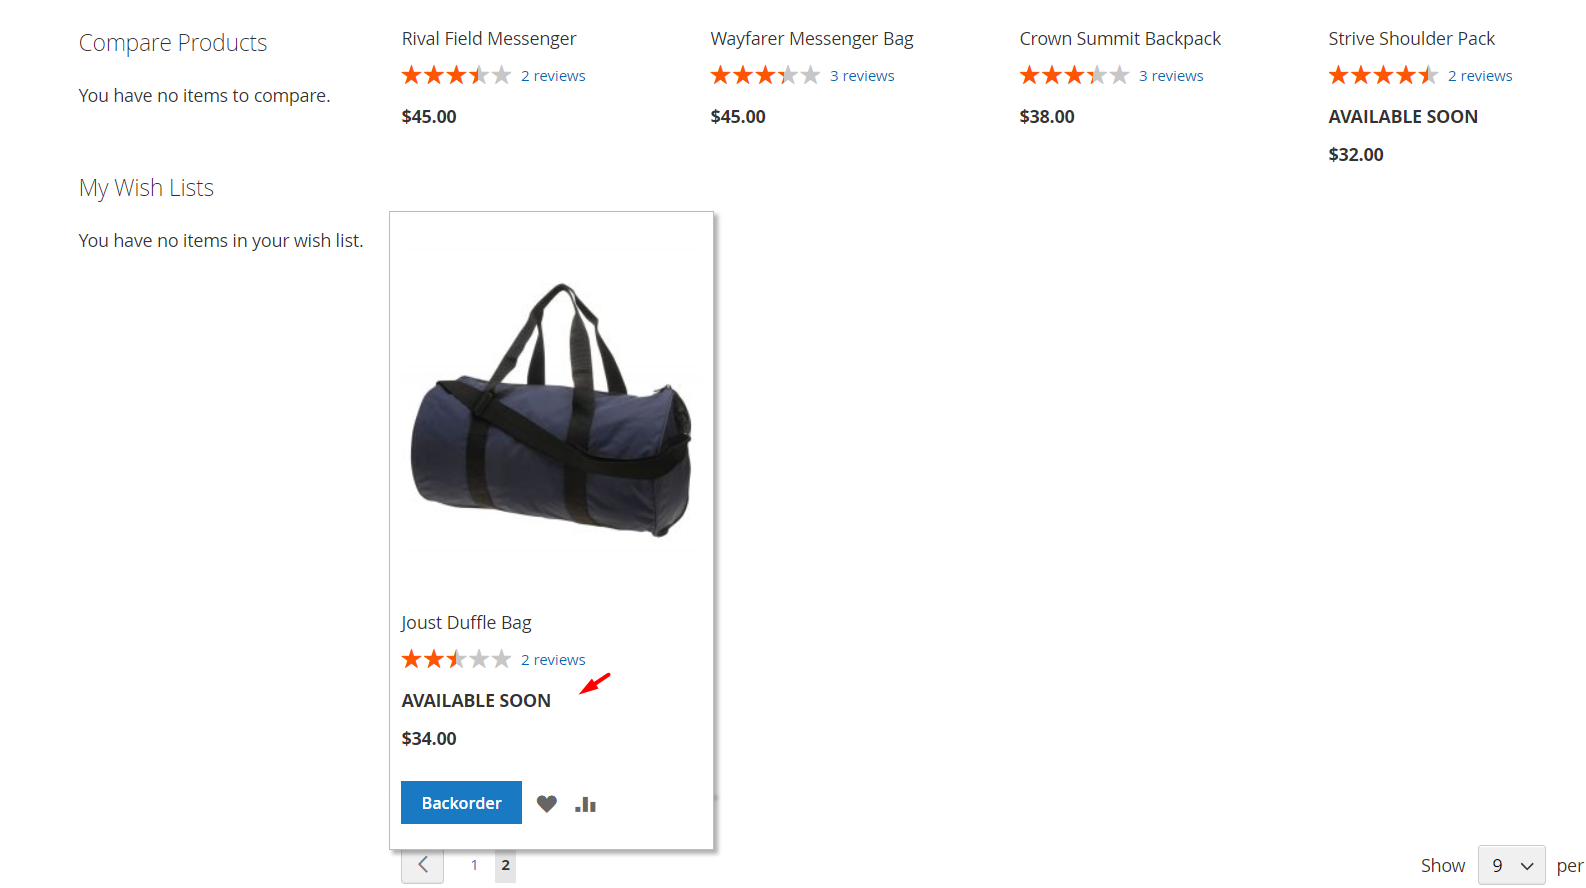
Enter the Stock Status Label to be displayed above the default label Pre Order on Product Listing Page. For example: Available Soon, Availabel in {{day}} days, Delivery on {{long_date}},...
If empty, no label will be shown. Variables available are:
- {{short_date}} - the delivery date set in short format. Ex: 11/20/2019.
- {{long_date}} - the delivery date in long format. Ex: Nov 20, 2019.
- {{day}} - number of days from current day to delivery date.

Show Stock Status Label On: Select to display Stock Status Label on:
- Category Page:
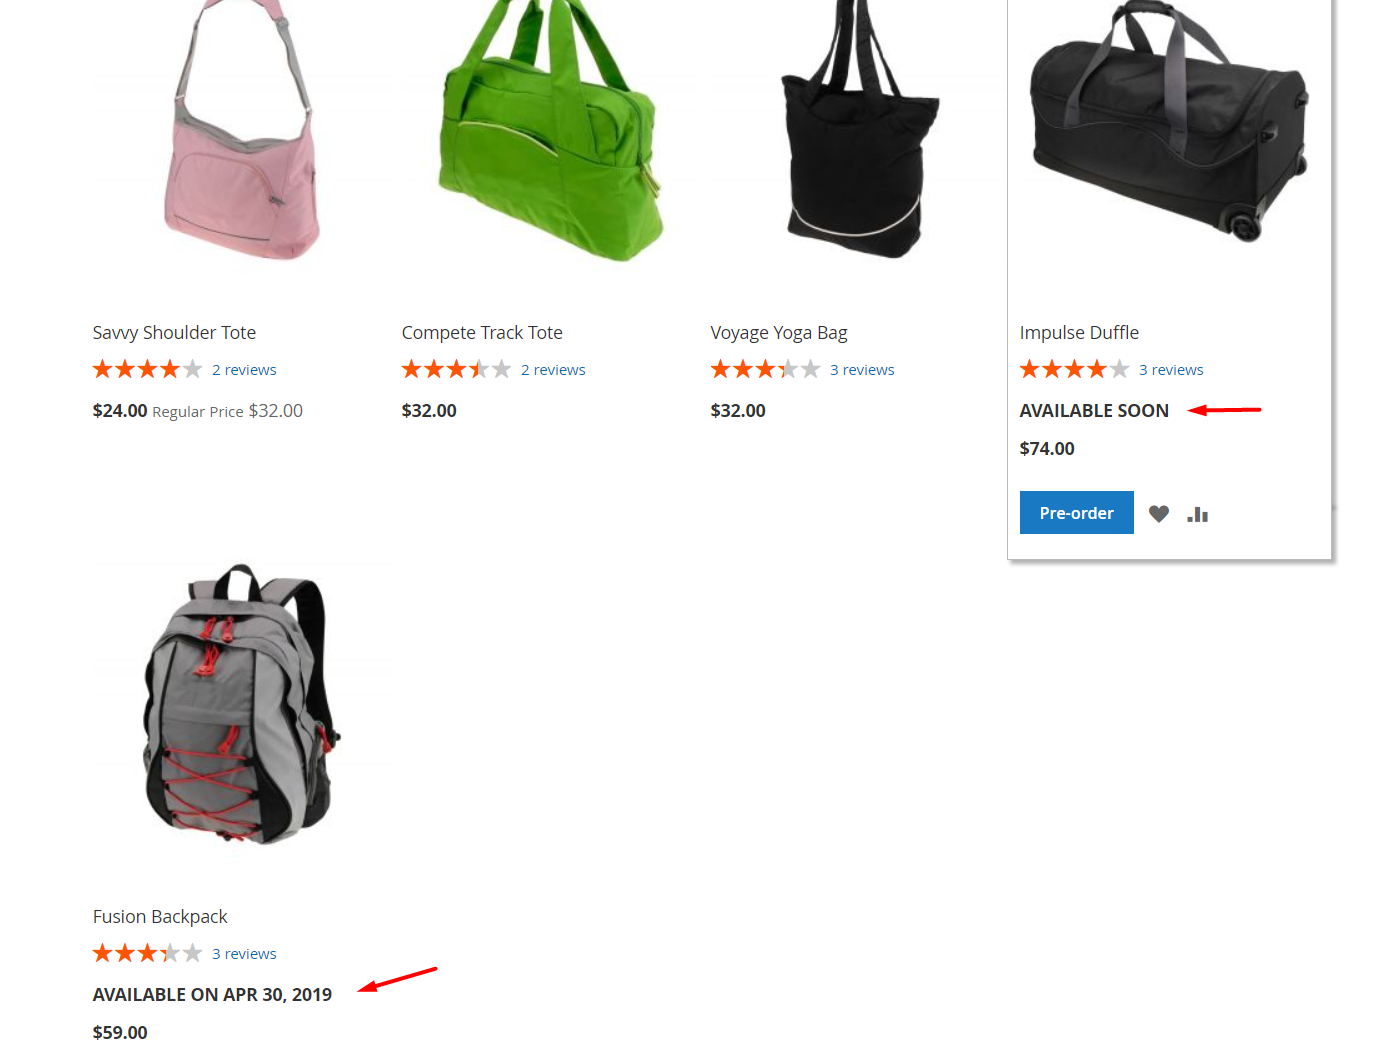
- Product Detail Page:

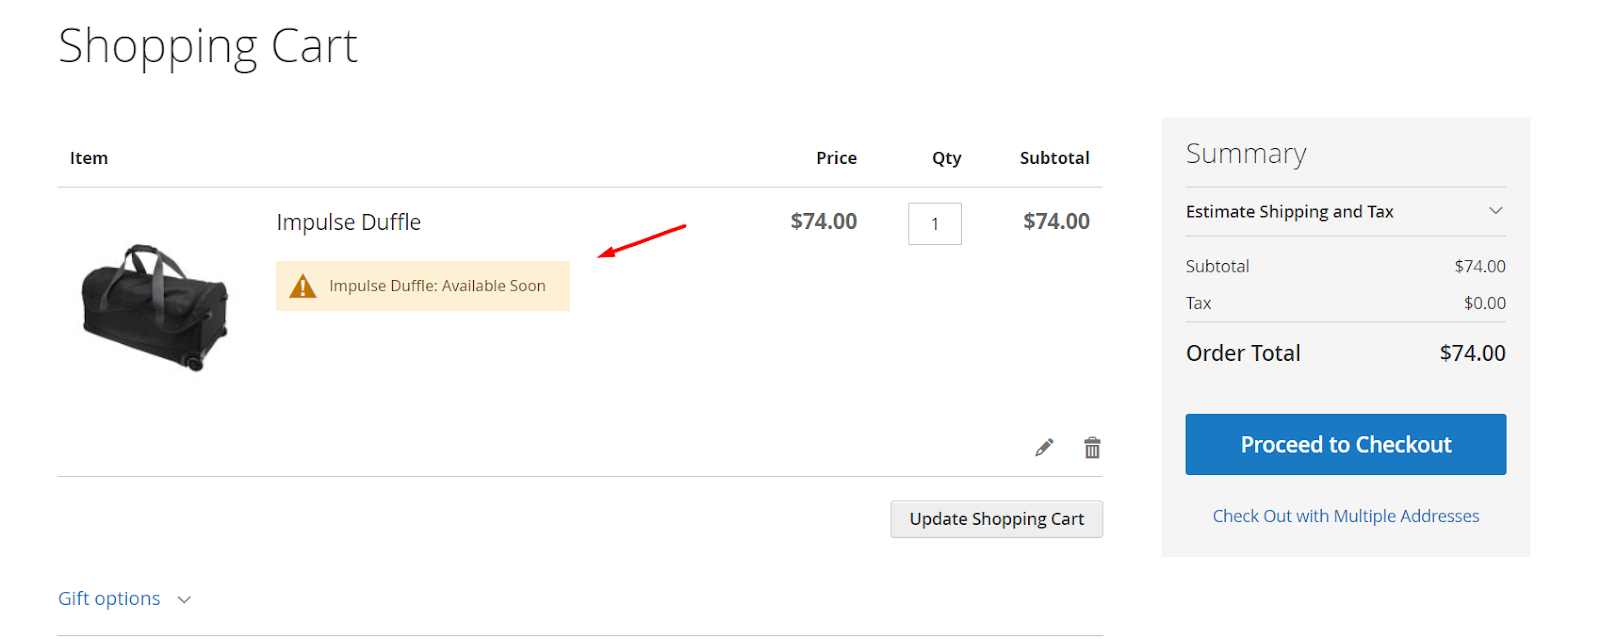
- Shopping Cart Page:
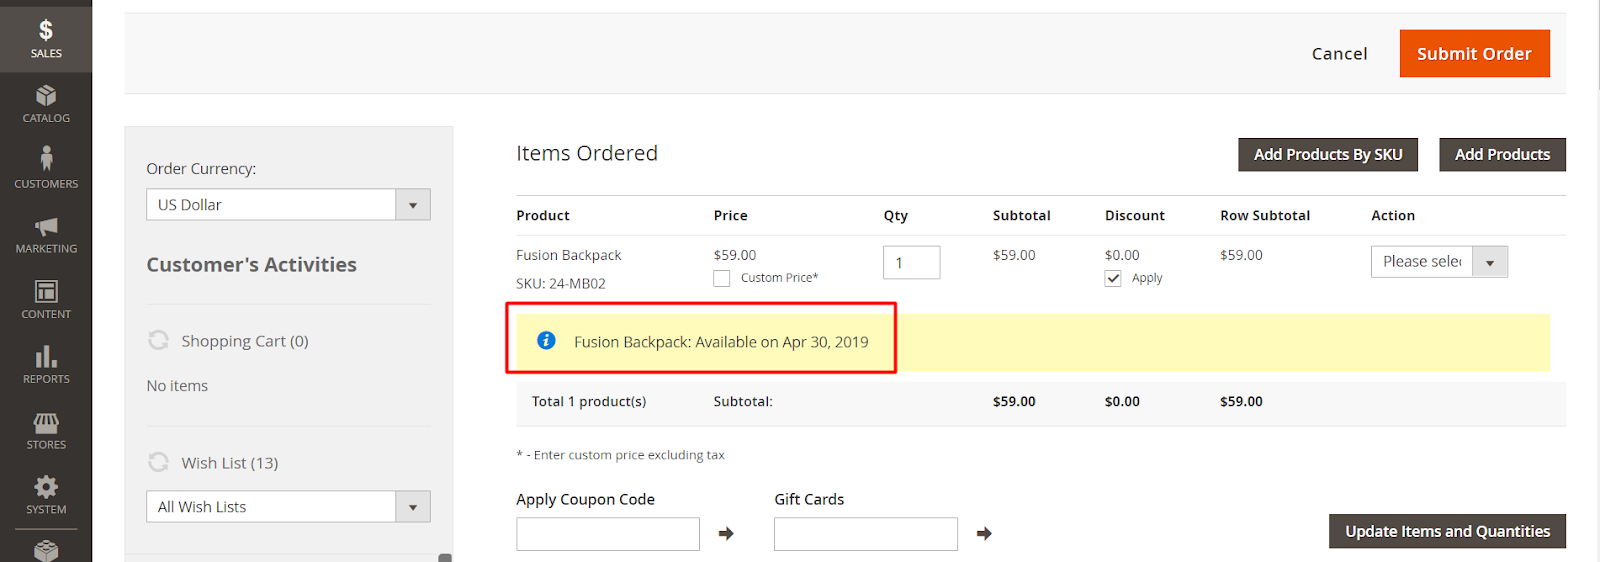
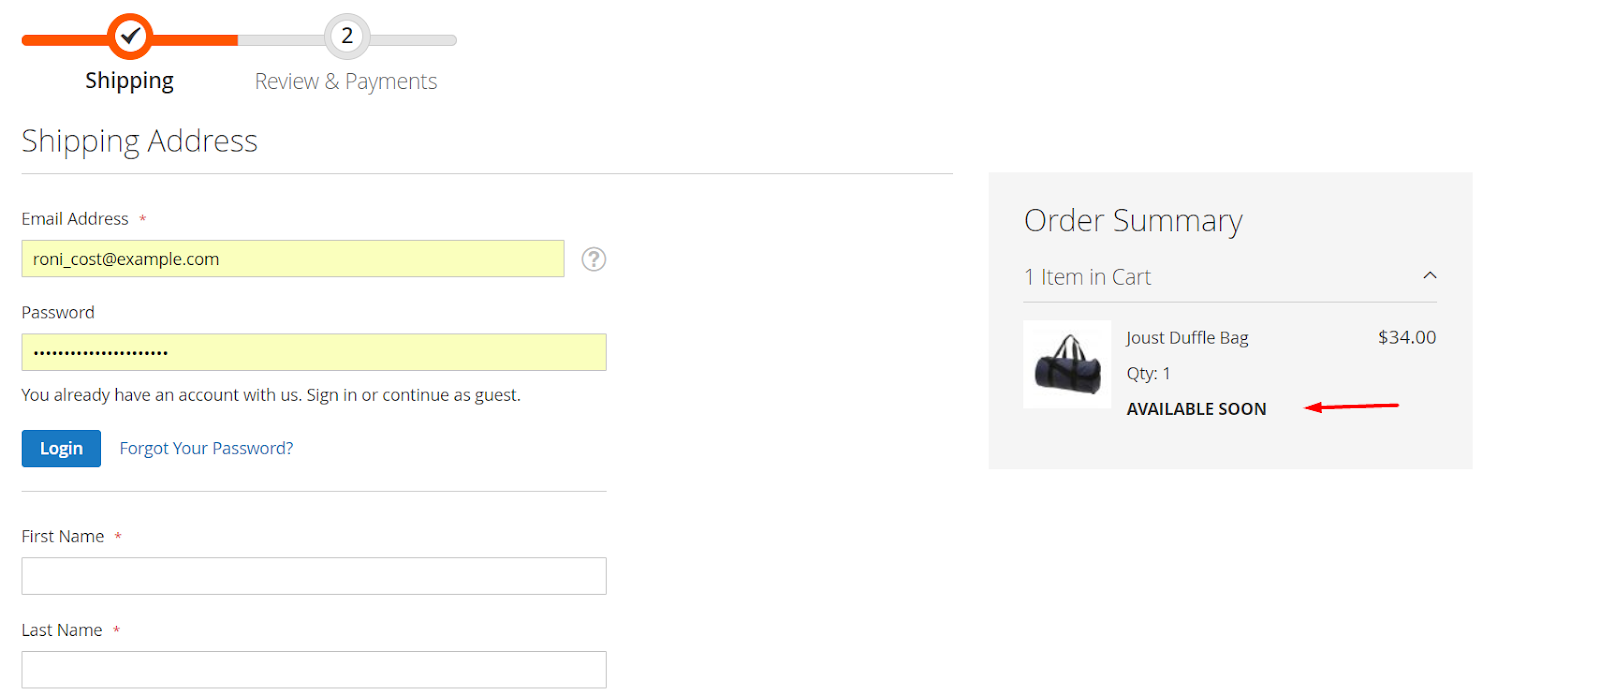
Admin Order Page: displays the message Stock Status Label in the backend with the pre-order products
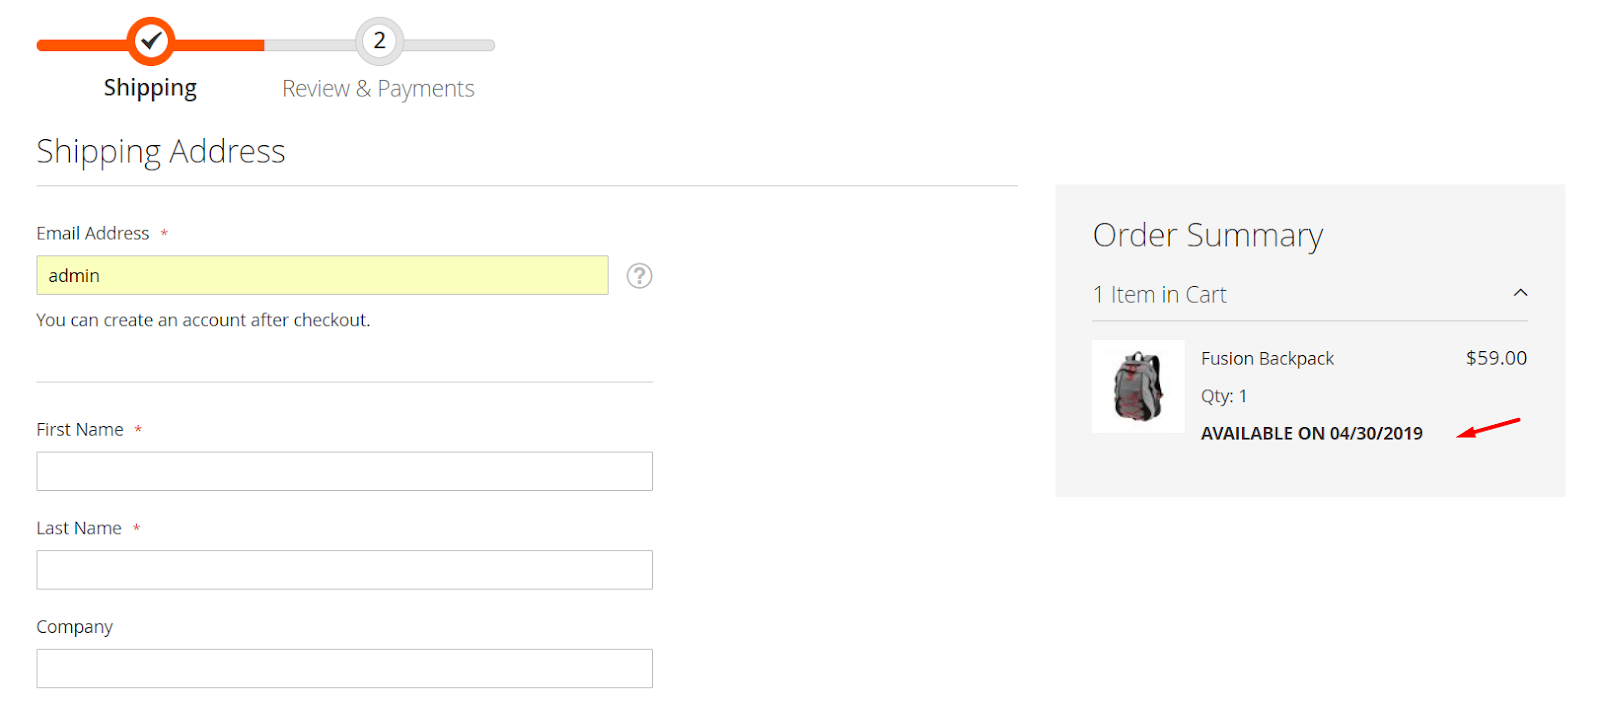
Checkout Page: displays the Stock Status Label in the Checkout page.
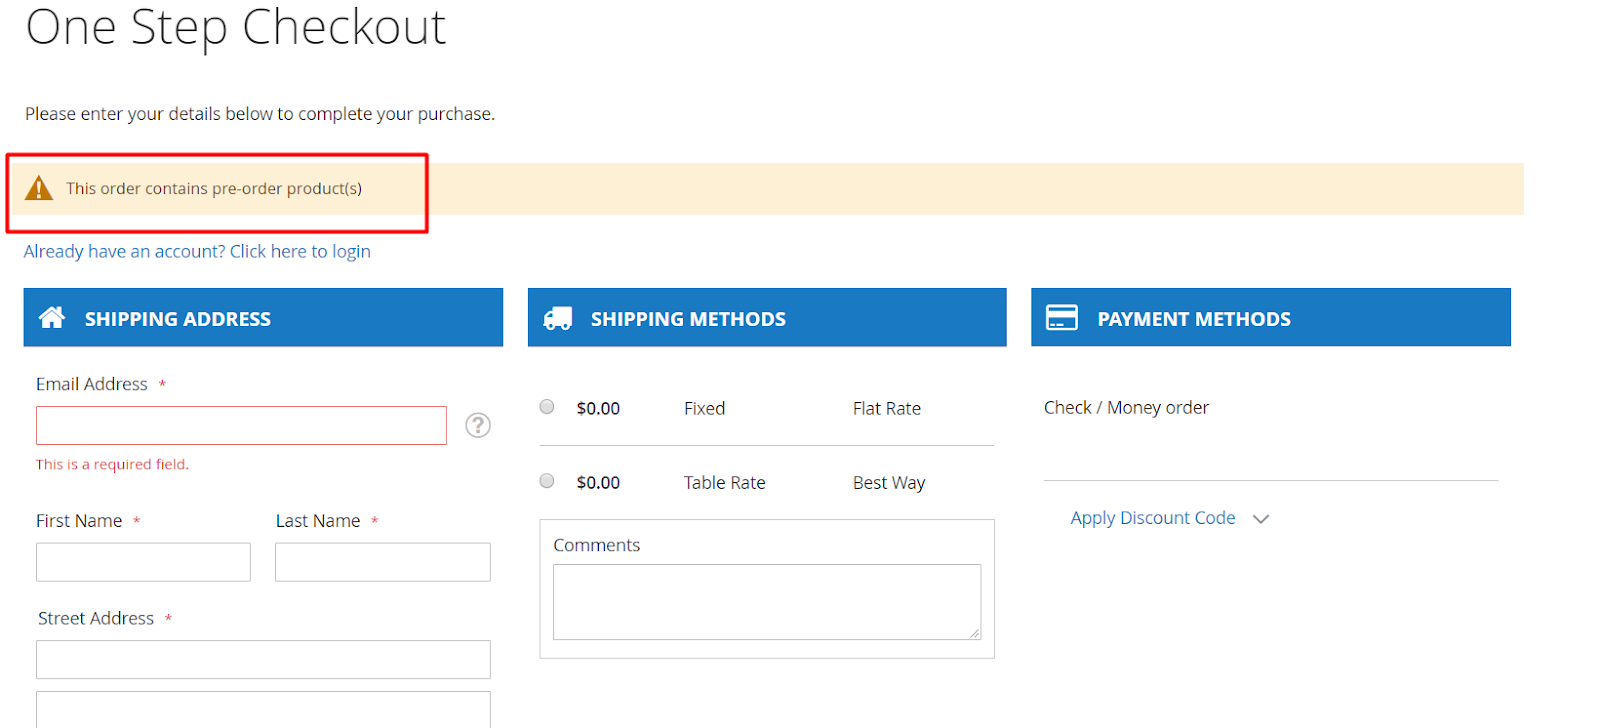
Compatible with One Step Checkout

Show Checkout Notice: Select to display Checkout Notice when the customer pays for the pre-order products on the pages:
Admin Order Page:

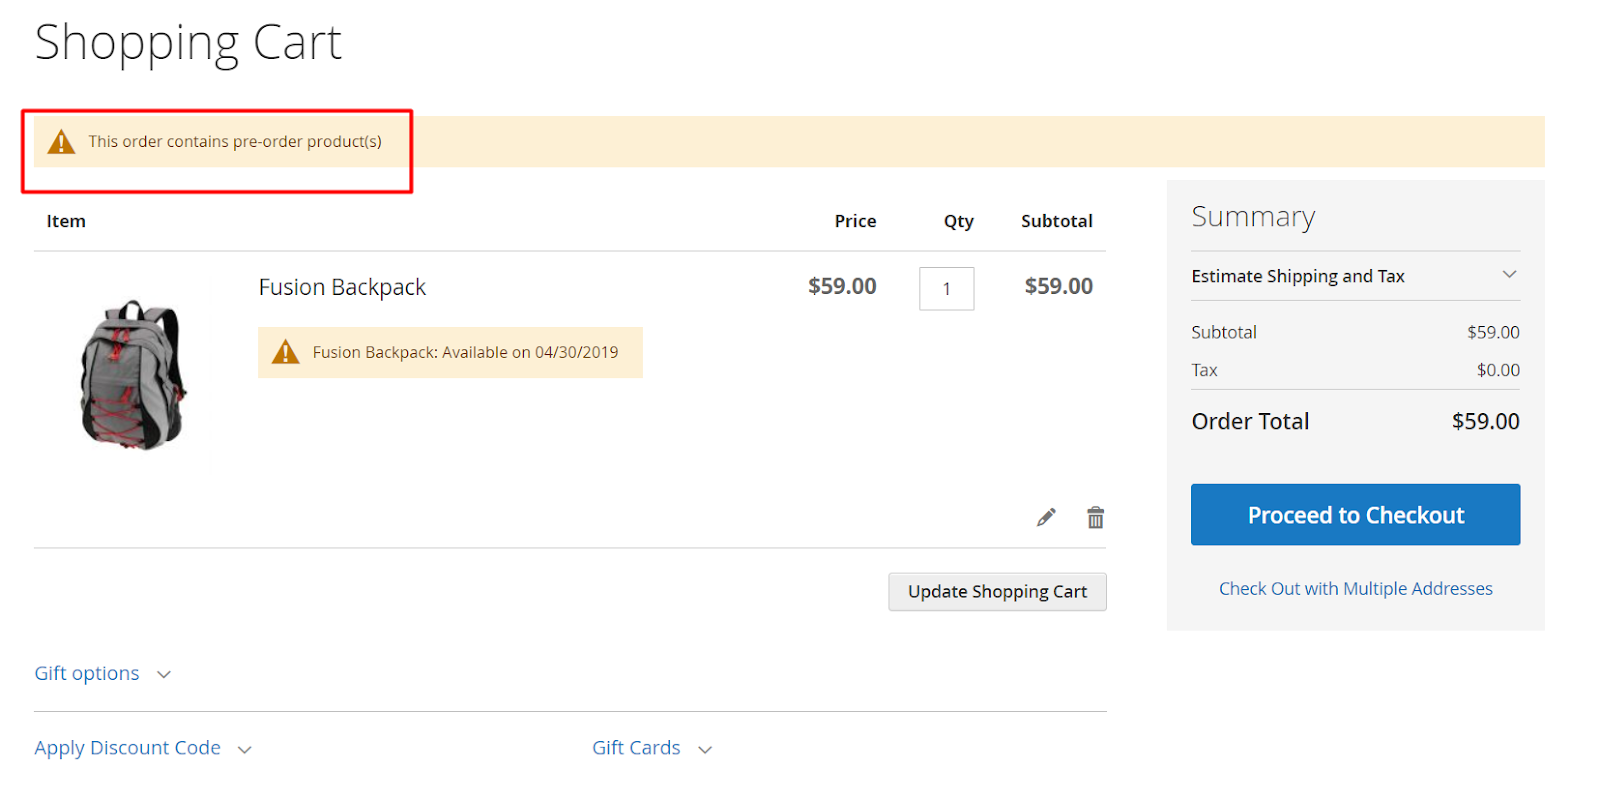
Shopping Cart Page: displays Checkout Notice on the Shopping Cart Page.
- Checkout Page:
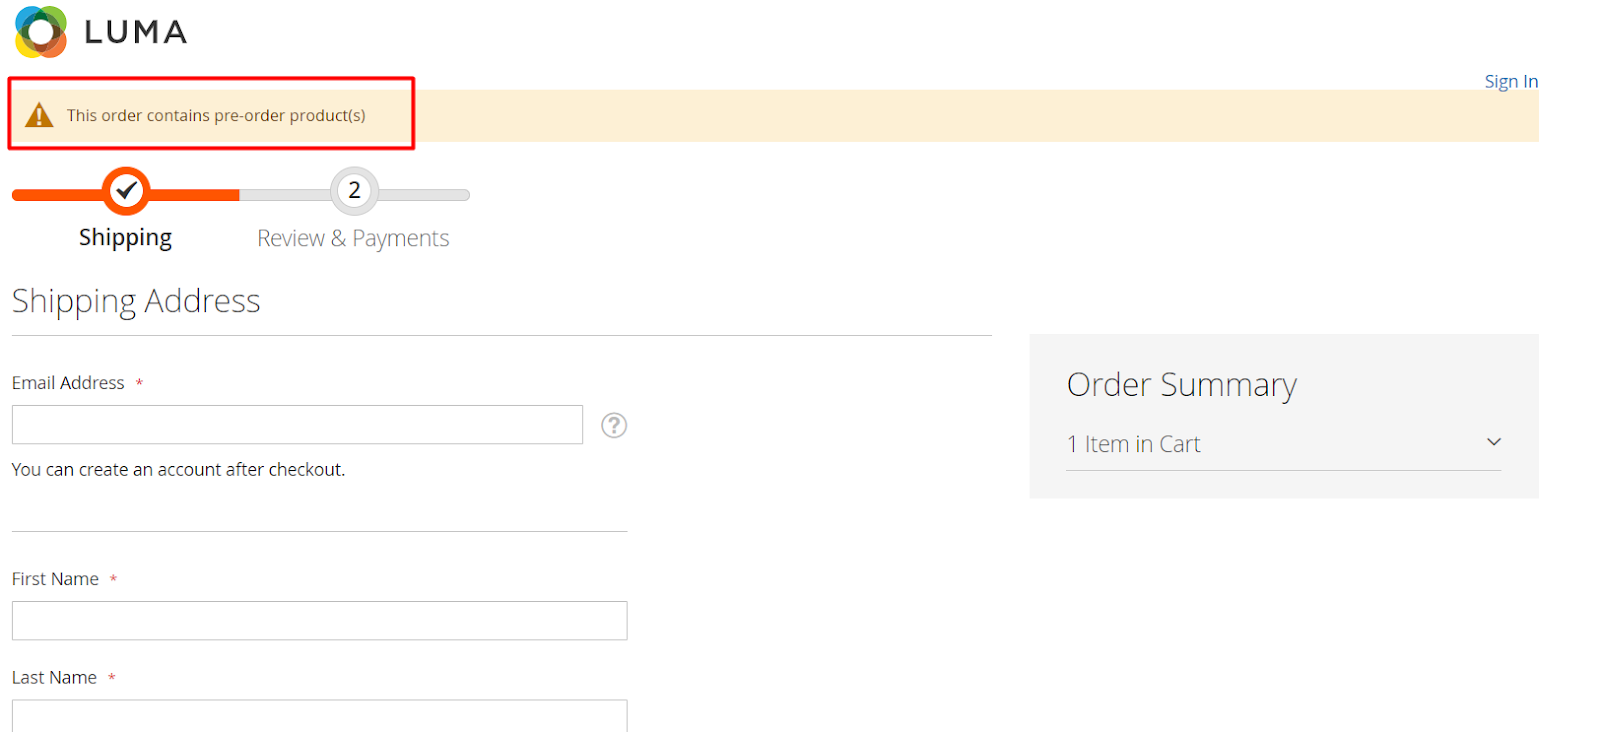
You can install Mageplaza One Step Checkout to make the payment steps convenient, fast and compact in 6 steps.
- Checkout Notice:
- Add Checkout Notice to display notifications for pre-order products when customers checkout.
- You can select Use system value to use the default of "This order contains pre-order product(s)".
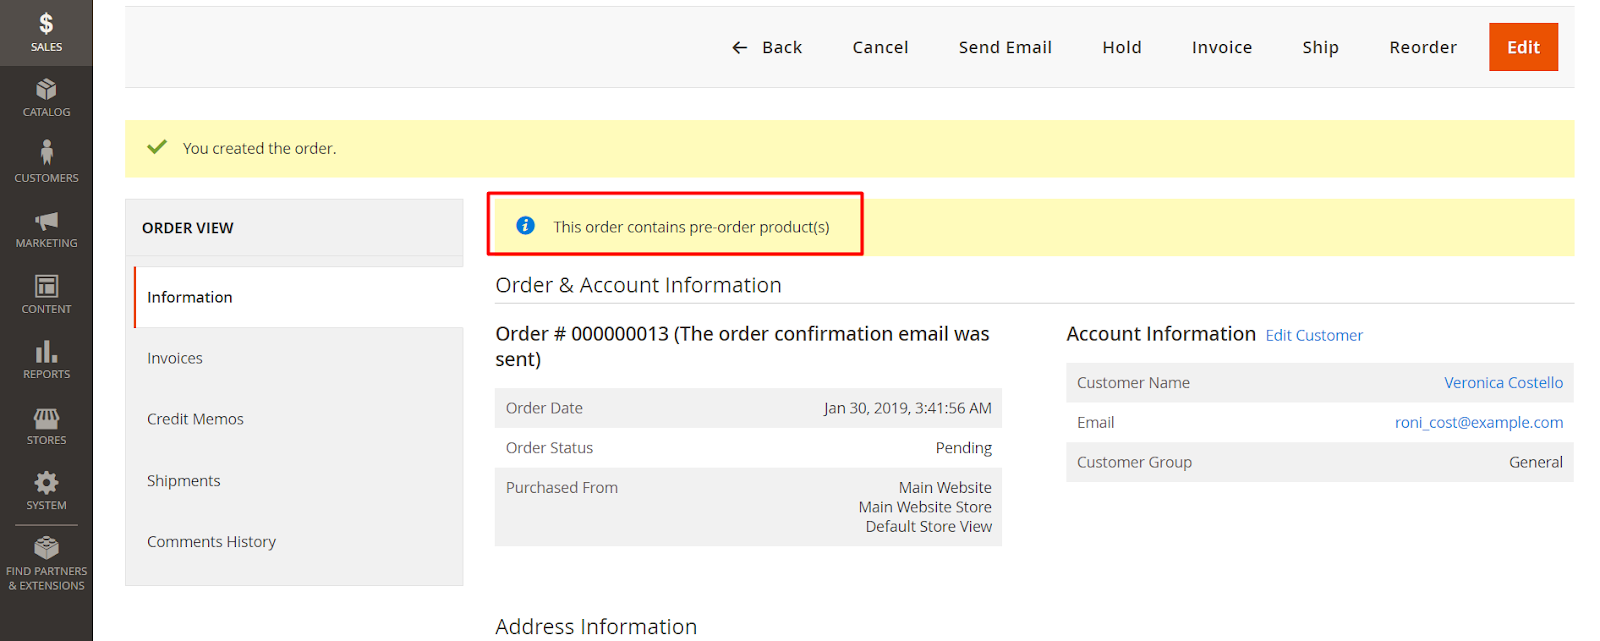
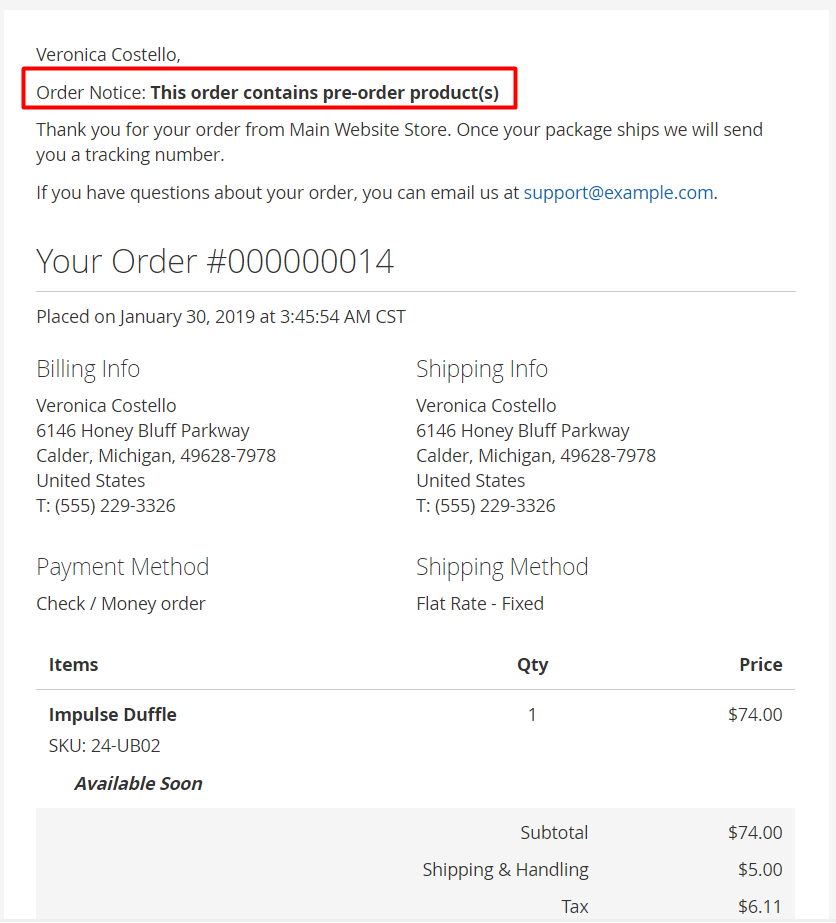
- Show Order Notice: Choose to apply the Order Notice when the customer orders with pre-order products. Pages that are not selected will not apply the Order Notice display. Order Notice will be shown on pages:
- Admin View Order Page: Displays a notification when the admins order pre-order products at backend
Frontend View Order Page: Display the Order Notice notification when the customers orders pre-order products at frontend

Order Confirmation Email: Automatically display a notification with the order confirmation email when the order is finished. Visit
Marketing> Email Templates> Add New Templateto create Email Templates.
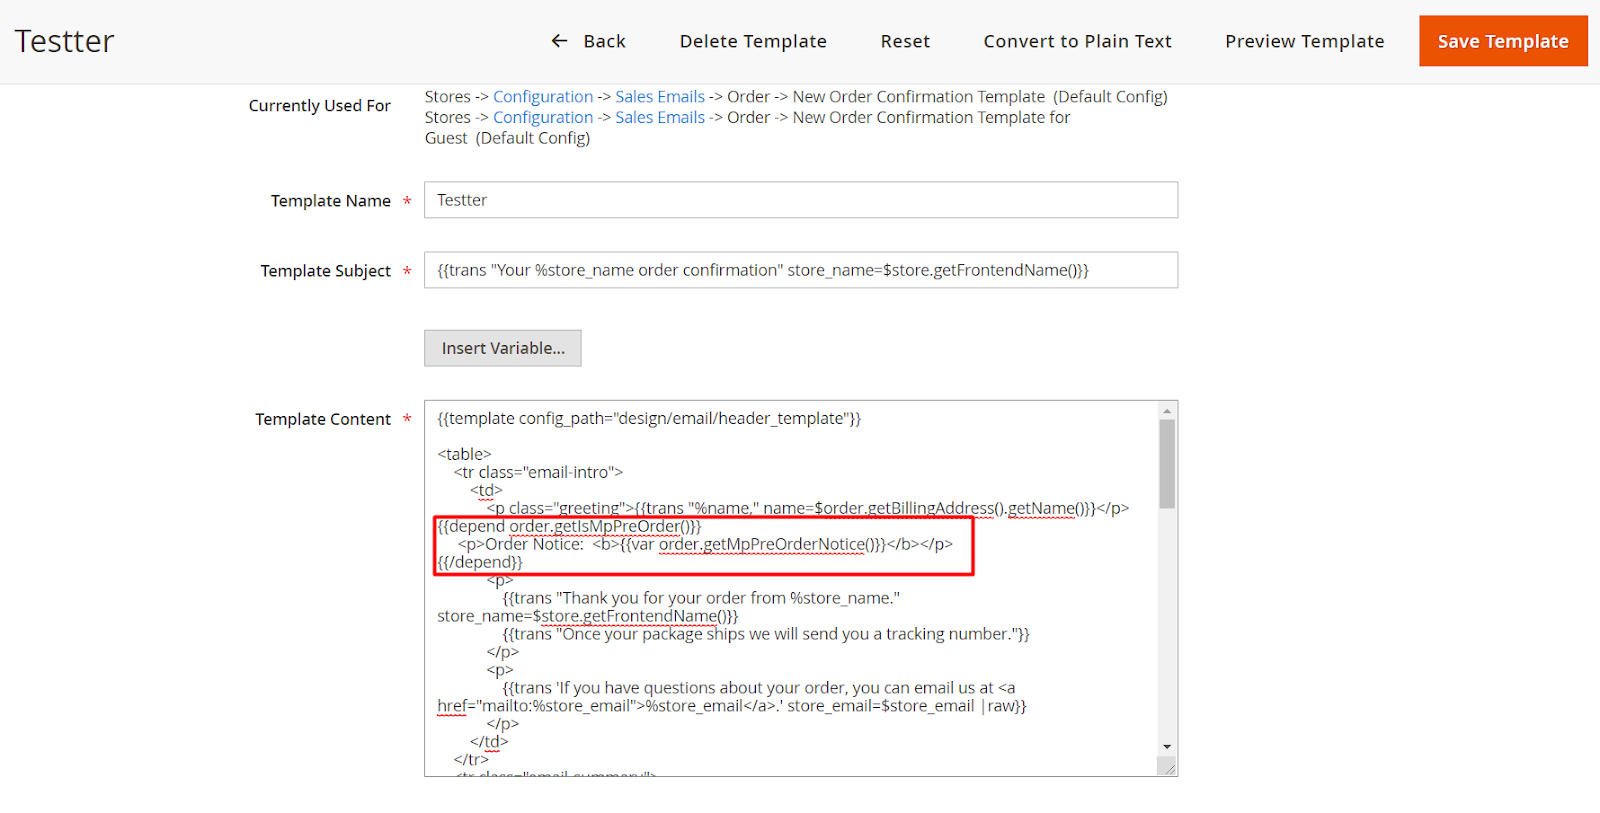
- Note: When you visit
Marketing> Email Templates> Add New Template, to create Email Templates, for each template email, you need to insert the following command line in the Template Content field in the position where you want to put Order Notice:
{{depend order.getIsMpPreOrder()}}
     <p> Order Notice: <b> {{var order.getMpPreOrderNotice()}} </b> </p>
{{/depend}}
- You can display an Order Notice on PDF invoice template.
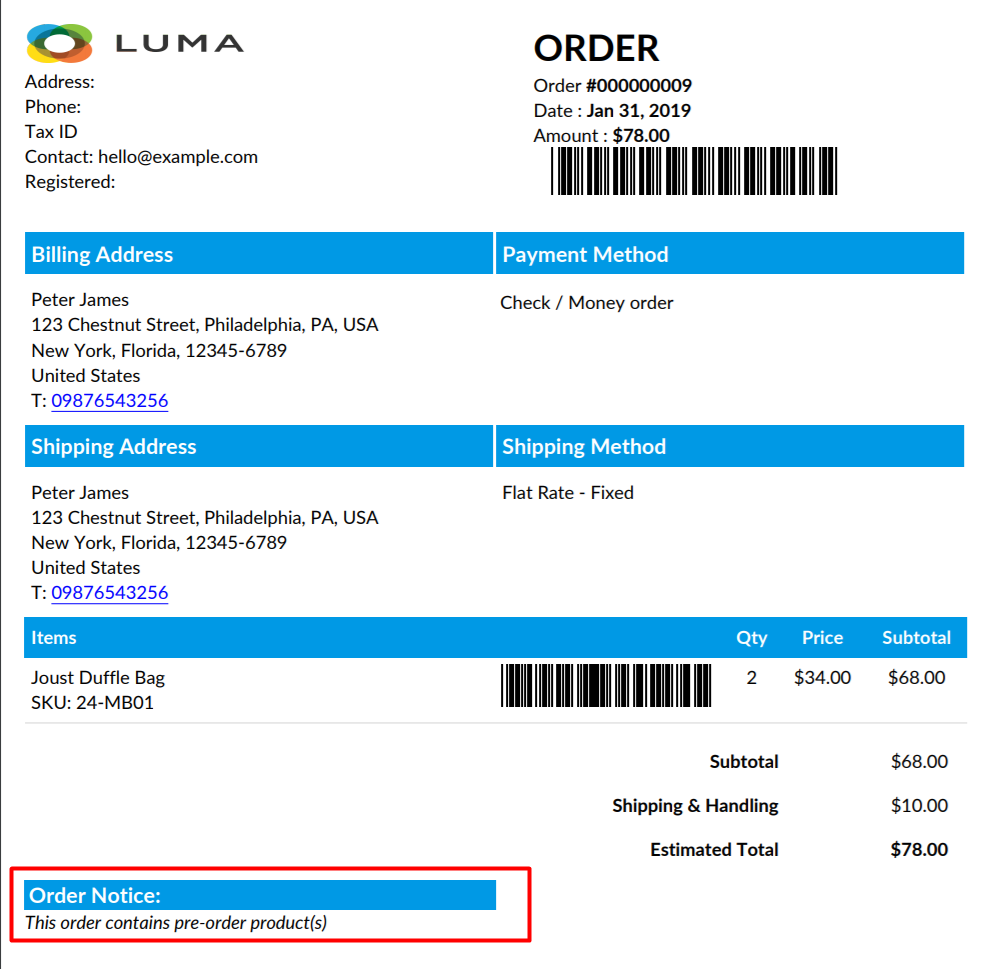
Note:
- Go to
Store> PDF Invoice> Manage Templates, Choose Add New Template with order, invoice,...To create PDF Templates, you can get it here. Otherwise, you can insert the following command under the Template Name field in the position you want to put Order Notice:
- Go to
{{depend order.getIsMpPreOrder()}}
<div className="footer-left">
  <h3 className="mp-note">
    {"{"}
    {"{"}trans "Order Notice"{"}"}
    {"}"}:
  </h3>
  <span style={{ fontStyle: "italic" }}>
  {"{"}
  {"{"}var order.getMpPreOrderNotice(){"}"}
  {"}"}
  </span>
</div>

{{/depend}}

- After creating your Email Template, go to
Stores> Configuration> Mageplaza> PDF Invoice, in the Order section with the Select Template field select the email template you just created.

- Order Notice:
- Enter Order Notice to display a notification for pre-order products when the customer orders them.
- You can select Use system value to use the default value of "This order contains pre-order product(s)".
1.2.2. Backorder Displaying Configuration
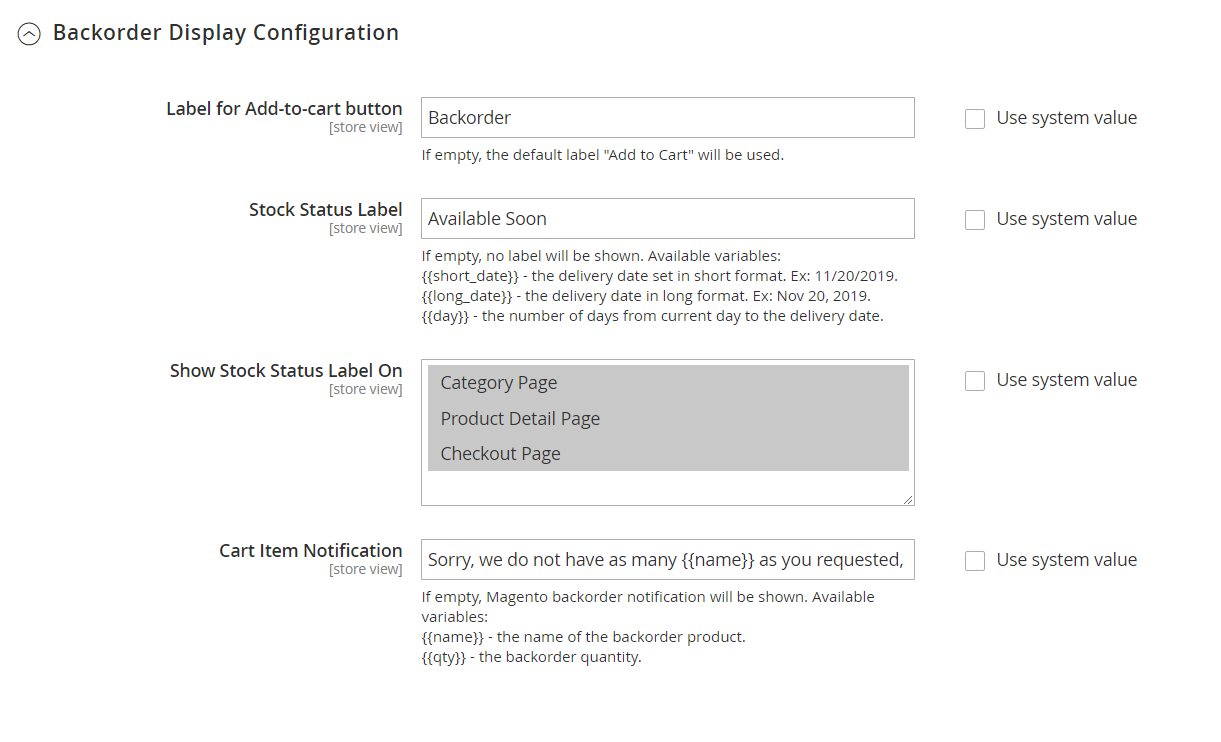
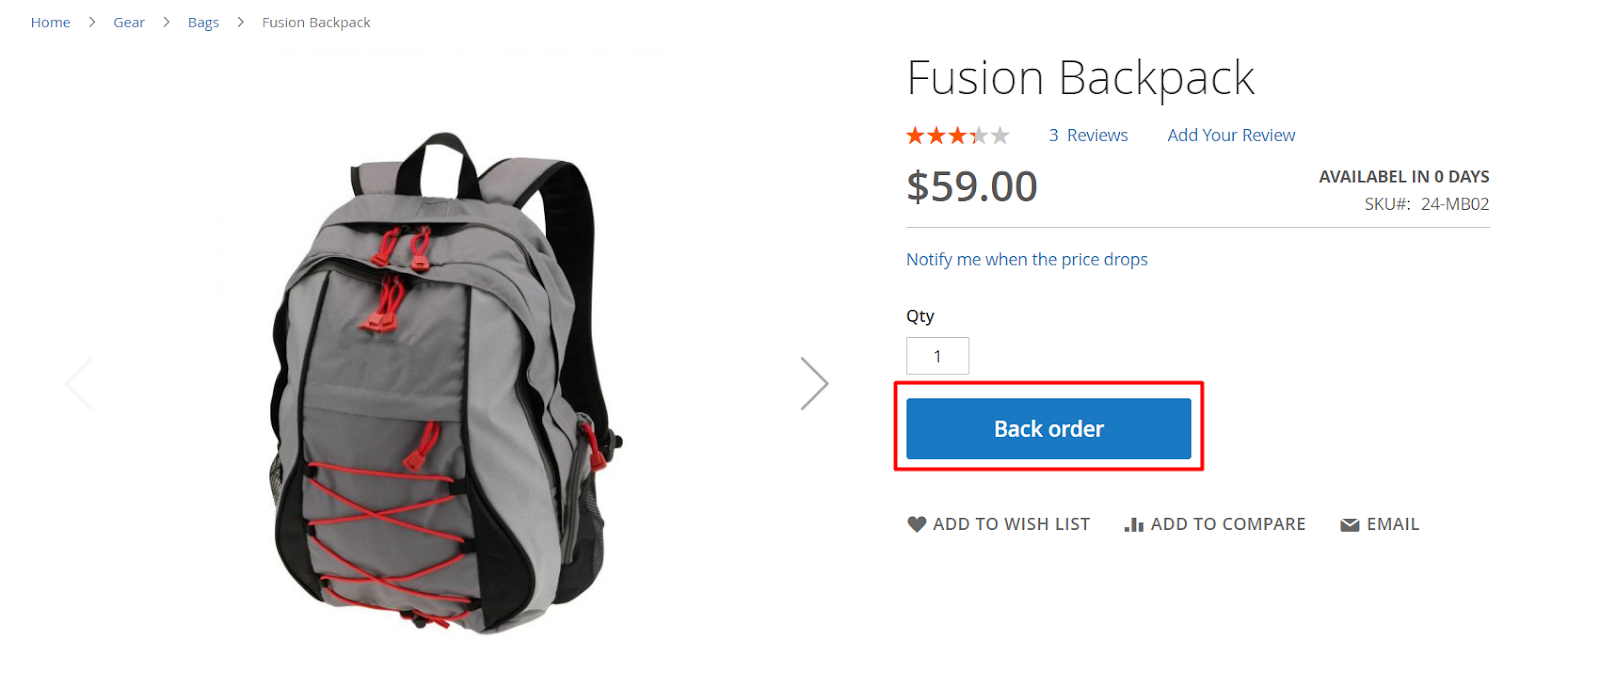
Add to Cart Button Label:
Enter the Label button to replace Add to cart button when you want to backorder with products that have less quantity in stock than the number customers want to buy. For example: Customers want to buy 5 items but you only have 3 available. Then customers will get these 3 items first and back-order 2 items. When stock is back in store, they will deliver the them or notify customers. You can install the Product Alerts extension of Mageplaza to automatically email customers when products are returned to stock or out of stock.
If left blank, Add to cart button will be used.
Stock Status Label:
- Enter the Stock Status Label which will be displayed above the default label Back Order on product listing. For example: Available Soon, Available in {{day}} days, Delivery on {{long_date}}, ...
- If empty, no label will be shown. Available Variables are:
{{short_date}} - the delivery date set in short format. Ex: 11/20/2019.
{{long_date}} - the delivery date in long format. Ex: Nov 20, 2019.
{{day}} - number of days from current day to delivery date.
Show Stock Status Label On: Select to display Stock Status Label on:
- Category Page:
- Product View Page:

- Checkout Page:
Compatible with One Step Checkout

- Cart Item Notification:
- Entering Cart Item Notification will be displayed on the shopping cart page. Example: Sorry, we do not have as many {{name}} as you requested, so we will back the quantity to {{qty}} items.
- If empty, Magento Backorder notification will be shown. Available variables:
- {{name}} - the name of the backorder product
- {{qty}} - the backorder quantity
2. Configuration in Product
Login to the Magento Admin, choose Catalog > Product > Edit Product > Advanced Inventory.
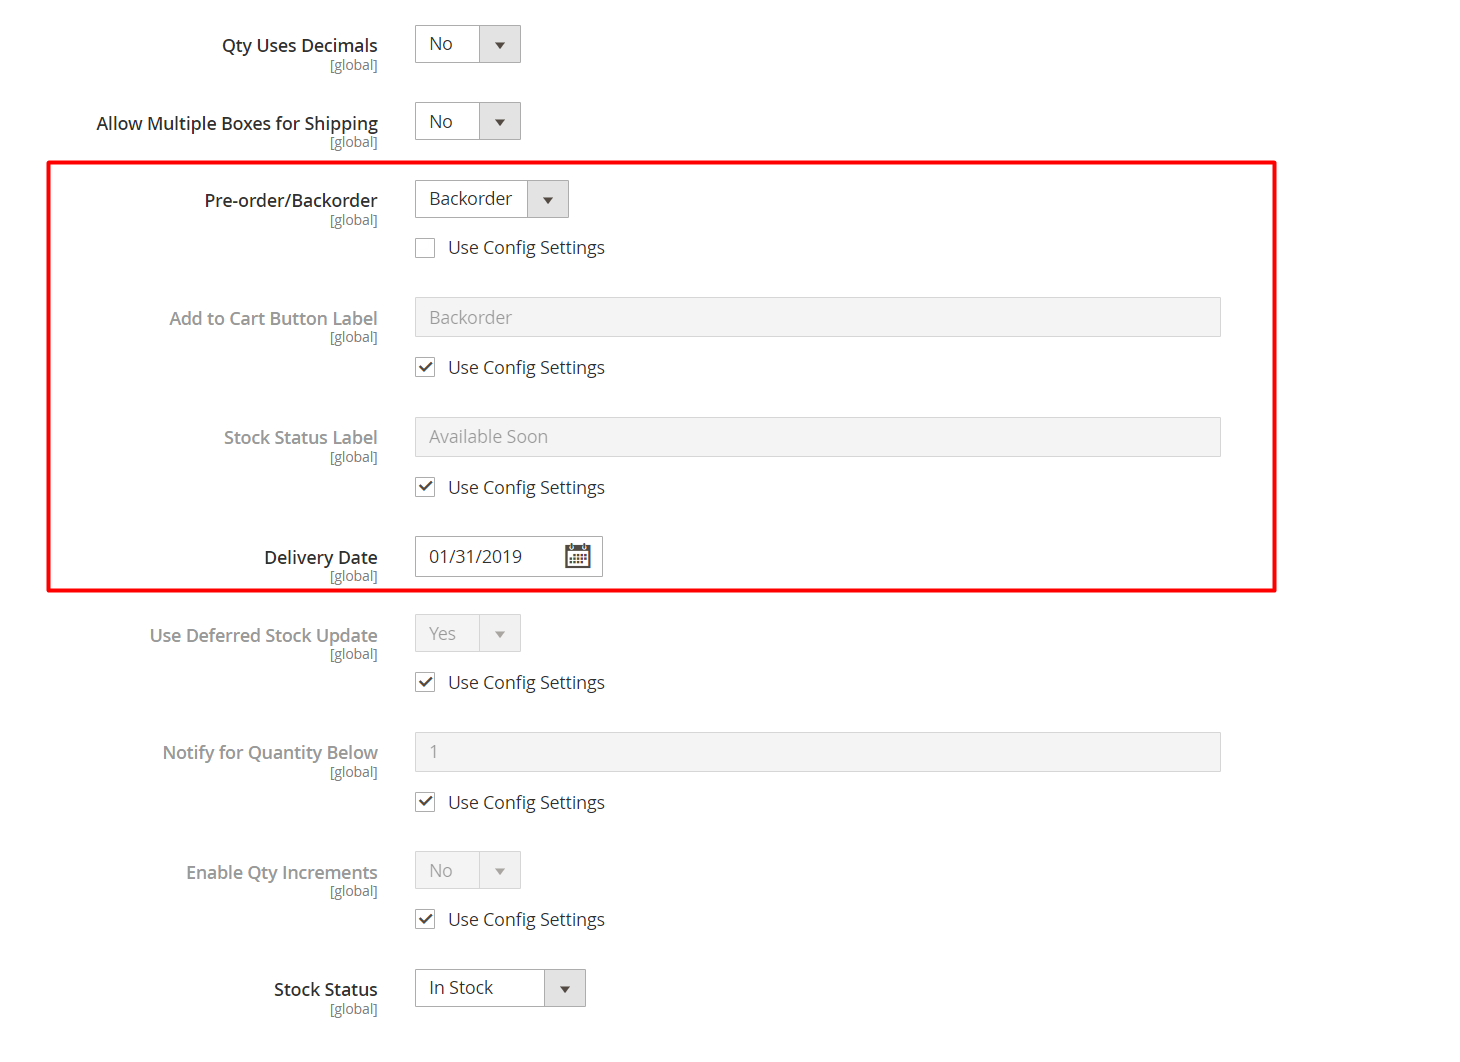
Pre-order/Back Order: - Select pre order or back order for each individual product. Priority will be given to the configuration of each product in this section first.
- Select None to not use pre order and back order with each product.
- You can select Use Config Settings to use the configuration in the Configuration section above.
Add to Cart Button Label: Enter the button name to replace Add to cart button with each product. If left blank, Add to cart button will be used. You can select Use Config Settings to use the configuration in the Configuration section above. If both configuration for each product and configuration in different Config section, priority will be given to configuration for each product first.
You can select Use Config Settings to use the configuration in the Configuration section above. If both configuration for each product and configuration in different Configuration section, priority will be given to configuration for each product first.
- Stock Status Label:
- Enter Stock Status Label to be displayed above the default label (eg "Back Order") with each product. For example: "Available Soon"
- If empty, no label will be shown. You can select Use Config Settings to use the configuration in the Configuration section above. If both configuration for each product and configuration in different Configuration section, priority will be given to configuration for each product first.
- This section relies on the Delivery Date field to get date information. Variables available:
- {{short_date}} - the delivery date set in short format. Ex: 11/20/2019.
- {{long_date}} - the delivery date in long format. Ex: Nov 20, 2019.
- {{day}} - number of days from current day to delivery date.
- Delivery Date: Choose a date to deliver goods with each product when stock is available or when stock is returned. And will announce the date of shipment based on the information of Stock Status Label field. If you leave the Delivery Date field blank, Stock Status Label will not be applied on all pages.
Notation
- When you want to remove the extension, you should use composer to run the command:
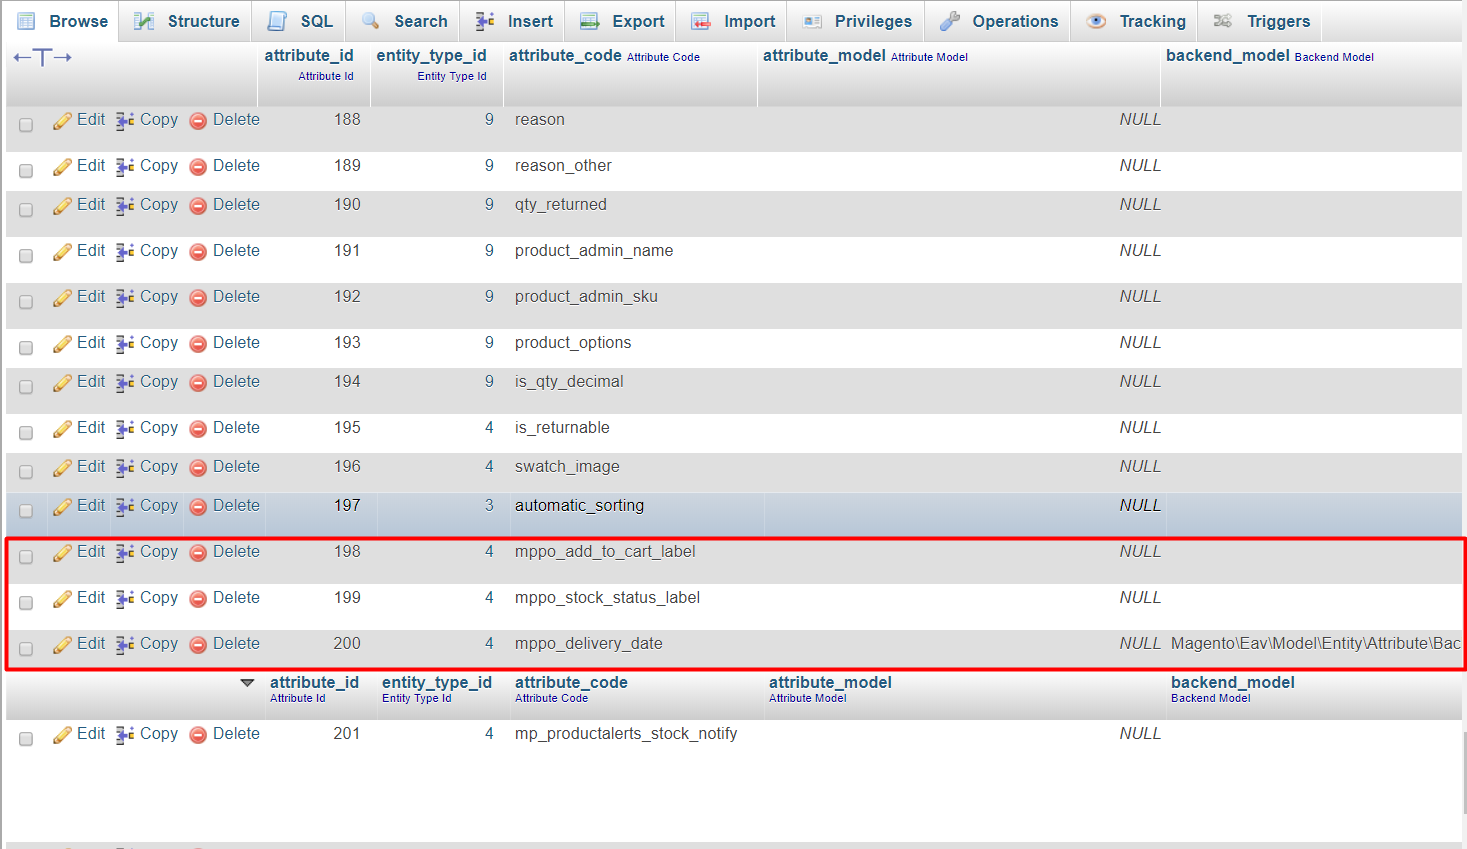
bin/magento module:uninstall Mageplaza_PreOrder - If you want to delete the extension, you need to delete more
mppo_add_to_cart_label,mppo_stock_status_labelandmppo_delivery_dateattribute in the database - Into the database to delete: Access to eav_attribute table. In the attribute_code column, you find and delete the attribute
mppo_add_to_cart_label,mppo_stock_status_labelandmppo_delivery_date
3. REST API
Mageplaza Pre Order Extension support using REST API to perform endpoints api which get information related to products, cart, orders available in Mageplaza Pre Order extension.
View detailed endpoints supported by Mageplaza Pre Order Extension here.
View REST API guidelines of Magento 2 here. View guidelines to create token here.
4. GraphQL
4.1. How to install
Run the following command in Magento 2 root folder:
composer require mageplaza/module-pre-order-graphql
php bin/magento setup:upgrade
php bin/magento setup:static-content:deploy
Note: Magento 2 Pre Order GraphQL requires installing Mageplaza Pre Order in your Magento installation.
4.2. How to use
To perform GraphQL queries in Magento, please do the following requirements:
Use Magento 2.3.x or higher. Set your site to developer mode.
Set GraphQL endpoint as
http://<magento2-server>/graphqlin url box, click Set endpoint. (e.g. http://dev.site.com/graphql)View details of queries supported by Mageplaza Pre Order GraphQL extension here