Salesforce
Overview
Salesforce is CRM (customer relationship management) software. It offers business applications focused on customer service, marketing automation, analytics and application development. Mageplaza Salesforce extension will help you fully integrate with Salesforce to connect and synchronize multiple or individual data information from Magento such as Customer, Product, Order, Catalog Price Rule to Salesforce with Account, Contact, Lead, Product, Order, Opportunity, Campaign. During the process of sending data to Salesforce, the admin can send it manually or automatically whenever there is any update.
How to download and install
- Download Salesforce extension
- Install magento 2 extension guide
How to use
Register Salesforce account:
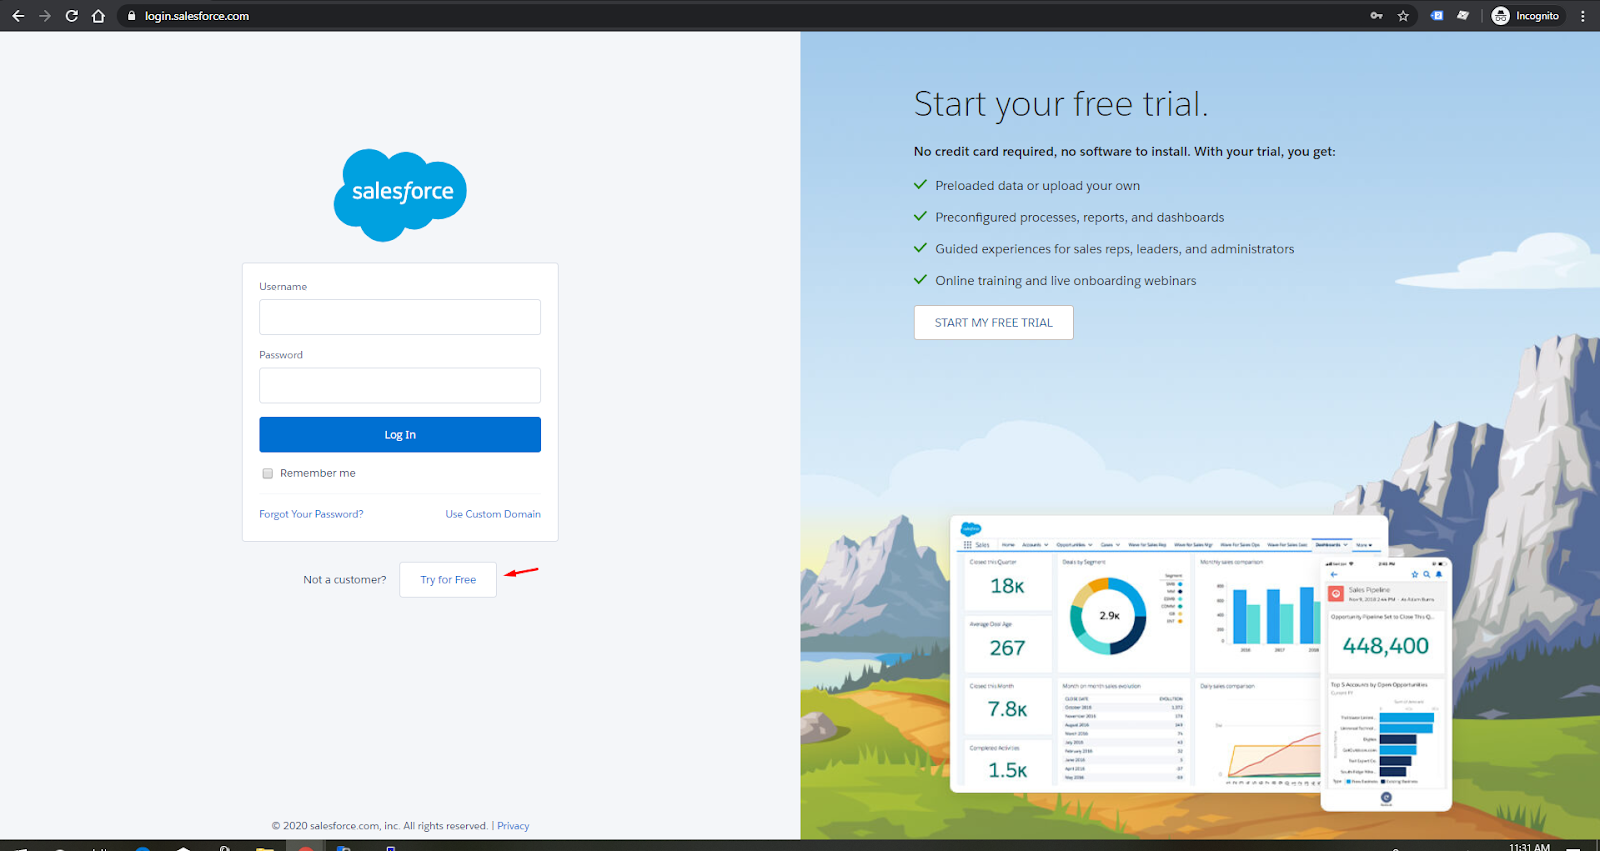
- To register a Salesforce account, visit this link.
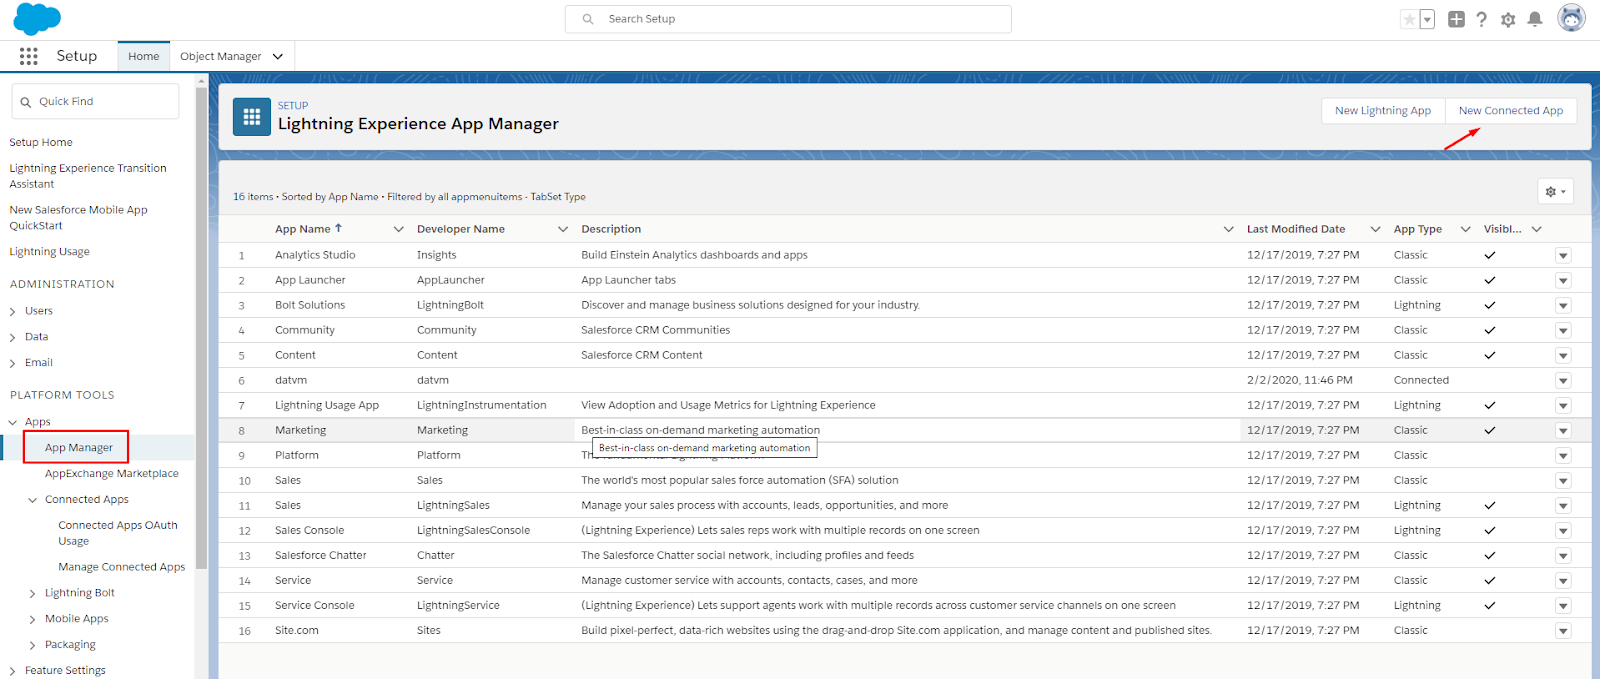
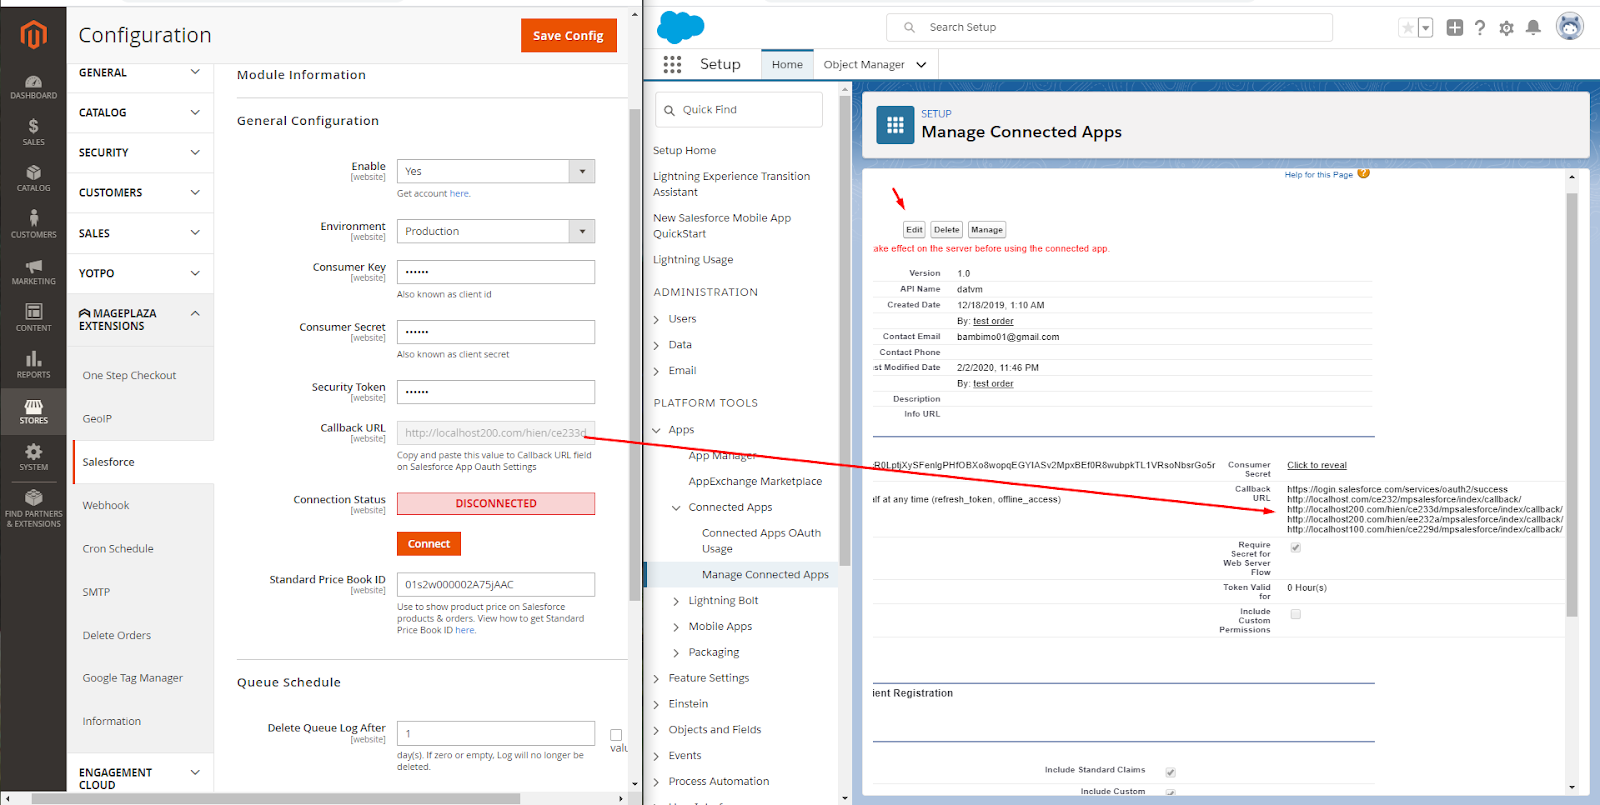
After registering an account, visit this link to create App Manager. Click New Connected APP button and enter all the necessary information to connect with Salesforce.
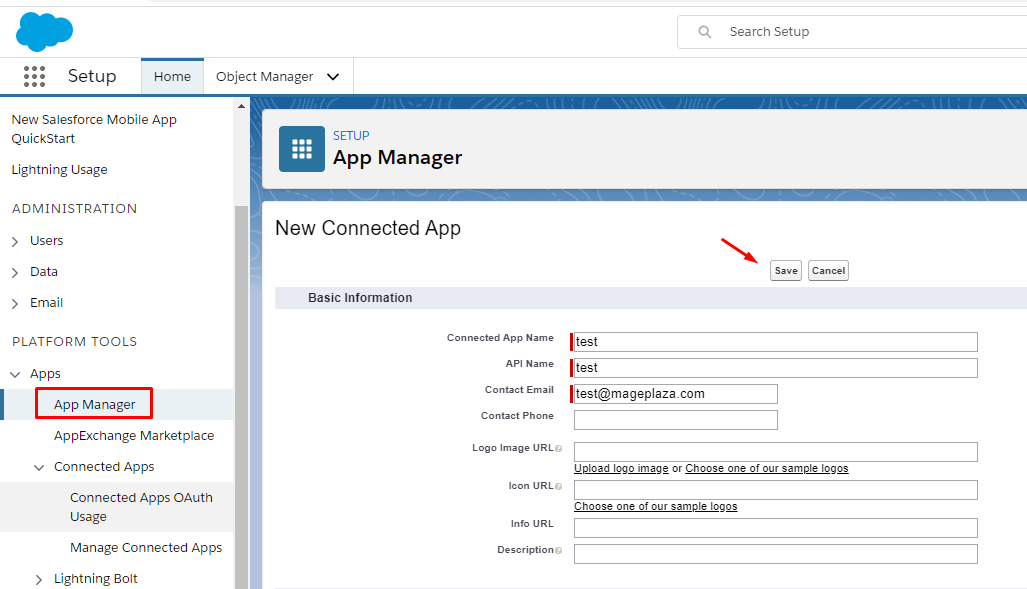
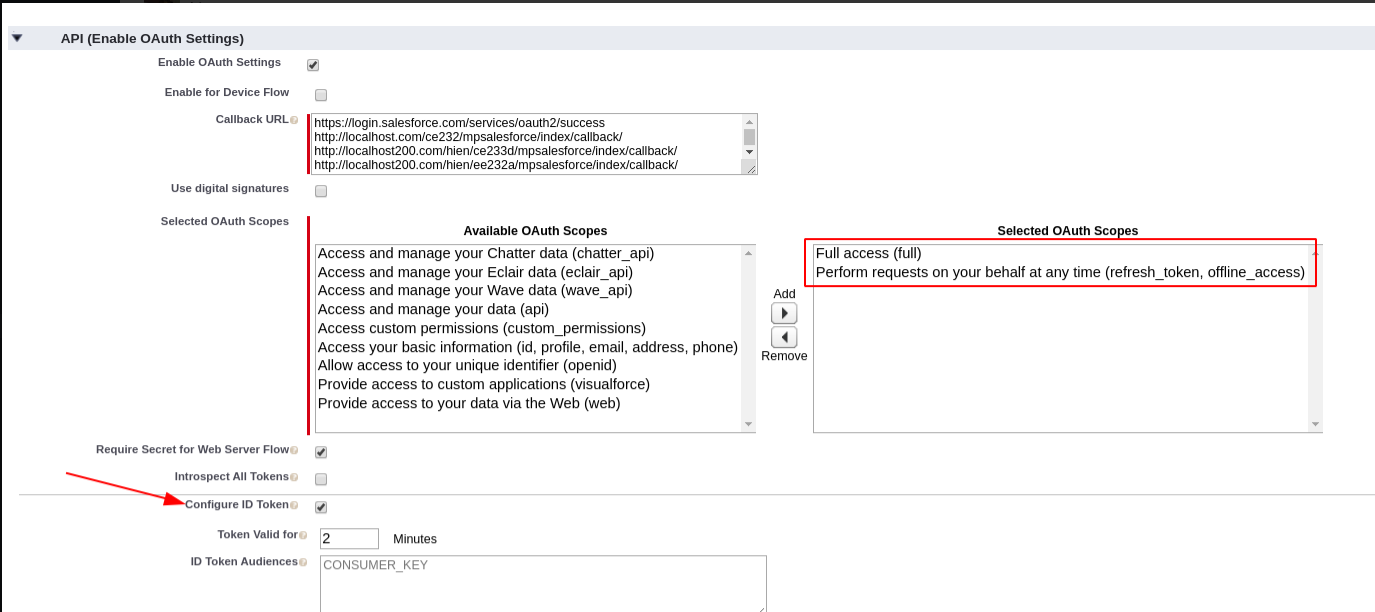
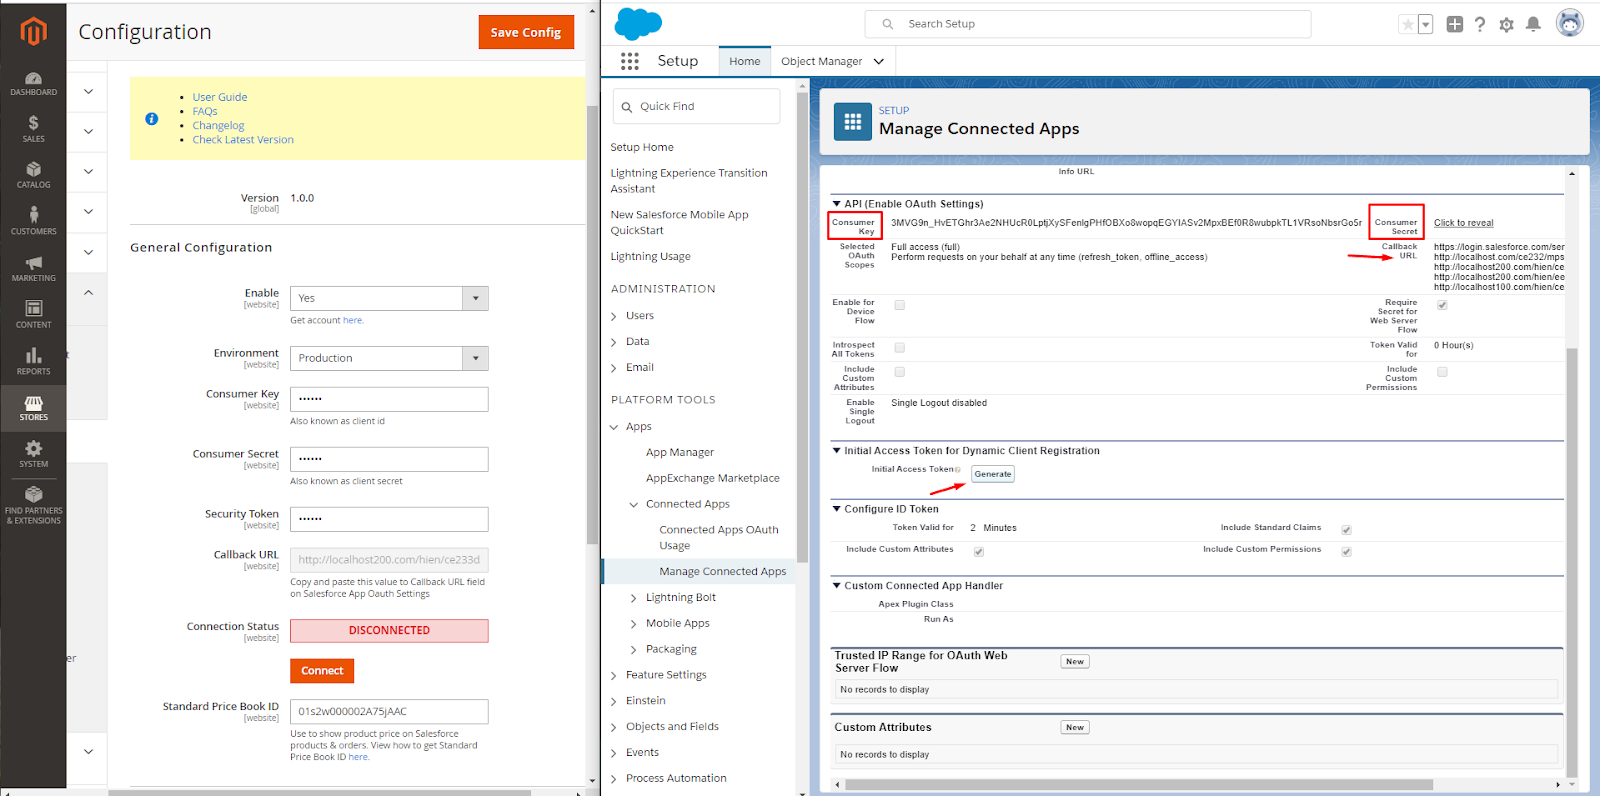
- After creating App Manager successfully, select View to see Consumer Key, Consumer Secret, and Security Token information. You need to save this information to be able to connect with Salesforce. For the Callback URL field, copy and paste the information of the Callback URL field in Salesforce. Note: Wait about 2-10 minutes so that the changed values will be connected to each other.

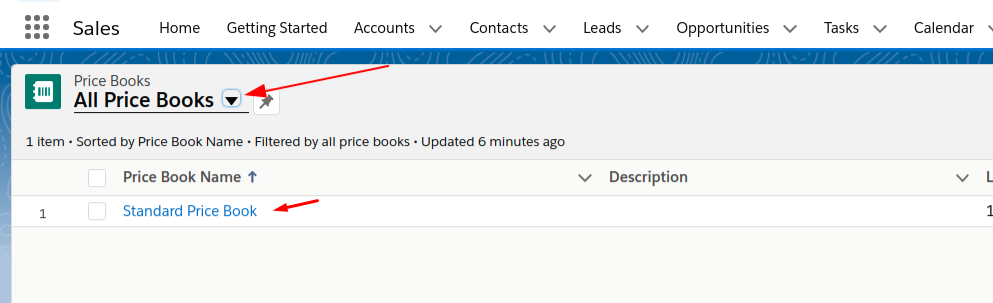
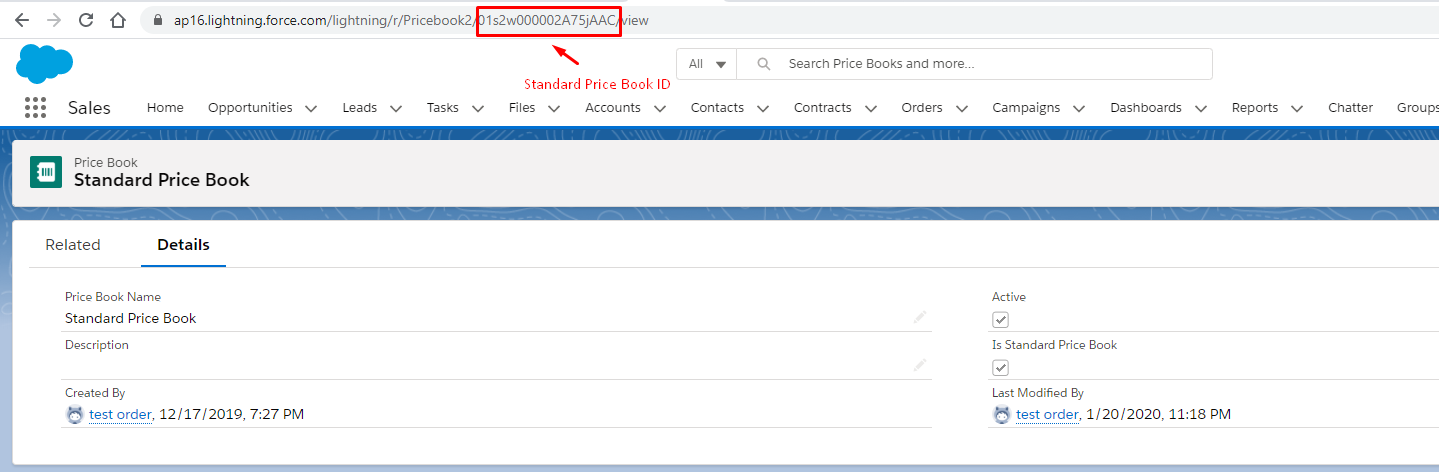
Get Standard Price Book ID
- At Price Books, click All Price Books and slelect Standard Price Book to get the Standard Price Book ID. Ater that, you can connect to Salesforce, when synchronizing data will show product prices on each product and its order at Salesforce.
How to Configure
1. Configuration
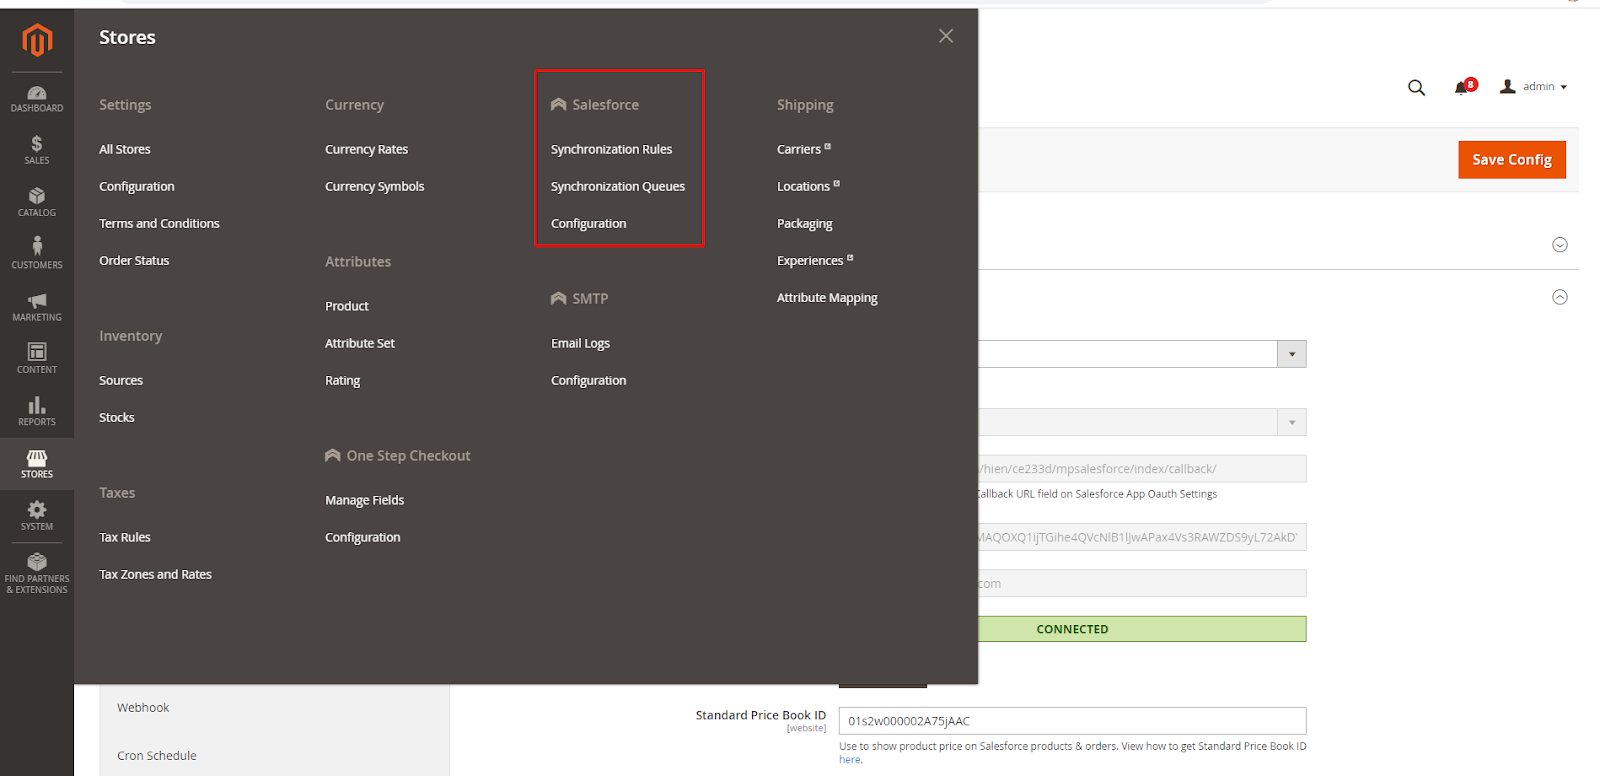
Login to the Magento Admin, choose Stores > Salesforce > Configuration.
1.1. General Configuration
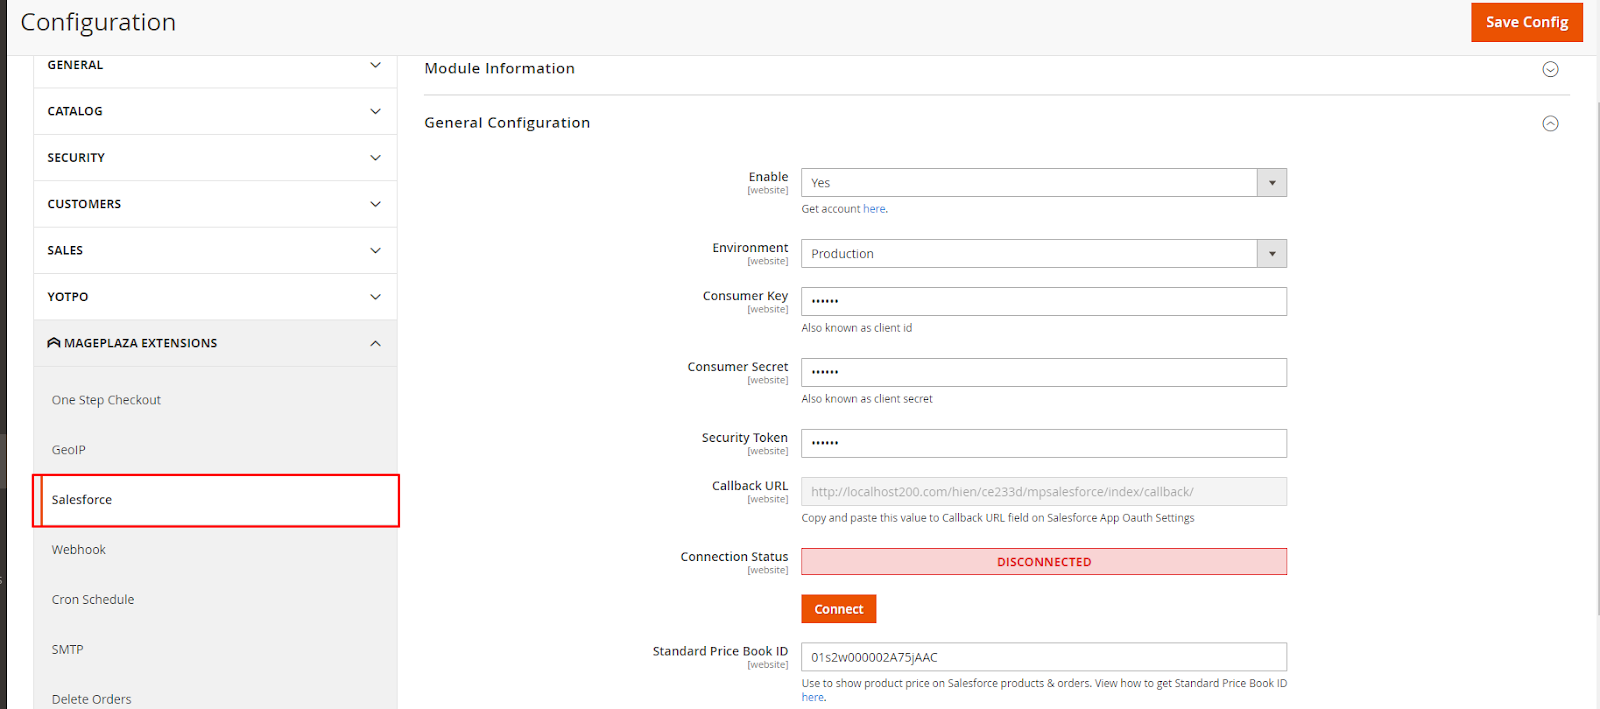
- Enabled: Select "Yes" to enable the module to synchronize data from Magento object to Salesforce.
- Environment:
- Admin can select Sandbox environment to test data synchronization feature on Salesforce.
- When you want to apply online data synchronization, the admin needs to move the environment to Production.
- Consumer Key:
- Enter the key obtained in Salesforce into the Consumer Key field to connect Magento to Salesforce.
- Leaving it blank or entering the wrong key will not sync data with Salesforce.
- Consumer Secret:
- Enter Consumer Secret obtained from Salesforce.
- Leaving the field blank will not connect to Salesforce.
- Security Token:
- Enter Security Token from Salesforce.
- Leaving it blank will not connect to Salesforce.
- Callback URL:
- With the value of this field, copy and paste the Callback URL field information in Salesforce. Note: Wait about 2-10 minutes, the changed values will be connected to each other.
- Connection Status: this field information shows the status of Connect or Disconnect with Salesforce.
- Click Connect button to connect and synchronize data on Salesforce. Once Magento has been connected to the Salesforce account, will display the fields information: Access Token and Instance URL.
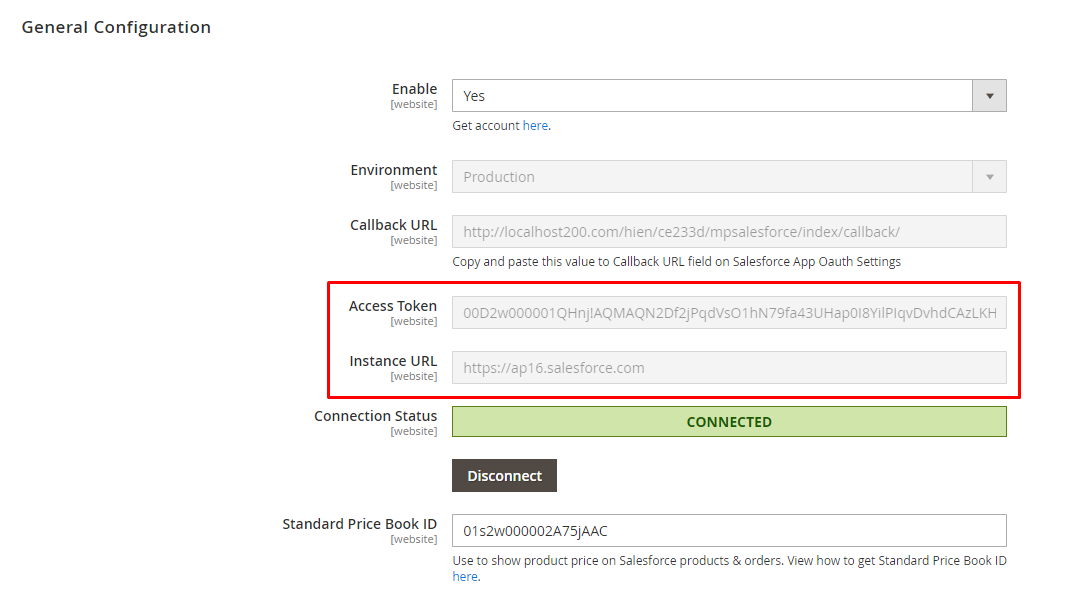
- Standard Price Book ID:
- Enter the correct Standard Price Book ID to display product prices on Salesforce products and orders.
- If entered incorrectly or left blank, the product price will not be displayed when synchronizing from Magento to Salesforce.
1.2. Queue Schedule
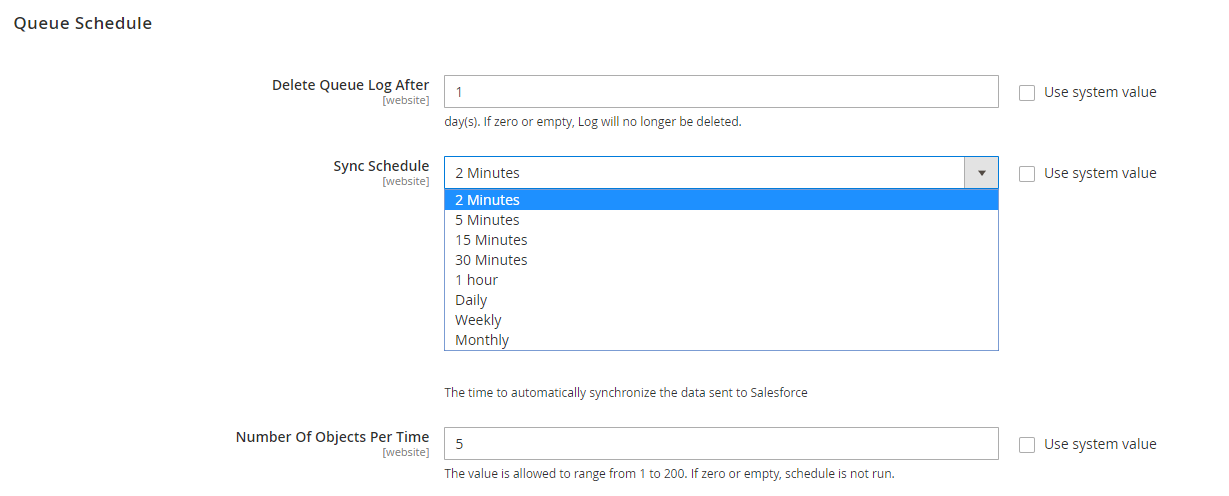
- Delete Queue Log After:
- Enter day(s) in the Delete Queue Log After field. The synchronized queue has the status of Success, then after the entered time period will automatically be deleted. For example: If you enter 6 days, the queues have the status of Success, then after 6 days will be automatically deleted.
- If empty, queue log will no longer be deleted.
- Sync Schedule: Select the time to automatically synchronize data sent to the Salesforce object. The modified Magento object will be sent to the Salesforce object, whereas the unchanged data will not be sent to the Salesforce object anymore.
- Number Of Objects Send Per Time:
- Enter the number of objects to limit the number of objects each time sending data to the Salesforce object into the Number Of Objects Send Per Time field. Queue which is added first will be given priority to send to the Salesforce object first. The value is allowed to range from 1 to 1000.
- If empty or zero, schedule is not run.
2. Manage Sync Rules
Login to the Magento Admin, choose Stores > Salesforce > Synchronization Rules
2.1. Grid
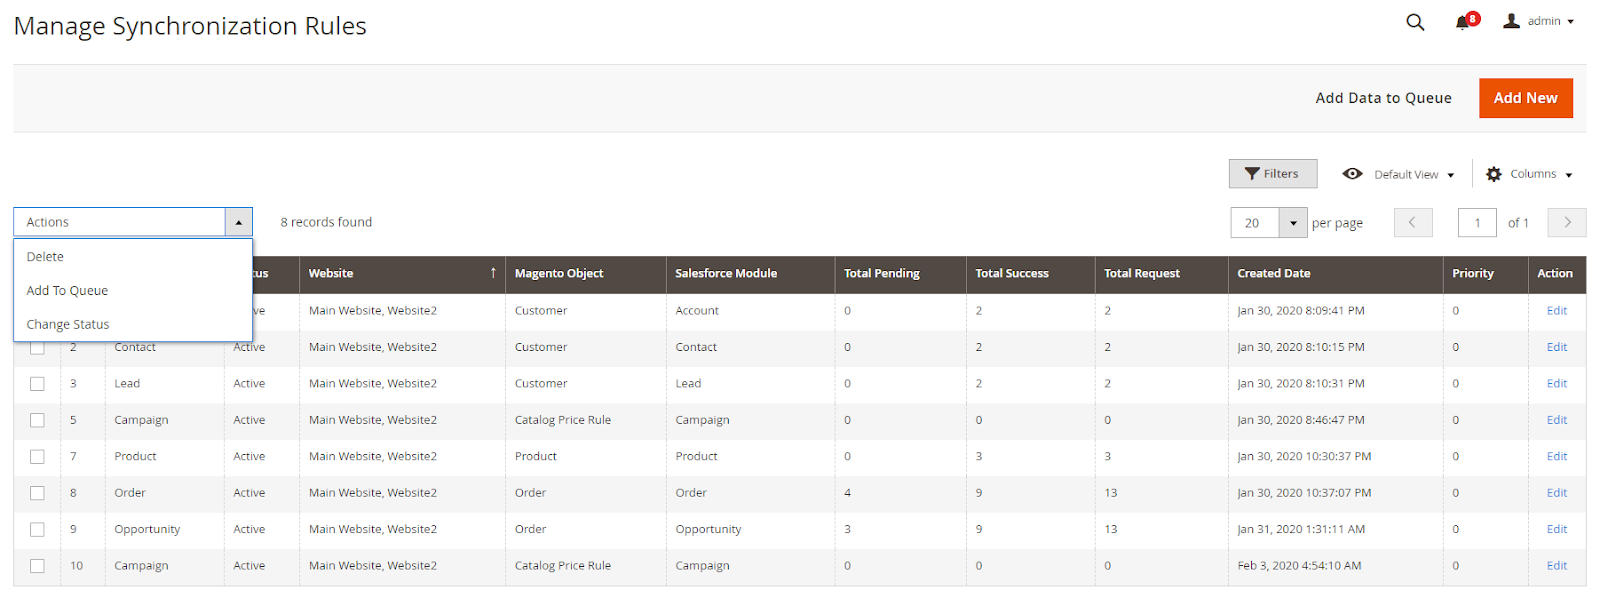
- Here record Sync Rules information including Name, Magento Object, Salesforce Object, Website, Total Success, Total Request (including status as error and success), Total Pending, etc.
- Click Add new button to create new rules. After creating the rules, you can choose edit to edit the rules. Also admin can delete rules, change status (Enable/Disable), filter, so on.
- Select Add Data to Queue to add data to Queue. Or with the MassAction, the admin can sync one or multiple rules at the same time when clicking Add To Queue.
- Note:
- When installing Mageplaza Salesforce and creating Synchronization Rules, click Add Data to Queue to bring the previous data into the queue and synchronize the data on the Salesforce .
- If you want to syn order to Salesforce, you should sync customer and product before it to avoid errors.
2.2. Create Sync Rule
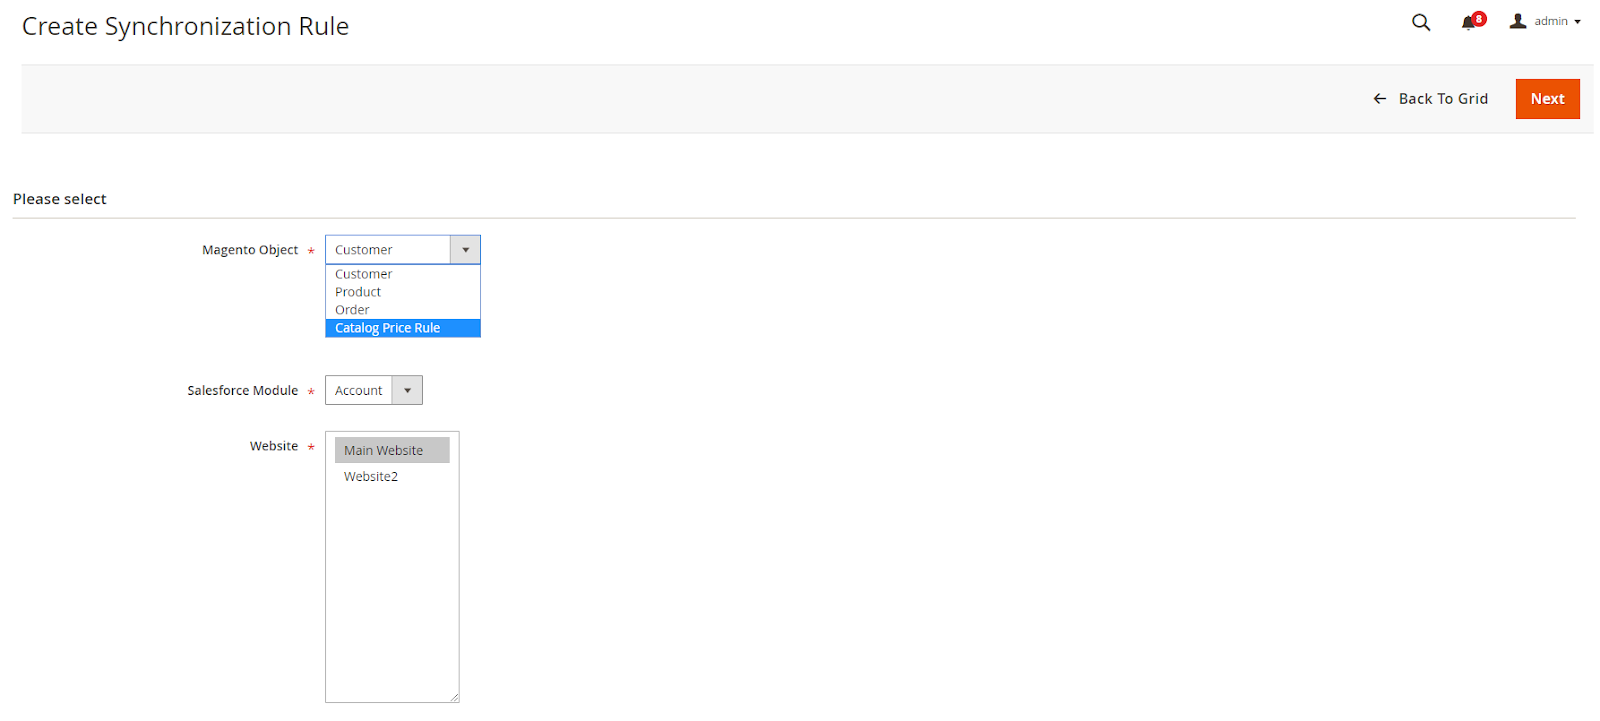
- Magento Object: Select the Magento Object to retrieve nd submit it to Salesforce .
- Salesforce Module: Here will display Salesforce Module corresponding to the Magento Object selected. For example: Magento Object is Customer, so the data information submitted corresponding to Salesforce Module can be selected as Accounts, Leads, Contacts.
- Website: Select Website to get Magento Object for submission to the Salesforce Module. Magento objects from non-selected websites will not be synchronized.
- After selecting the object, click Next to start the Form create/edit Sync Rule
2.2.1. General
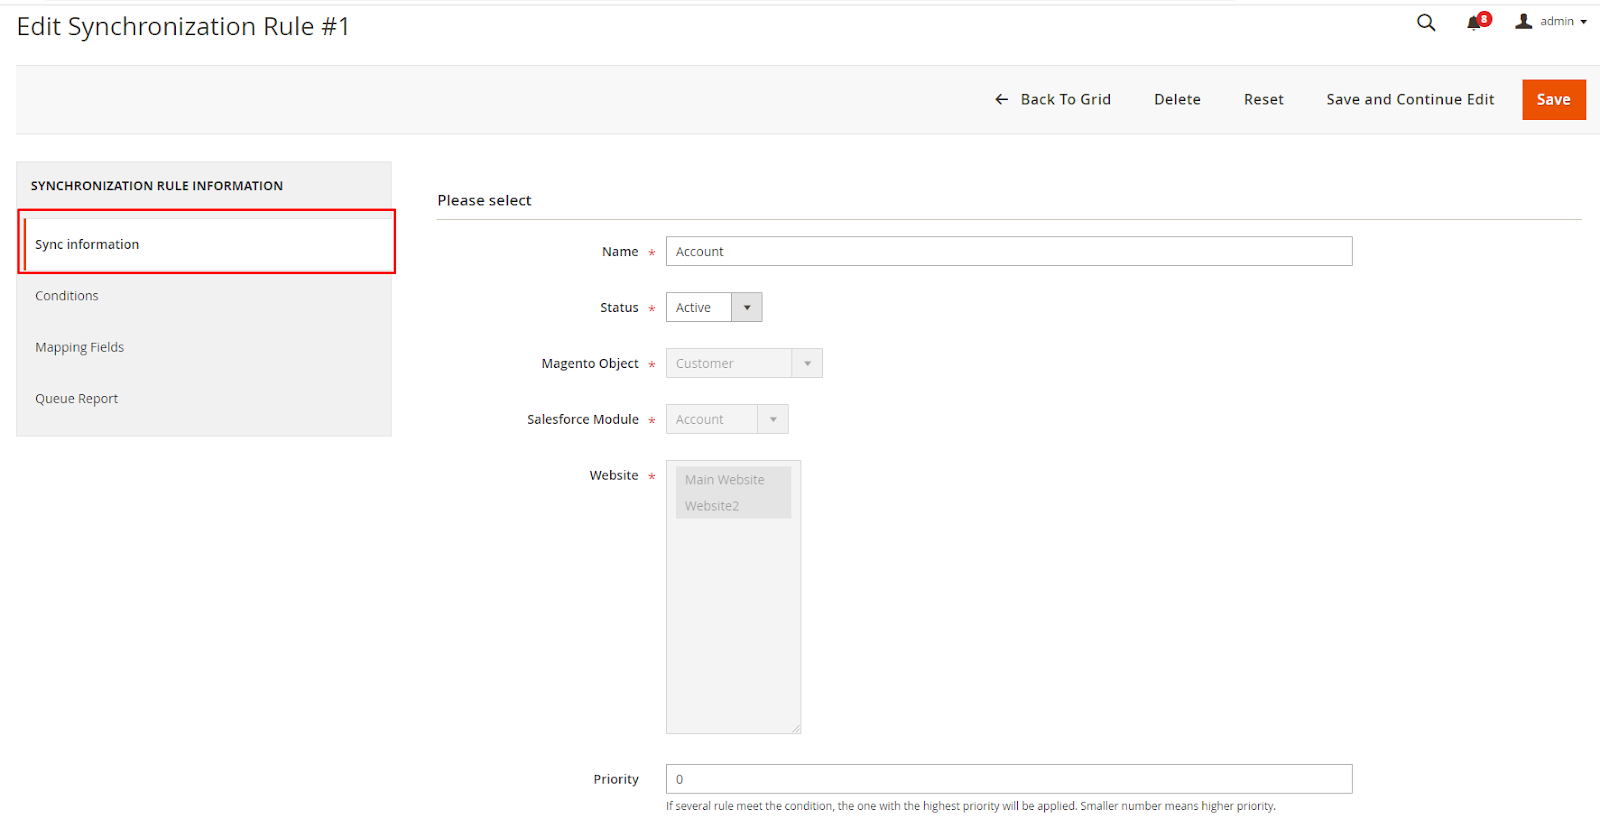
- Name:
- Enter the name that is applied to the Sync rules
- This is a Required field.
- Status: Select Active to make the rules active and synchronize the data on the Salesforce Object.
- Magento Object, Salesforce Object, Website data are retrieved according to the above object information before creating sync rules and the information is only changed when the admin changes the object information before creating.
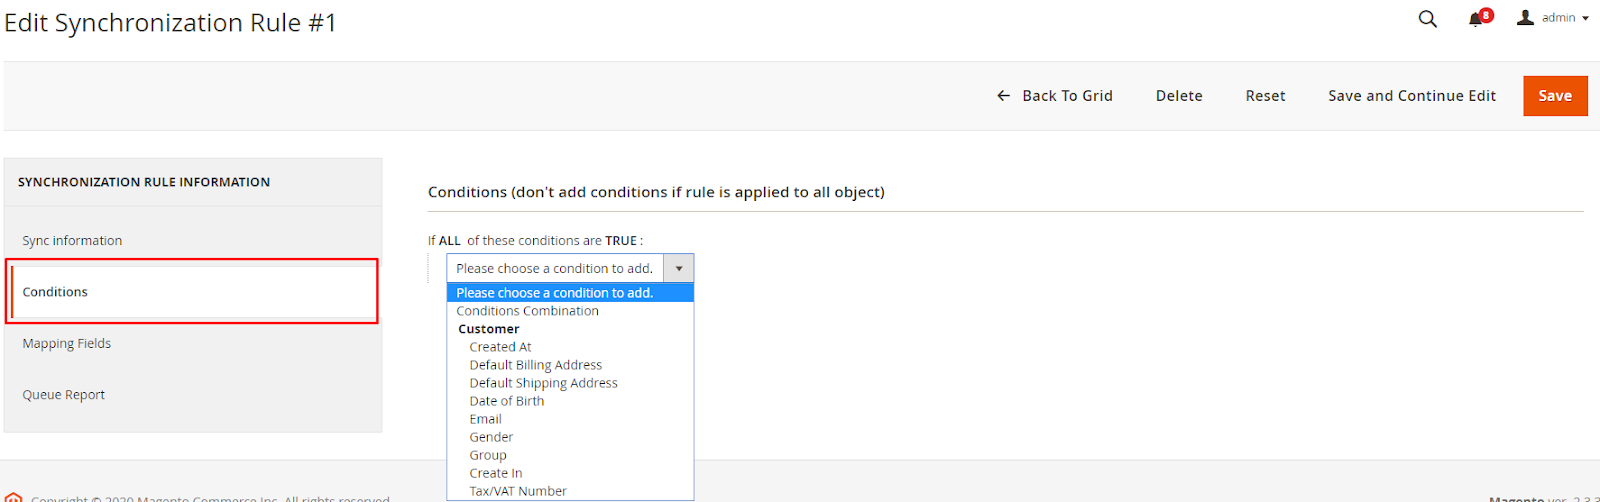
2.2.2. Conditions
- Select the condition to filter the data that the admin wants to sync to Salesforce. Those data that meet the conditions will be put into Manage Synchronization Queues to synchronize data and vice versa.
- Note: Each rule will have different options and conditions.
2.2.3. Mapping Fields
- Here, select the information of the corresponding Magento fields to submit data to the Salesforce .
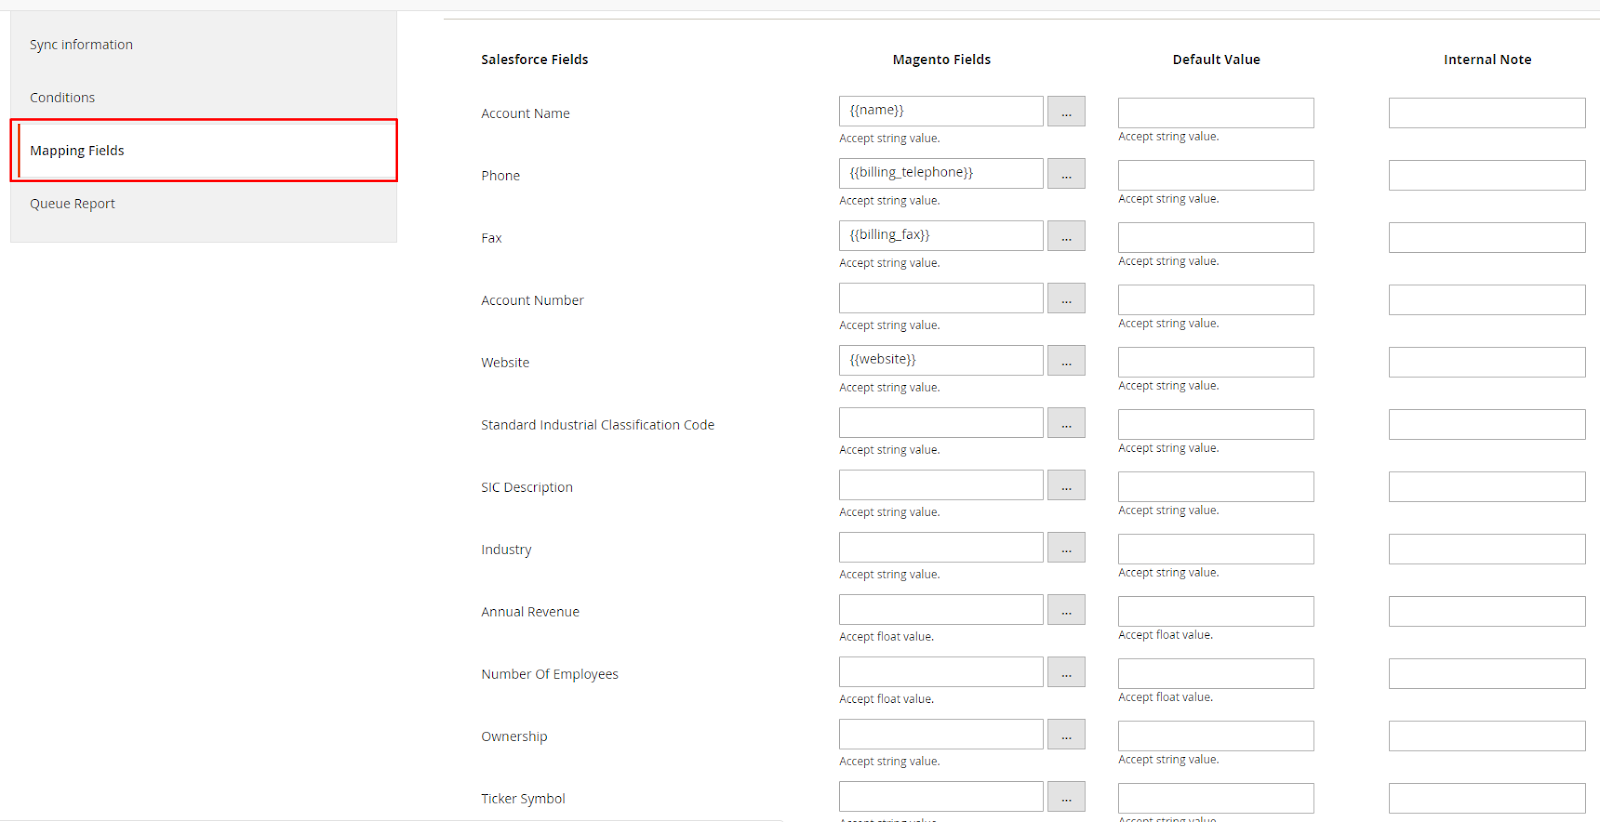
- Salesforce Fields: Displays fields managed by Salesforce for this module according to the selected Magento Object. Fields of Salesforce Field vary depending on the selected Magento Object such as Customer, Product.
- Magento Fields
- Enter the fields of the corresponding magento object to push the data corresponding to the fields of the Salesforce object.
- Leaving this column blank will take the Default Value field value to be applied to the Salesforce object.
- Internal Note: Enter a description in the Internal Note field. This section is only for admin note information with this rule.
- Insert Variables: Select the fields of the Magento object that correspond to the fields of the Salesforce object.
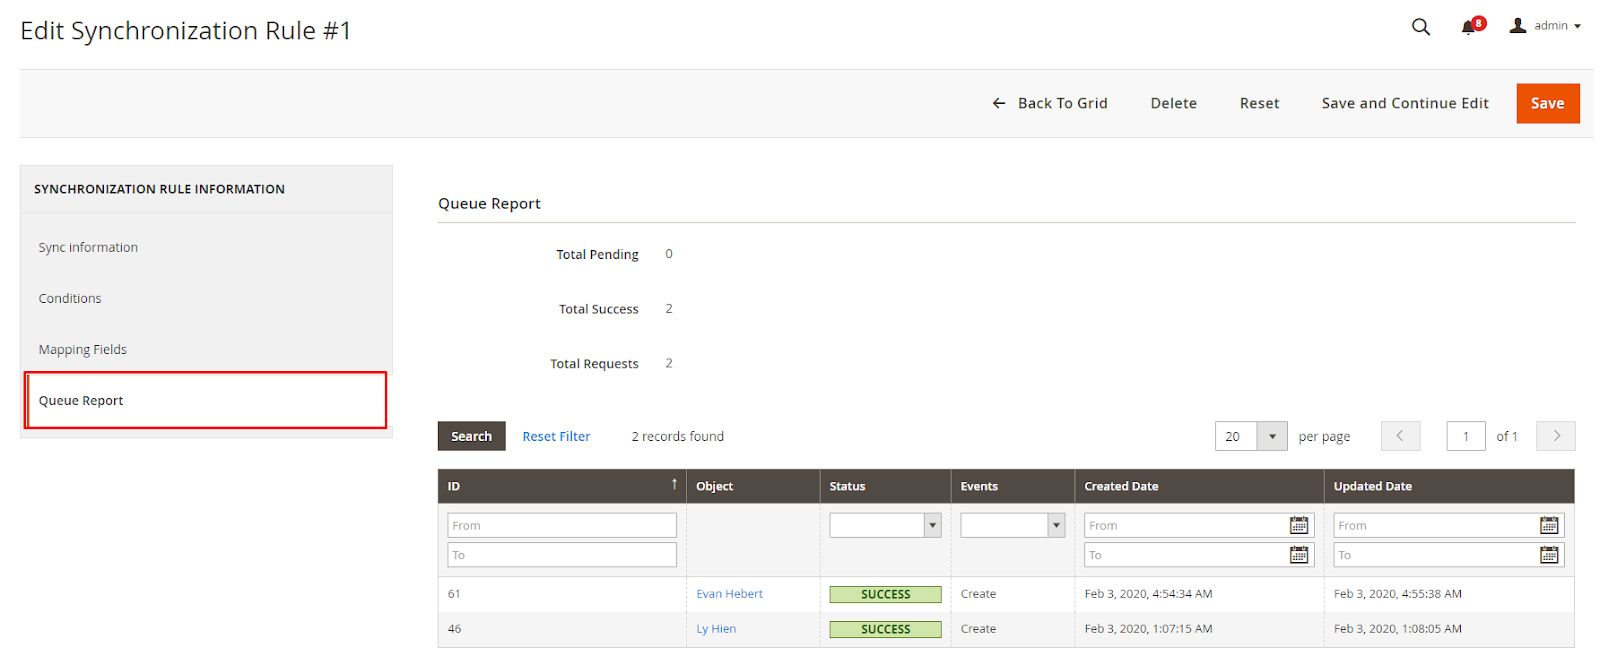
2.2.4. Queue Report
- Here record the Queue information with each rule including the following information: Object, Created Date, Status, Updated Date, etc. Statistical information with Total Pending, Total Success, Total Request (total Queue includes success and error ). After Save and Continue Edit/Save will display the Queue Report tab.
- Note: With Created Date is the time data is entered into the Queue. Updated Date is the time when the queue is synchronized to Salesforce .
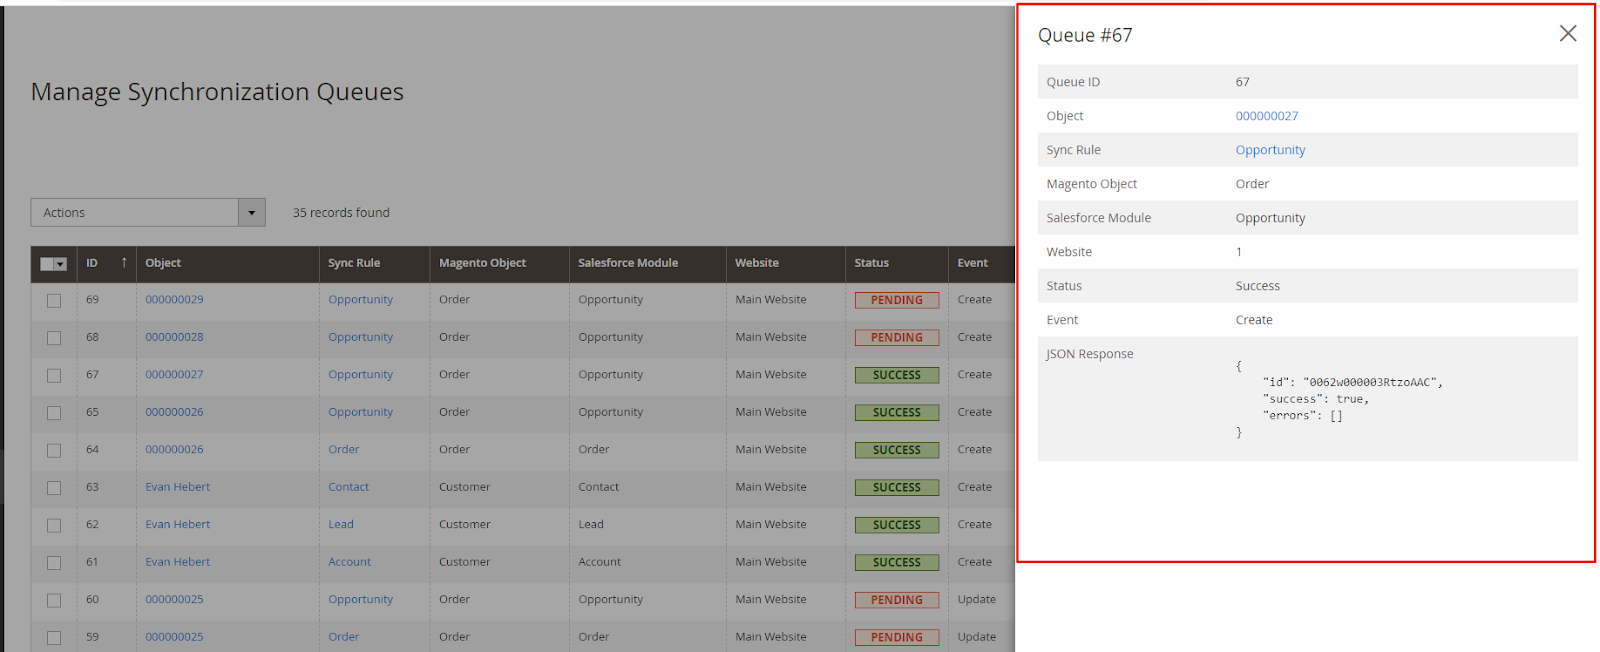
3. Manage Synchronization Queues
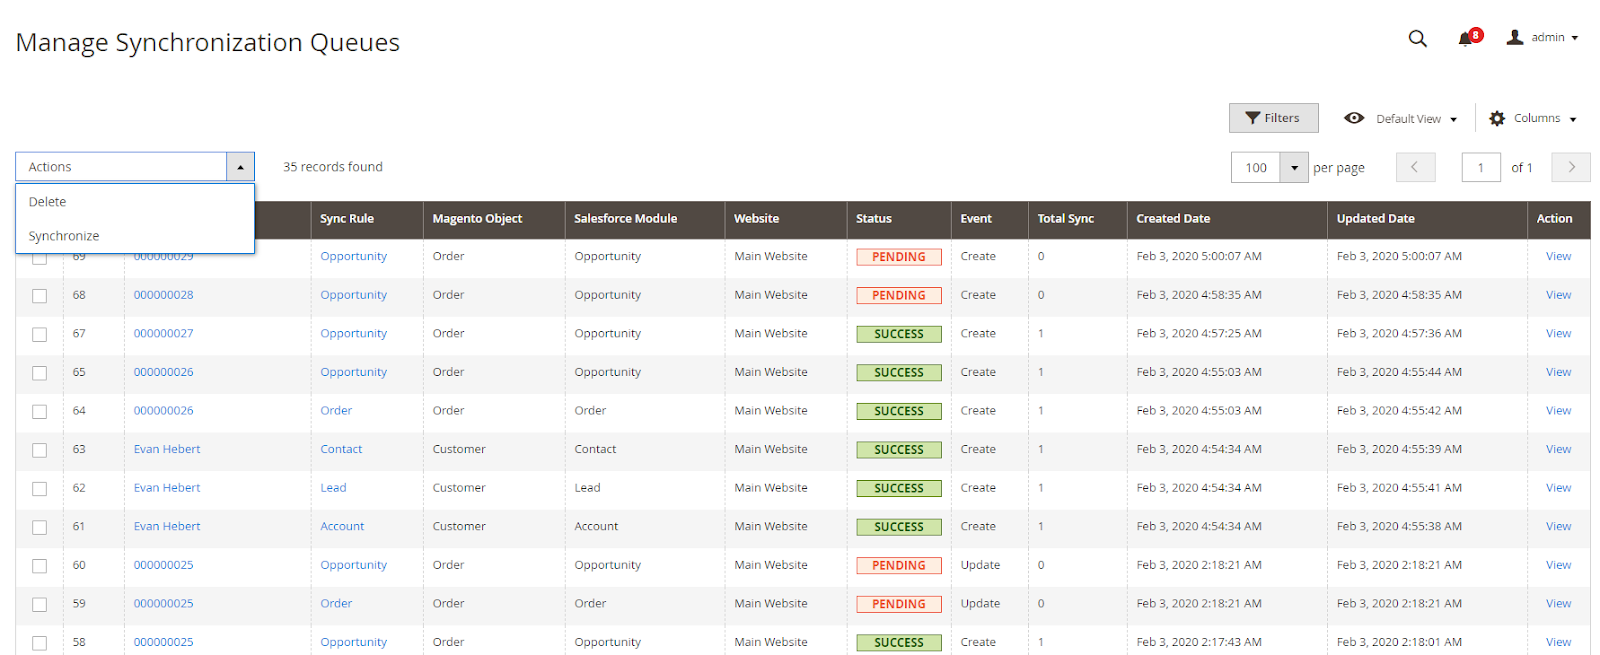
- This section records information of Queue including Object information, Sync Rule, Magento Object, Salesforce Object, etc.
- Here admin can synchronize all data or select each data included in queue to sync to Salesforce. All data changes such as create, update, delete are included in Queue.
- When clicking on View, will display Popup View Queue to view the full information of each Queue. Select Delete to delete Queue.
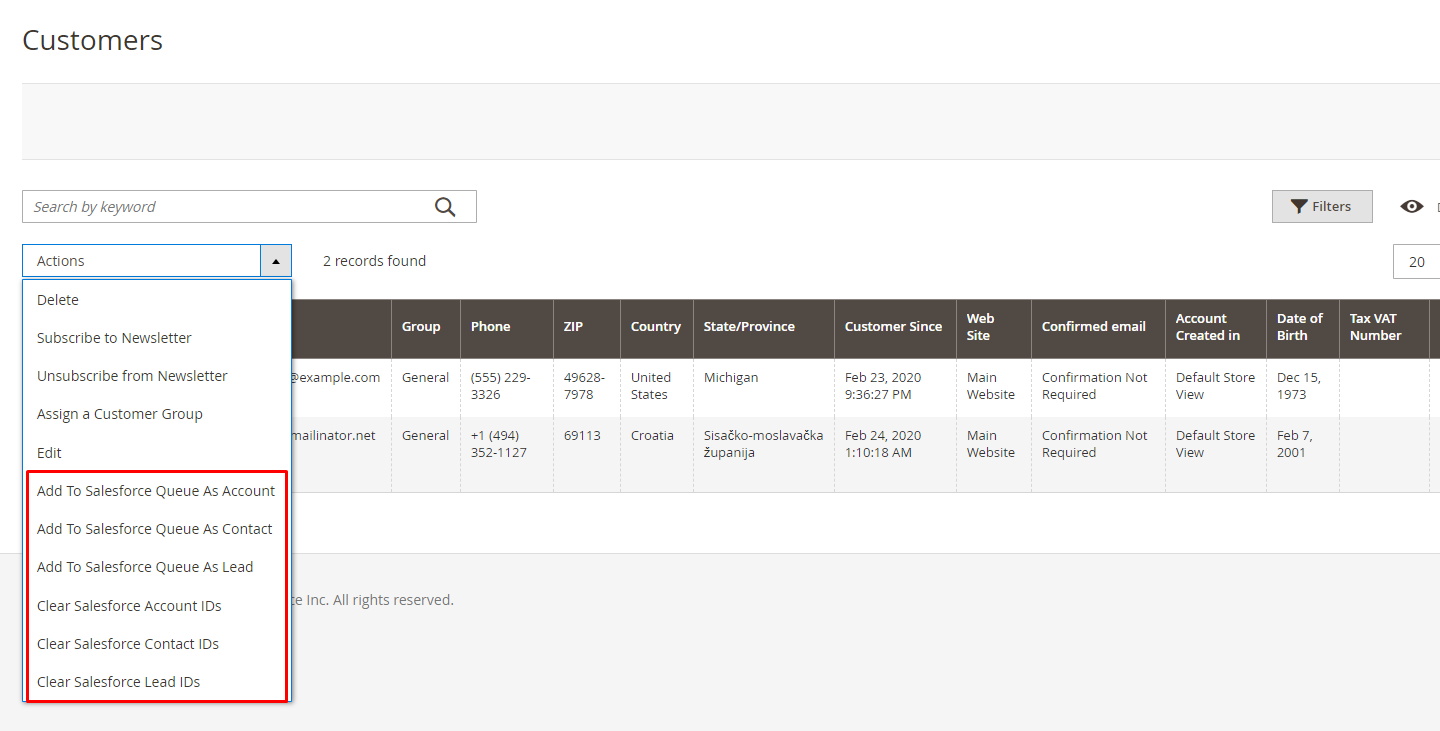
4. Customer, Product, Order, Catalog Price Rule
4.1. Grid
Here admin can synchronize multiple data or each data information by event: product, order, catalog price rule. For customer data such as Account, Lead, Contact and Order including order and Opportunity, these data will be put into the Manage Synchronization Queues to synchronize data. This feature will help admin perform synchronized data selection according to each customer data, each product more quickly and conveniently.
To remove Salesforce id from Magento objects, you can select Clear Salesforce Account IDs, Clear Salesforce Lead IDs. This will help to avoid sync errors when having salesforce ids coinsidence and some other errors.
4.2. Edit
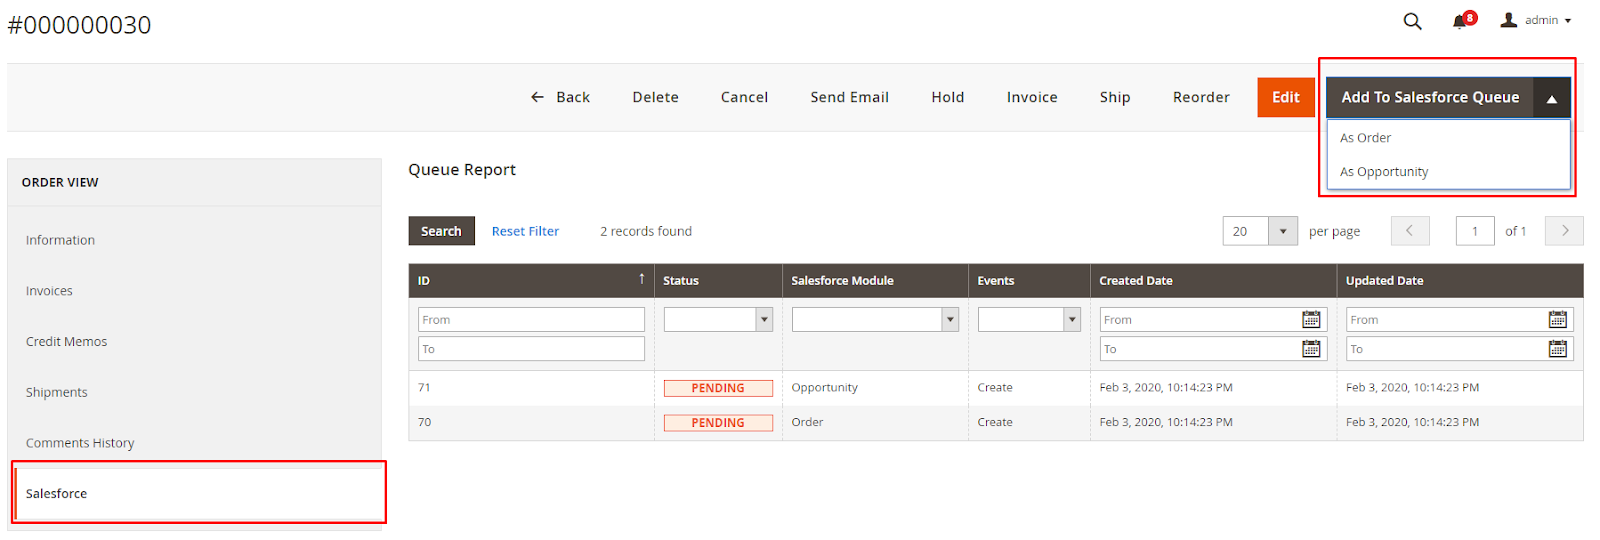
- With the data available before, admin can Add To Salesforce Queue with As Account, As Lead, As Contact, Order to put data into Manage Queue and synchronize data.
- Will display more Salesforce tab when editing into customer account data, order. This grid shows statistics and displays a list of queues with each data information, including information: Status, Salesforce Module, Event, Created Date, Updated Date, etc. Also, the admin can filter, search at those columns.