PDF Invoice
Overview
Mageplaza offers a solution to help customers easily print, download PDF Invoice, PDF Order, PDF Shipment, PDF Credit Memo quickly and easily with just a single click on the customer information page. To enhance user experience, PDF files are included in emails to customers. In addition, Mageplaza also adds the HTML edit feature so shop owners can customize their PDF files, and Preview function also allows them to take an overview look at the newly created design conveniently.
Outstanding Features
| Outstanding Features | Description | |
|---|---|---|
| 1 | Download and Print | Both store admins and customers can download and print or mass-print all documents, including orders, invoices, s, and credit memos. |
| 2 | Highly Customizable Templates | Offer multiple pre-designed templates. Admins can configure several details, such as the template's basic design and style. Besides, admins can edit CSS and HTML to customize the templates. A preview button also allows admins to view the template without moving to another page. |
| 3 | QR code and barcode | Ability to include product images and QR codes in the PDF helps customers easily scan to view orders or product information |
Installation Guide
We offer two methods for installing our plugins: the Copy & Paste method and the Composer method. Please follow the detailed instructions provided below.
Method 1: Installation via Copy & Paste
To install our plugins using the Copy & Paste method, kindly follow the instructions at the link below:
How to Install Magento 2 Extension via Copy & Paste
Method 2: Installation via Composer
Composer name: mageplaza/module-pdf-invoice
To install our extensions using Composer, please refer to the comprehensive guide at the link below:
How to Install Magento Extension via Composer
By following these guides, you can ensure that the installation process is handled correctly, allowing you to fully utilize the features and benefits of our plugins.
Module Update Guide
Keeping your module updated ensures optimal performance. Follow one of these steps to update your module:
By Account Dashboard: Log in to your Mageplaza account > go to the My Licenses section > click on the Download button > choose the latest version from the popup.
By composer: Kindly use the following commands to update module via composer
composer require mageplaza/module-pdf-invoice
php bin/magento setup:upgrade
php bin/magento setup:di:compile
Updating a module by Composer ensures efficient dependency management, version control, and integration with development tools, making the process faster and more reliable.
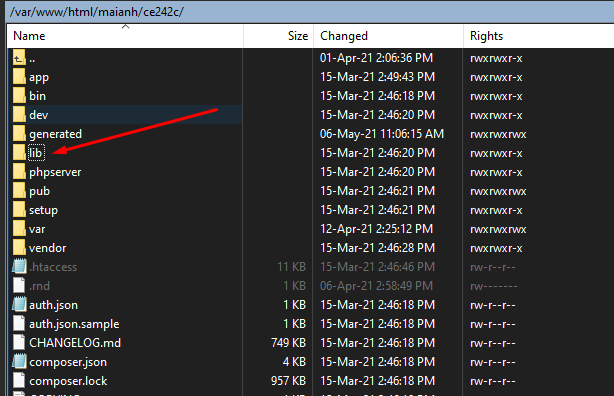
Note: To use the full feature of PDF Invoice, you need to get the full font of the library here. After downloading and unzipping the library, you just need to drag and drop the unzipped folder into the lib directory:
You can also directly download the library here.
How to configure
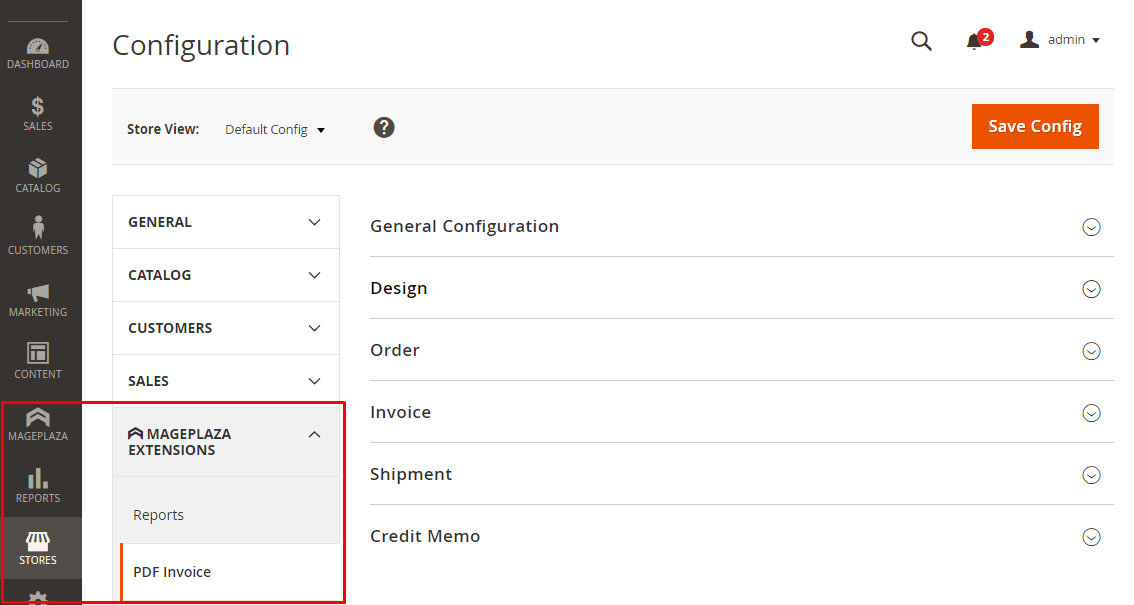
Log in to your Magento Admin, follow the path Store > Setting > Configuration > Mageplaza Extensions > PDF Invoice
1. Configuration.
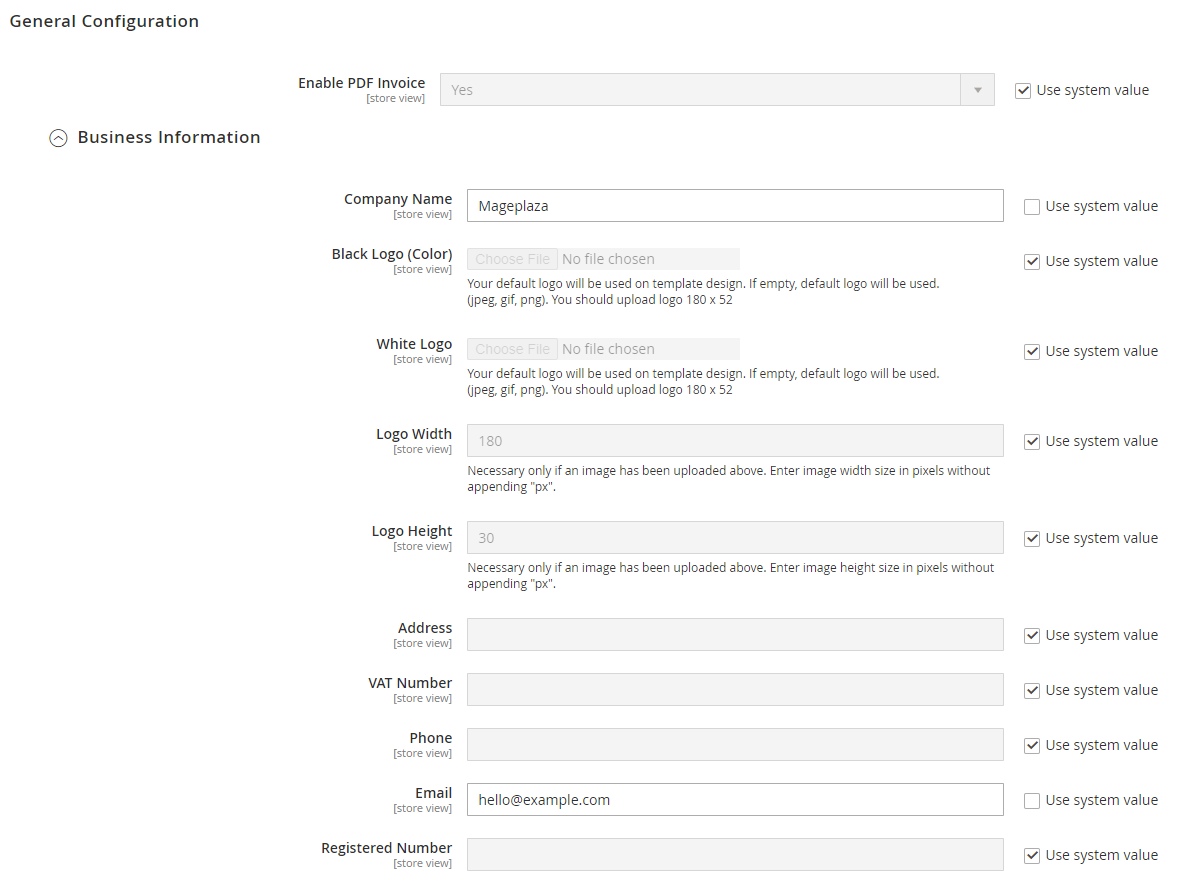
1.1. General Configuration
Keep going from Store > Setting > Configuration > Mageplaza Extensions > PDF Invoice > General Configuration, expand the section
- In Enable PDF Invoice field:
- Uncheck the Use system value to configure the extension. Choose “Yes” to enable it
- Tick Use system value again to use “Enable PDF Invoice = Yes” as your default.
- Expand Business Information field:
- In Company Name field:
- Enter your company/store name; it will be displayed in your PDF invoice.
- If you leave it blank, the Company Name place won’t have a name.
- Check Use system value to use it as default.
- In Black Logo (Color):
- Choose the logo shown on PDF Template 1. Only allow choosing a logo for image format: jpeg, gif, png.
- Use the default logo if you leave this field blank
- In White Logo
- Choose the logo shown on PDF Template 2. Only allow choosing a logo for image format: jpeg, gif, png.
- Use the default logo if you leave this field blank
- In Logo Width field:
- Select the size for your logo (pixel)
- If you leave it blank, the default width is 180px
- Check Use system value to use 180px as default logo width.
- In Logo Height field:
- Select the size for your logo (pixel)
- If you leave it blank, the default width is 30px
- Check Use system value to use 30px as default logo width.
- In Address field:
- This is the place where you can fill in your company/store’s address, this will be displayed in the PDF invoice file.
- If you leave it blank, address information won’t be seen.
- Check Use system value to use it as default.
- In VAT number field:
- Enter your company/store’s VAT number to perform it on the PDF file.
- There won’t be VAT number displayed if you leave it blank.
- Check Use system value to use it as default.
- In Phone field:
- Enter your company/store’s phone numbers.
- If you leave it blank, phone numbers won’t be seen.
- Check Use system value to use it as default.
- In Email field:
- Enter your company/store’s official email address.
- There won’t be an email displayed if you leave it blank.
- Check Use system value to use it as default.
- In Registered Number field:
- Enter your company/store’s business number in this field.
- If you leave it blank, PDF invoice file won’t display it.
- Check Use system value to use it as default.
- In Company Name field:
1.2. Design
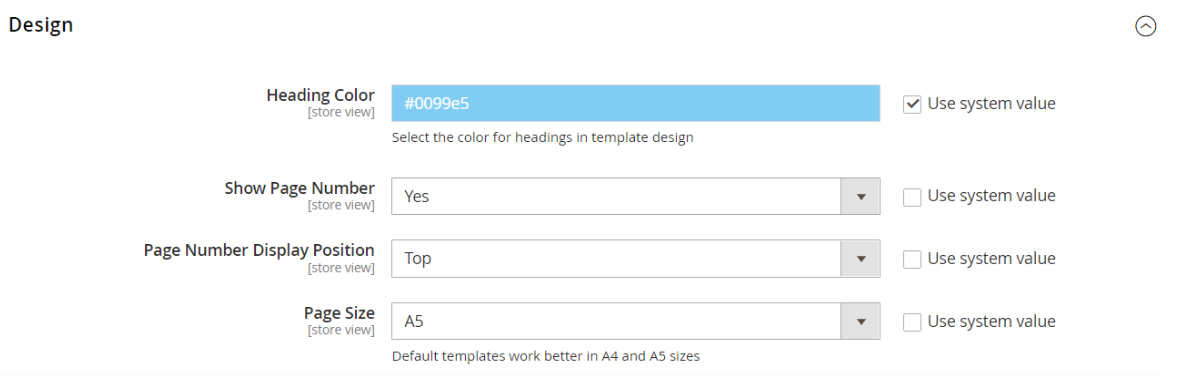
In Heading Color field:
- You're able to customize the color of the heading in the PDF file
- If you leave it blank, the color of the heading will be white.
- When you print the PDF in the backend, the color of the heading will be the selected color in
Store View > Default Config. When when you print the PDF on the frontend or send an email with a PDF attachment, the heading Color will display according to the configuration of that store.
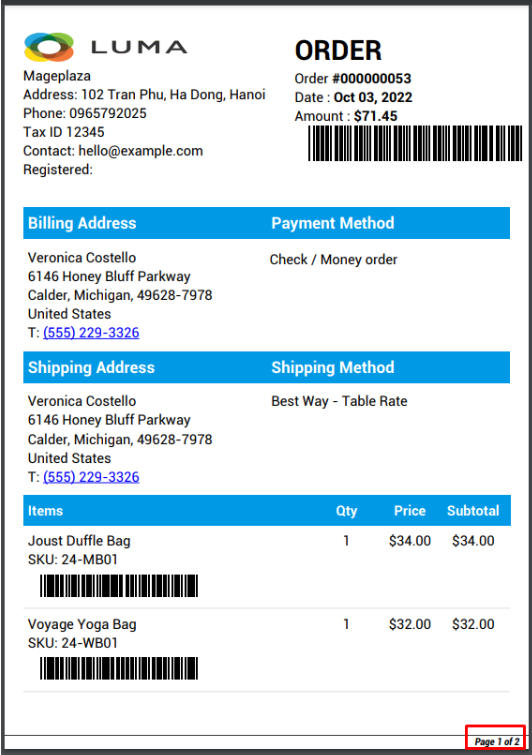
In Show Page Number field:
- Choose "Yes" to display page numbers at the end of the PDF document.
- Check Use system value to set "Show Page Number = Yes" as default.
- Please note that:
- When you configure it in
Store View > Default Config, the page number is displayed/hidden when you print the PDF in the backend and when you preview the template. - When you configure the store, the number of pages is displayed/hidden when you print the PDF outside of the frontend and in the PDF attached to the email.
- Specifically, when you print multiple PDFs at the same time, displaying the page number at the bottom of each PDF is the default.
- When you configure it in
In Page Number Display Position field: Select the position to display the page number of the PDF file:
Top: Display on the top of each page in the PDF file.
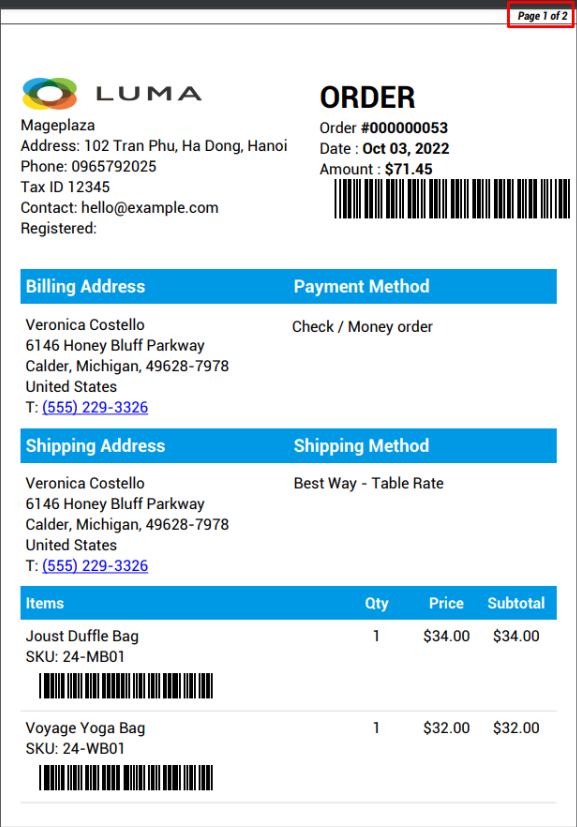
Bottom: Display at the bottom of each page in the PDF file.
In Page Size field:
- There are 4 kinds of paper sizes you can choose: A4, A5, A6, and A7.
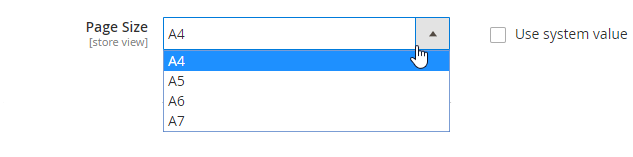
- The design of PDF files works best with an A4 page size.
- When you print a PDF in the backend or when you create a template, the page size displays in
Store View > Default Configsection. - When you print a PDF on the frontend or send an email with a PDF attachment, the page size will display in the configuration section of the store.
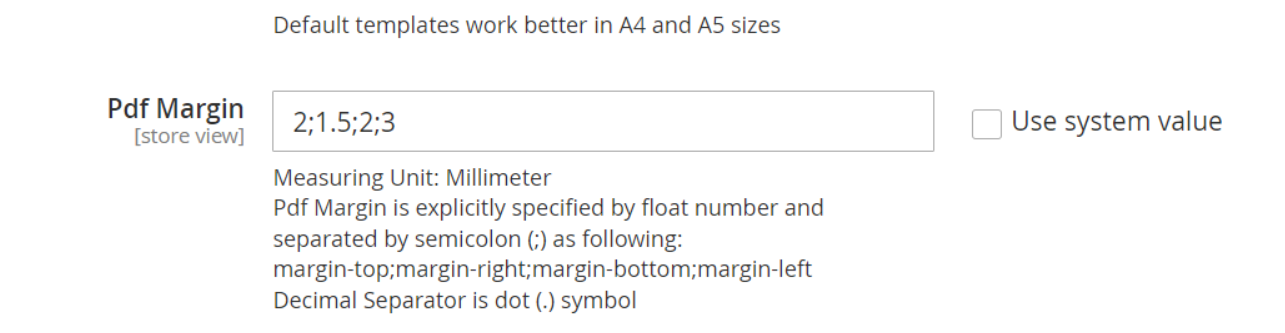
- PDF Margin: Admin can customize the margin for an invoice with measurement unit mm.
- a;b;c;d are margin-top; margin-right; margin-bottom;margin-left
- This field only accepts numeric values (2;1.5;2;3 is default).
- If you want to use decimals, the separator is a dot (.) symbol.
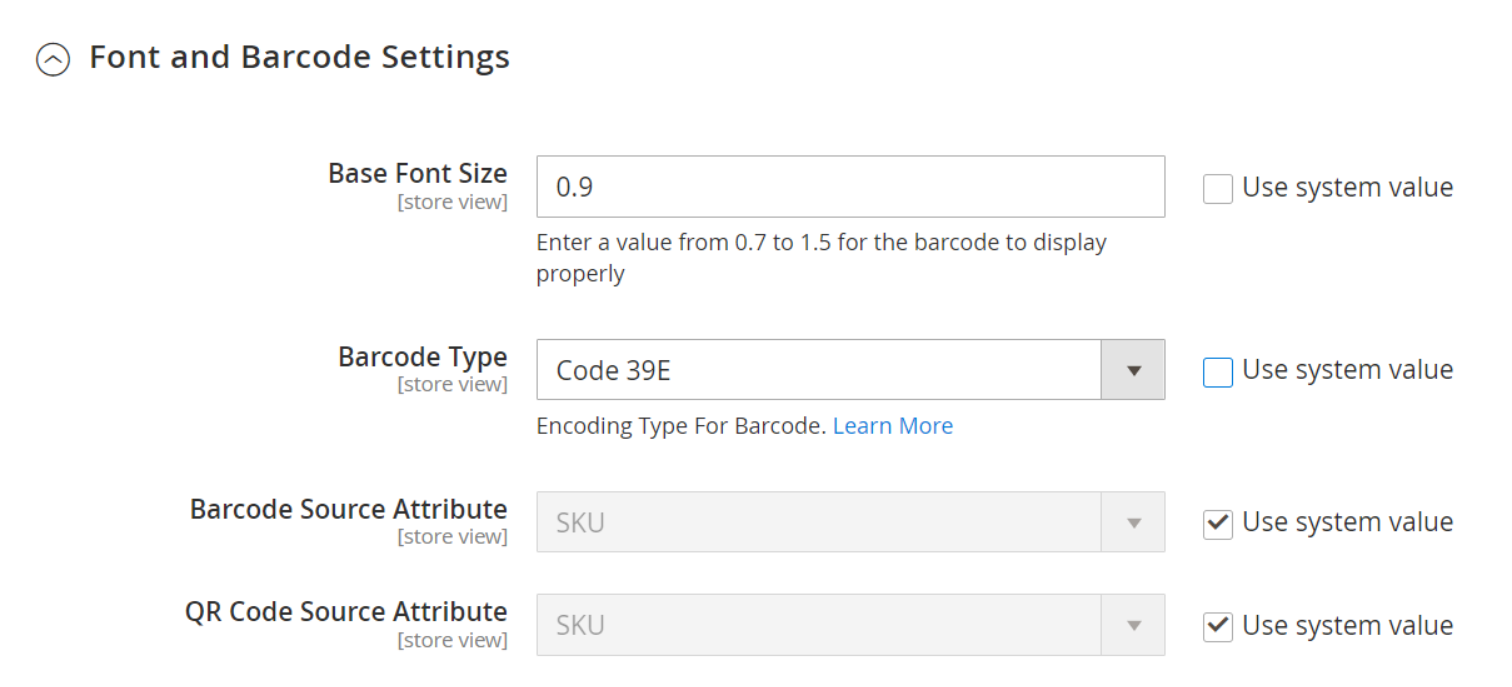
To configure font and barcode, navigate to Font and Barcode Settings section: You can go to Design section in Configuration to find it.
Base Font Size: The size of letters/numbers of Barcode:
- Only accept positive numbers
- Only accept values <1.5 (Default is 0.9)
- A value from 0.7 to 1.5 is most recommended
Barcode Type: the bar code in the invoice is displayed below the product information by default
Barcode Source Attribute includes SKU, Product ID, Product name (SKU is default).
QR Code Source Attribute includes SKU, Product ID, Product name (SKU is default).
1.3. Order
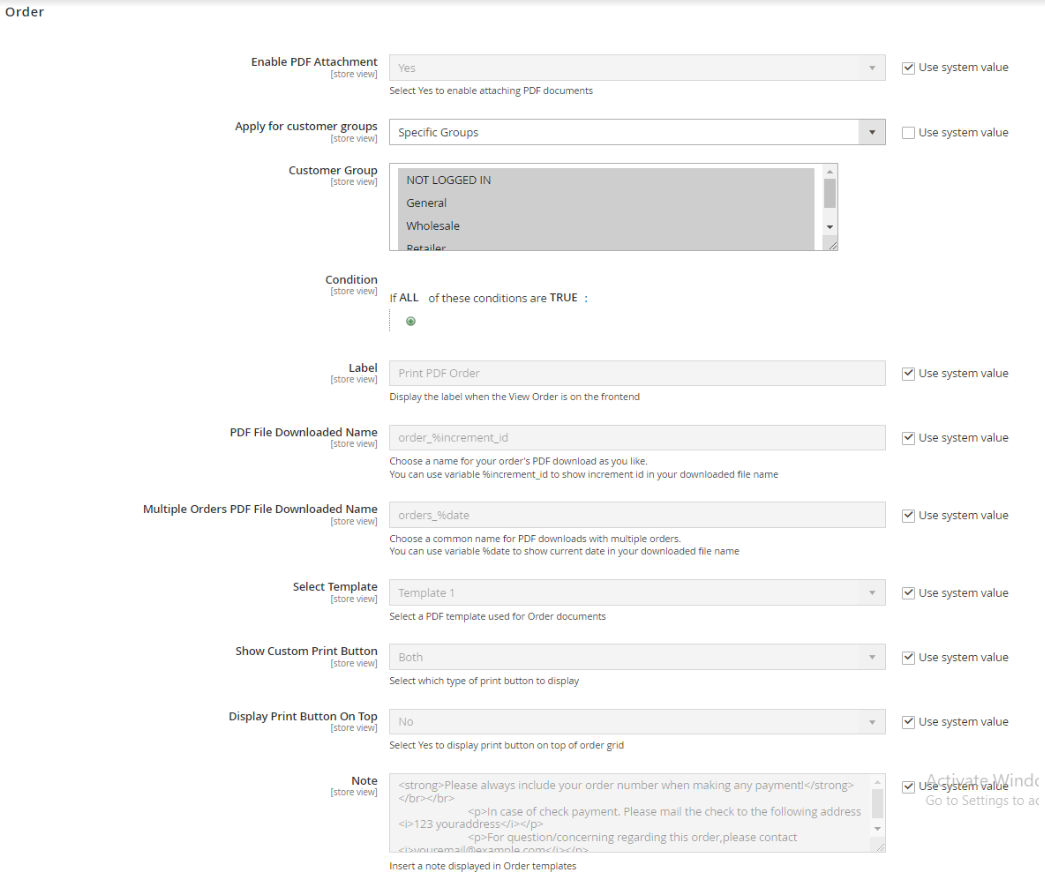
- In Enable PDF Attachment field:
- Uncheck the Use system value to configure the extension. Choose “Yes” to send the PDF invoice attached along with the email.
- Tick Use system value again to use “Enable PDF Attachment = Yes” as your default.
- In Apply for customer groups:
- Specific Groups: Show Customer Group field. Only selected customers are able to view attachments in emails
- All Allowed Groups: All customers can view attachments in emails
- In Condition field: Select the condition to display Print PDF Order with each order to download files. Orders that do not satisfy selected conditions will not display Print PDF Order.
- In Label: Set up the Label Print PDF Order in My Order page in the frontend
- PDF File Download Name: Enter the name of the file downloaded when printing PDF Orders with each order. For example, order_%increment_id.
- Multiple Orders PDF File Downloaded Name: Enter the name of the file downloaded when printing PDF Orders with many orders.
- In Select Template field:
- Uncheck the Use system value to configure the extension. Choose “Template” to display the PDF file as in the selected template.
- All your created templates will be displayed as a drop-down list in this section.
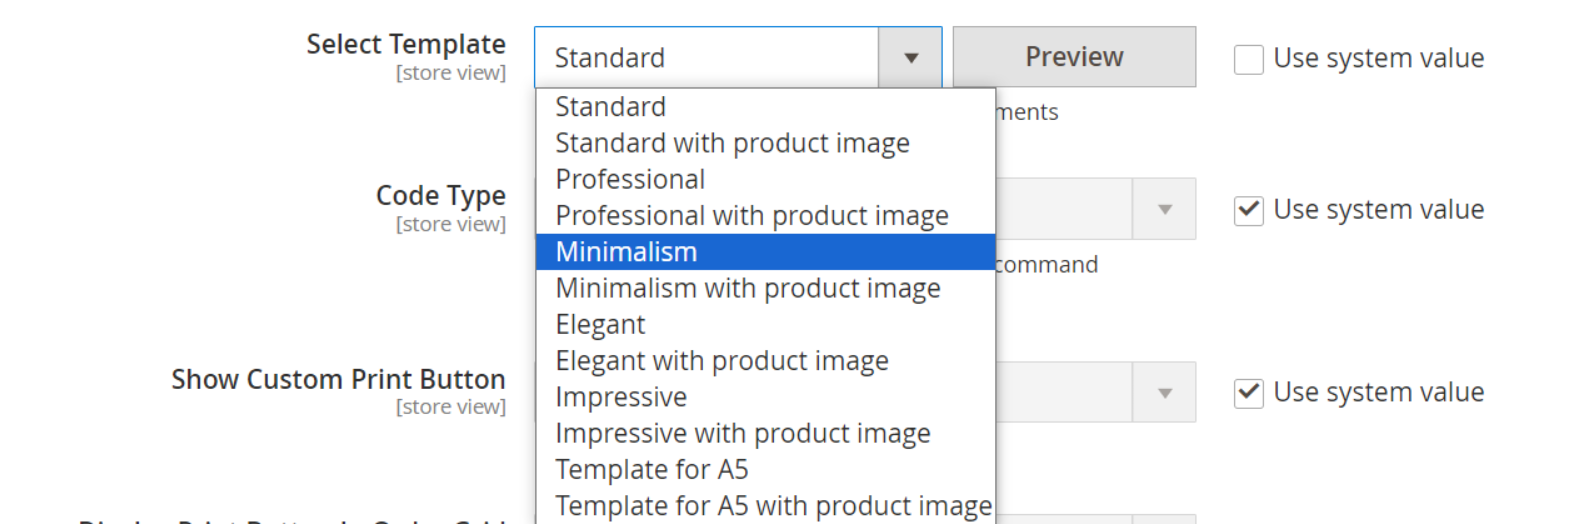
Tick Use system value to use
Select Template = Template 1as the default setting.Preview: After selecting a template, you can click on the preview template to preview the invoice template.
If store owners want to use the page size of A5, they should use the template for A5. As this template, we design servers for the page size for A5.
Code Type: You have 2 options to choose the type of code displayed in the invoice:
- Barcode
- QR code (If you choose this option, run the command "composer require mpdf/qrcode"
- None: No code appears in billing
In Show Custom Print Button field:

Uncheck Use system value to configure this field.
- Show Custom Print Button = Both: This will display an additional
Print PDF Orderbutton in the backend’s Order and the frontend’s My order page. When customers click thePrint PDF Orderbutton, the designed PDF template will be downloaded automatically. - In Note field: This is the place where you enter your note for the Order. HTML code can be used here.
- Show Custom Print Button = Both: This will display an additional
Frontend

Order Guest View Frontend
Backend in each of the order

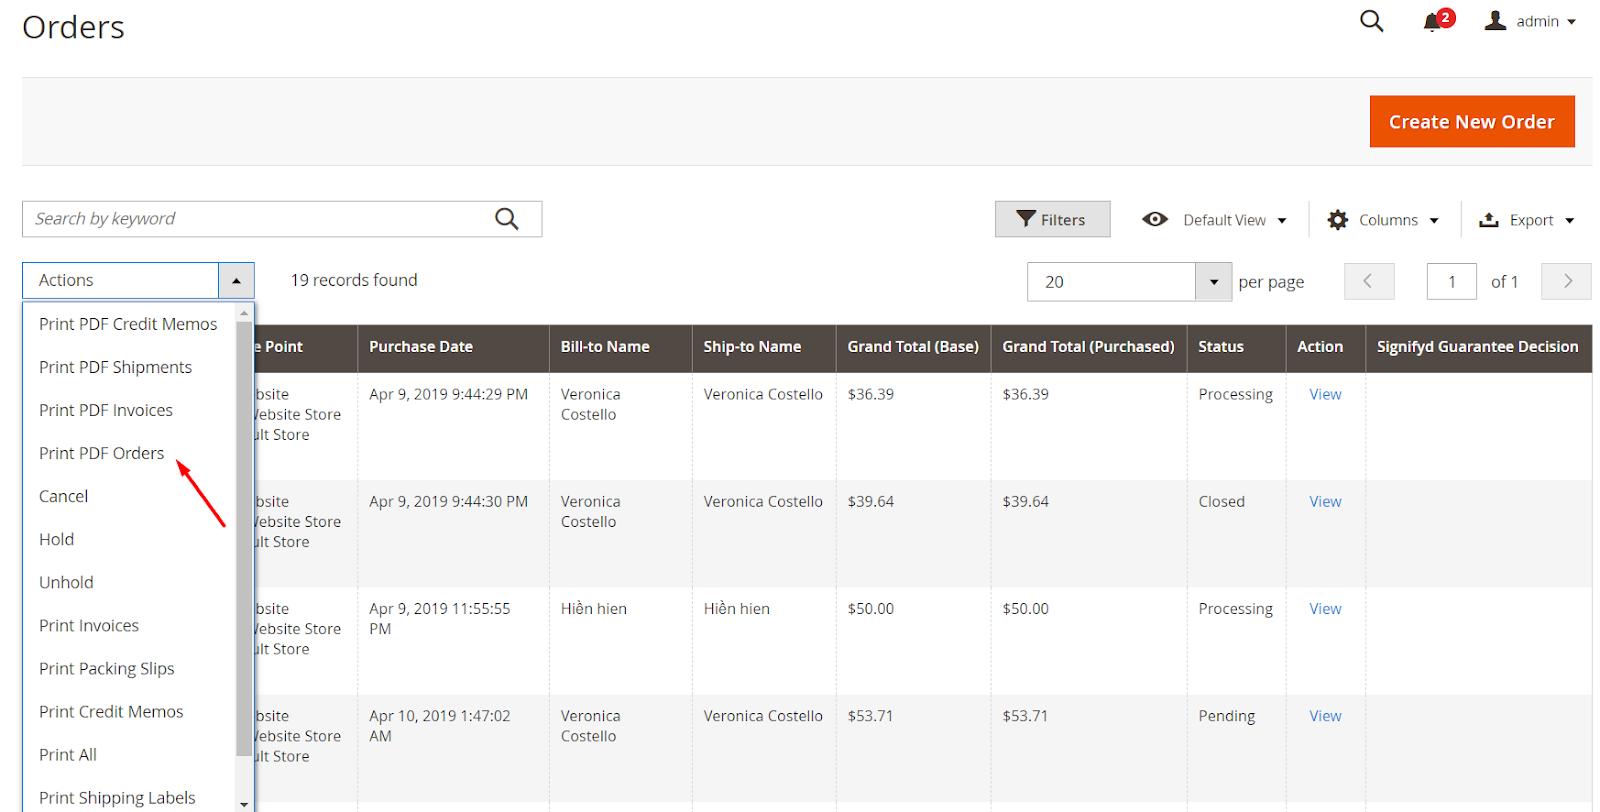
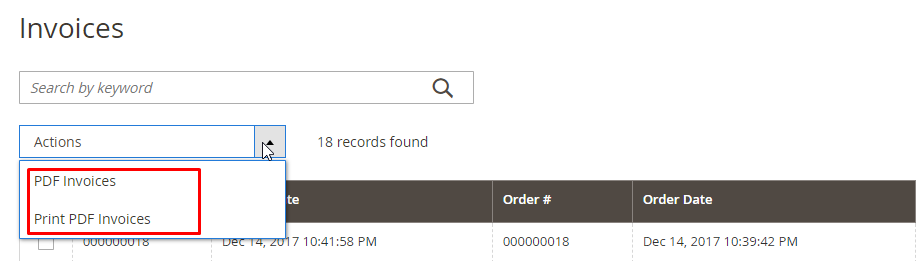
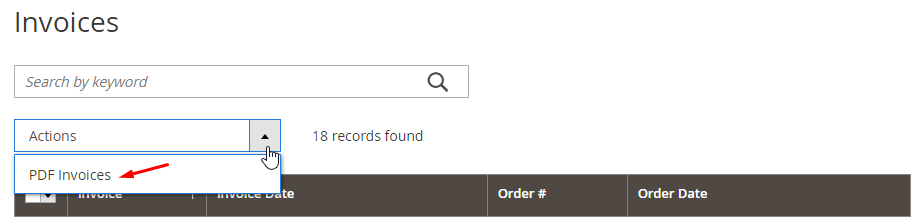
Or in massAction, besides displaying Print PDF Orders button, we also design Print PDF Invoices so that store owners can print Invoices at this place. Print PDF Invoices will display in massAction
- Show Custom Print Button = Custom PDF: Show
Print PDF Orderat massAction This won’t displayPrint PDF Orderbutton. The button will be combined with thePrintbutton by Magento 2. When the button is clicked, the designed PDF template will be downloaded automatically.
- Show Custom Print Button = Custom PDF: Show
Frontend
Order Guest View Frontend
Backend

- Show Custom Print Button = No: This won’t display
Print PDF Orderbutton. When the button is clicked on My Order page on the frontend, the file will be downloaded as the Magento 2’s template.
- Show Custom Print Button = No: This won’t display
- Check Use system value to use “Show Custom Print Button = Both” as the default setting.
Frontend
Backend in each of the order

In massAction
- Display Print Button On Top: Select Yes to show the Print button at the top of Order Grid. Choose No, not display the Print button, but use the default Magento PDF file.
- In Note field: This is the place where you enter your note for the Order. HTML code can be used here.
1.4. Invoice
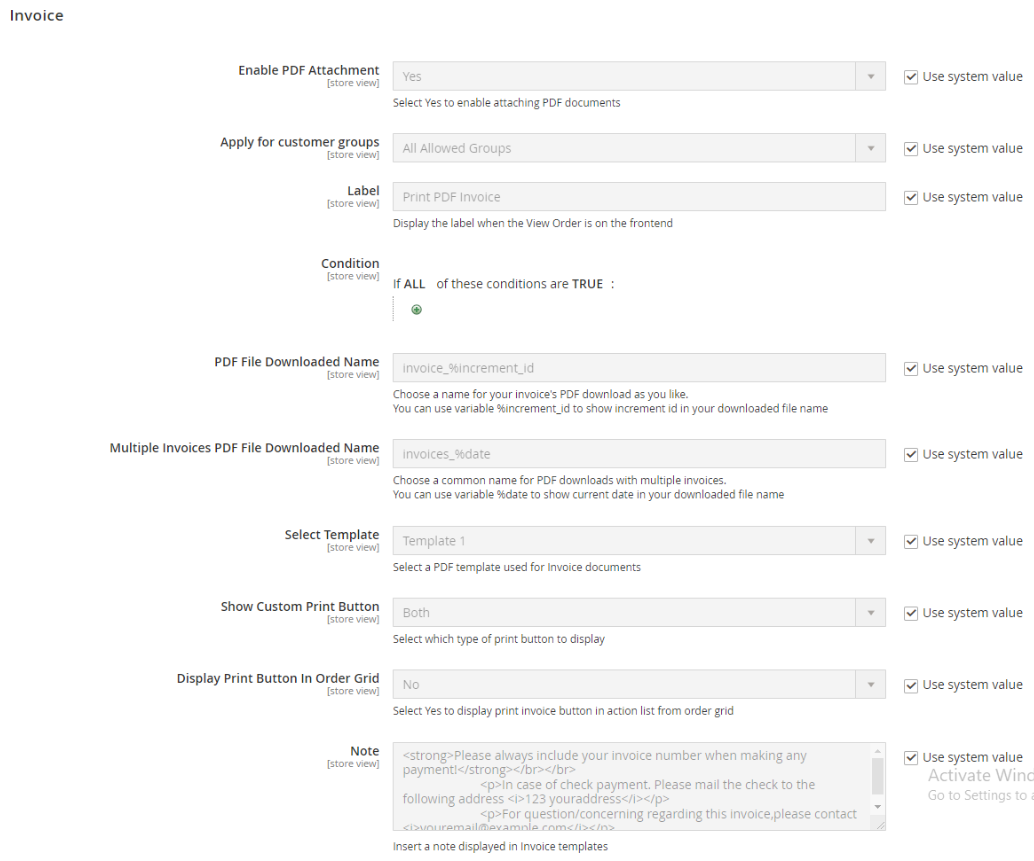
In Enable PDF Attachment field:
- Uncheck Use system value to configure the extension. Choose “Yes” to send emails along with the attached PDF invoice.
- Check Use system value to set “Enable PDF Attachment = Yes” as the default setting.
In Apply for customer groups:
- Specific Groups: Show Customer Group field. Only selected customers are able to view attachments in emails
- All Allowed Groups: All customers can view attachments in emails
In Label: Set up the Label Print PDF Order in My Order page in the frontend
PDF File Downloaded Name: Enter the name of the file downloaded when Print PDF Invoices with each invoice.
Multiple Invoices PDF File Downloaded Name: Enter the name of the file downloaded when printing PDF Invoices with many invoices.
In Select Template field:
- Uncheck Use system value to configure the extension. Choose “Template” to display the selected template in the PDF file.
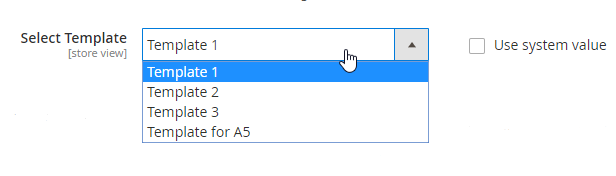
- Check Use system value to use “Select Template = Template 1” as the default setting.
- If store owners want to use the page size of A5, they should use the template for A5. As this template, we design servers for the page size for A5.
In Show Custom Print Button:
- Uncheck Use system value to configure the extension. Choose
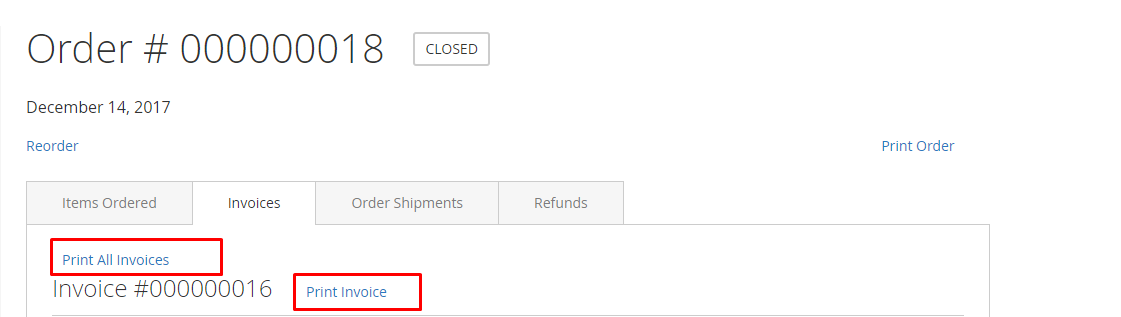
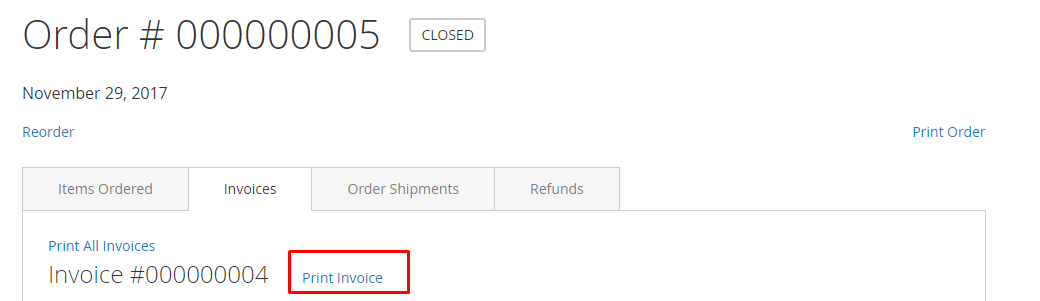
Printbutton to display:- Show Custom Print Button = Both: This will display
Print PDF Invoicebutton in the backend’s invoice and on the My Order page of the frontend. When clicking that button, the designed PDF template will be downloaded automatically.
- Show Custom Print Button = Both: This will display
Frontend
Backend in each of the order

In massAction
- Show Custom Print Button = Custom PDF: This won’t display
Print PDF Invoicebutton. The button will be combined with thePrintbutton by Magento 2. When the button is clicked, the designed PDF template will be downloaded automatically.
- Show Custom Print Button = Custom PDF: This won’t display
Frontend
Backend
In each of the order:

Or in massAction:
- Show Custom Print Button = No: This won’t display
Print PDF Invoicebutton. When admins clickPrintin the backend’s Invoice, and customers clickPrint Invoicein My Order of the frontend, the order file will be downloaded as Magento’s template.
- Show Custom Print Button = No: This won’t display
Frontend
Backend in each of the order
In massAction
- Display Print Button In Order Grid: Select Yes to show the Print PDF Invoices button at the top of Order Grid. Choose No, not display the Print button but using default Magento PDF file.
- In Note field: This is the place where you enter your note for the Order. HTML code can be used here.
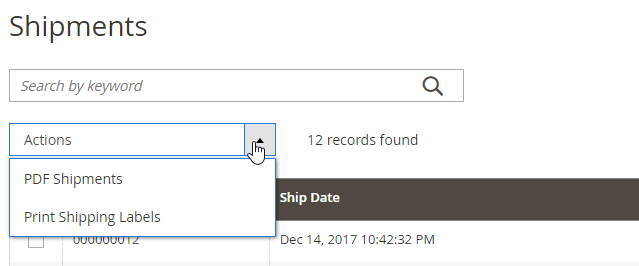
1.5. Shipment

In Enable PDF Attachment field:
- Uncheck Use system value to configure the extension. Choose “Yes” to send emails along with the attached PDF invoice.
- Check Use system value to set “Enable PDF Attachment = Yes” as the default setting.
In Apply for customer groups:
- Specific Groups: Show Customer Group field. Only selected customers are able to view attachments in emails
- All Allowed Groups: All customers can view attachments in emails
In Label: Set up the Label Print PDF Order in My Order page in the frontend
PDF File Downloaded Name: Enter the name of the file downloaded when Prin DPF Shipments with each shipment.
Multiple Shipments PDF File Download Name: Enter the name of the file downloaded when Printing PDF Shipments with many shipments.
In Select Template field:
- Uncheck Use system value to configure the extension. Choose “Template” to display the selected template in the PDF file.
- Check Use system value to use “Select Template = Template 1” as the default setting.
- If store owners want to use the page size of A5, they should use the template for A5. As this template, we design servers for the page size for A5.
In Show Custom Print Button:
- Uncheck Use system value to configure the extension. Choose
Printbutton to display:- Show Custom Print Button = Both: This will display an additional
Print PDF Shipmentbutton in the backend’s Order and the frontend’s My Order page. When customers click thePrint PDF Shipmentbutton, the designed PDF template will be downloaded automatically.
- Show Custom Print Button = Both: This will display an additional
Frontend
Backend in each of the order

In massAction
- Show Custom Print Button = Custom PDF: This won’t display
Print PDF Orderbutton. ThePrint PDF Shipmentbutton will be combined with thePrintbutton by Magento 2. When admins clickPrintof the Shipment (in the backend) or customers clickPrint Shipment(My account > My Orderof the frontend), the designed PDF template will be downloaded automatically.
- Show Custom Print Button = Custom PDF: This won’t display
Frontend:
Backend in each of the order

- Show Custom Print Button = No: This won’t display
Print PDF Shipmentbutton. When admins clickPrintof the Shipment in the backend’s or customers clickPrint Shipmentin My Order of the frontend, the file will be downloaded as the Magento 2’s template.
- Show Custom Print Button = No: This won’t display
Frontend
Backend in each of the order
In massAction
In Note field: This is the place where you enter your note for the Order. HTML code can be used here.
Display Print Button In Order Grid: Select Yes to show the Print PDF Shipments button at the top of Order Grid. Choose No, not display the Print button, but use the default Magento PDF file.
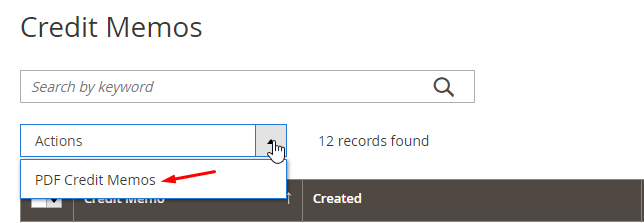
1.6. Credit Memo
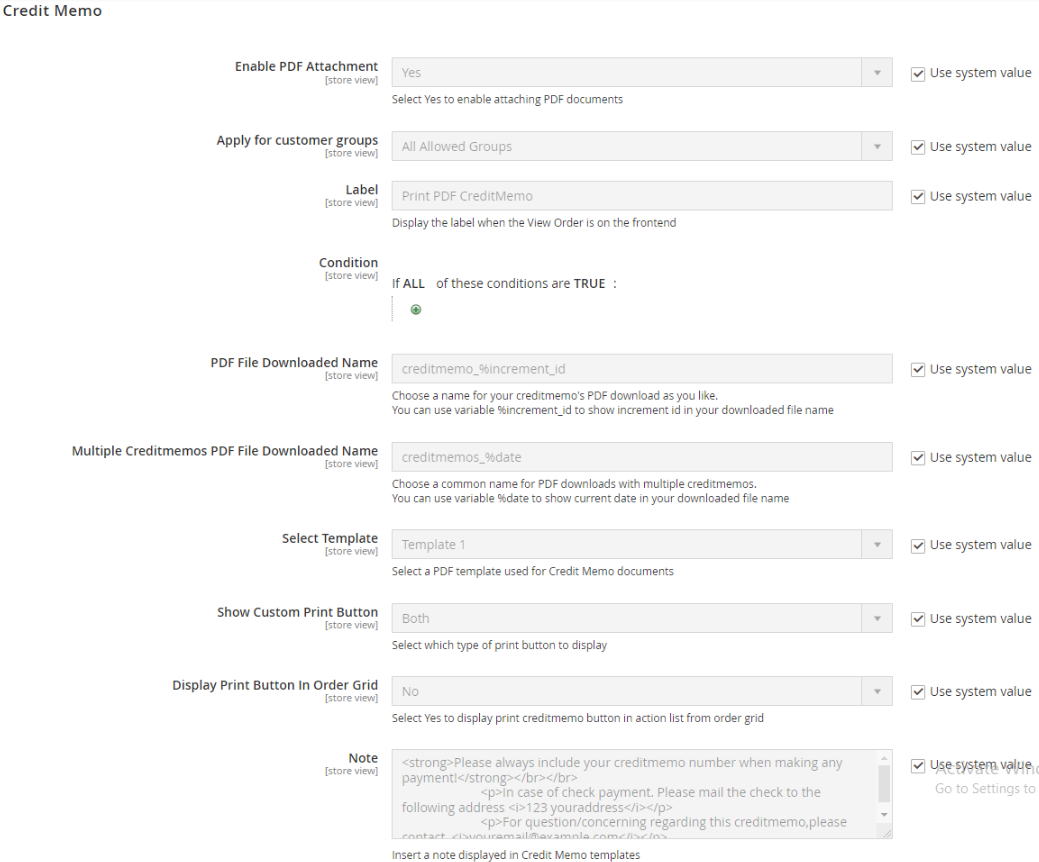
- In Enable PDF Attachment field:
- Uncheck Use system value to configure the extension. Choose “Yes” to send emails along with the attached PDF invoice.
- Check Use system value to set “Enable PDF Attachment = Yes” as the default setting.
- In Apply for customer groups field:
- Specific Groups: Display the extra Customer Group field; only selected customers can view the attached file in the email.
- All Allowed Groups: All customers can view the attached file in the email.
- PDF File Downloaded Name: Enter the name of the file downloaded when Printing PDF Credit Memos with each credit memo.
- Multiple Credit Memos PDF File Downloaded Name: Enter the name of the file downloaded when Print DPF Credit Memos with many credit memos.
- In Select Template field:
- Uncheck Use system value to configure the extension. Choose “Template” to display the designed PDF as in the selected template.
- Check Use system value to set “Select Template = Template 1” as default setting.
- If store owners want to use the page size of A5, they should use the template for A5. As this template, we design servers for the page size for A5.
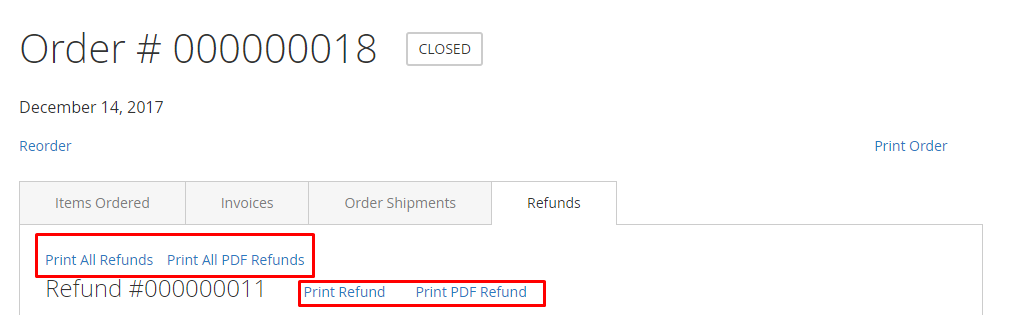
- In Show Custom Print Button:
- Uncheck Use system value to configure the extension. Choose
Printbutton to display:- Show Custom Print Button = Both: This will display an additional
Print PDF Refundbutton in the backend’s Credit Memo and the frontend’s My order page. When customers click thePrint PDF Refundbutton, the designed PDF template will be downloaded automatically.
- Show Custom Print Button = Both: This will display an additional
- Uncheck Use system value to configure the extension. Choose
Frontend
Backend in each of the order

In massAction

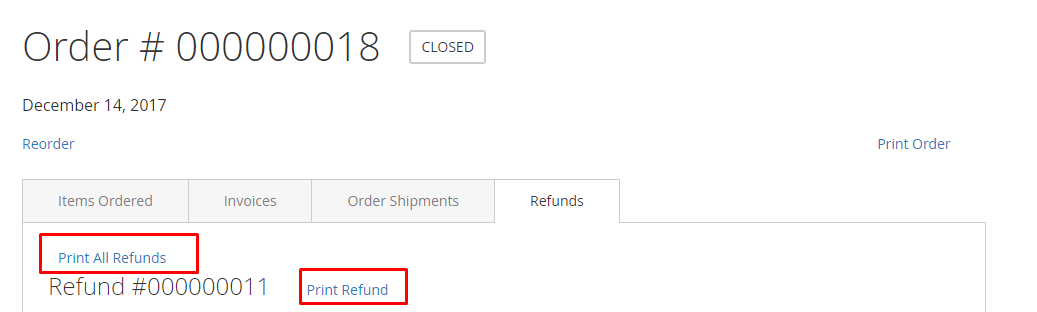
- Show Custom Print Button = Custom PDF: This won’t display
Print PDF Refundbutton. ThePrint PDF Refund** button will be combinated withPrintbutton by Magento 2. When admins clickPrintof the Credit Memo (in the backend) or customers clickPrint Credit Memo(My account > My Order`` of the frontend), the designed PDF Credit Memo template will be downloaded automatically.
- Show Custom Print Button = Custom PDF: This won’t display
Frontend:
Backend in each of the order

In massAction
- Show Custom Print Button = No: This won’t display
Print PDF Refundbutton. When admins clickPrintof the Credit Memo section (in the backend) or customers clickPrint Refundin My Order (of the frontend), the file will be downloaded as the Magento 2’s template.
- Show Custom Print Button = No: This won’t display
Frontend
Backend in each of the order
In massAction
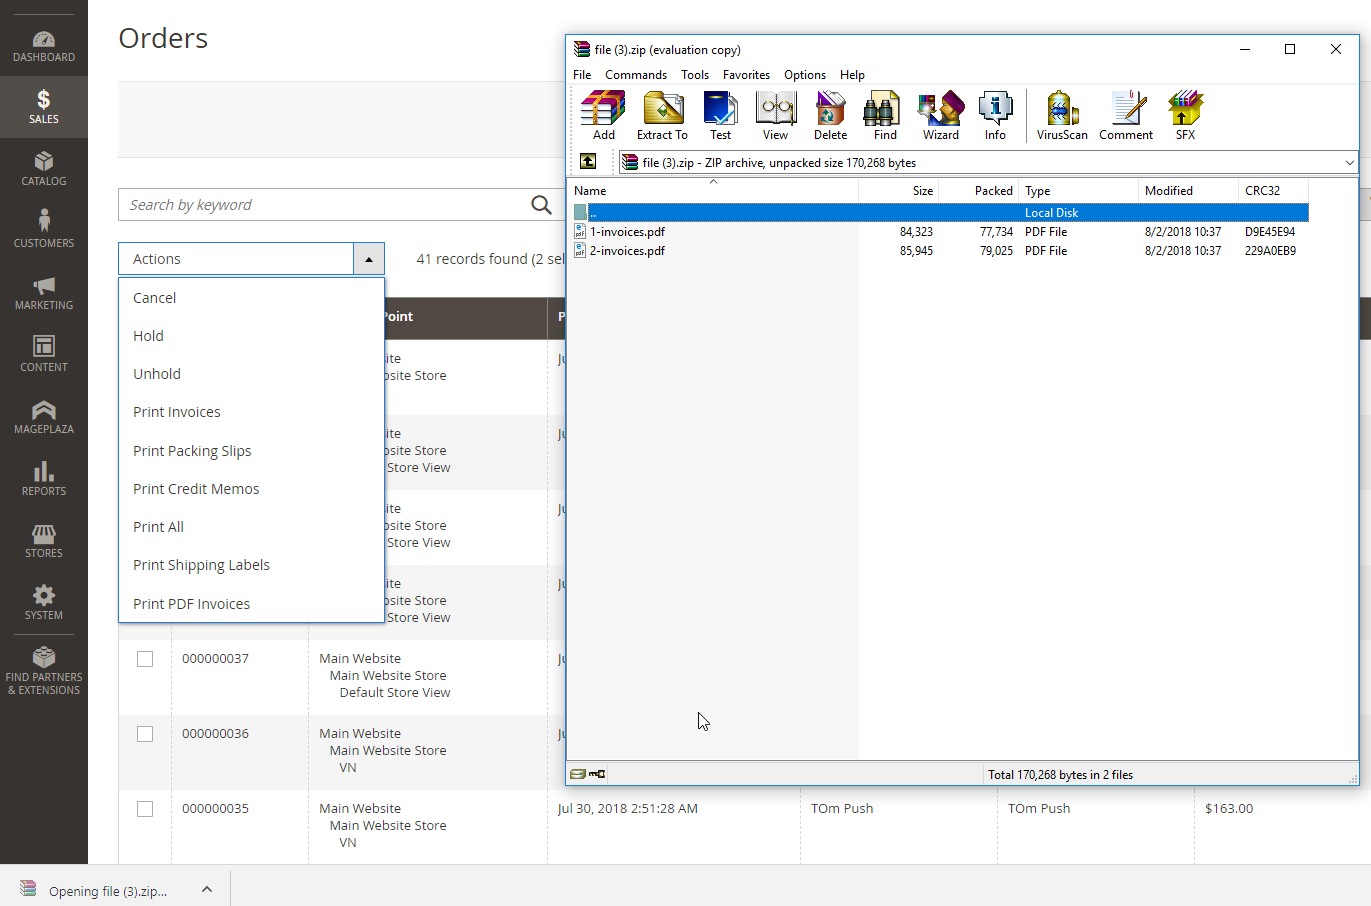
- In Note field: This is the place where you enter your note for the Order. HTML code can be used here. Also, when you print in the massAction, store owners can print all PDF files of many different stores. All these PDF files will display as the configuration of that store, and the PDF files are extracted in the zip format.
- Display Print Button In Order Grid: Select Yes to show the Print PDF Credit Memo button at the top of Order Grid. Choose No, and do not display the Print button, but use the default Magento PDF file.
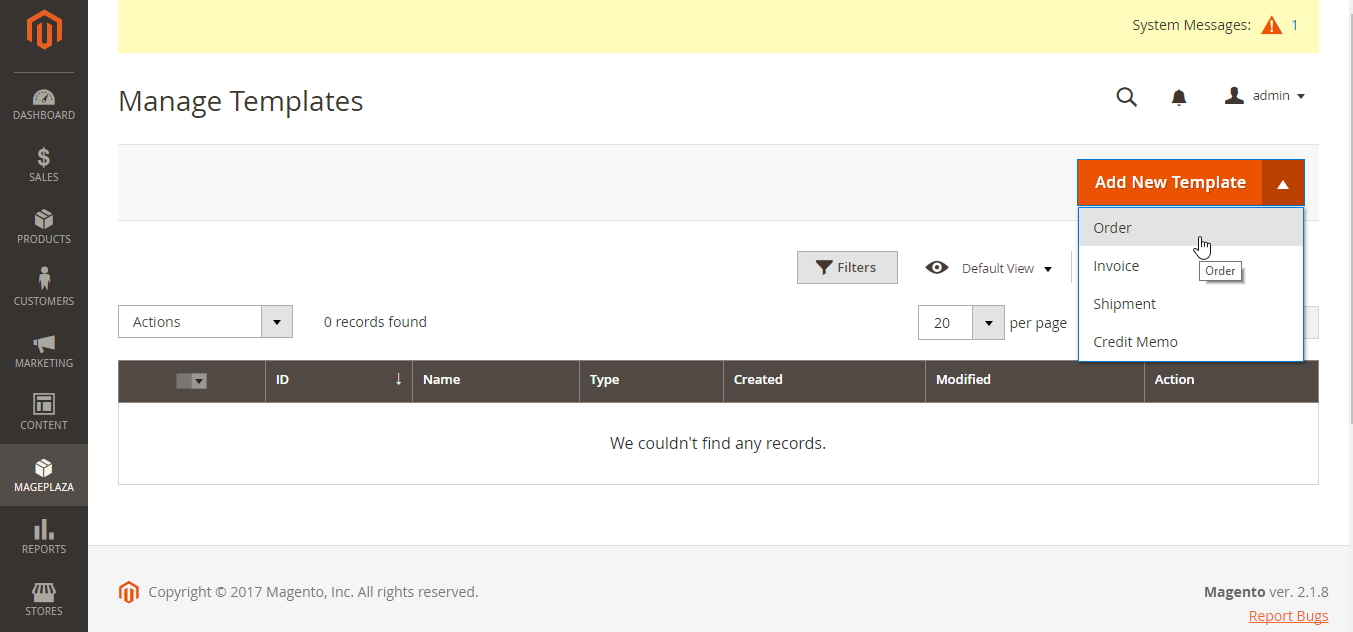
2. Manage Templates
This section allows store owners to customize and manage PDF invoice templates for their online stores. Admin can create or edit templates, customize the content, choose a layout style, add logo and images, set colors and fonts, edit columns in the Product List table, and preview invoice templates. This helps store owners easily create professional invoices while enhancing the customer experience by providing clear and easy-to-understand information.
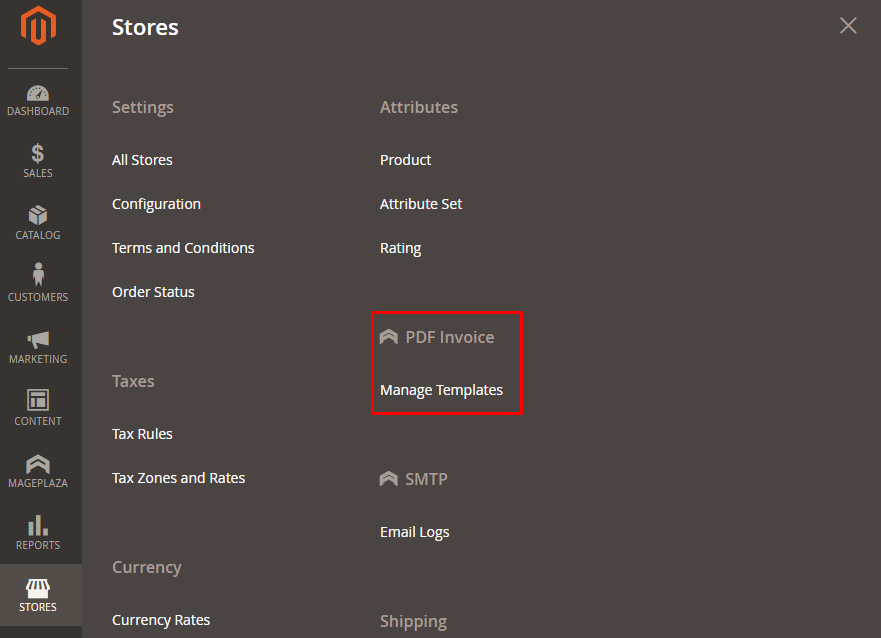
From the Admin Panel, go to Mageplaza > PDF Invoice > Manage Templates
Click Add New Template Order button and choose the kind of template you want to generate. There will be 4 kinds of templates corresponding to 4 kinds of PDF files:
- Order
- Invoice
- Shipment
- Credit Memo
You’re able to freely design templates in your own style by using available templates in the extension’s configuration.
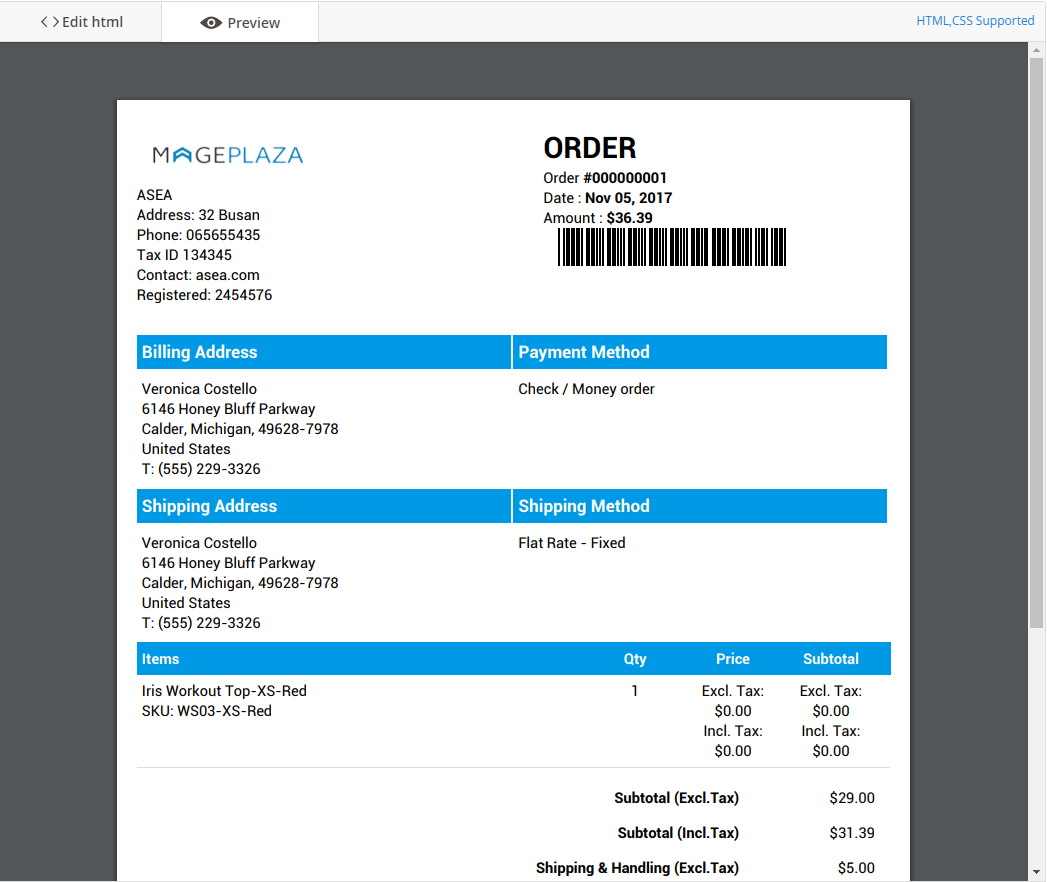
For example, if you choose to create an “Order” template, the design form will appear like the below image:
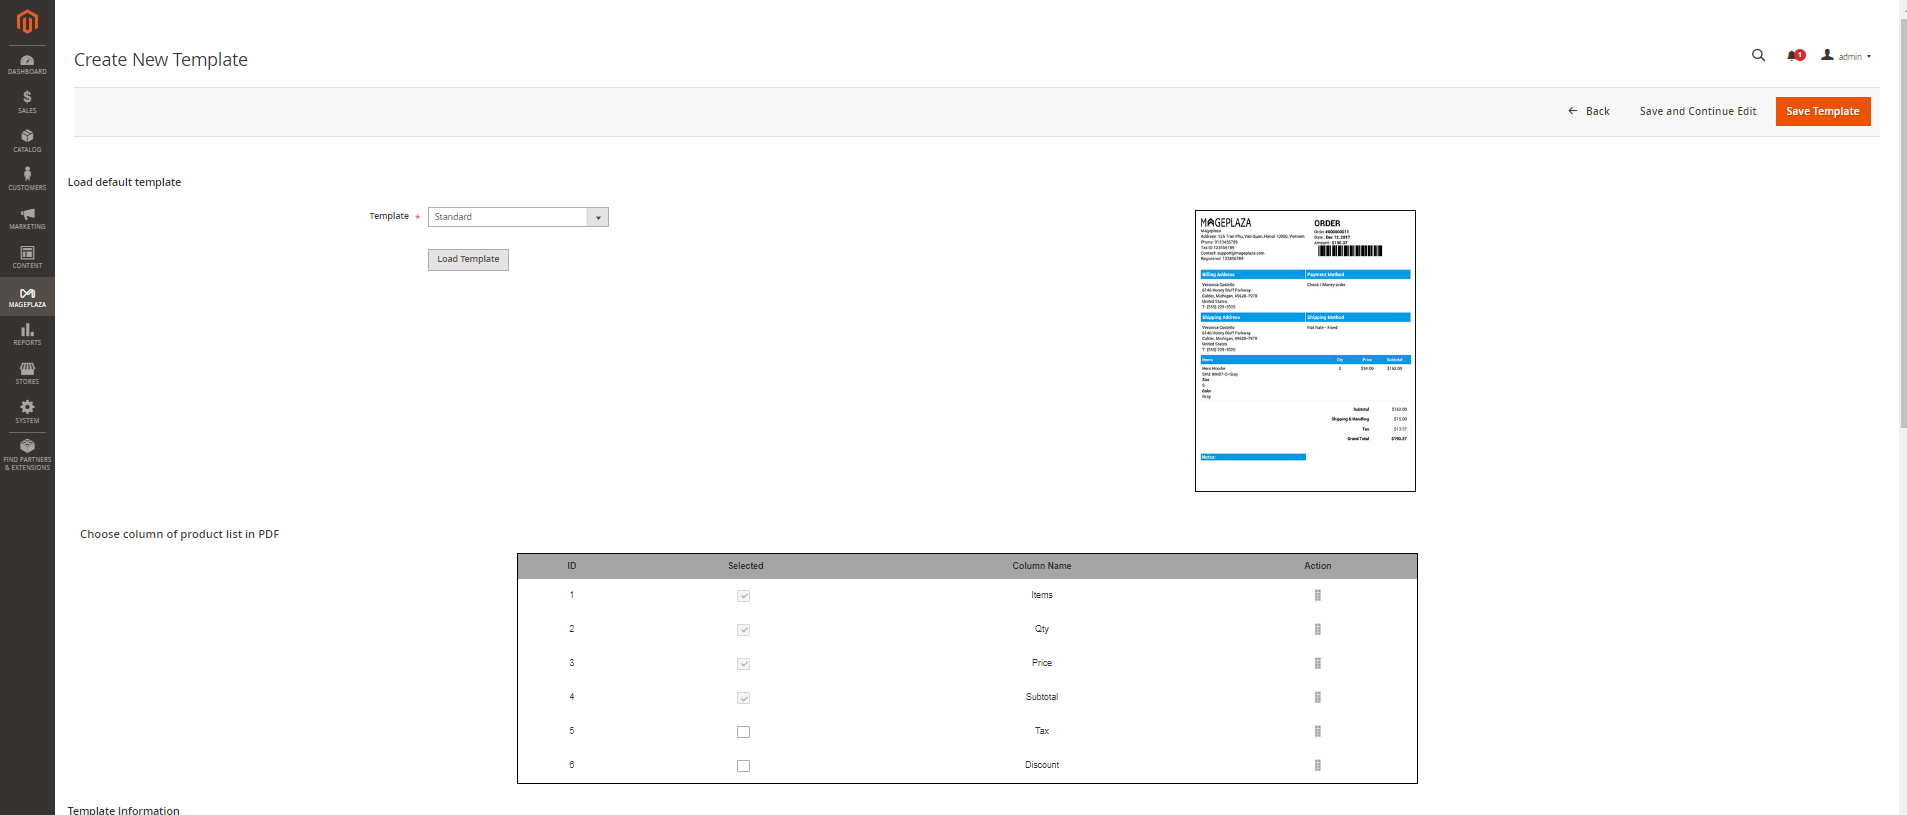
In Load default template field:
- Template
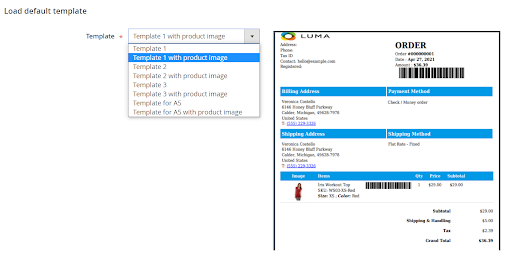
- You can choose one of the available templates. With each template, you can choose to display product images in the PDF file. After having it done, the chosen template will show up right your left side to be previewed.
- If you don’t choose a template form, the default template will be “Template = Template 1”.
- Load Template: The selected template’s code will be displayed automatically in the below HTML box.
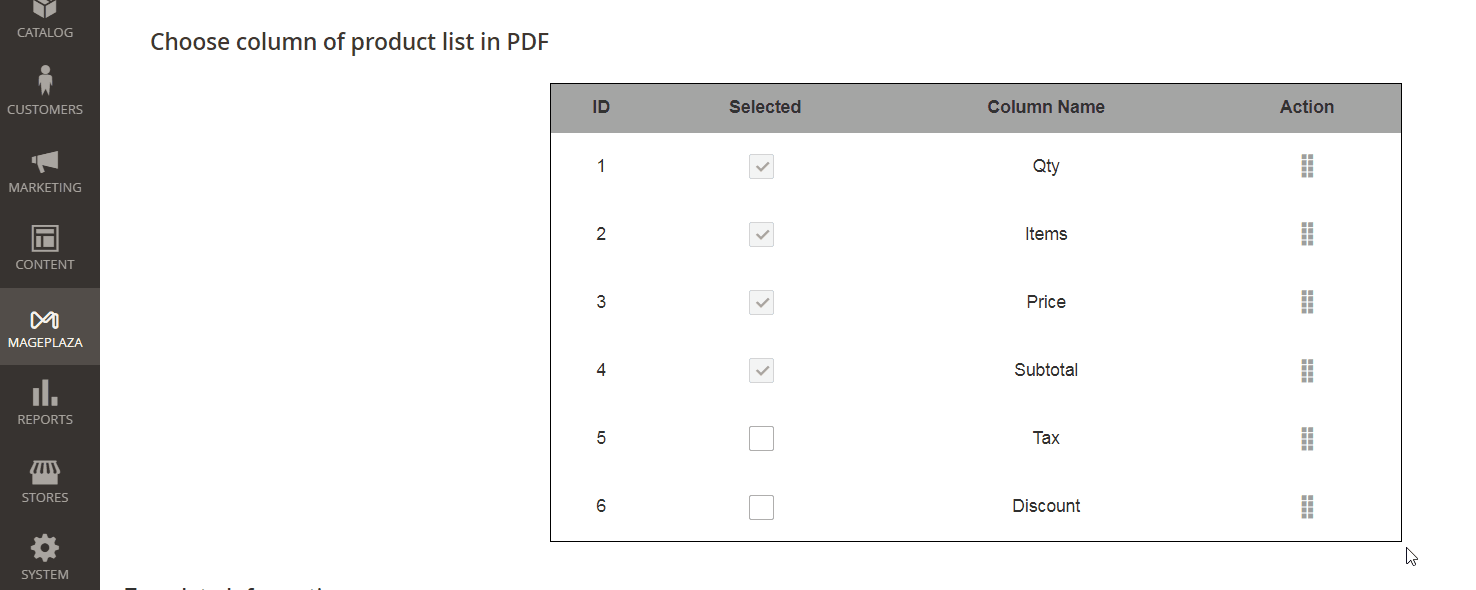
- In the Choose column of the product list in the PDF field:
- Users can edit columns in the Product List table (this is the product detail table in a PDF file).
- Move the order of columns in PDF invoice
- Show/hide Tax and Discount fields
- Users can edit columns in the Product List table (this is the product detail table in a PDF file).
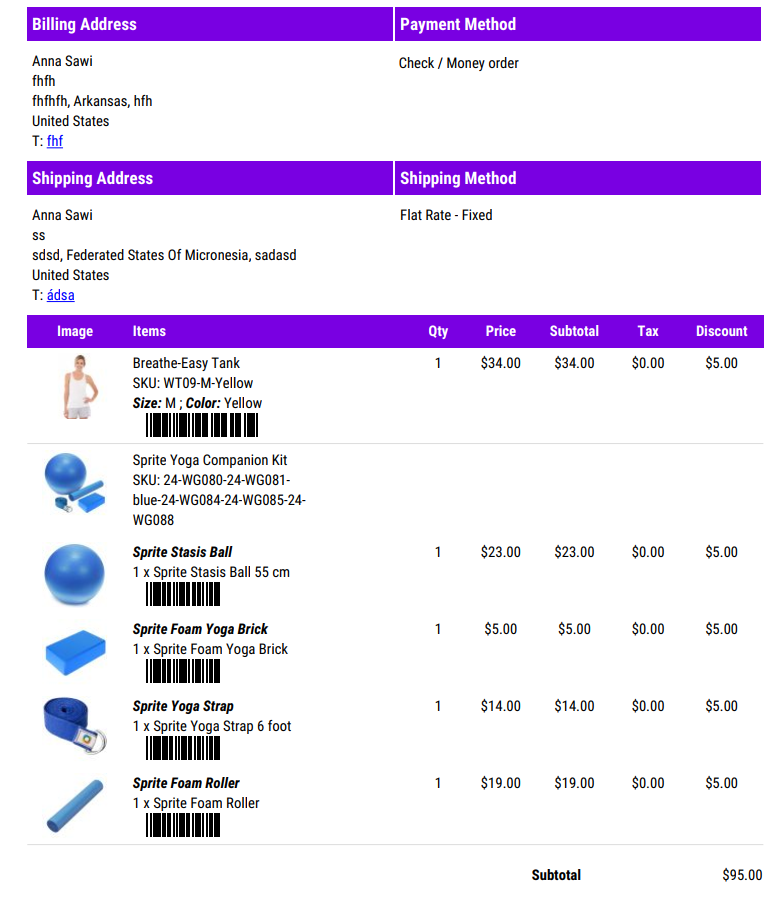
The PDF invoice will be shown like this when you select all six options:
Note:
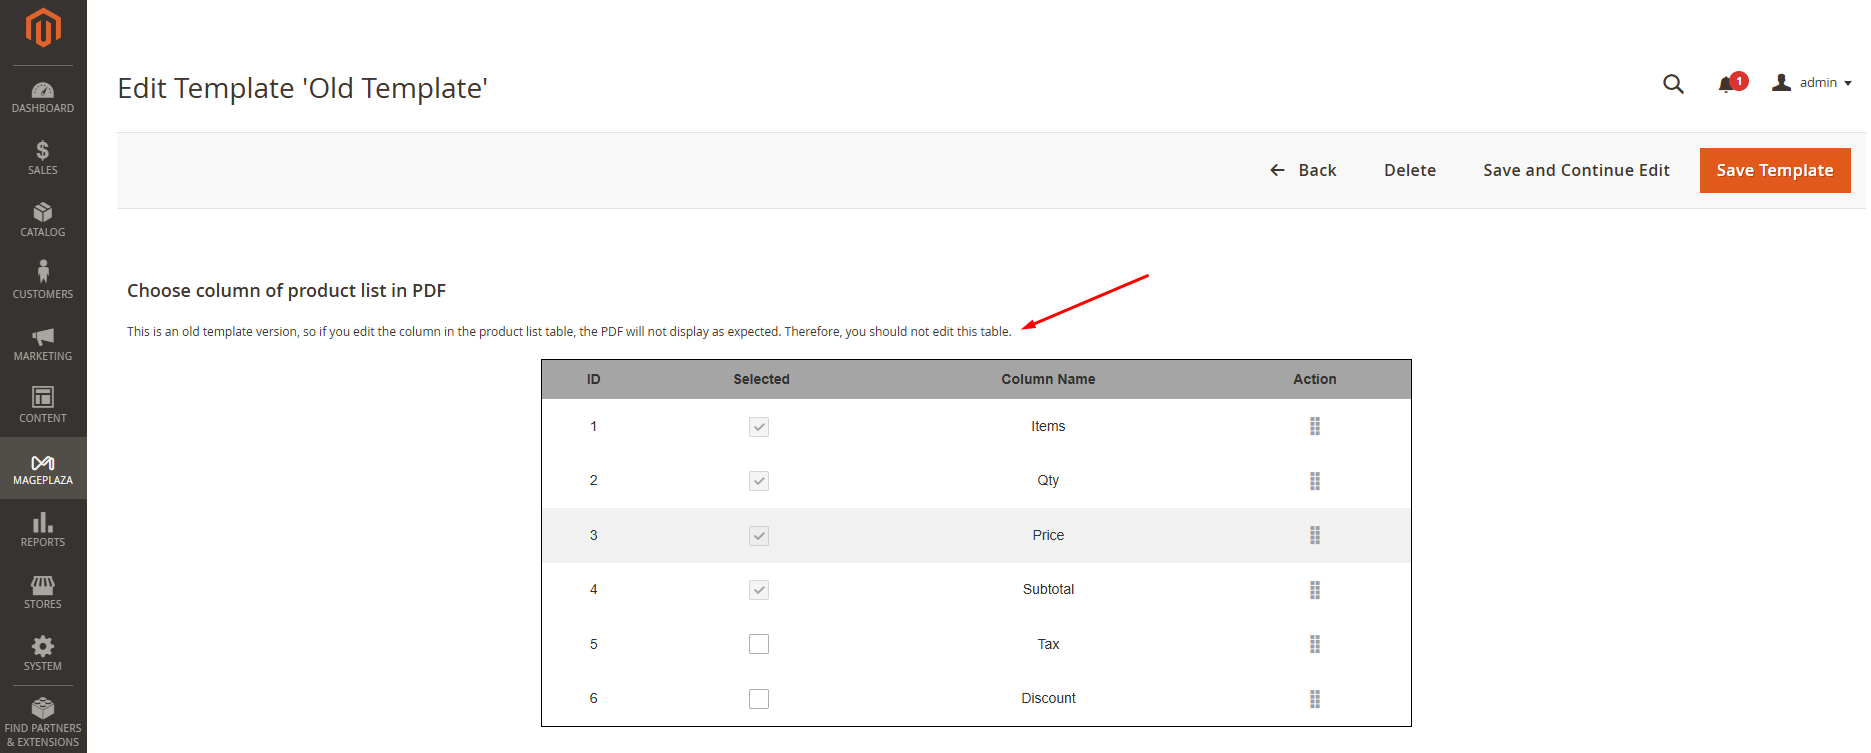
- After updating this new feature, if admins edit old templates (created before updating this new feature), that template will display an error. And the system has displayed a note for this case. You can create a new template in case you want to use this function.
- The Shipment PDF file does not have information about Subtotal, Tax, and Discount, so the shipment template will omit these 3 columns compared to other PDFs (Order, Invoice, Credit Memo). Therefore, users can only adjust the order of the Items, Qty, and Price columns of the Shipment pdf.
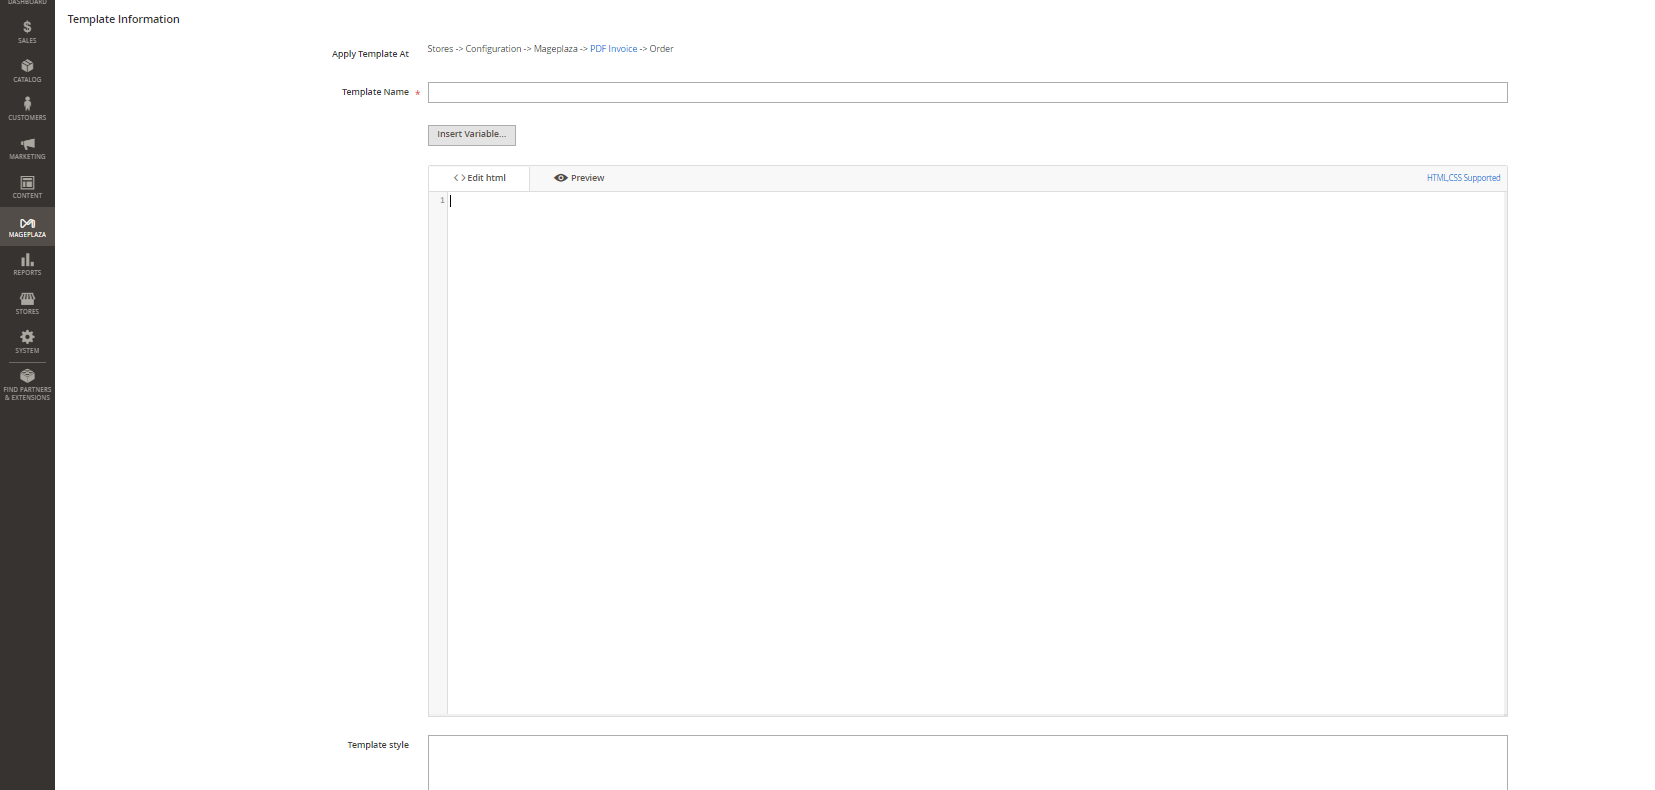
- In Template Information field:
- Currently Used for: Click the PDF Invoice link to direct to the configuration section.
- Template Name
- This is the place where you name your own template.
- If you leave it blank, there will be an error message.
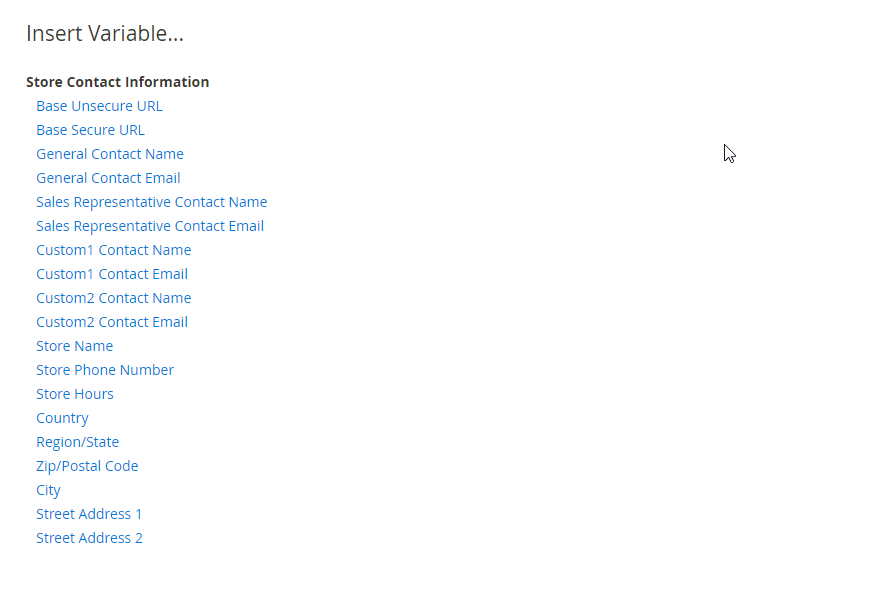
- Insert Variables: Choose a variable to display the value of that variable in the PDF file. Besides that, Mageplaza also supports customers in adding more information such as Order Information, Shipping Information, or Billing Information.
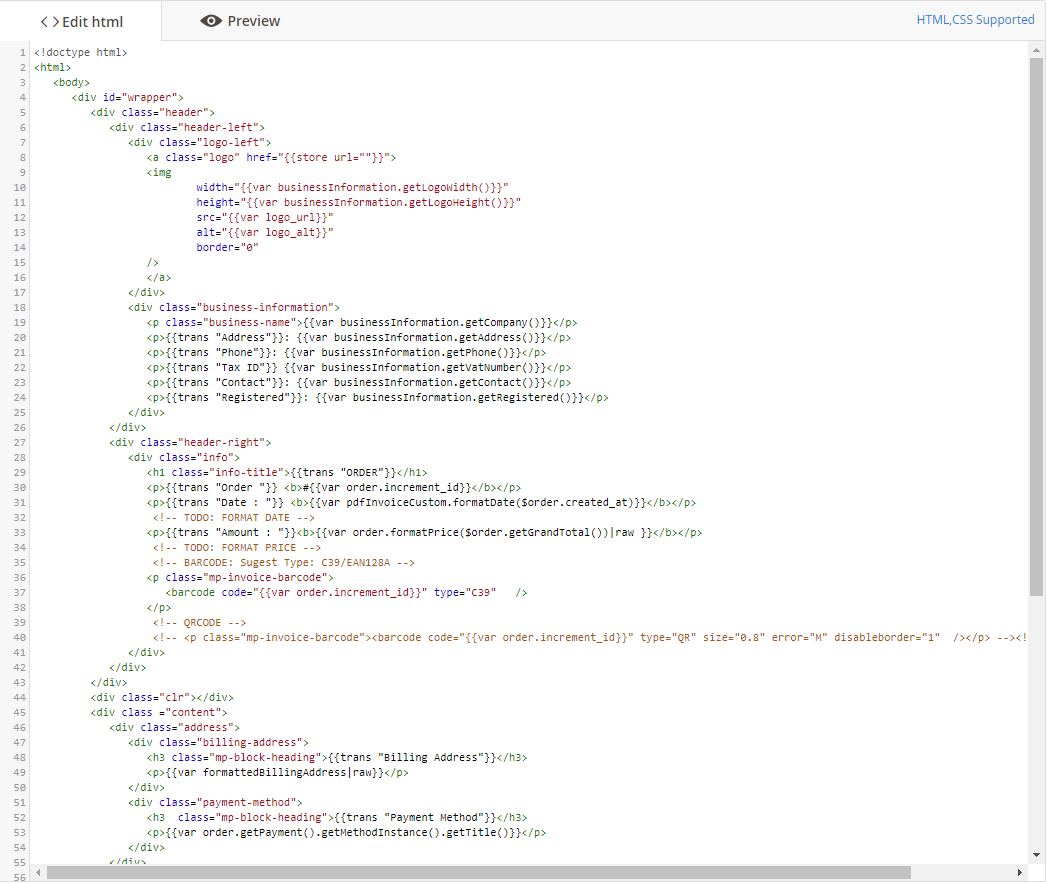
- Edit HTML: This section allows you to generate a unique PDF form by your own idea.
- Preview: After editing the PDF form, click here to have an overview glance again.
- Link CSS: This will direct you to a detailed CSS support guide on how to learn to design by CSS properly.
- Link HTML Support: Click it to direct to a detailed HTML support guide that points out what HTML tags you can use to create a template.
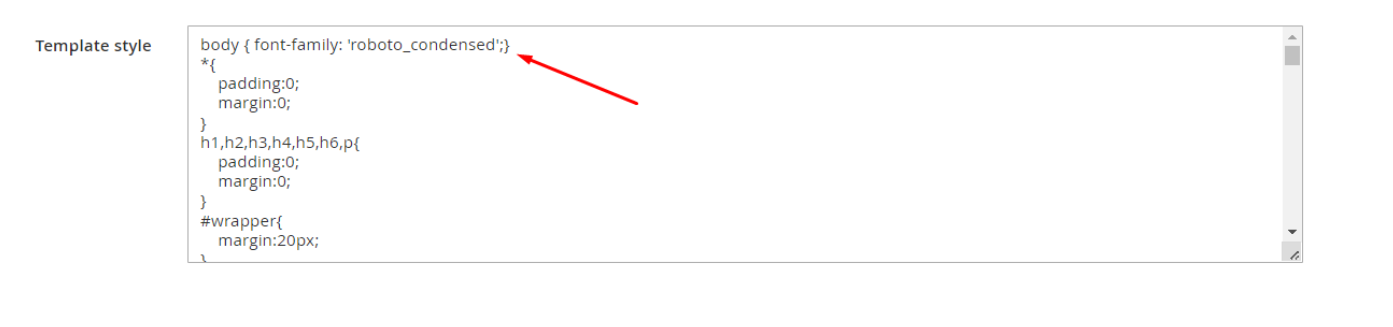
- Template Style: You can add CSS codes here. Users can set supported fonts such as Roboto, Lato, Roboto_condensed, Opens_san, Oswald, and Montserrat for the whole PDF file. If the fonts are not supported, Mageplaza will convert them into the default DejaVu font.
3. Sale
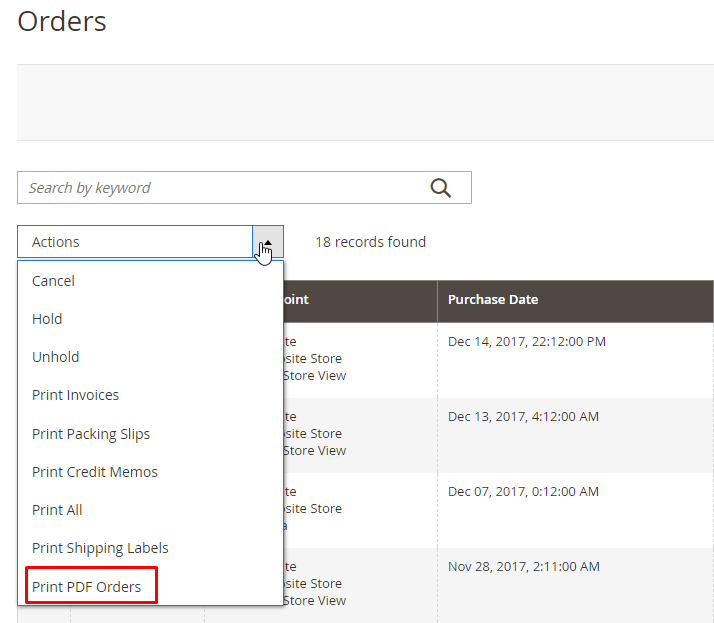
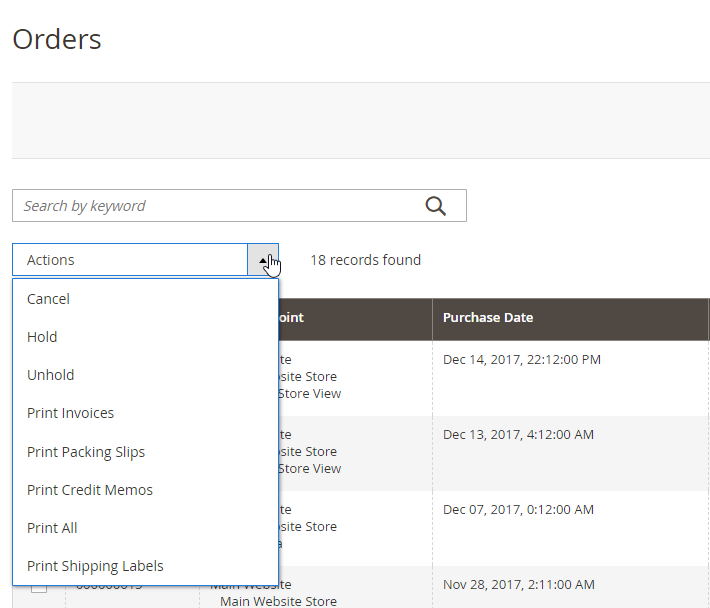
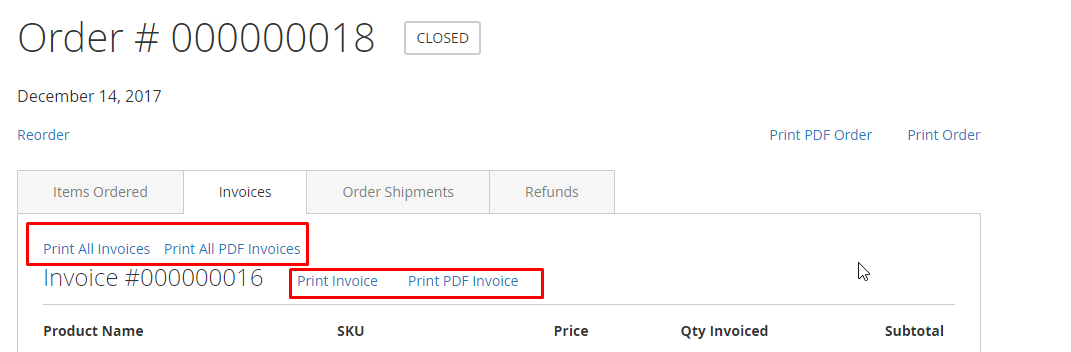
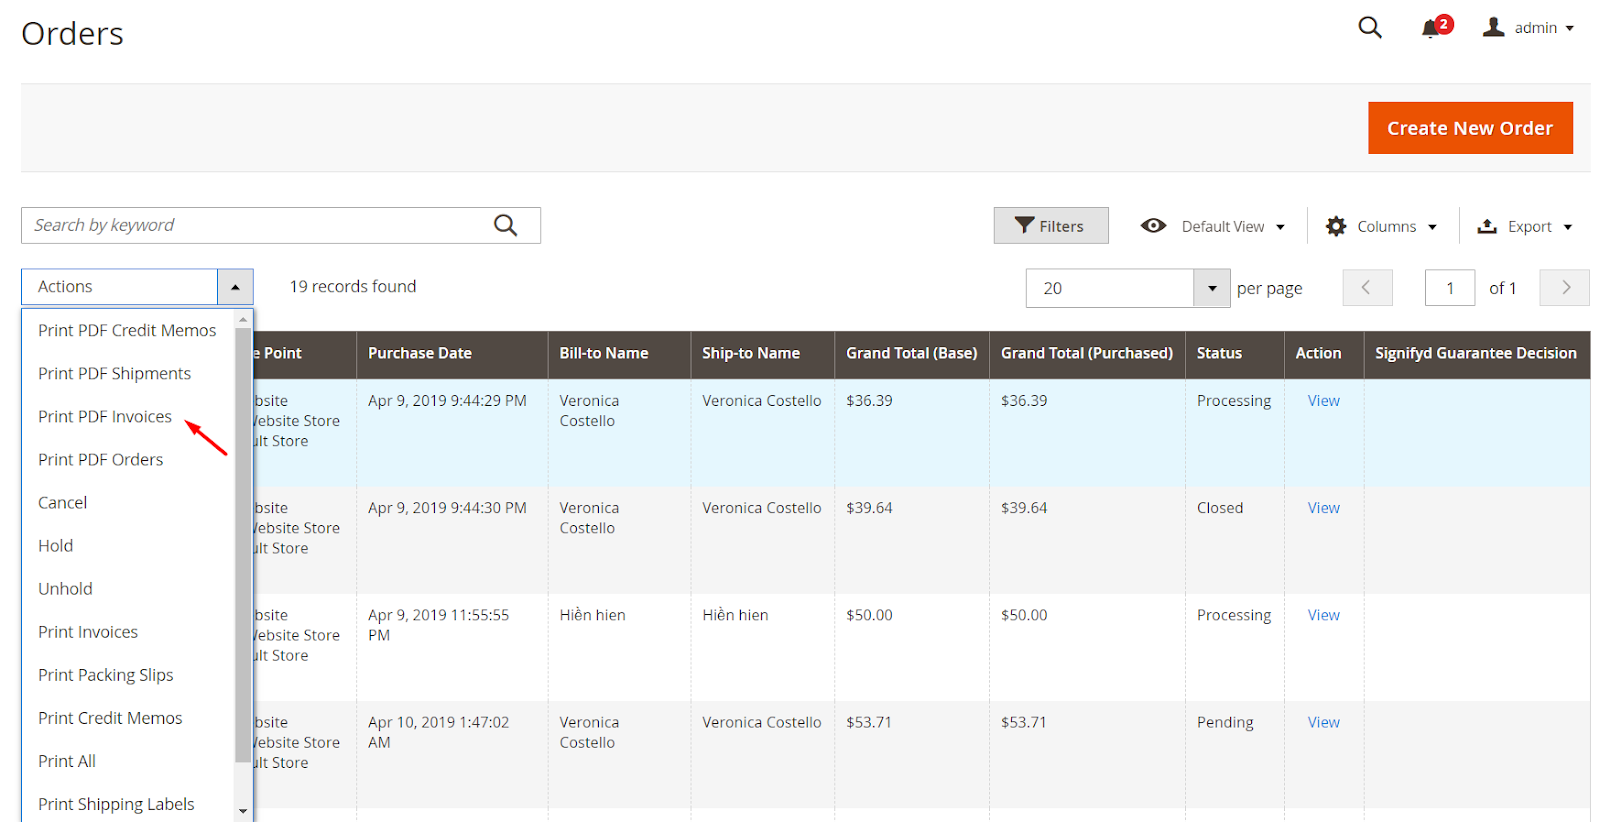
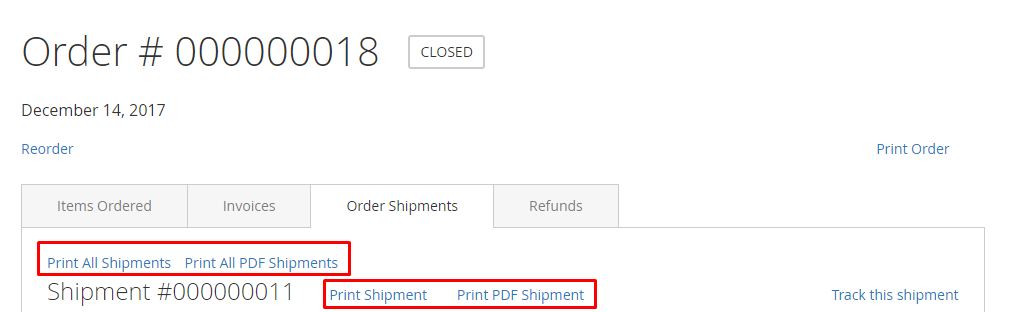
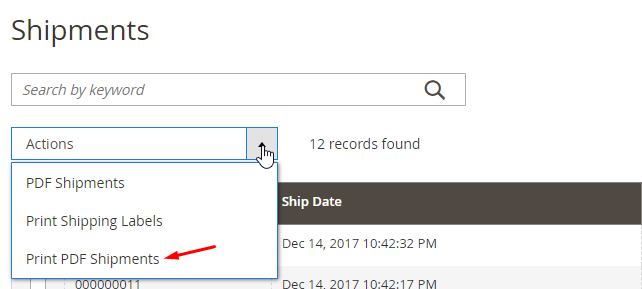
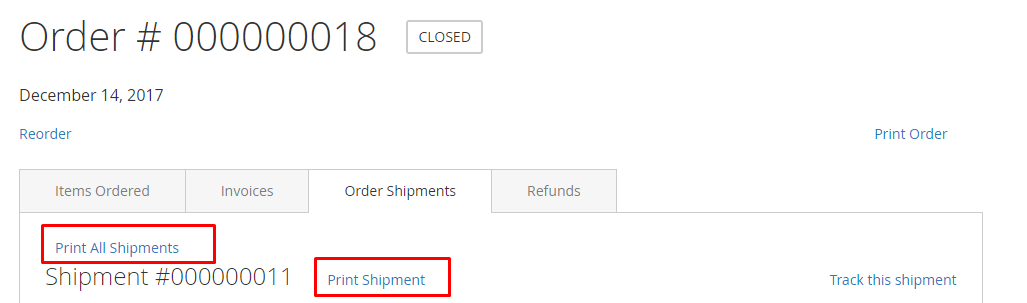
From the admin backend, follow Sales > Operation > Orders. In this section, you can output a printable PDF Order. Moreover, PDF invoices, PDF shipments, or PDF credit memos can be used using the same method. Here is the detailed guide for the Order's part:
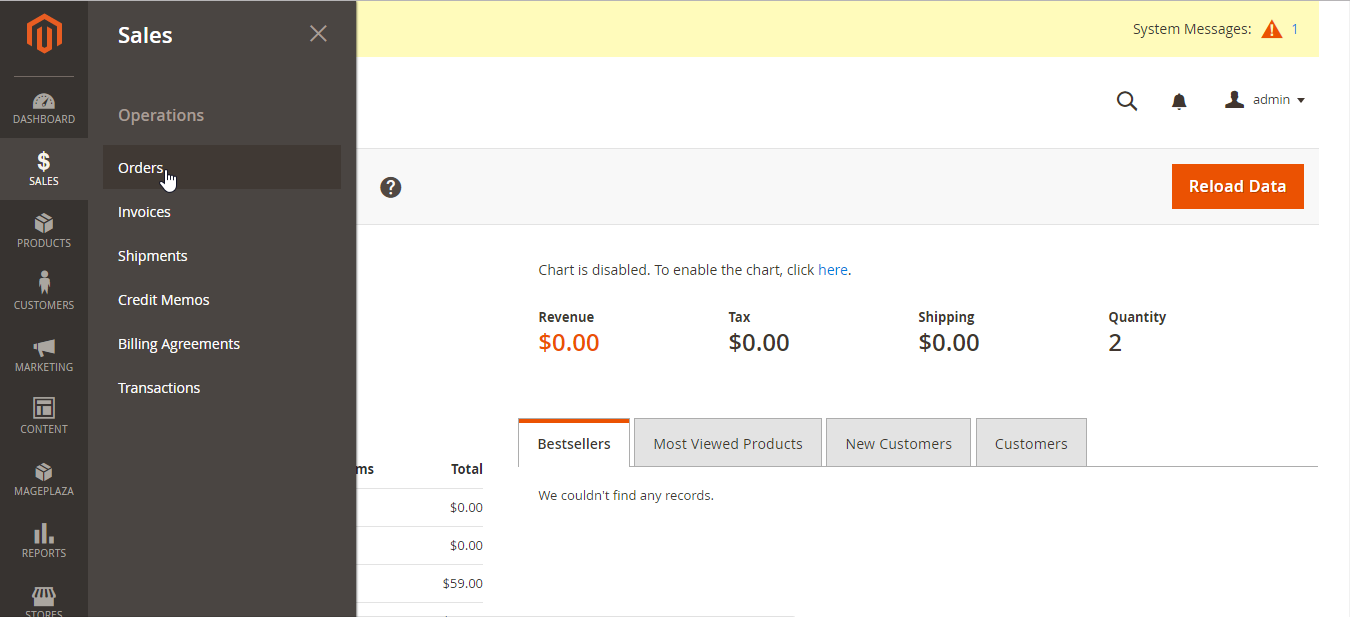
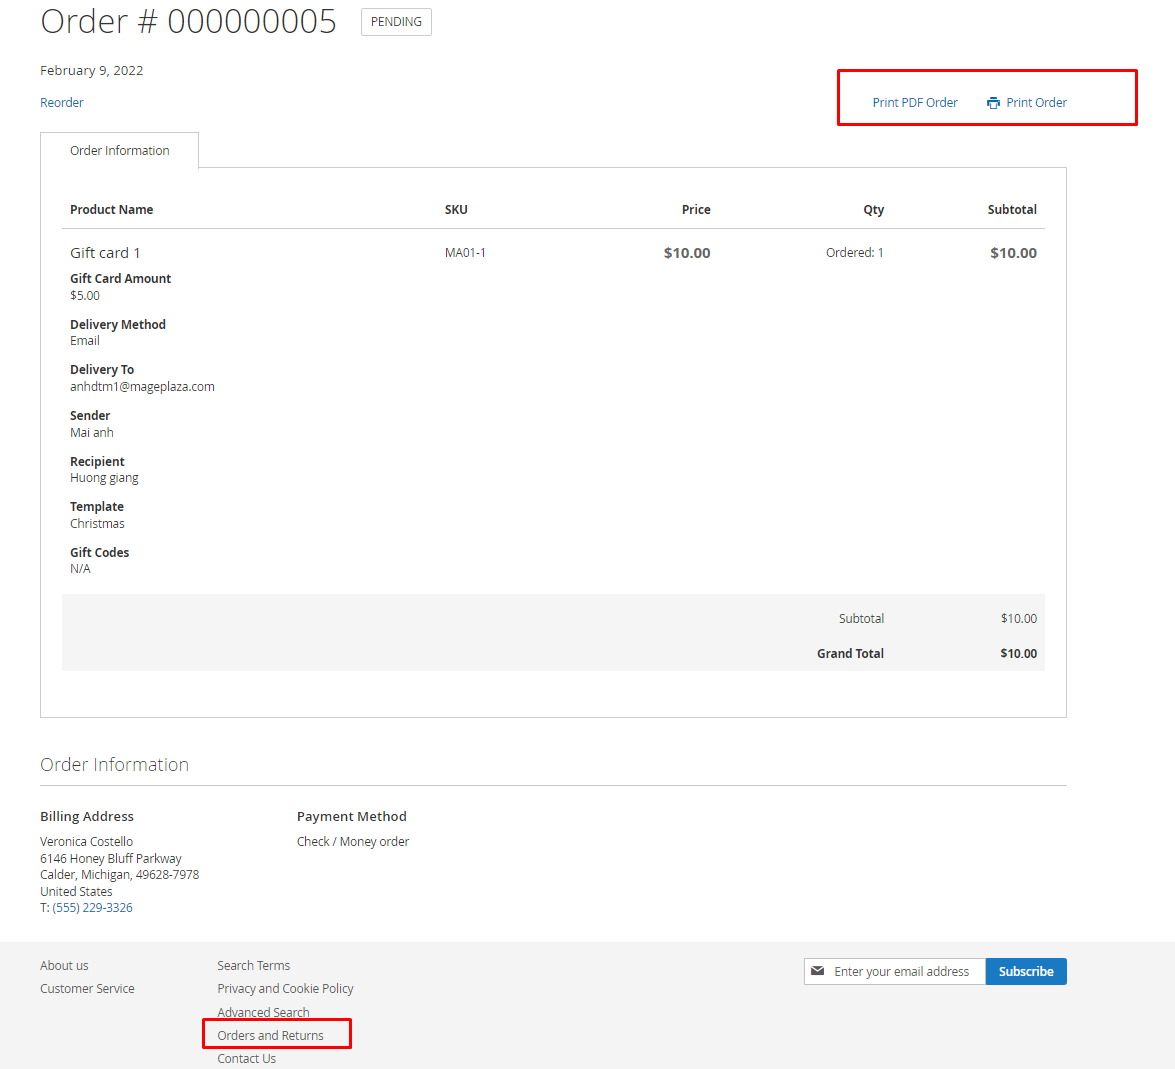
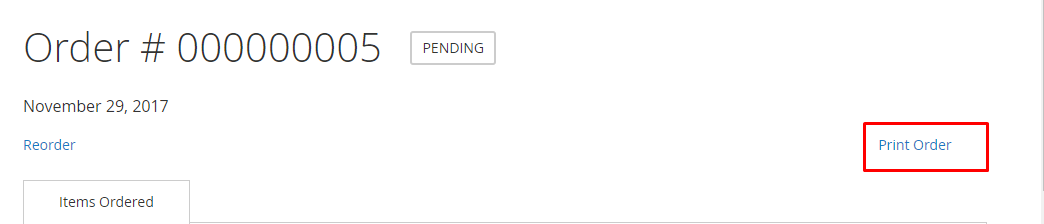
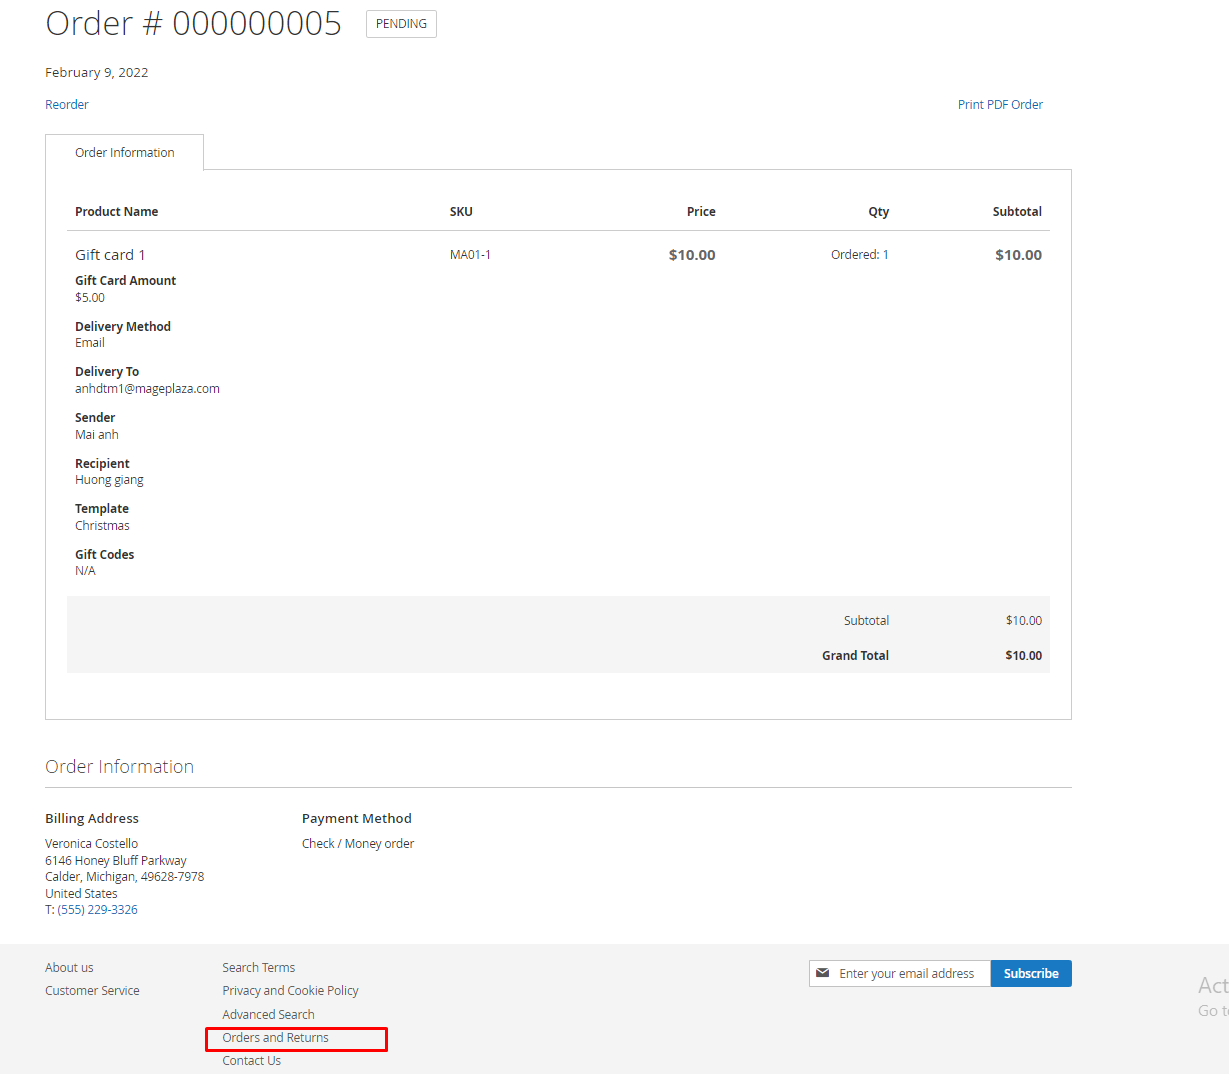
In the Order section, click Print PDF Order button to download the PDF Order.

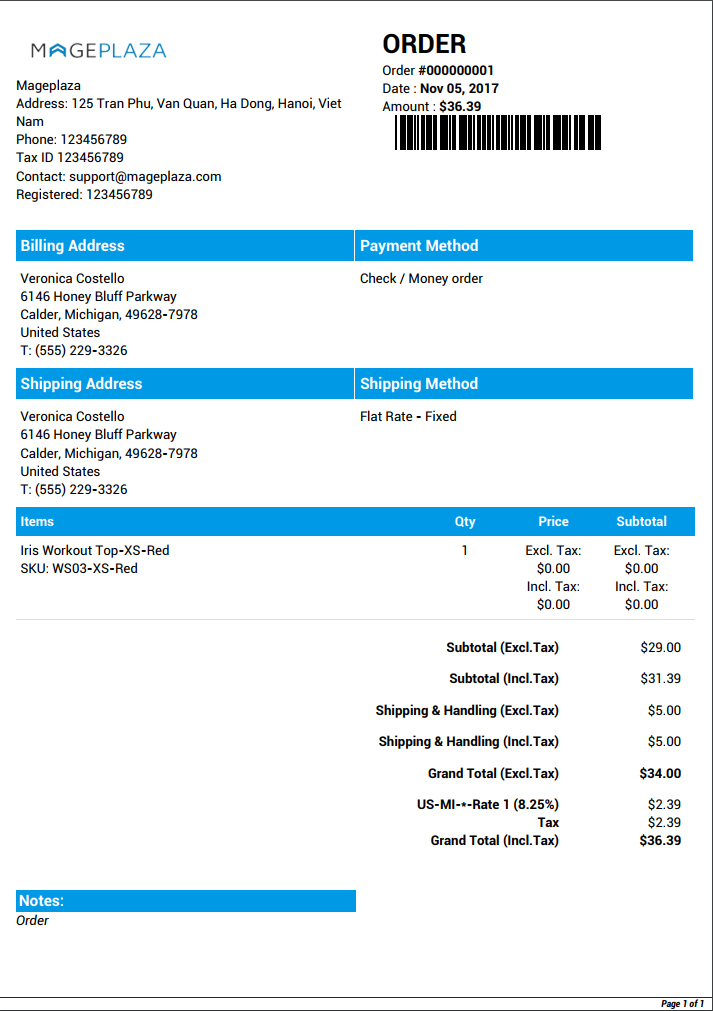
The downloaded PDF will have your designed template from previous steps you’ve done above.
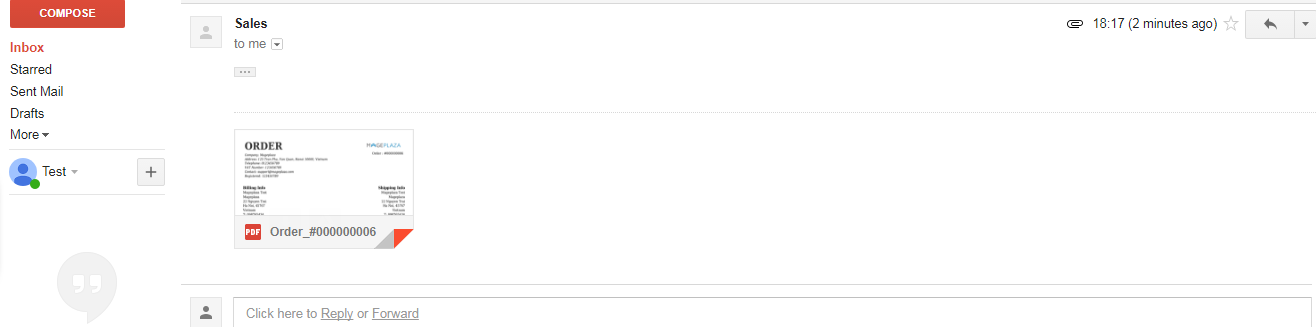
When you click Send Email, the sending email will be attached to that PDF Order if in the 1.2. Order’s configuration, “Enable PDF Attachment = Yes”. Besides, when customers place a new order, stores will send that particular order billing to their emails. Your customers can preview and download this PDF Order to print instantly.
When you create Invoice, Shipment or Credit Memo, if you check the “Email Copy of Invoice”, “Email Copy of Shipment” or “Email Copy of Credit Memo” box, the sent mail will also include the PDF file.
Similar to the Order section, Invoice, Shipment, or Credit Memo PDF files will be attached to the sent mail, or when the customer clicks the Print button, the PDF file will be downloaded automatically. With the virtual product’s Order, in the PDF Order, PDF Invoice, PDF Credit Memo, there won’t be included Shipping To, Shipping Information or Shipment Method section.
4. API
Mageplaza's PDF Invoice extension supports the use of the Rest API to view details of the PDf file via order, invoice, shipment, credit memo, and more, created by the admin and customer.
5. FAQs
6. Support and Assistance
1. Customer Support
For any assistance, please visit our Support page or email us at cs@mageplaza.com/ sales@mageplaza.com
2. Create a Ticket
If you need to create a support ticket, please use the following link:
Operating Hours
Our support team is available during the following hours:
- Monday to Friday: 8:00 AM - 23:59 PM
- Saturday: 8:00 AM - 12:00 PM
- Sunday: Closed
Refund Policy
We understand that sometimes things don't go as planned. Please review our refund policy for detailed information:
Frequently Asked Questions (FAQ)
For quick answers to common questions, please visit our FAQ page: