Request For Quote
Overview
How can your loyal and wholesales customers can make a bagain on your stores if they buy product in large quantity? With Mageplaza Request For Quote, customers and admin can create quote prices for a request. A chat channel established, helping admin and customer to discuss with each other. Besides, button request for quote displayed on the category page, product detail page, view cart page helps customer make a quote easily at anywhere. Moreover, the extension also notifies customers when the request is about to expire and has expired already so that customers can track their quote again.
In addition, we also support Request For Quote compatible with Quick Order extension, SMTP. This extension helps you quickly handle customer requests and take care of your customers better.
Download and Install
- Download Request For Quote
- Install Mageplaza extension
How to Use
With this extension Customer can perform the following actions:
1. Customer creates Request for Quote:
To create a Request for Quote, customer can follow these steps:
Step 1: Add Product(s) to Quote Cart.
When Guest click on Add to Quote icon, a popup shown requiring login to your account.
Customer can add products to Quote Cart at locations below:
- Categories Page
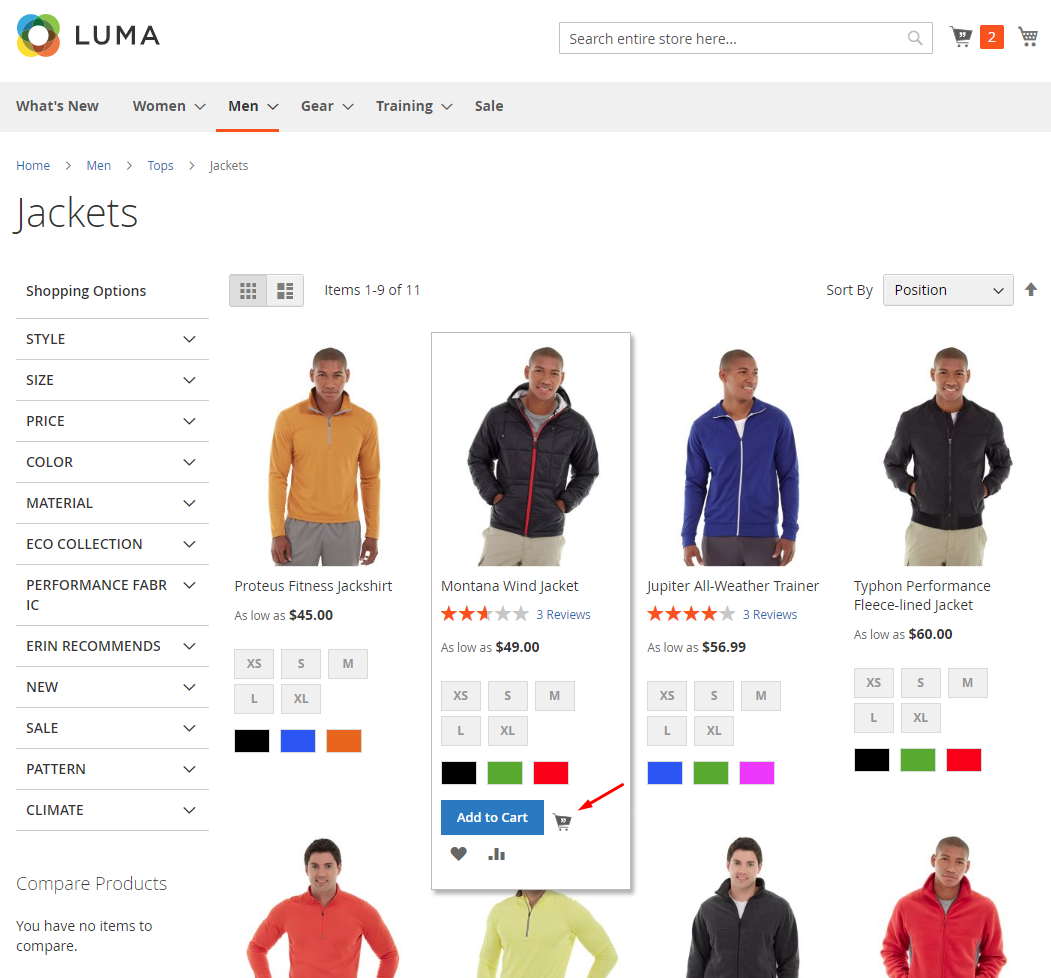
- Product Detail Page

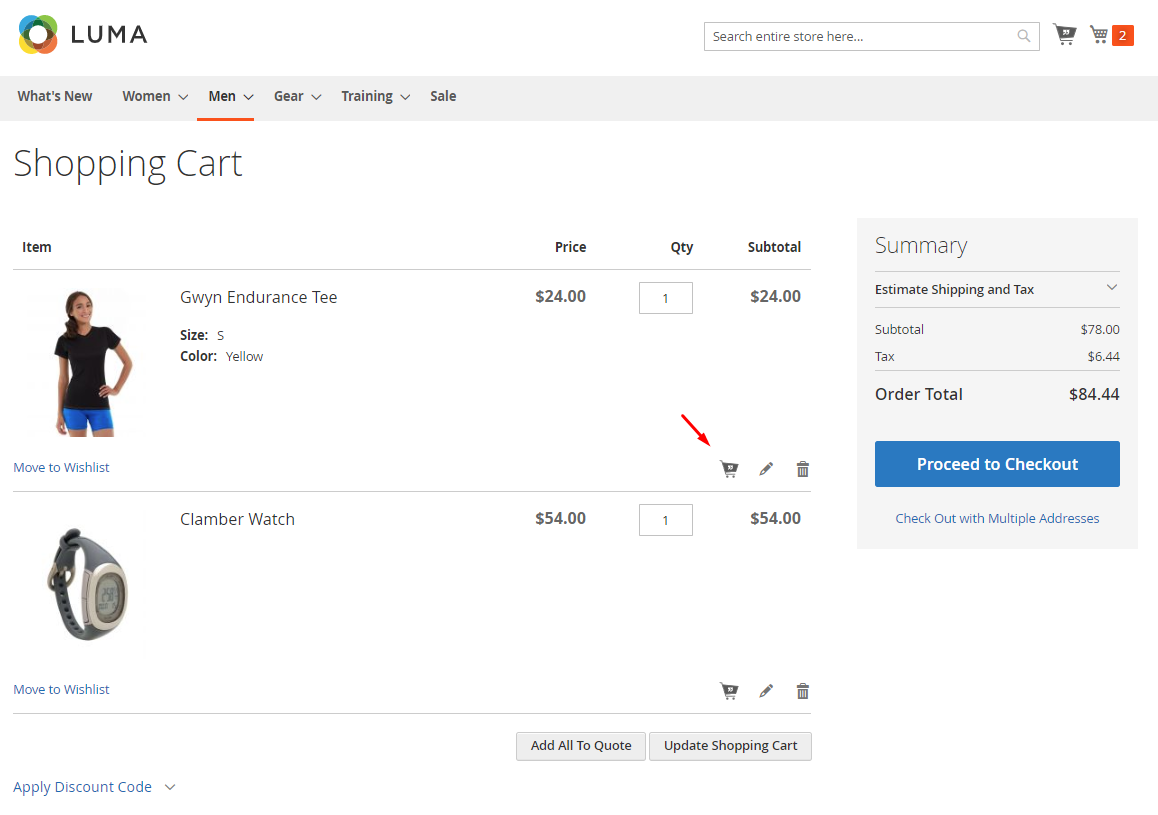
Shopping Cart Page
Note: Customer can add all products in the cart to the quote by clicking on the Add All To Quote button.
Step 2: Submit Quote Cart
After adding product(s) to the Quote Cart, customer click the mini Quote Cart icon (next to the Shopping Cart icon) and then click View Quote Cart.
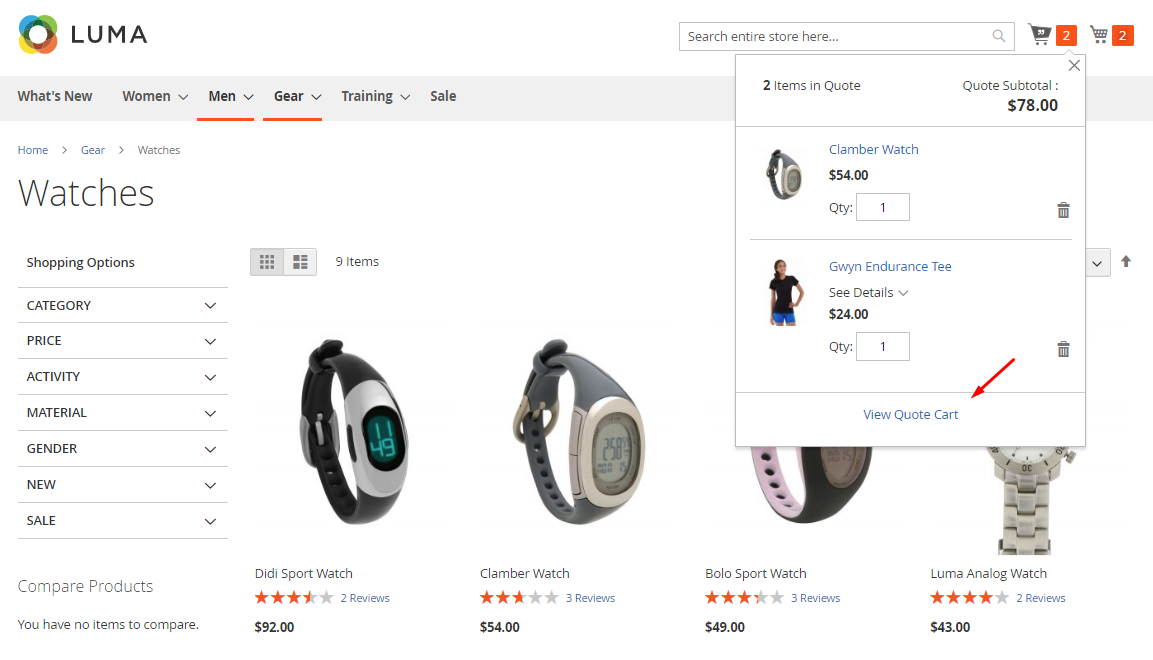
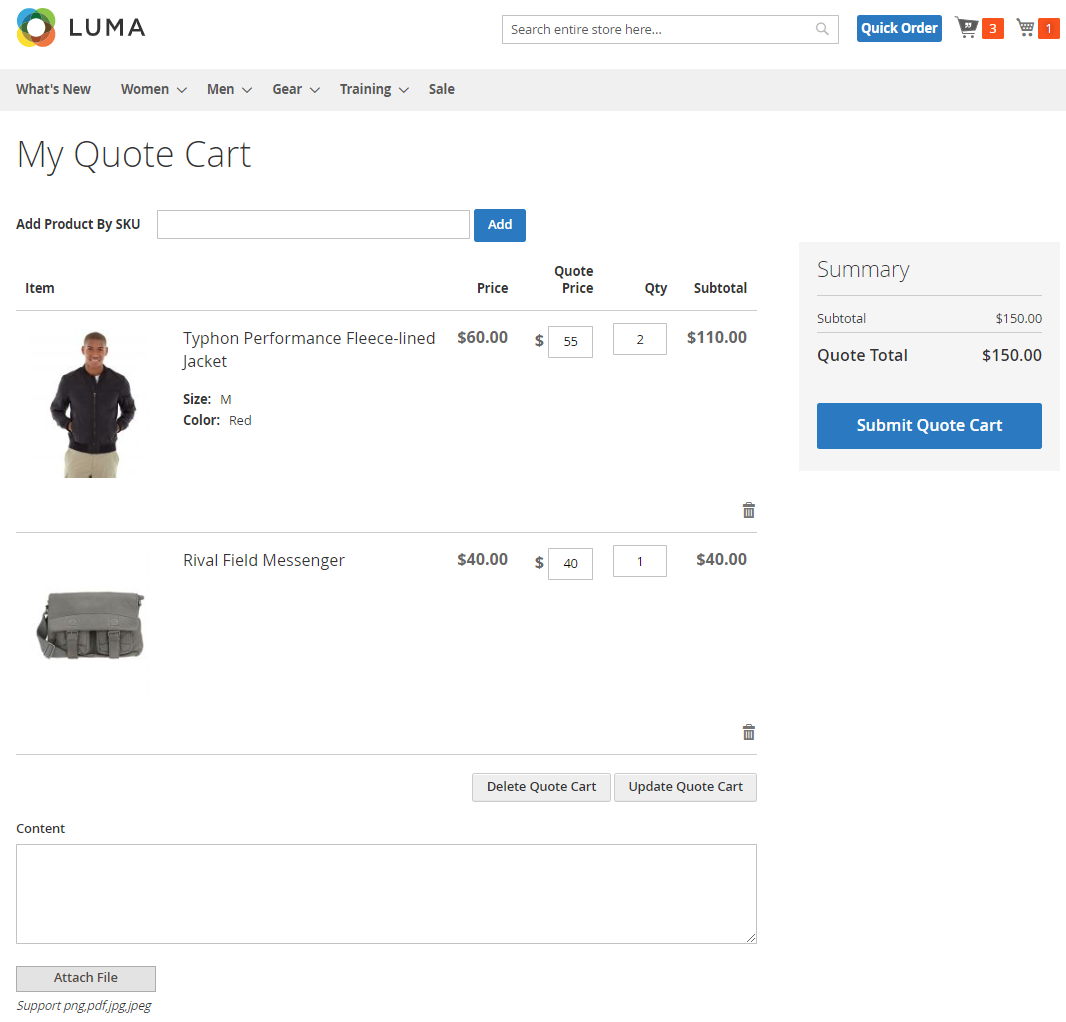
The system automatically redirects to My Quote Cart page. Here, display information of the product that has been added to quote.
- Customer can add one or more products by entering the SKU at Add Product By SKU.
Note: Products that use Customizable Options (required) will not be added here.
- Customer makes the quote for product(s) by changing Quote Price and Qty, click Update Quote Cart to complete the change.
- Click Add Comment to enter and send a message to the admin when submitting the quote. Attachments for messages must not exceed 2Mb.
- Click Submit Quote Cart to complete the Request creation.
- Requests created by customer are all displayed in Pending status
 .
.
2. My Quotes
- Customer can view quote information such as: ID quote, Submitted Date, Expired Date, Quote Total, Status, Action.
- In addition, customer can perform actions in the Action column such as:
- Select View: To view the Quote details.
- Add to Cart: The products included in approved quotes will be added to the cart.
- Duplicate: The products included in the duplicate are automatically added to quote.
- Cancel: Cancel the request for quote.
- Delete: Delete the quote.
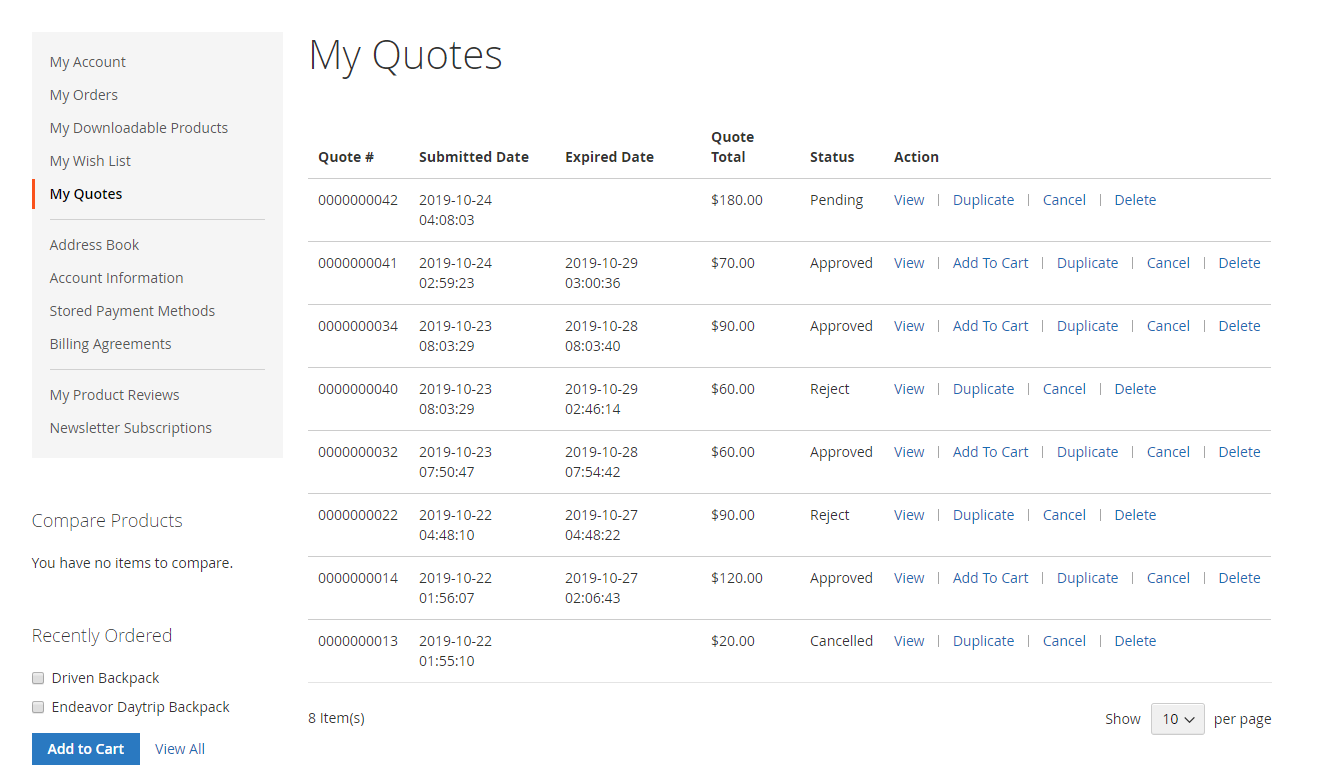
- In View Quote, customer can only edit the quote when the quote has Status = Pending.
- In addition, customers can Delete, Cancel, Add to Cart, Print Quote and send a message to the admin at Conversation.
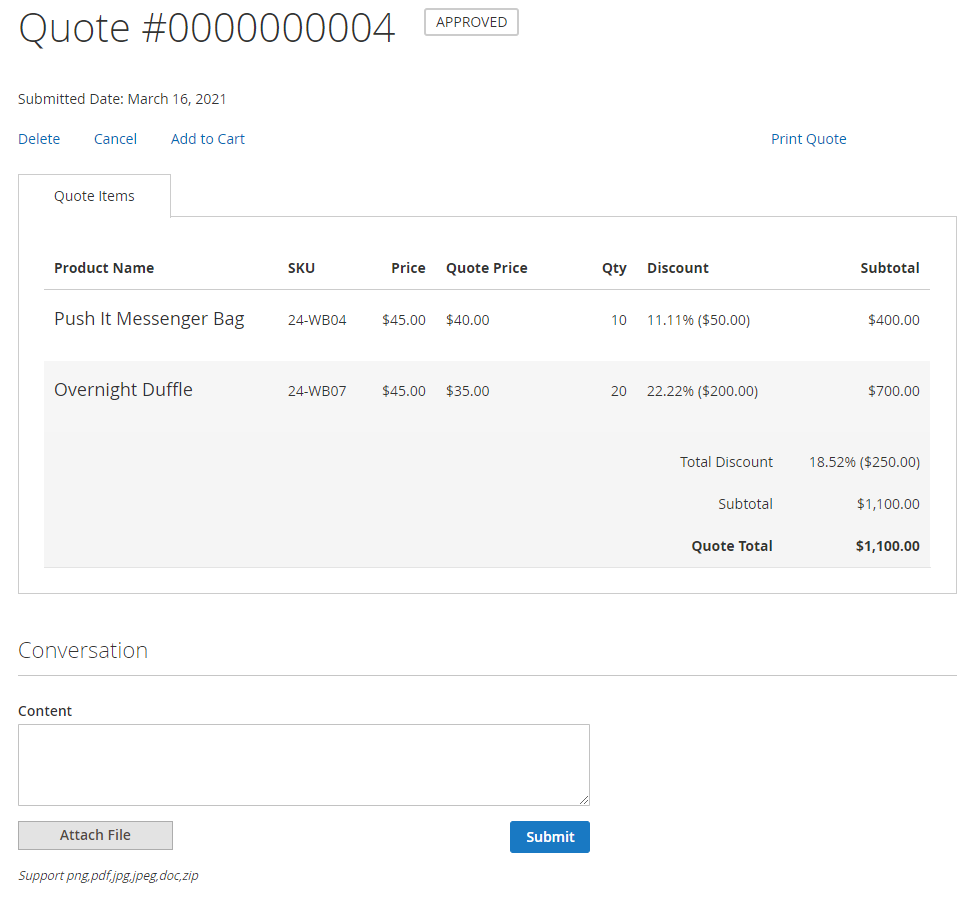
3. Customer add quote to cart
- Customer adds the quote to the cart when the quote is approved. This quote has already added to cart in this order. Each quote is added to cart once per order.
- In order for customers to easily distinguish the product in quote from other products, the extension supports displaying Quote Label item in each product belonging to quote.

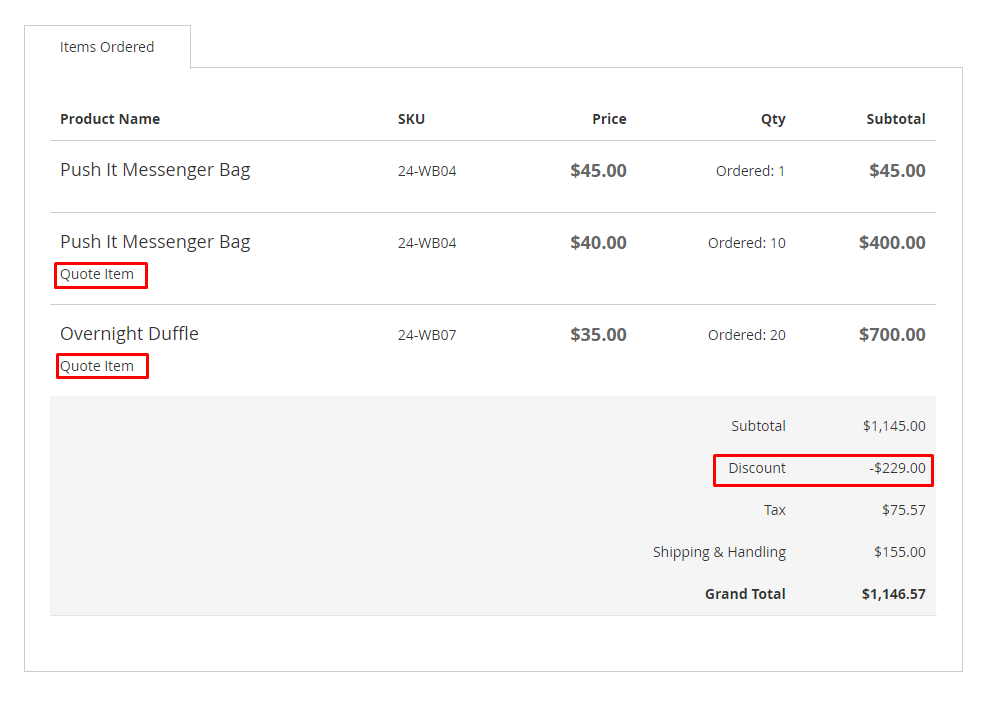
- Customer view order
How to Configure
I. Configuration
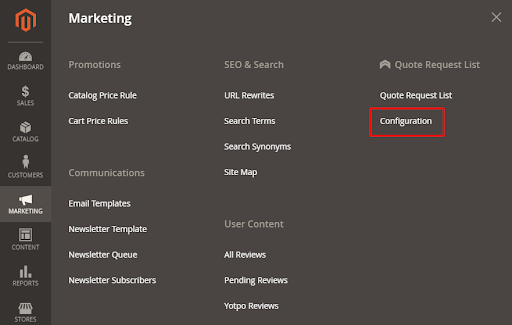
Login to the Magento Admin, go to Marketing > Quote Request List > Configuration.
Admin can also go to Stores> Configuration > Mageplaza > Request For Quote to configure the module.
1. General

- Select Enable = Yes: The Request For Quote module is enabled.
- Quote Request Icon: Admin click Choose File to select the image for the icon. If left blank, the icon will be the module's default icon.
- Allow By Categories:
- Select All Categories: Request for quote will be applied to all products in all categories.
- Select Specific Categories: The module automatically displays the Select Categories field. Admin selects the categories so that the products in that category are applied Request for quote.
- Enable For Customer Group: Admin selects a group of customers that can request for quote.
- Display For Guest: Select Yes to allow customers who do not have an account to make a request. When the customer clicks on the Add To Quote button, the system will ask the customer to loggin.
- Allow Requesters To Attach Files: Choose Yes to allow customers to upload the file for the request.
- Allow File Types: Admin enters file formats for the file to be uploaded in the message area. This field only shows up when Allow Requesters To Attach Files = Yes
- Add-to-cart Redirect Page: Admin selects the redirected page when clicking Add to cart to the My Quote Cart** page.
- Auto-approve Quotes: If select Yes, quote will be approved automatically with a discount smaller than the fixed amount (%)
- Once Percentage Discount is No More Than: The percentage discount (%) is applied for the whole quote excluding tax (only shown when Auto-approve is set as Yes)
2. Expiration Setting
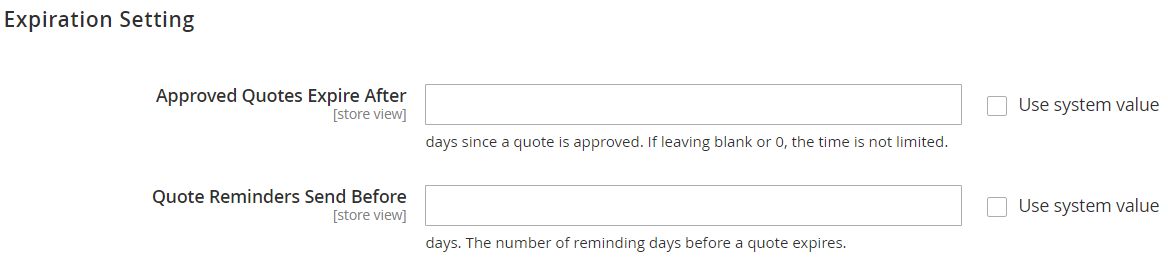
- Approved Quotes Expire After: Admin enter the number of expiration dates for the quote. Leaving the request blank mean that no expiration limited.
- Note: When quote expires, the system will automatically send notification email to customer.
- Quote RemindersSend Before: Admin enter the number of days to send a reminder email before the quote expires.
3. Email Setting
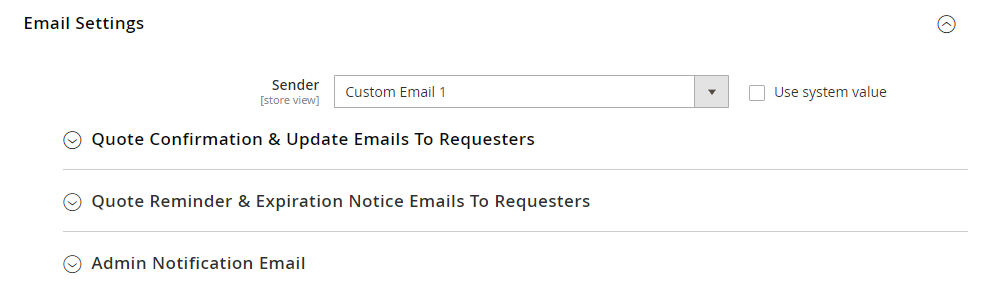
- Sender: Admin selects the email sender to the customer.
3.1. Quote Confirmation & Update Emails To Requesters
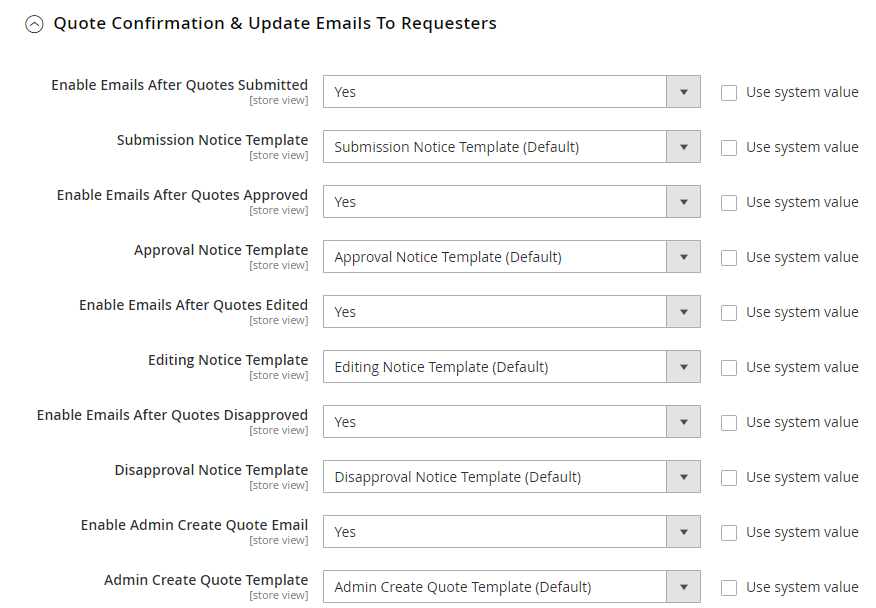
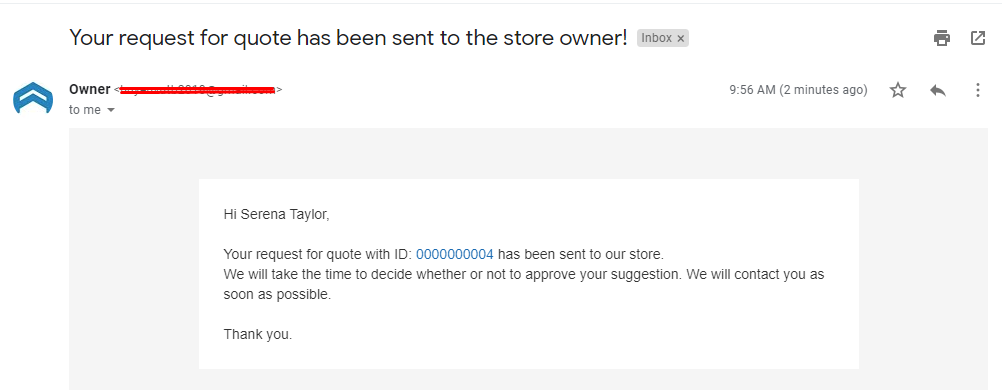
- Enable Emails After Quotes Submitted: Select Yes to send mail to customers when the quote has been successfully submitted. Admin chooses submission email template at Submission Notice Template.
- Enable Emails After Quotes Approved: Select Yes to allow sending mail to customer when quote has been approved. Admin chooses approve email template at Approval Notice Template.
- Enable Emails After Quotes Edited: Choose Yes to send mail to customers when the quote has been edited by admin. Admin chooses edit email template at Editing Notice Template.
- Enable Emails After Quotes Disapproved: Select Yes to allow sending mail to customer when the quote has been rejected by admin. Admin chooses disapproval email template at Disapproval Notice Template.
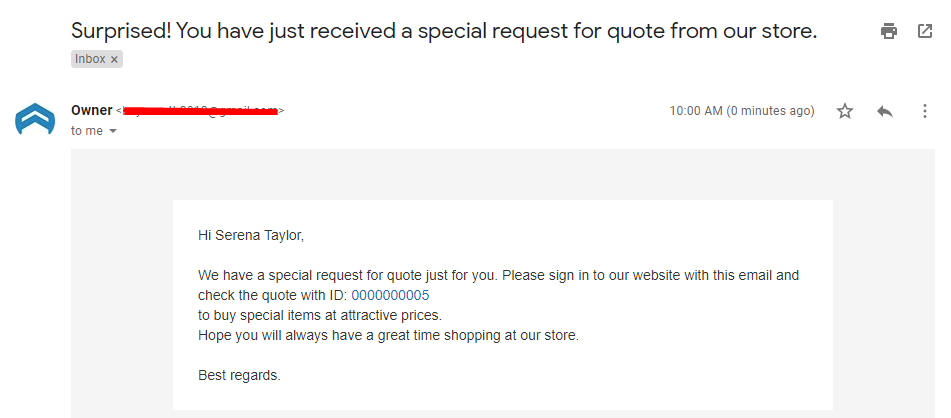
- Enable Admin Create Quote Email: Select Yes to allow sending mail to the customer when the quote has been admin created. Admin chooses create quote email template at Create Notice Template.
3.2. Quote Reminder & Expiration Notice Emails To Requesters
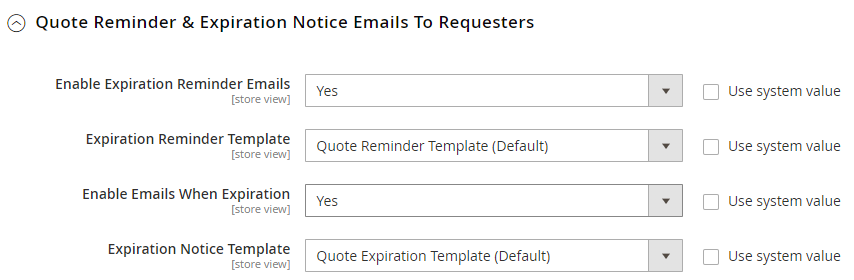
- Enable Expiration Reminder Emails: Choose Yes to send email reminders to customers. Admin chooses reminder email template at Expiration Reminder Template.
- Enable Emails When Expiration: Select Yes to send customers an email to notify the end of quote. Admin chooses expire email template at Expiration Notice Template.
3.3. Admin Notification Email
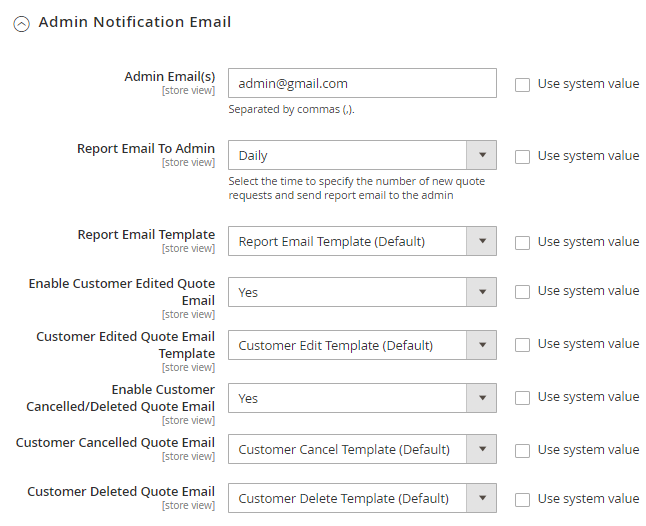
- Admin Email(s): Enter admin's email to receive notifications. The email is separated by commas.
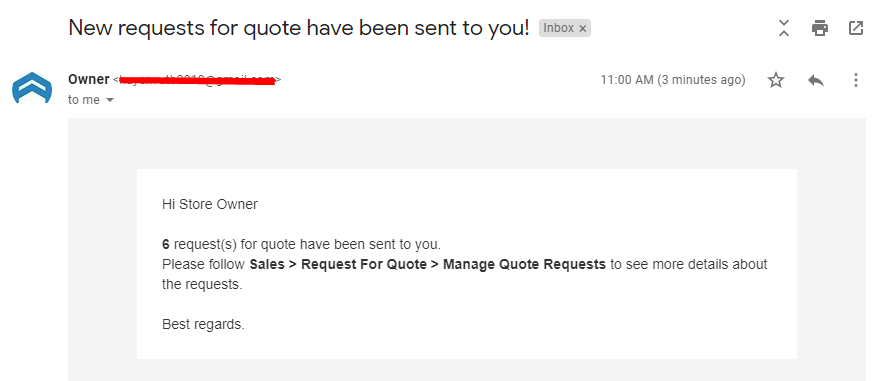
- Report Email To Admin: Admin chooses the time to send statistics of the number of quotes created to the admin. Admin select the report email template at Report Email Template.
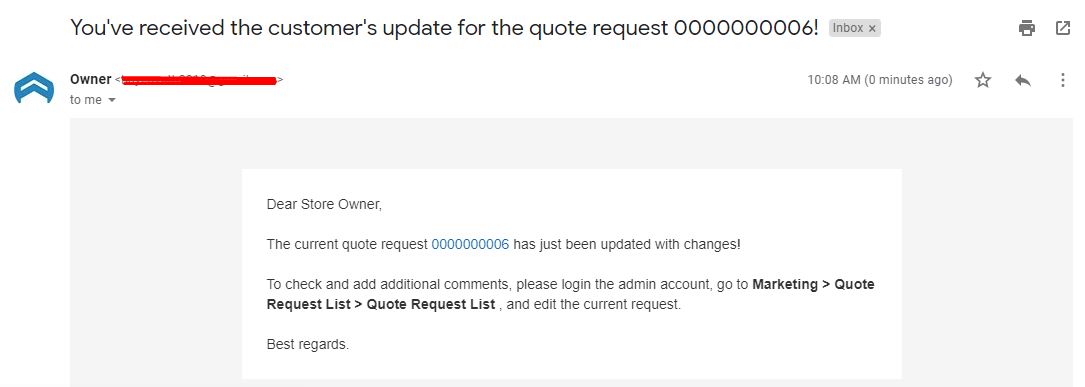
- Enable Customer Edited Quote Email: Select Yes to send an admin notification email when the quote has been edited by customer. Admin chooses edit email template at Customer Edited Quote Email Template.
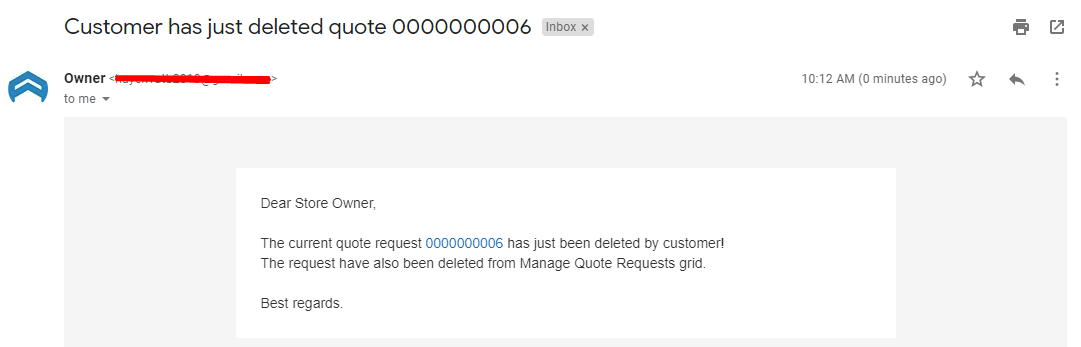
- Enable Customer Canceled/ Deleted Quote Email: Choose Yes to send admin notification emails when the quote is canceled/deleted by customer. Admin chooses cancel/delete email template at Customer Canceled Quote Email and Customer Deleted Quote Email.
II. Manage Request For Quote
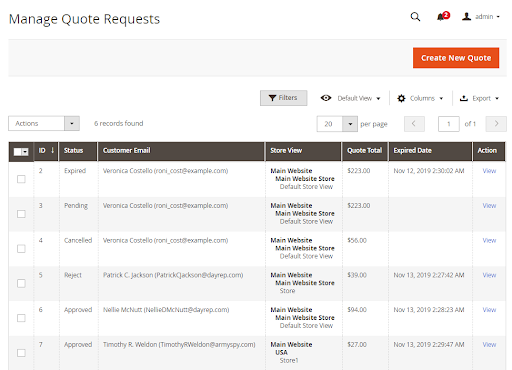
- This is where all the Request For Quote is saved.
- On the form grid, Admin can view all the basic information of Request For Quote such as ID, Status, Customer, Customer Groups, Store View, Quote Total, Expired Date, Action.
- The admin can perform the following actions:
- Edit: Click Edit in the Action column to edit the information on the Edit Request For Quote page.
- Change Status: Change the Request For Quote status.
- Create New Quote: Create New Request For Quote.
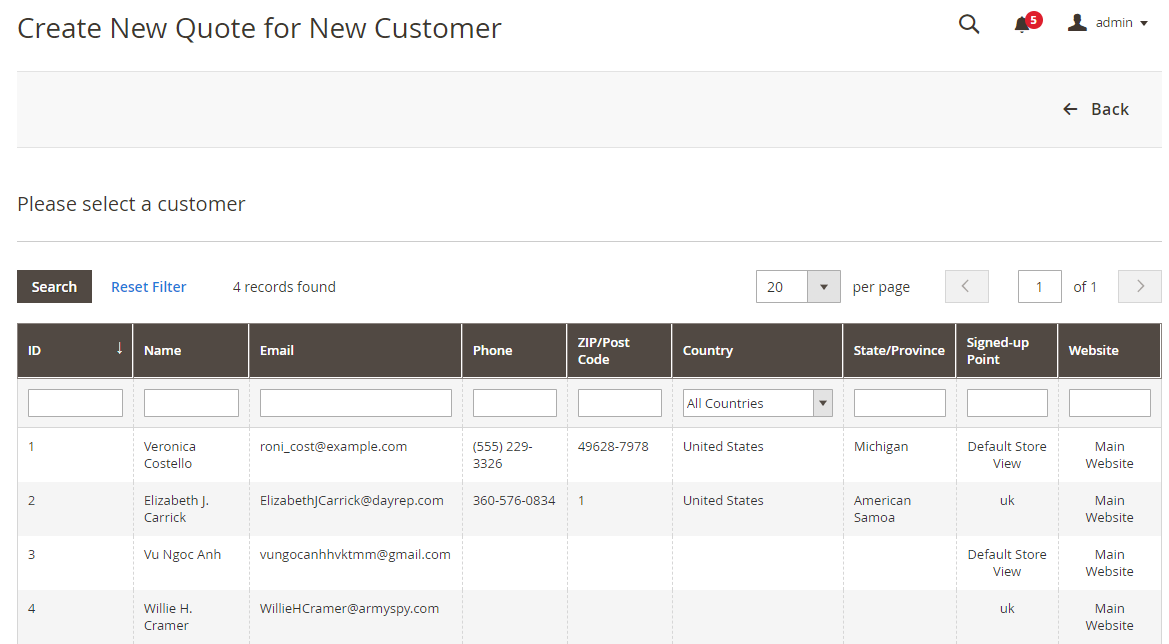
1. Create New Quote
The admin support module creates a new Request Quote for existing and existing Customer accounts. Admin, follow the steps below. The steps to create a new quote are similar to the admin for creating a new order.
Step 1: At Manage Quote Request Grid, admin click the Create New Quote button.
- Customer grid displays, admin select an account to create quote for that account.
- You can click Back to return to the grid Manage Quote Requests
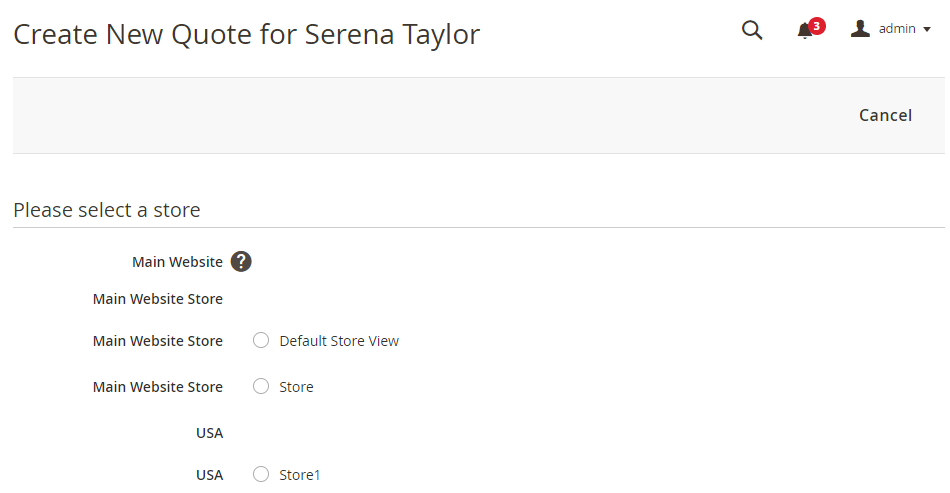
Step 2: Admin select Store, Quote created will be applied to that store.
Click Cancel to cancel the action.
Step 3: Admin creates quote.
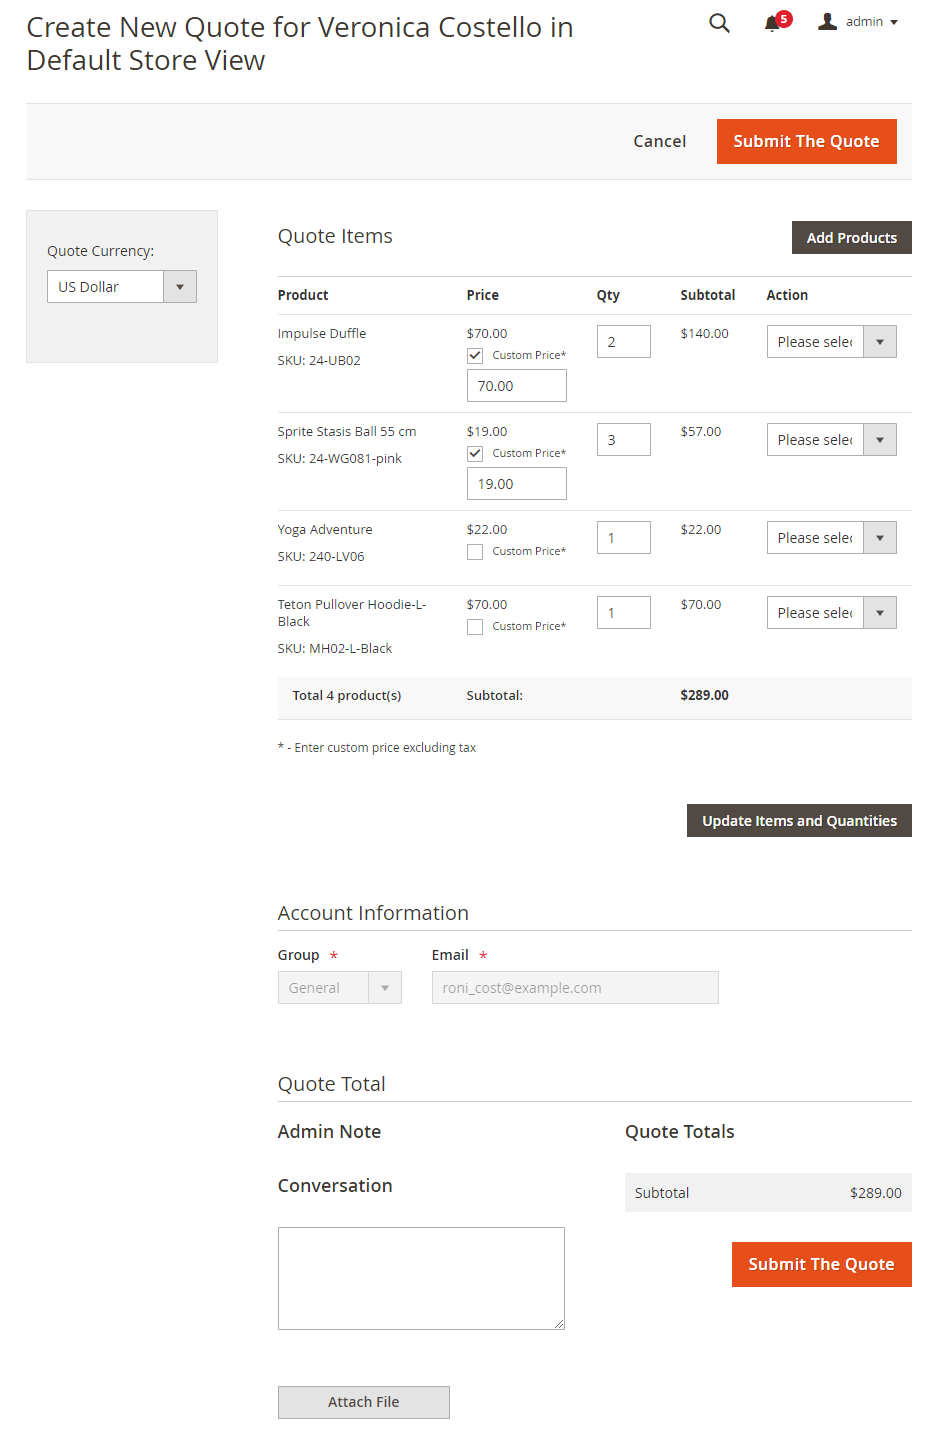
- Click the Add Product button to select a product to apply to the quote. Then, select Add Selected Product(s) to Quote to display the selected products on the Quote Item.
- Click Update items and Quantities after editing Price and Qty. - Select quote currency at Quote Currency.
- Account Information: Here shows the Customer's Group and Email created quote, admin cannot edit this information.
- Conversation: Admin enter the message for quote. Attached files in messages must not exceed 2Mb.
- Quote Totals: Displays the total Quote Price.
- Click Submit The Quote to finish creating the quote for the customer. The admin-created quote will be in Approve status.
- Click Cancel to cancel the action.
2. Edit Request Quote
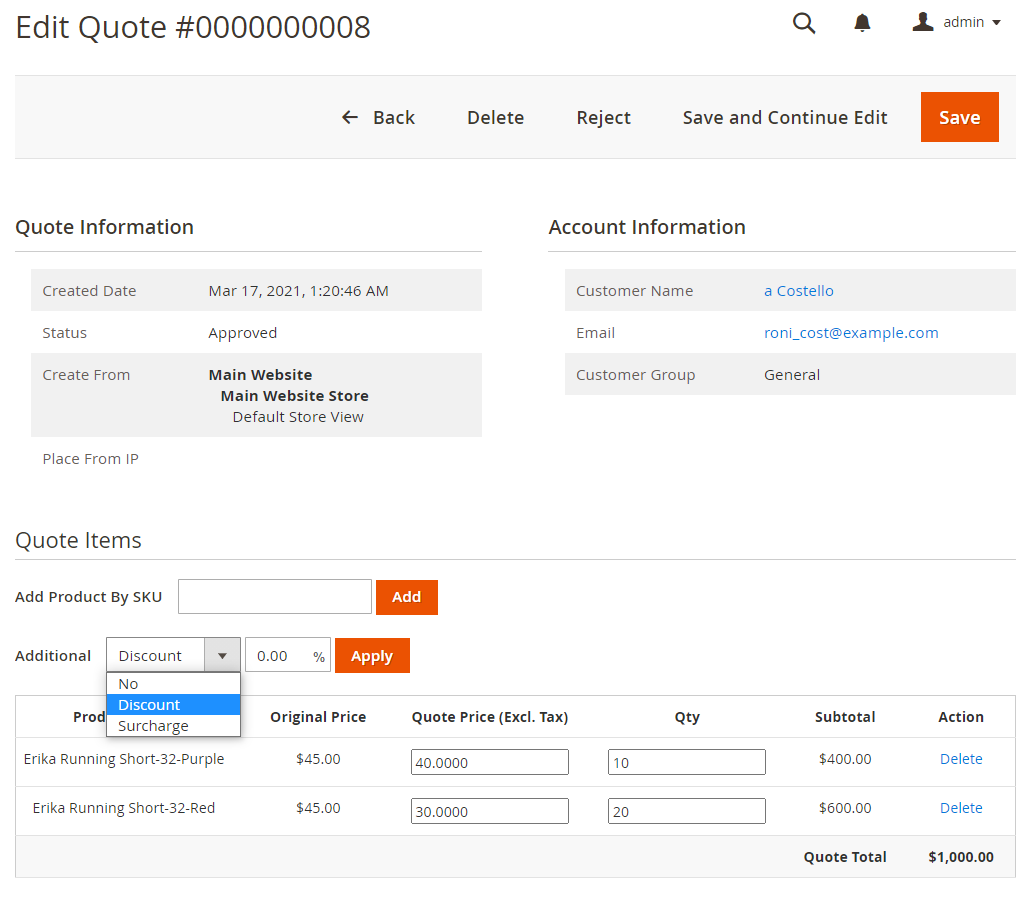
- Quote Information: Displays information of quote such as Created Date, Status, Expired Date, Create From, Place From IP.
- Expired Date is only displayed when the quote is in Approve, Reject, and Expired states. Admin can change the quote's expired date
- Account Information: Display account information such as Customer Name, Email, Customer Group.
- Quote Items: Displays the product information contained in the quote.
- Add Product By SKU: Admin enter SKU to add product to quote, the SKUs are separated by commas. Products that use Customizable Options (required) will not be added here.
- Admin changes the price and qty for the product at Quote Price and Qty.
- Click Delete to delete the product in the quote.
- Conversation: Admin enter the message for quote
- Attachments for messages must not exceed 2Mb.
- Click the Send email to Customer checkbox: The message is emailed to the customer.
- Click the Visible on Frontend checkbox: The message is sent via the frontend.
- Click the trash icon to delete the message.
- Additional: Select the additional Discount/ Surcharge for quote Note: After editing the quote, the admin should Save/ Save and Continue Edit before Approve or Reject.
III. Emails
1. For Customer
1.1. Emails After Customer Submitted Quote
1.2. Emails After Admin Submitted Quote
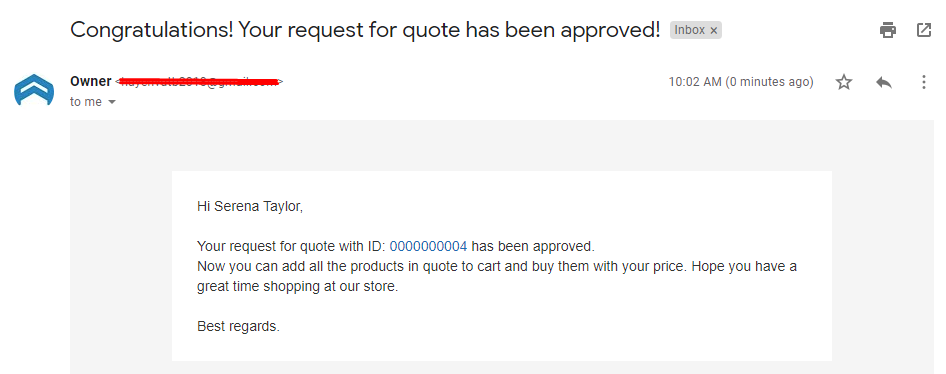
1.3. Emails After Quotes Approved
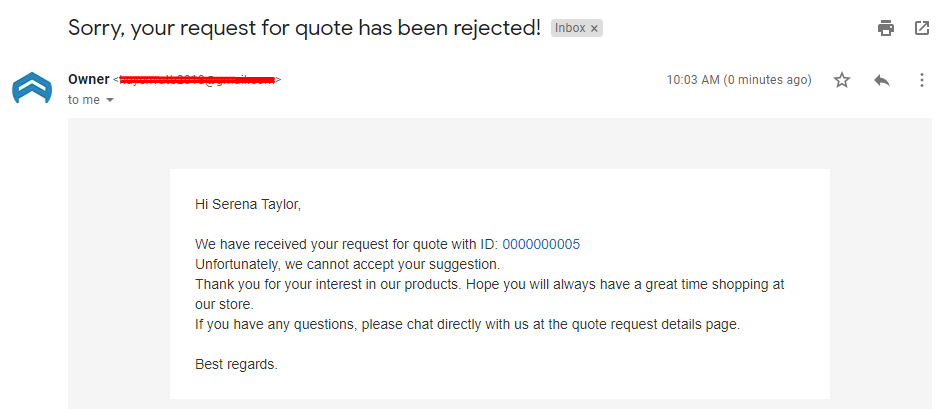
1.4. Emails After Quotes Rejected
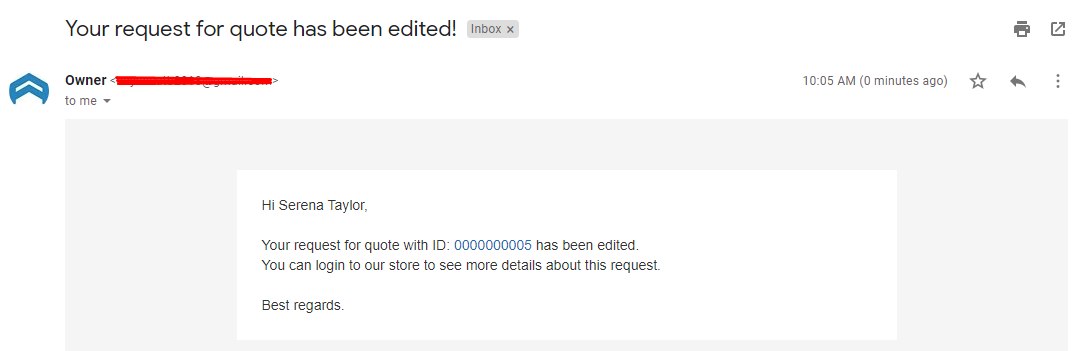
1.5. Emails After Admin Edited Quote
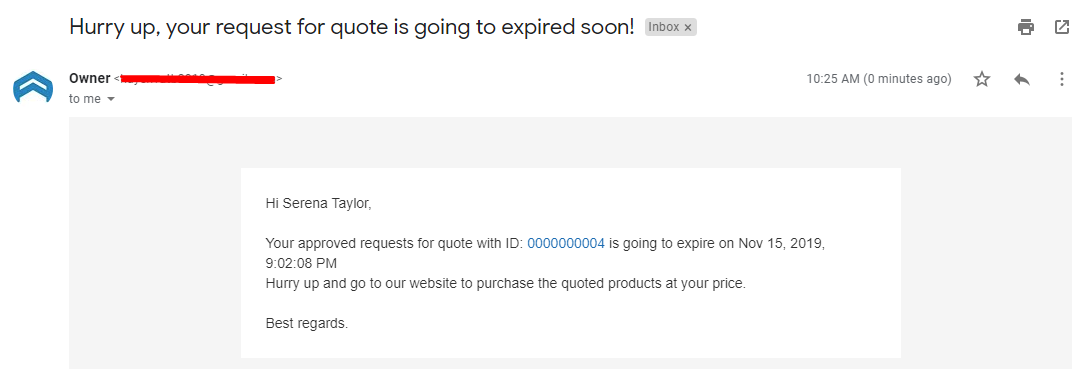
1.6. Quote Reminder Email
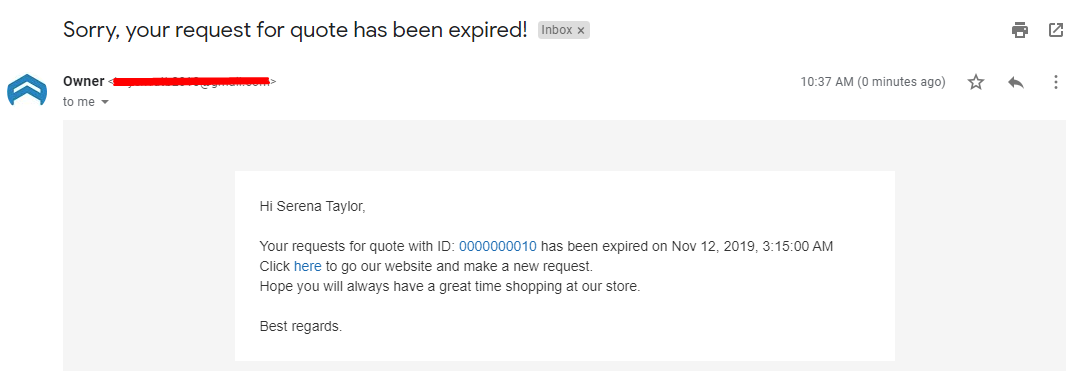
1.7. Quote Expiration Email
2. For Admin
2.1. Customer Edited Quote Email
2.2. Customer Canceled Quote Email

2.3. Customer Deleted Quote Email
2.4. Quote Report Email
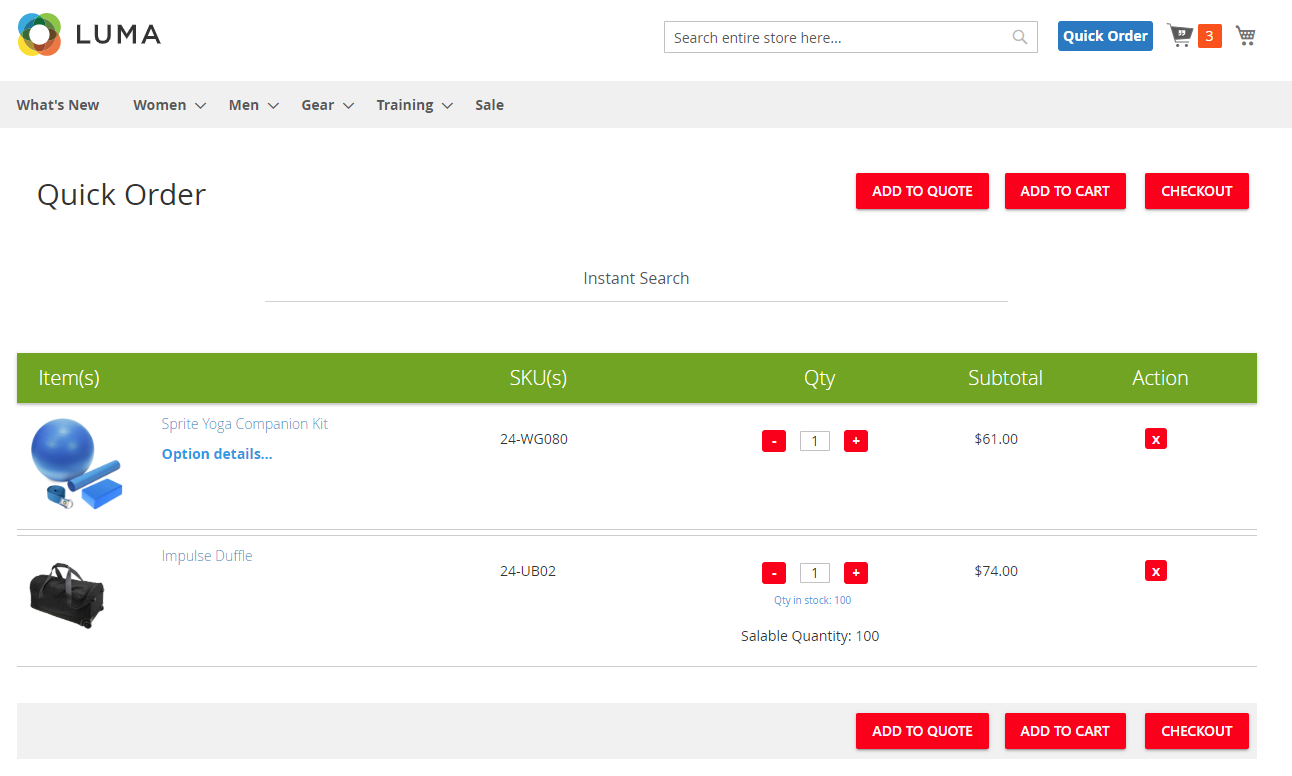
IV. Compatible with Quick Order extension
The Add To Quote button is displayed on the Quick Order page when you use the Quick Order and Request For Quote extensions together. This support helps customers' operations more quickly.
III. Rest API
Mageplaza Request For Quote extension allows customers to use Rest APi to practise requests realted to Quote such as adding products to quote, deleting items in the quote, updateting quote, canceling/deleting quotes that have been summited, uploading files, creating reply for conversations, getting quote/conversation information. Moreover, when you using both Quick Order extension and Request for Quote extension, you can add items form the quote to Quick Order.
See details request Rest API supported by Mageplaza here.
View Rest API Guidelines for Magento 2 here.
See guidelines to create tokens here.