Zoho CRM
Overview
Zoho CRM or Customer Relationship Management software is a cloud-based CRM service that helps you store and segment your customer data into different groups throughout the customer's journey. Mageplaza Zoho CRM extension will help you integrate seamlessly with Zoho CRM to connect and synchronize single or bulk data from Magento including Customer, Product, Order, Invoice, Catalog Rules to Zoho CRM with Accounts, Contacts, Leads, Sales, Purchase Orders, Invoices, Products, Campaigns. That will help create a smooth flow to maintain customer relationships and organize your business well. Also, data to Zoho CRM can be sent manually or automatically synchronized whenever there is any update.
How to download and install
How to use
Zoho CRM:
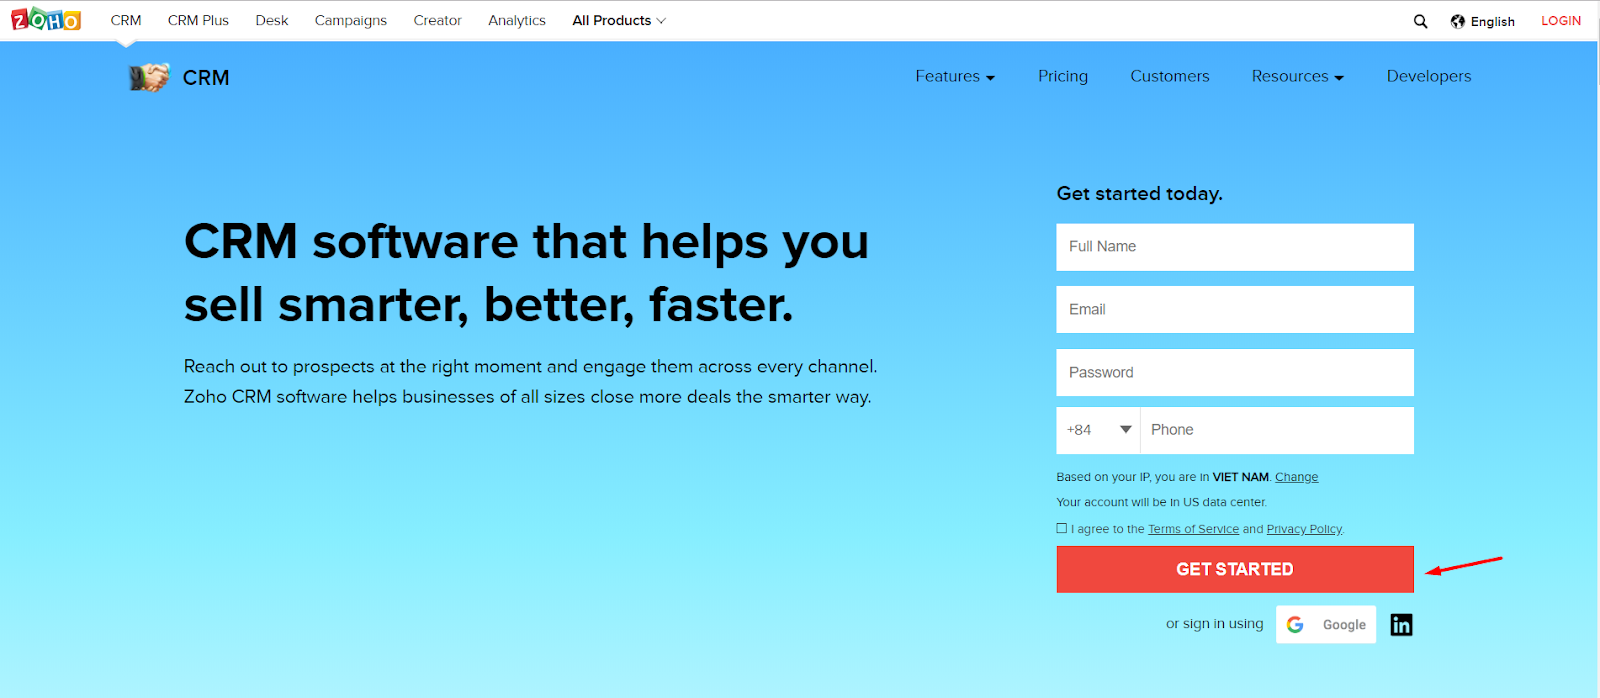
- To register a Zoho CRM account, visit the this link.
After registering an account, visit this link to get your Zoho API login information when clicking Add Client ID. There provided with Client Id information, Client Secret you need to be able to connect with Zoho CRM.

Fill in the information below to Create Zoho Client ID.
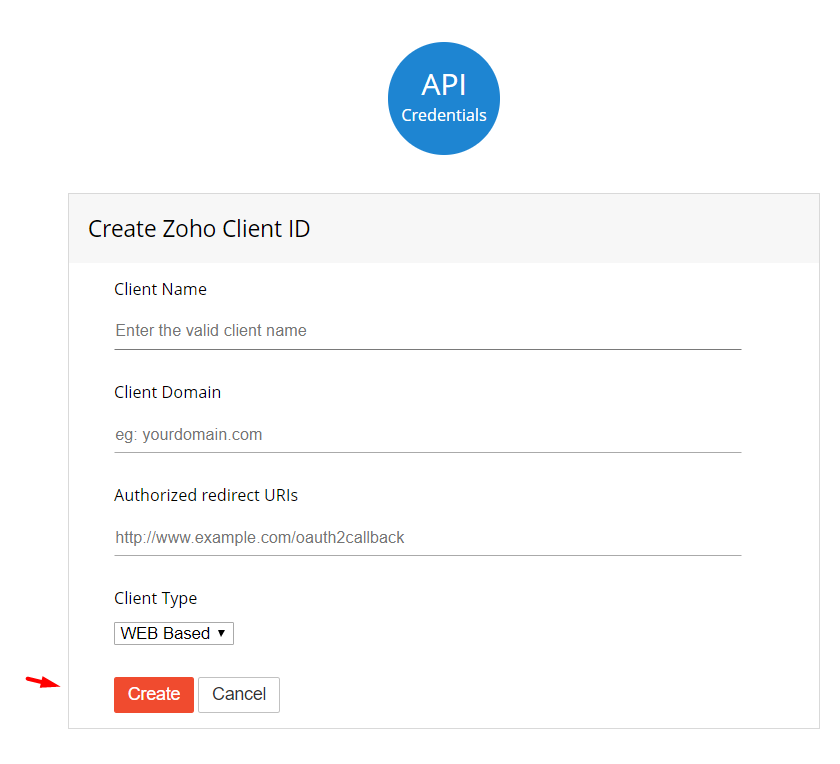
- With Authorized Redirect URIs of Zoho CRM, you need to get the available value at Authorized Redirect URIs field from Mageplaza Zoho CRM extension.

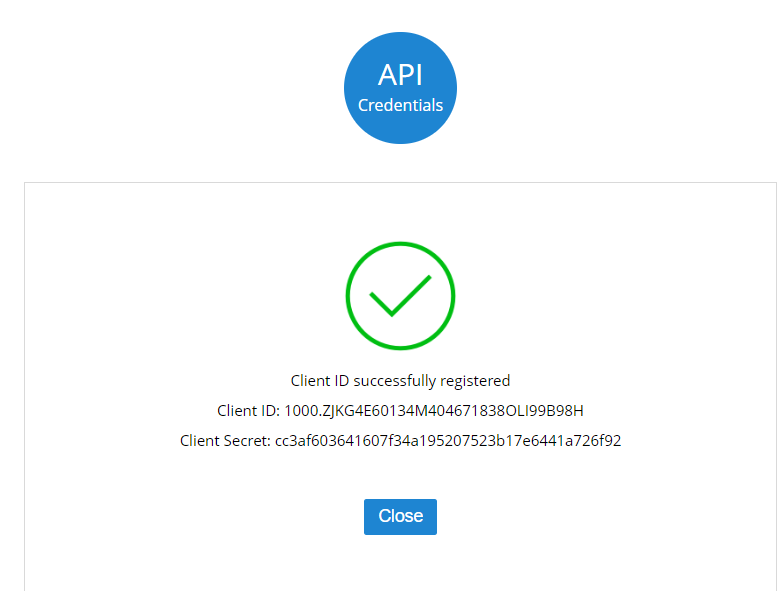
- After click Create button, you get the Zoho API, including Client Id, Client Secret, you need to save this information so you can connect to Zoho CRM.
How to Configure
1. Configuration
Login to the Magento Admin, choose Stores > Settings > Configuration > Zoho CRM.
1.1. General Configuration
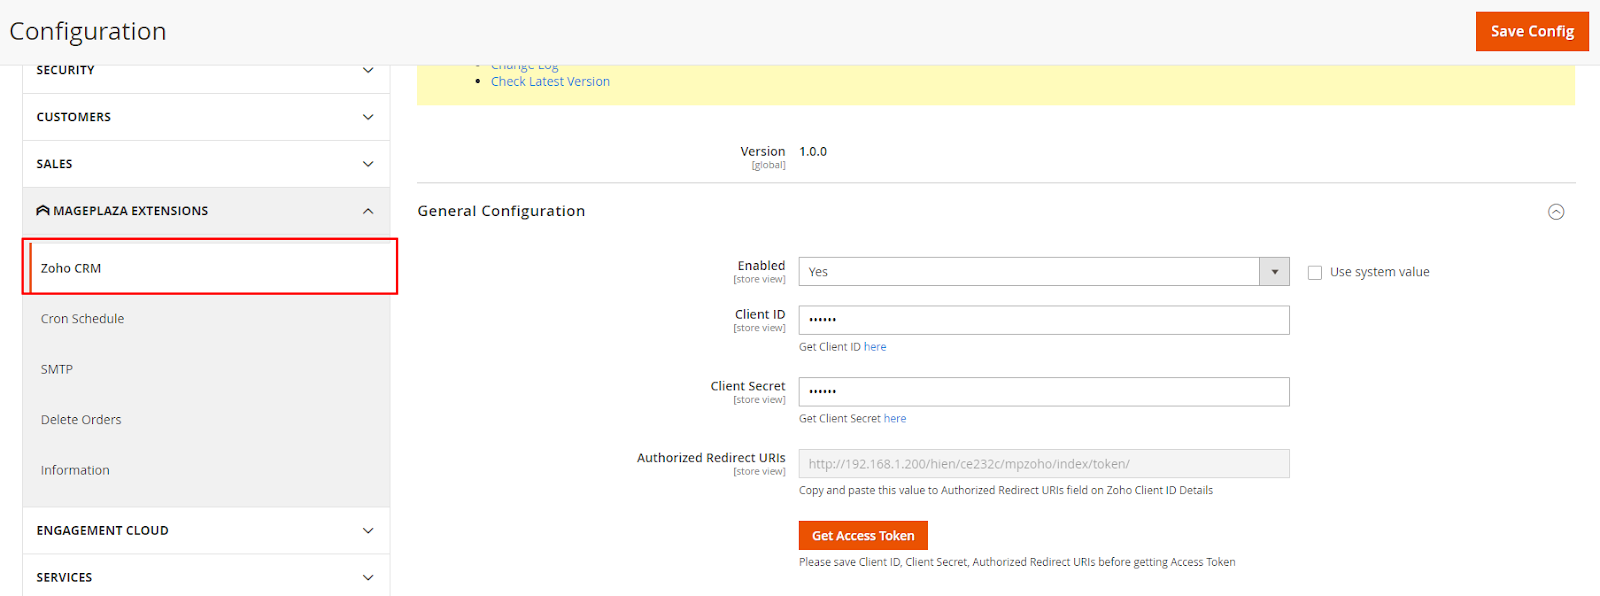
- Enabled: Select Yes to activate the module and use the feature to support data synchronization from the Magento Objects to Zoho CRM.
- Client Id:
- Enter the obtained ID in Zoho CRM into the Client Id field to connect to Magento.
- If left blank or incorrectly entered Id, it will not synchronize data with Zoho CRM.
- Client Secret:
- Enter the Client Secret obtained in Zoho CRM.
- If left blank or filled incorrectly in the Client Secret, it will not synchronize data with Zoho CRM.
- Authorized Redirect URIs:
- Copy value in this field and paste to the similar field in Zoho CRM
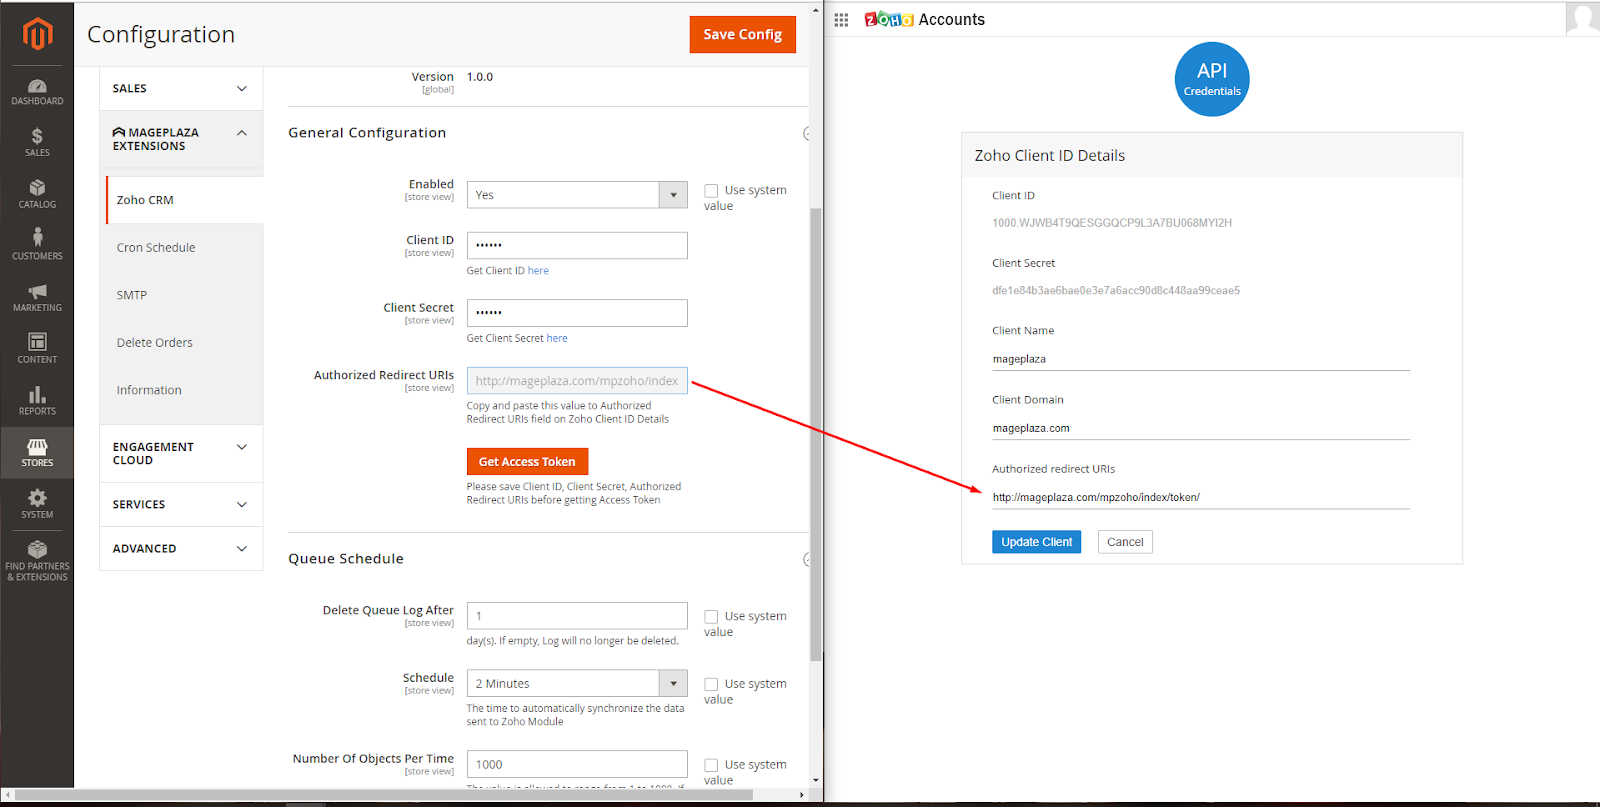
- Admin can get Access Token to check the connection with Zoho CRM by clicking Get Access Token button and Accept. After that, you will see a successful notification. You should close the current tab then return to Zoho CRM to configure the module
- Copy value in this field and paste to the similar field in Zoho CRM
1.2. Queue Schedule
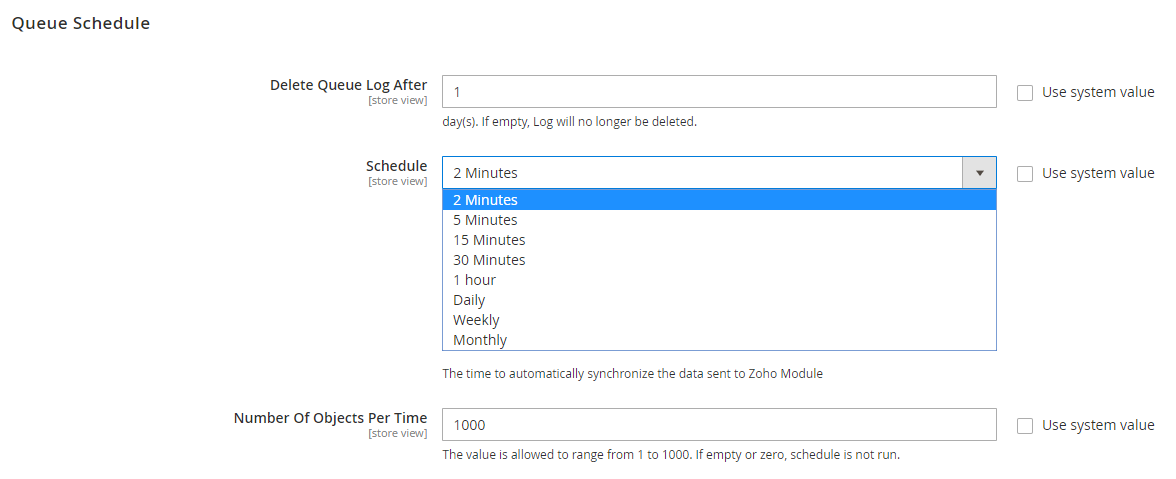
Delete Queue Log After:
- Enter the number of days into Delete Queue Log After. In which, for the queues synchronized having success will be auto-deleted after the time configured here. For example: You enter 6 days in this field, meaning that those queues with success status will be deleted after 6 days.
- If empty, Log will no longer be deleted.
Schedule: Select the time to send data to Zoho Module automatically. Any Magento objects changes will be sent to Zoho Module; otherwise, the unchanged data will not be sent to Zoho Module anymore.
Number Of Objects Send Per Time:
- Enter the number of objects limit each time sending data to Zoho Module. Any pre-added queues will be prioritized to be sent to the Zoho Module first. The value is allowed to range from 1 to 1000.
- If you leave it blank or zero, the schedule is not run.
1.3 Developer

- Developer Mode: Choose the environment for data synchronizing. There are two options:
- Sandbox: Only allow admins to synchronize data manually
- Production: Allow admins to synchronize data manually and automatically
2. Manage Sync Rules
Login to the Magento Admin, choose Stores > Zoho CRM > Synchronization Rules.
2.1. Grid
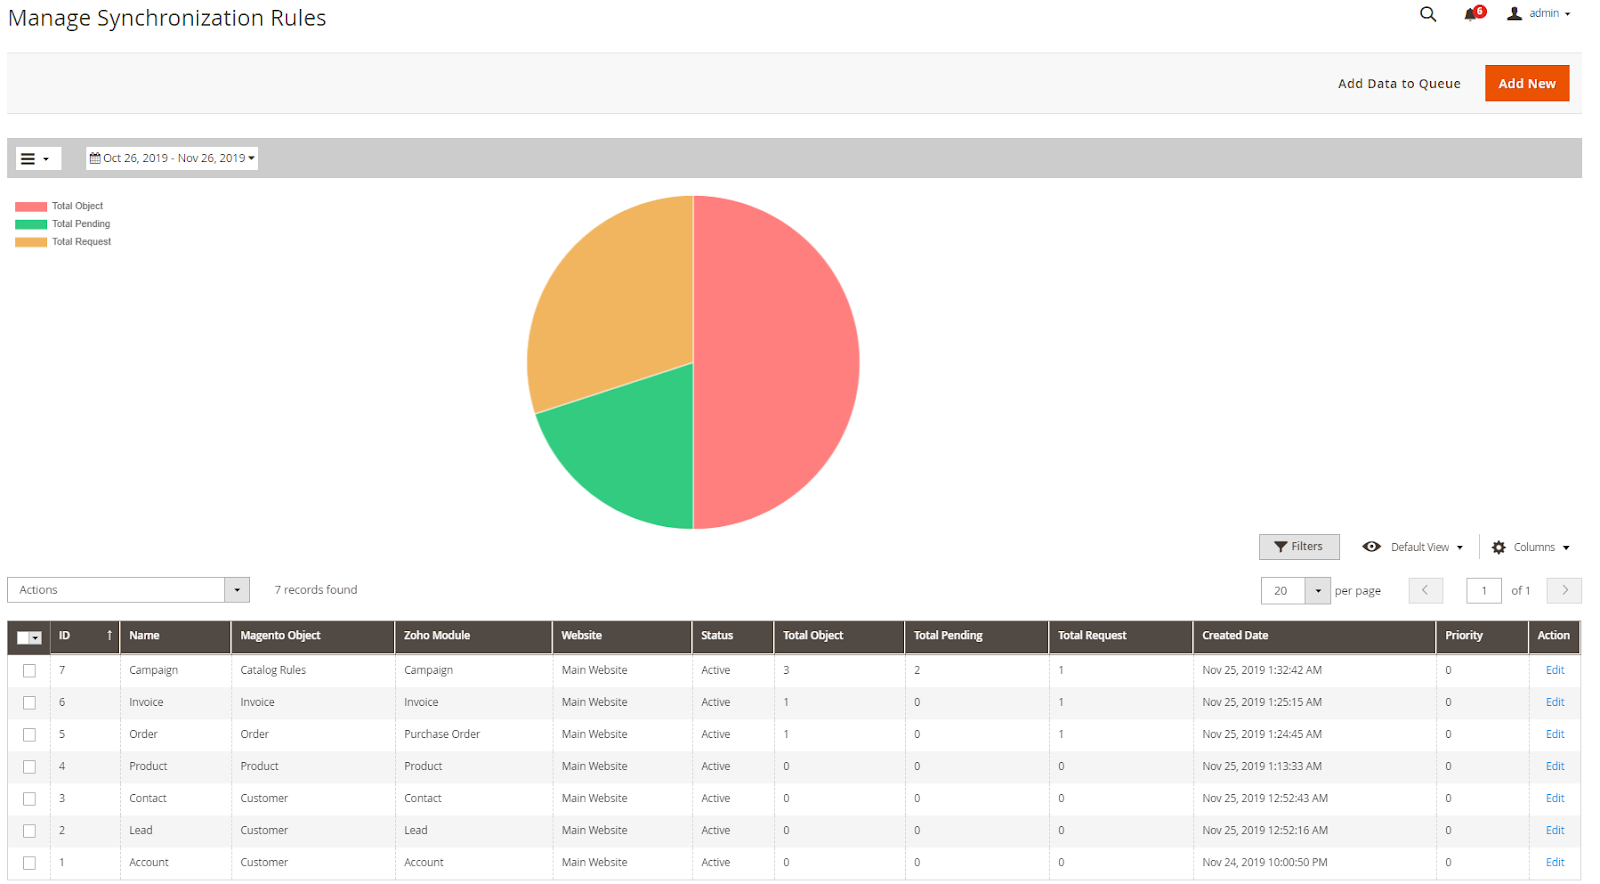
- Here, the Sync Rules information includes the Name, Magento Object, Zoho Module, Website, Pending Queue fields, etc.
- Click Add new button to create a new rule. After creating rules, you can choose Edit to edit rules. Also admin can delete rules, change status (Enable / Disable), filter, and so on.
- Select Add Data to Queue if you want to add more data to Queue. Or with Mass Actions, admin can synchronize one or more rules at the same time when clicking Add To Queue.
Note: When installing Mageplaza Zoho CRM and creating the Synchronization Rules, click Add Data to Queue to put the previous data into Queue and synchronize data to Zoho CRM.
Mageplaza's Zoho CRM extension is fully compatible with the Report extension, which provide reports on queue synchronized quickly and conveniently at three columns: Total Object, Total Pending, Total Request (include success and error statuses).
2.2. Create Sync Rule
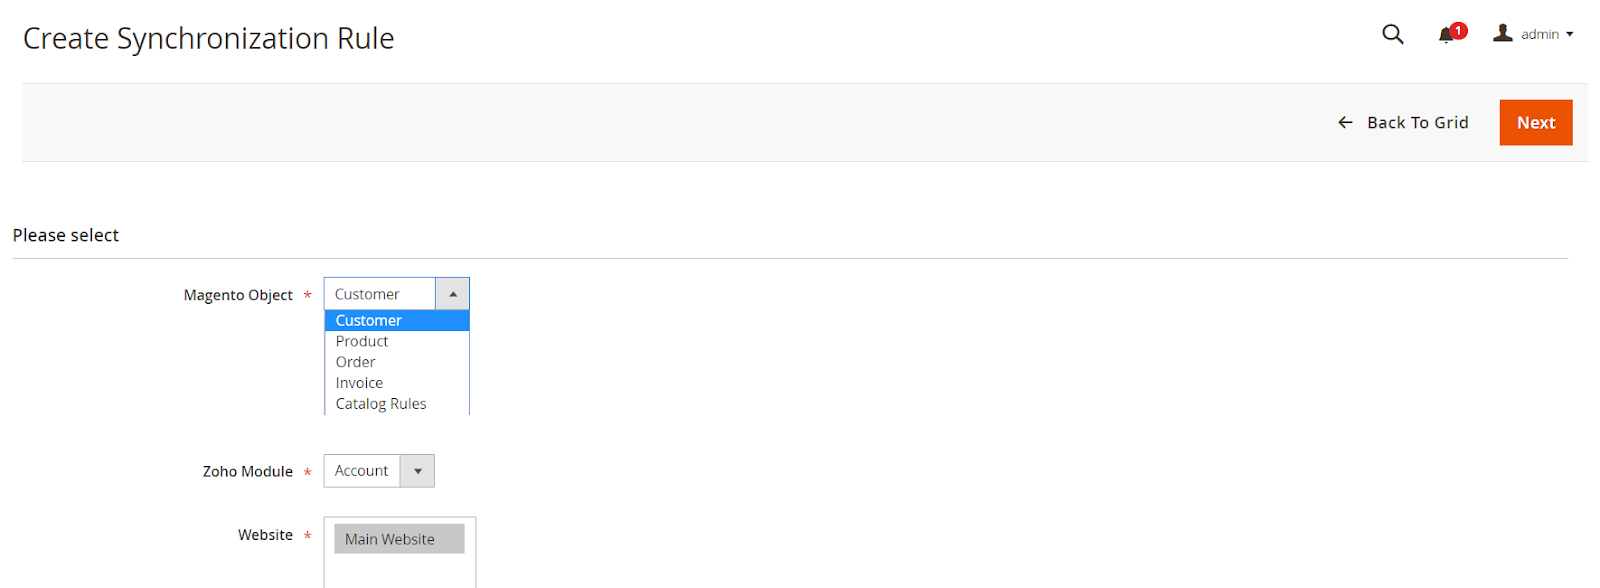
- Magento Object: Select Magento Object to allow sending that Magento object data to Zoho CRM.
- Zoho Module: Here will display the Zoho Module corresponding to the selected Magento Object. For example: Magento Object is Customer, so the information corresponds from Zoho Module selectable are Account, Lead, Contact.
- Website: Select Website from which to get Magento Object data sending to Zoho Module.
After selecting the object, click Next to start filling at Form create/ edit Sync Rule
2.2.1. General
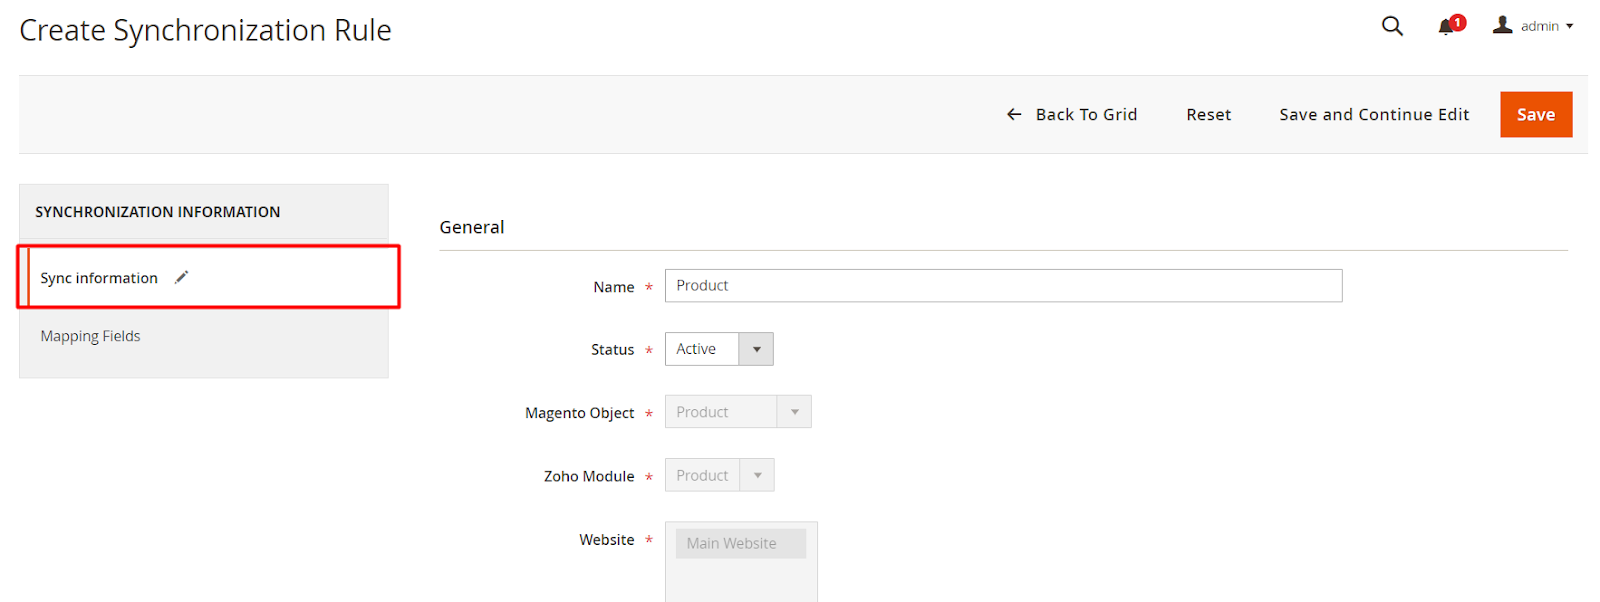
- Name:
- Enter the name of Sync rules
- This is a required field
- Status: Select Active to enable the rules to work and synchronize data to Zoho Module.
- Data of Magento Object, Zoho Module, Website are taken according to the object data above before creating sync rules and can only be changed when admin changes object information before creating.
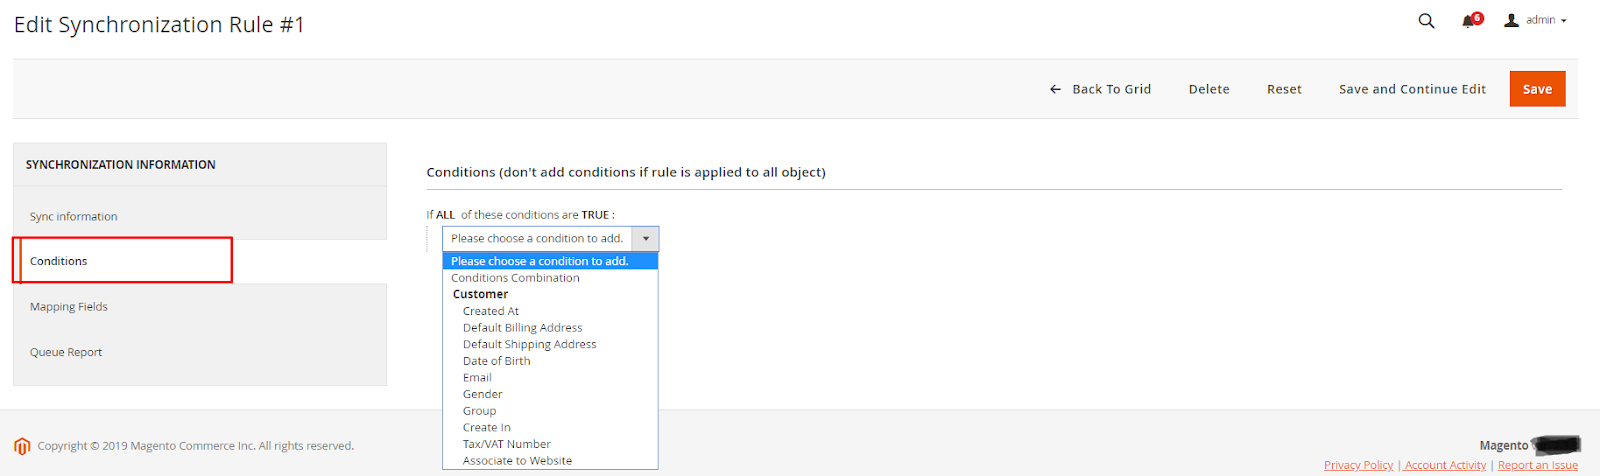
2.2.2. Conditions
Select the conditions to filter the data that the admin wants to sync to Zoho CRM. Those data that meet the conditions of each rule will be put into Manage Queue to synchronize data and vice versa.
Note: Each rule will have different options and conditions.
2.2.3. Mapping Fields
Here select the corresponding Magento Fields to send data to Zoho CRM.
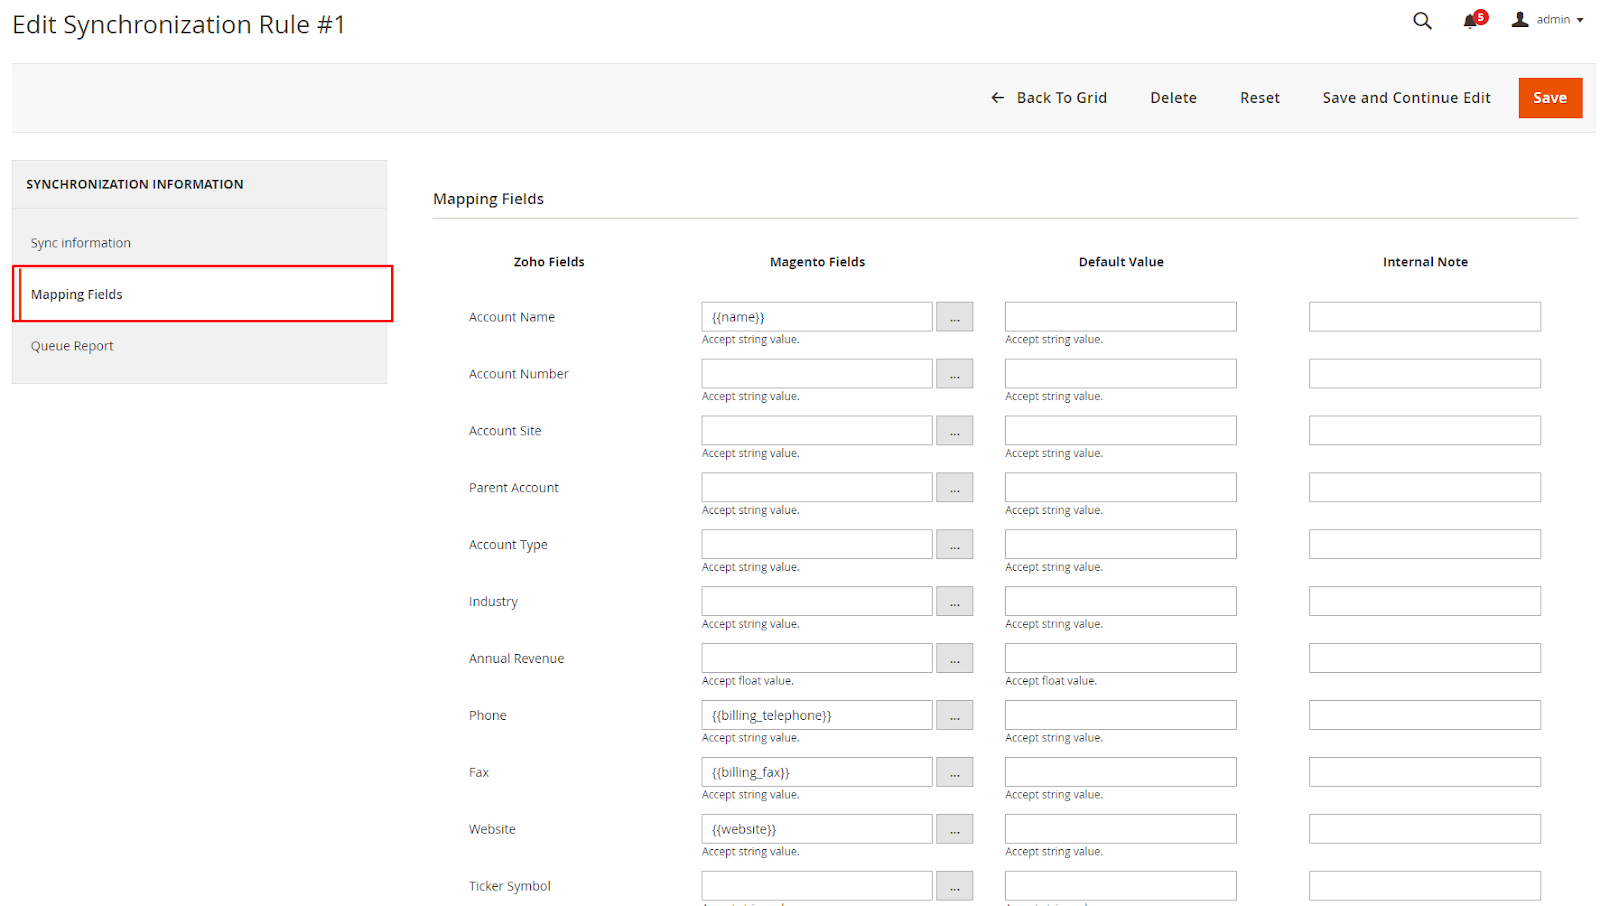
Zoho Fields: Displays the fields managed by Zoho corresponding to the selected Magento Objects. Zoho Fields change depending on the change on selected Magento Object such as Customer, Product, etc.
Magento Fields:
- Enter the fields of the corresponding Magento object to upload data with the fields of Zoho Module.
- Leaving this column blank will get the Default Value column to apply to Zoho Module.
Internal Note: Enter an internal note for any note of this rule. This is for admin use only, not for data synchronization.
Insert Variables: Select the fields of the Magento object corresponding to the fields of Zoho Module.
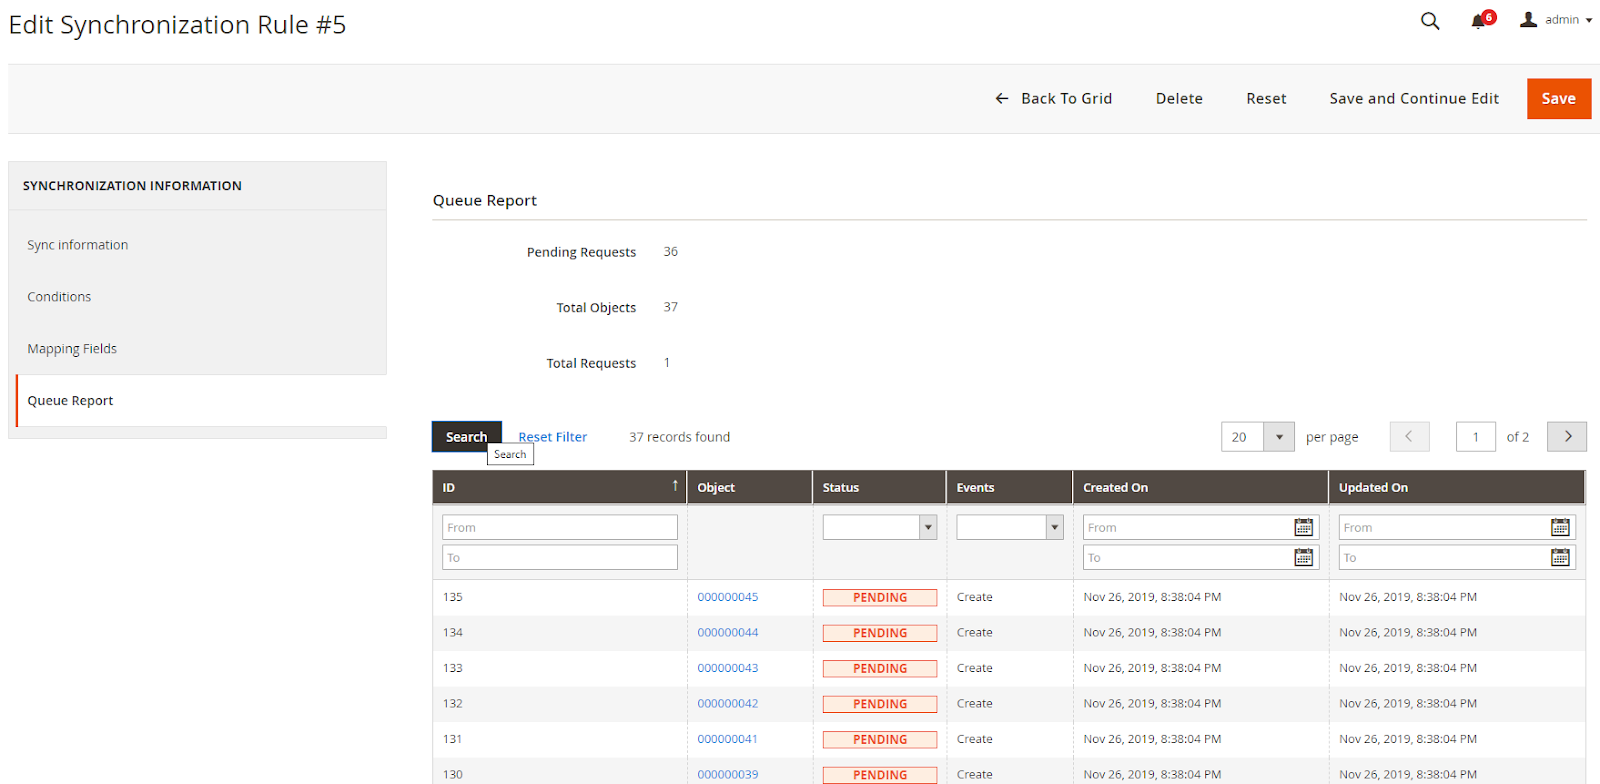
2.2.4. Queue Report
Here records Queue data by rules which include information of Object, Created On, Status, Updated On. etc. Also, there are reports of Pending Request, Total Object, Total Request (Queue number created).
Note: With Created On is the time that data are imported to Queue. Updated On is the time when the queue is synchronized to Zoho CRM.
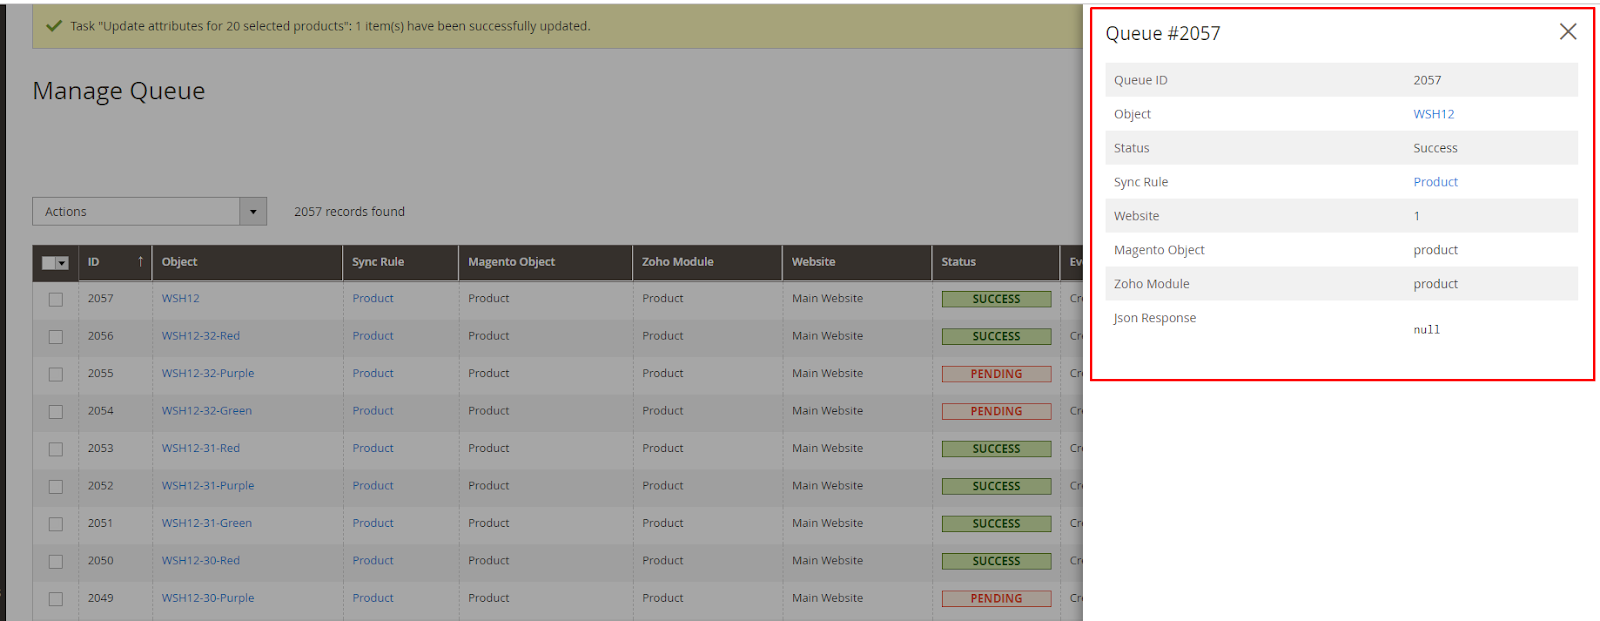
3. Manage Queue
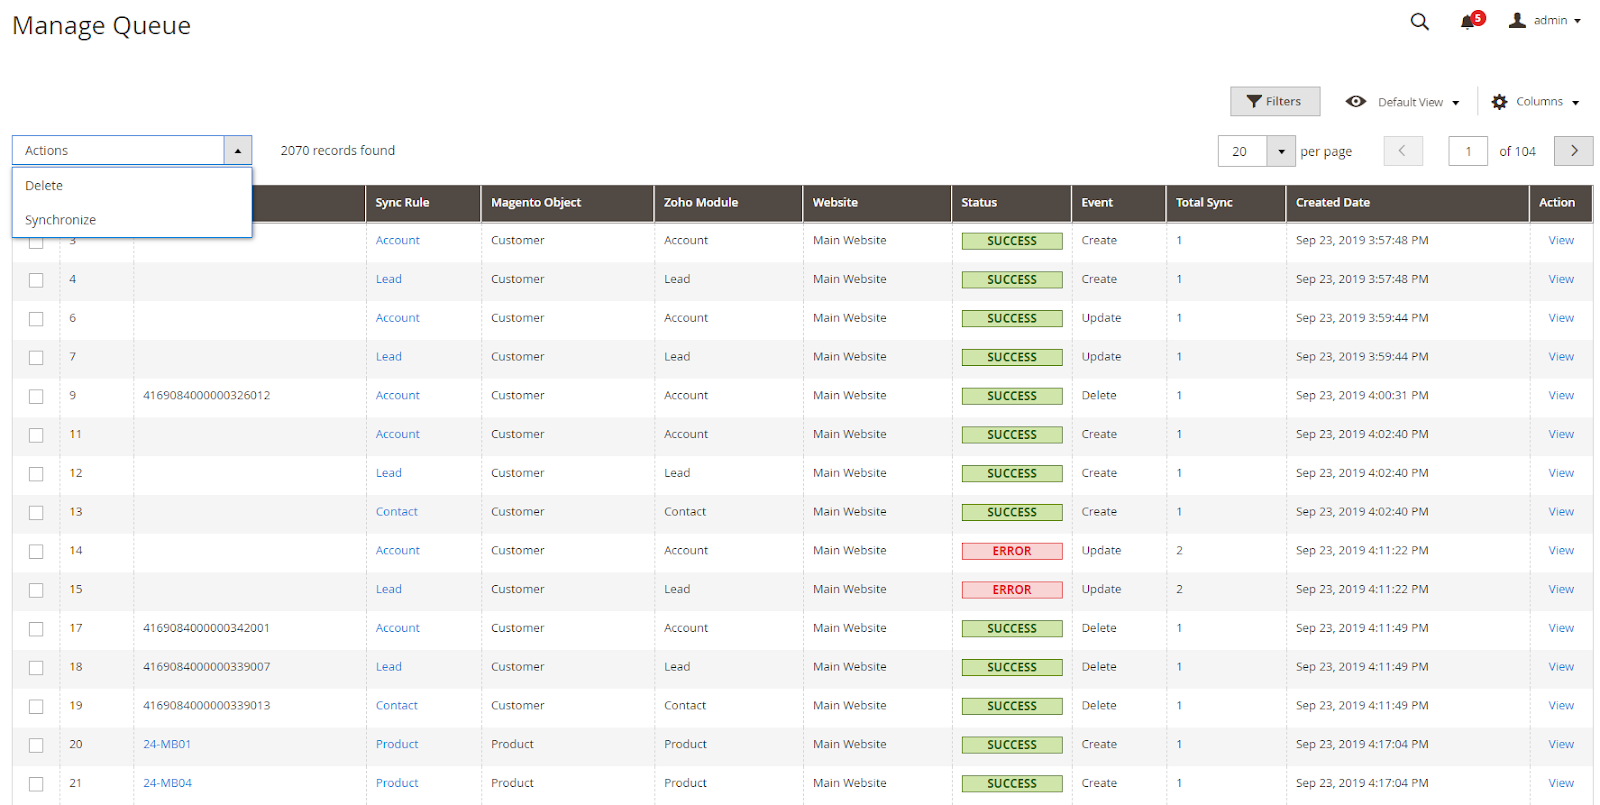
- This section records the information of Queue including Object, Sync Rule, Magento Object, Zoho Module, and so on.
- Here admin can synchronize all data or select specific data to add to queue and synchronize to Zoho CRM. All data changes such as create, update, delete are included in Queue.
- When you click on View, it will display Popup View Queue to see all information of each Queue. Select Delete to delete Queue and Resend to resend Queue.
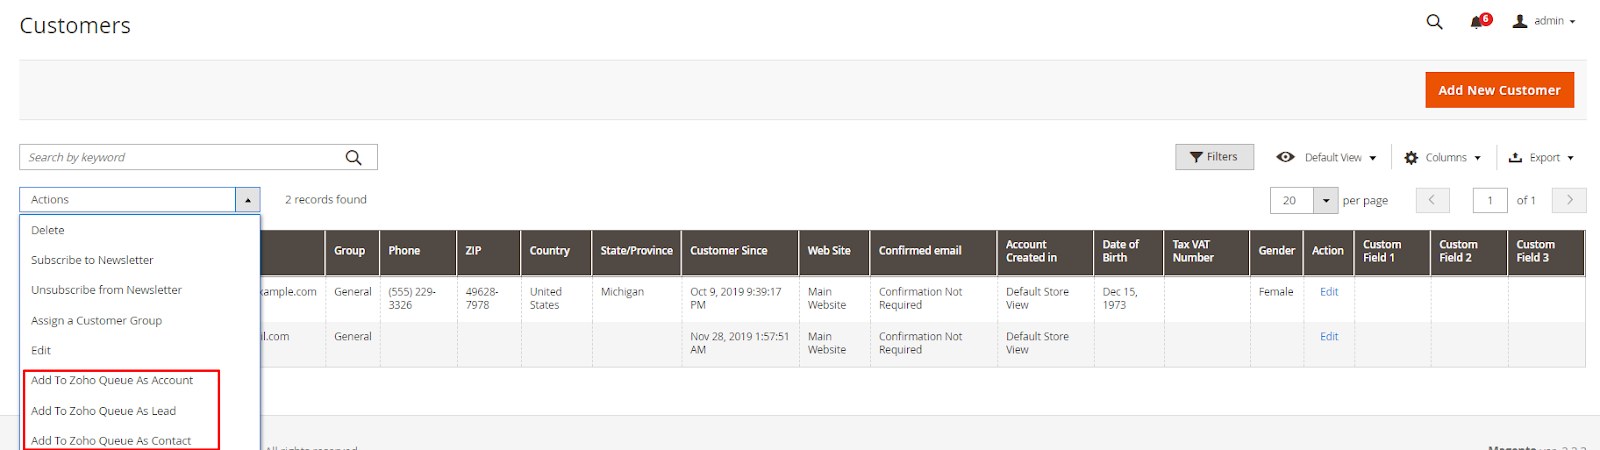
4. Customer, Product, Order, Invoice, Catalog Rules
4.1. Grid
Here admin can synchronize multiple data or individual data by event: product, order, invoice, catalog rules, customers (Account, Lead, Contact). These data will be sent to Manage Queue to be synchronized. This feature will help admin synchronize selected data by each product, customer, etc., more quickly and conveniently.
4.2. Edit
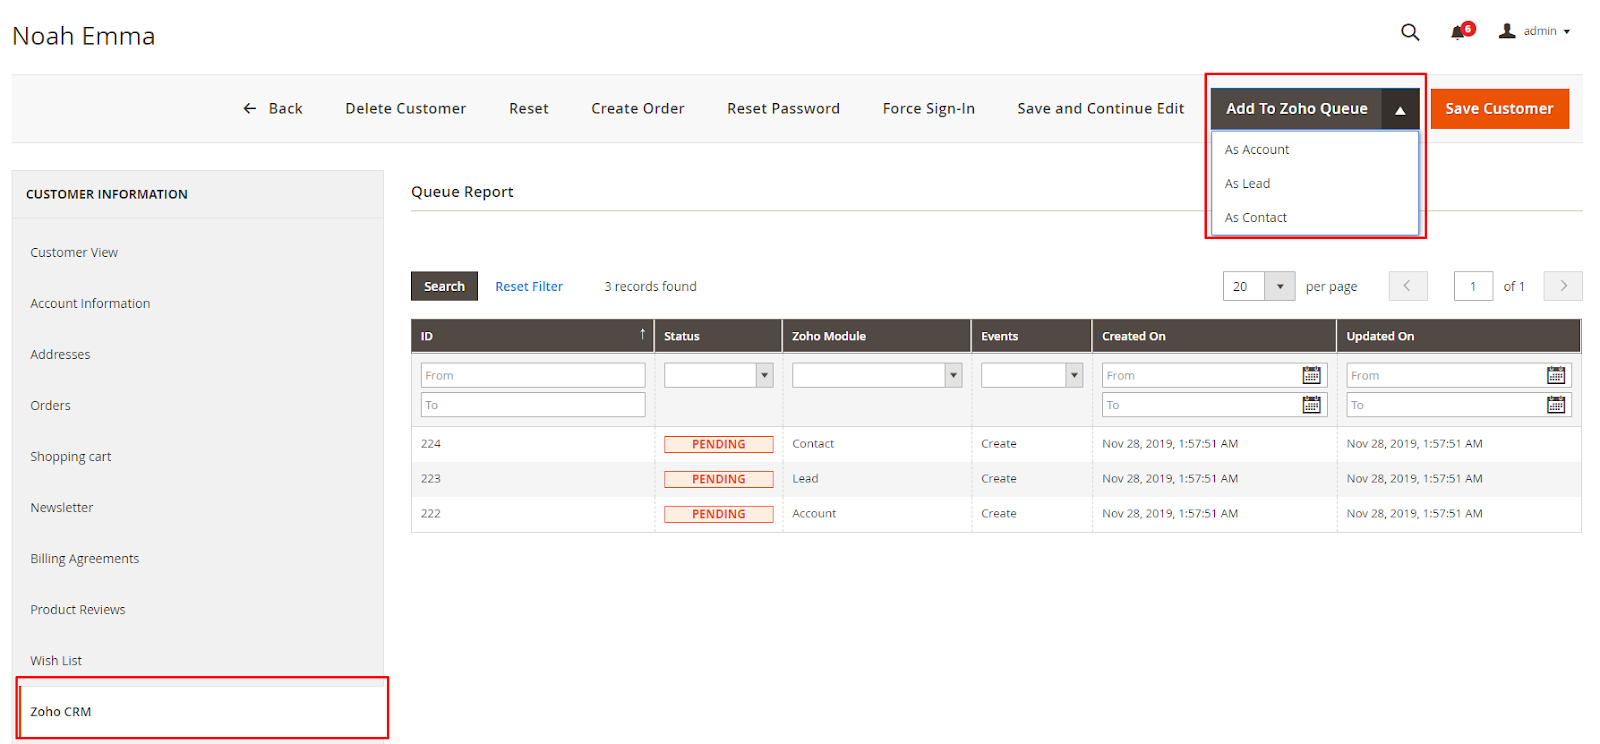
With the available data before, admin can Add To Zoho Queue with As Account, As Lead, As Contact, Product, Order, Invoice, Catalog Rules to send data into Manage Queue and synchronize them.
- System will show a Zoho CRM tab when editing into customer account data, product, order, so on; which helps report and display a list of queues with each of that data information, including Status, Zoho Module, Event, Created On, Updated On, etc.
- Admin can filter, search those data from the available columns.