Subscription & Recurring Payment
Introduction
To attract customers to the subscription and recurring payment method, Mageplaza developed the Subscription and recurring payments extension. Its main feature is to enable store owners to sell products under the payment of the subscriptions, and customers to track and manage their subscription history. The Subscription and recurring payments module for Magento 2 is compatible with Mageplaza One Step Checkout Extension
How to Use
1. Customer
- Customers can buy a product or service using the subscription and recurring payments method.
- Customers can manage their subscriptions on the My Subscription page.
2. Admin
- Admins can set up the configuration for the Subscription
- Admin can create and manage Subscriptions
- Admin can manage and track customers’ subscriptions
3. How to configure a key for Paypal Subscription
3.1. How to create a webhook at Paypal
- Sign in to your account at developer Paypal, then go to
My Apps & Credentials > Create App
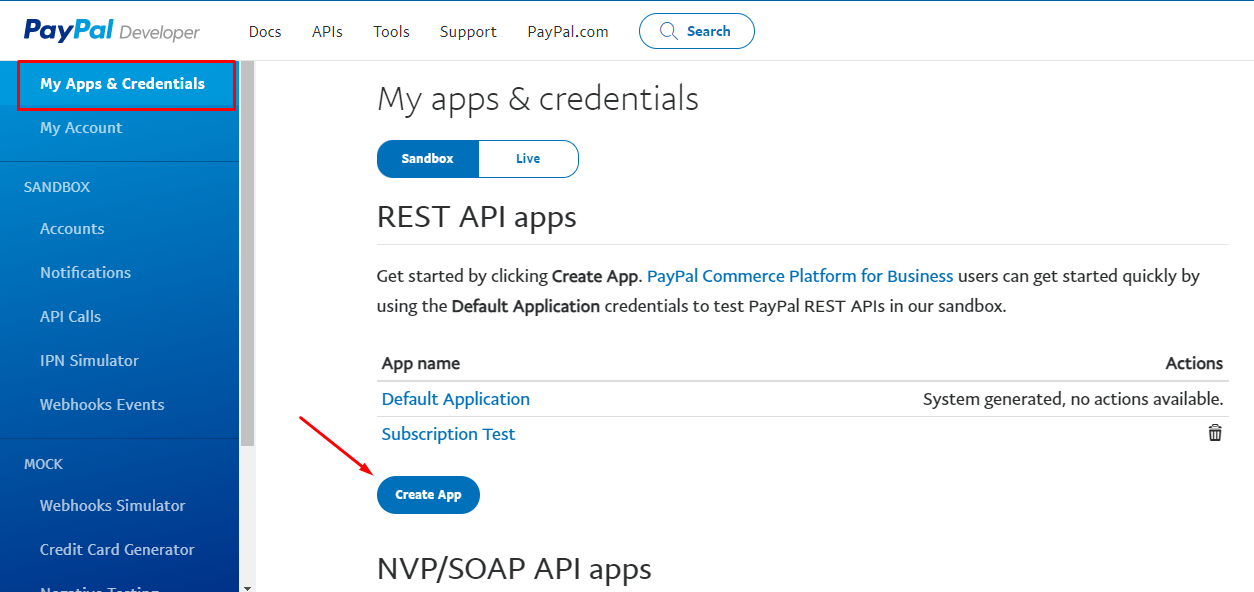
- Enter
App Name > App Type = Merchant > Select Business Account
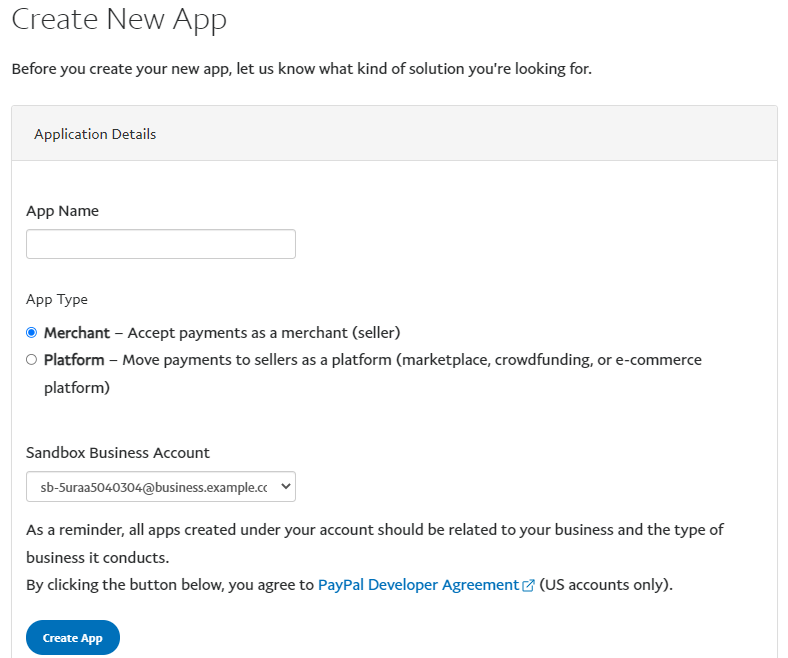
- After the App is created, there will be Client ID and Secret, which are used for the Configuration section of Mageplaza Subscription and recurring payment extension.
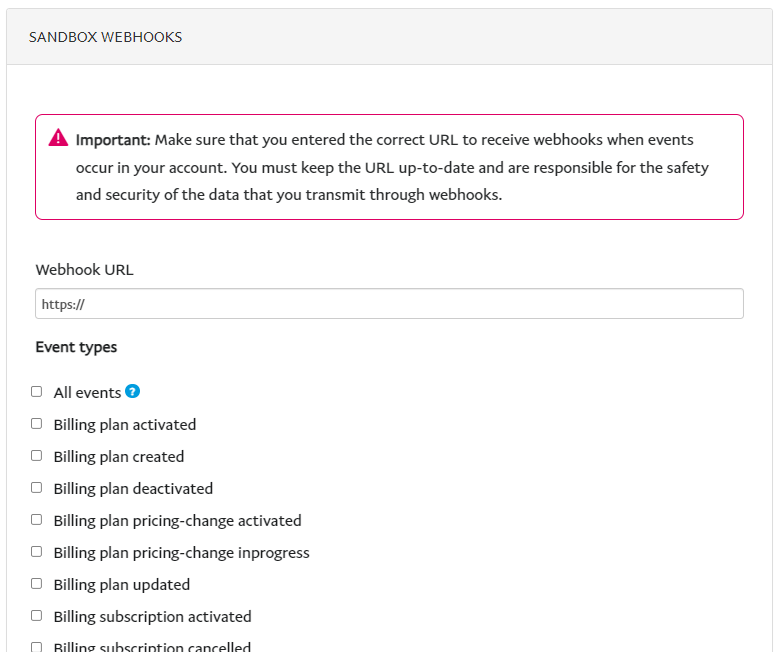
- It is necessary to create a webhook to launch the subscription. In the App you have created, scroll down to the WEBHOOK section > click Add Webhook.
- Enter Webhook URL: https://<base_url>/mpsubscription/webhook/paypalexpress
- Select Event Type: You can select All events
- Click Save to save the webhook
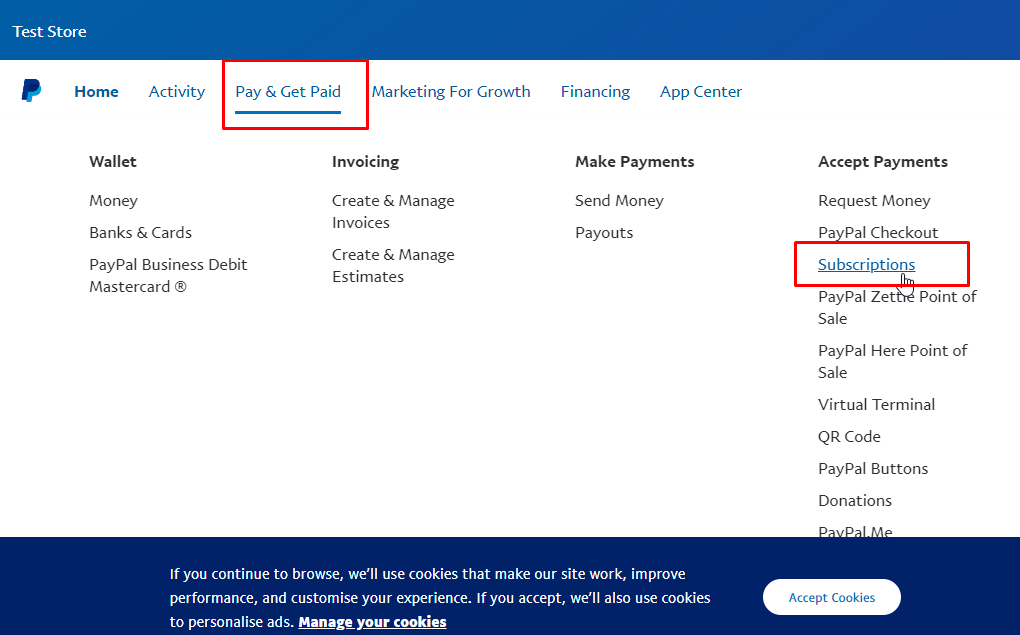
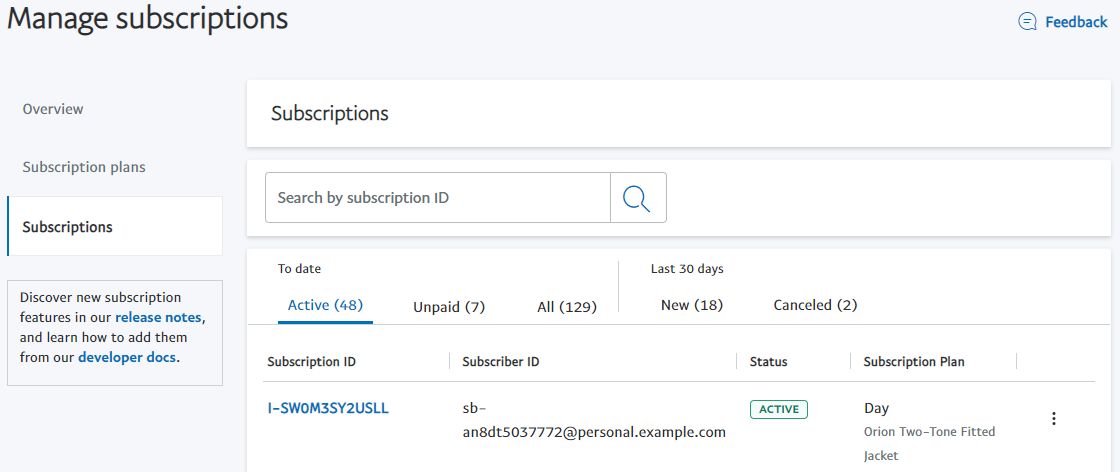
- To track Subscriptions on Paypal, log into your Business Account, which was selected when creating the App > go to Pay & Get Paid > click Subscriptions.
- In the Subscription tab, the details of Subscriptions can be displayed and managed.
3.2. How to configure a Paypal key in Magento 2
From the Admin panel, go to Stores > Settings > Configuration > Sales > Payment Methods > PayPal Express Checkout > Required Paypal Settings > Mageplaza Subscription
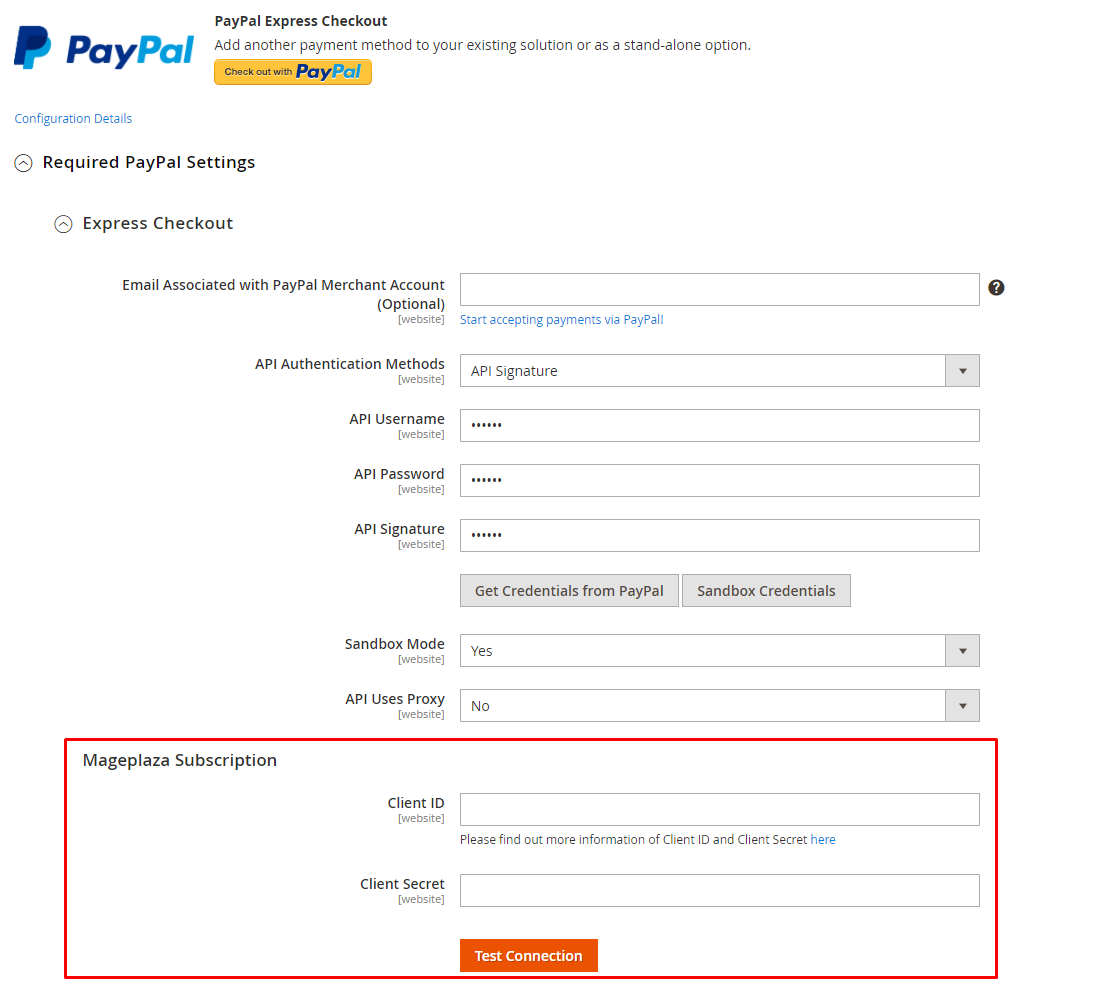
- Client ID: Enter the Client ID of the webhook created at Paypal.
- Client Secret: Enter the Client Secret of the webhook created at Paypal.
- Button Test Connection: Check the connection with Paypal
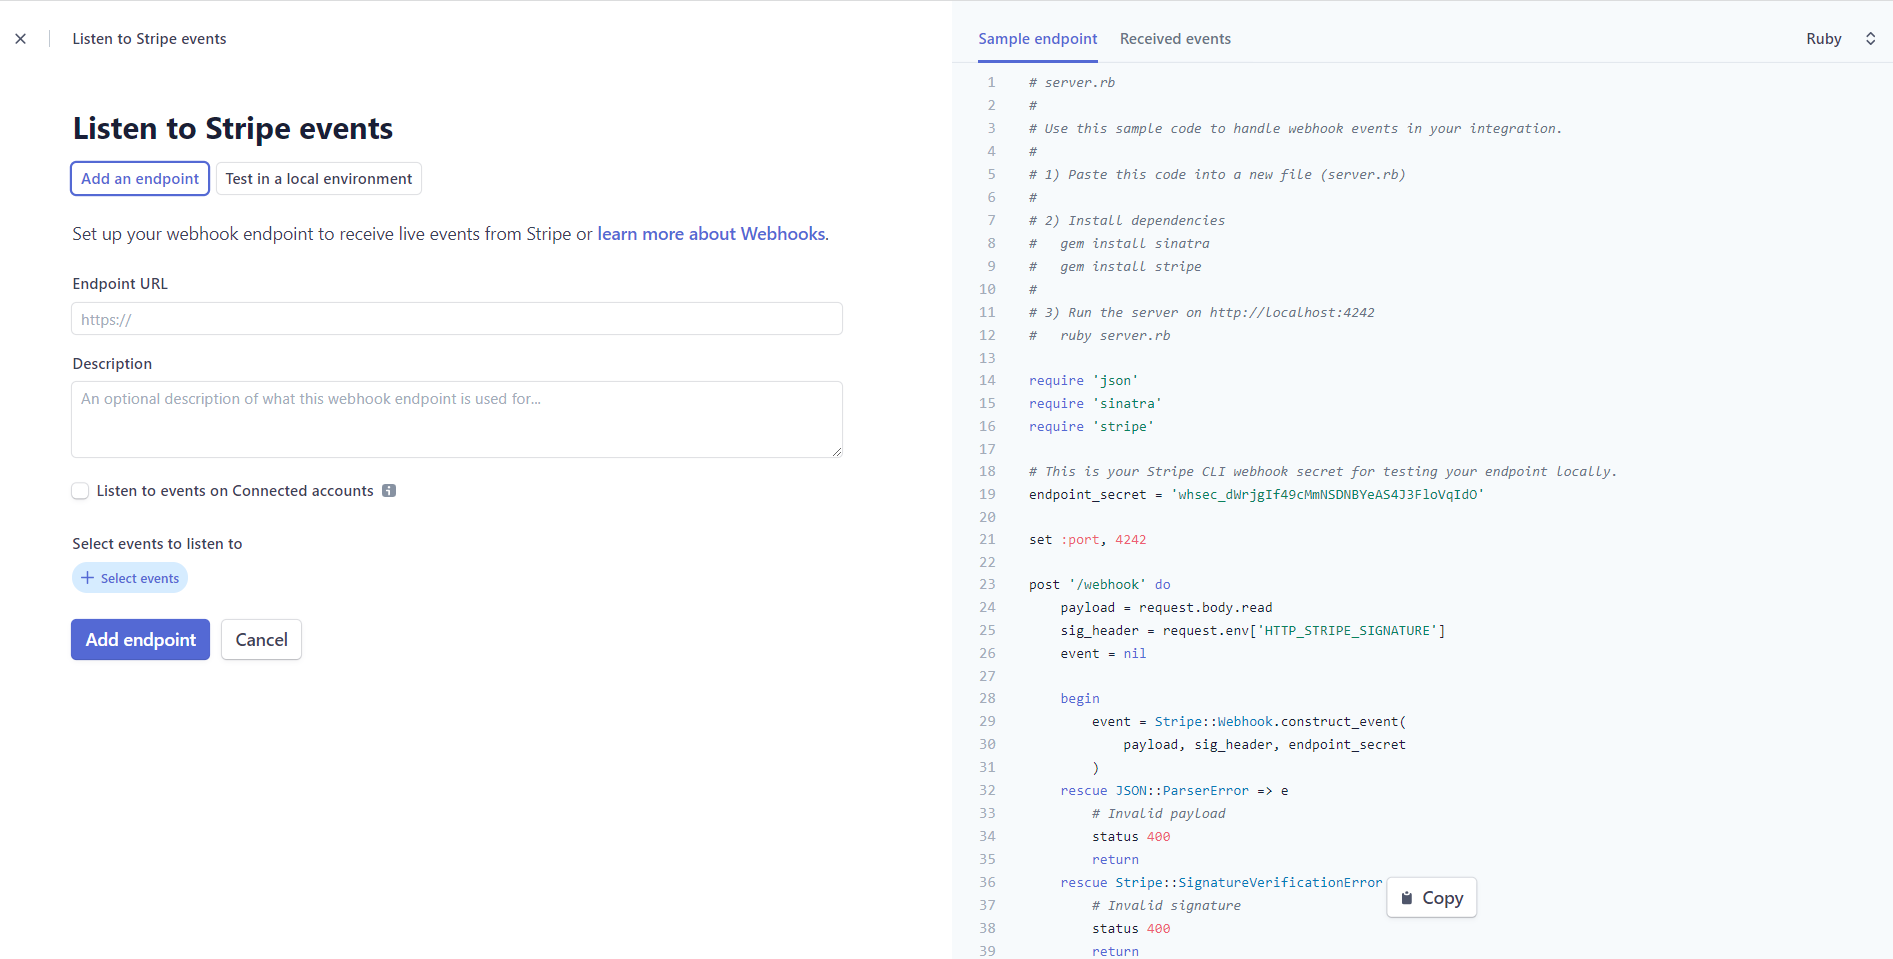
4. How to create a webhook in Stripe
- Log into your Stripe account > go to
Developers > Webhook
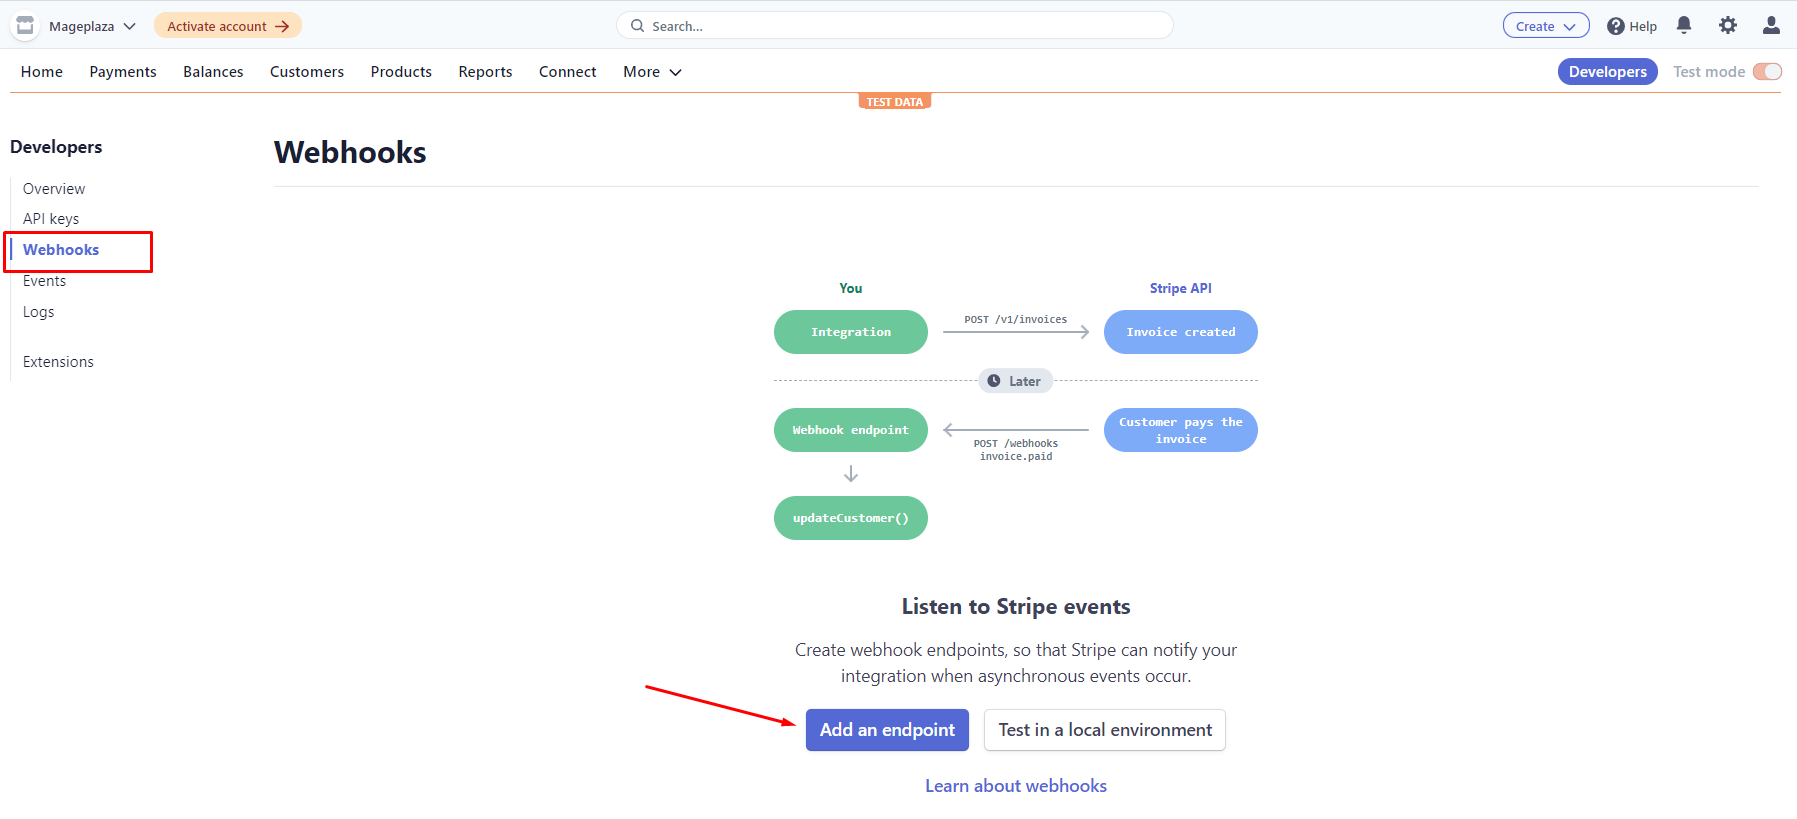
- Complete the following information:
- Endpoint URL: https://<base_url>/mpsubscription/webhook/stripe
- Select events to listen to: Choose all events or necessary ones only, but the following events are compulsory:
customer.subscription.created, customer.subscription.updated , invoice.created, invoice.payment_succeeded - Click Add endpoint to complete the settings.
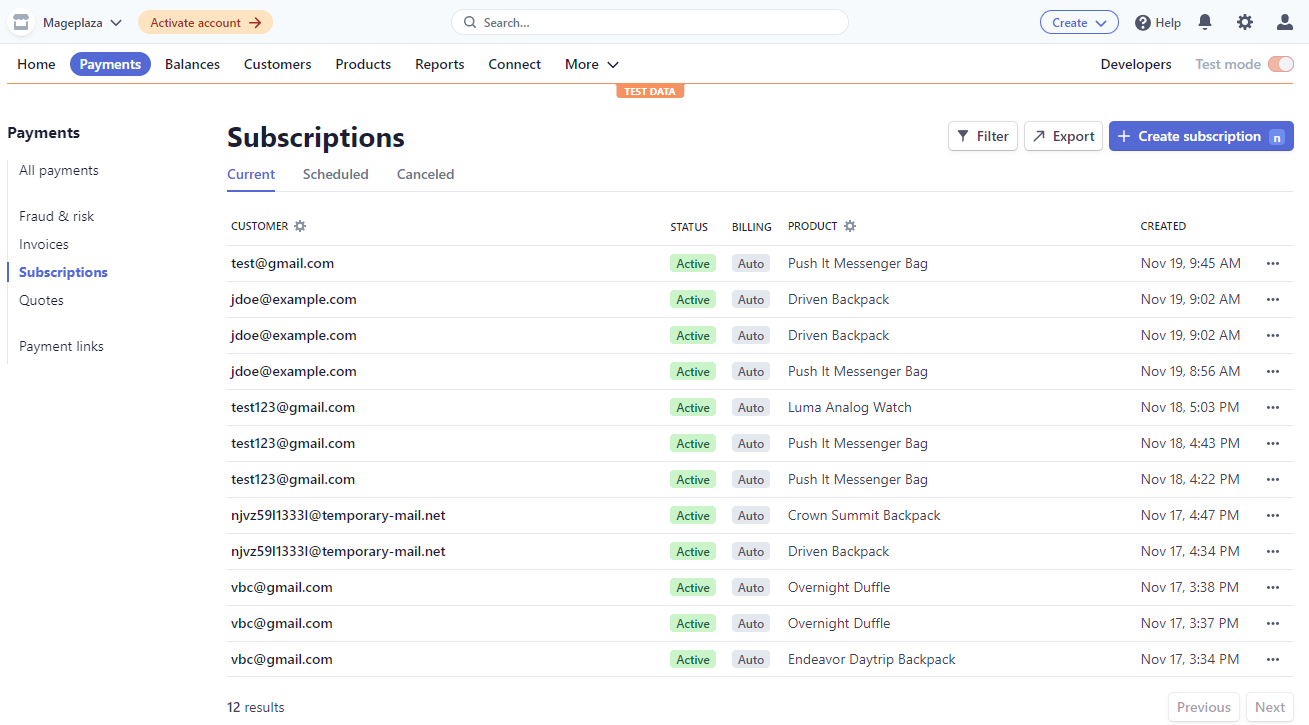
- To manage Subscriptions on Stripe, go to
Payment > Subscriptions
How to Configure
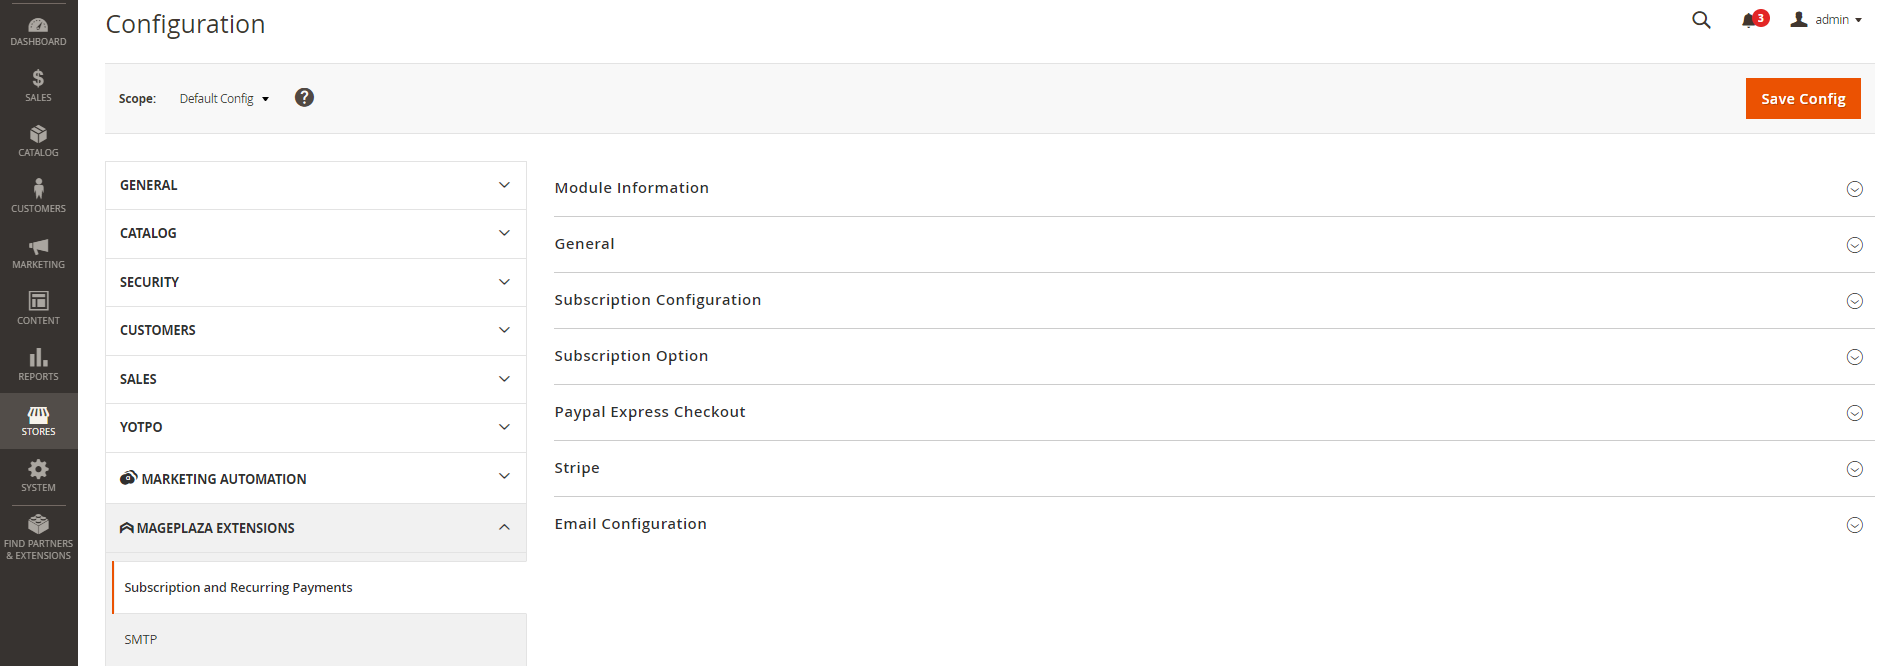
1. Configuration
Go to the Admin panel, select Sales > Subscription and Recurring payments > Configuration; or from the Admin panel, select Stores > Setting > Configuration > Mageplaza > Subscription and recurring payments
1.1. General
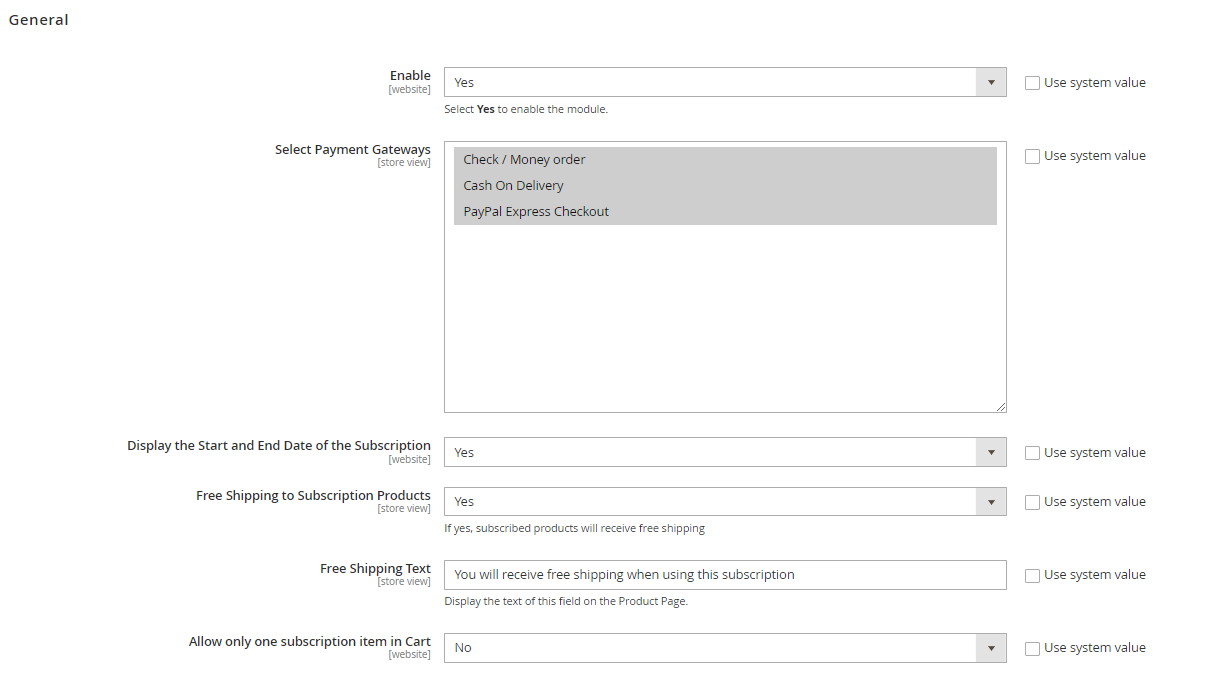
- Enable: Select Yes to enable the extension
- Select Payment Gateways: Choose the payment method for subscription-based payment
- Display the Start and End Date of the Subscription: Select Yes to allow customers to choose the start and end date of the subscription
- Free Shipping to Subscription Products: Select Yes to enable free shipping and display the Free Shipping Text
- Free Shipping Text: Enter the notice text if you allow free shipping for subscription products. This will be shown if
Free Shipping to Subscription Products = Yes - Allow only one subscription item in Cart: If selected Yes, the customer’s cart can only contain one subscription-based product. If there is one subscription-based product in the cart, they cannot add any other items. In case there is one one-time payment product in the cart, they can add one-time payment products freely, but cannot add any other subscription-based product.
1.2. Subscription Configuration
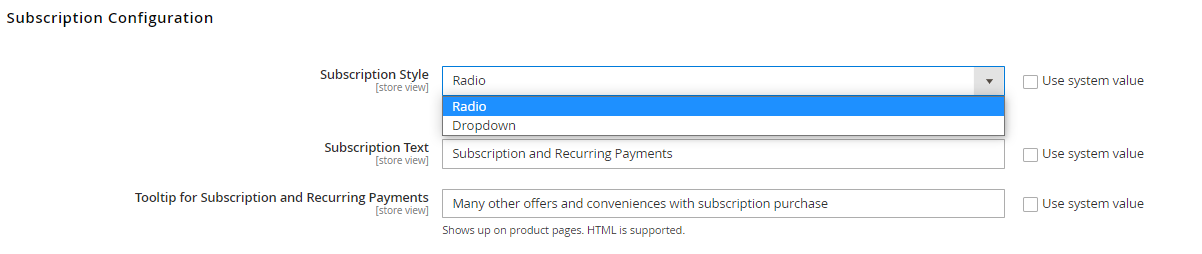
- Subscription Style:
- Radio: The options of Subscription and Recurring Payments in the Product Detail Page frontend will be displayed in radio buttons.
- Dropdown: The options of Subscription and Recurring Payments in the Product Detail Page frontend will be displayed in dropdown style.

- Subscription Text: The text is shown on the Product Detail Page
- Tooltip for Subscription and Recurring Payments: Enter information for the tooltip, which will be shown on the Product Page when customers hover the icon next to the Subscription Text
1.3 Subscription option

- Only buy products through subscription: Set up the purchase method options:
Only buy products through subscription = No: It is possible to buy subscription and recurring payment products through subscription and one-time payment.Only buy products through subscription = Yes: It is only possible to buy subscription and recurring payment products through subscription
- Label for Subscription and Recurring Payments: Enter the label for Subscription and Recurring Payments option on Product Page
- Label for One-Time Payment Option: Enter the label for the One-Time Payment option on the Product Page
1.4. Paypal Express Checkout

- Limit The Number of Failures Payments: Set the maximum number of failed payments for recurring orders. If left empty or zero, there is no limitation.
- Customer Cancel Subscription: Select Yes if allow customers to delete subscriptions paid via Paypal Express. This is only applicable if the Rule Subscription allows cancellation.
- Notice: With Paypal, you can only pay for 1 subscription product per transaction
1.5. Stripe

- Customer Cancel Subscription: Select Yes if allow customers to delete subscriptions paid via Stripe. This is only applicable if the Rule Subscription allows cancellation.
- To use Stripe, you need to install Mageplaza Stripe Extension
1.6. Email Configuration

- Enable Email Notification: Select Yes to allow emails sent to customers
- Email Sender: Select the sender of emails. This will be visible when
Enable Email Notification = Yes - Email Notify Customers Upon Subscription: Select templates for emails when customers buy subscription products
1.6.1. Reminder Email Template

- Enable: Select Yes to send emails to remind customers of the next payment
- Next Billing Email Reminder Template: Choose email template. Only visible when
Enable = Yes - Send Reminder About Next Invoice (Days): Enter the number of days before the next payment deadline to send an email to remind customers. If left empty or zero, the default value will be 2. Only visible when
Enable = Yes
1.6.2. The Trial Ends Email Template

- Enable: Select Yes to send emails when the trial period expires.
- Email template notifies the customer when the trial ends: Select the email template. Only visible when
Enable = Yes
1.6.3. Remaining Trial Time Email Template
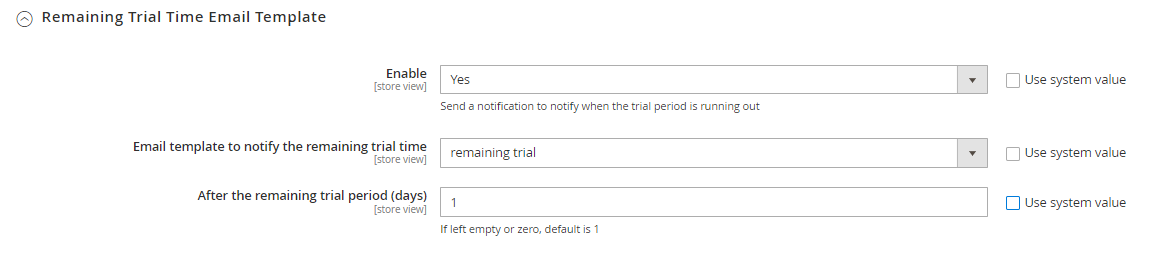
- Enable: Select Yes to send emails when the trial period is about to expire
- Email template to notify the remaining trial time: Choose email template. Only visible when
Enable = Yes - After the remaining trial period (days): Enter the number of days before the trial time ends to send emails to remind customers. If left empty or zero, the default value will be 1. Only visible when
Enable = Yes.
1.6.4. Subscription is Cancelled Email Template

- Enable: Select Yes to send emails to customers when the subscription is cancelled.
- Notify Customers When Subscription is Cancelled: Select email template. Only visible when
Enable = Yes.
1.6.5. Subscription Expiration Email Template

- Enable: Select Yes to send emails to customers when the subscription expires.
- Notify Customers When Subscription Expires: Select email template. Only visible when
Enable = Yes.
2. Manage Subscription
From the Admin panel, go to Sales > Subscription and Recurring payments > Subscription Plans.
2.1. Grid
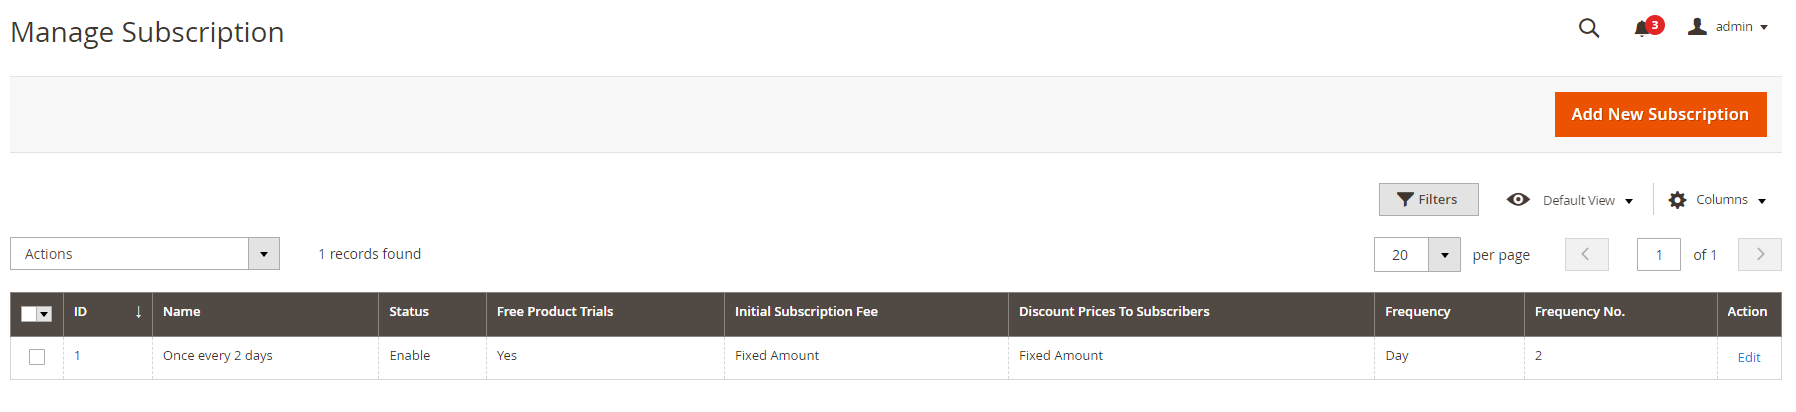
- Display information of Subscription rules: ID, Name, Status, Free Product Trials, Initial Subscription Fee, Discount Prices To Subscribers, Frequency, Frequency No., Action
- Action:
- Edit: direct to the Edit Subscription information page.
- Mass Action:
- Delete: remove Subscription
- Change Status: edit status of Subscription
- Enable
- Disable
- Admins can also filter the grid information by using Filters or Sort details according to columns, show or hide columns, set views.
2.2. Add New Subscription
2.2.1. General
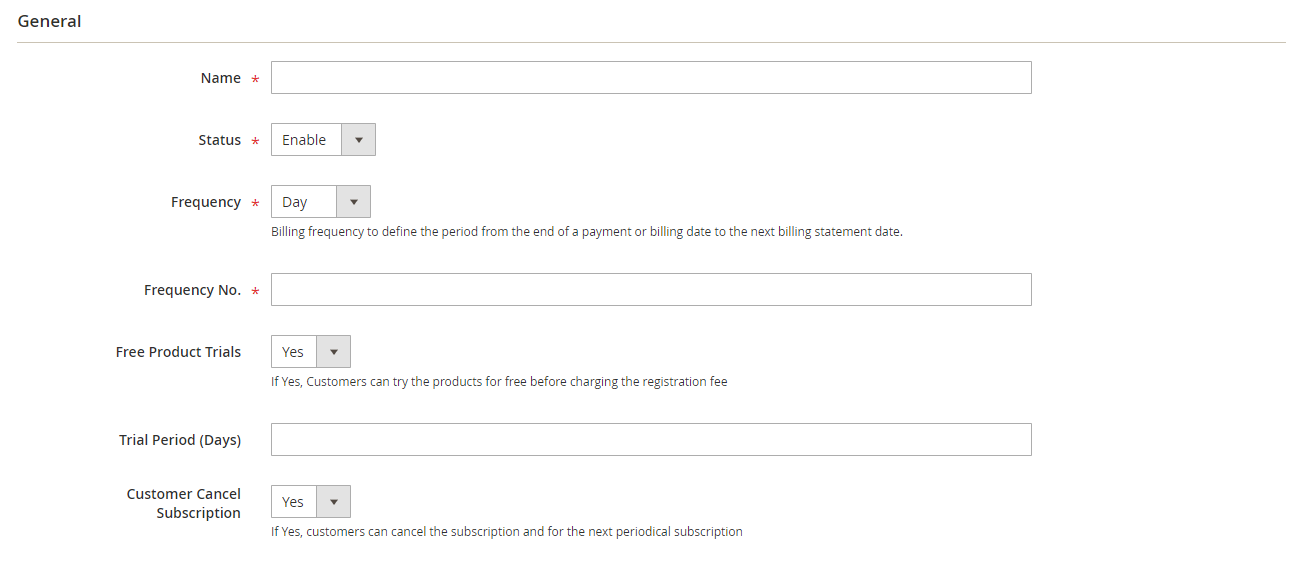
- Name: Enter the name of the subscription. This is compulsory so you cannot leave it blank.
- Status: There are 2 subscription statuses: Enable and Disable
- Frequency: Set the frequency of subscription. Available options include Day, Week, Month, Year
- Frequency No.: Enter the frequency number. For example: If Frequency = Day, Frequency No.=10, the subscription period will be 10 days.
- Free Product Trials: Select Yes to allow a trial period of the product.
- Trial Period (Days): Enter the number of days for the product trial, counting in days. This is only visible when
Free Product Trials = Yes. - Customer Cancel Subscription: Select Yes to allow customers to cancel subscriptions
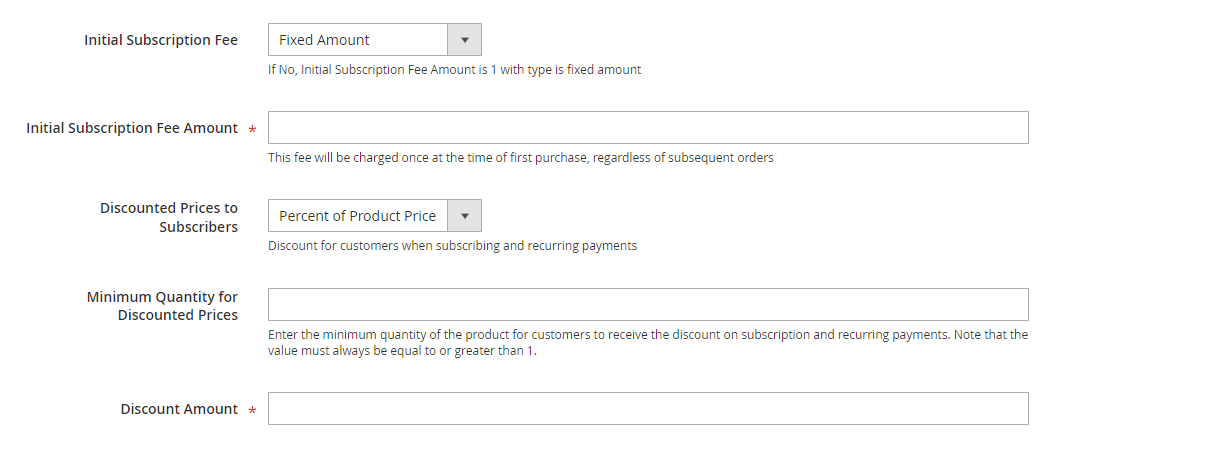
- Initial Subscription Fee: Set up how the initial subscription fees are calculated.
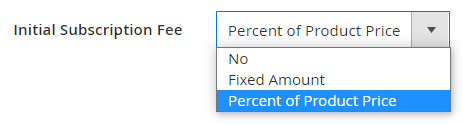
- No: No fee is charged. However, to take payment online, we will leave the default as $1.
- Fixed Amount: The initial fee will be calculated as a fixed amount, which will be entered in the Initial Subscription Fee Amount field.
- Percent of Product Price: The initial fee will be calculated as a percentage of the product price, which will be entered in the Initial Subscription Fee Amount field.
- Initial Subscription Fee Amount: Enter the initial fee of the subscription. Only visible when
Initial Subscription Fee = Fixed Amount or Percent of Product Price. The way how fees are calculated will be set up in the Initial Subscription Fee field. - Discounted Prices to Subscribers: Offer discounts for customers purchasing products using Subscription and recurring payments (not applicable for the initial subscription fee)
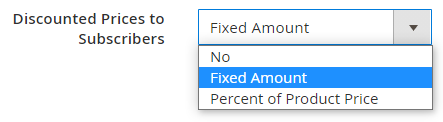
- No: No discount
- Fixed Amount: The discount amount will be calculated as a fixed amount, which will be entered in the Discount Amount field
- Percent of Product Price: The discount amount will be calculated as a percentage of the product price, which will be entered in the Discount Amount field.
- Discount Amount: Enter the discount amount. Only visible when
Discounted Prices to Subscribers = Fixed AmountorPercent of Product Price. The way how fees are calculated will be set up in the Discounted Prices to Subscribers. - Minimum Quantity for Discounted Prices: Enter the minimum product quantity for customers to get the discounts. Only visible when
Discounted Prices to Subscribers = Fixed AmountorPercent of Product Price.
2.2.2. Select Product
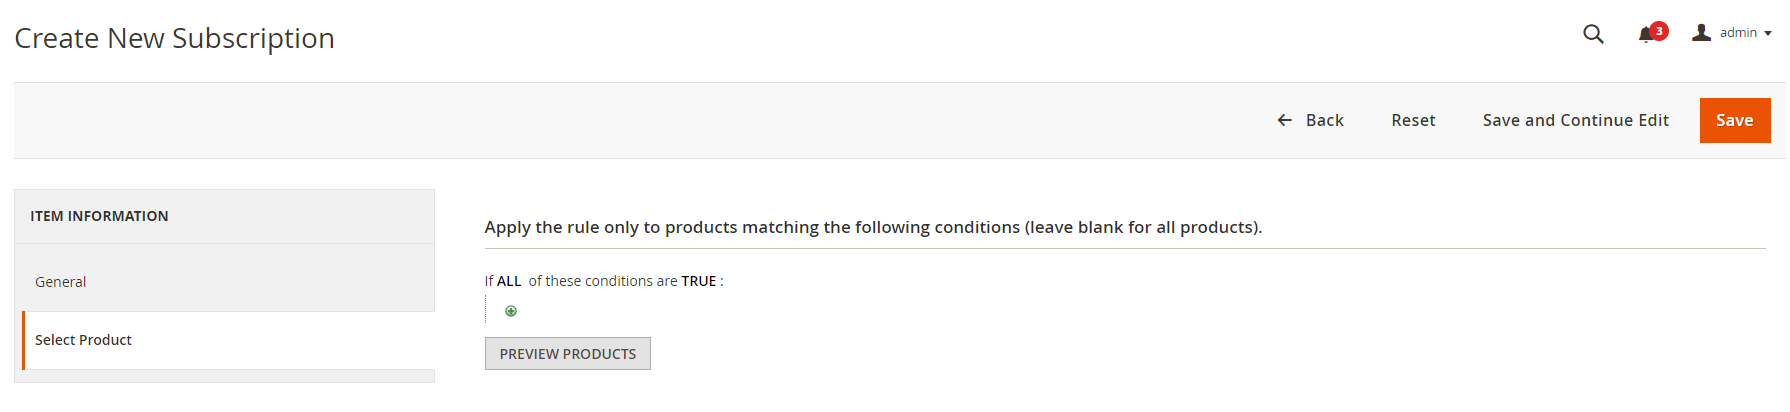
- Configure which products can be purchased by Subscription and recurring payments
- Click icon
 to select product
 - Click the Preview Products button to view the list of products that can be ordered by Subscription.
3. Subscription Log
From the Admin panel, go to Sales > Subscription and Recurring payments > Subscription Log.

- Display information of Subscription Log: ID, Order ID, Subscription ID, Product Name, Status, Customer Email, Payment Method, Start Date, End Date, Created At, Action
- Action:
- View: direct to the Subscription information page.
- Mass Action:
- Change Status: Edit the Subscription status
- Active
- Inactive
- Cancel
- Change Status: Edit the Subscription status
- Admins can also filter the grid information by using Filters or Sort details according to columns, show or hide columns, set views.
4. Frontend
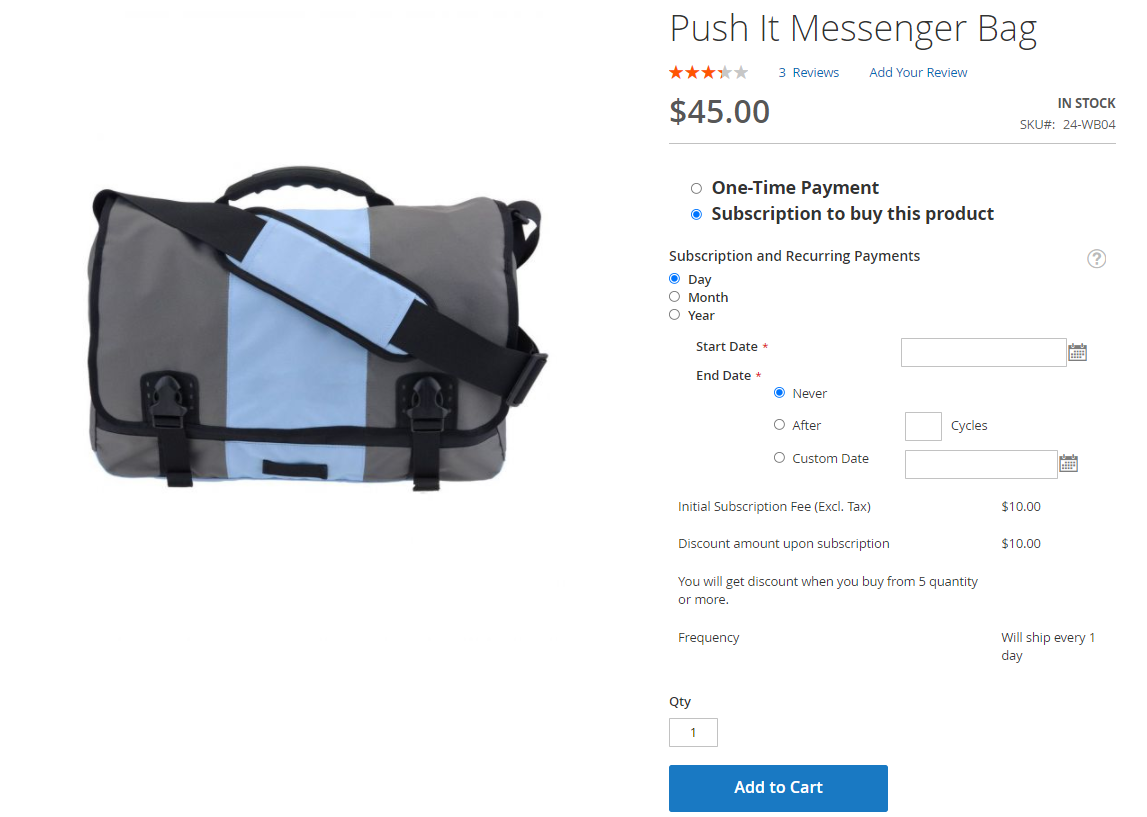
4.1. Product Page
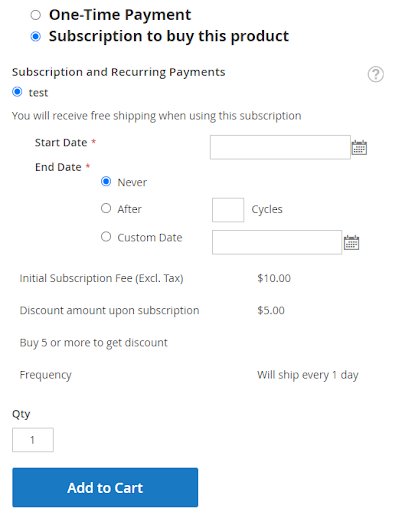
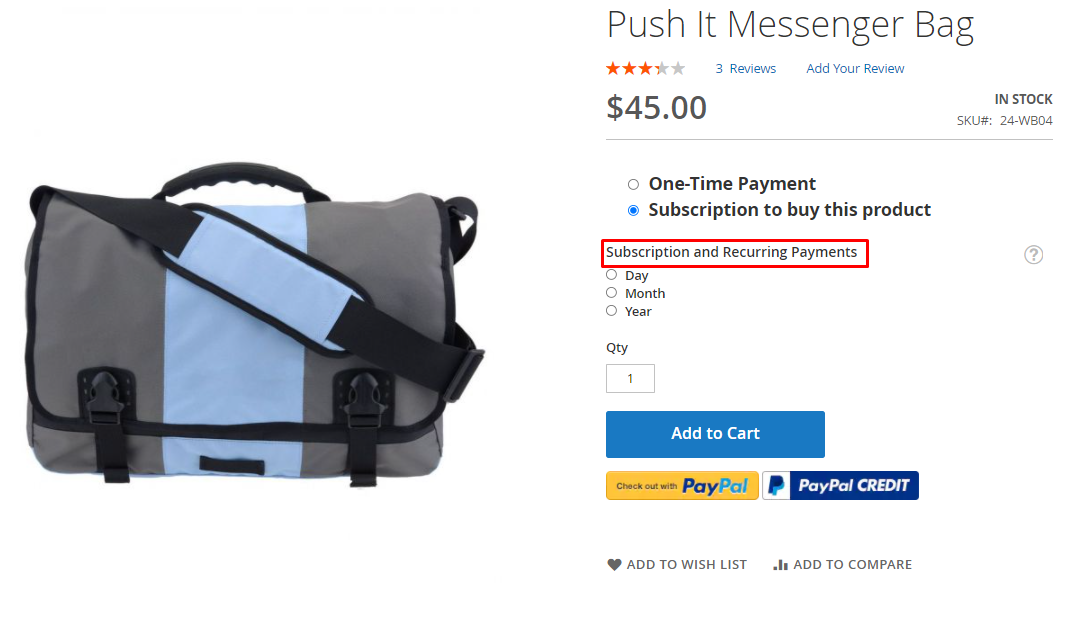
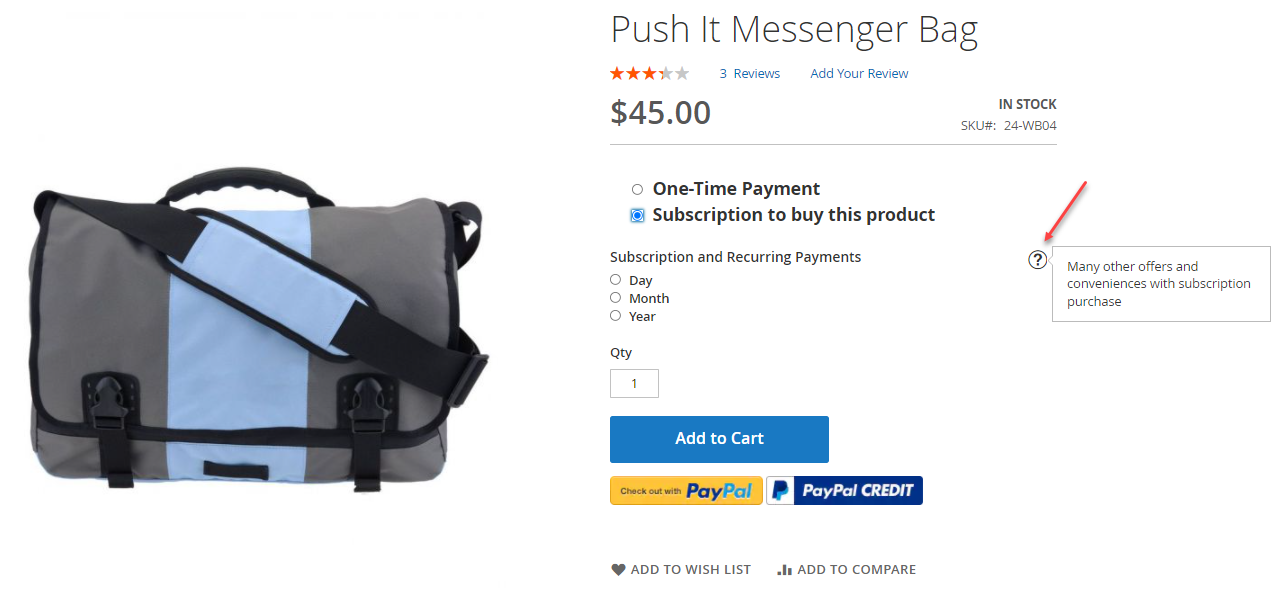
- Customers can pay for the products in 2 ways:
- One-Time Payment
- Subscription to buy this product
- The subscription options applied to products can be shown in the radio buttons or dropdown lists, according to the admin’s configuration. When customers choose to purchase the product by subscription method, the following information will be displayed on the frontend:
- Start Date: select the start date of the subscription
- End Date: select the date to end subscription
- Never: Subscription only ends when there is a request to the store owner, or when it is cancelled.
- After … Cycles: In the textbox, enter the number of cycles to apply Subscription. After the entered number of cycles, the Subscription will automatically end.
- Custom Date: Customize the end date from the calendar. After the stated date, the Subscription will automatically end.
- There are also details about Product Trials, Trial Period, Initial Subscription Fee (Excl. Tax), Discount amount upon subscription, Frequency
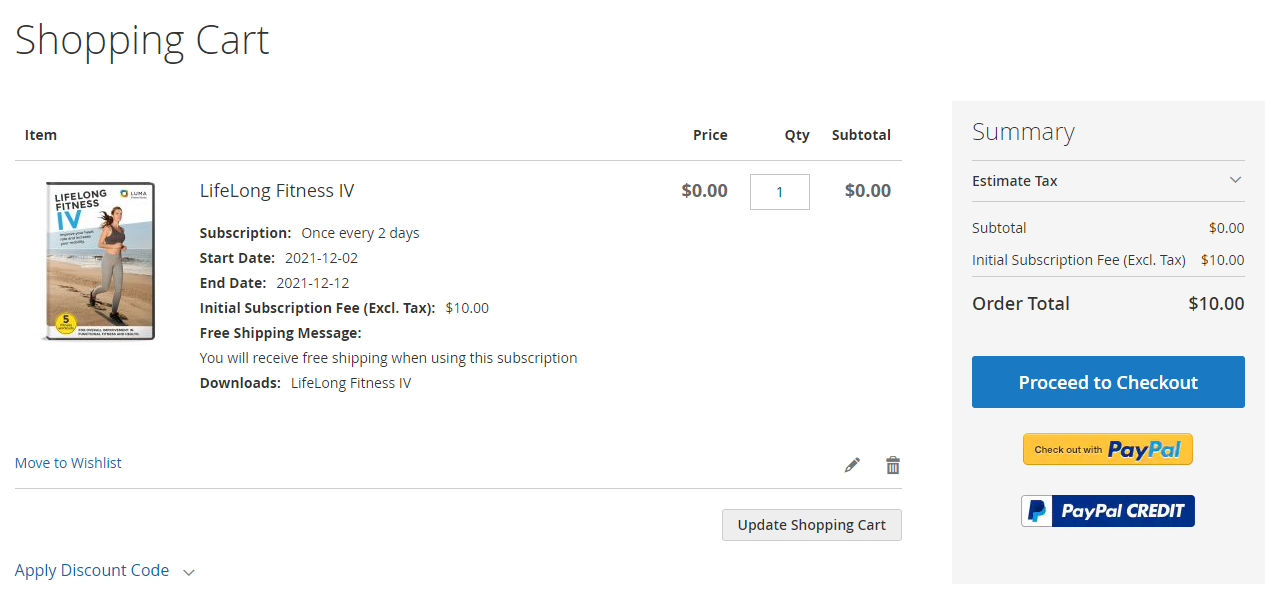
4.2. Shopping Cart Page
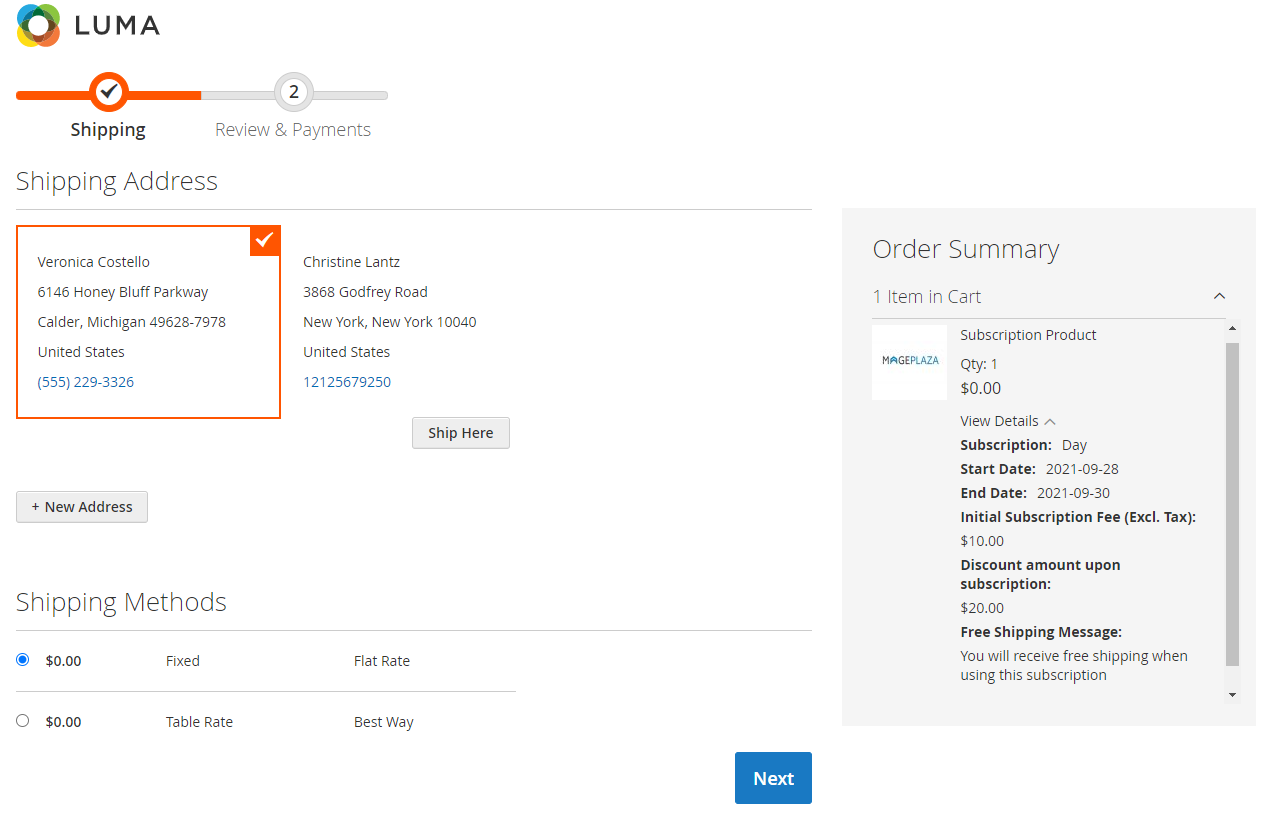
4.3. Checkout Page
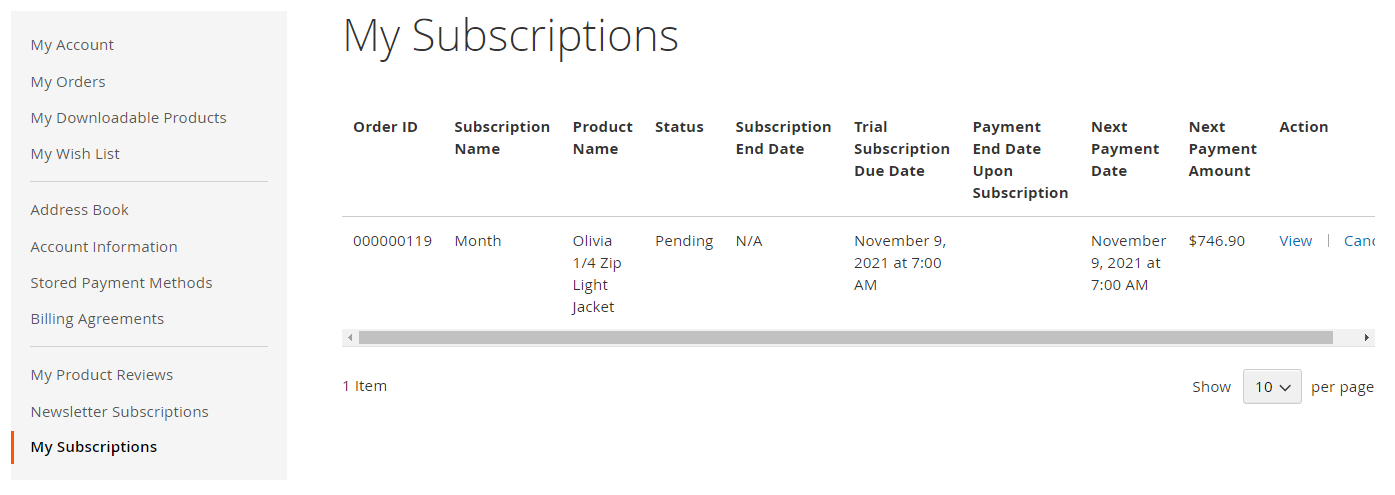
4.4. My Subscriptions page
Go to My Account > My Subscriptions.
- Includes the Subscription list of customers.
- Includes the following information:
- Order ID: ID of the order that contains subscription-based products
- Subscription Name: Name of the subscription plan
- Product Name: Name of the product
- Status: Status of the subscription
- Subscription End Date: The end date of the subscription
- Trial Subscription Due Date: The end date of the trial subscription
- Payment End Date Upon Subscription: The date when customers make payments for the subscription
- Next Payment Date: The date of the next payment
- Next Payment Amount: The amount customers have to pay in the next payment (including subtotal and discount of the subscription), excluding shipping fees and tax.
- Action:
- View: Show popup that contains Subscription information
- Cancel: Cancel Subscription
- When the Invoice of the subscription order is created, the subscription status will be Active, and the subscription starts.