Google Tag Manager
Overview
How to know the increase in traffic of a website every week? What is the conversion rate of turning visitors into customers this month? Mageplaza Magento 2 Google Tag Manager extension will help online stores track and report these data. The module is integrated with Google Analytics, Google Tag Manager, Facebook and Google Adwords to provide statistics about Shopping Behavior, Checkout Behavior, Product Performance that allow you to track website traffic and conversion rates with a few clicks.
Outstanding Features
| STANDARD | Outstanding Features | Description |
|---|---|---|
| 1 | Increase Marketing Efficiency | Extensive Tag Support: Mageplaza Google Tag Manager supports more than 40 tags, triggers, and variables. Pre-built Variables: Leverage over 20 pre-built variables for your tags, or create custom ones. Dynamic Remarketing Support: Create dynamic remarketing campaigns to target past website visitors. Google Analytics 4 Ready: Includes support for Google Analytics 4, the latest version. Facebook Pixel Integration: Track conversions from your website to Facebook ads. |
| 2 | Productive Improvement | Shopping Behavior Reports: Gain insights into customer shopping behavior. Checkout Behavior Reports: Analyze customer checkout behavior for optimization. Product Performance Reports: Understand individual product performance. Sales Performance Reports: Analyze overall sales performance trends. Product List Performance Reports: Track the effectiveness of product listings. |
| 3 | Improve website performance | Event Tracking: Implement event tracking without code modifications. Monitor user behavior and gather website performance data. |
| 4 | Ensure data privacy for users | Version Control: Track changes to tags and revert to previous versions if needed. |
Installation
We offer two methods for installing our plugins: the Copy & Paste method and the Composer method. Please follow the detailed instructions provided below.
Method 1: Installation via Copy & Paste
To install our plugins using the Copy & Paste method, kindly follow the instructions at the link below:
How to Install Magento 2 Extension via Copy & Paste
Method 2: Installation via Composer
Composer name: mageplaza/module-google-tag-manager
To install our extensions using Composer, please refer to the comprehensive guide at the link below:
How to Install Magento Extension via Composer
By following these guides, you can ensure that the installation process is handled correctly, allowing you to fully utilize the features and benefits of our plugins.
Module Update Guide
Keeping your module updated ensures optimal performance. Follow one of these steps to update your module:
- By Account Dashboard: Log in to your
Mageplaza account > go to the My Licenses section > click on the Download button > choose the latest version from the popup. - By composer: Kindly use the following commands to update the module via composer
composer require mageplaza/mageplaza/module-google-tag-manager
php bin/magento setup:upgrade
php bin/magento setup:di:compile
Updating a module by Composer ensures efficient dependency management, version control, and integration with development tools, making the process faster and more reliable.
How to use
Google Tag Manager:
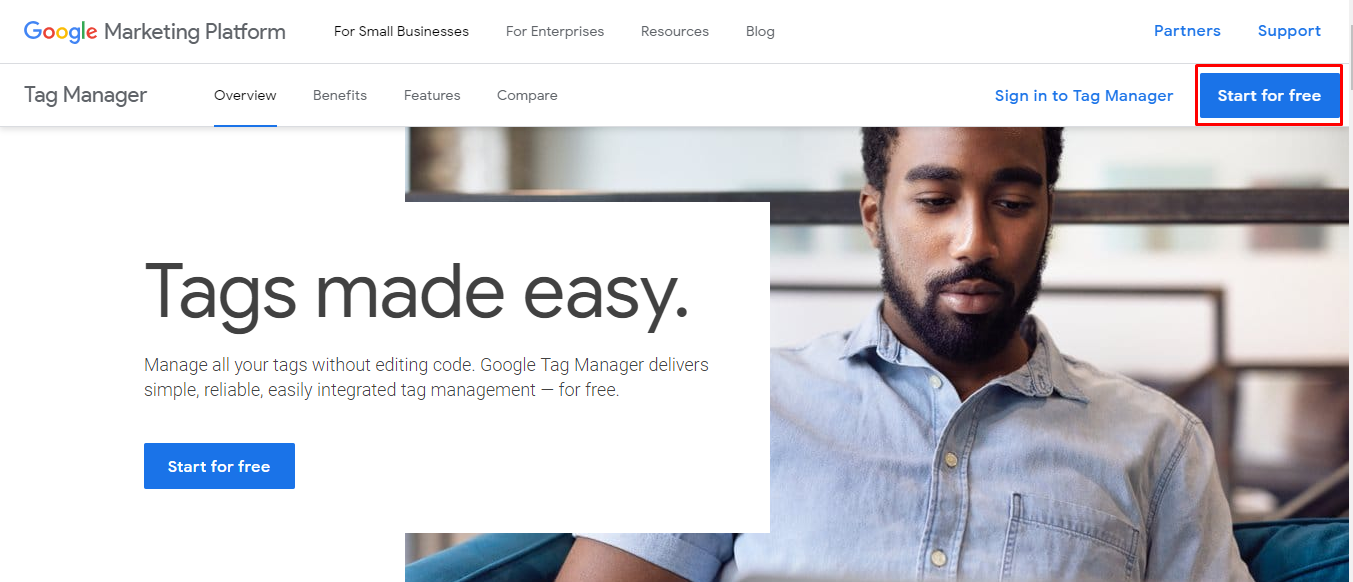
- To register a Google Tag Manager account, please access the following link here
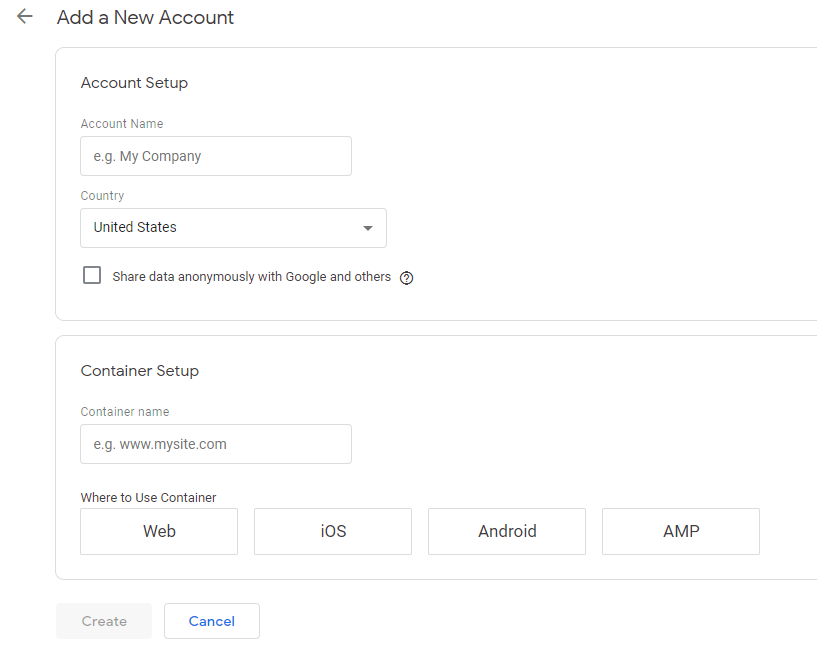
- Then, fill in the required information to register your account:
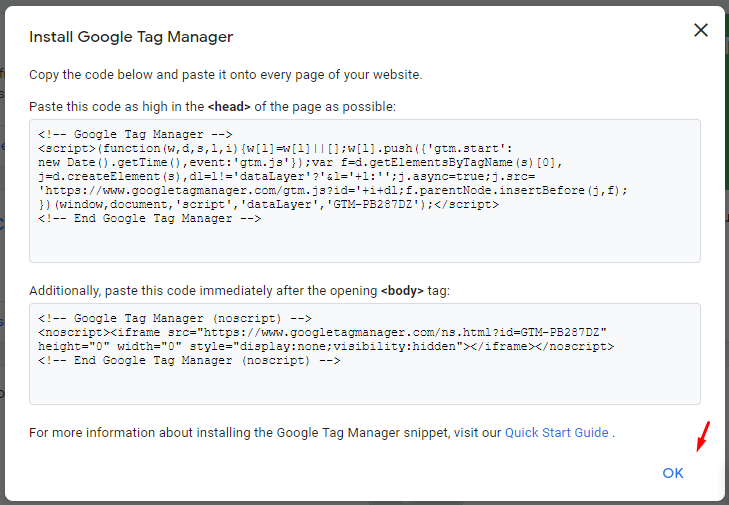
- Copy the code below and paste it into each page of your site.
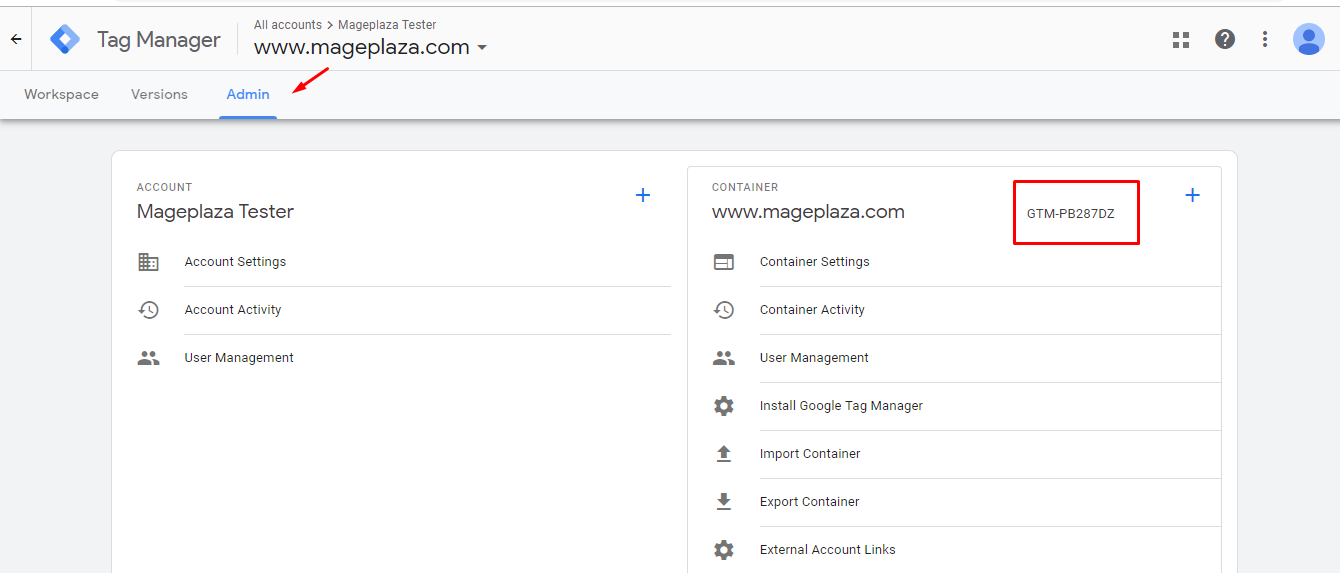
- Get Container ID to install in your Magento store.
Google Analytics:
Visit the following link to register a Google Analytics account
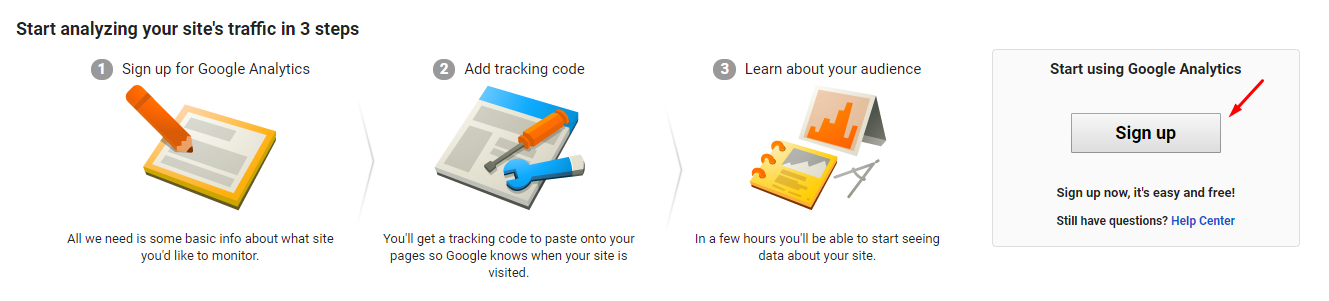
First, click on Sign up to register using the Google Analytics tool.
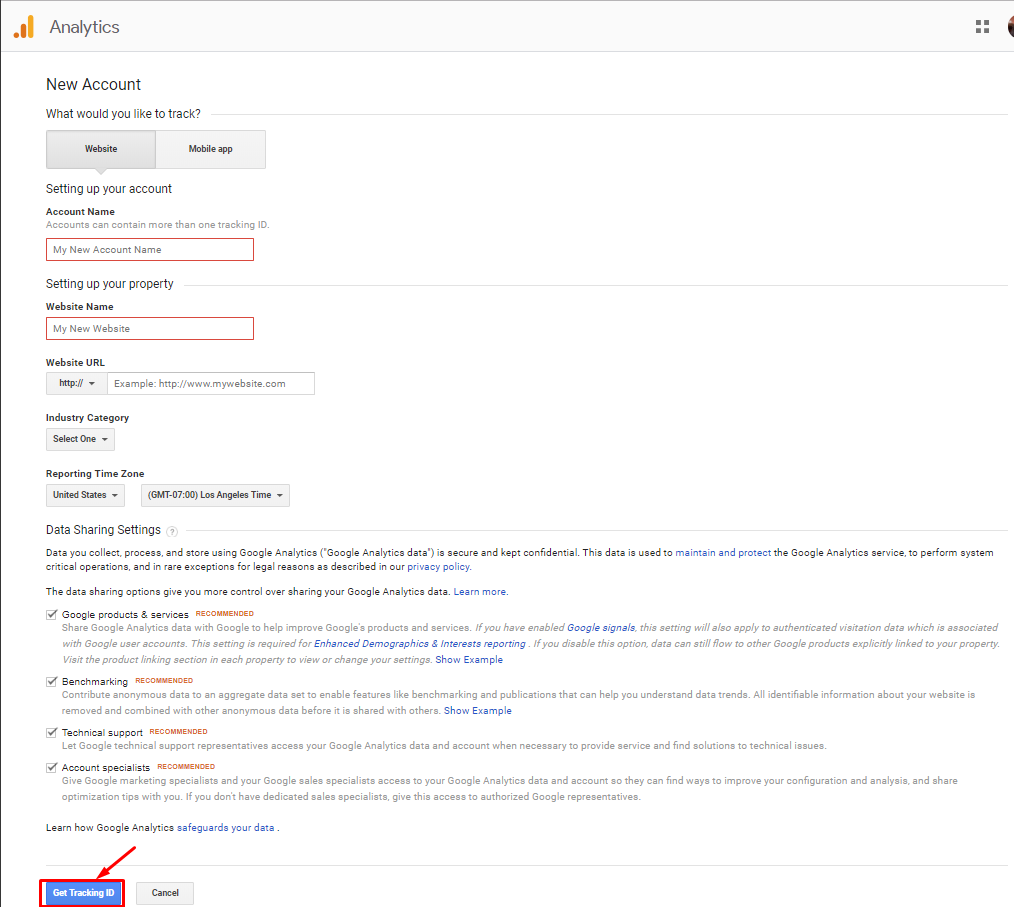
Select the object you want to track, either Website or Mobile Apps. Then, complete your account information in the New Account registration form.
After completing the information, click on the "Get Tracking ID" button.
Another dialog will appear:
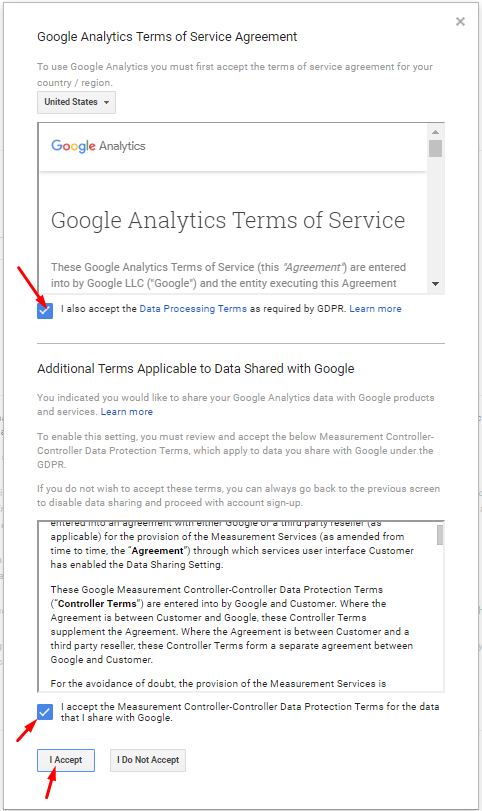
Select to agree to the terms of service. And click on the I accept button.
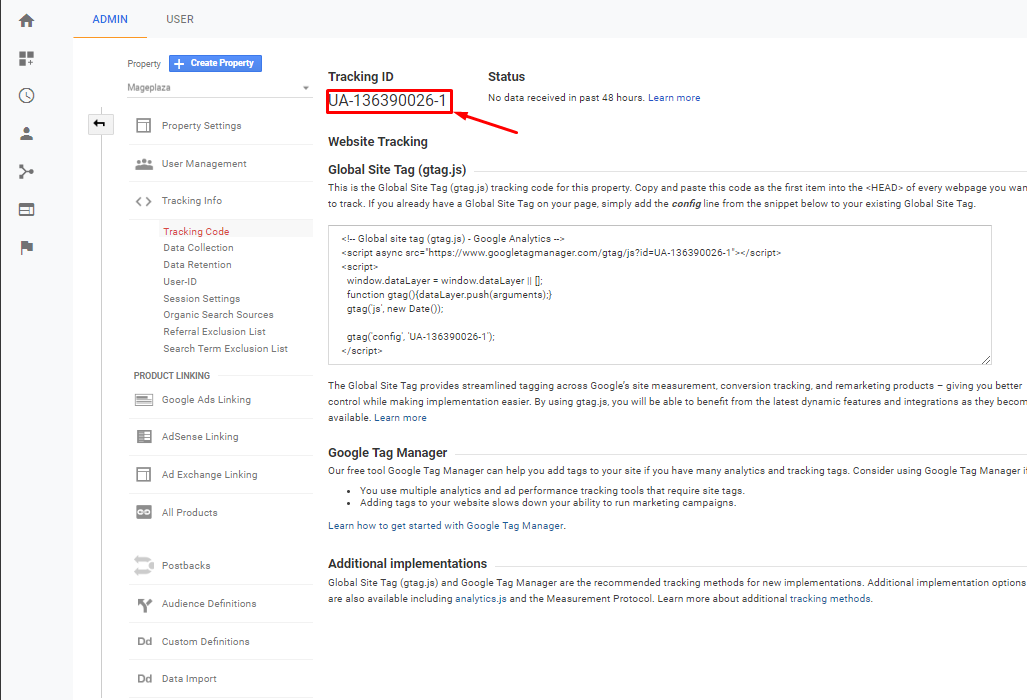
If the registration is successful, we will see the following interface and get GA Tracking ID to install in Magento.
Facebook Pixel
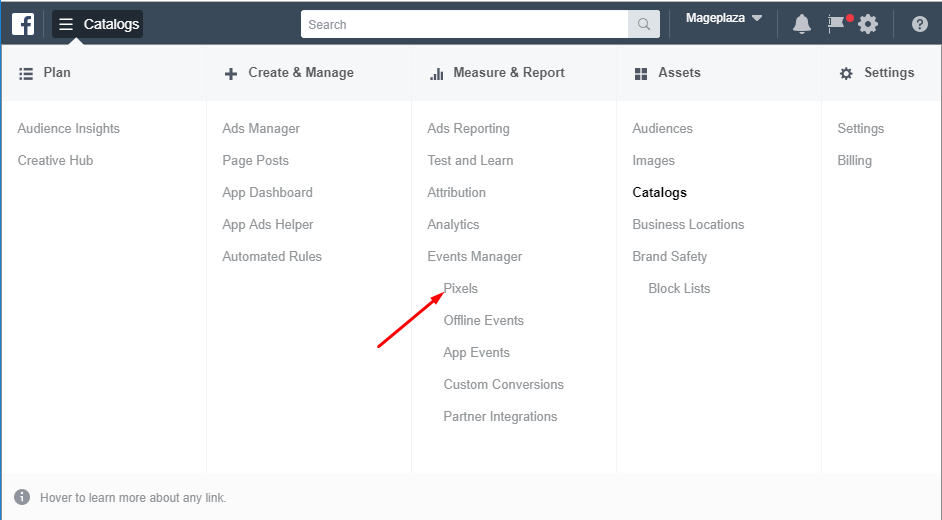
Visit here to get Facebook Pixel ID.
First, click on the Catalog section in the top left corner of the screen. In the Measure & Report column, go to the
Events Manager> select Pixels.
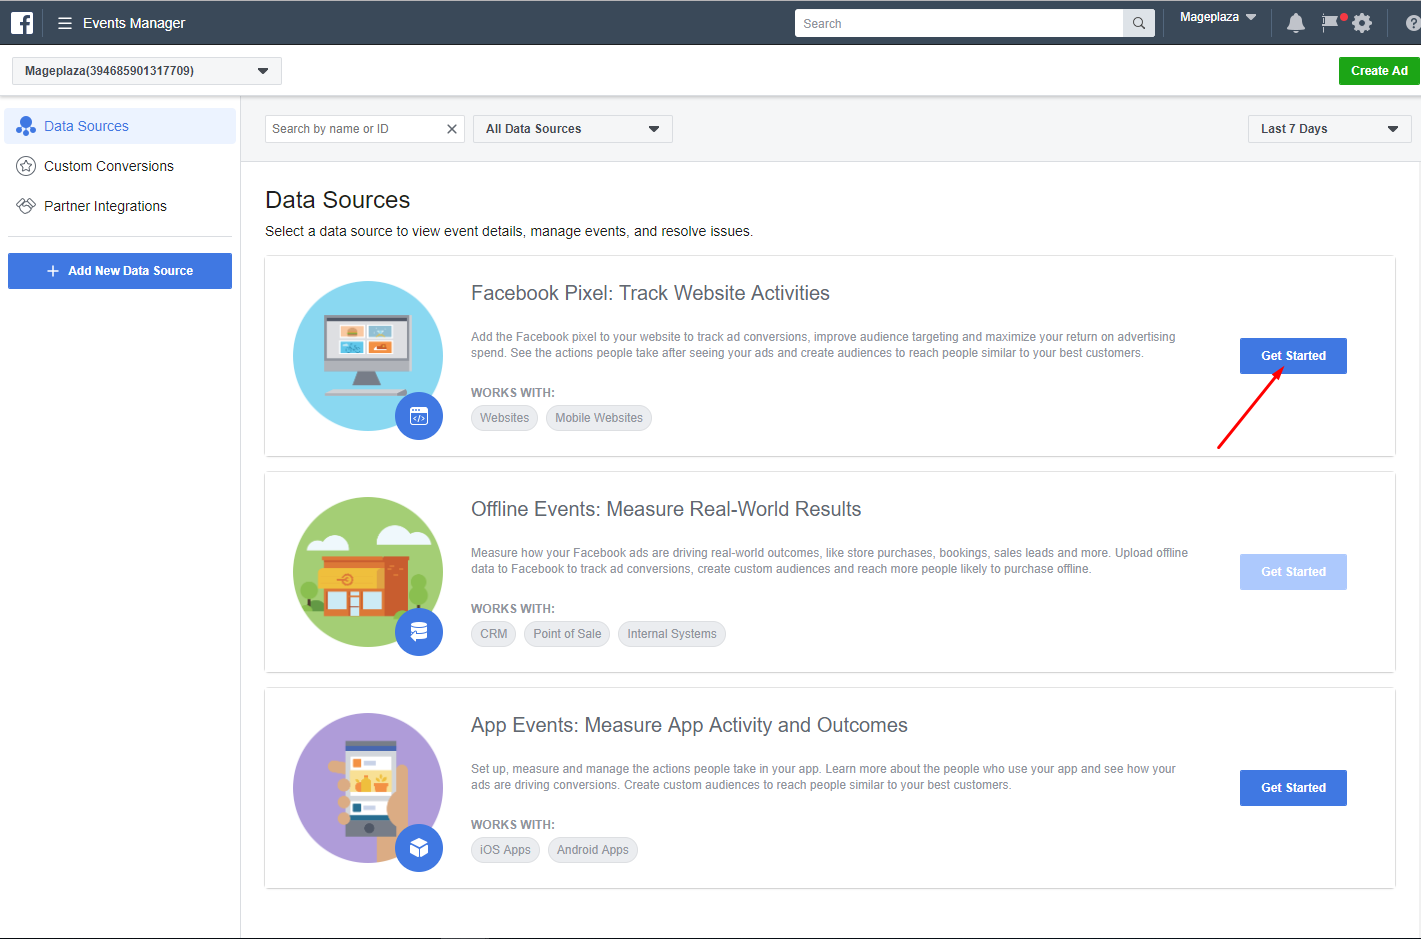
- This time, at Datasources, go to Facebook Pixel > Track Website Activities. Click to Get Started to create Facebook Pixel
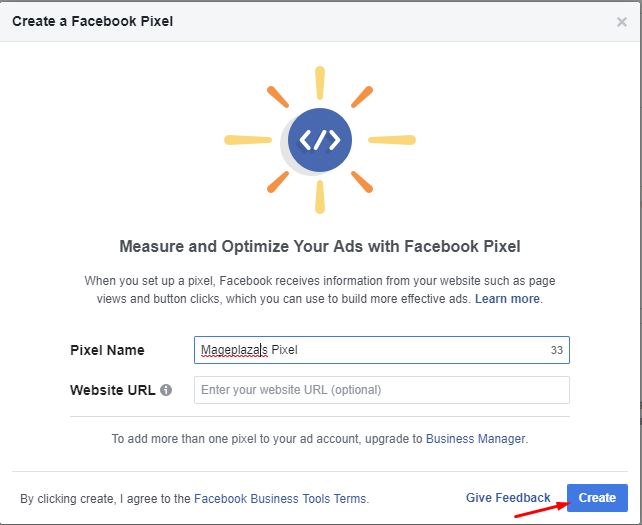
- You can skip the Website URL field. It is not a required field. Click Create
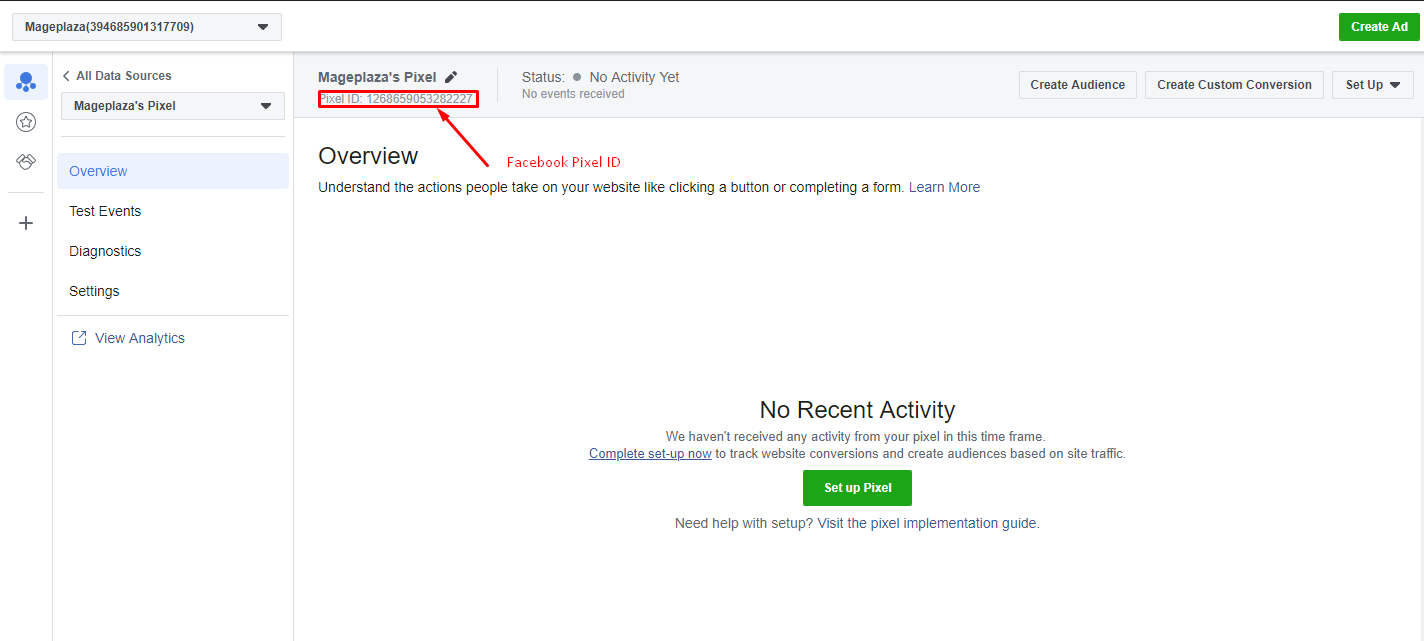
- Then, you can see a Pixel ID under your Pixel Name. That is the Facebook Pixel ID you need to get.
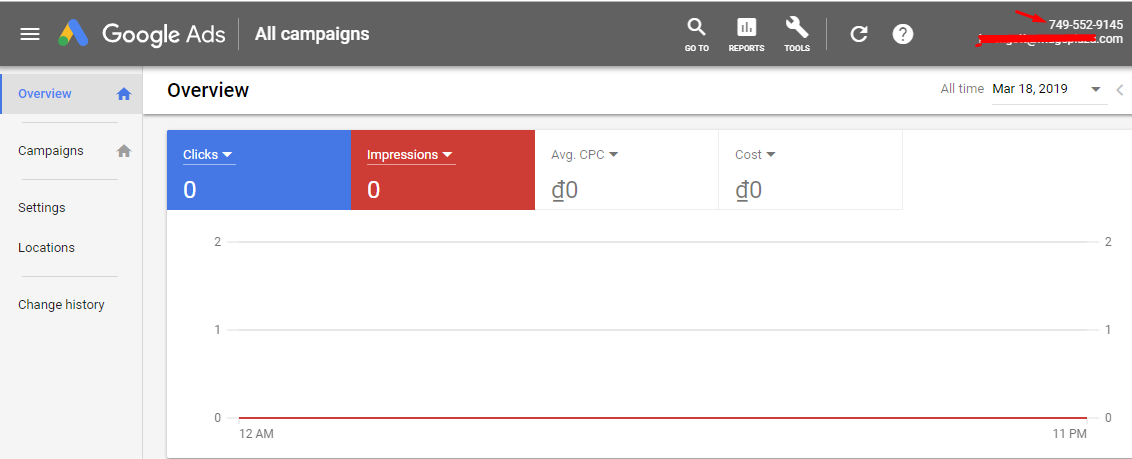
Google Adwords
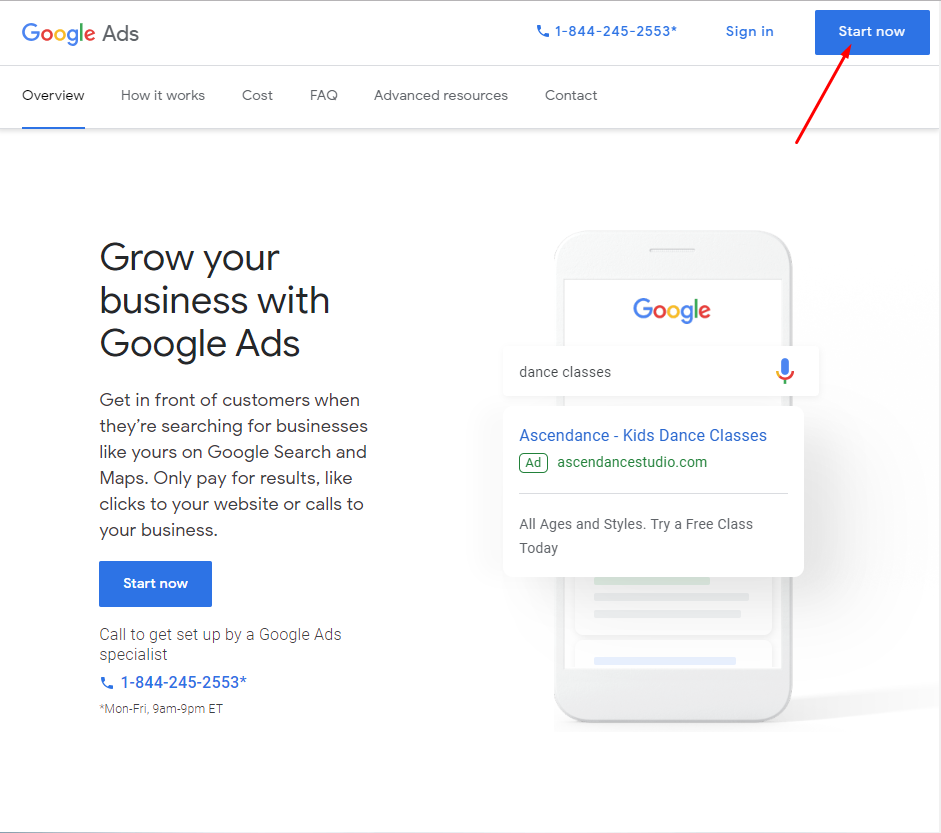
- Access to the link ads.google.com to log in with your Gmail account and enter the website to start using Google Adwords.
- First, click on the Start now button in the top right corner of the screen.
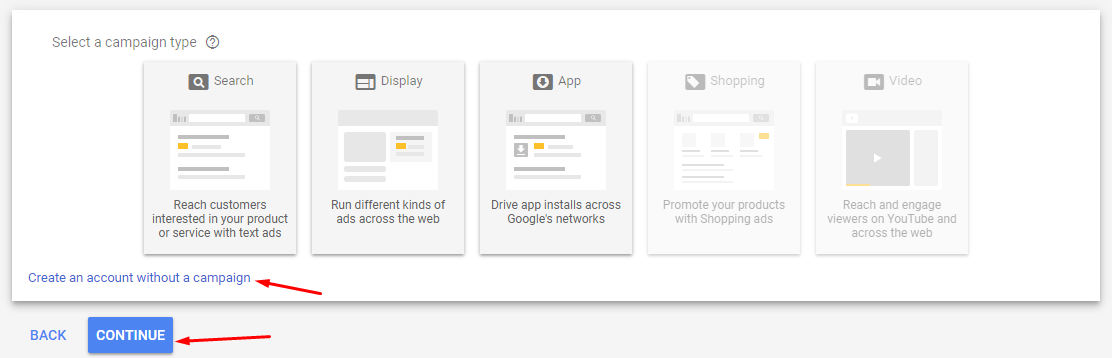
- Then select a suitable campaign type, then click on Continue. You can also create an account without choosing any campaign.
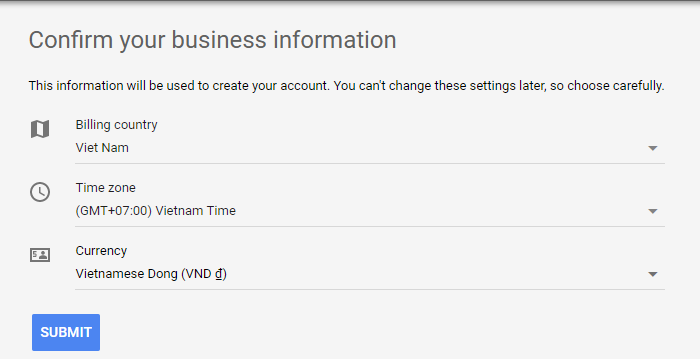
- Confirm your business information and click Submit.
- Next, click on Explore your account to explore your account and get your Google Adwords ID.
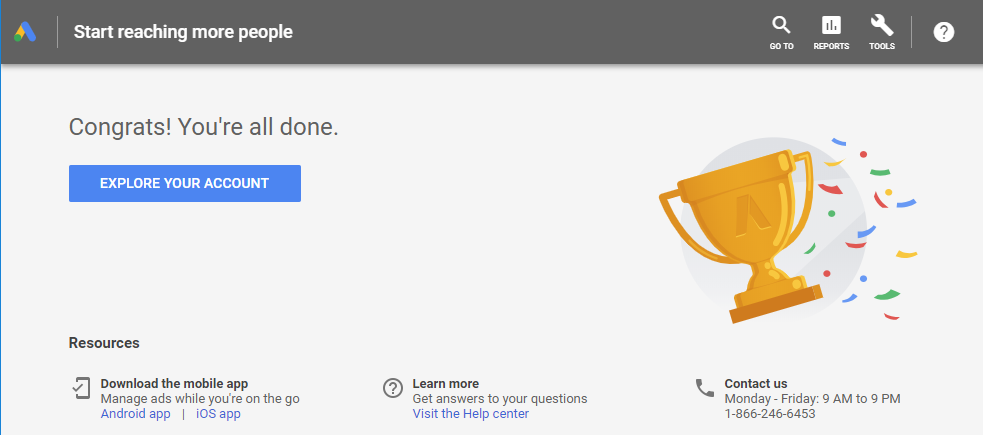
- The serial number above your Gmail is Google Adwords ID.
How to configure
1. Configuration
Login to the Magento Admin, choose Stores > Configuration > Mageplaza Extensions > Google Tag Manager.

1.1. General
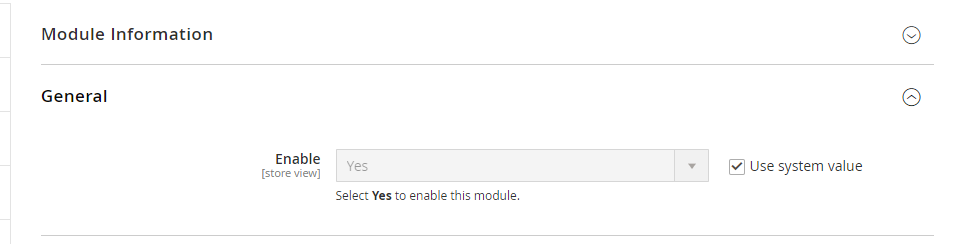
- Enable: Select Yes to enable the module's feature.
1.2. Advanced Configuration
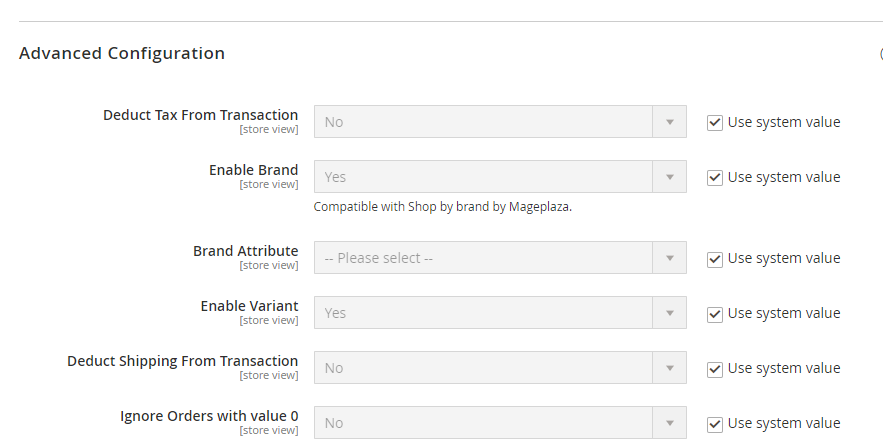
- Deduct Tax From Transaction: Select Yes to deduct tax from Grand Total
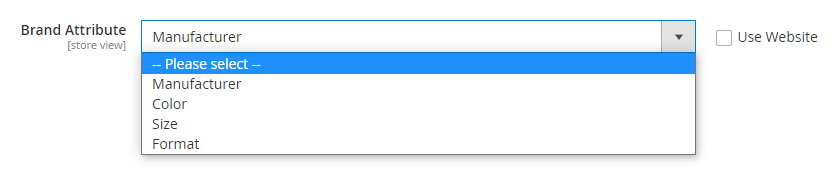
- Enable Brand: Select Yes to turn on the configuration, take the value according to the brand
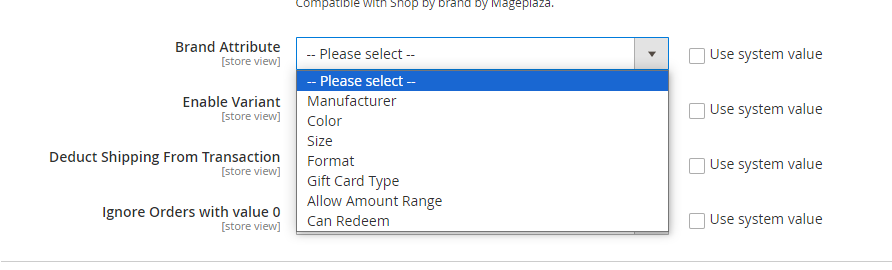
- Brand Attribute: There are seven attributes: manufacturer, color, size, format, gift card type, allow amount range, and can redeem. Brand will be set according to the selected Attribute.
- Enable Variant: Select Yes to show the Variant field

Deduct Shipping From Transaction: Select Yes to deduct Shipping from transaction. The system will then display another field.
- Tax Deduction On Shipping: Choose Yes to deduct shipping tax from transaction.
Ignore Orders with value 0: Select Yes to exclude orders with the value of 0
1.3. Google Tag Manager
Configure and manage all your website's tracking tags within a single, user-friendly interface. This eliminates the need to manually edit website code for each tag, reducing errors and streamlining the process.
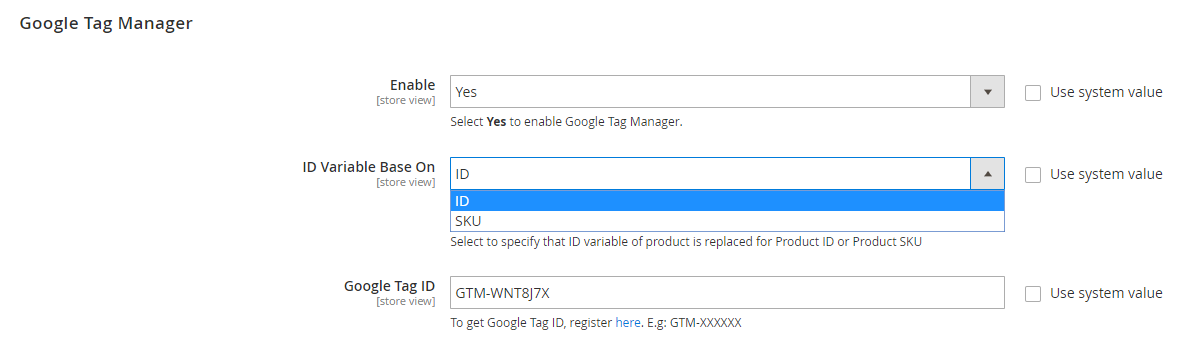
- Enable: Selecting Yes to enable the use of the Google Tag Manager feature to update and control all tags for the site.
- ID Variable Base On: Select the variable of the product ID to be replaced displayed:
- ID: Display the ID value of the product according to the product ID.
- SKU: Display the ID value of the product according to the product SKU.
- Google Tag ID:
- Enter Google Tag Manager's ID into the Google Tag ID field to update some information about event, such as the category page, product page, when adding to cart, remove from cart, order success, search, checkout default or checkout page of One Step Checkout) extensions, which help shorten the checkout process to only 6 steps within a page.
- If left blank or incorrectly entered, the Container ID will not display tag information.
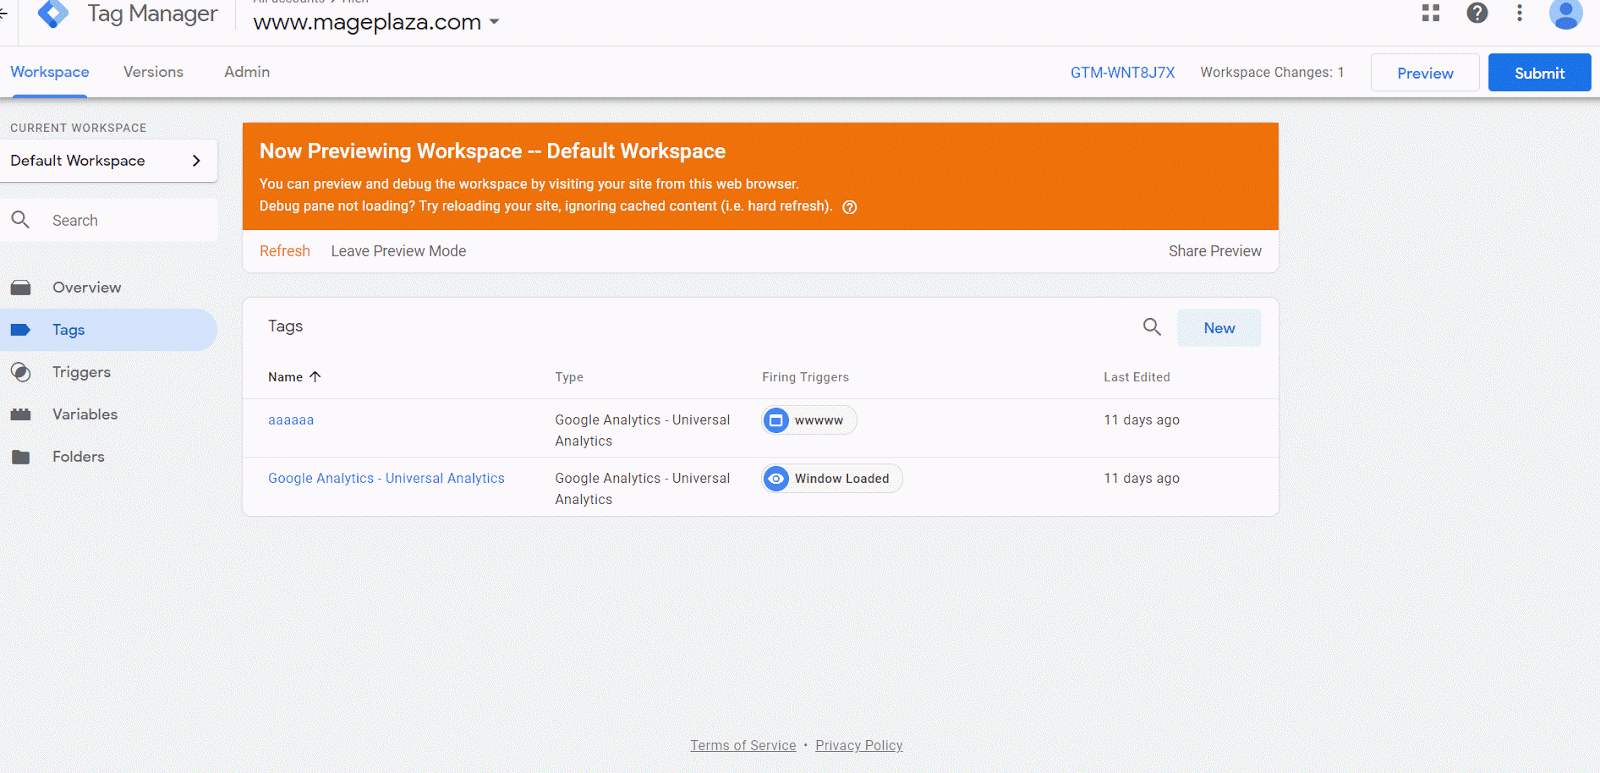
Note: To turn on Google Tag Manager, you need to create Trigger, then Tag and click Preview or Submit in case GTM is disabled.
1.4. Google Analytics 4
Configure tracking for Google Analytics 4, including advanced features and e-commerce tracking. This allows you to gain deeper insights into user behavior, purchase data, and overall website performance
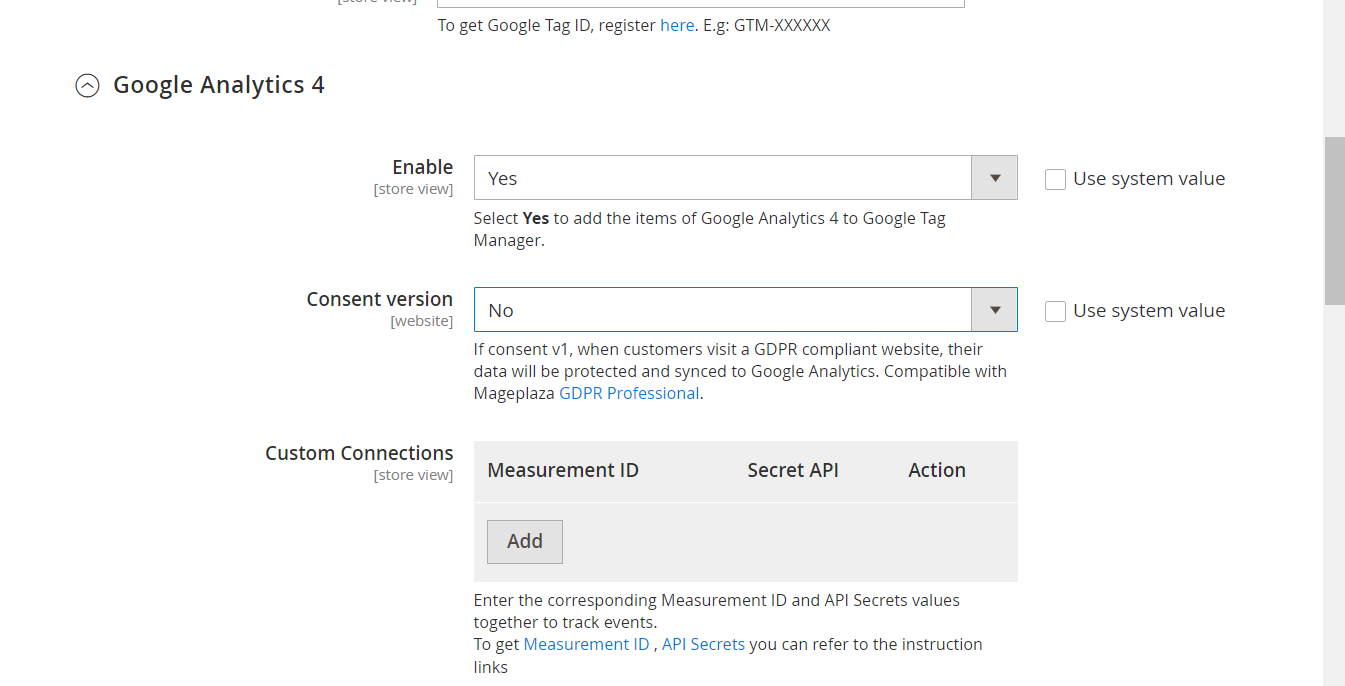
- Enable: Select Yes to add items of Google Analytics 4 to Google Tag Manager.
- Consent version: Allow users to enable/disable Consent version selection with options:
- No: Cookies still collect data without allowing consent.
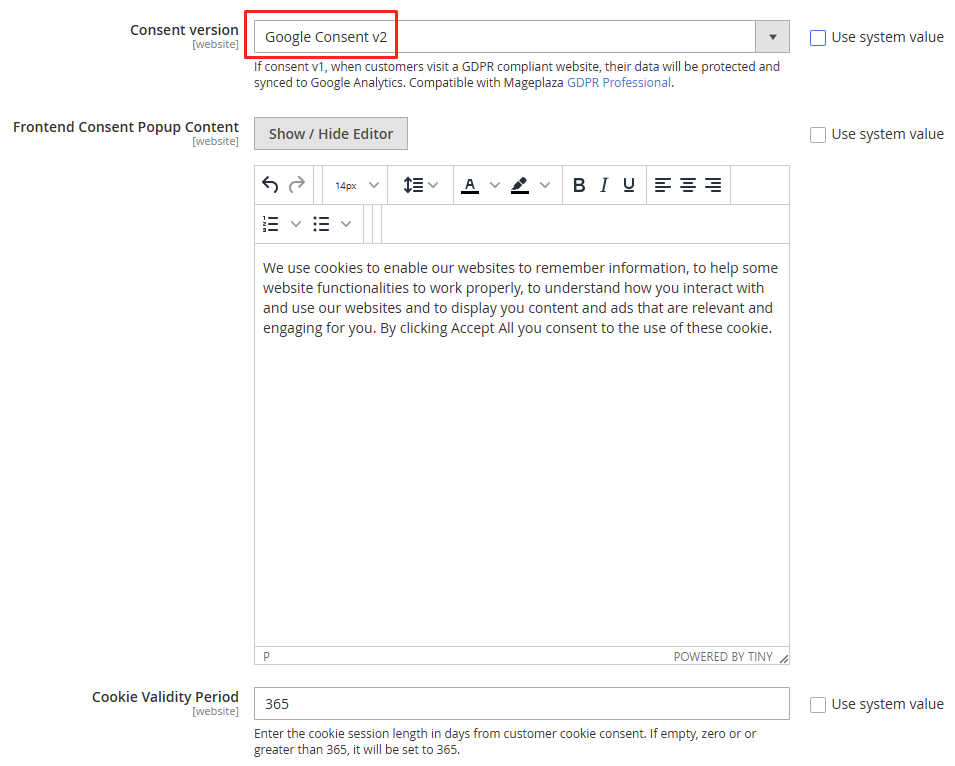
- Google consent v1: Use consent v1. However, cookies will not be able to collect new user data from the EEA due to Google's new policy.
- Google consent v2: Use consent v2; when clicking this option, the fields “Frontend Consent Popup Content” and “Cookies Validity Period” appear.
- Frontend Consent Popup Content: Users can edit the content displayed on the consent v2 popup on the frontend. Popup consent on Frontend guide: The first time a customer accesses the website or if the cookies have expired, the popup consent will show up with two types of cookies.
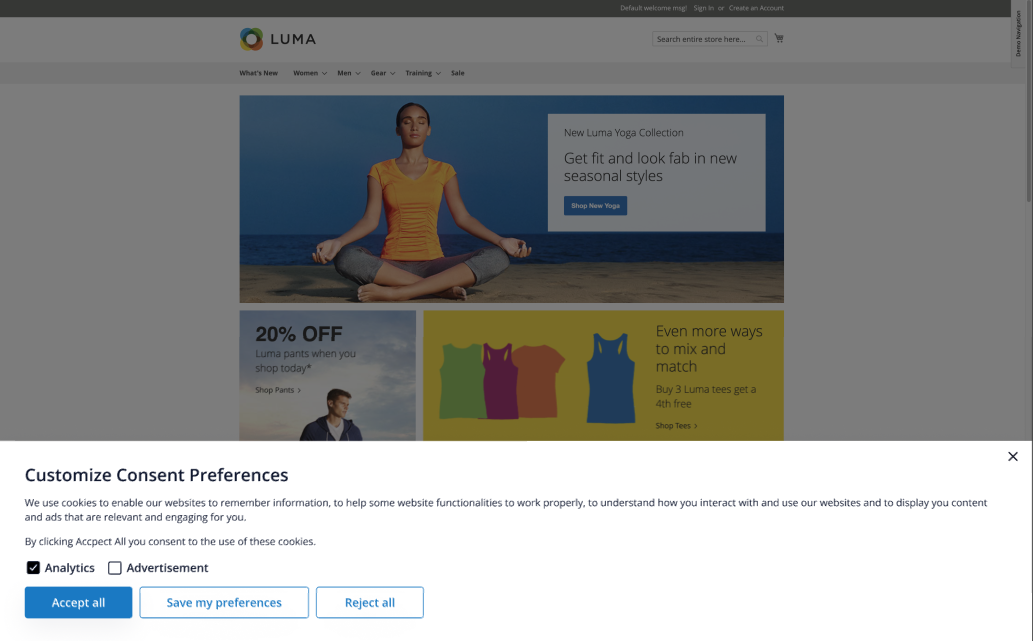
- If the customer clicks to close the popup without selecting one of the 3 buttons: The system will close the popup and reject all cookies
- If the customer clicks the button Reject all: the system will refuse all cookies
- If the customer clicks the button Accept all: the system will accept all cookies
- If the customer clicks the button Save my preferences: Only enable when ticking 1 or 2 types of cookies and accepting the ticked cookies
Cookie Validity Period: Users can enter the number of days the cookie expires from the time the customer approves the cookie.
Due to the ePrivacy Directive , the cookie validity will only be set to a value from 1 to 365 (unit is days).

Custom Connection: Enter the corresponding Measurement ID and API Secrets values together to track events
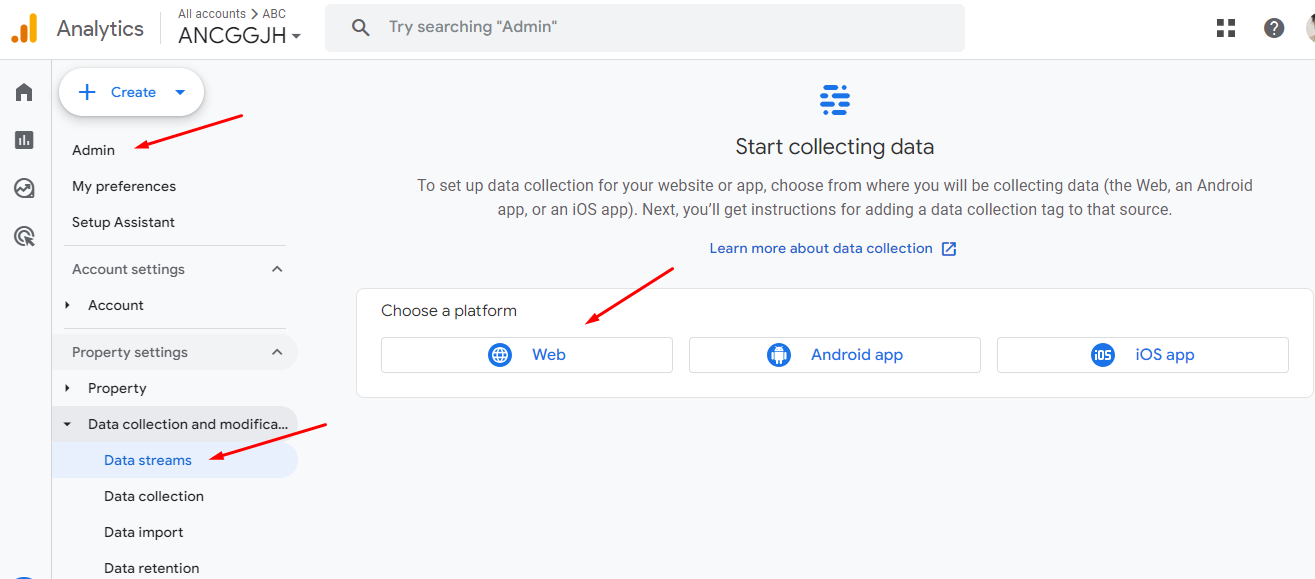
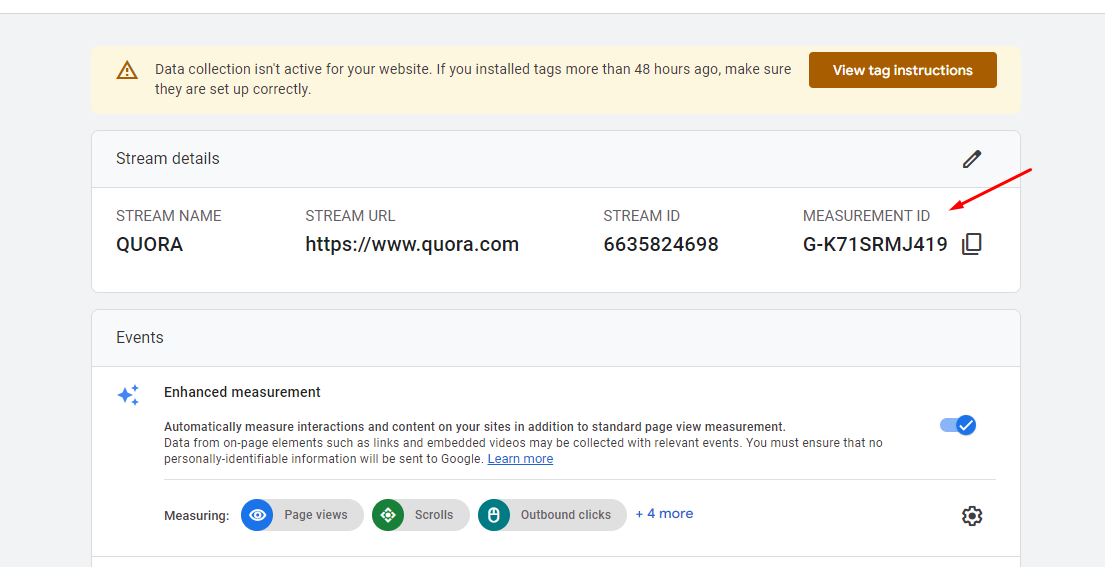
To find the measurement ID, follow these steps:
- In Admin, under Data collection and modification, click Data streams.
- Select the Web tab.
- Click the web data stream
- Find the measurement ID in the first row of the stream details.
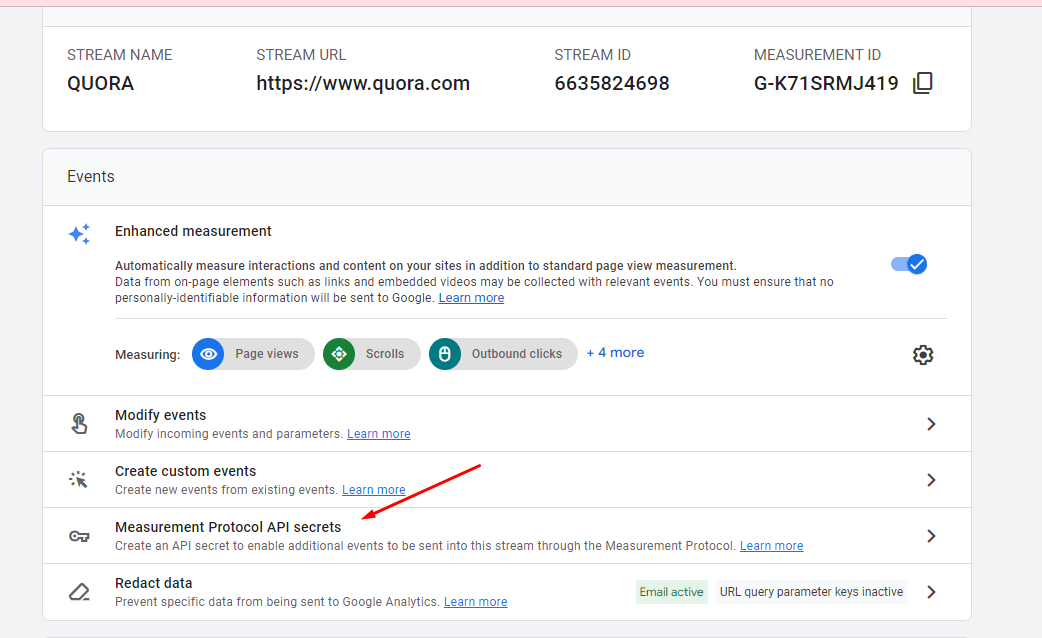
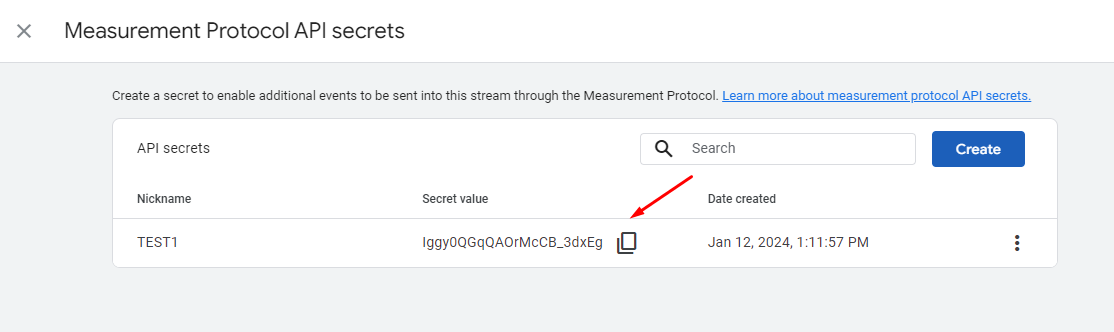
Generate API secrets in Analytics Admin
- In Admin, under Data collection and modification, click Data Streams.
- Click Web, then click a web data stream.

- In the web stream details, click Measurement Protocol API Secrets.
- If necessary, review and accept the User Data Collection Acknowledgement.
- Click Create
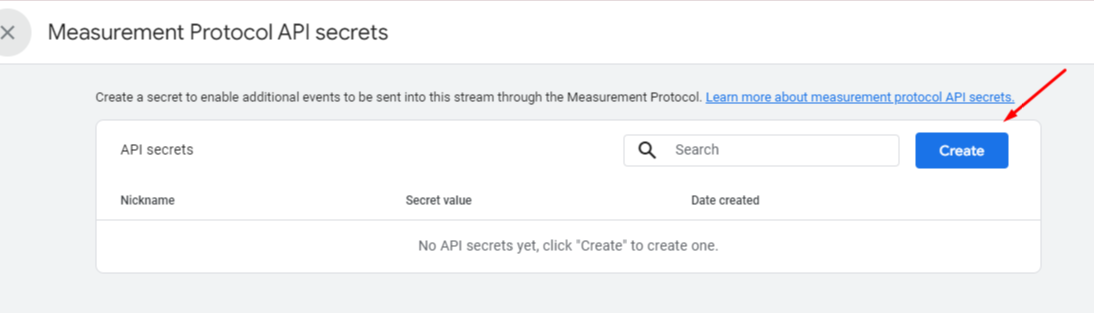
- Enter a nickname for the secret, then click Create.
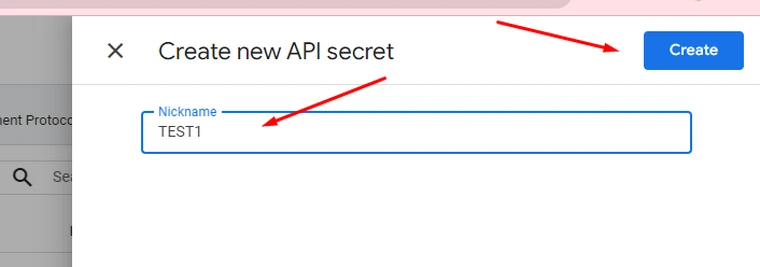
- Click the below symbol to copy the secret so you can paste it into your POST request
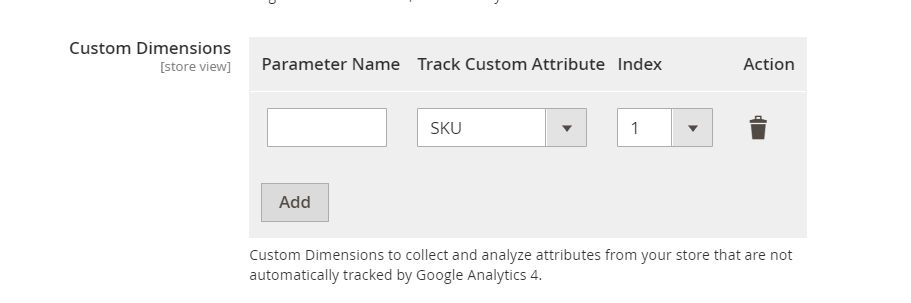
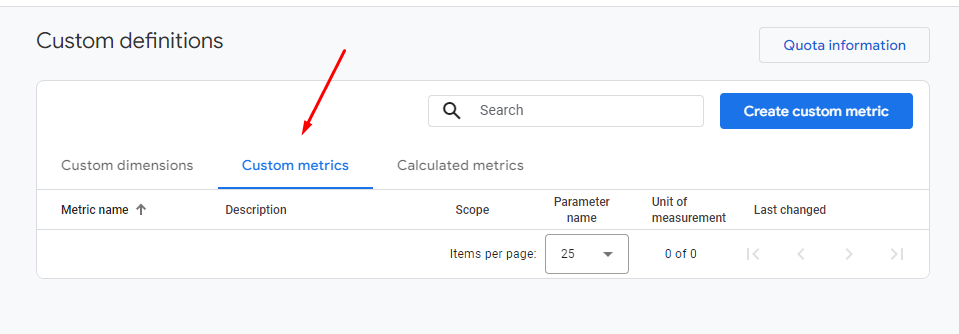
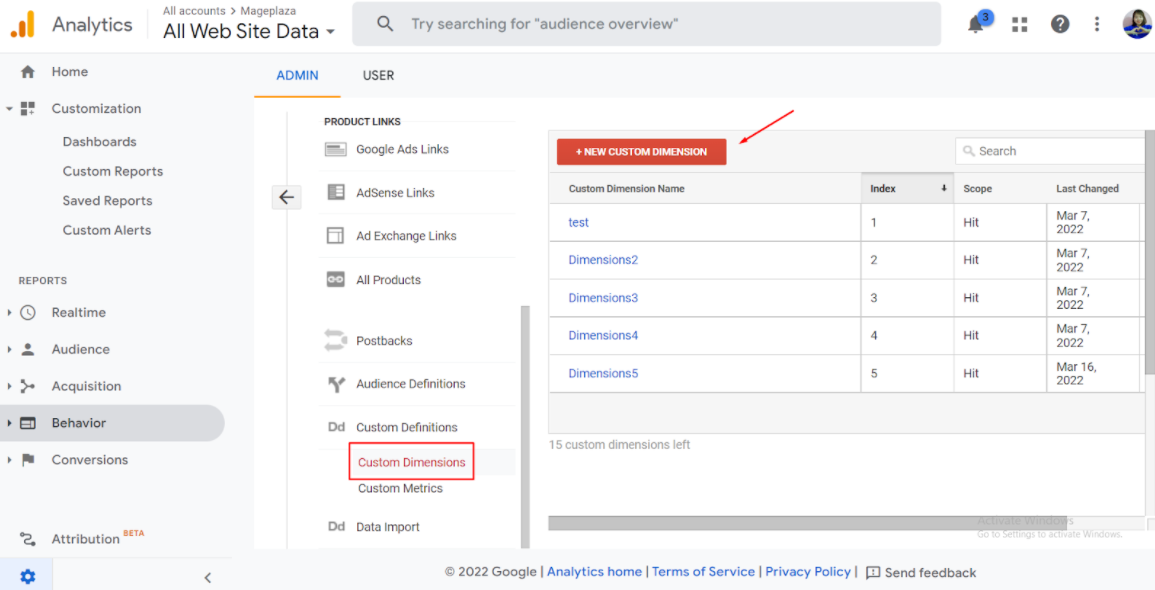
Custom Dimension: To create a GA4 custom dimension, follow these steps:
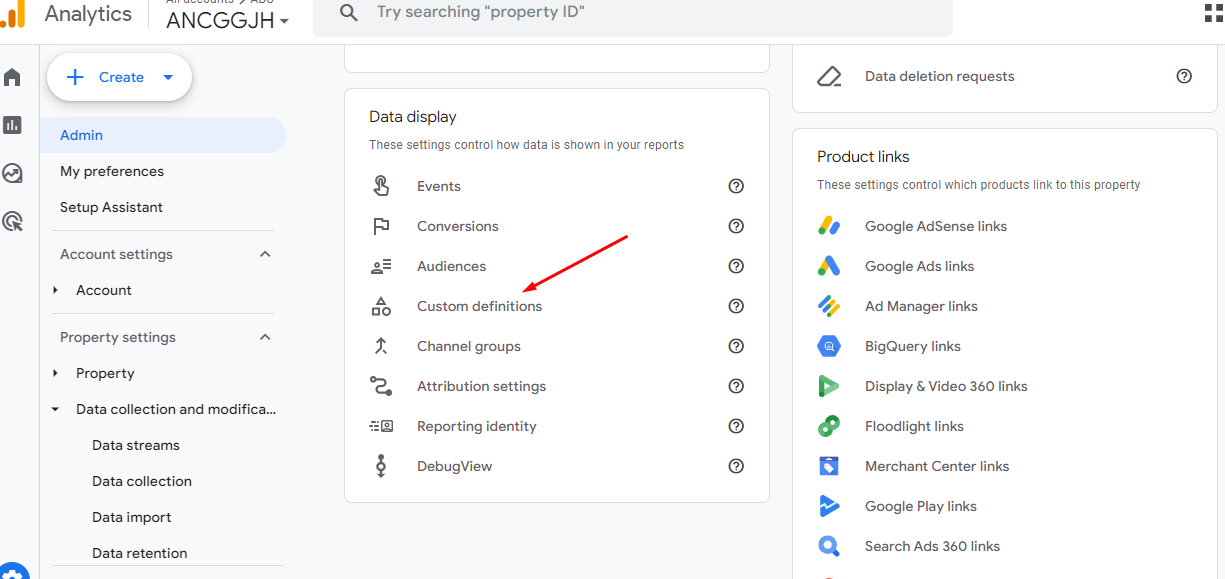
- Sign in to Google Analytics and click Admin.
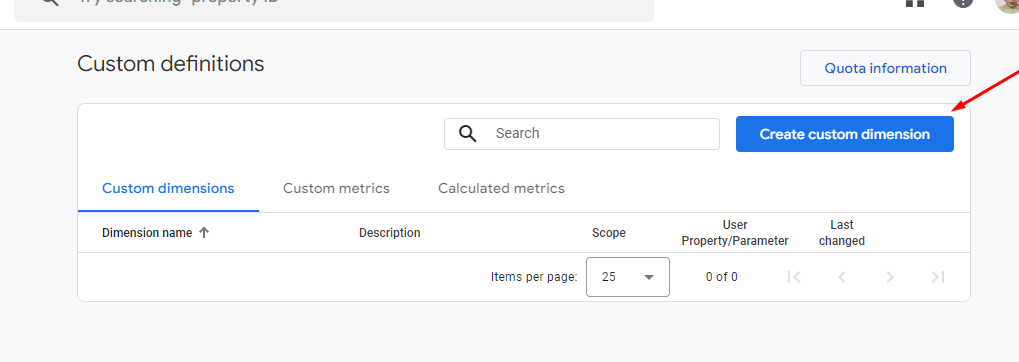
- Click Custom definitions > Custom dimensions.
- Click the Create custom dimension button.
- Enter a Name and Scope for the dimension.
- Click Create.
- Custom Dimensions to collect and analyze attributes from your store that are not automatically tracked by Google Analytics 4.
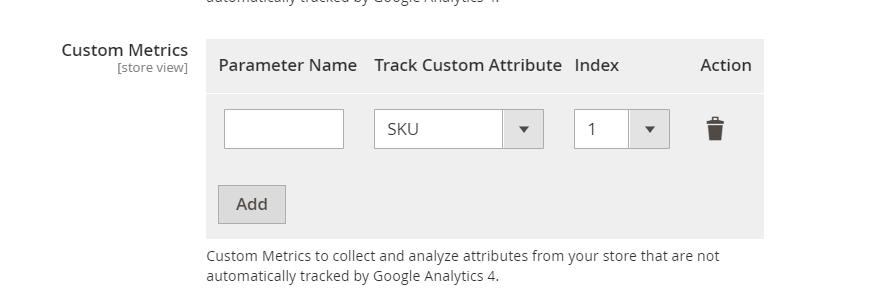
- Custom Metrics: In the Custom Definition section, choose Custom Metrics and Create Custom Metric
Custom Metrics to collect and analyze attributes from your store that are not automatically tracked by Google Analytics 4.
Note:
- Please enter the Parameter Name that matches the GA4 side to sync data
- On the Magento site, if the Parameter Name and Index match, the data will be taken according to the latest one. Duplicate Parameter Name is not acceptable
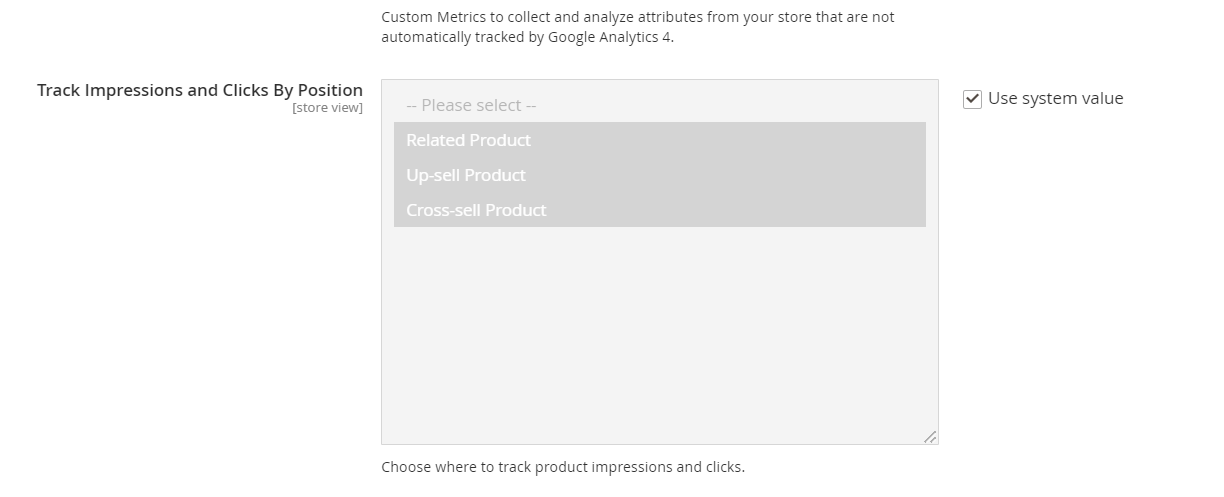
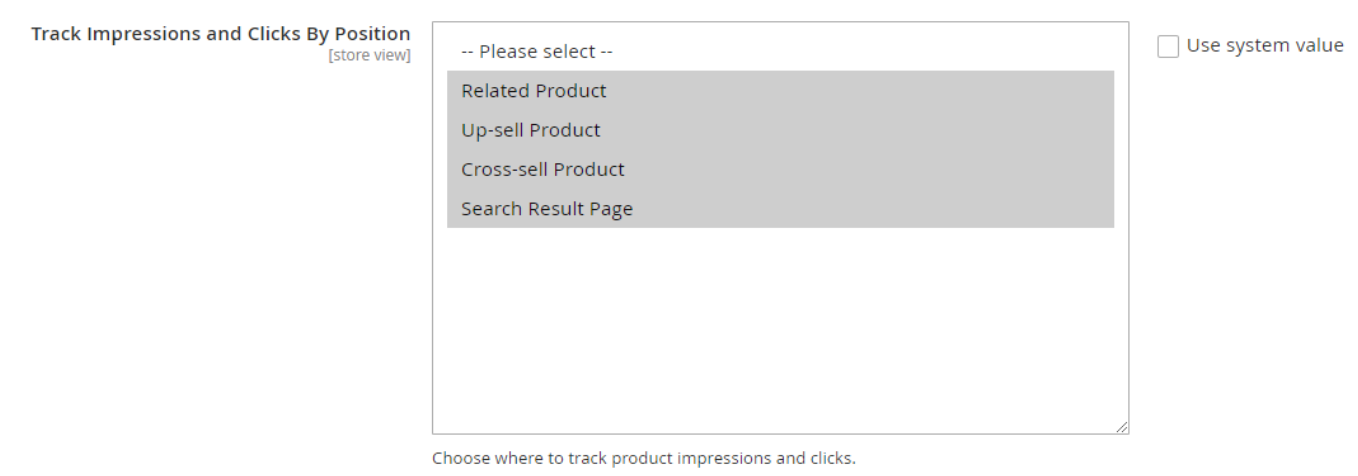
- Track Impression and Click By Positions: Choose where to track product impressions and clicks, including Related Product, Up-sell Product and Cross-sell Product
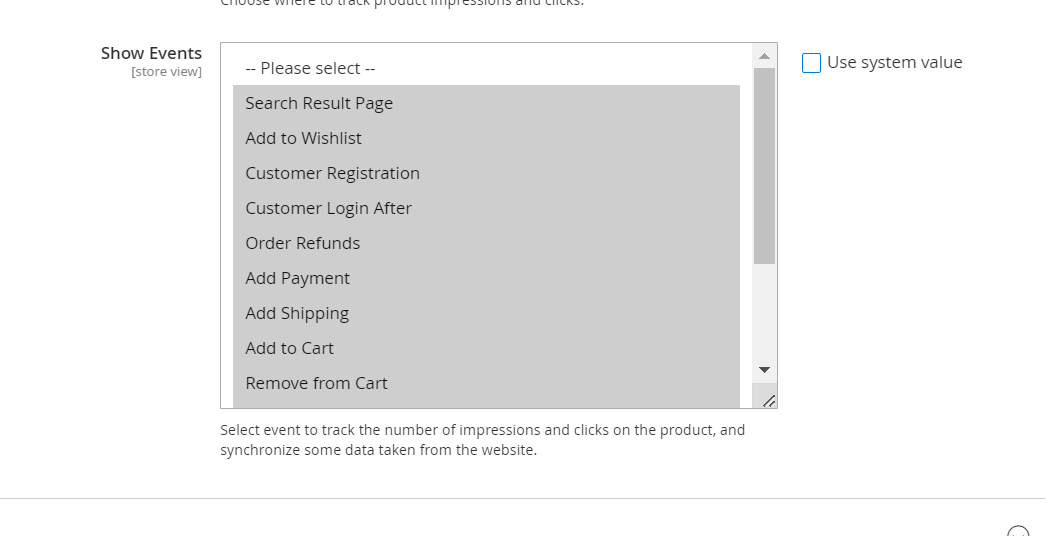
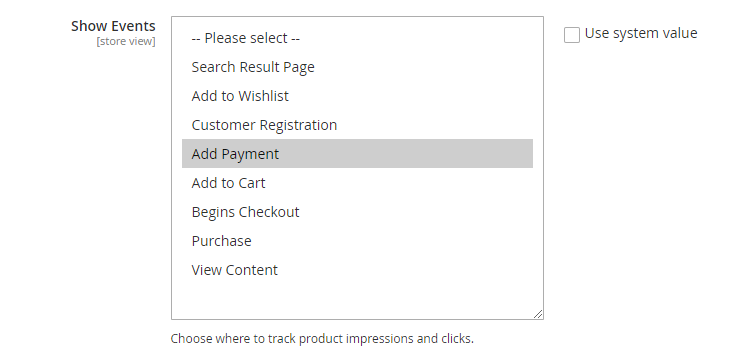
Show Events: Select one or more events in this field to track the number of impressions and clicks on the product and synchronize some data taken from the website. Events include:
- Search Result Page
- Add to wishlist Customer Registration
- Customer Login After
- Order Refunds
- Add Payment
- Add Shipping
- Add to cart
- Remove from cart
- Begins checkout
- Purchase
- View Item
- View Item List
- View Cart
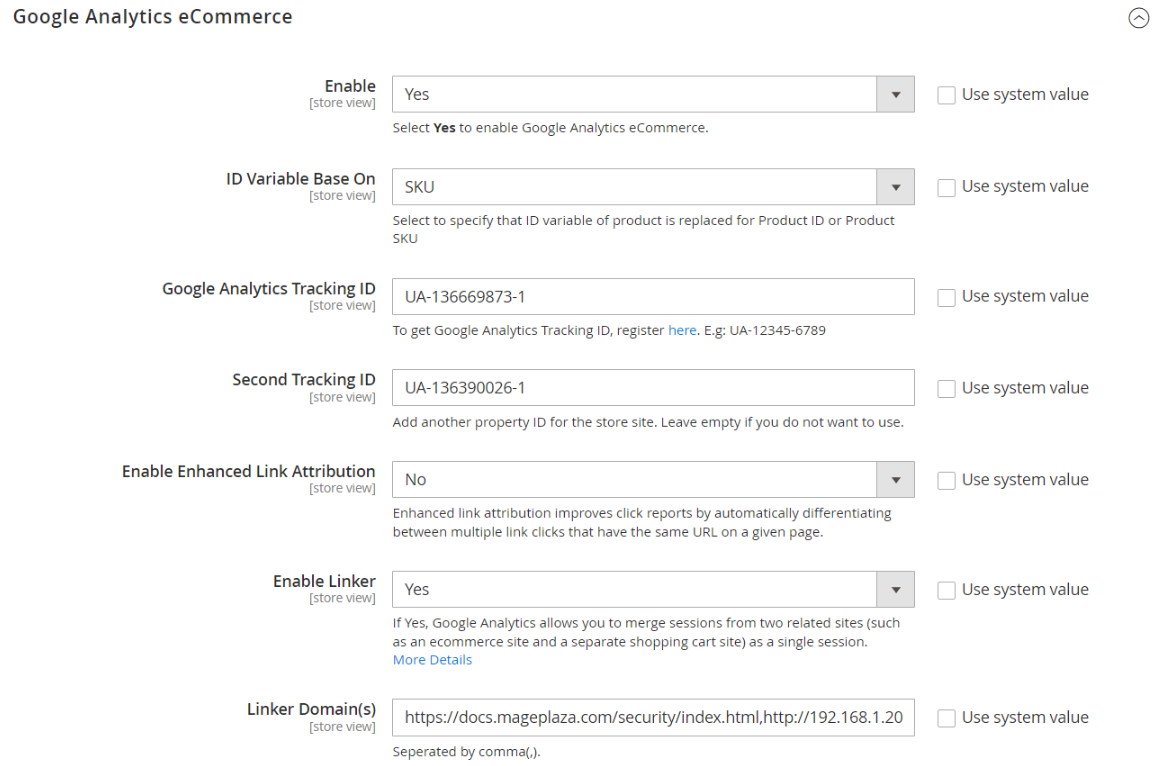
1.5. Google Analytics eCommerce
 https://cdn6.mageplaza.com/mageplaza/docs_user_guide/magento-2-google-tag-manager/19lpn3S.png

Enable: Select Yes to enable the use of the Google Analytics function for the website to analyze the report.
ID Variable Base On: Select the variable of the product ID to be replaced displayed:
- ID: Display the ID value of the product according to the product ID.
- SKU: Display the ID value of the product according to the product SKU.
GA Tracking ID:
- Enter Tracking ID of Google Analytics into GA Tracking ID field.
- If you leave it blank or enter the wrong tracking ID, it will not be able to track the information.
Second Tracking ID:
- Enter another Tracking ID of Google Analytics in the Second Tracking ID field so you can add the ability to track website information such as product, category page, checkout page, page cart, one step checkout page (compatible with One step checkout), remove from cart, ...
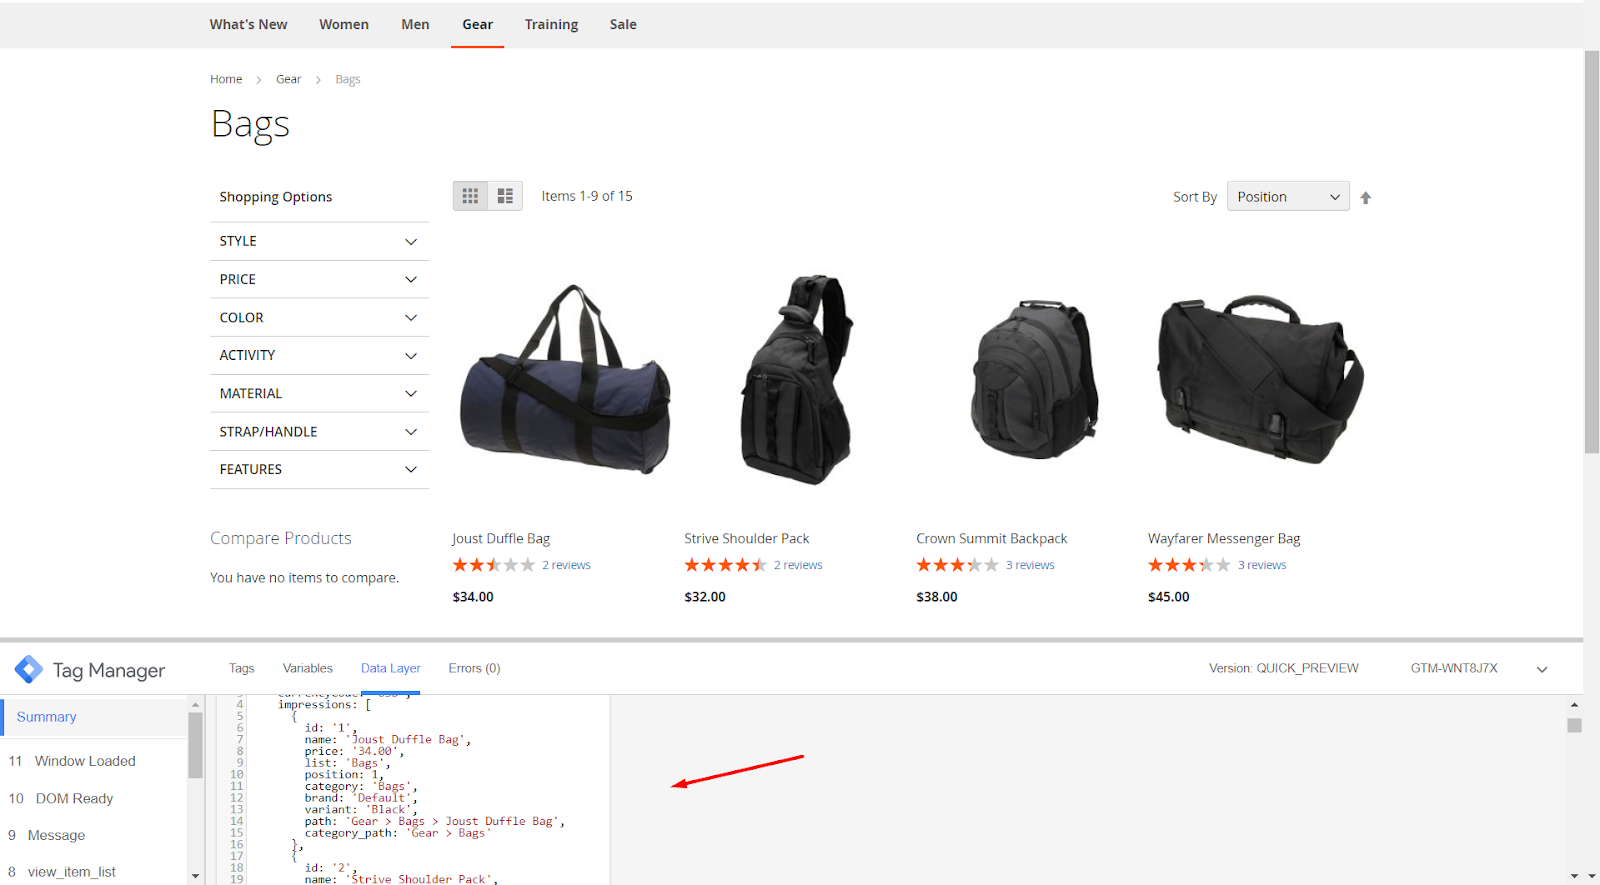
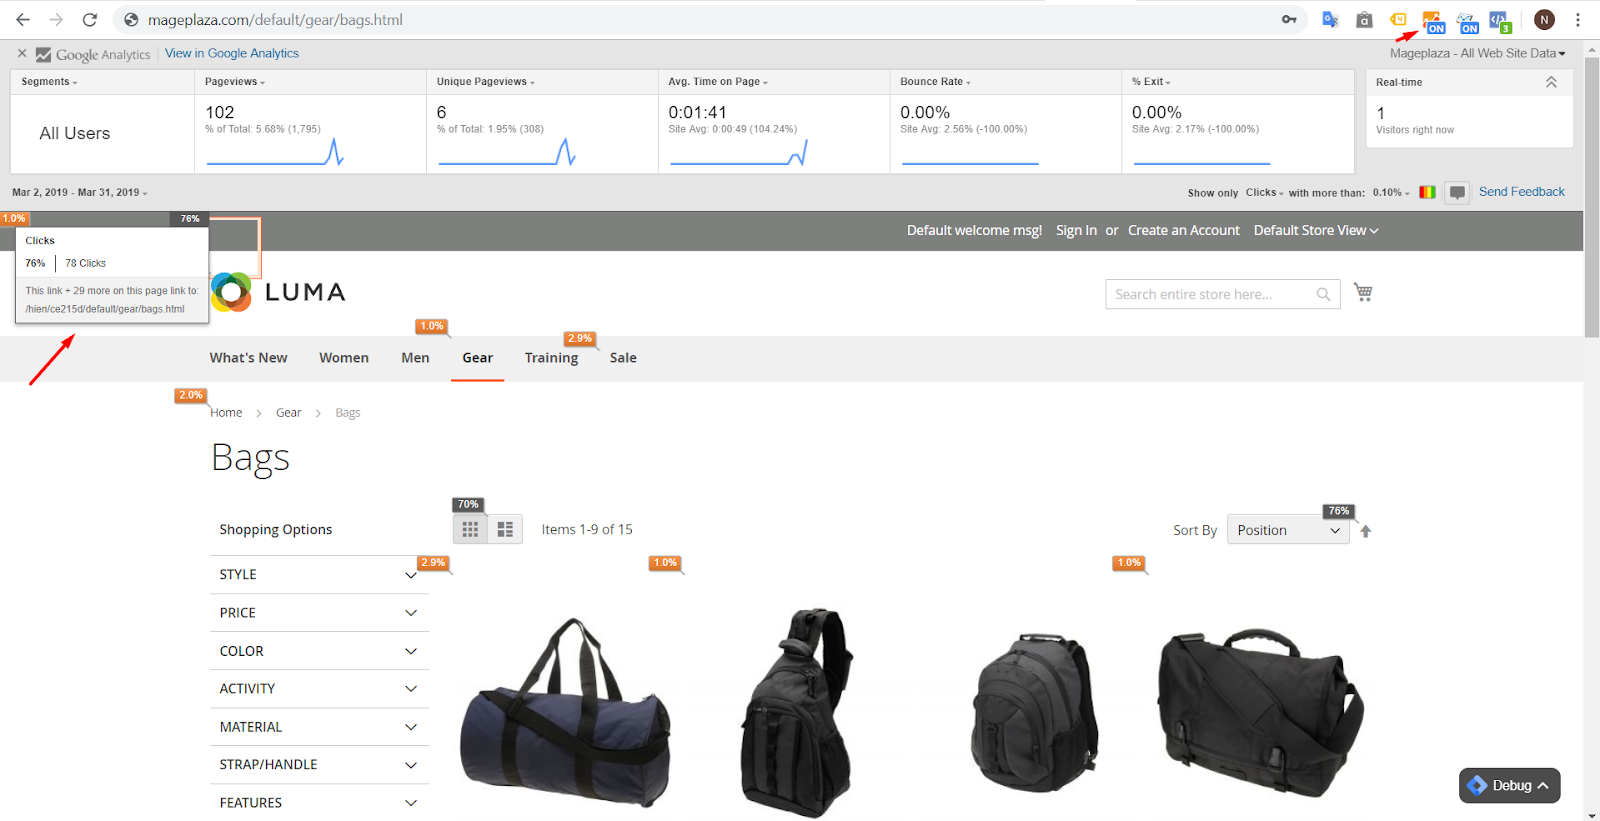
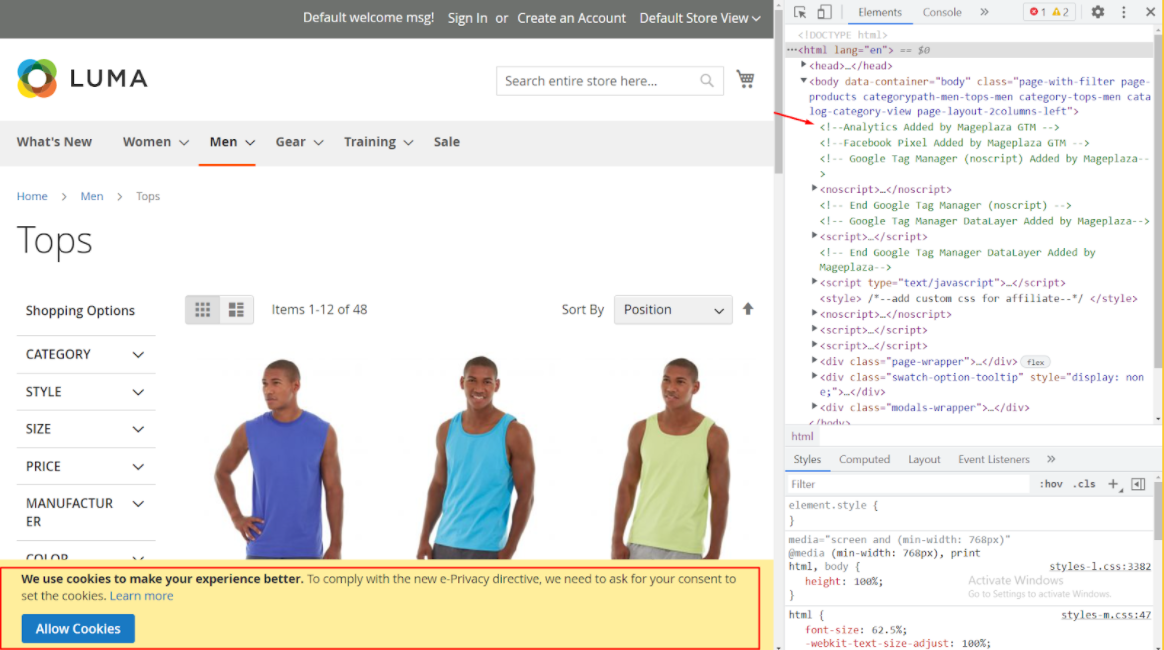
Enable Enhanced Link Attribution: Selecting Yes to enable allows customers to track each link and know the accuracy of the analytics report on the page by automatically distinguishing between multiple links to the same URL on one. The page from which the number of customers clicked on the page or product was calculated. For example, your link to the same page is the same, but the path is completely different on the same page. When you go to
Gear> Bagsfolder, you still click on the view of products like Grid or List, then click on each part in the Bags folder, and when you click on the Grid or List, are different You should install and turn on Google Analytics Debugger and Page Analytics add to the browser you are using to support the reporting feature to see the number of clicks.
Enable Linker:
- If you select Yes, Google Analytics allows you to view sessions from two related websites (such as separate e-commerce and shopping cart websites) as a session. Show more Linker Domain(s) fields.
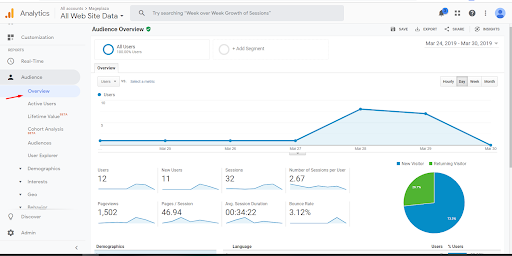
- Linker Domain(s): Enter an additional domain link to count customer tracking from two related websites. You can import multiple domain links at the same time and be separated by a ",". You can configure additional domain links for your site when you go to
Store > Configuration > Web. For example, your site's current link domain ishttp://example.com. You configure another domain link when changing store view with the same content as http://mageplaza.com. So the tracking number of customers will be counted as 1 session. You can access toAudience > Overviewof Google Analytics to view the exact number of sessions by day.
- Linker Domain(s): Enter an additional domain link to count customer tracking from two related websites. You can import multiple domain links at the same time and be separated by a ",". You can configure additional domain links for your site when you go to
- If you select Yes, Google Analytics allows you to view sessions from two related websites (such as separate e-commerce and shopping cart websites) as a session. Show more Linker Domain(s) fields.
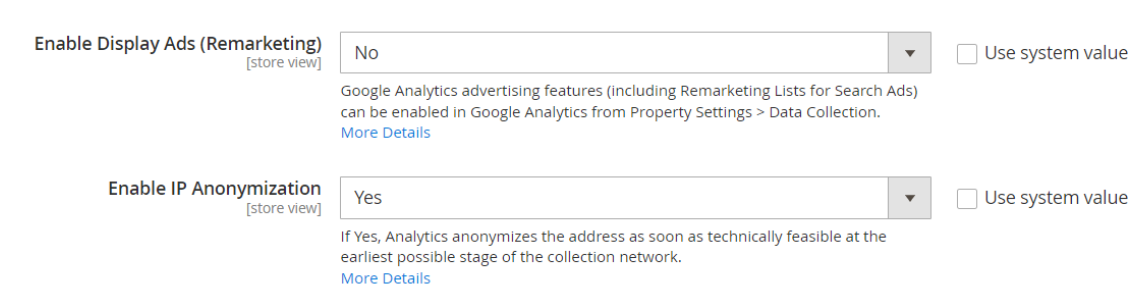
Enable Display Ads (Remarketing): Select Yes to enable Google Analytics advertising features (including Remarketing Lists for Search Ads) that can be enabled in Google Analytics from
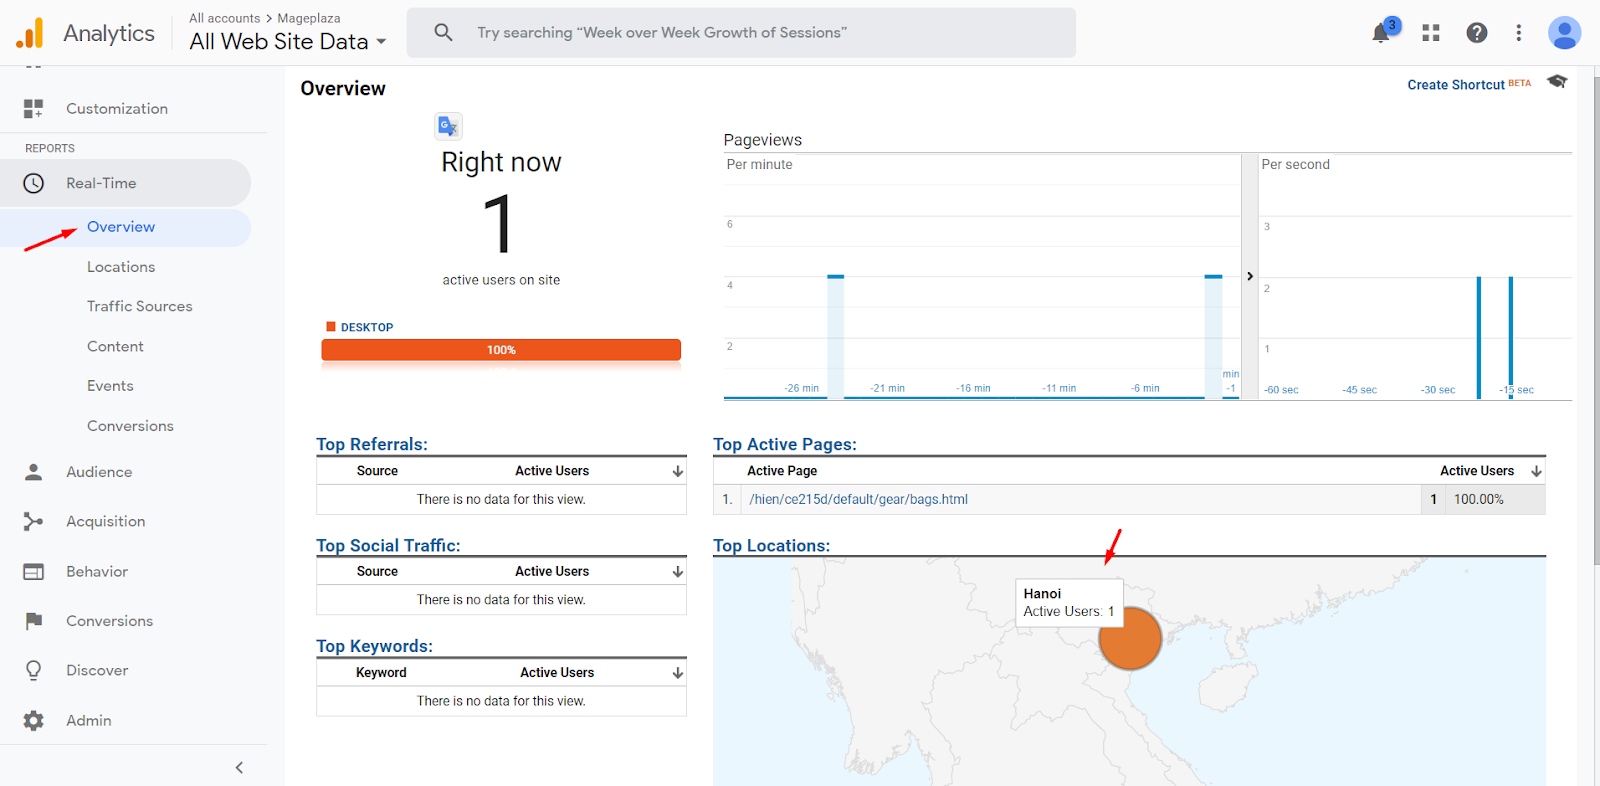
Property Settings > Data Collection.Enable IP Anonymization: Select Yes to allow anonymous IP addresses of visits (http requests) sent to Google Analytics. And will be sent to the region. You can view it at Google Analytics, go to
Real-Time > OvervieworLocations.
Note: To see the amount of Link Attribution, Linker or some features of Google Analytics, you need to wait some time for Google Analytics to update data. You should install and enable Google Analytics Debugger and Page Analytics to the browser you are using to support adding reporting features to see the number of clicks.
- Enable Google Analytics Opt Out: Select Yes so that when customers enter your website, if they do not follow and accept cookies, the data will not be synced to Google Analytics, and if they do, the data will be synced to Google Analytics. This can help customers protect their information and reduce unnecessary data. This feature is compatible with Mageplaza GDPR Professional.
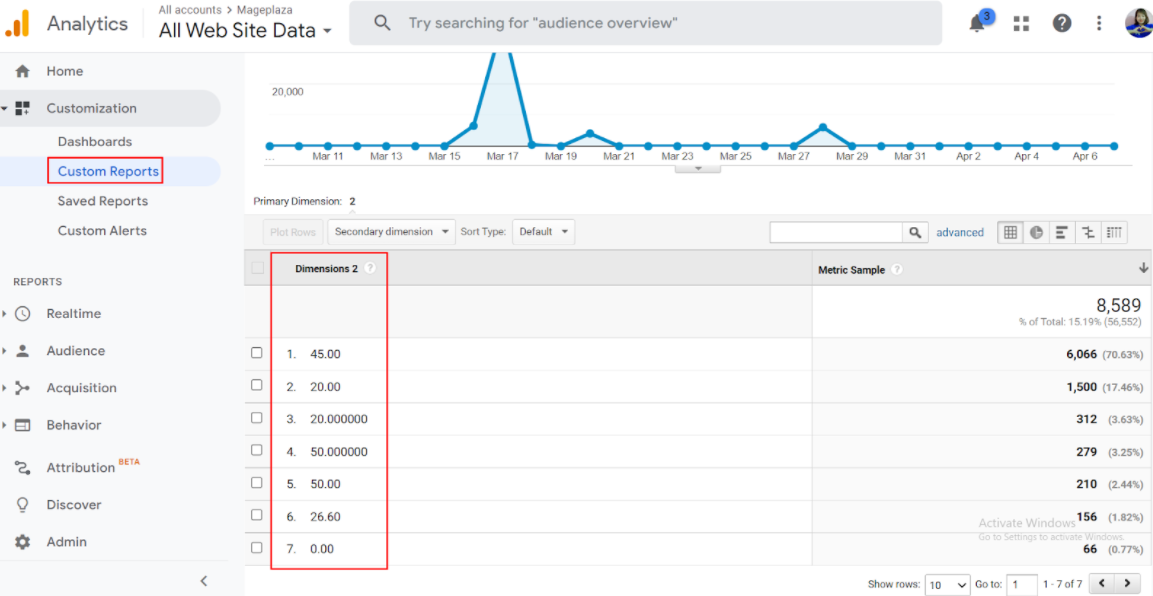
Custom Dimensions:
- First, you should go to
Admin > Custom Dimensions > Add New Customer Dimensionsor Dimensions, which are available in Google Analytics.
- Then go to Custom Dimensions field, click Add button and select values of Name, Track Custom Attribute, Index so that when you create New Customer Report in Google Analytics, you can collect and analyze selected store attributes that are not automatically tracked by Google Analytics.
- First, you should go to
Custom Metrics:
- Enter
Admin > Custom Dimensions > Add New Customer Metricsor Metrics available in Google Analytics.
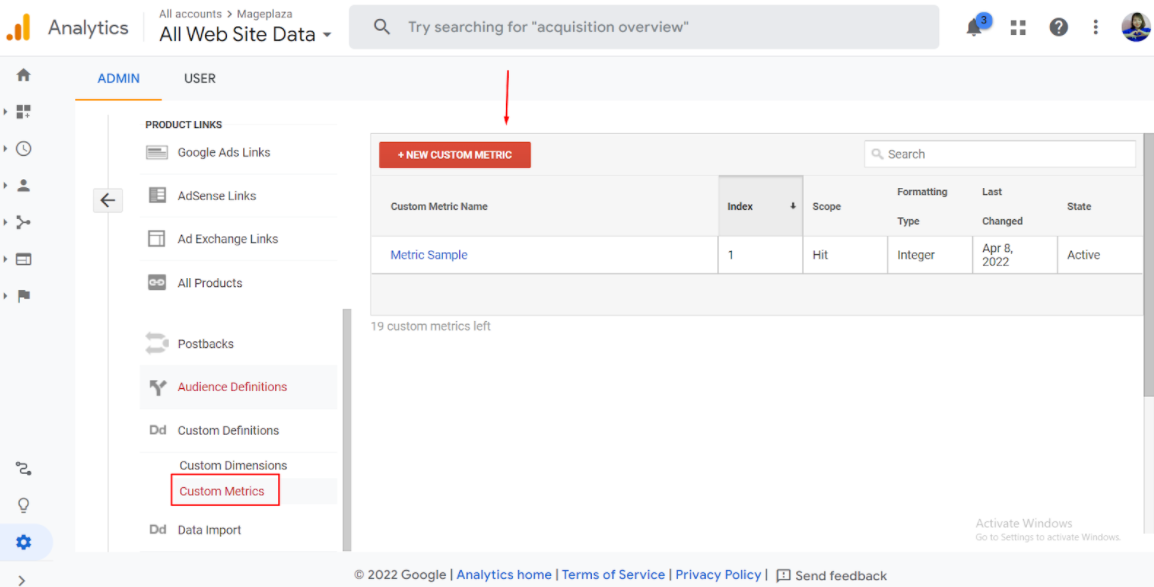
- Then go to Custom Metrics field, click Add button and select values of Name, Track Custom Attribute, Index so that when you create New Customer Report in Google Analytics, you can collect and analyze selected store attributes that are not automatically tracked by Google Analytics.
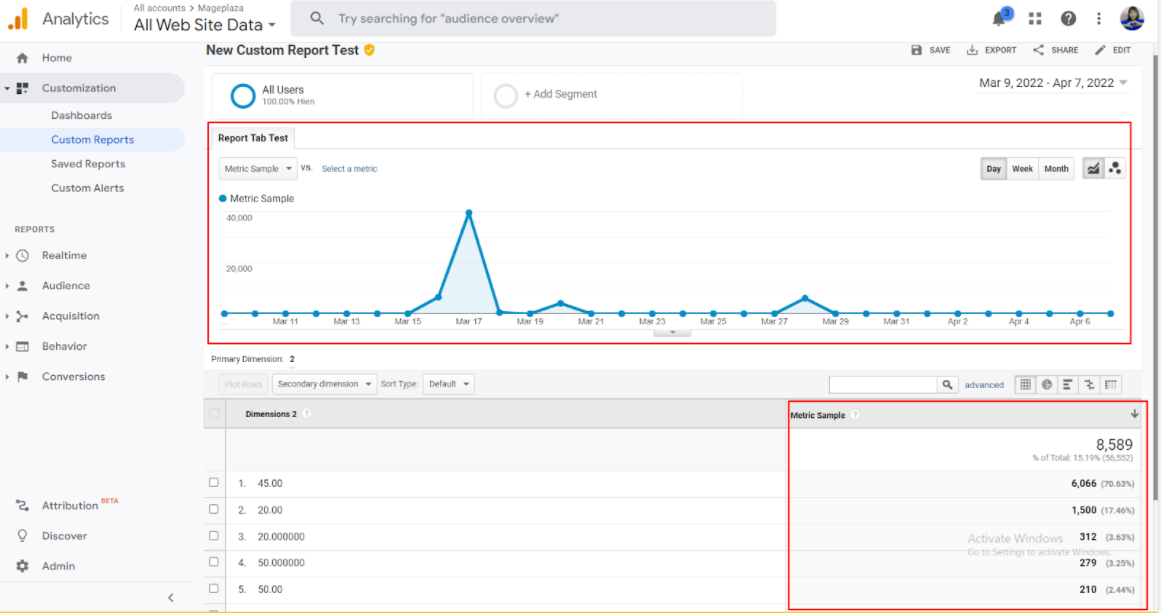
Note: To create New Custom Report in Google Analytics, Dimensions and metrics are 2 custom attributes that always go along with each other and need creating and customizing.
- Enter
Track Impressions and Clicks By Position: Choose one or multiple options of the product location like Related Product, Up-sell product, Cross-sell product, or Search Result Page to follow the impressions and click numbers of the product.
1.6. Facebook Pixel
Easily integrate Facebook Pixel and Google Ads conversion tracking within GTM. This enables you to track conversions and measure the effectiveness of your marketing campaigns on both platforms.
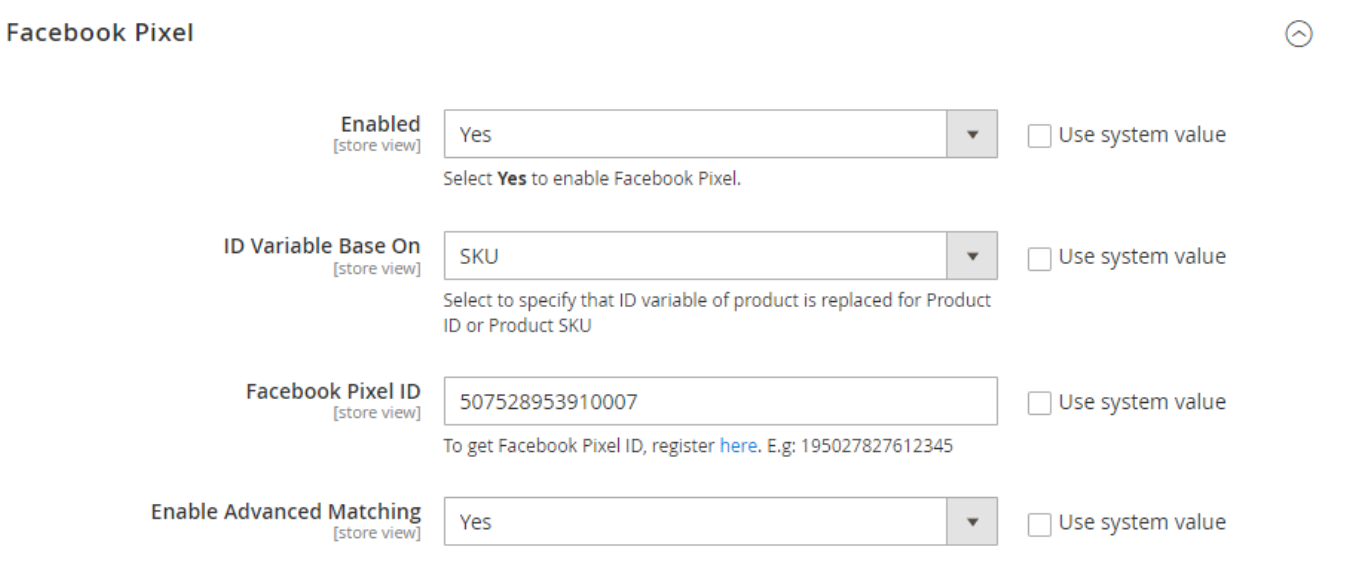
Enable: Select Yes to enable the use of Facebook Pixel features.
ID Variable Base On: Select the variable of the product ID to be replaced displayed:
- ID: Display the ID value of the product according to the product ID.
- SKU: Display the ID value of the product according to the product SKU.
Facebook supports 3 additional events: Add to Wishlist, Customer Registration, Add Payment and previous old events, including Search Result Page, Begin Checkouts, Purchase, View Content, Add To Cart
Facebook Pixel ID:
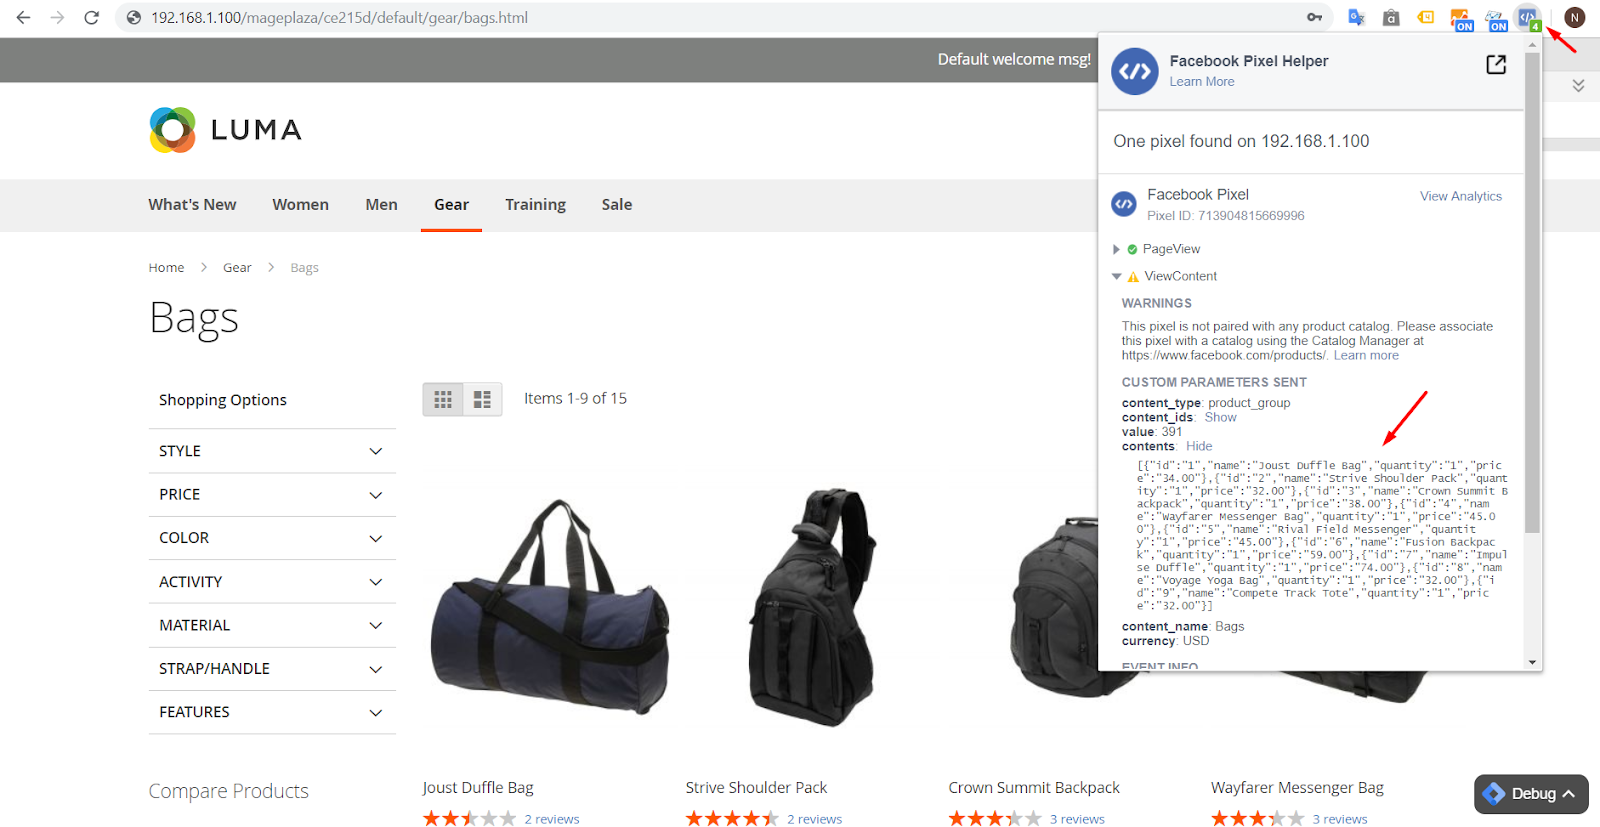
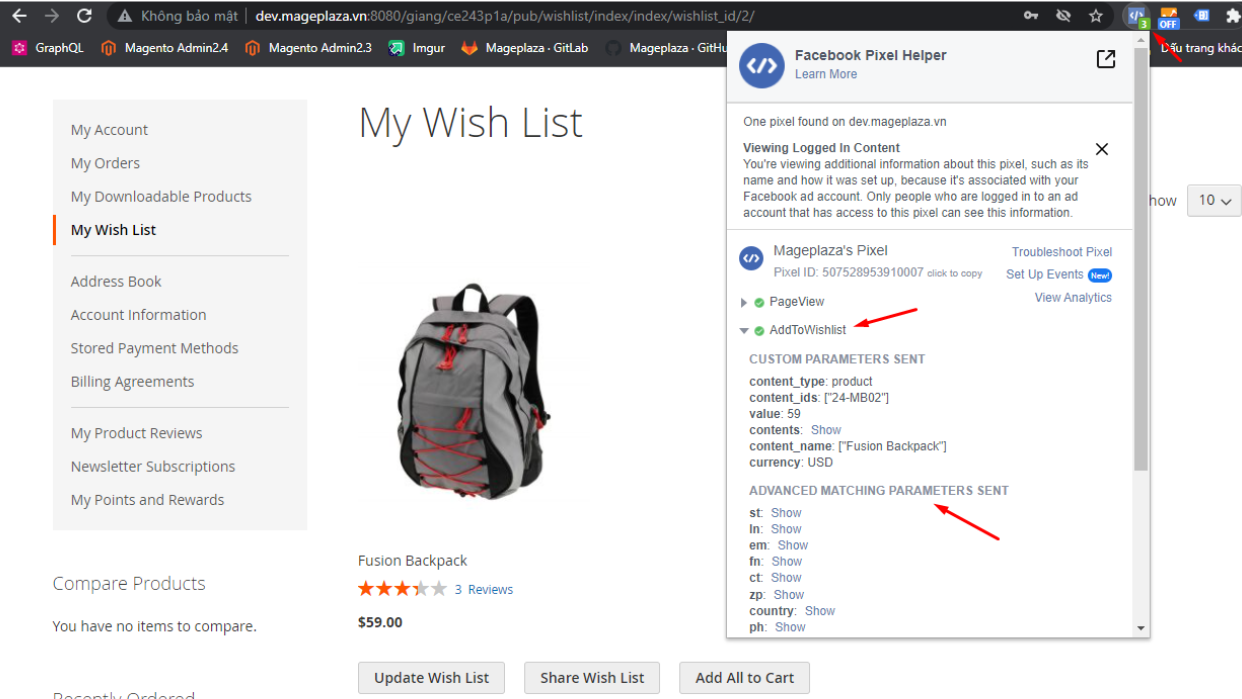
- Enter Facebook Pixel ID in the Facebook Pixel ID field to report and update website information such as in product page, category, checkout page, cart page, one step checkout page (compatible with Mageplaza One Step Checkout), remove from cart,...You should install the Facebook pixel helper in your browser to view information.
- If left blank or incorrectly filled in, the Pixel ID will not report and update the website's information to Facebook.
Enable Advanced Matching: Select Yes to add Tracking Add to Wishlist and Advanced Matching Parameters for Facebook Pixel.
1.7. Google Adwords Conversion Tracking

- Guide: Click to the link to configure the conversion tracking function in Google Adwords in Magento 2.
1.8. Create Tags, Triggers, Variables
For advanced users, the module allows granular control over tag creation. You can define custom tags to track specific user interactions or website events, set triggers to determine when these tags fire, and create variables to store dynamic data for more tailored tracking.
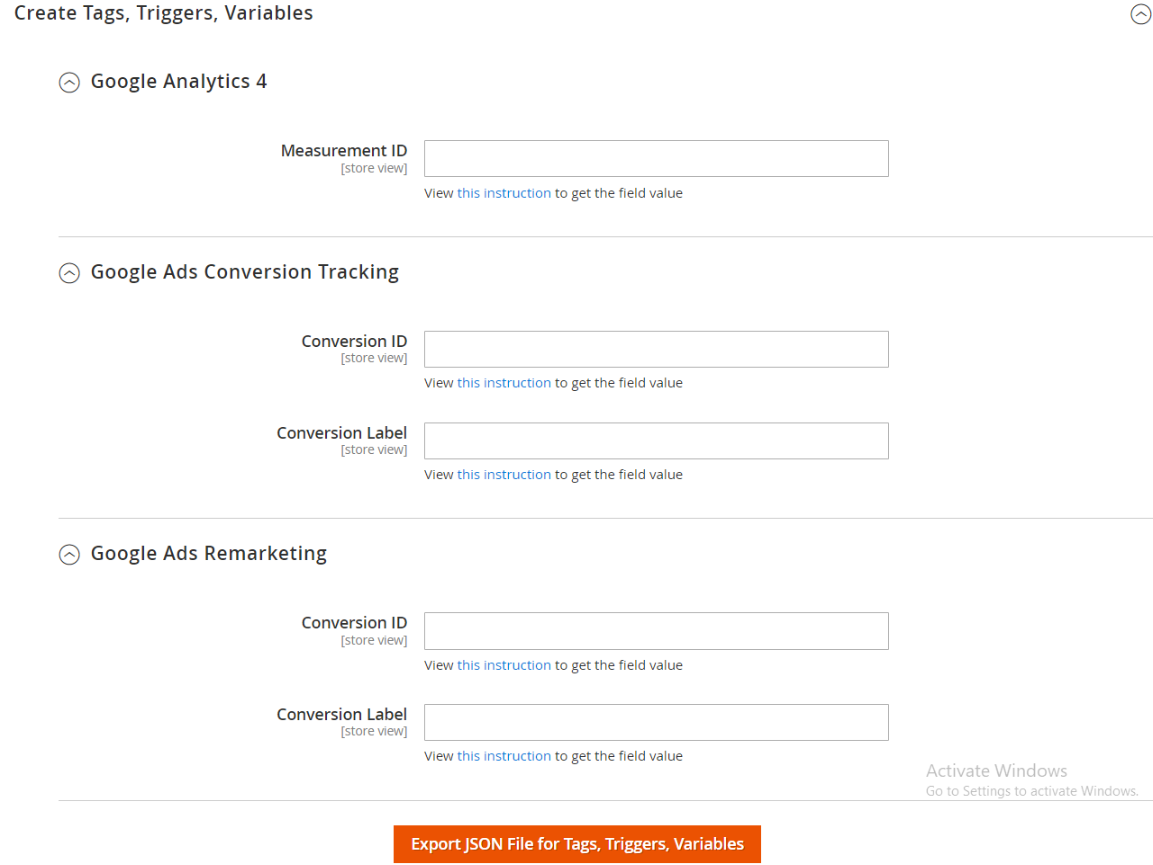
- Enter essential information to Export JSON File for Tags, Triggers, Variables such as: Measurement ID of Google Analytics 4, Conversion ID and Conversion Label of Google Ads Conversion Tracking and Google Ads Conversion Remarketing.
- Click Export JSON File for Tags, Triggers, Variables button to Export JSON File. After that, you can upload that file to Google Tag Manager to create and import Tags, Triggers, Variables.
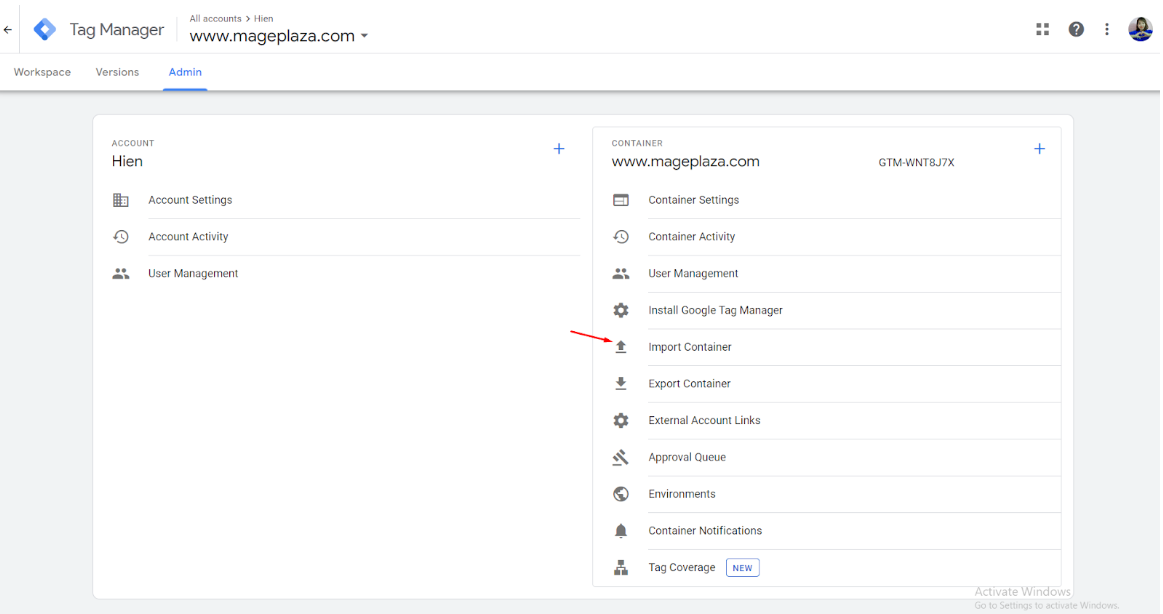
You can upload file here:

2. API
Google Tag Manager extension by Mageplaza supports using the REST API to get data with events such as product, category, homepage, catalog search, checkout index, checkout cart, checkout success, one step checkout, multi-shipping checkout success, thank you page, add to cart, remove cart, and get head of Google Tag Manager, Google Analytics, Facebook Pixel.
Please see details here.
A guide on how to create Integration tokens can be viewed here.
3. GraphQL
Run the following command in Magento 2 root folder:
composer require mageplaza/module-google-tag-manager
php bin/magento setup:upgrade
php bin/magento setup:static-content:deploy
Google Tag Manager extension by Mageplaza supports getting data with events such as product, category, homepage, catalog search, checkout index, checkout cart, checkout success, one step checkout, multi shipping checkout success, thank you page, add to cart, remove cart, and get head of Google Tag Manager, Google Analytics, Facebook Pixel via GraphQL.
To start working with Google Tag Manager GraphQL in Magento, you need to:
- Use Magento 2.3.x or 2.4.x. Return your site to the developer mode
- See GraphQL requests we support here.
FAQ
Maintenance
Troubleshooting Articles
For common issues and their fixes, refer to these articles:
Support and Assistance
1. Customer Support
For any assistance, please visit our Support page or email us at cs@mageplaza.com/ sales@mageplaza.com
2. Create a Ticket
If you have technical issues, please open a ticket at this link.
3. Operating Hours
Our support team is available during the following hours:
- Monday to Friday: 8:00 AM - 23:59 PM
- Saturday: 8:00 AM - 12:00 PM
- Sunday: Closed
4. Refund Policy
We understand that sometimes things don't go as planned. Please review our refund policy for detailed information:
5. Frequently Asked Questions (FAQ)
For common questions, please visit our FAQ page: