Store Locator
Overview
Developed by Mageplaza experts, Store Locator is one of the best extensions that allows customers to easily purchase the desired products in the nearest store. Integrated with Google Maps and GPS, everything becomes easier for customers to find the nearest shop location.
Especially, if customers want to be active in getting their orders. Store Pickup function allows them to choose the nearest store and time to pick their purchased items. Moreover, it comes with many powerful functions, and we are sure that you will be satisfied with this module's benefits. Let's experience it right now!
Outstanding Features
| Outstanding Features | Description | |
|---|---|---|
| 1 | Improve customer experience in finding store locations | Allow admins to create an unlimited number of store locations. All store addresses will be fully displayed on the store locator page as soon as customers click the "Find Store" button. Fast searching and realistic images supporting: Customers just need to enter a few letters in the address box and will be suggested all the relevant store addresses with directions to the store they want. In addition, they can see the whole street view, allowing customers to visualize the store's surroundings and the exact location of the store. Advanced Filters: Admins can set up in the backend to allow the module to use geolocation to determine the customer's current location automatically. To find the nearest store, they just need to fill in the Filter Radius. In addition, customers just need to enter details such as Filter Radius, Store Name, Street Address, Country, City, Postal Code and State/Province; the “search By Area" sorting” tool will help filter out the appropriate stores. |
| 2 | Boost customer confidence | Provide complete, clear and transparent information about the store using Google Maps from address, contact information (phone number, email address, Twitter), website, business hours, holidays, etc. In addition, the module also provides customers with real-life images of the store. All actual store locations are also displayed on the Store Location Management Grid, allowing administrators to quickly edit or modify store details. |
| 3 | Easily manage when customers choose to pick up at the store | Admins can let customers choose the nearest store and pickup time, as well as add notes about their requests. Additionally, admins can decide the earliest pickup time or can close the store immediately with just one click. This is very useful in case of emergency or unexpected closure, allowing store owners to promptly notify customers of the store's status and avoid inconvenience or unnecessary visits. Show product availability: Allow store owners to display a list of locations where your product can be picked up. These pop-ups will appear as soon as customers start viewing your product, ensuring they are immediately informed of your pick-up options and can make their selections right away. "Calculate Handling Fee" feature: Allow store owners to add an additional fee to orders picked up in-store. The fee can be calculated as a percentage of the order value or a fixed amount. If this field is left blank, customers will not be charged any additional fee for picking up their items. |
Installation Guide
We offer two methods for installing our plugins: the Copy & Paste method and the Composer method. Please follow the detailed instructions provided below.
Method 1: Installation via Copy & Paste
To install our plugins using the Copy & Paste method, kindly follow the instructions at the link below:
How to Install Magento 2 Extension via Copy & Paste
Method 2: Installation via Composer
Composer name: mageplaza/module-store-locator
To install our extensions using Composer, please refer to the comprehensive guide at the link below:
How to Install Magento Extension via Composer
By following these guides, you can ensure that the installation process is handled correctly, allowing you to fully utilize the features and benefits of our plugins.
Module Update Guide
Keeping your module updated ensures optimal performance. Follow one of these steps to update your module:
- By Account Dashboard: Log in to your
Mageplaza account > go to the My Licenses section > click on the Download button > choose the latest version from the popup. - By composer: Kindly use the following commands to update the module via composer
composer require mageplaza/mageplaza/module-store-locator
php bin/magento setup:upgrade
php bin/magento setup:di:compile
Updating a module by Composer ensures efficient dependency management, version control, and integration with development tools, making the process faster and more reliable.
Guide to install the library
Please run the below command to install the module library:
composer require liquid/liquid
How to use
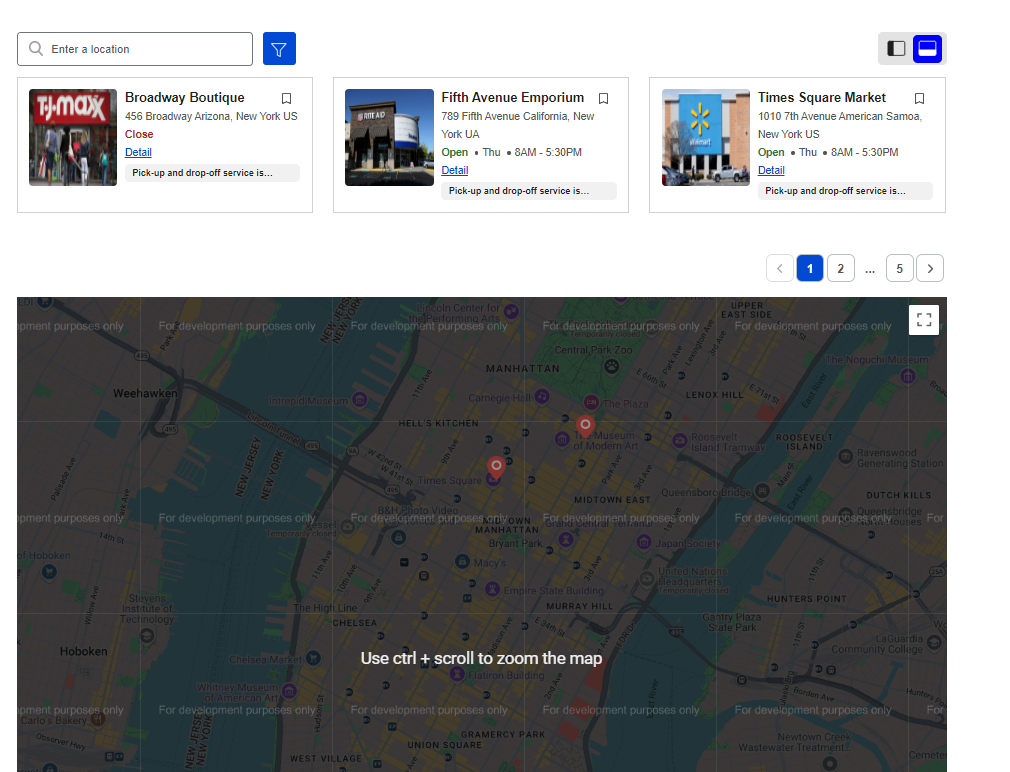
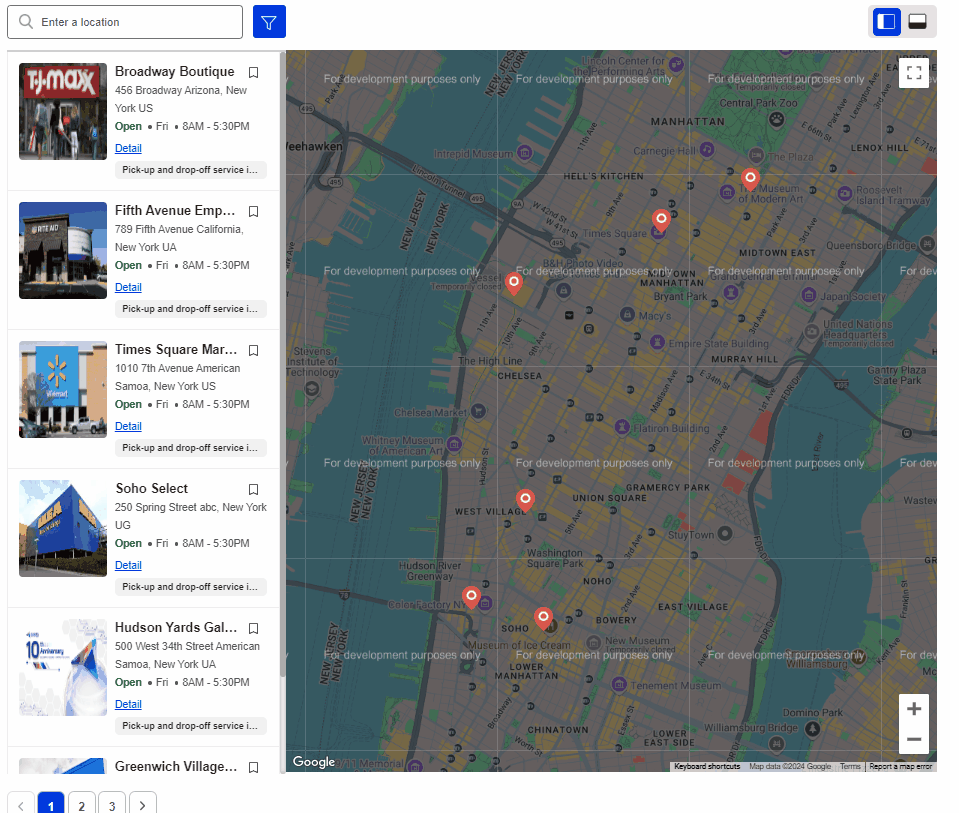
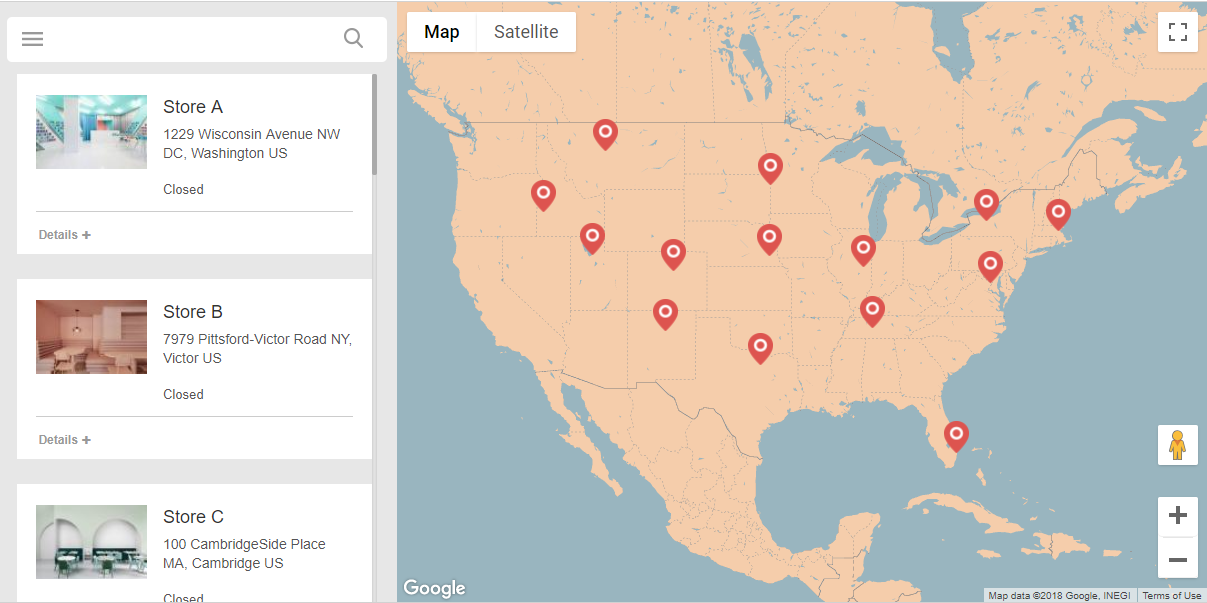
Customers can see a list of all the addresses of the store branches with two types of layout: horizontal and vertical.
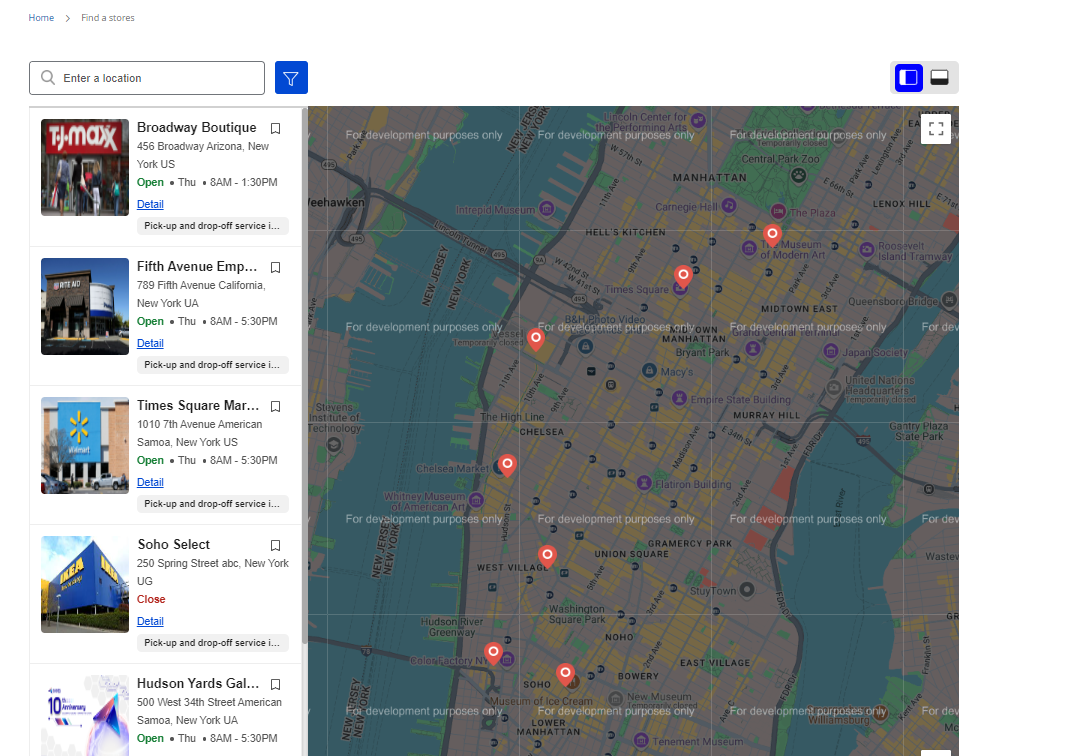
- Customers can zoom in, zoom out Map as well as change the store search radius
- By clicking on the arrow, customers will see detailed information about the Store and can use the directions to the selected store. Clicking the collapse button will close the information box.
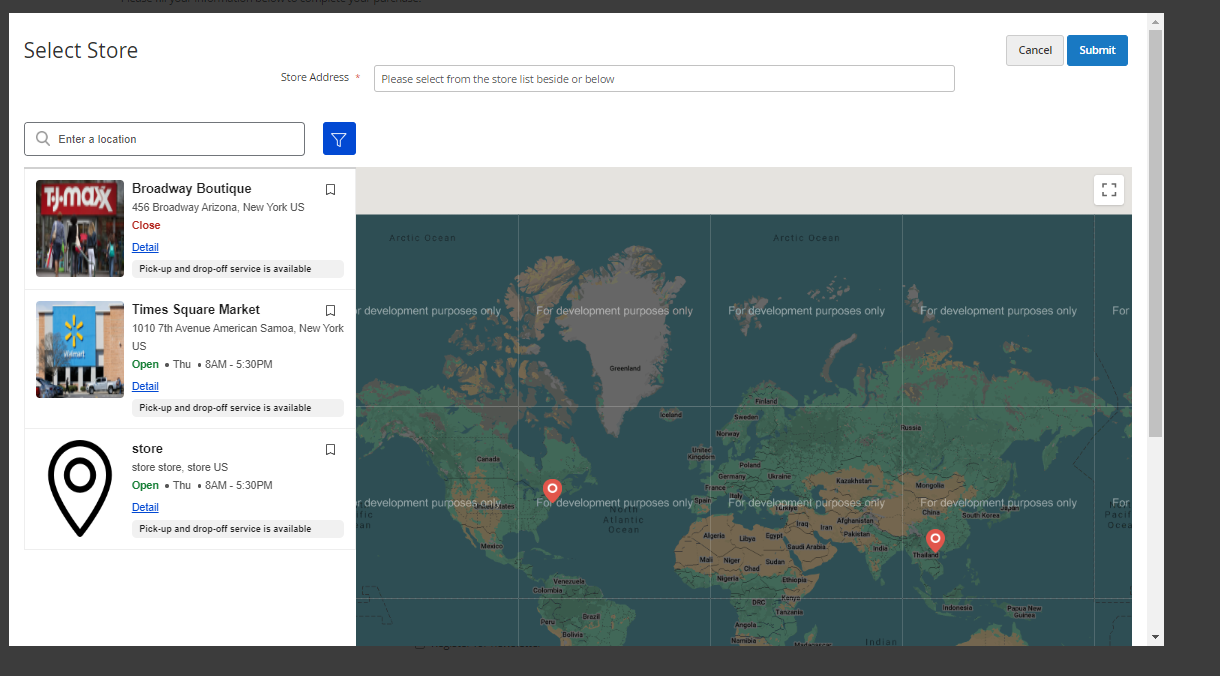
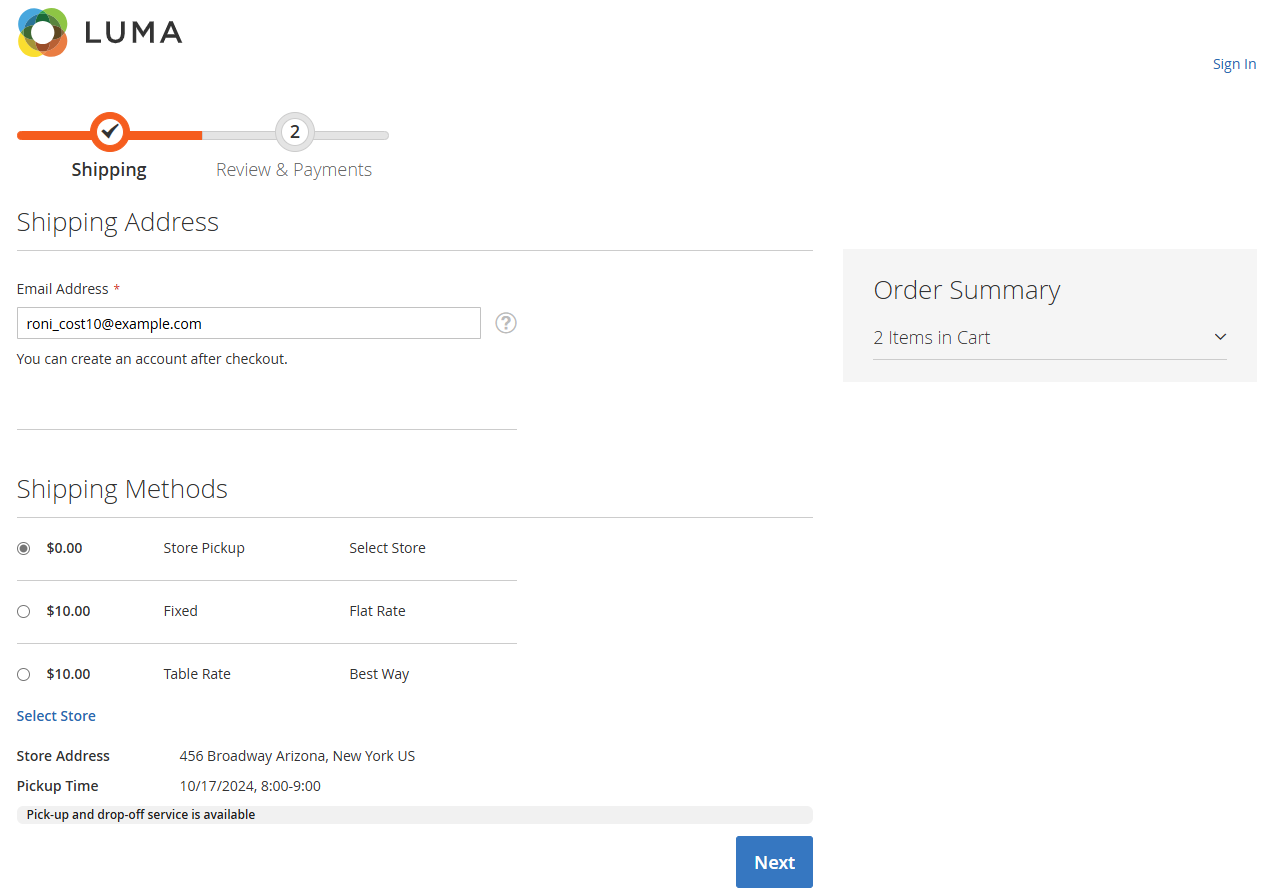
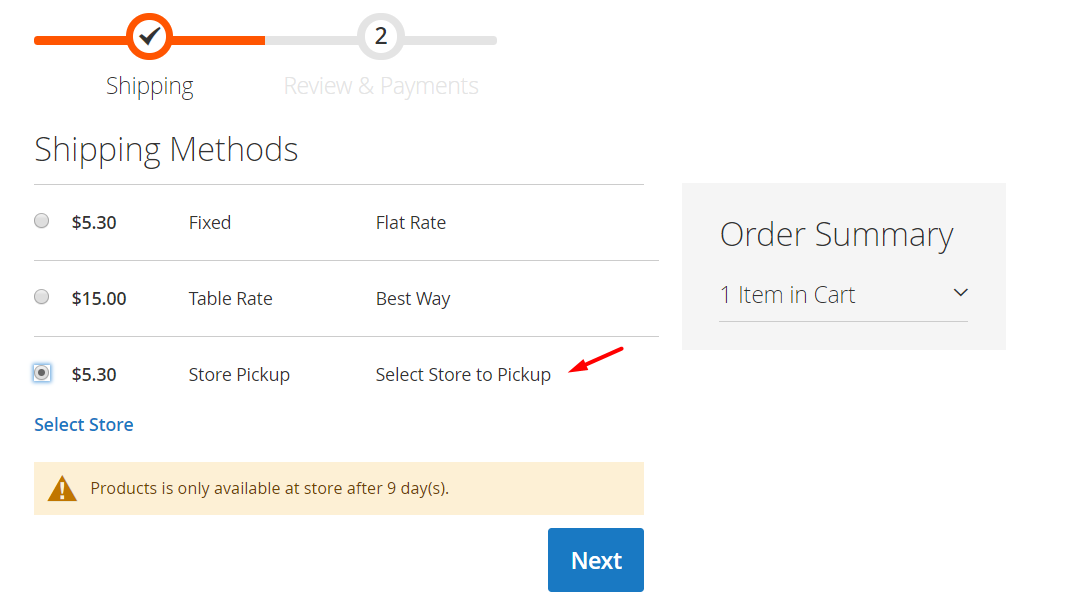
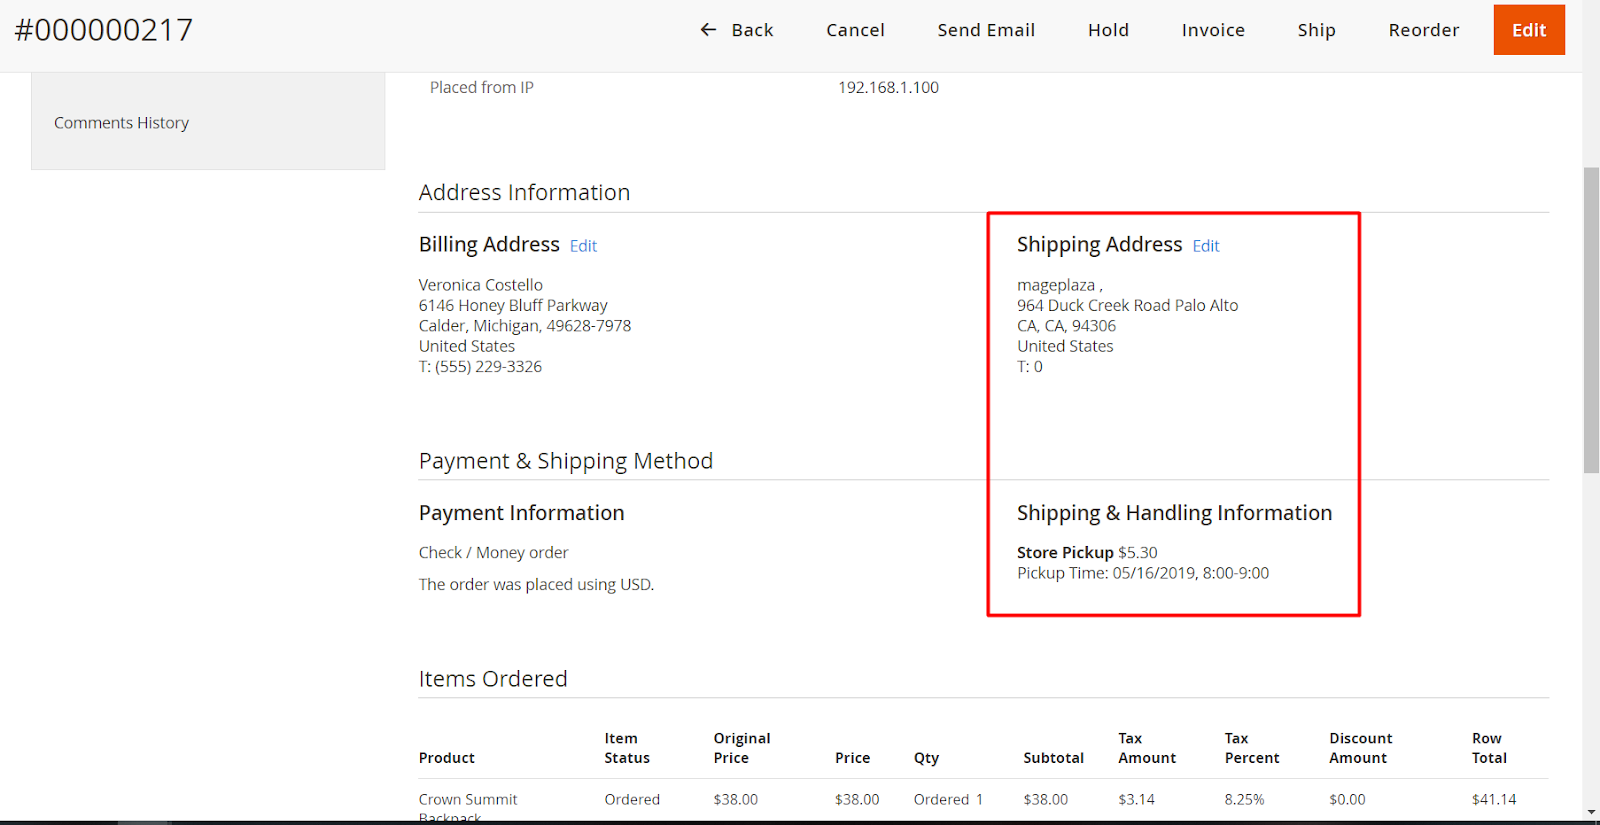
- Checkout page: show the detailed information, including store location, shipping fee, and pickup time. After that, customers can get their items. Please make sure that the products in the cart have the same addresses as the store locator. If not, the error message will be shown. corresponding to the ordered products. Click Select Store to show popup.
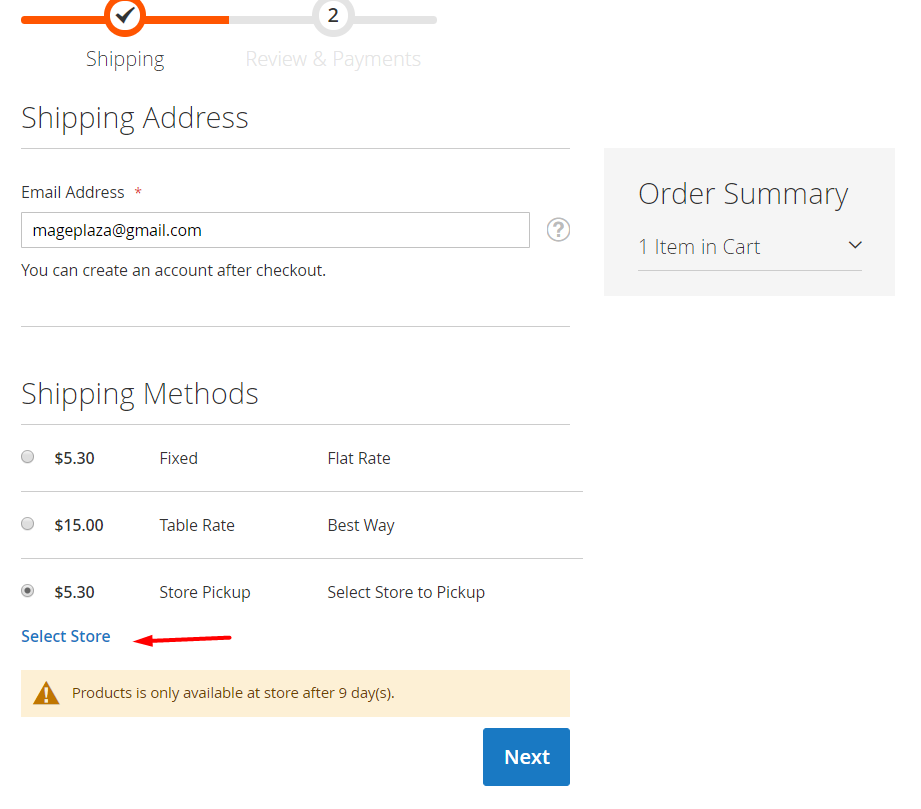
- Click Select Store to show popup. Here, customer should choose the location and time to pick their items up.
- Note: Only show the opening time of stores. The time waiting for an order is available or the closing time of the store will be hidden, so customers cannot choose them. Then click Submit button to confirm the store location and time to pickup items. Click Cancel to quit the popup.
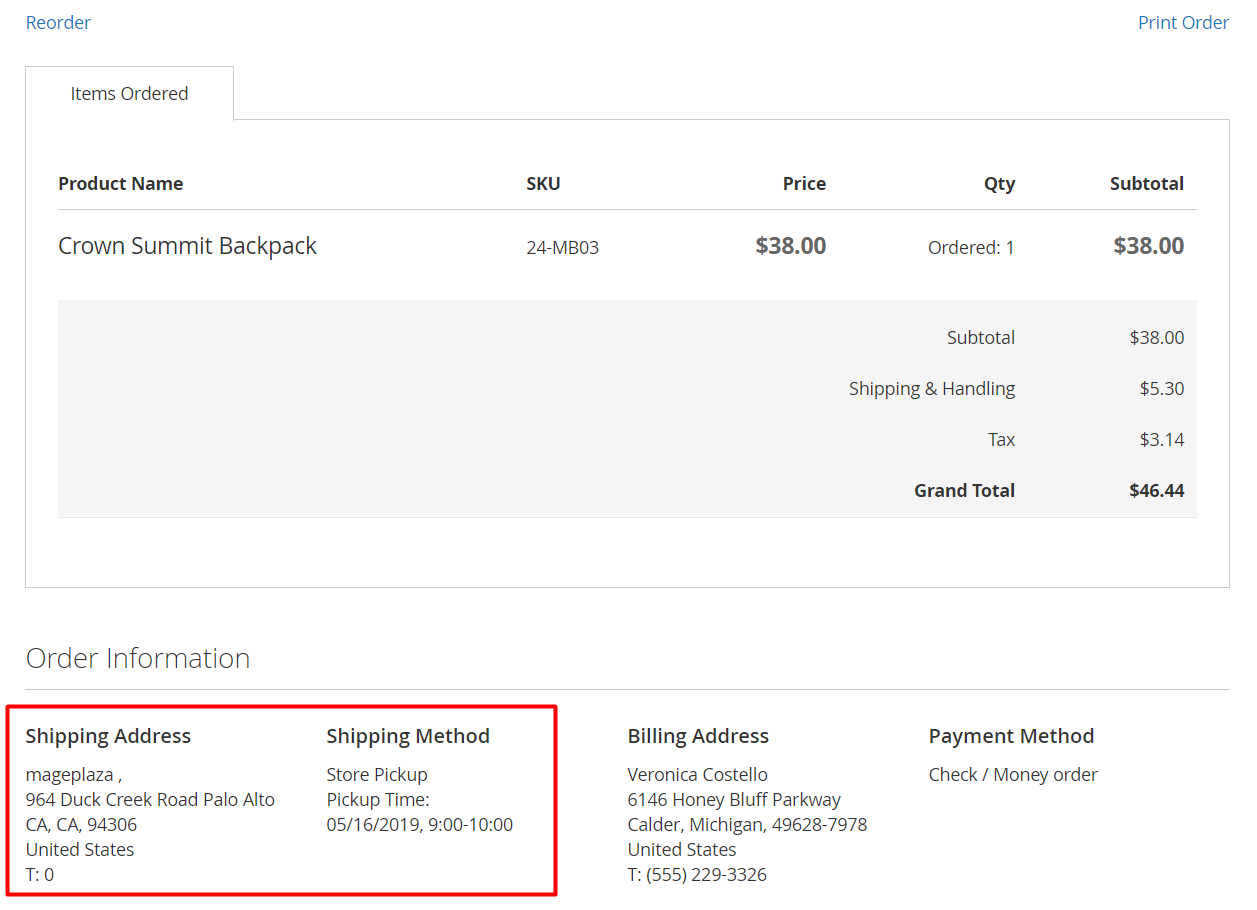
- Frontend Order: Record the order data: time, location, and shipping fee customers choose to get their items.
How to configure
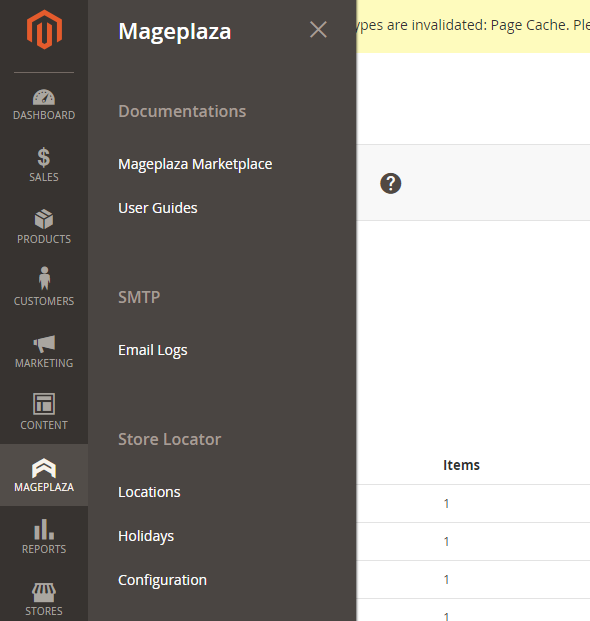
There're 2 ways to access the menu of the extension:
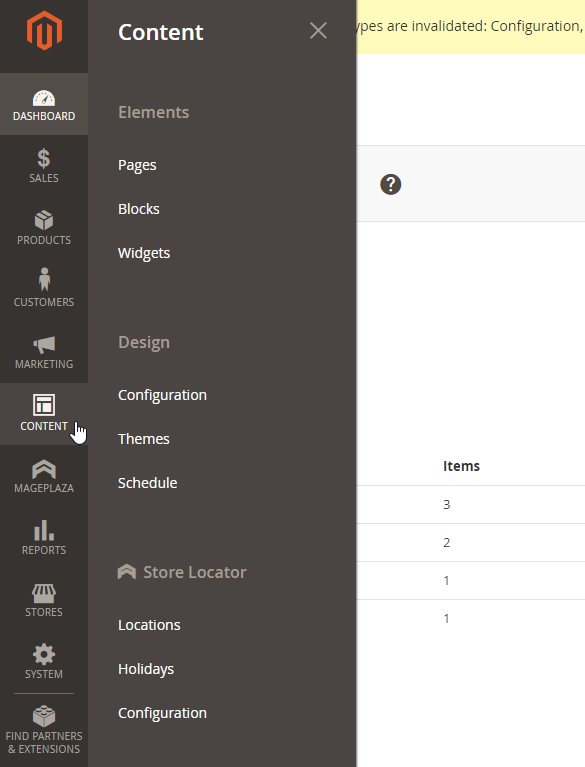
Content > Store Locator
- Enable Mageplaza Menu, all extensions of Mageplaza you are installing will be displayed in this menu:
1. Configuration
1.1. General
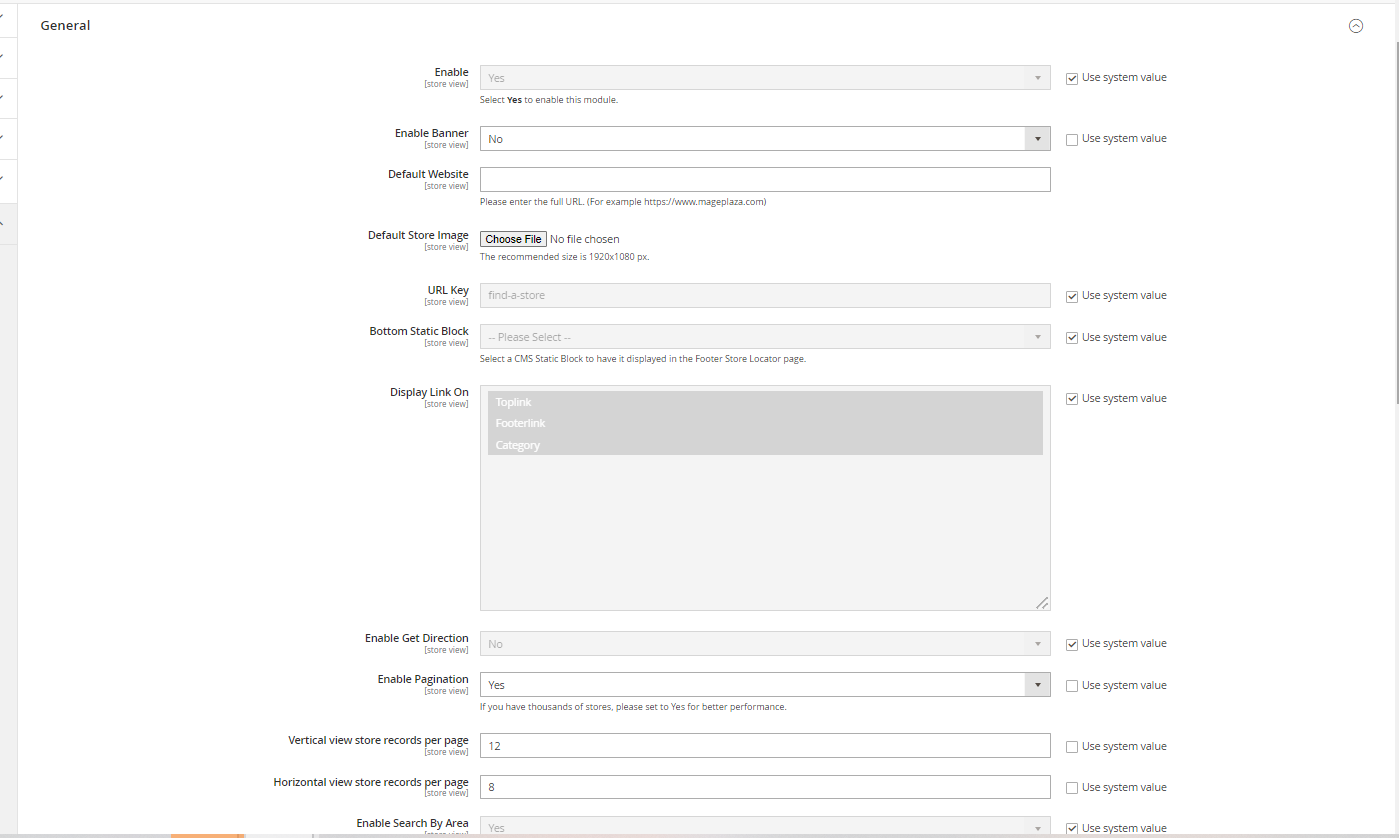
Enable: Choose Yes to enable this moduleEnable Banner: choose Yes or No to allow Banner to be on Frontend or not- If Enable Banner is No, then the title will display:
- Enter the title for the page
- Title plays a role as label of the link that accesses the page
- If you leave this field blank, the default is Find a store
- If Enable Banner is No, then the title will display:
Description: Enter the description for the pageDefault website: Enter the default website for the store. With stores that have multiple branches, admins can quickly synchronize the website with this itemDefault Store Image: Showing the default image on FrontendURL Key:- Enter the link to access the page
- If leaving this field blank, the default is
find-a-store
Bottom Static Block: Select a CMS Static Block to have it displayed on the Footer Store Locator pageDisplay Link On: Select where the link can be displayed on the frontendEnable Get Direction: Select Yes to enable the directions to the store when customers wantEnable Pagination: If Yes, pagination will be displayed when you have multiple stores. It will improve customer experience significantly. You can set the number of stores per page for both vertical and horizontal layouts with two fields:- Vertical view store records per page: For the optimal user interface, the admin can only set the field's value greater than or equal to 6, and only positive integers are allowed. We highly recommend setting it to 10.
- Horizontal view store records per page: For optimal user interface, the admin can only set the field's value greater than or equal to 3, and only positive integers are allowed. We highly recommend setting it to 6.
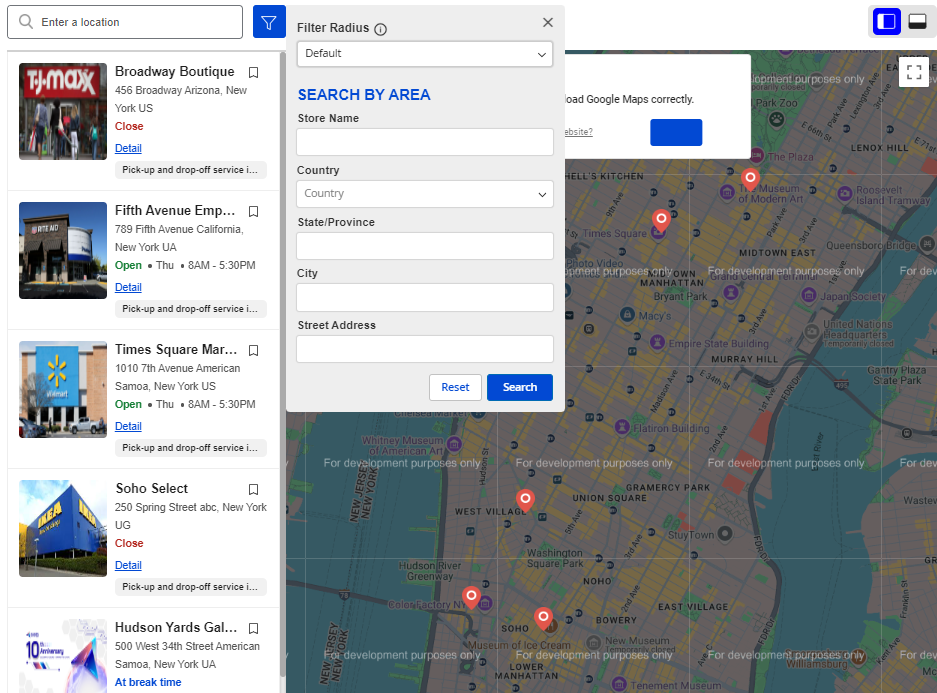
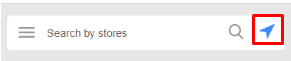
Enable Search By Area: If Yes, the Search By Area feature will be displayed in the store information map, enabling customers to search for stores more quickly based on where customers are, including fields such as Store Name, Street Address, Country, City, Zip/Postal Code, State/ Province. Click the Reset button to reset and display all stores.
Enable Favorite Store Bookmark: If Yes, it will display a star next to the store locations so customers can bookmark their favorite store, which will be displayed first to reduce the time needed to find and choose the right store.
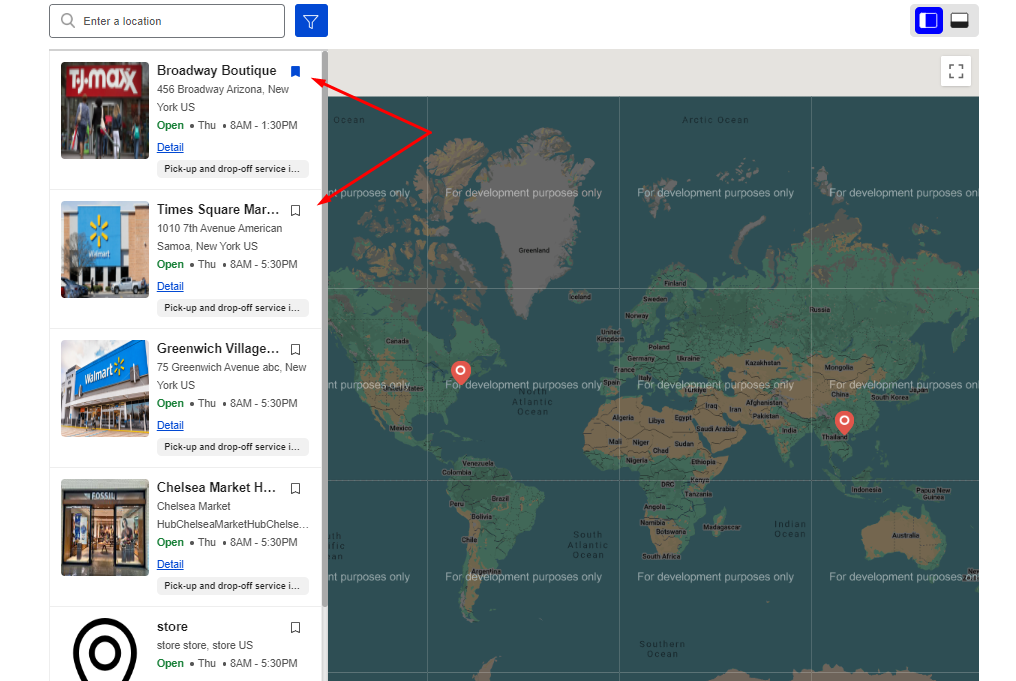
- Image: Upload the image to replace the star marking the favorite store
- Show Product quantity at relevant store locations with Assigned MSI Stock: If Yes, the product quantity and stock status of the selected product will be displayed on the product page. To show the quantity of the products at each store as below, store owner needs to turn on the MSI Stock and Assign Source in each product's setting.
Note: The module only reads inventory from Magento's Default Source. It cannot display stock from any other MSI Sources, even if the product is assigned to them.
- View Store: When a customer clicks the
View Storebutton, they will be redirected to theFind a Storepage, and the corresponding store will be automatically selected.
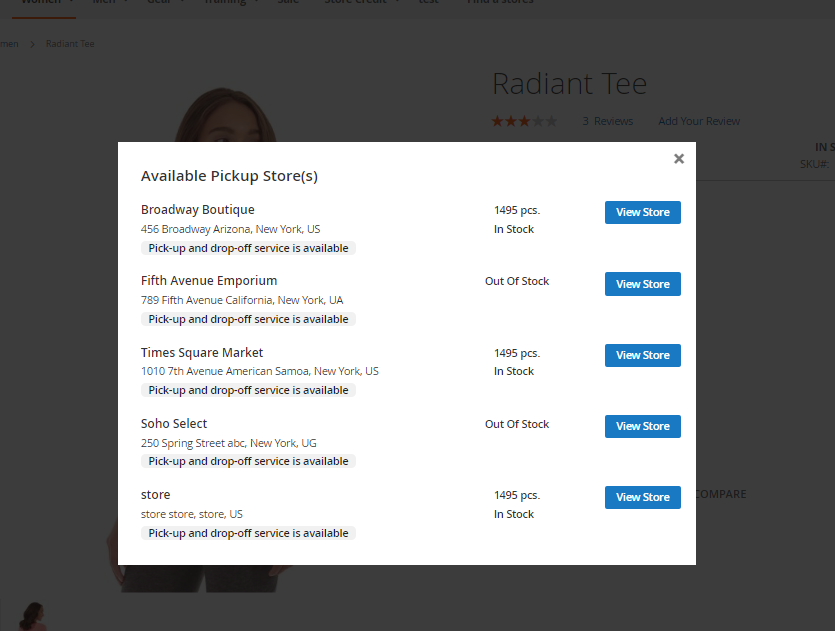
- Enable Store Locator when the product is out of stock: If Yes, will display the store locator when the product is running out of stock on the product page.
1.1.1. Filter store
Admins can enable or disable the module, setting it up to allow customers to filter search results by criteria such as store type, distance, or specific services the store provides to enhance the customer search experience.

Enable: Select Yes to enable the search feature.Auto-Filter by current position: Select Yes so that customers can move the maps back to their position with one click in the search box:
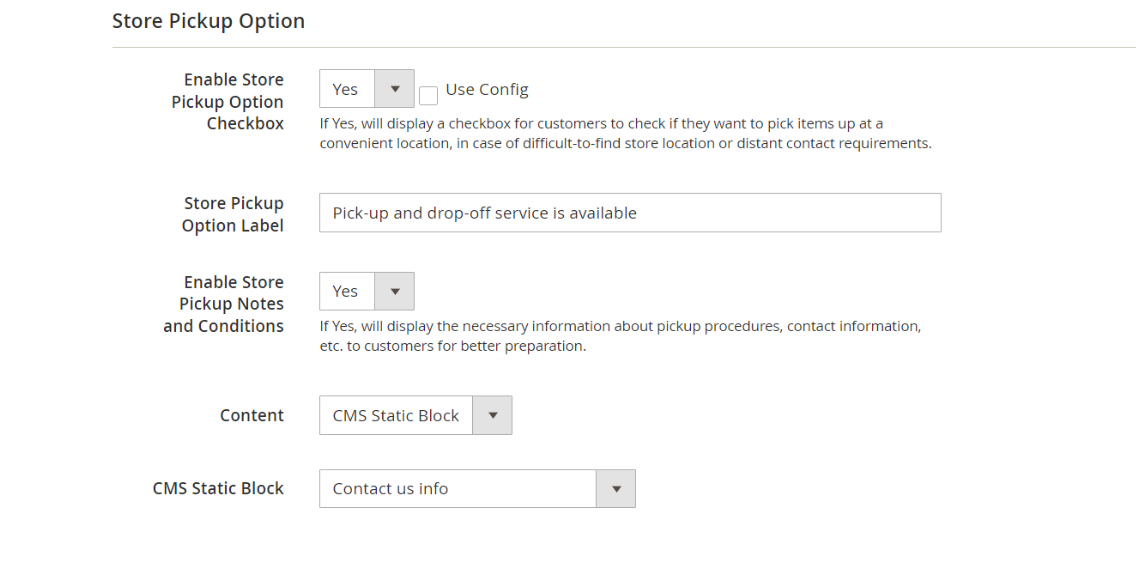
1.1.2. Store Pickup Option
Admins can set up customers to pick up goods directly at the store as well as design content, Store Pickup label in this section. This helps store owners conveniently manage the store as well as the quantity of available goods when customers request to pick up goods directly at the store.
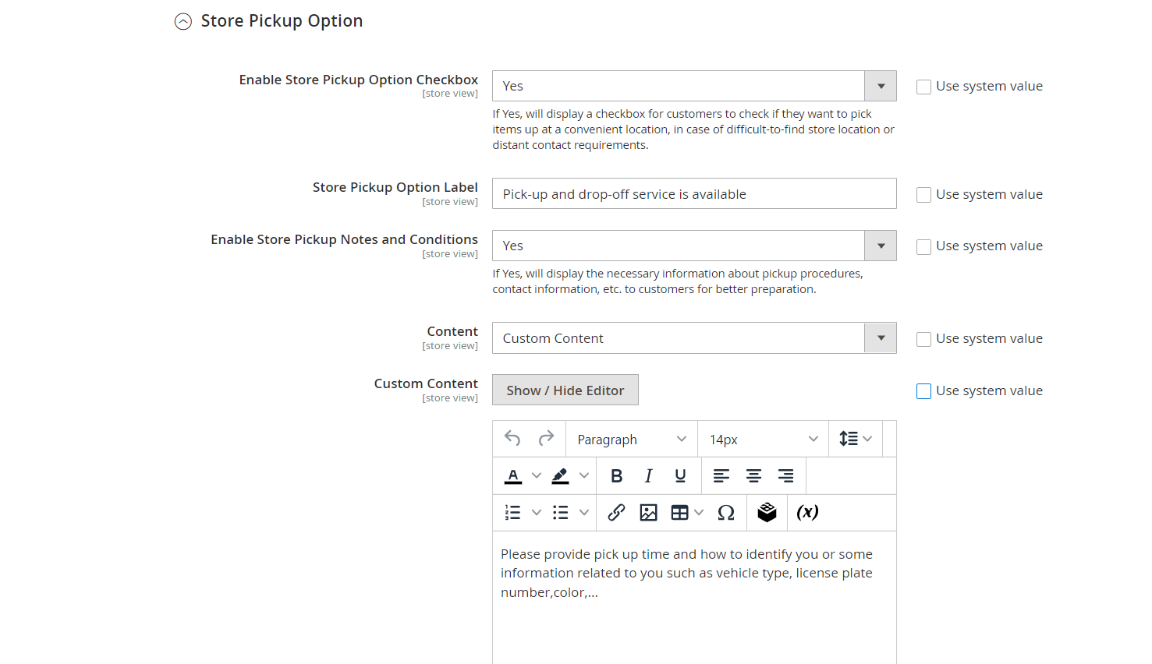
- Enable Store Pickup Option Checkbox: If Yes, will display a checkbox for customers to check if they want to pick items up at a convenient location, in case of difficult-to-find store location or distant contact requirements.
- Store Pickup Option Label: Show the label of the Store Pickup Option Checkbox
- Enable Store Pickup Notes and Conditions: If Yes, will display the necessary information about pickup procedures, contact information, etc. to customers for better preparation.
- Content:
- Custom Content: Show the Custom Content field for the store owner to edit the content in the Store Pickup Notes and Conditions section.
- CMS Static Block: Show the CMS Static Block field for the store owner to select the available blocks for the content in the Store Pickup Notes and Conditions section.
1.2. Map Settings
Combined with Google Map API Key, admins can display store maps as satellites, helping to improve customer search experience and creating trust and familiarity between the store and customers.
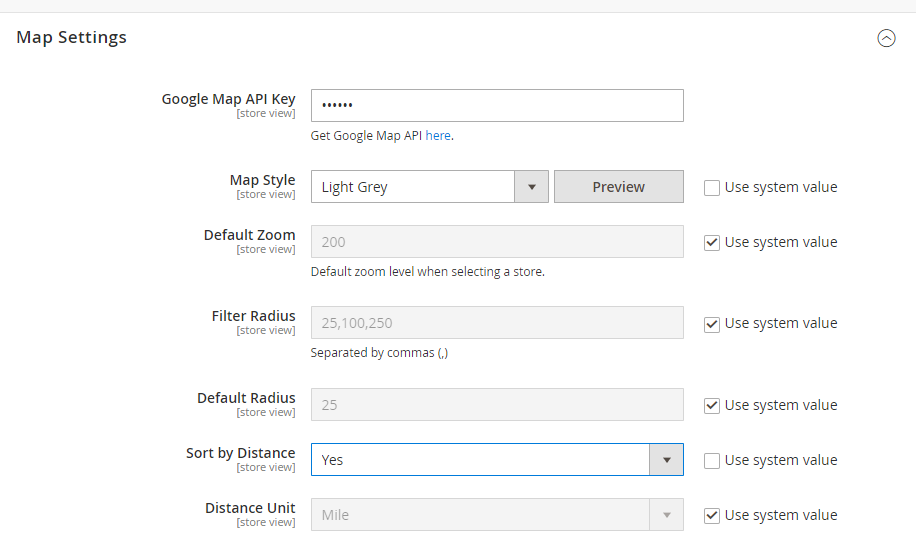
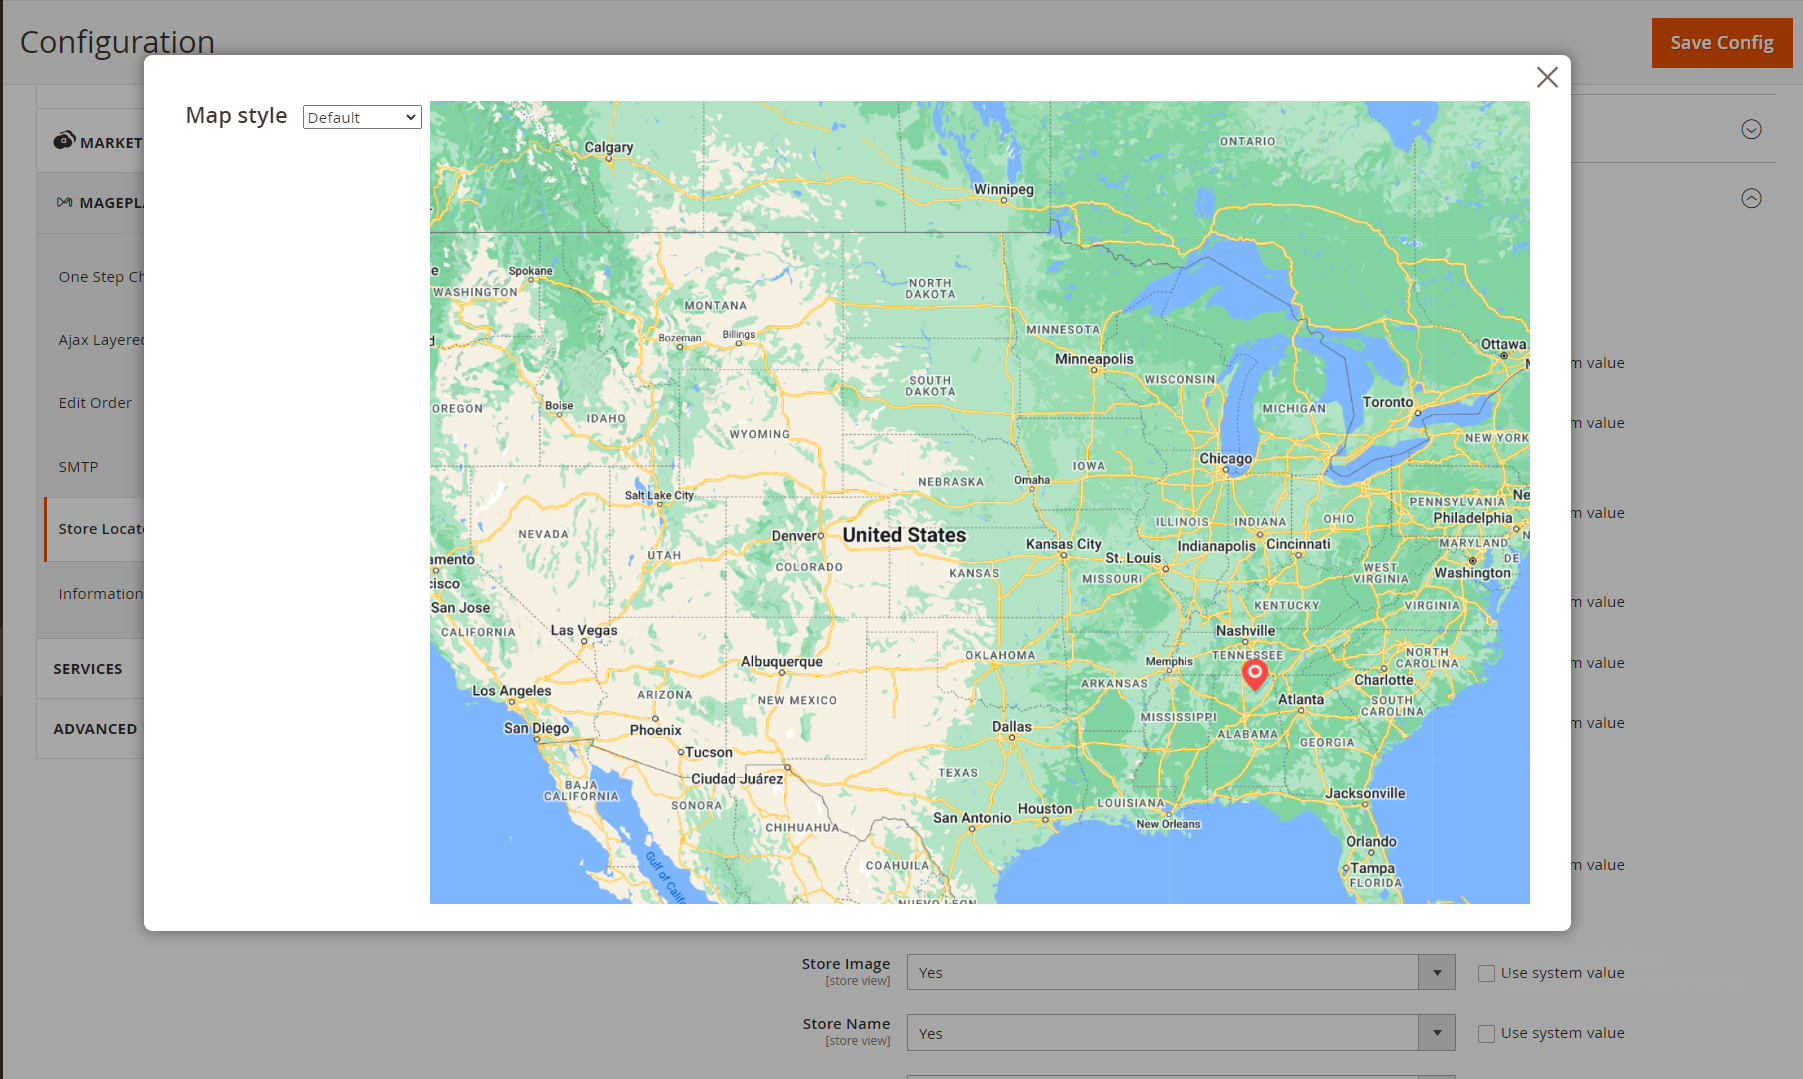
Google Map API Key: In order for Google Map to obtain the coordinates of the locations that admins have added, admins need to enter the Google Map API Key into this section. Google map API key is displayed in encrypted form to increase security.Map Style:- We provide 4 most popular Style Maps for admins to choose
- Admins can only select one style at the same time
- Admins can also customize the maps as they want. Admins can add
Map Styleas the guide in the last section of this page. - Preview: It is easier for you to see how your style map appears.
Zoom Default:- Set map zoom factor (count by %)
- We recommend a zoom factor as 12%
Filter Radius:- Install the search radius store from the customer location that they can use
- Radiuses are separated by commas
- For example:
10,20,50,100
Default Radius:- Set default search radius store from customer location. When the client accesses the page, the map will filter the stores near them in this radius
- This number may be different from the number entered in
Filter Radiusfield - If you leave this field blank, the default radius is 6731 miles (the same as the radius of the earth)
Sort By Distance: When enabling this feature, the display order is based on the location closest to the customer. Now the customer can easily find the nearest location.Distance Unit: Admins can choose the unit distance asMileorKilometerdepending on the localMarker Icon:- Select the icon representing the location of the store on the map
- As it doesn't resize itself, admins need to put the icon with the size 20x20 px before uploading
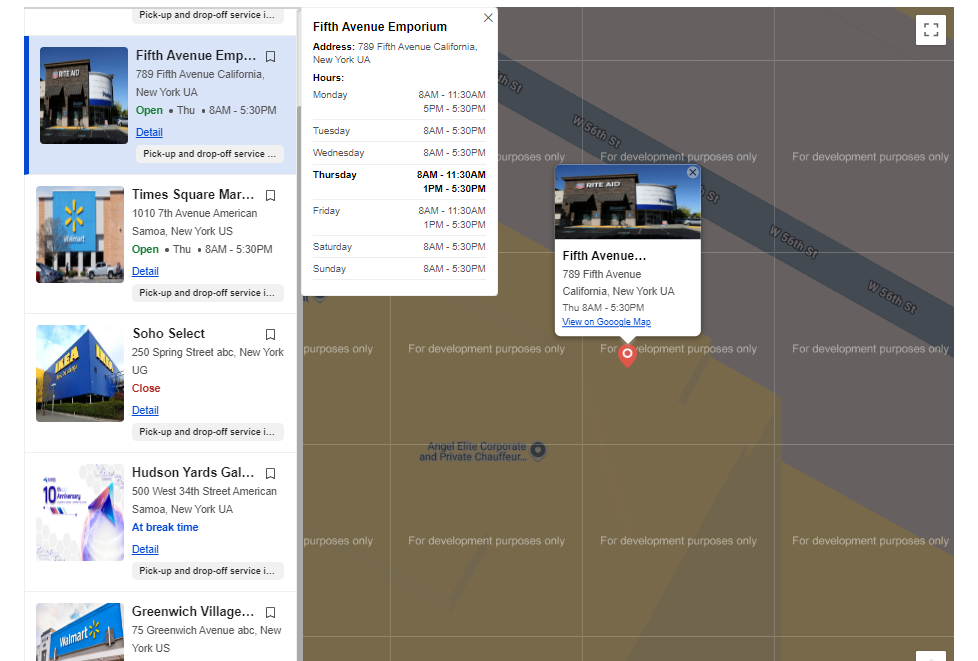
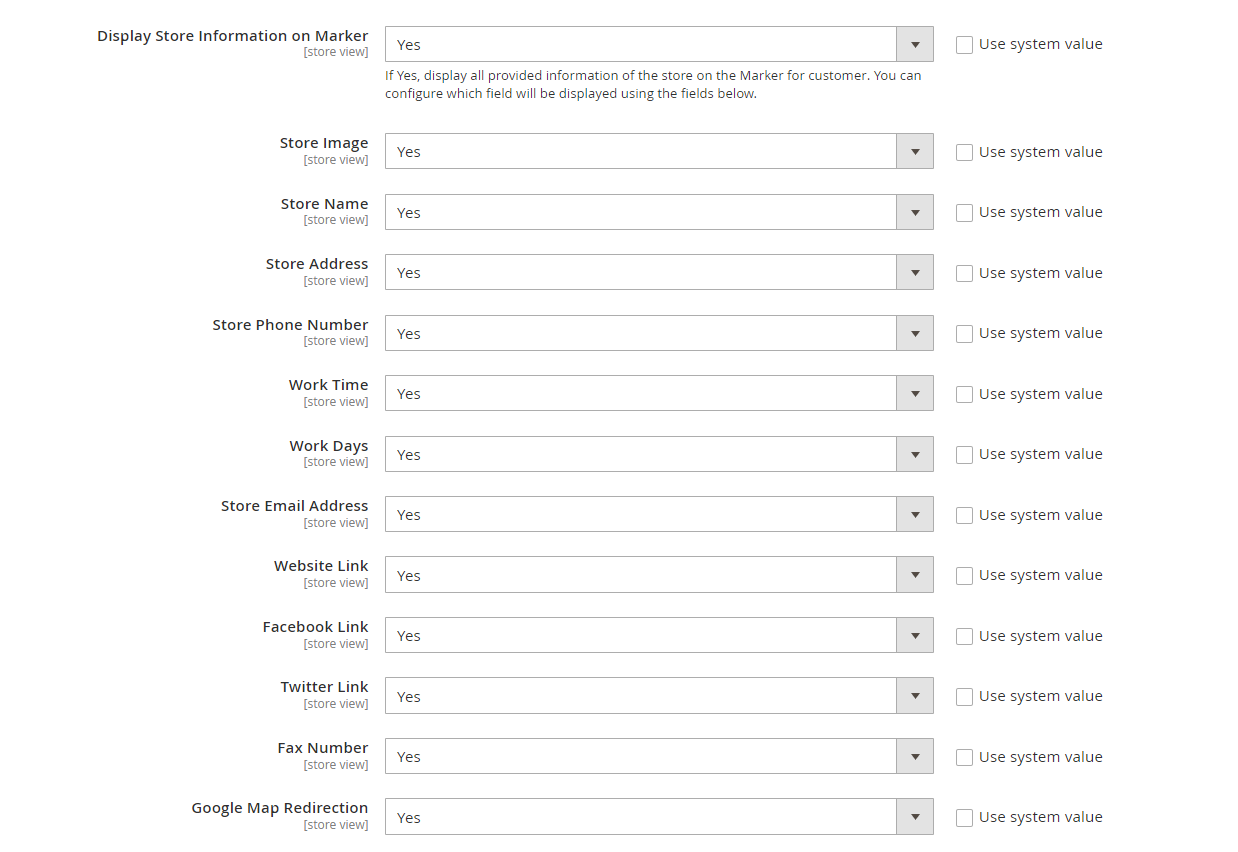
Display Store Information on Marker: If Yes, it will display all store information provided on the Marker to customers. You can configure which fields will be displayed using the fields below which are dependent on this field.
1.3. Store Time Default
This feature allows admins to set store operating hours so that customers can grasp the store operating hours in case they choose to pick up goods directly at the store.
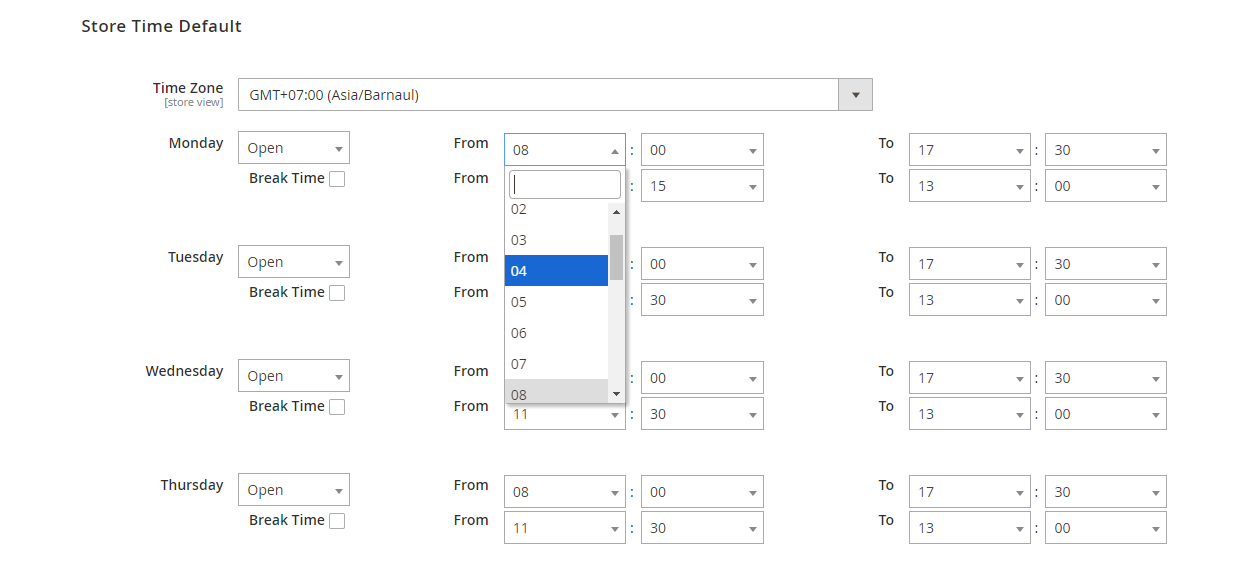
- Admins can set the timezone and opening time for each item of the week for all stores. These values are only default values. They are only applied when admins click the
Use Configbutton when theyAdd New Location. - The time filling style now is changed from dropdown to drop down & text field.
- Break Time: Displaying the extra lunch break time in order to avoid customers coming when the store closes at mid-hours.
1.4. SEO
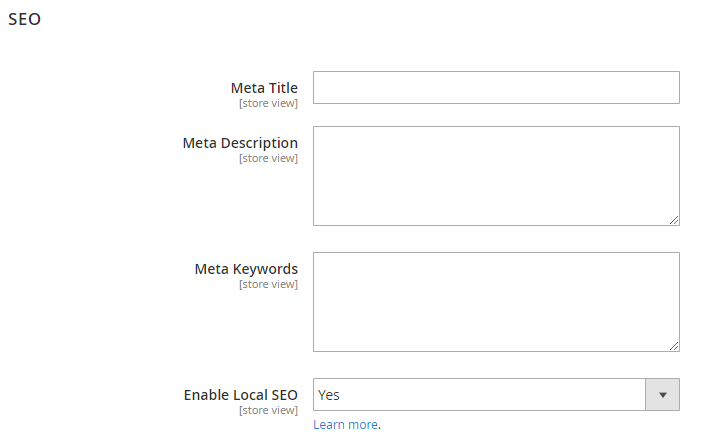
You can configure the meta that is useful for your better SEO
Meta Title: Set Meta title for posts list page (Blog Page)Meta Description: Set Meta description for posts list pageMeta Keyword: Set Meta keywords for posts list pageEnable Local SEO:
2. Locations
Admins can manage the list of stores in 1 table and edit, add, or remove order forms. Store Locator helps manage stores and order status easily.
2.1. Grid
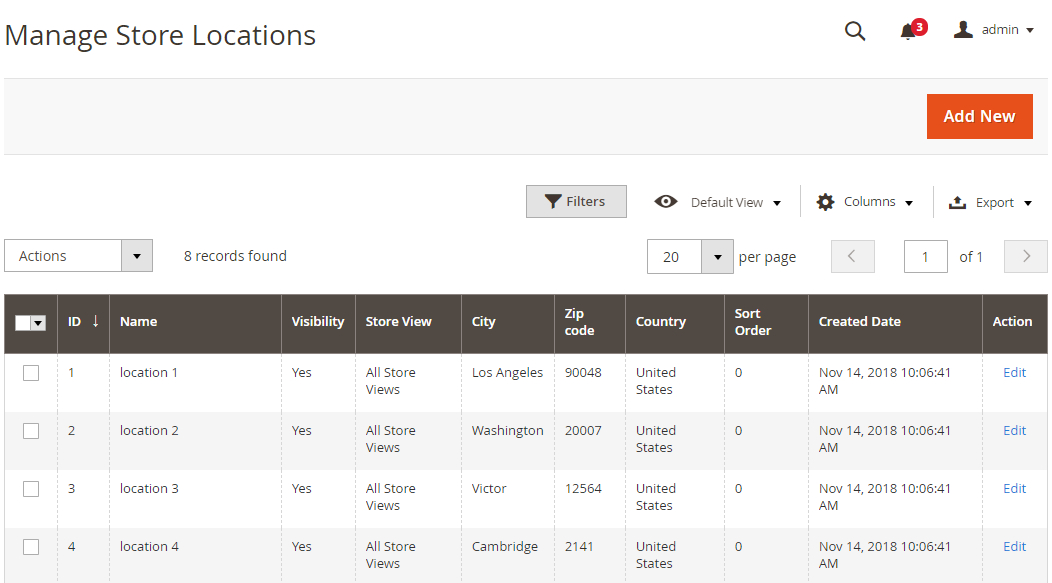
This is a place to store all store locations that are created
From the Grid, admins can capture the basics of Store Location such as ID, Name, Visibility, Store View, City, Zip Code, Country, Sort Order, Create Date, and Actions that can be done with Store Location.
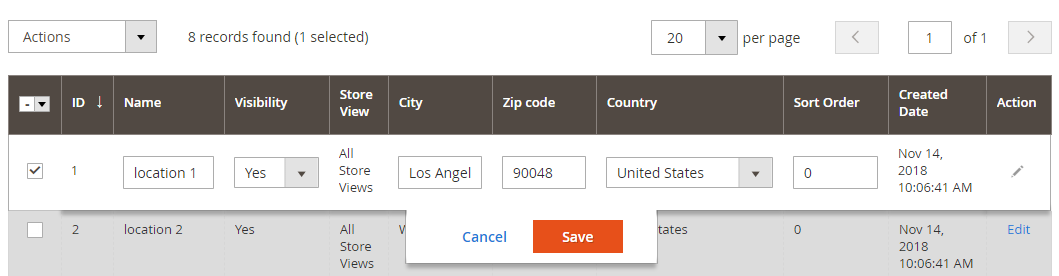
In the
Actionsdialog, admins can execute the following actions:Delete: Admins need to tick Store Location to delete, then selectDeletein theActions(upper left of the Grid) to delete. A confirmation dialog will appear, selectOKto continue deletingChange Visibility: Admins need to tick Store Location to change the status, then selectChange Visibility > Yes/Noin theActionsdialog (top left of the Grid) to change. A confirmation dialog will appear, selectOKto confirm the change
In the
Actioncolumn, admins can click onEditto modify the Store LocationIn addition, admins can Filter, Change Store View, hide/show Columns, Export Grid or edit inline
2.2. Add New/Edit Store Locator Order form
2.2.1. General
2.2.1.1. General
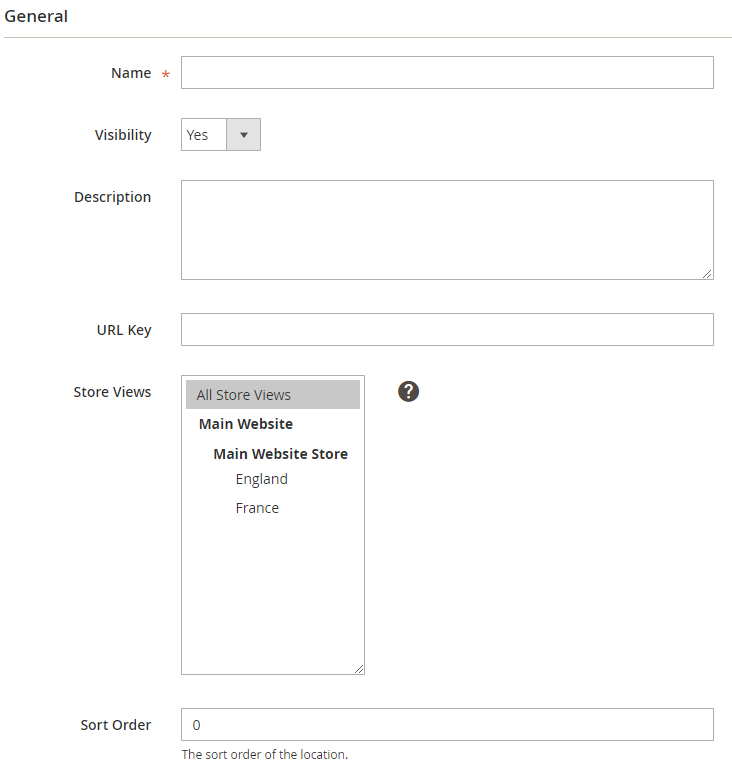
Name: The name entered here is displayed in both the backend and the frontendVisibility: Select Yes so that the store locator is displayed on the frontendDescription: Record a short description of the storeURL Key:- Enter the link to access the location
- If left blank, after you Save, based on the
Namefield, URL key will automatically create (unless Name is a hieroglyphic as Russian, Japanese, Korean, Chinese, etc)
Store View: Store Location is only available in the selected Store ViewSort Order:- Stipulate the display order of the Store Location on the frontend
- 0 is the highest position
2.2.1.2. Store Pickup Option
- Enable Store Pickup Option Checkbox: If Yes, will display a checkbox for customers to check if they want to pick items up at a convenient location, in case of difficult-to-find store location or distant contact requirements. If you select Use Config, that Store Location will take the value you set in the Configuration section.
- Store Pickup Option Label: Show label of the Store Pickup Option Checkbox
- Enable Store Pickup Notes and Conditions: If Yes, will display the necessary information about pickup procedures, contact information, etc. to customers for better preparation.
- Content:
- Custom Content: Show the Custom Content field for the store owner to edit the content in the Store Pickup Notes and Conditions section.
- CMS Static Block: Show the CMS Static Block field for the store owner to select the available blocks for the content in the Store Pickup Notes and Conditions section.
2.2.2. Location
2.2.2.1. Address Information
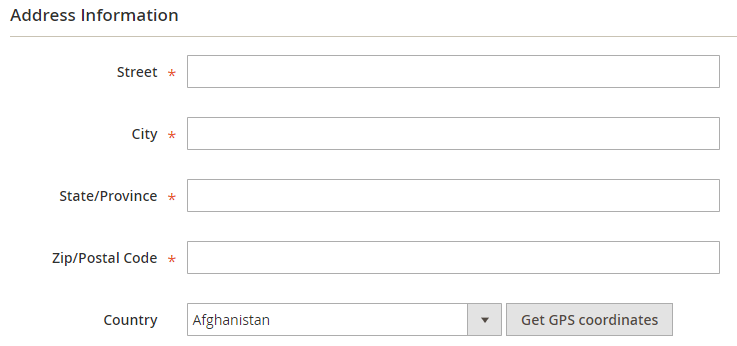
- Fill in the store location's address information in these fields
- After entering the correct address, admins click on
Get GPS coordinatesto automatically get coordinates and display on Maps
2.2.2.2. Review Map
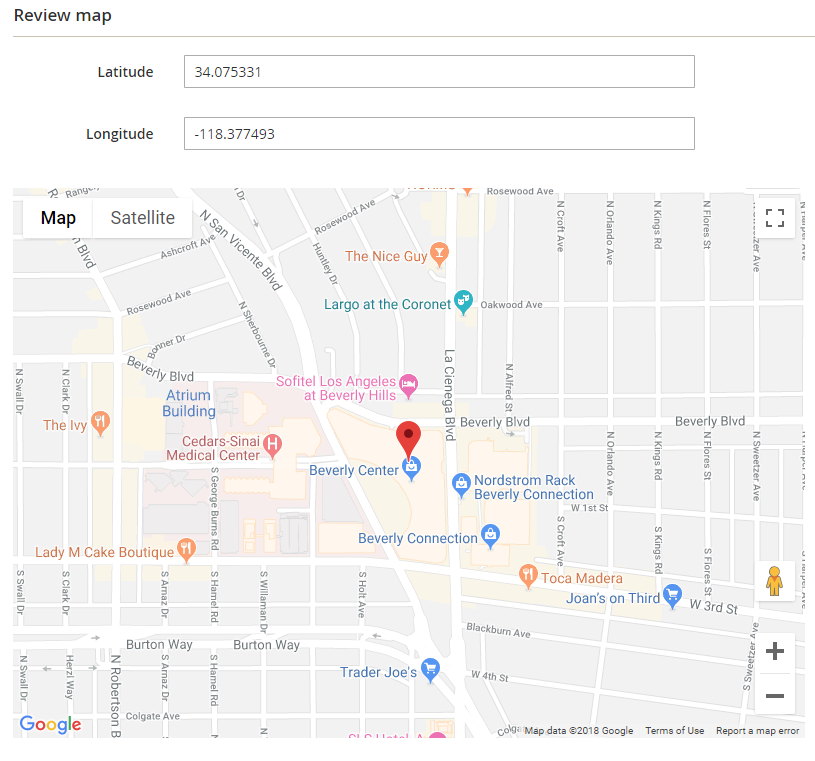
- The coordinates of the store location are shown here
- They can be obtained automatically when admins
Get GPS coordinates, admins can also manually fill - The coordinates change with the marker icon when it moves to another location, however the information on the address above (street, city, etc.) will not change.
2.2.3. Time
2.2.3.1. Open Hours
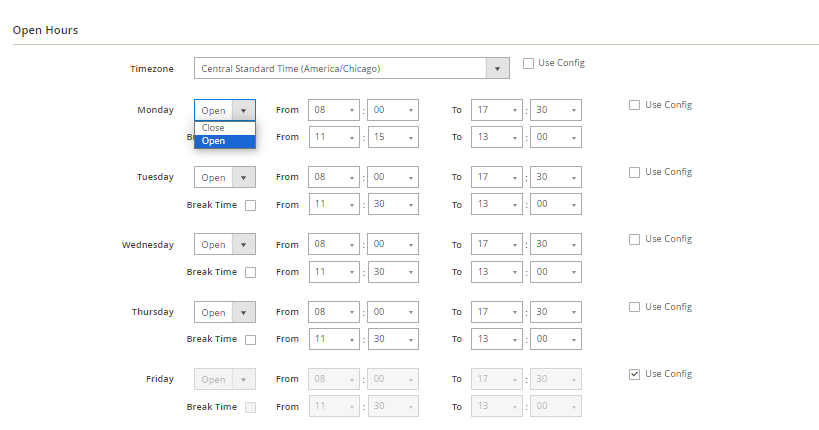
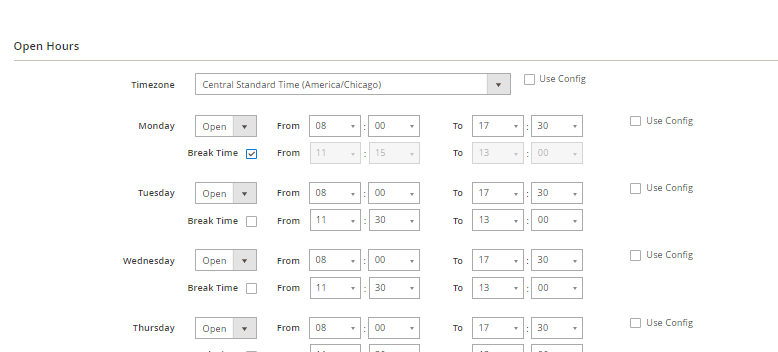
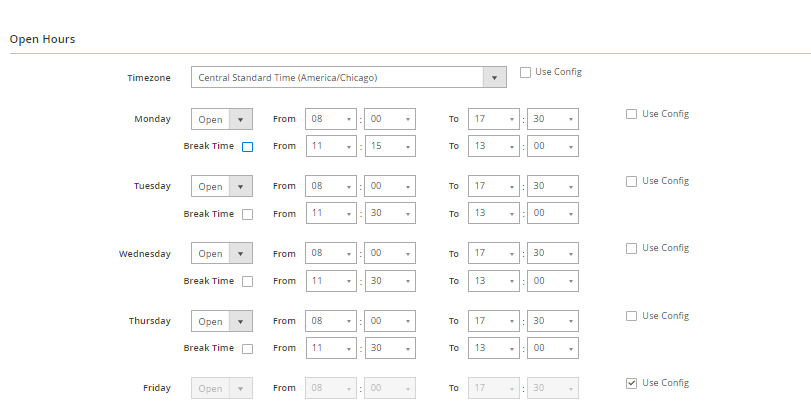
- When the Break Time section is chosen, the time selection boxes of From and To will be highlighted, and the admin cannot select or enter numbers. On the front end, Break Time will not be displayed.
- When the Break Time section is not chosen, the admin will select or enter the number in the From and To section.
- Default: The Break Time section is chosen (Break Time will not be displayed on the front end)
2.2.3.2. Holiday
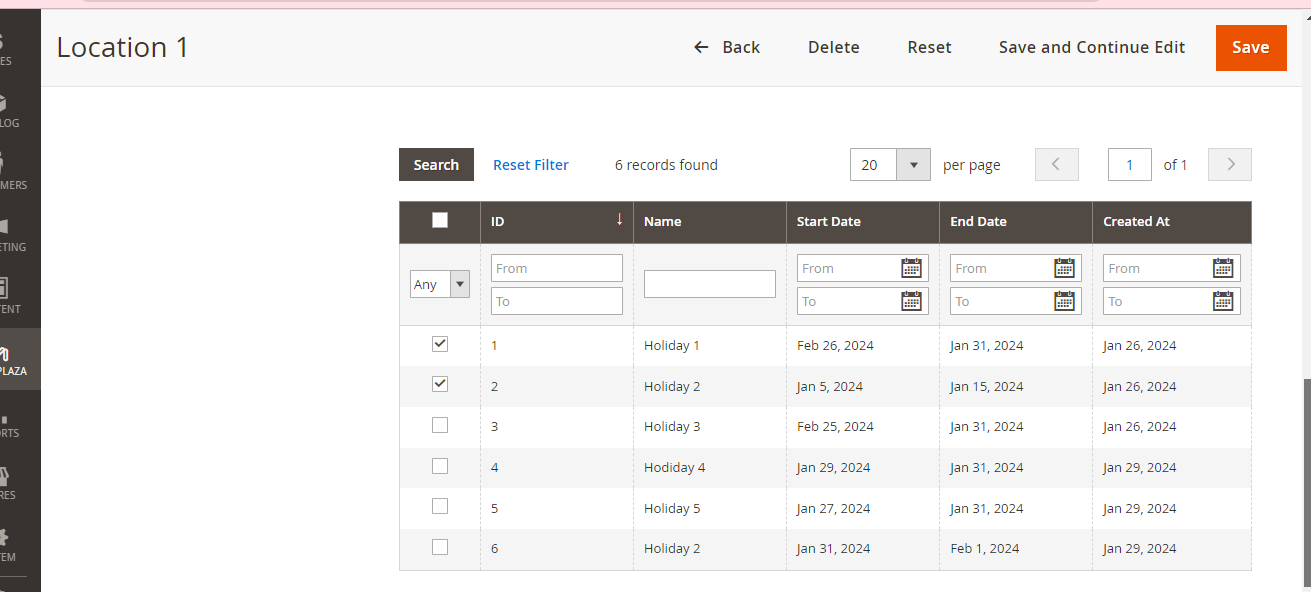
- Holidays created under
Content > Store Locator > Holidayswill be displayed in this section - The selected holidays will be applied to the store. Opening times on the frontend will change from Open to Close on holidays
- A detailed holiday (start-end date) column is added in the holiday grid section
2.2.4. Contact
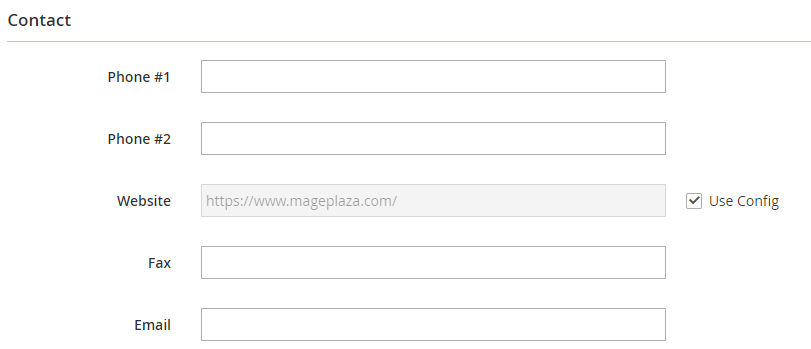
- Admins can enter their contact information to display on the frontend
- Basic information includes phone number, website address, fax number, and email address
2.2.5. Images
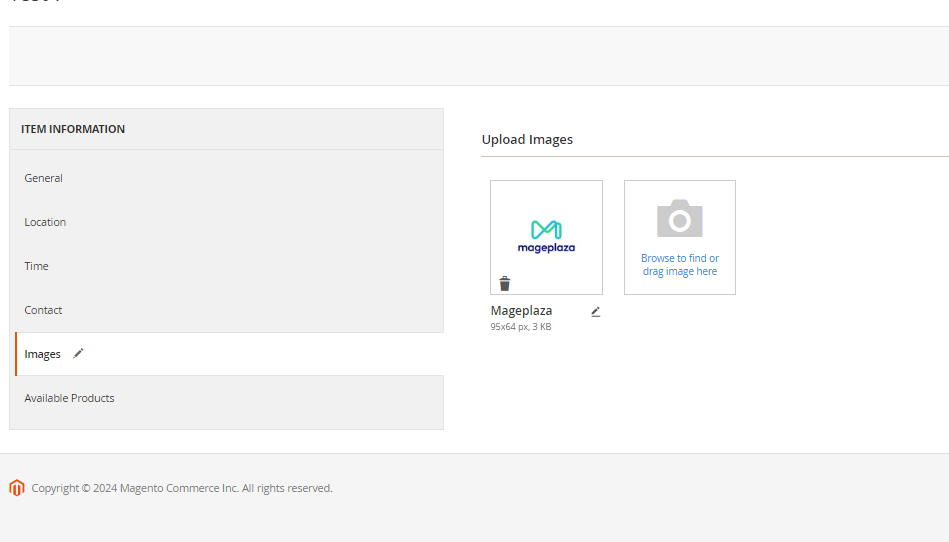
- Admins can upload typical images of the store to display on the frontend.
- The uploaded first image is displayed on the store locator page; the remaining images are displayed as a slider when the customer clicks on the location detail.
- Users can edit inline Alt Text of uploaded images by clicking
editbutton
2.2.6 Available Products
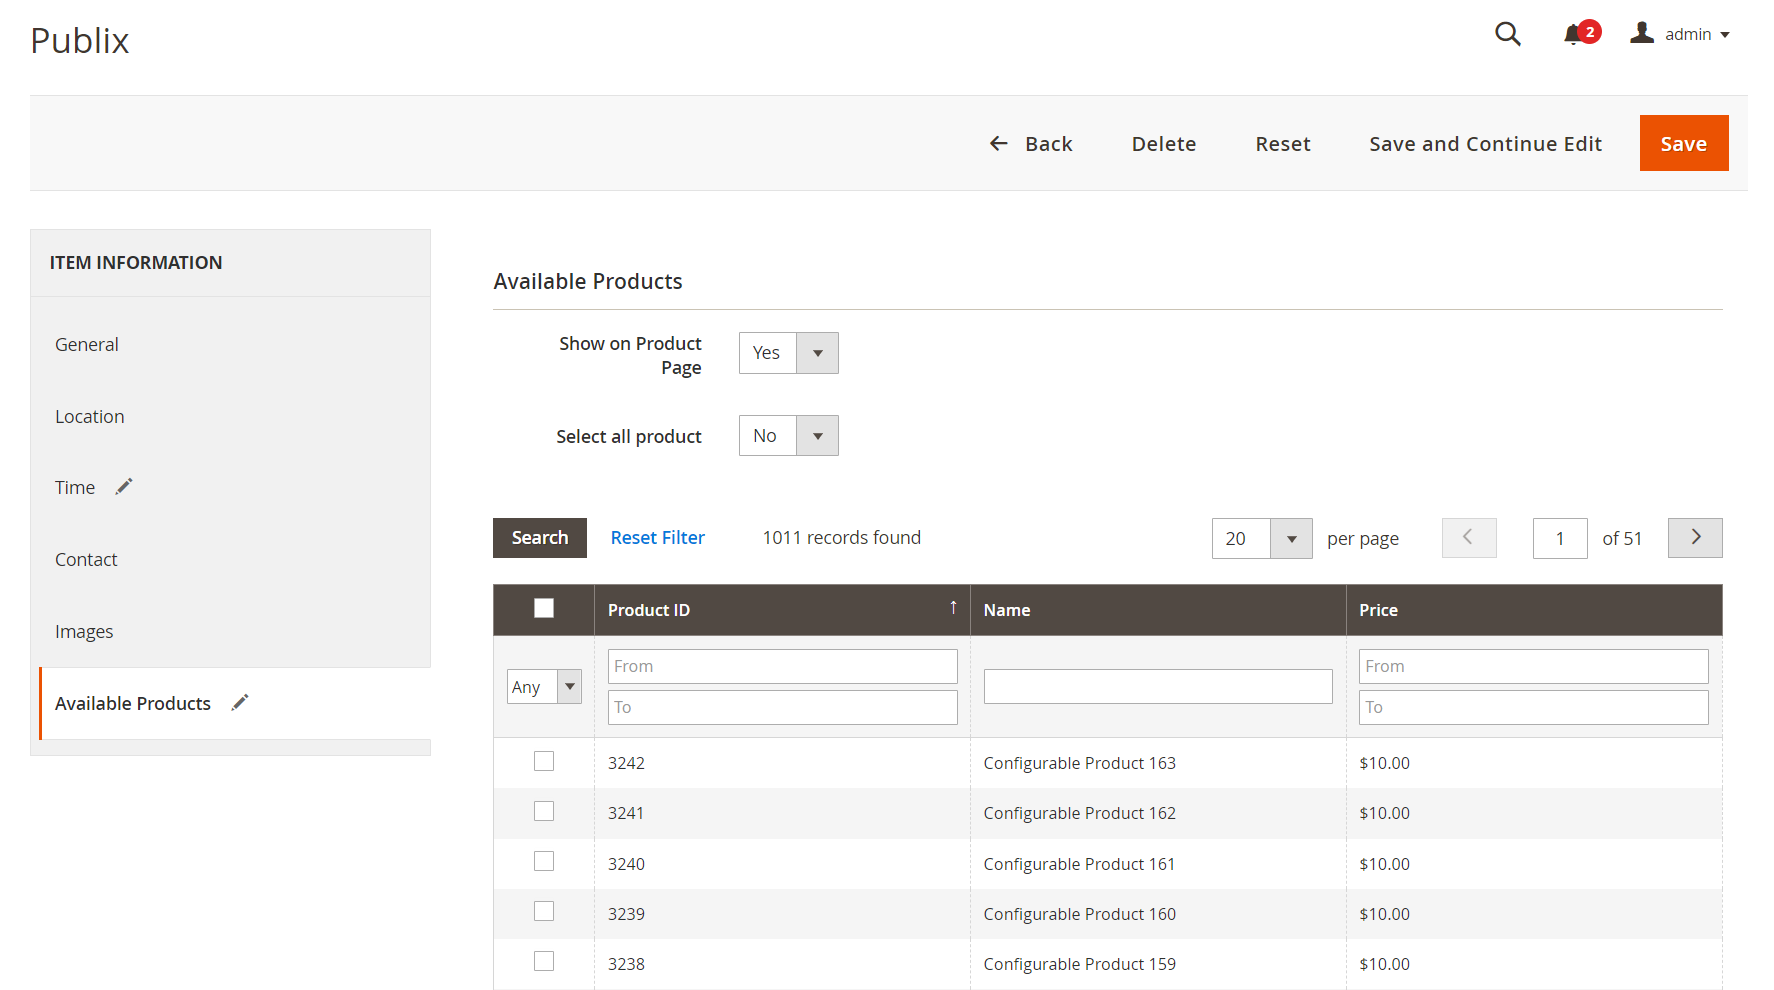
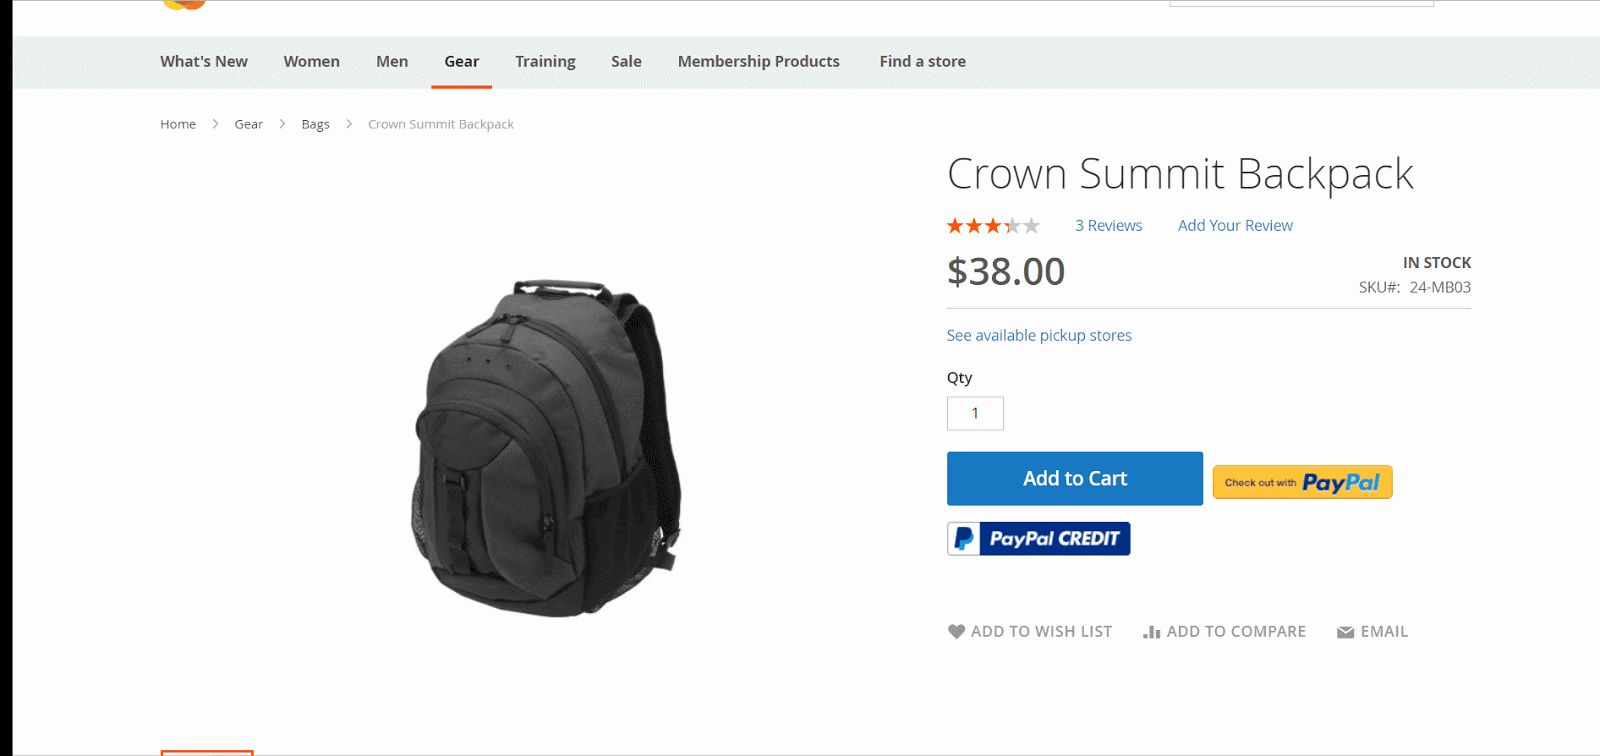
- Show on Product Page: Select Yes to allow showing specific store can be picked up on Product Page. For each Product page, customers can click on
See available pickup storesto check in which stores that product is available.
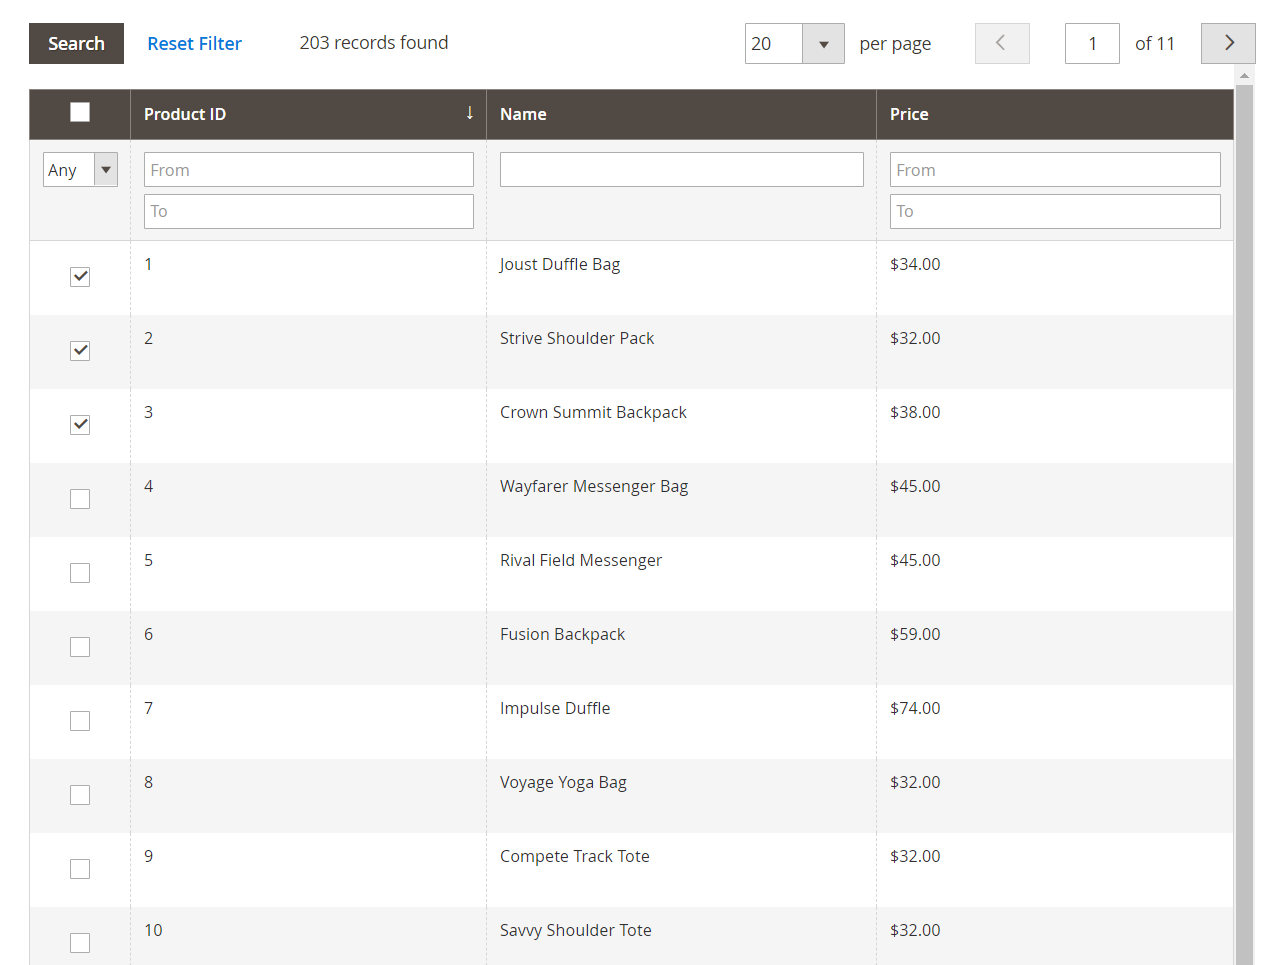
- Select all product: Choose Yes for all products to be added to the store. If No, it will depend on the Product Grid to be able to select individual products.
- Selected Product: This part records the information of products within related stores. Admins can search, filter product ID, SKU, Price in the Grid. Admin can add products to each store locator.
2.3. Manage Holidays Grid
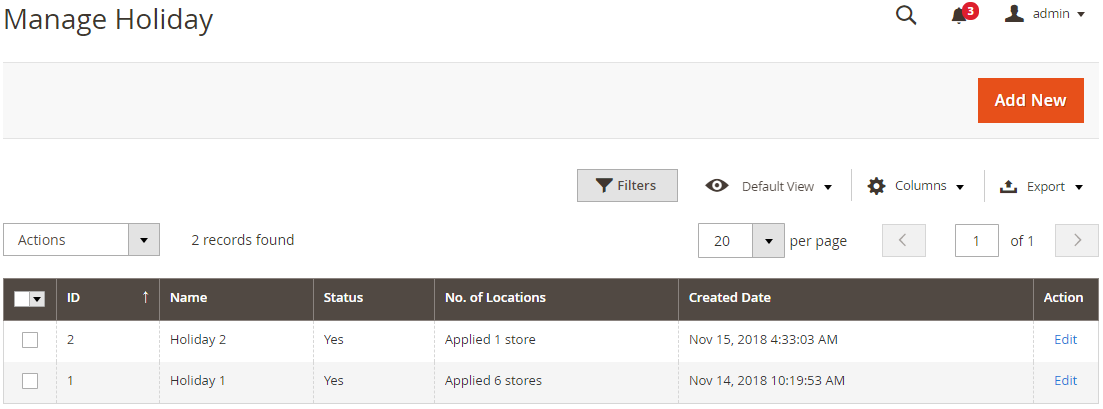
This is a place to store all the Holidays that admins installed for the store.
From the Grid, admins can capture basic Holiday information such as ID, Name, Status, No. of Locations, Create Date and Action that can be done with Holiday
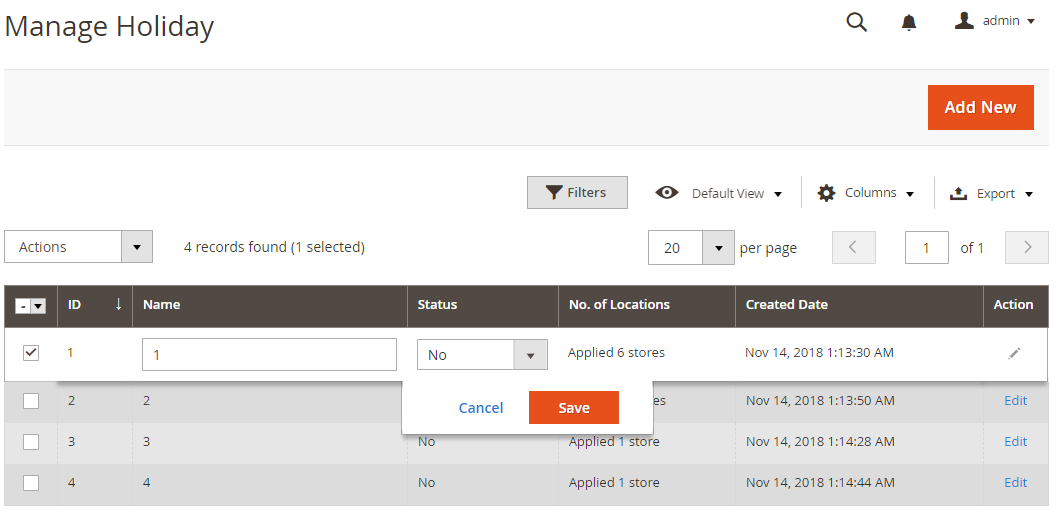
In the
Actiondialog, admins can execute the following actions:Delete: Admin needs to tick Holiday to delete, then select delete in the Actions (upper left of the Grid) to delete. A confirmation dialog will appear; select OK to continue deletingChange Status: Admins need to tick the Holiday that they want to change status, then chooseChange Status > Yes/Noin theActiondialog (top left of the Grid) to change. A confirmation dialog will appear, selectOKto confirm the change
In the
Actioncolumn, Admin can click Edit to modify Holiday informationIn addition, admins can Filter, Change Store View, hide/show Columns, Export Grid or edit inline
2.4 Add New/Edit Form
2.4.1. General
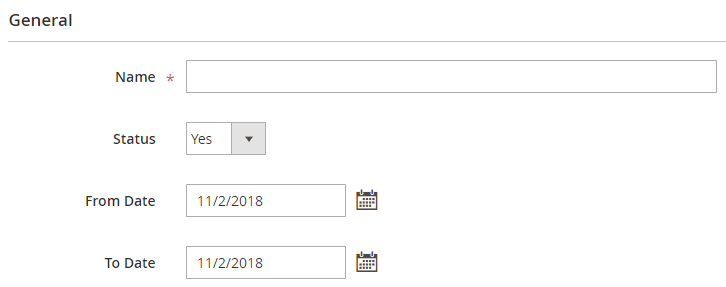
2.4.2. Locations
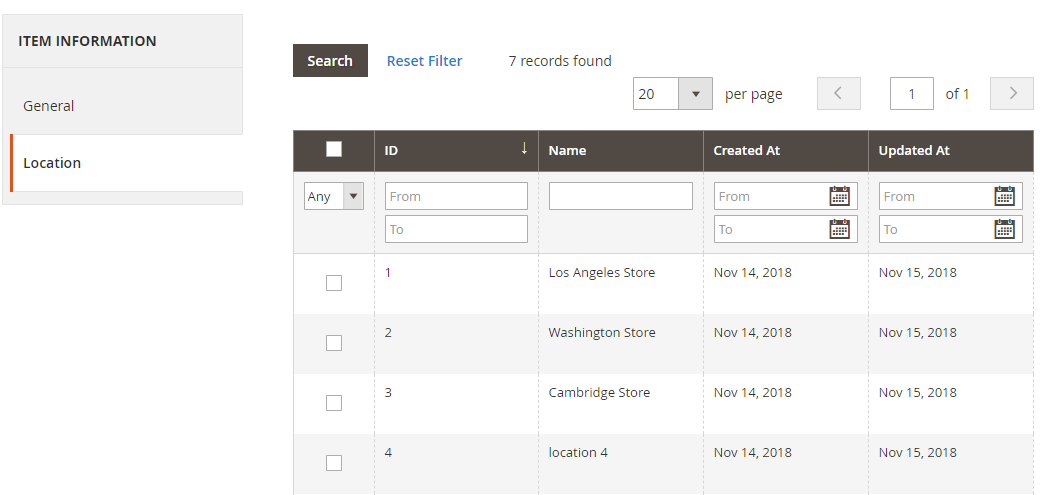
- The created locations in the
Content > Store Locator > Locationssection will be displayed in this section - Selected stores will be applied for this holiday. Opening times on the frontend will change from Open to Close on holidays.
How to add Map Style
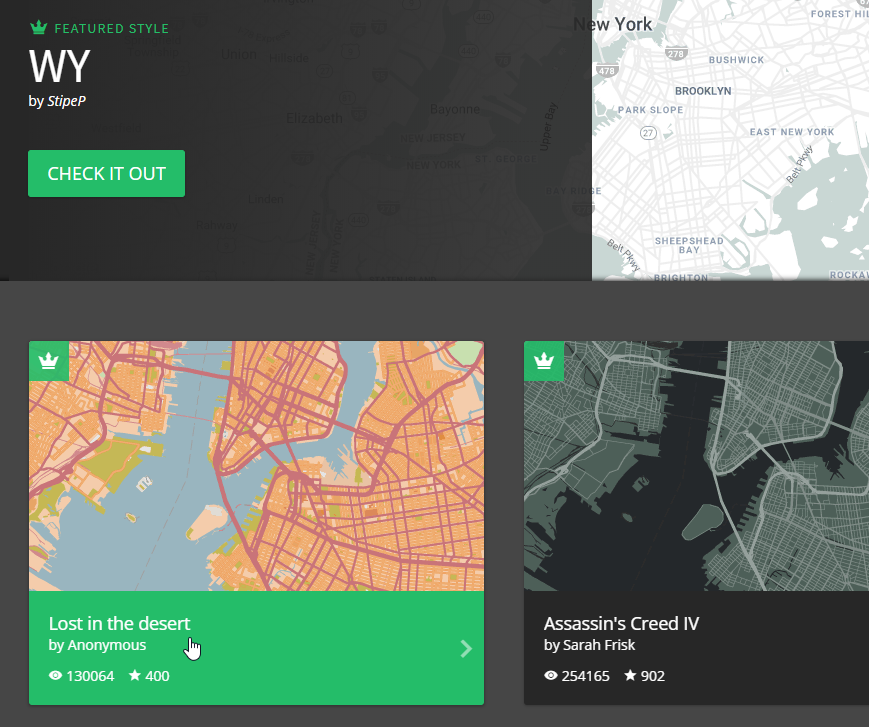
Step 1: Choose Map Style = Custom

Step 2: Click here in the comment. The link will lead to https://snazzymaps.com/
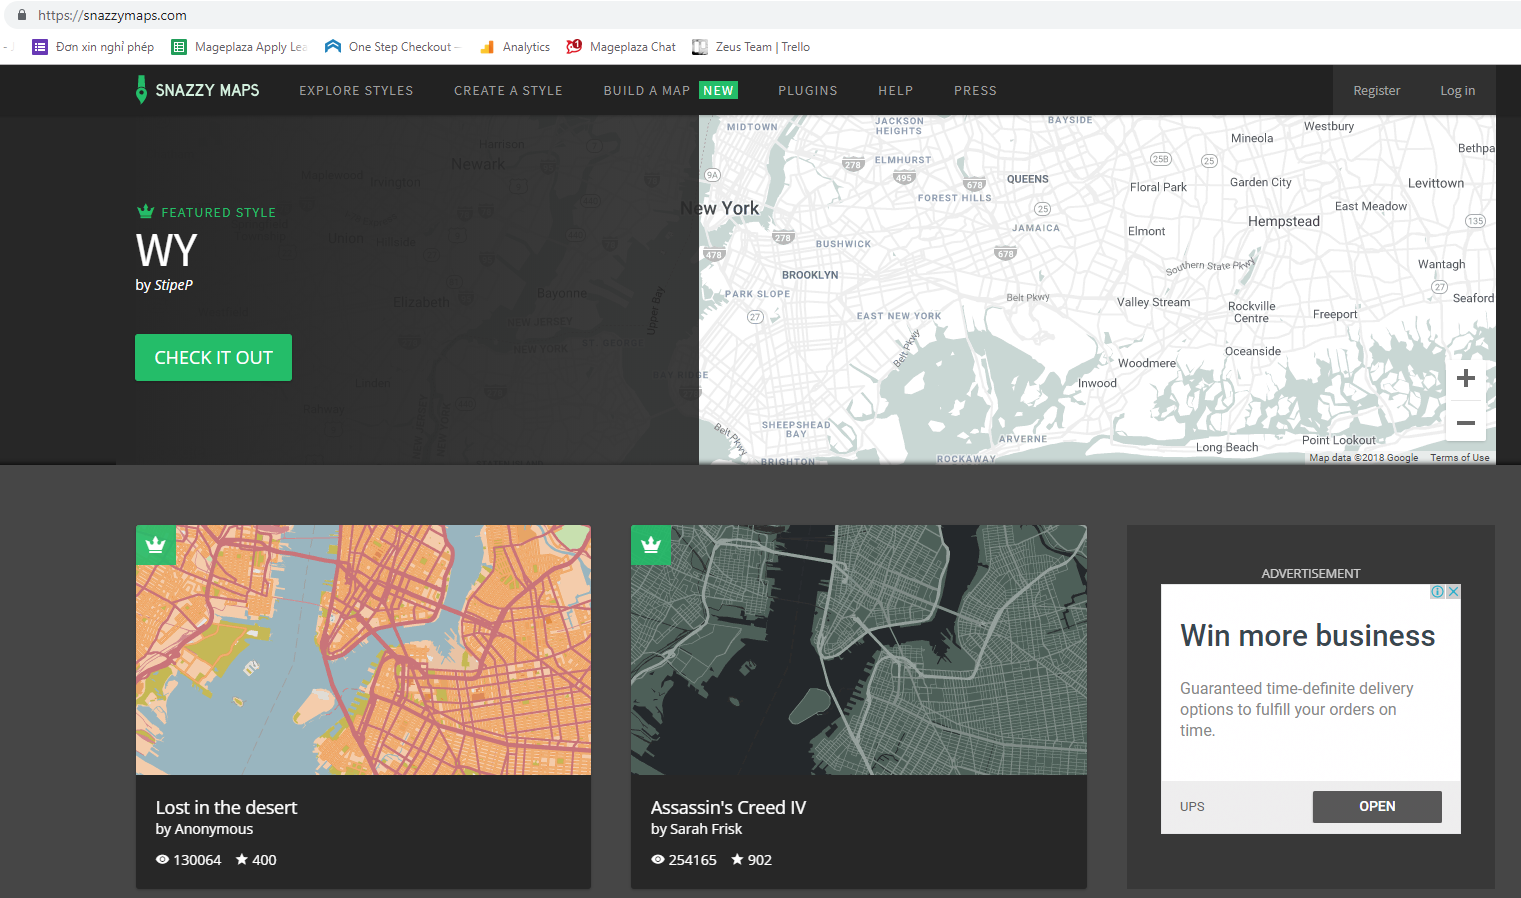
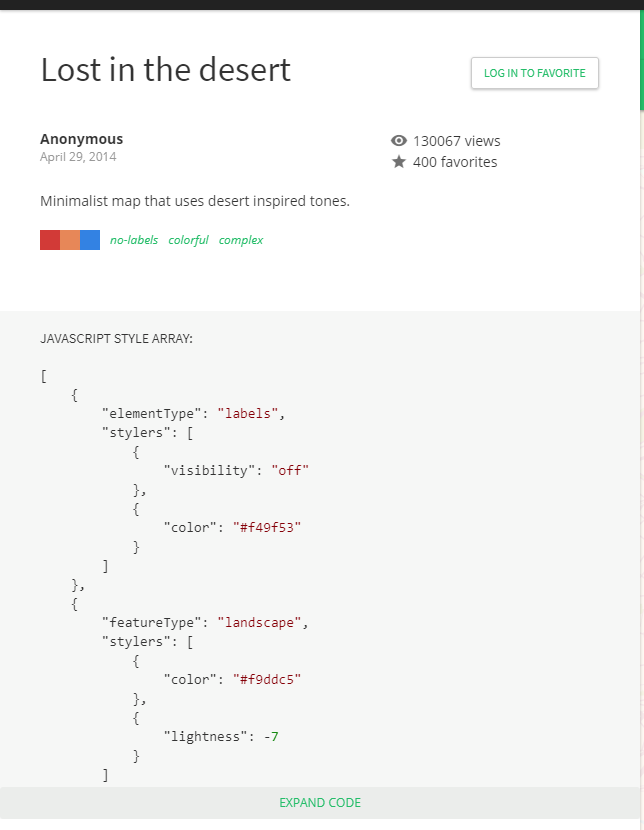
Step 3: Click on Map Style that you want. For example: Lost in the desert
Step 4: Expand Code and Copy JAVASCRIPT STYLE ARRAY into the Custom checkbox in the configuration
Step 5: Save and check on the frontend
Mageplaza Store Pickup
1. Configuration
Login to the Magento Admin, choose Stores > Configuration > Sales > Shipping Methods > Mageplaza Store Pickup.
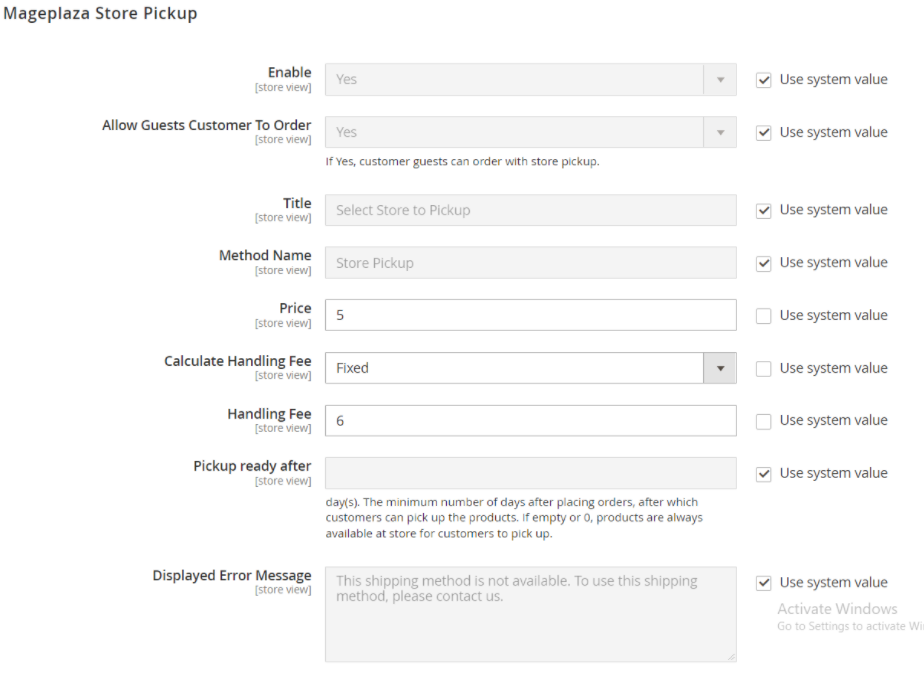
- Enable: Select Yes to enable using the Shipping Methods feature with Mageplaza Store Pickup.
- Title:
- Enter the title for the Shipping Methods type with Mageplaza Store Pickup.
- If left blank, the default is Select Store to pickup.
Method Name:
- Enter a name for this Shipping methods type, and it will appear on Shipping methods when the customer checkout.
- If left blank, the default is Store Pickup.
Price: Enter the price for shipping methods. If left blank, the ship price will default to 0.
Calculate Handling Fee: Select the Handling Fee for the shipping methods, this price will be added to the Price field and displayed in shipping methods when the customer checkout. With two Handling Fee types:
- Fixed: Shipping methods will be calculated according to the price and handling-free fields as follows: Price + Handling Fee. For example: Price: 5, Handling Fee: 6, so the total ship charge is: 5 + 6 = 11.
- Precent: Shipping methods will be calculated according to the free and handling price fields: Price + Handling Fee. For example: Price: 5, Handling Fee: 6, so the ship's total charge is: 5 + 5 * 6/100 = 5.3.
Handling Fee: Enter the price for Handling Free. If left blank, the default is 0.
Pickup ready after:
- Enter the number of days after ordering at least how many days customers can pick up the goods.
- If left blank, it means that the product is always available in the store so customers can pick it up during business hours at any time.

Displayed Error Message: Enter the message to notify errors when the shipping method is not applied to several addresses that customers selected. Display message when
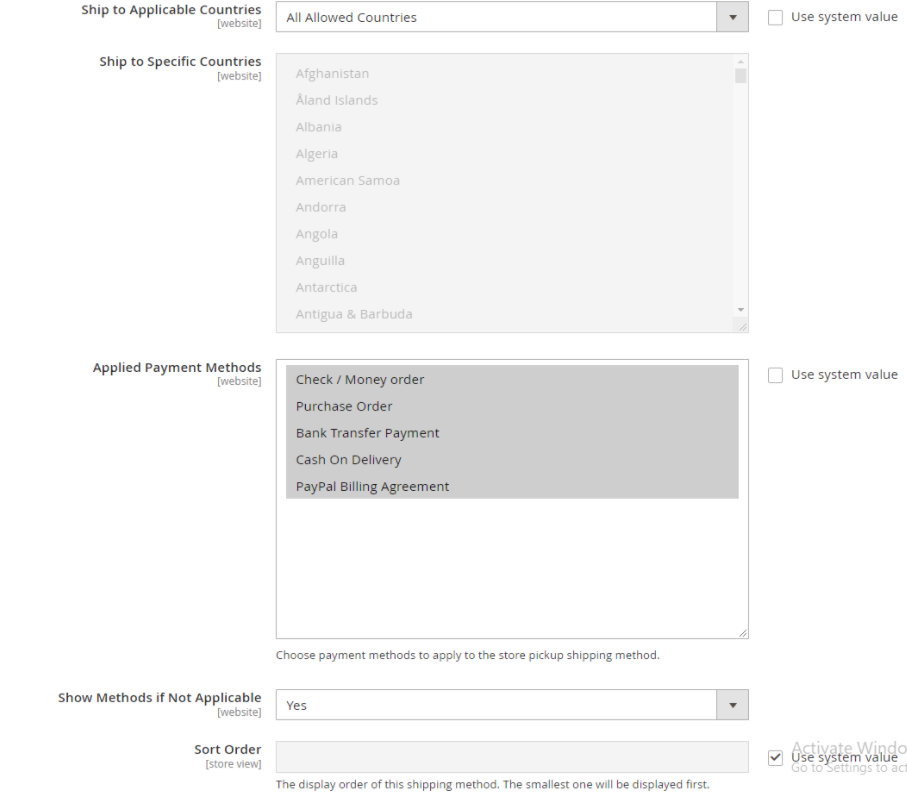
Show Methods if Not Applicable = Yes.Ship to Applicable Countries:
- All Allowed Countries: Apply the store pickup method to all countries.
- Specific Countries: Apply the store pickup method to certain countries.
- Ship to Specific Countries: Select countries to apply the store pickup method. Unselected countries will not allow this delivery method.
Applied Payment Methods: Select payment method to apply to store pickup method.
Show Methods if Not Applicable: If Yes, the store pickup method will still be displayed even when not applicable to some addresses or countries that customers selected, and the Displayed Error Message will be shown.
Sort Order:
- Enter the number in the Sort Order field. Display sort order for Shipping method when customers pay. The higher the number, the more priority the shipping method has. With 0 being the highest.
- If left blank, the default is 0.
2. Form Add New/Edit Product
Login to the Magento Admin, choose Catalog > Products Add new/Edit any product
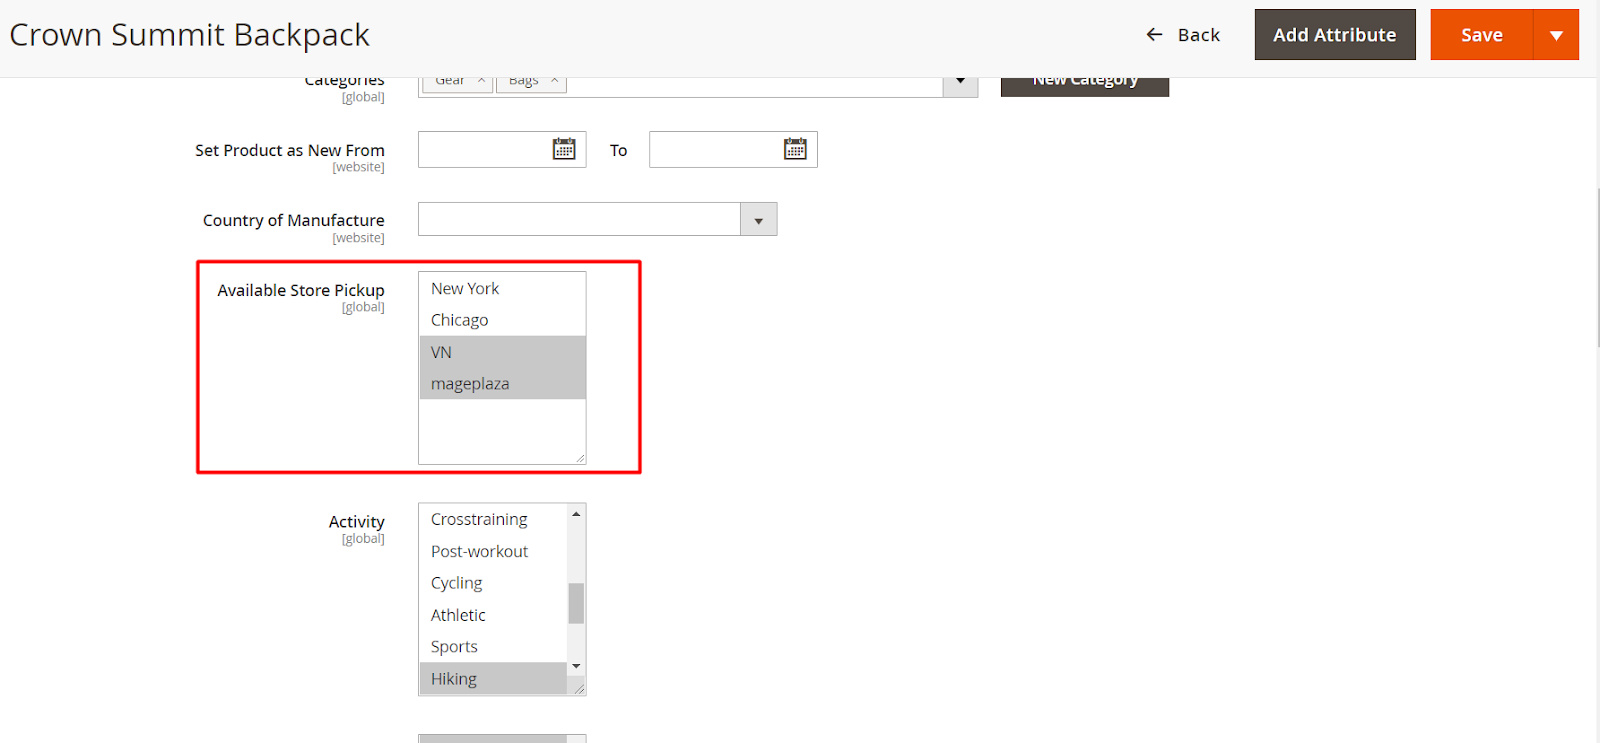
- Available Store Pickup:
- Select store locator to display product on that store locator. - If left blank, the product will not display and be in any store locator.
- Note: If the Form Add New/Edit Store locator has been selected, in this part the product will be selected for that store locator. Or you can edit the store locator for each product here.
3. Orders Backend
This section records the store locator's address information, after ordering for how long the customer can come to pick up the goods and the amount of additional charges customers have to pay as shipping,...
API
Store Locator extension developed by Mageplaza supports the use of Rest API to view the information of locations data by store, configuration by store, get map config by style, location information by quote, etc.
More details can be seen from here
Get instruction on creating Integration tokens from here
GraphQL
Run the following command in Magento 2 root folder
composer require mageplaza/module-store-locator-graphql
php bin/magento setup:upgrade
php bin/magento setup:static-content:deploy
To start working with Store Locator GraphQL in Magento, you need to:
- Use Magento 2.3.x. Return your site to developer mode
- Set GraphQL endpoint
http://<magento2-3-server>/graphqlin URL section, click on Set endpoint. For example, http://develop.mageplaza.com/graphq - Mageplaza supports query and mutation to view the information by locations data by store, configuration by store, pickup config, etc. That can be seen from here
Notation
If you want to uninstall the extension, please use composer to run the command bin/magento module:uninstall Mageplaza_StoreLocator
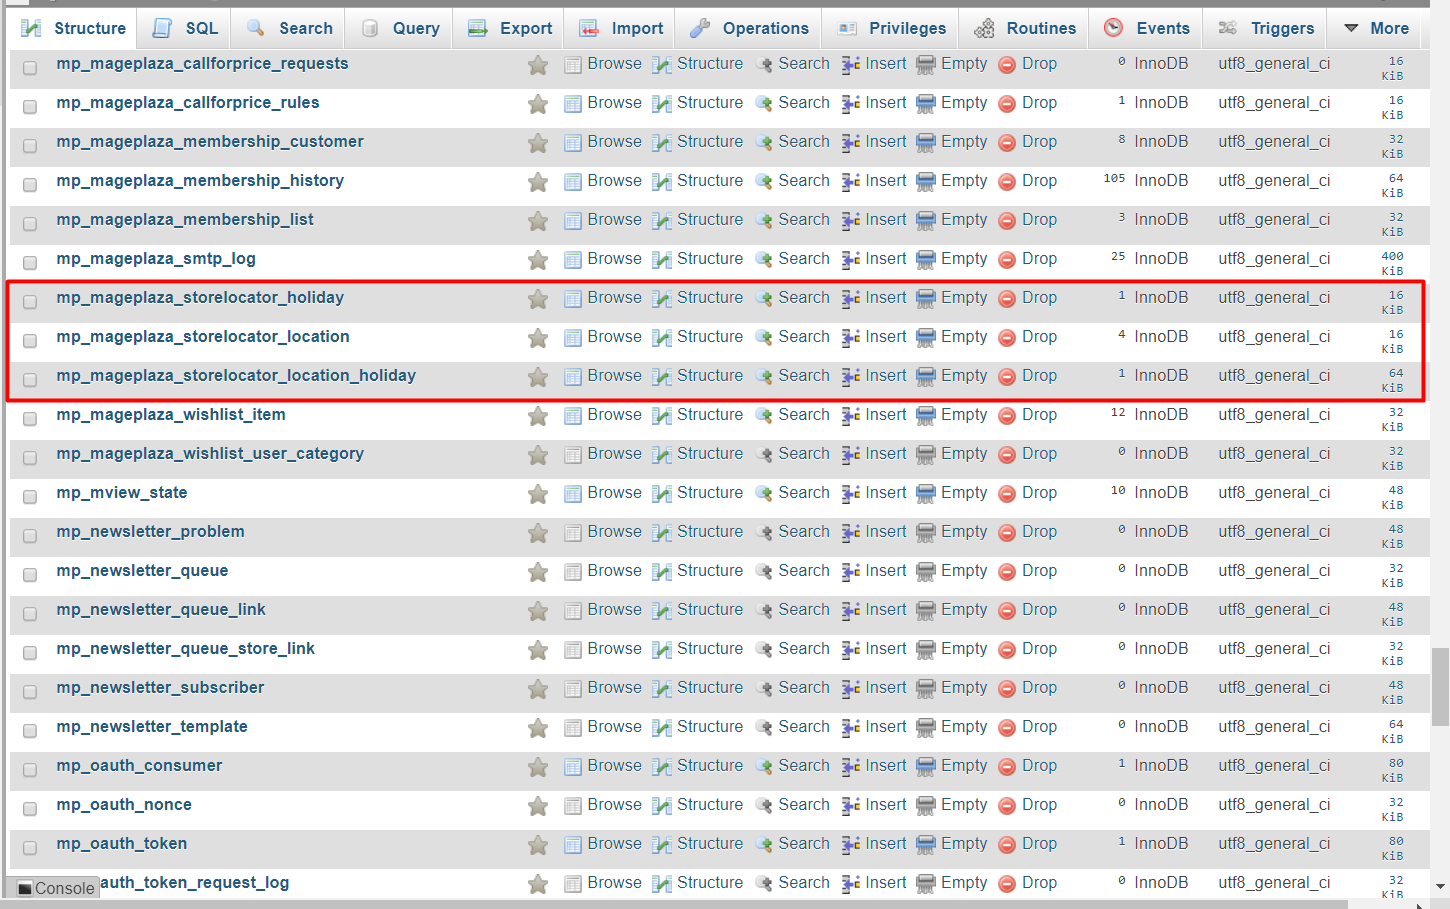
Find the following table to delete extension mp_mageplaza_storelocator_holiday, mp_mageplaza_storelocator_location, mp_mageplaza_storelocator_location_holiday attribute in your database.
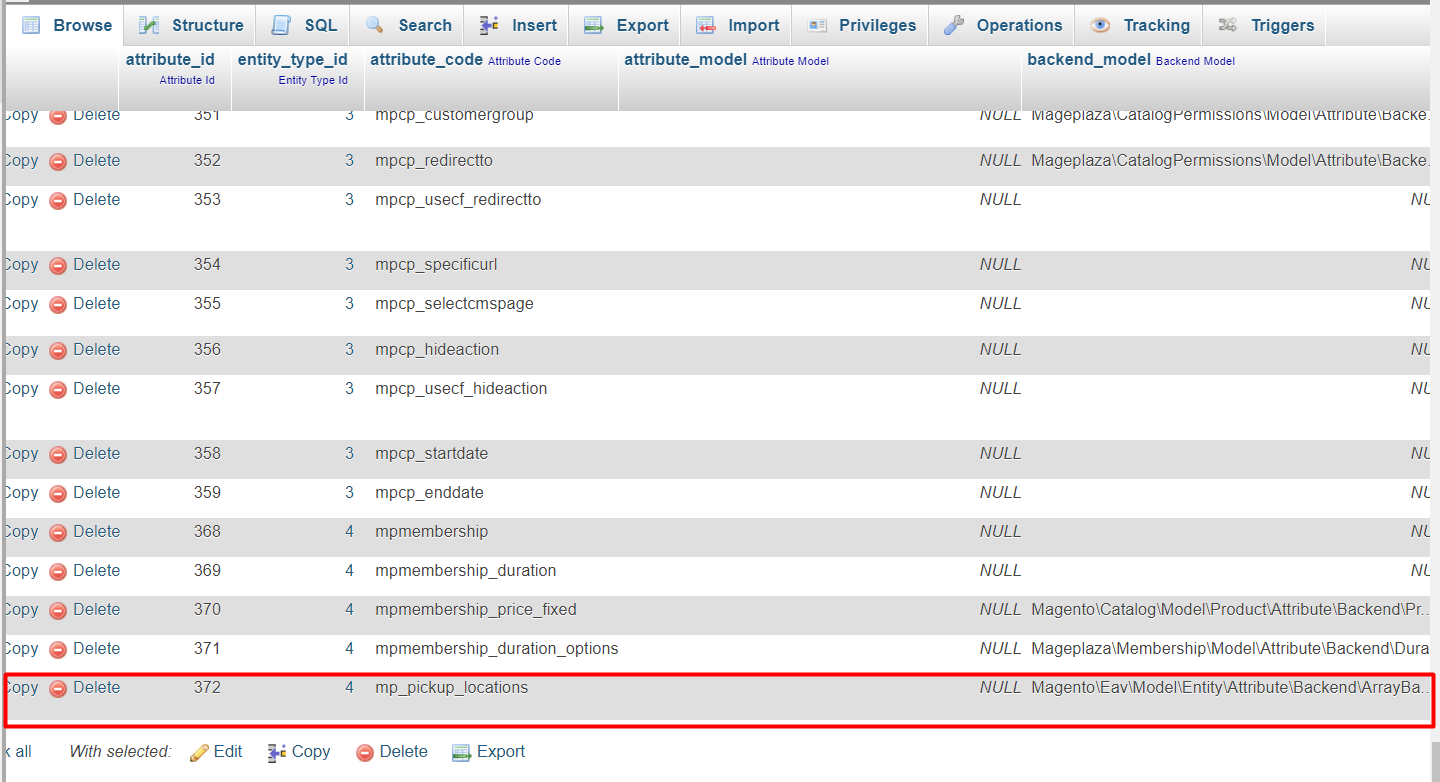
Go to database > table eav_attribute. At attribute_code, delete attribute mp_pickup_locations
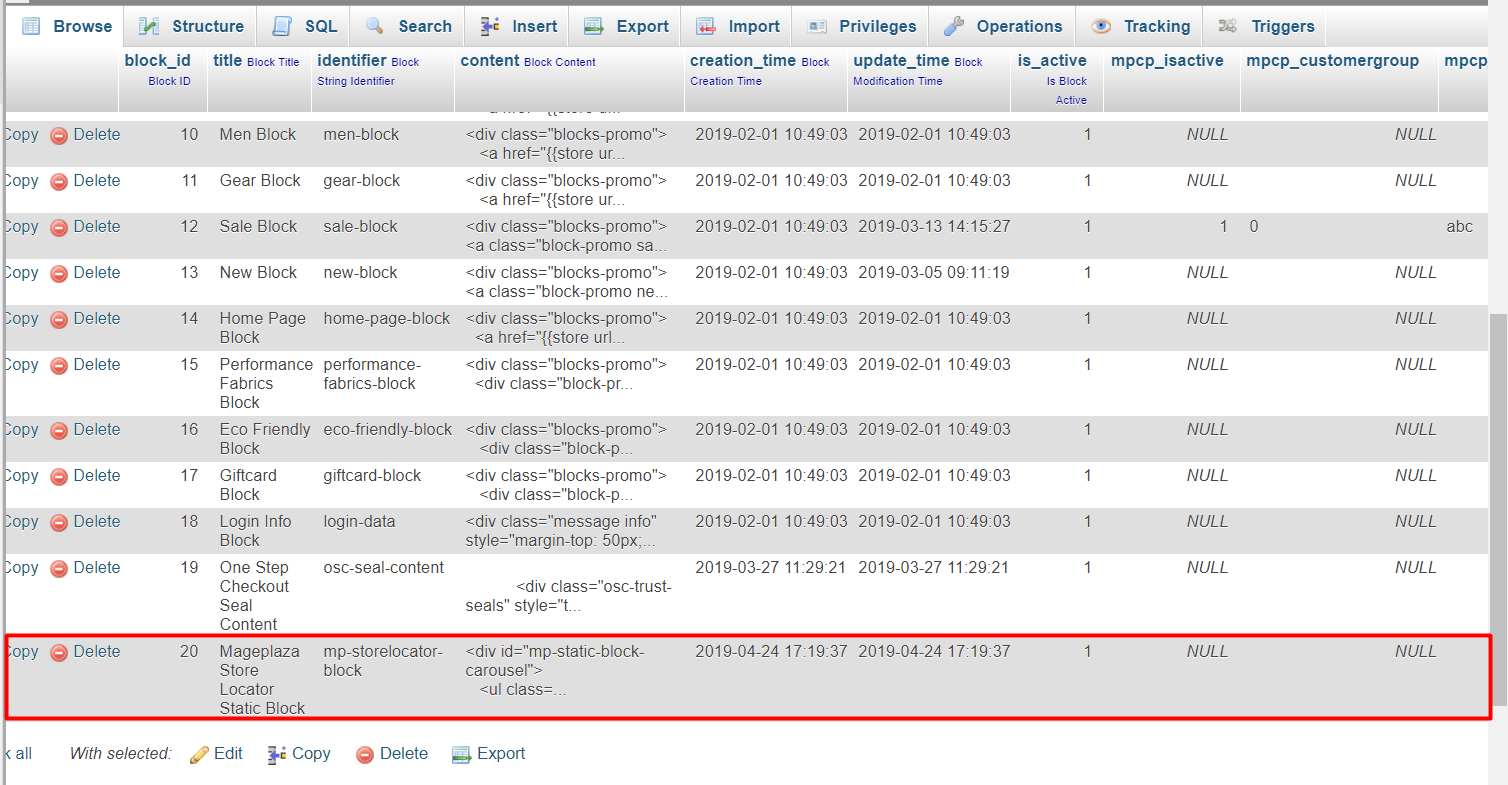
Next, go to mp_cms_block then delete mp-storelocator-block
FAQs
Support and Assistance
1. Customer Support
For any assistance, please visit our support page or email us at cs@mageplaza.com/ sales@mageplaza.com
2. Create a Ticket
If you have technical issues, please open a ticket at this link.
3. Operating Hours
Our support team is available during the following hours:
- Monday to Friday: 8:00 AM - 23:59 PM
- Saturday: 8:00 AM - 12:00 PM
- Sunday: Closed
4. Refund Policy
We understand that sometimes things don't go as planned. Please review our refund policy for detailed information: Refund Policy Link
5. Frequently Asked Questions (FAQ)
For quick answers to common questions, please visit our FAQ page: FAQ Page Link