Product Feed
Overview
If customers sell their products on a variety of channels such as Google Shopping, Ebay, Amazon, etc and these channels use the same database, then they can automatically update their items by importing the exported data files from the original channels. Thanks to this, store owners can save more time and manage their sales channels with ease. That's also an awesome feature from Mageplaza Product Feed extension.
Outstanding Features
| Outstanding features | Description |
|---|---|
| Customize Feed templates | Apart from 5 default feed templates ( XML, TXT, CSV, XLS, TSV), users can increase the variety of their website by self-customizing their own templates. This aims to find the most suitable template for your website's content as well as attract more visitors. |
| Synchronize products with Google Shopping API, Facebook API | To reduce the workload, this module supports synchronizing the products to GG shopping API as well as Facebook API. This also helps to reach out to more potential customers and enhance the revenue of your store. |
| Filtering and displaying | Not only support admin filtering products based on attributes, but admin also can set the limitation for products. |
| Mapping categories | Assist admins in arranging delivery times, checking change logs, and importing category maps for products |
| Product Feed Revenue Report | This feature helps admins monitor website performance through reporting charts (column and pie), and clearly understand the operating situation of the entire store. |
Installation
We offer two methods for installing our plugins: the Copy & Paste method and the Composer method. Please follow the detailed instructions provided below.
Method 1: Installation via Copy & Paste
To install our plugins using the Copy & Paste method, kindly follow the instructions at the link below:
How to Install Magento 2 Extension via Copy & Paste
Method 2: Installation via Composer
Composer name: mageplaza/module-product-feed
To install our extensions using Composer, please refer to the comprehensive guide at the link below:
How to Install Magento Extension via Composer
By following these guides, you can ensure that the installation process is handled correctly, allowing you to fully utilize the features and benefits of our plugins.
Module Update Guide
Keeping your module updated ensures optimal performance. Follow one of these steps to update your module:
By Account Dashboard: Log in to your
Mageplaza account > go to the My Licenses section > click on the Download button > choose the latest version from the popup.By composer: Kindly use the following commands to update the module via composer
composer require mageplaza/mageplaza/module-product-feed
php bin/magento setup:upgrade
php bin/magento setup:di:compile
Updating a module by Composer ensures efficient dependency management, version control, and integration with development tools, making the process faster and more reliable.
How to configure
From the Admin Panel, go to Store > Settings > Configuration > Mageplaza Extensions > Product Feed > Configuration
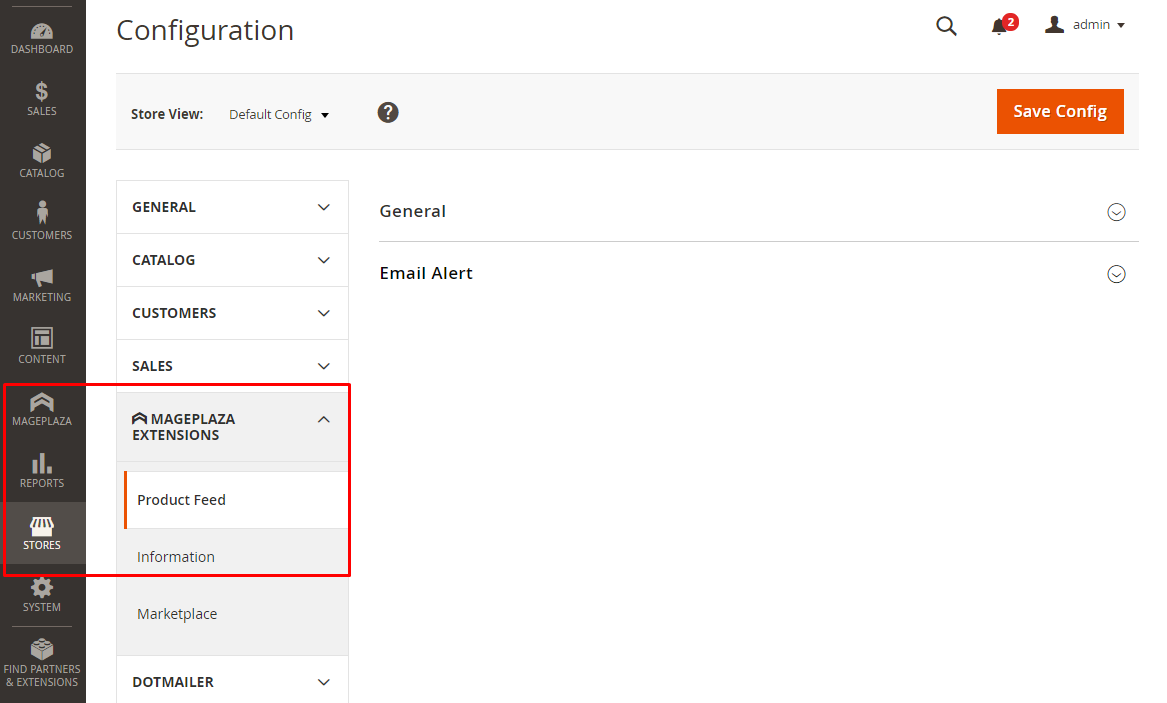
Configuration
From the Admin Panel, go to Products > Product Feed > Configuration, choose General section
General
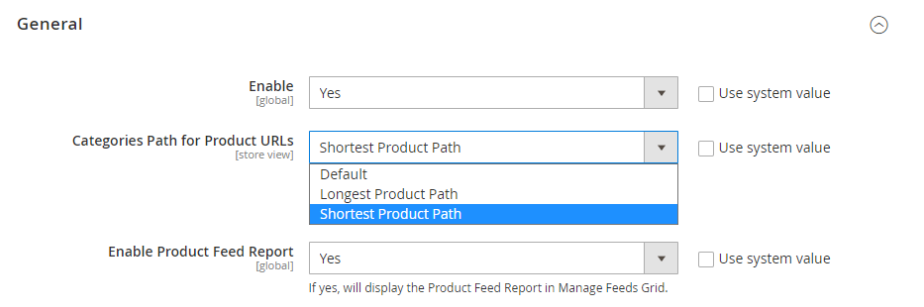
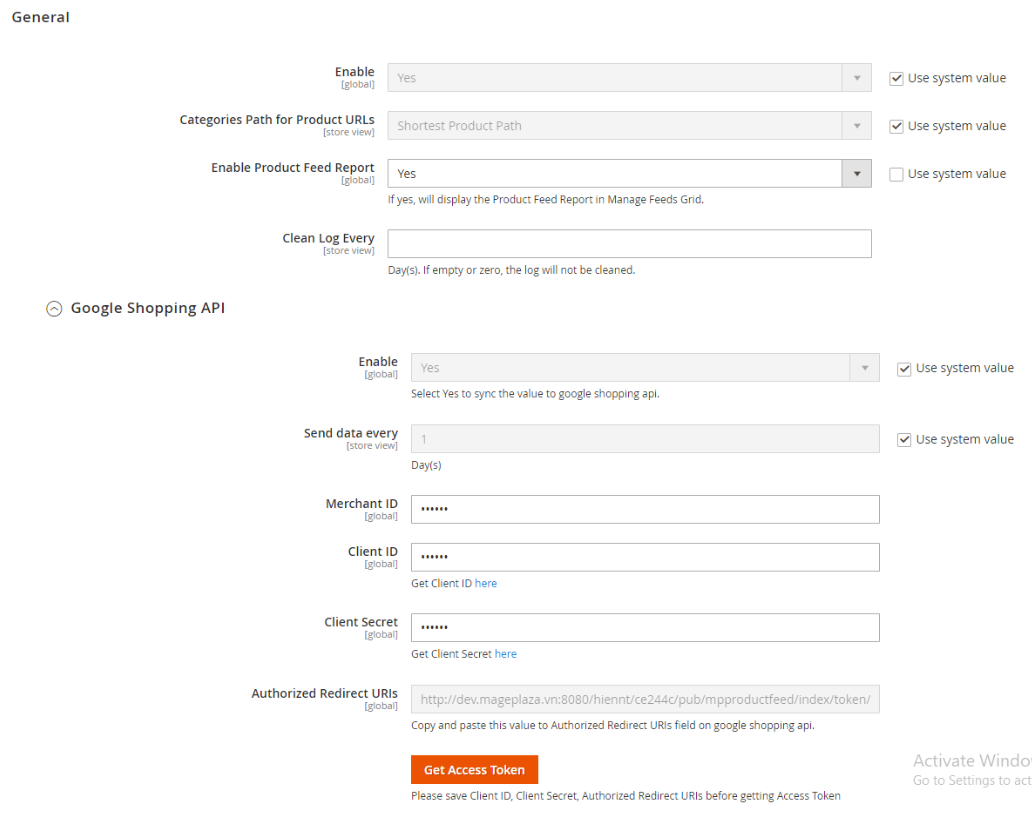
- Enable: Choose "Yes" to use this module
- Categories Path for Product URLs: Create the URL for the product. If select Default, the URl will be generated as the default Magento (Category with the smallest ID).
- Note: Categories Path is only correct when setting
Use Categories Path for Product URLs = Yes
- Note: Categories Path is only correct when setting

- Enable Product Feed Report: Select Yes to display the Product Feed Report on the Manage Feeds Grid.
- Clean Log Every: Select the number of days to clean the created logss at Feed Log after the selected time. If empty or zero, the log will not be cleaned.
Google Shopping API
This aims to guide users on how to synchronize the products from their websites to GG shopping API as well as Facebook API. The detailed instructions as below:
How to set up
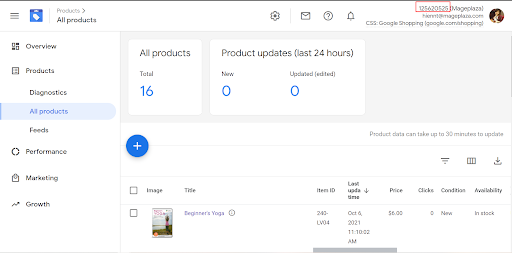
- Register an account of Google Shopping API and go to this link.
- After your account has been registered, you will see the value in the field Merchant ID. Save that Merchant ID value to connect with your website later.
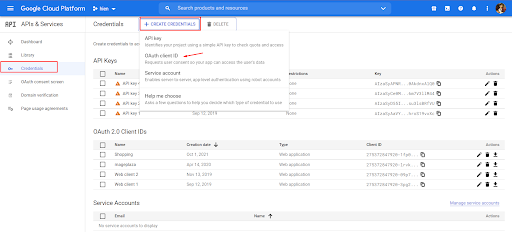
- Go to this link to get the information of Google Shopping API: Client ID and Client Secret connect with your website. Click on Create Credentials > OAuth client ID.
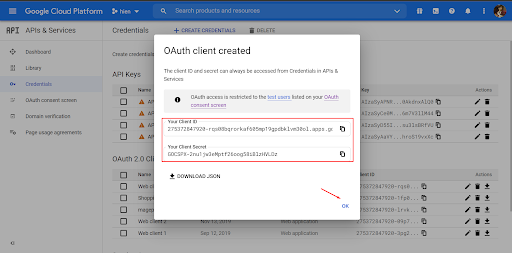
- With the field Application type, you can choose Web application, enter the information like Name. Copy and paste the value of the field Authorized Redirect URLs of your website in the field Authorized Redirect URLs of Google Shopping API. Then click Create button to complete.
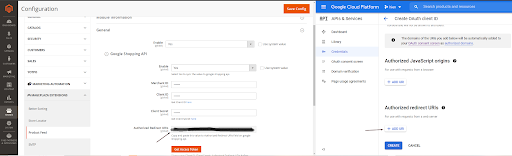
- Select Ok to complete creating OAuth client ID. Save the Client ID and Client Secret to connect with your website.
Google Shopping API
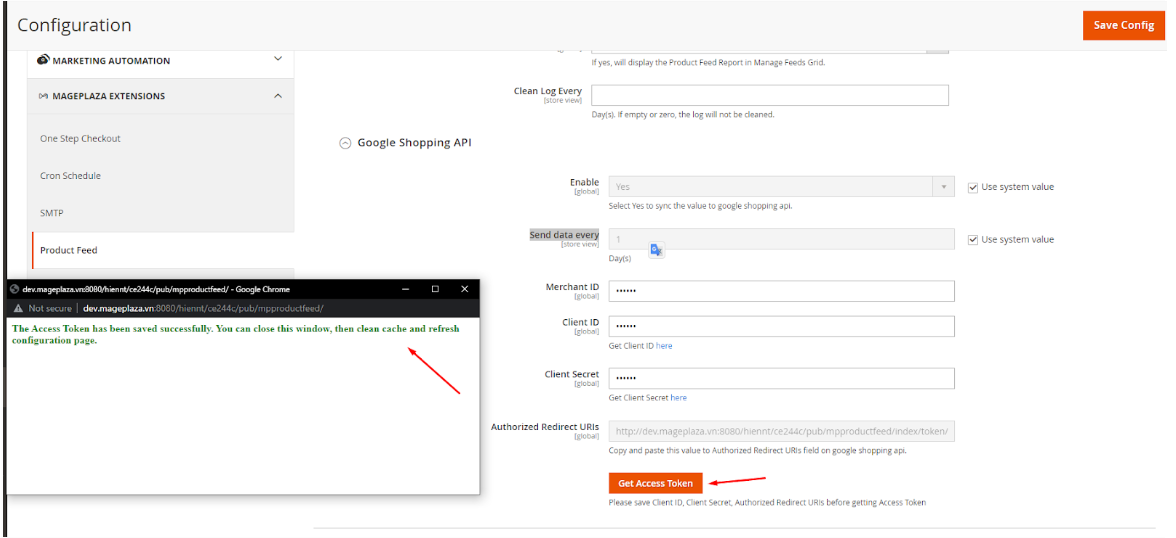
- Enable: Choose Yes to synchronize the value with Google Shopping API
- Send data every: Select the number of days in the Send data ever field. After the selected number of days, the feed data will be synced to Google Shopping API. Note that this feature is only applied to sync via cron.
- Merchant ID, Client ID, Client Secret: Enter the value of the fields you have already saved and set up here.
- Authorized Redirect URLs: Copy and paste the value of this section in URLs of the **Authorized Redirect URLs of Google Shopping API.
- Click Get Access Token button to check the connection with Google Shopping API.
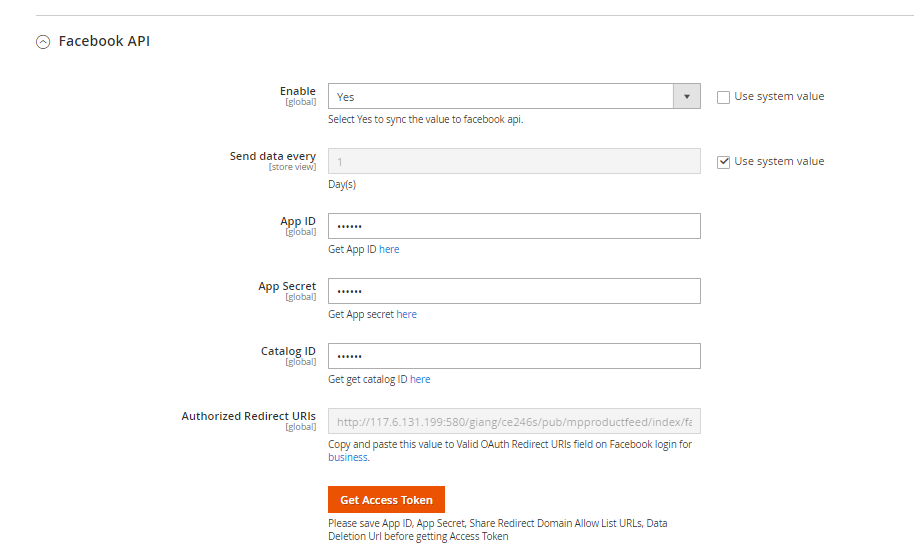
Facebook API
The purpose of this configuration is the same as that of GG shopping API
- Enable: Select Yes to sync the value to Facebook API.
- Send data every: This is the part that automatically syncs Facebook feed data from the customer's website to the Facebook page. It will automatically sync after the selected time. The default time is 00:00. After syncing the facebook feed to the facebook page, the time will be fixed at 3:00 a.m to synchronize data from the feed on the facebook page to the item.
- App ID, App secret, Authorized Redirect URIs

How to configure Facebook API:
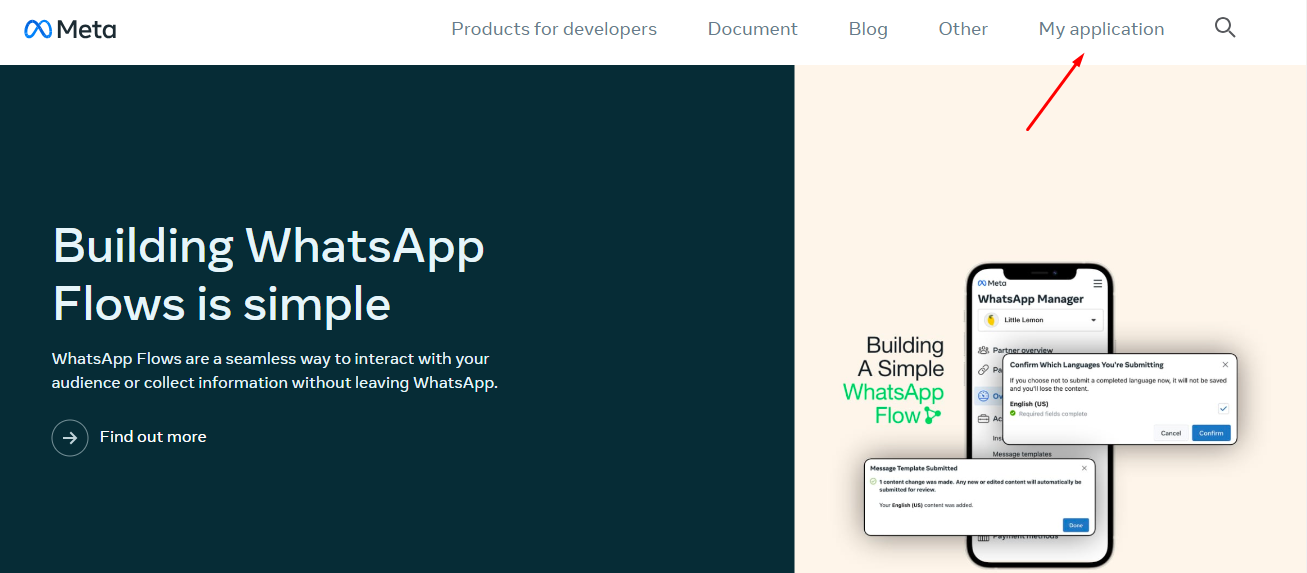
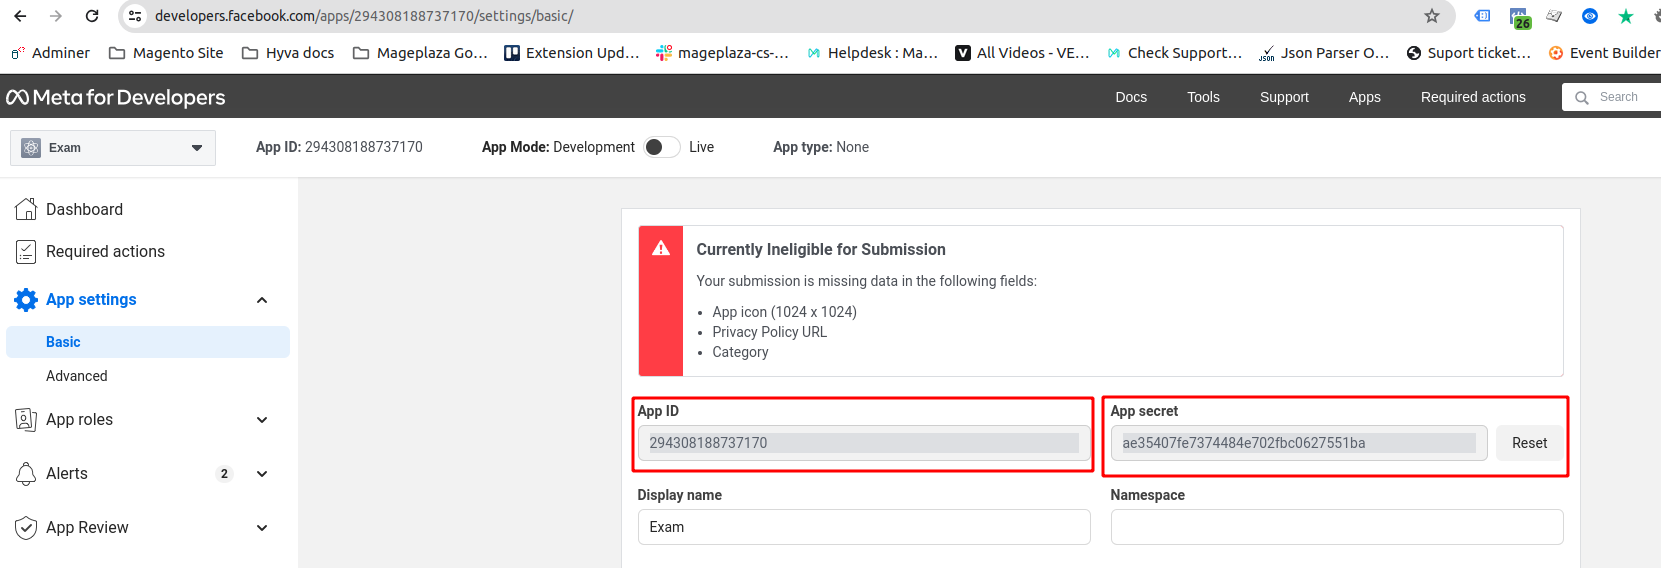
- Head to the Facebook Developers portal https://developers.facebook.com/apps and log in using your Facebook credentials.
- Login Facebook by click on Login or Create a new Facebook account. After that, click on My App from the Apps menu at the top, then click Create Apps to create your new app
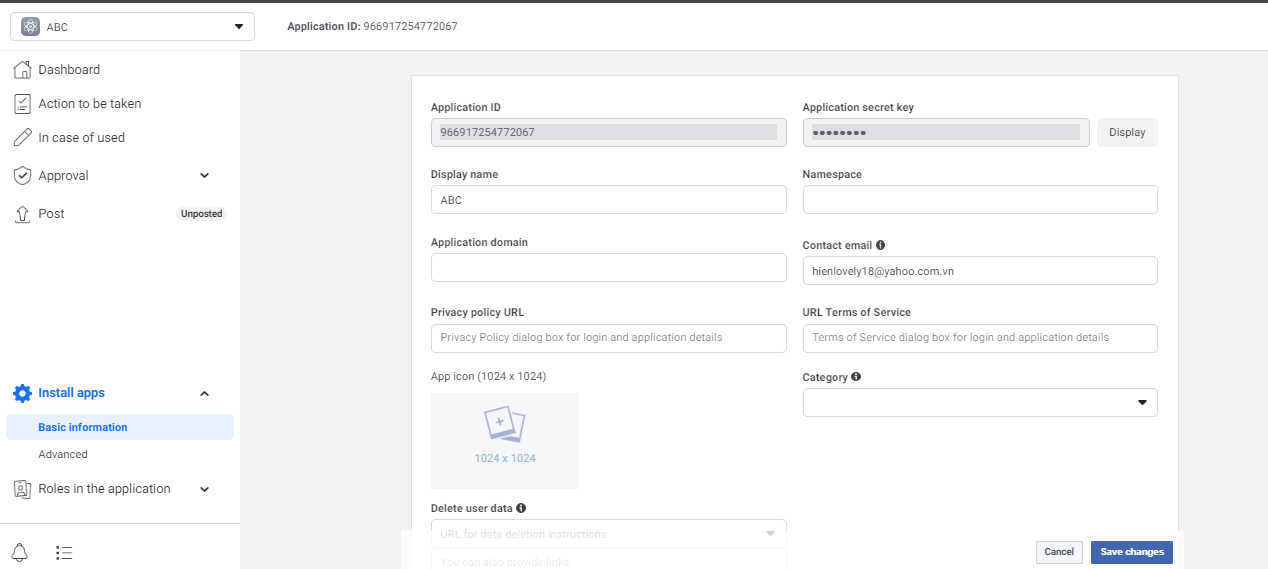
- Then, redirect to the app creation page. Fill out Display name, Email for your app
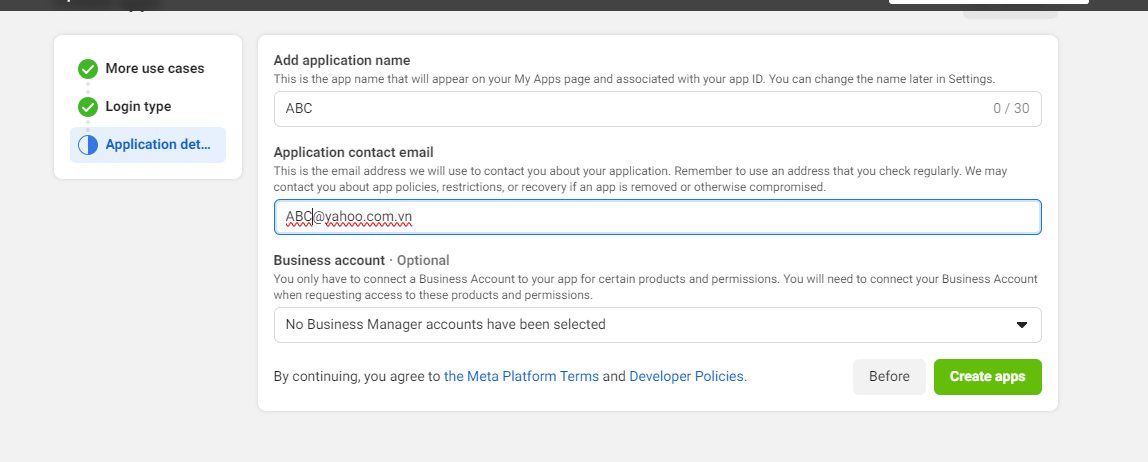
- Next, at page Basic, enter the url in App Domains, Site URL and URL Privacy Policy fields. They should match with the current hostname example.com. Here, get information from the App ID and App Secret fields to enter into the Facebook Api section on your website
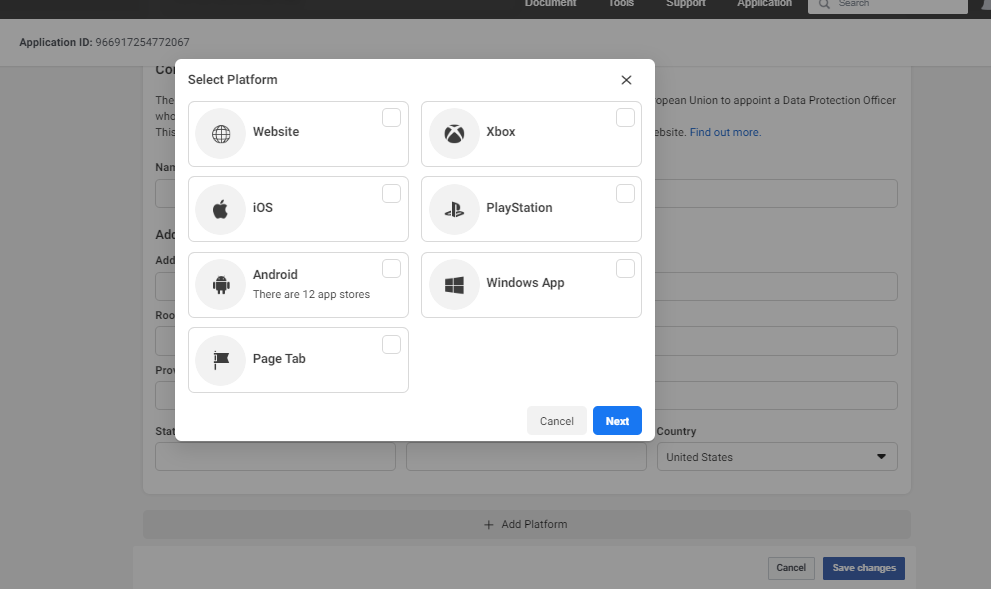
- Click Add platform to add Site URL.
- On the Advanced page, get the Authorized Redirect URIs from our Product Feed settings in the backend
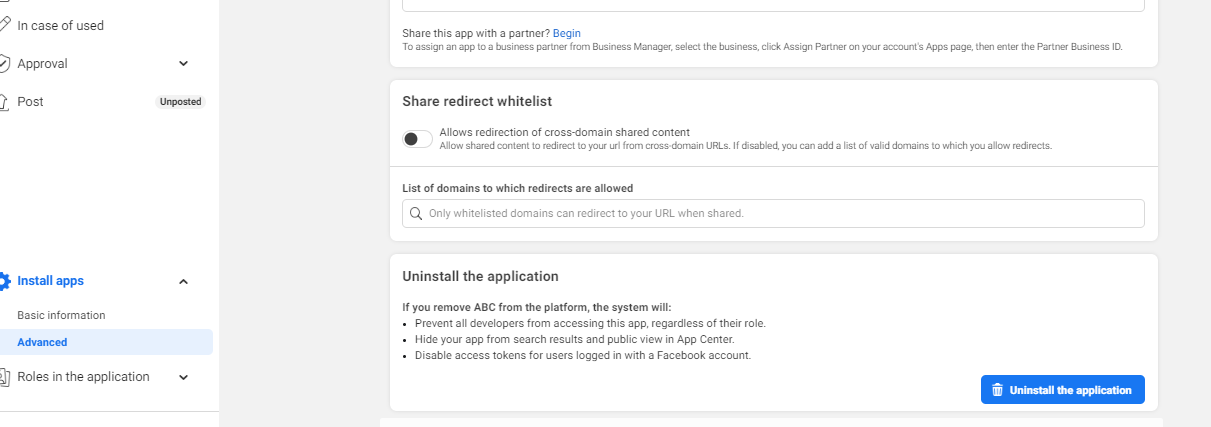
- Click Add product from the navigation bar to perform Facebook setup. As the Step 5, at Facebook Login > Settings: copy Authorized Redirect URIs and paste in the Share Redirect Domain Allow List field.
- Add Permissions & Verification by going to App Review and select Permissions and Features
- Access to the Basic page, get, and insert APIs into API fields in the extension's settings in the Admin console.
And that's it!
If, for some reason, you still can't manage to create an application for Facebook, you can ask for support
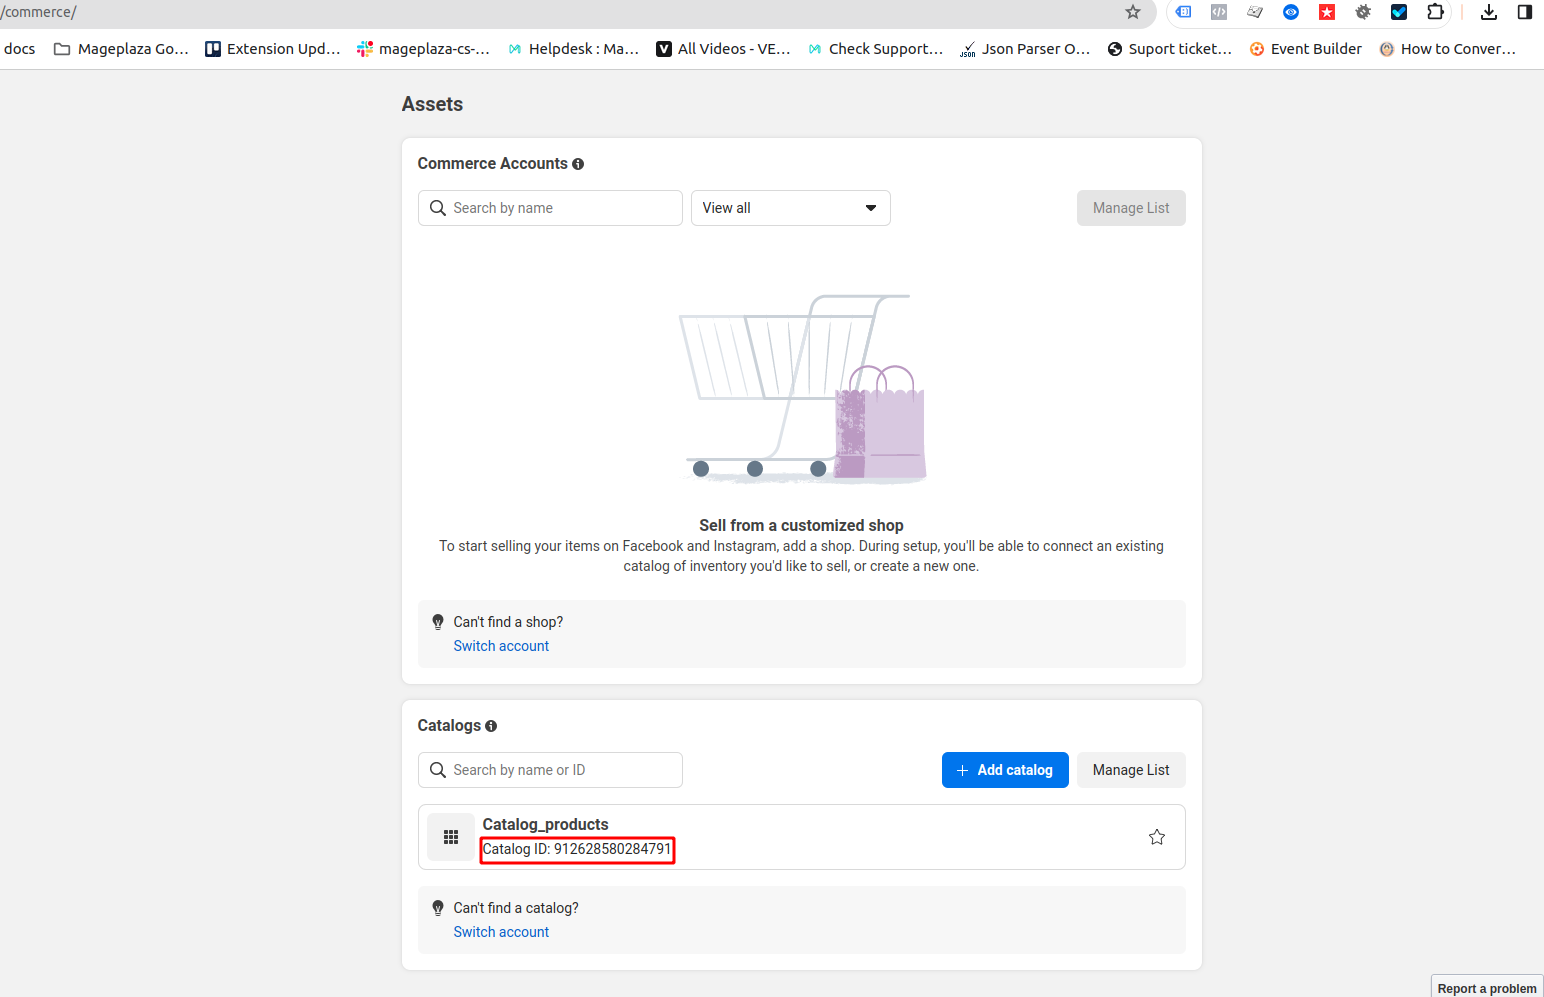
Catalog ID
- Go to Commerce Manager.
- Use the drop-down menu in the left-hand menu to select your business portfolio. Then, use the second drop-down menu to select the shop that you want to use in your ad.
Note: If you do not see the second drop-down menu, you may need to first select your commerce account. You can do this under Assets.
- With your shop selected, click Settings in the left-hand menu.
- Click Catalogue.
- Your catalogue details will appear under Catalogue name.
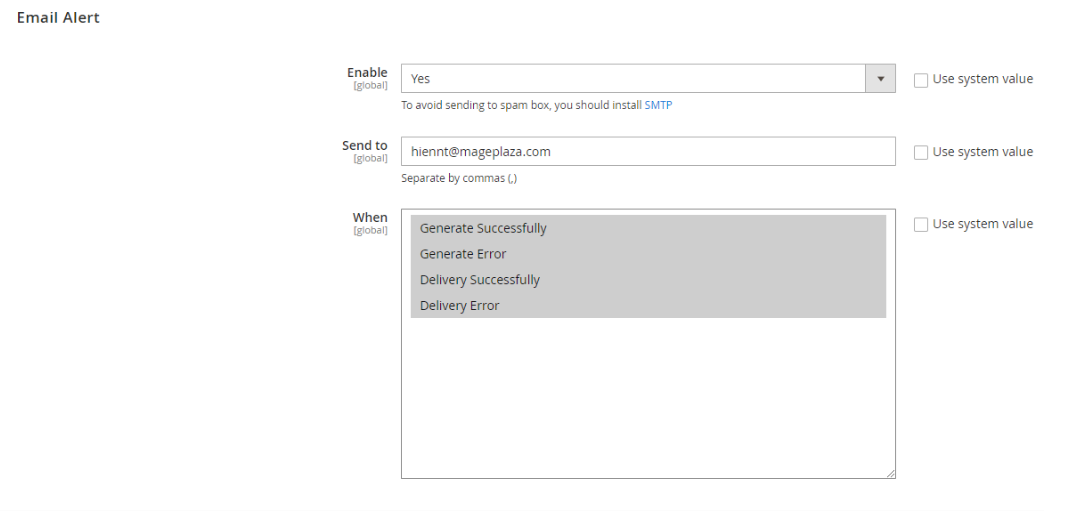
Email Alert
Enable Email Alert means that every action is made, and there will be a notification sent to the specified emails. There can be 1 or many actions, depending on the need of admins.
Enable: Choose "Yes" to enable the email notification for store owners
Send to:
- Enter the email to send the notification
- Allow entering multiple emails. These emails are separated by commas.
When:
- Choose the events that when it happens, the email notification will be sent
- Be able to choose many events at once
Report
The Report section is now separated from Manage Feeds into a new title. From the Report, the admin can follow all the created feeds with the most basic information such as name, status, etc.
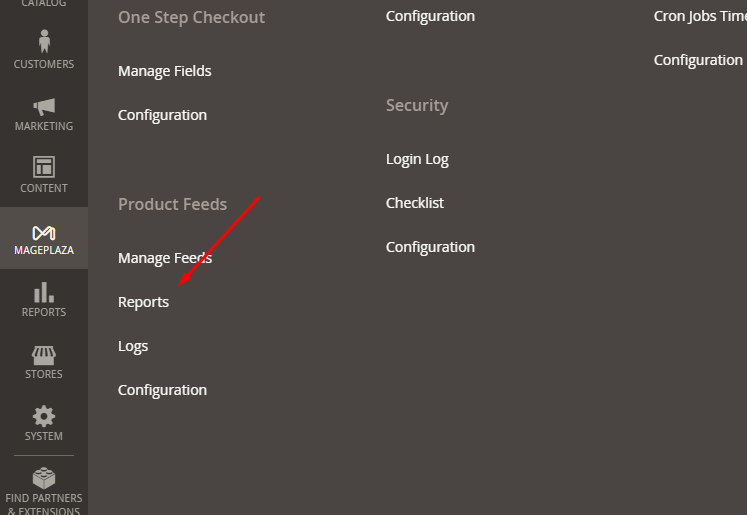
- From the Admin Panel, go to Catalog > Product Feeds > Report
This is where all created feeds are displayed.
Here admins can have basic information of the feed such as: ID, Name, Status, File Type, Execution Mode, Store, Action, Click, Impression, CTR,...
Admins can select Action if they want to Delete, Generate, or Change Status Feed.
Besides that, admins can also Filter, Export, Hide/Show the Columns
Note: CTR (Click through rate)= (Click/ Impression) * 100%
- Click: the number of clicks in the product link uploaded to the app or the feed file
- Impression: the number of views of the product link uploaded to the app or the feed file
Sync Facebook including:
- Sync Manual: Only sync Facebook when the feed file has been generated
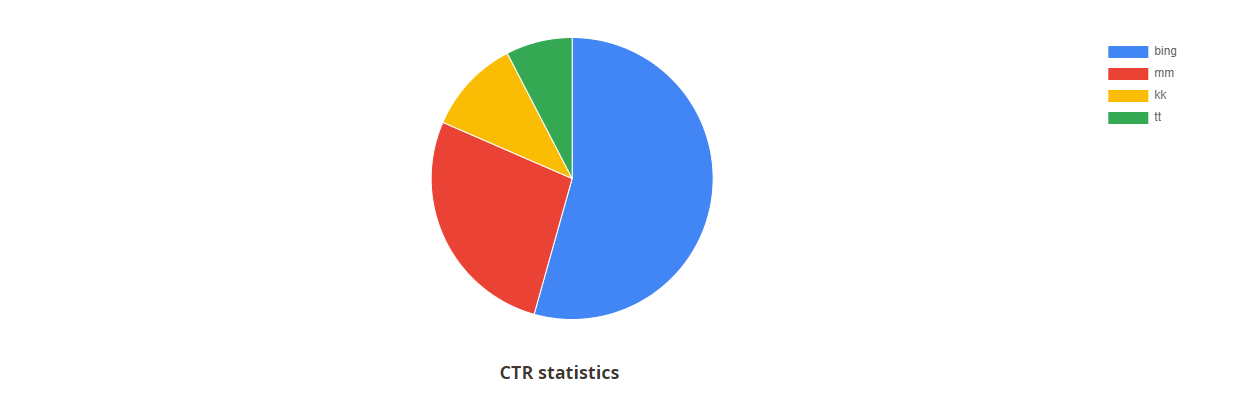
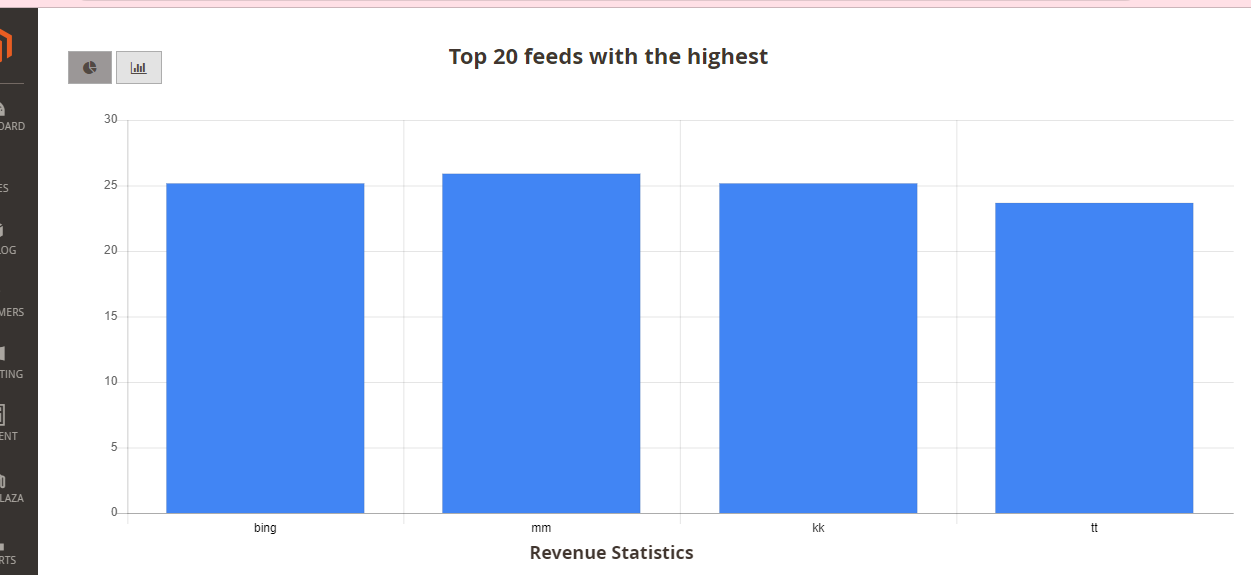
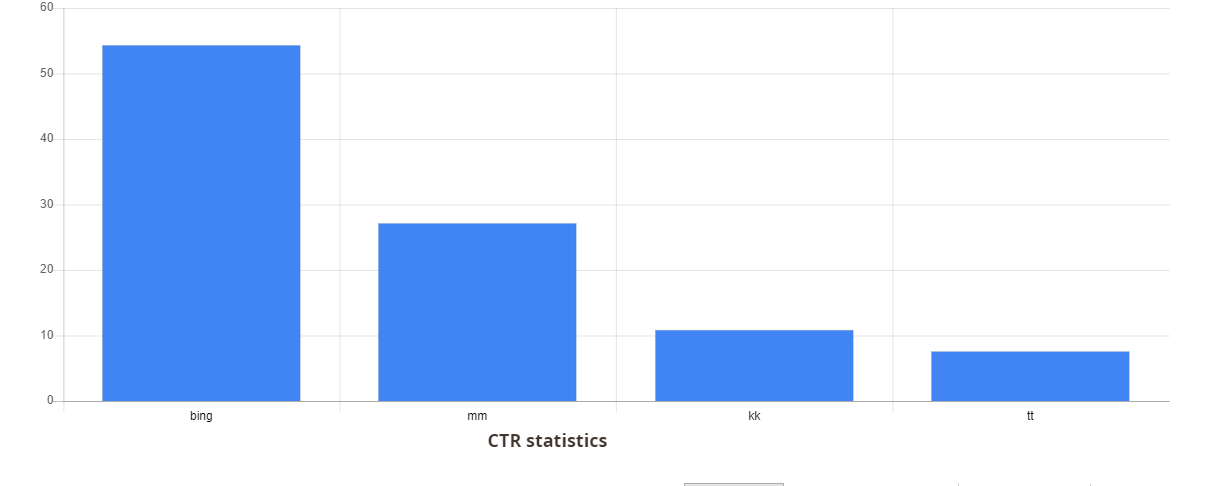
Product Feed Revenue Report
The Revenue Report is based on the statistics of the ordered products uploaded to the feed file or the app. The pie and column charts shown are the results of the Total Revenue field, with the top 20 feeds with the highest revenue. This helps the admin manage the website’s productivity.
Report information includes:
- Pie and column charts including Revenue statistic and CTR statistics
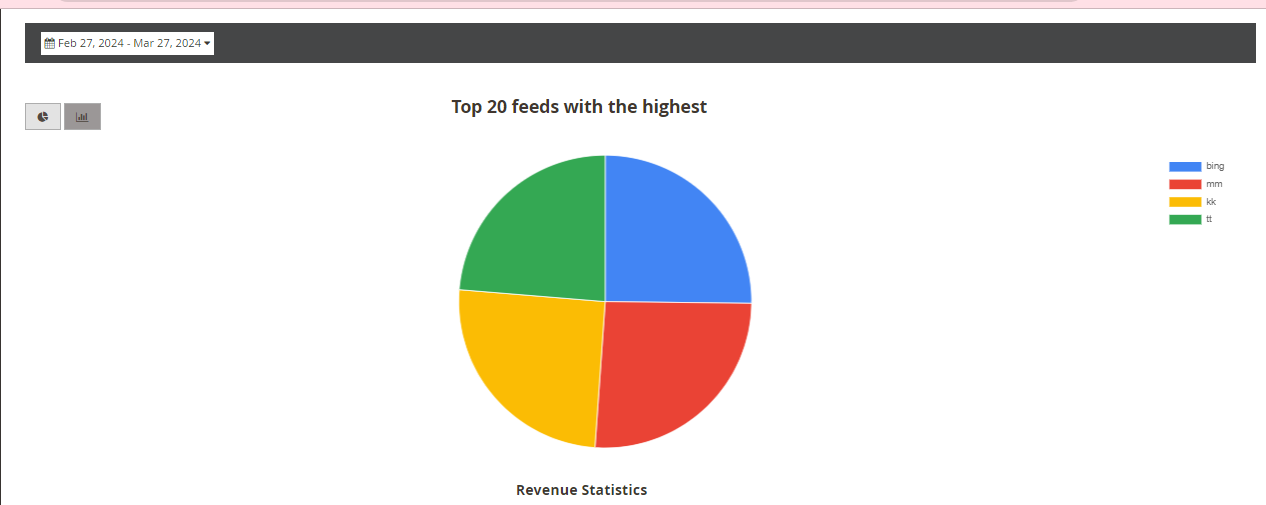
- Grid includes: pagination, filter, export, information on ID, name columns,...
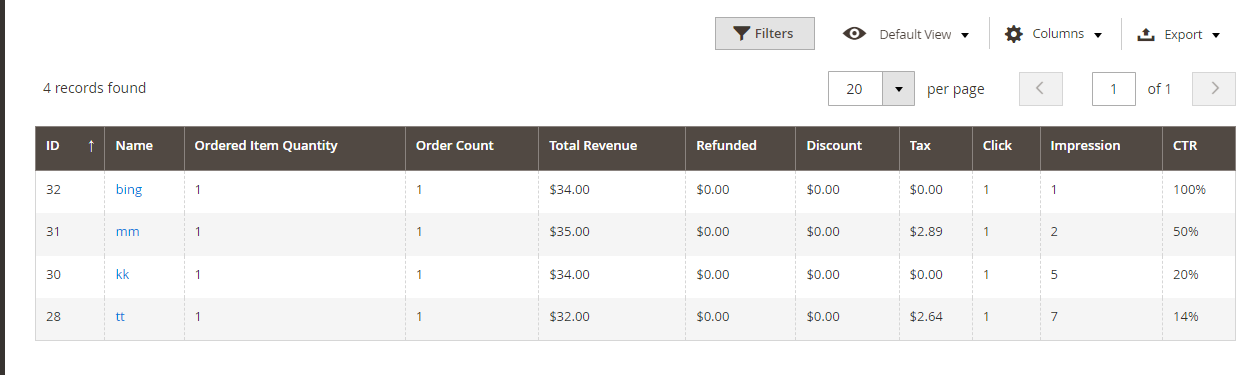
Note: Total Revenue and Refunded do not include the shipping fee.
How to create New Feed
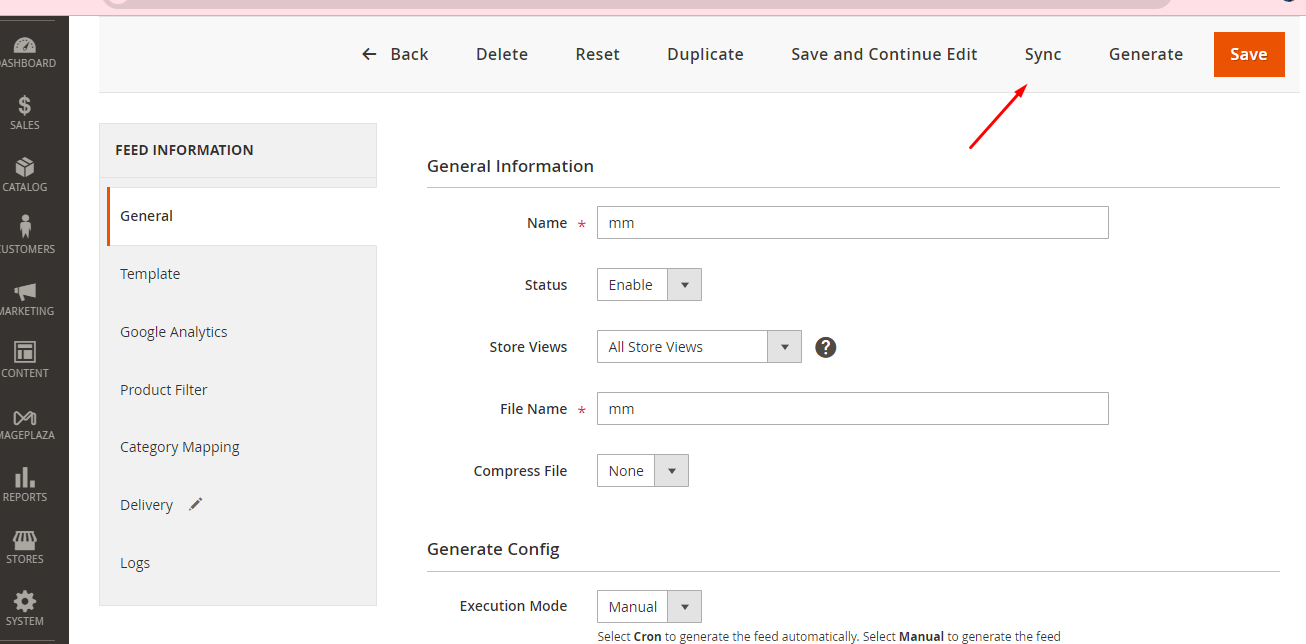
- Step 1: Enter full information of General field
- Step 2: Choose Template type
- Step 3: Enter full information of Google Analytics
- Step 4: Choose the condition to export the file
- Step 5: Enter the Category Map for products
- Step 6: Setup the method to send the exported file
- Step 7: Check the update history of the exported file
Step 1: Enter full information of General field
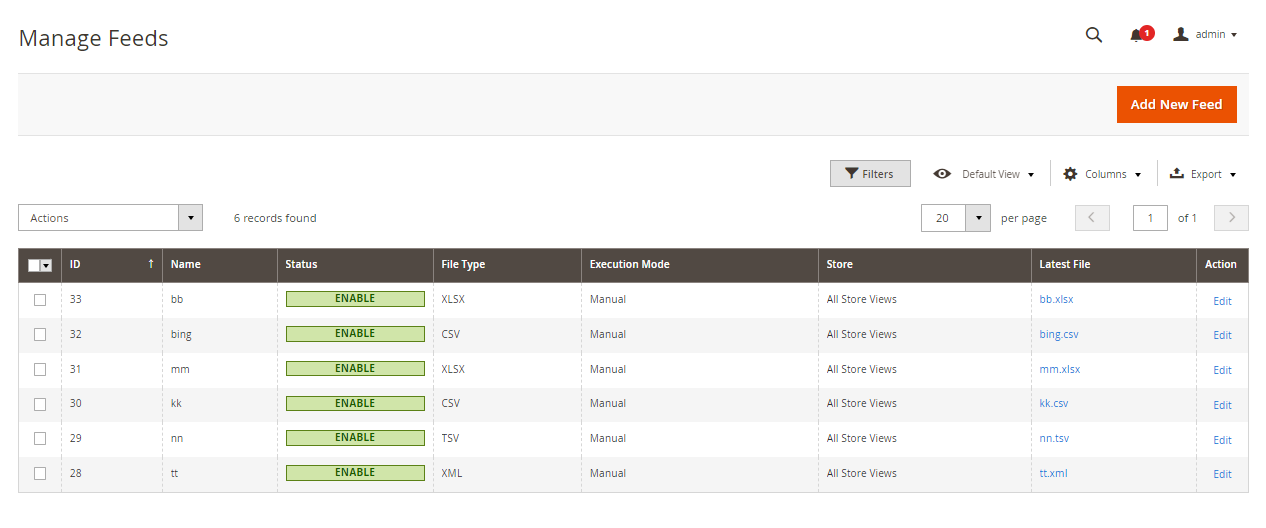
From the Admin Panel, go to Products > Catalog > Product Feed > Manage Feeds
In the right corner, choose
Add New FeedbuttonName: Enter the display name in the Grid Feed for the export type
Status: Choose Enable to auto-update the products when running cron
Store Views: Choose the store to get that store’s product and generate the file
File Name: Enter the export file name to send to the server
Compress File: Choose the format to compress the file when downloading
Generate Config: Choose the export type
Execution Mode = Manual: Allow generating the file manually
Execution Mode = Cron: Auto-generate the file, depend Frequency & Cron Run Time field
- Frequency = Daily: Auto-generate the file daily
- Frequency = Weekly: Auto-generate the file weekly
- Frequency = Monthly: Auto-generate the file monthly
- Cron Run Time: Setup the time to auto-generate the file at the time that you have setup. Please note that the time of Cron Job will be the timezone of UTC

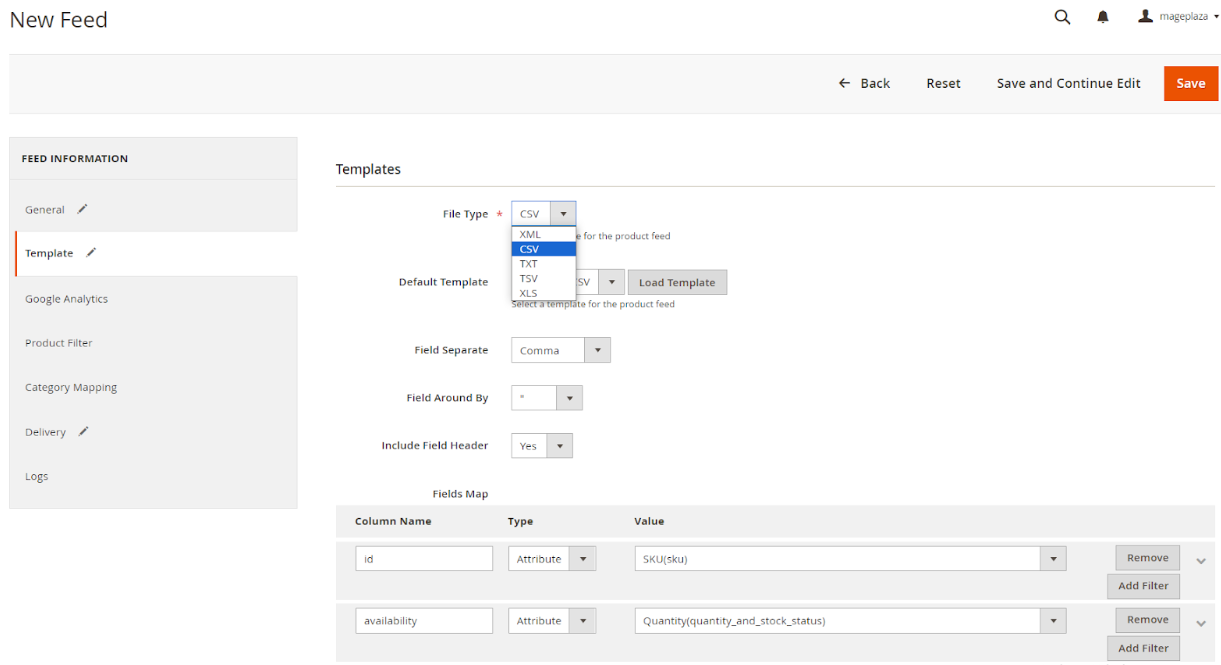
Step 2: Choose Template type
- Template is updated with Bing Ads CSV, Facebook XML, TSV, XLSX
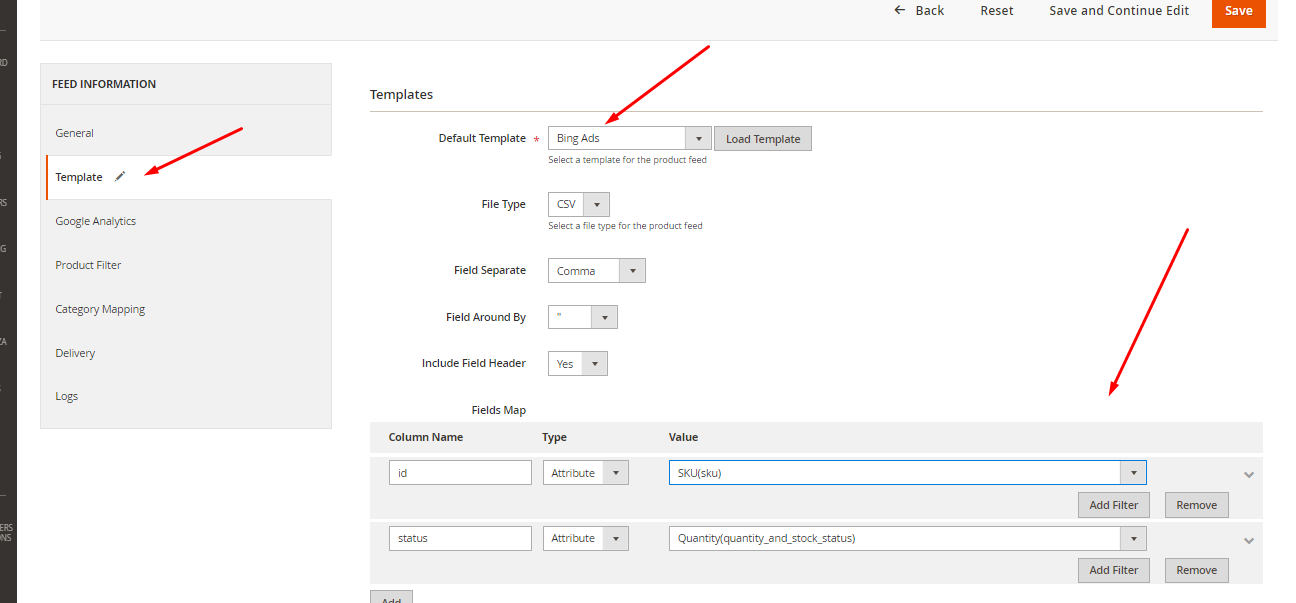
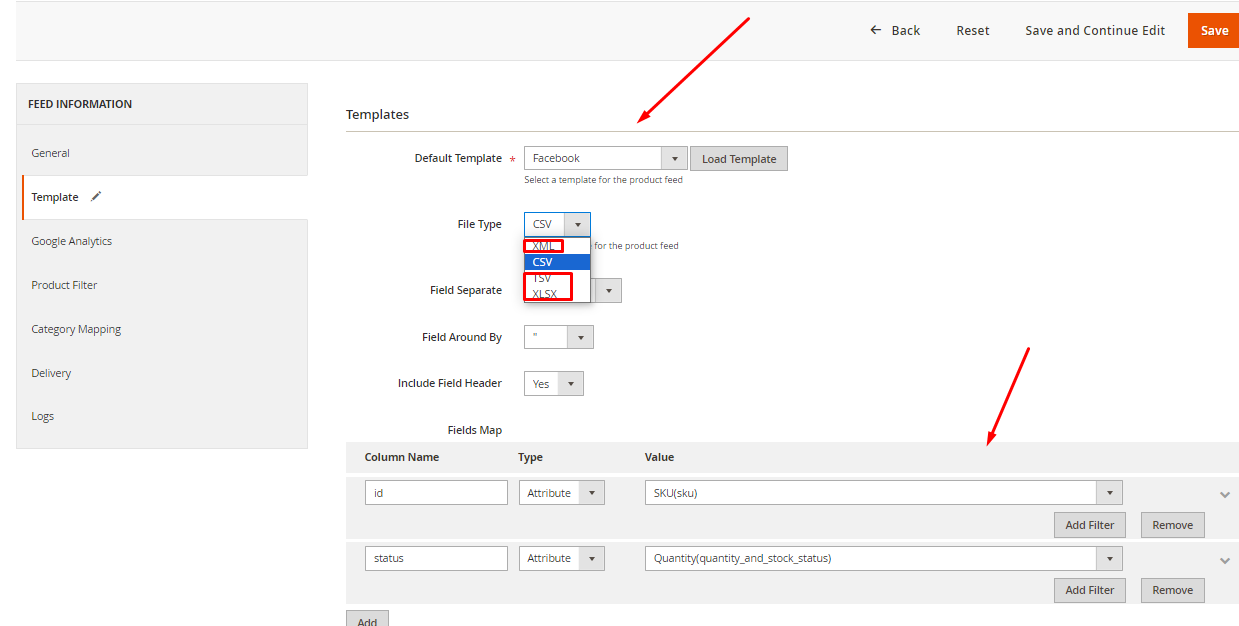
Select the template format to export the file. There're 5 template formats. They are: Google Shopping, Google Shopping Review, Amazon Inventory, Amazone Marketplace, Facebook, Ebay and you can choose to customize as your preference.
After selecting the Default Template, it will depend on File Types including: TXT, CSV, and XML, TSV, XLS
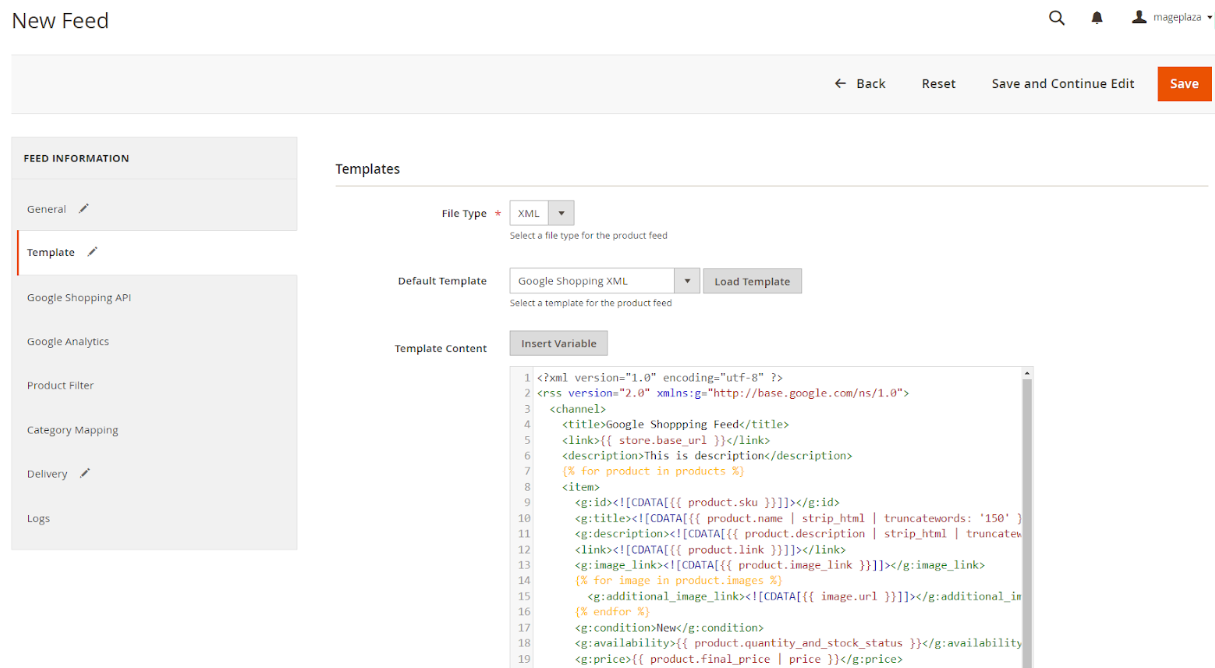
Click on the
Load Templatebutton to display the template contentFor the template format is XML:
- Template content: The template content is displayed in this field. Admins can edit the template content here.
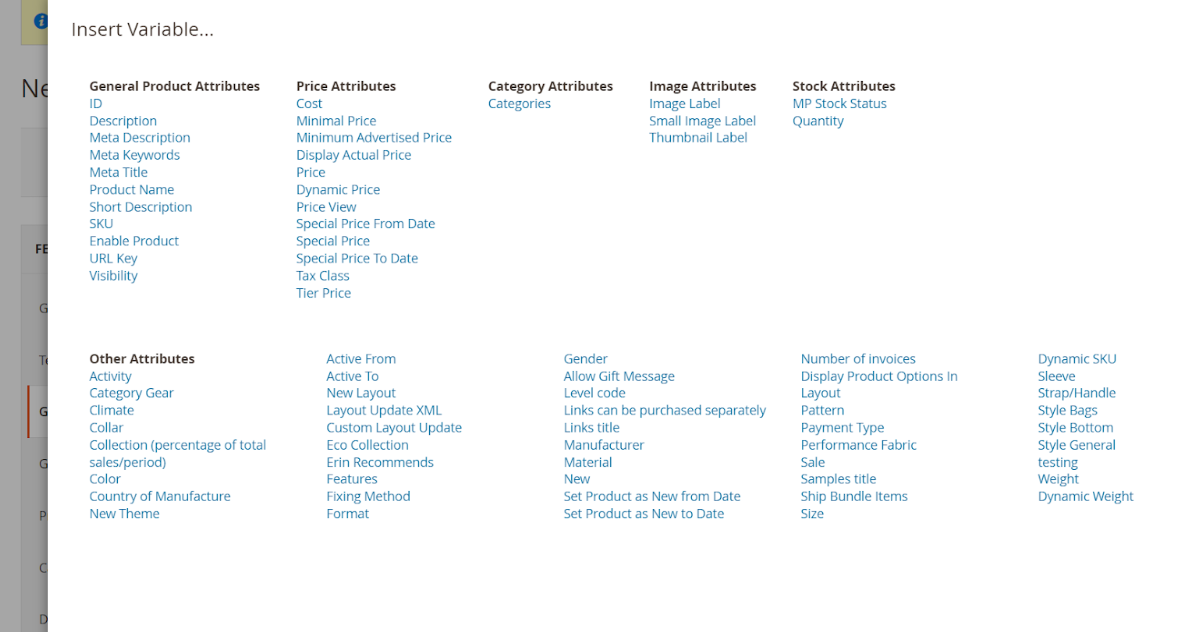
- Add the values to the template by clicking on the
Insert Variablebutton.
- For the template format is CSV
- Choose the character separating the fields when exporting the file in the
Field Separatefield - Select the character surrounding the fields when exporting the file in the
Field Aroundfield - To get the header field when exporting the file, choose "Yes" in the
Include Field Headerfield - Allow adding any value you want into the
Fields Mapfield. Please note that: The added values must be standard of Google or Facebook or Ebay, Amazon.
- Choose the character separating the fields when exporting the file in the
Step 3: Enter full information of Google Analytics. These values will be added into URL of the product to know what the search engine is, what analytic keyword is, etc.
- Enter the value for the
Campaign Sourcefield - Enter the value for the
Campaign Mediumfield - Enter the value for the
Campaign Namefield - Enter the value for the
Campaign Termfield - Enter the value for the
Campaign Contentfield
Step 4: Product Filter: Choose the condition to export the file. All products meeting the conditions will be exported.
Here you can select the conditions for the feed. Only apply the rules for products meeting the conditions.
Maximum Product Displayed on Preview Product: Enter the maximum number of products shown in the Preview Product. If left empty, the number of displayed products when clicking the Preview Products button will not be limited.
Step 5: Enter the Category Map for products. Admins can choose and classific according to the availabe suggestions. For the categories with the same level, it will get the classification type of the top-level category.
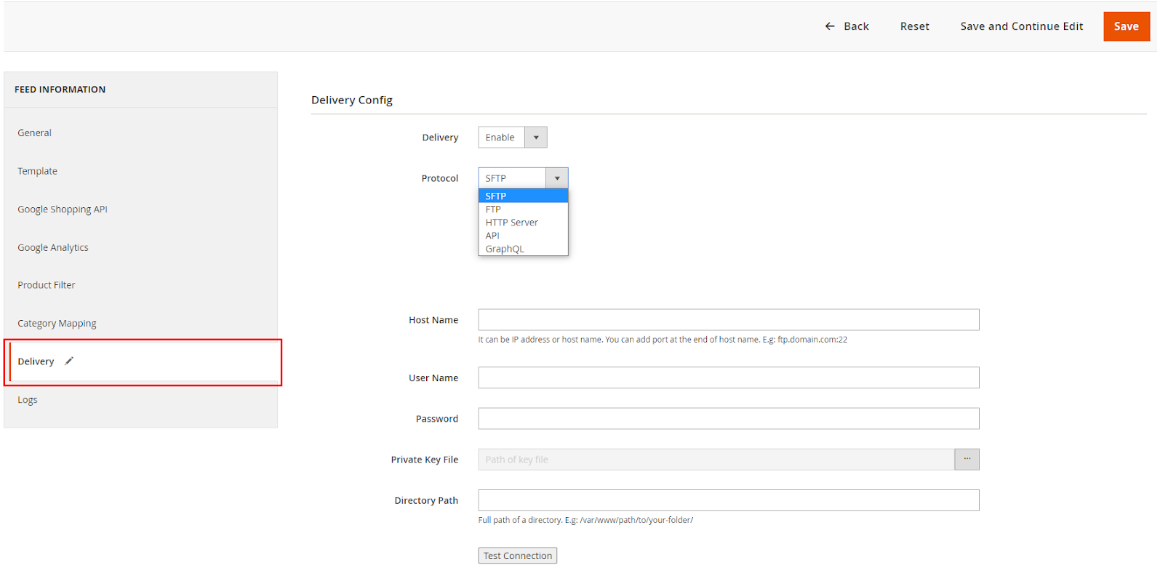
Step 6: Setup the method to send the exported file
- Delivery Config: Setup the method to send the exported file to the server
- To send the exported file to the server, choose "Yes" in the
Deliveryfield - Choose the method to send the file in the
Protocolfield: FTP or SFTP, HTTP Server, API, GraphQL.- For the FTP protocol, you can add the selection to use
Passive Modeor not. We recommend that you should this mode to avoid being blocked by firewalls/NATs/proxies from sending files to the server. - HTTP Server: Send to the HTTP server by sending POST request. For example: https://httpbin.org/post
- API / GraphQL: Send the feed file to API, GraphQL by sending POST, GET,... requests. For example: http://mageplaza/rest/V1/mpProductfeed/feed/file/, http://mageplaza/graphql,...
- For the FTP protocol, you can add the selection to use
- Enter the host name in the
Host Namefield - Enter the user name in the
User Namefield - Enter the password to access the host in the
Passwordfield - Private Key: Click [...] and choose key file to connect with the server. You can skip choosing key file when your server can connect without key file.
- If you want to save the file, only enter the path in the
Directory Pathfield. Note: You need to set the name the export file at the end of the path - Request URL: Show this field when selecting Protocol as HTTP Server, API, GraphQL. Enter URL to send POST, GET,... request to HTTP Server, API; GraphQL.
- Headers: Show this field when selecting Protocol as HTTP Server, API, GraphQL. Enter content to send POST, GET,... request. For example: Content-Type: application/json
- To check whether it is connected to the host, press
Test Connection
- To send the exported file to the server, choose "Yes" in the
Step 7: Check the update history of the exported file. Admins can check the update history of the file in the Logs field.
Step 8: Synchronize product value with Google Shopping API
Choose the information of the fields in Magento appropriately to send data to Google Shopping API. This tab will appear when Template File Type = XML.
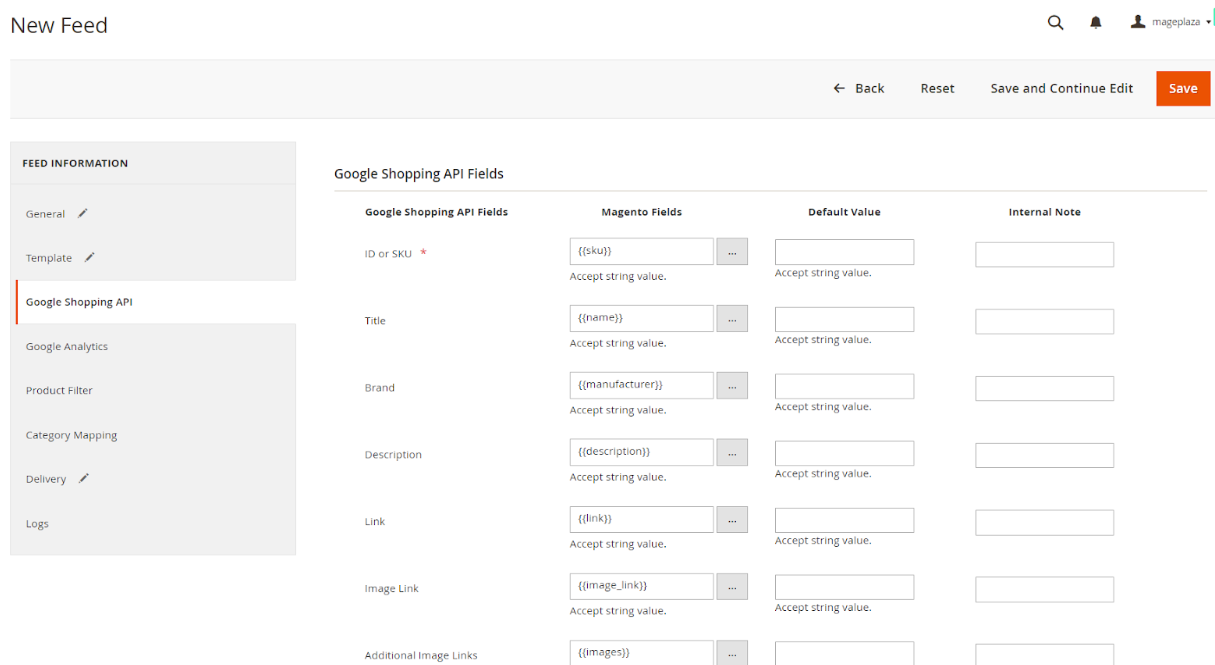
- Google Shopping API Field: Display the fields which are managed by Google Shopping API for this module based on the selected Magento fields.
- Magento Fields:
-> Fill in the Magento fields to get the data corresponding to the fields of Google Shopping API. -> If you leave this column blank or no value is existing, the Default value will be arquired and push to Google Shopping API. - Internal Note: Enter the description in the Internal Note section. This is only for admin to notice the information of the synchronization and is invaluable to data processing.
- Insert Variables: Select the Magento Fields corresponding to the fields of Google Shopping API.
- You can sync manually or sync via cron data from attributes of Magento Field to Google Shopping API.
Logs
This section will record the process of generating files including information such as status, type, notification, etc. When you click on any files, it will automatically open the file.
From the Admin Panel, go to Products > Catalog > Product Feed > Logs
After manual or auto sync Facebook, Feed Logs will be created with Sync or Sync via Cron types
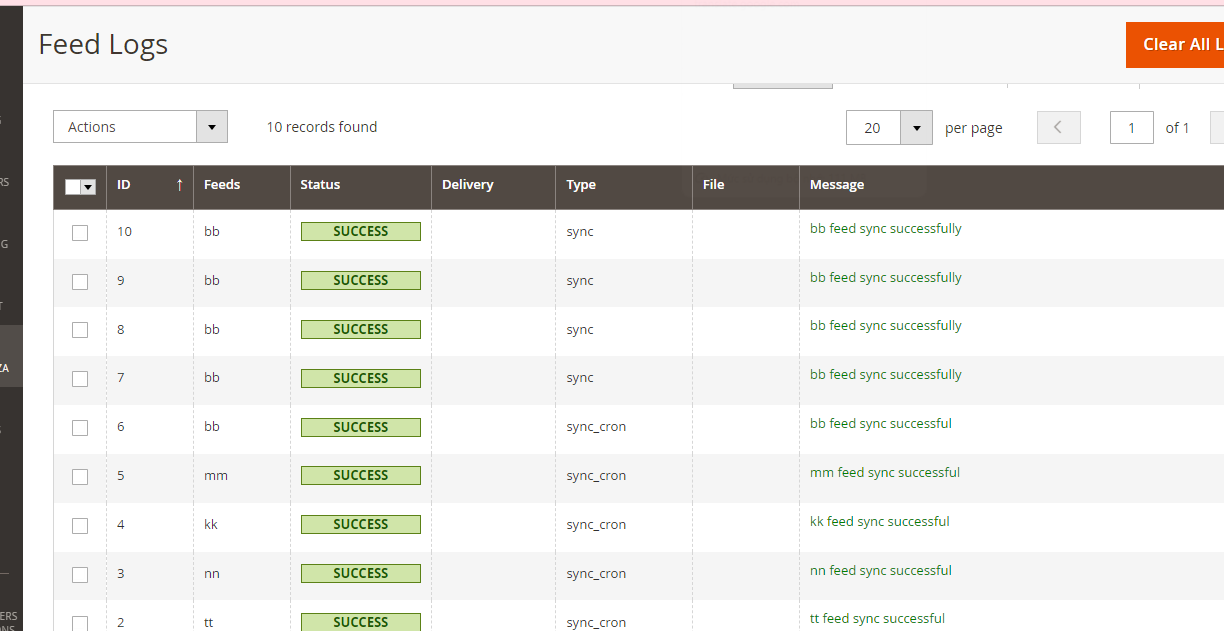
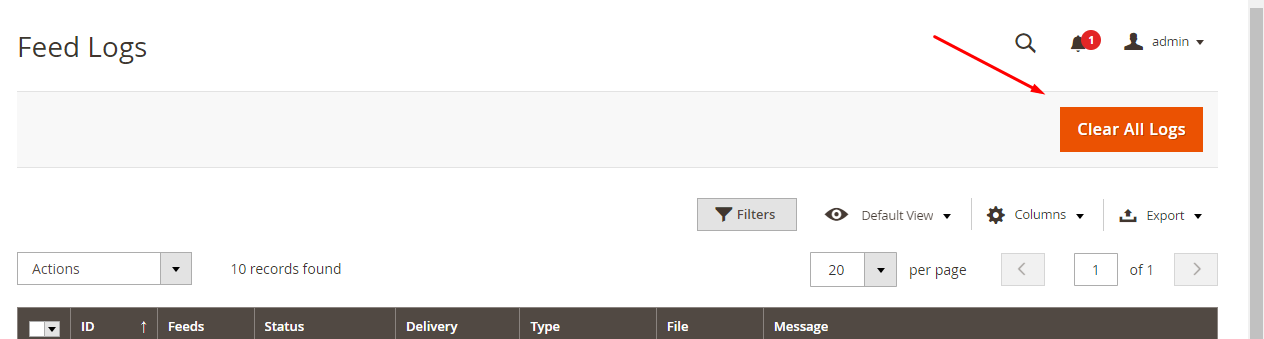
Clear All Logs Button: Delete all feed logs
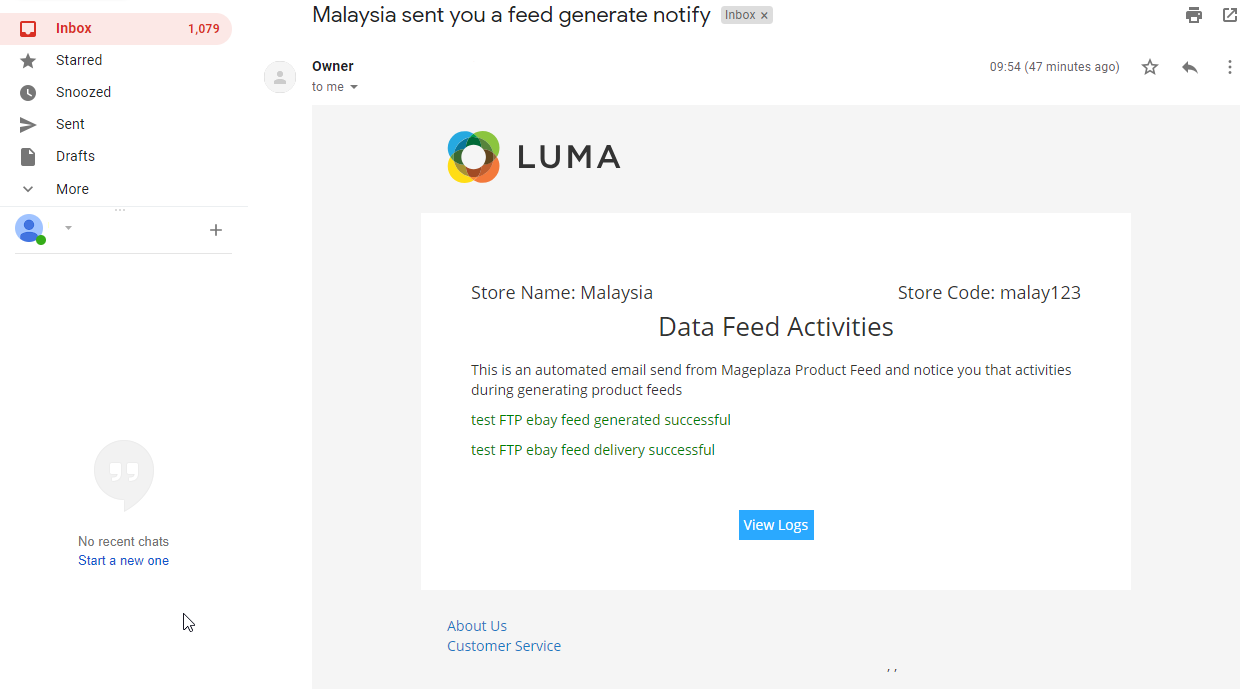
Email notification about the status of the file
Click on the View Logs, it will redirect the email recipients to the Feed Logs page to view the logs details.
How to Run Command to Generate Feed
To generate one or more feed quickly, you can run the following command line:
php bin/magento mp-productfeed:generate {id}
- In which: {id} is the Feed ID. If you do not fill Feed ID, all the feed will be generated.
- Example: Generate some feed that you want, running the command:
php bin/magento mp-productfeed:generate 1 3 4
Note:
- After installing the extension, you need to download Liquid by running the command composer require liquid/liquid or need to install the library
- When the extension is enabled, Manage Feed and Logs will be displayed
- To reload data of Report, you need to run the command:
php bin/magento mp-productfeed:report
FAQs
Maintenance
Troubleshooting Articles
For common issues and ways to fix, refer to these articles below:
- How to fix empty template issue when creating new Product Feed in Magento 2
- Magento 2 Product Feed with Skourtz Feed
- Magento 2 Product Feed filters products with attributes
Support And Assistance
1. Customer Support
For any assistance, please visit our Support Page or email us at cs@mageplaza.com/ sales@mageplaza.com
2. Create a Ticket
If you need to create a support ticket, please open a ticket at this Link
3. Operating Hours
Our support team is available during the following hours:
- Monday to Friday: 8:00 AM - 23:59 PM
- Saturday: 8:00 AM - 12:00 PM
- Sunday: Closed
Refund Policy
We understand that sometimes things don't go as planned. Please review our refund policy for detailed information:
Frequently Asked Questions (FAQ)
For quick answers to common questions, please visit our FAQ page:
Must-have extensions for your Magento stores
- Increase website traffic: SEO
- Build leads
- Increase conversion rates: One Step Checkout, Layered Navigation
- We believe that you can sell more: Gift Cards, Auto Related Products, Frequently Bought Together, Free shipping bar, Daily Deal, Product Feed
- Keep customers return: Reward Points
- Let your customer become raving fans
- Optimize your stores: PDF Invoice, Custom Order Number, Stop return items issue