Custom Stock Status
Overview
Custom Stock Status will help admin install additional stock statuses for the products. Information about the product's stock status is displayed at the frontend more accurately and clearly, giving customers better shopping experience and increasing the ability to buy from them. In particular, admins can custom stock status automatically or manually with image and text to quickly attract customers' attention with appealing status. That's the feature of Mageplaza Custom Stock Status extension.
How to download and install
- Download Mageplaza Custom Stock Status
- Install Custom Stock Status
How to use
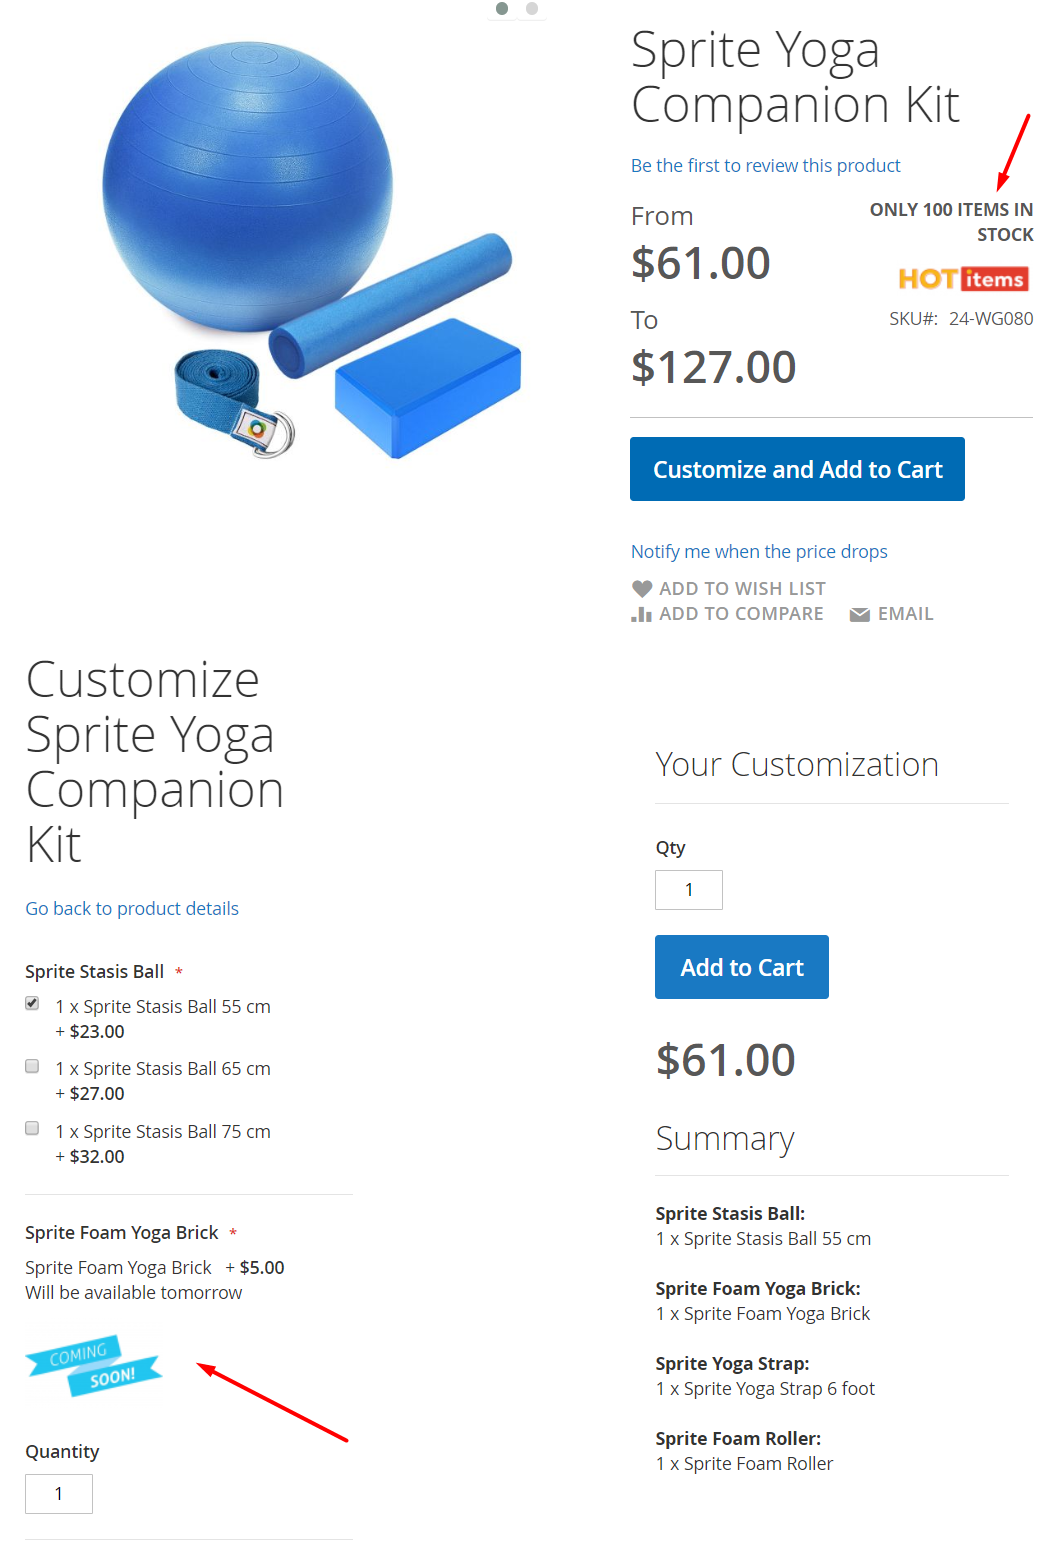
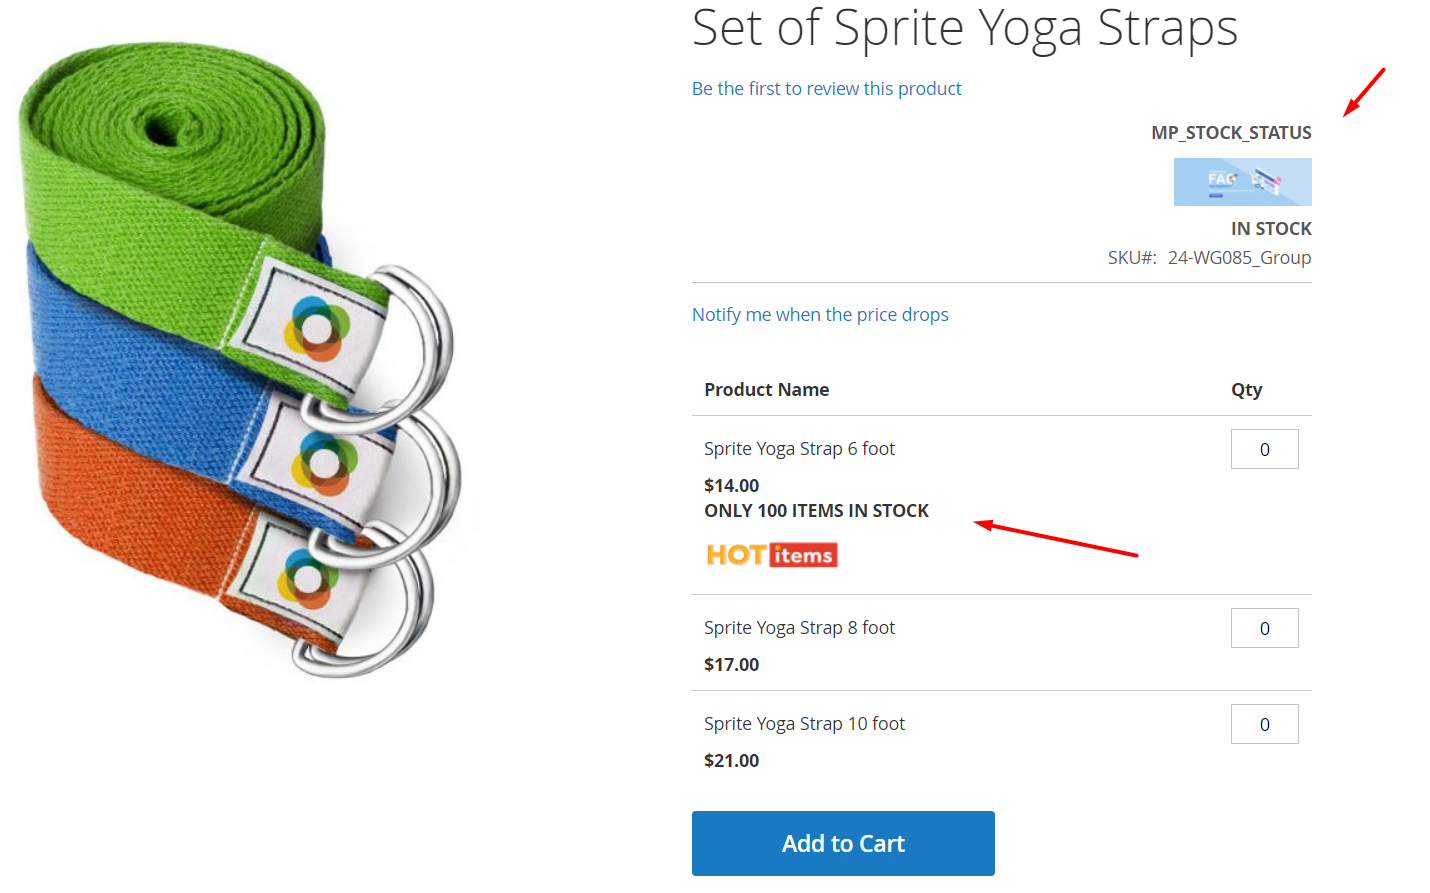
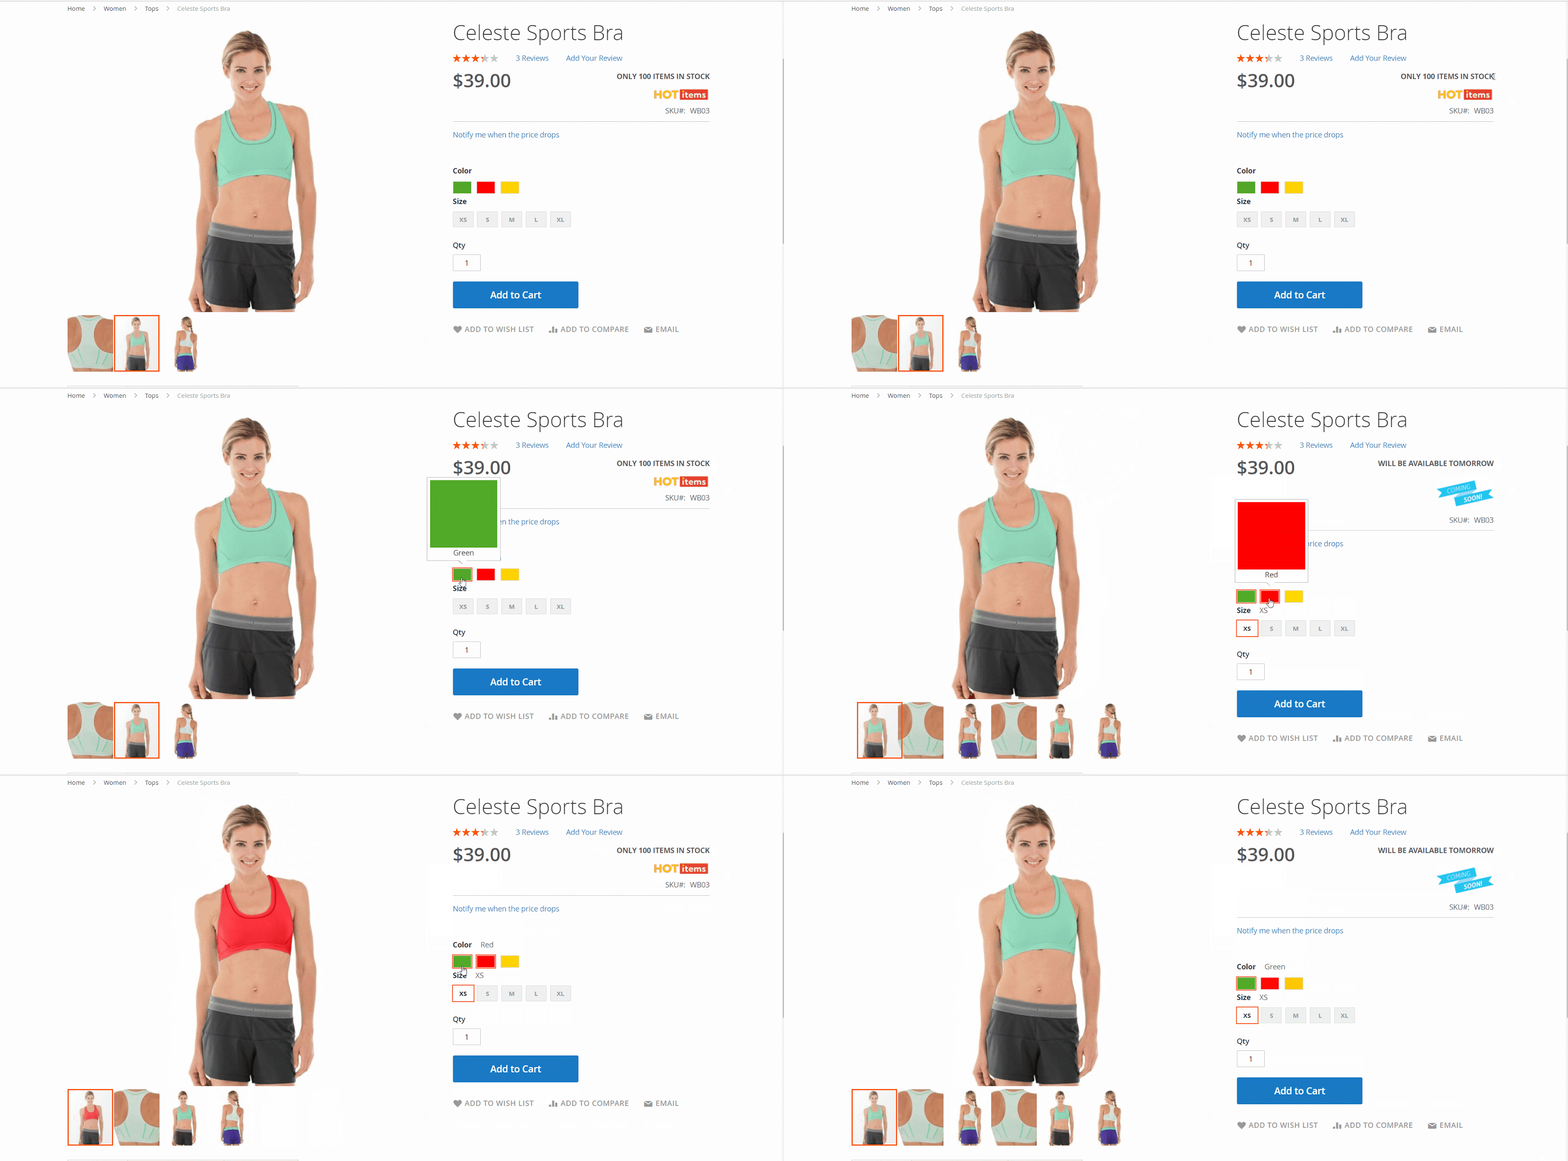
Custom Stock Status apply for the followign product types:
- Simple Product
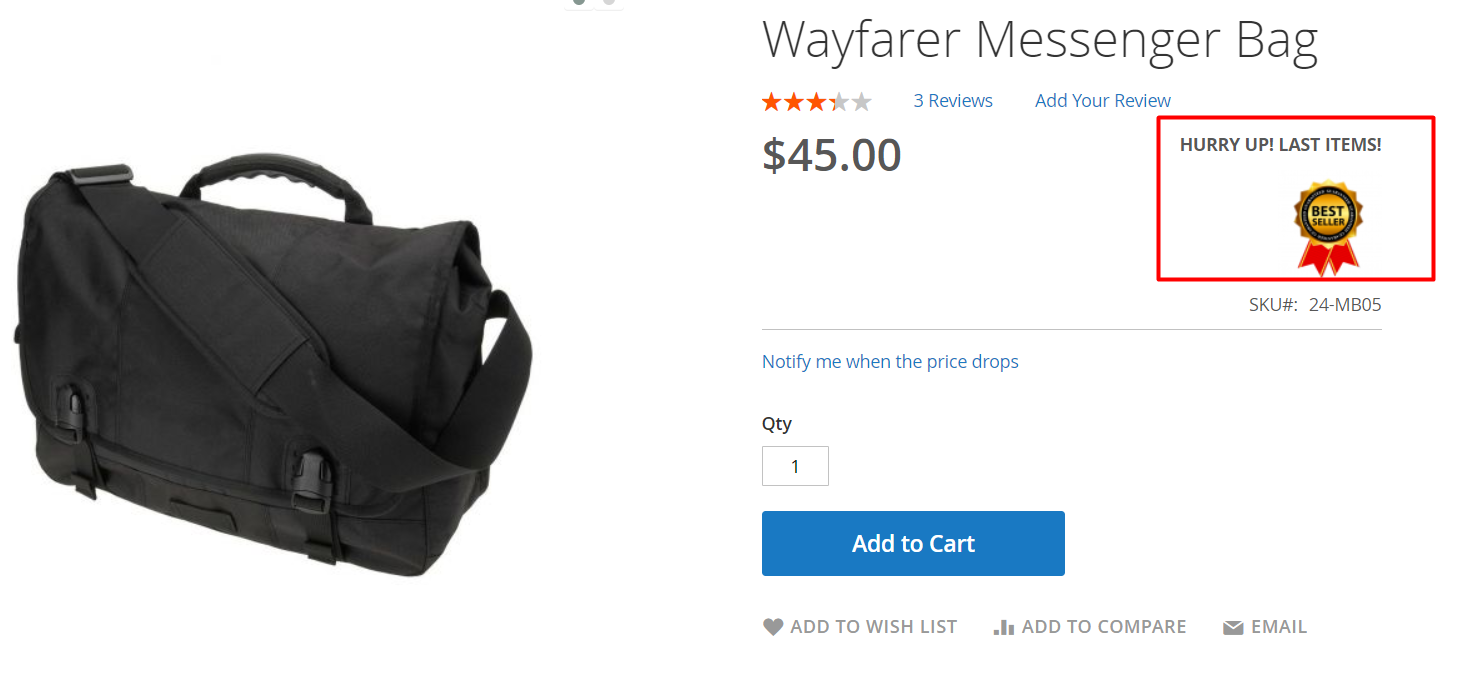
- Bundle Product: Can apply for child products of Bundle products
- Group Product: Can apply for child products of Bundle products
- Configurable Product: With this product type, you can configure the Custom Stock Status by size and color of products
How to configure
1. Configuration
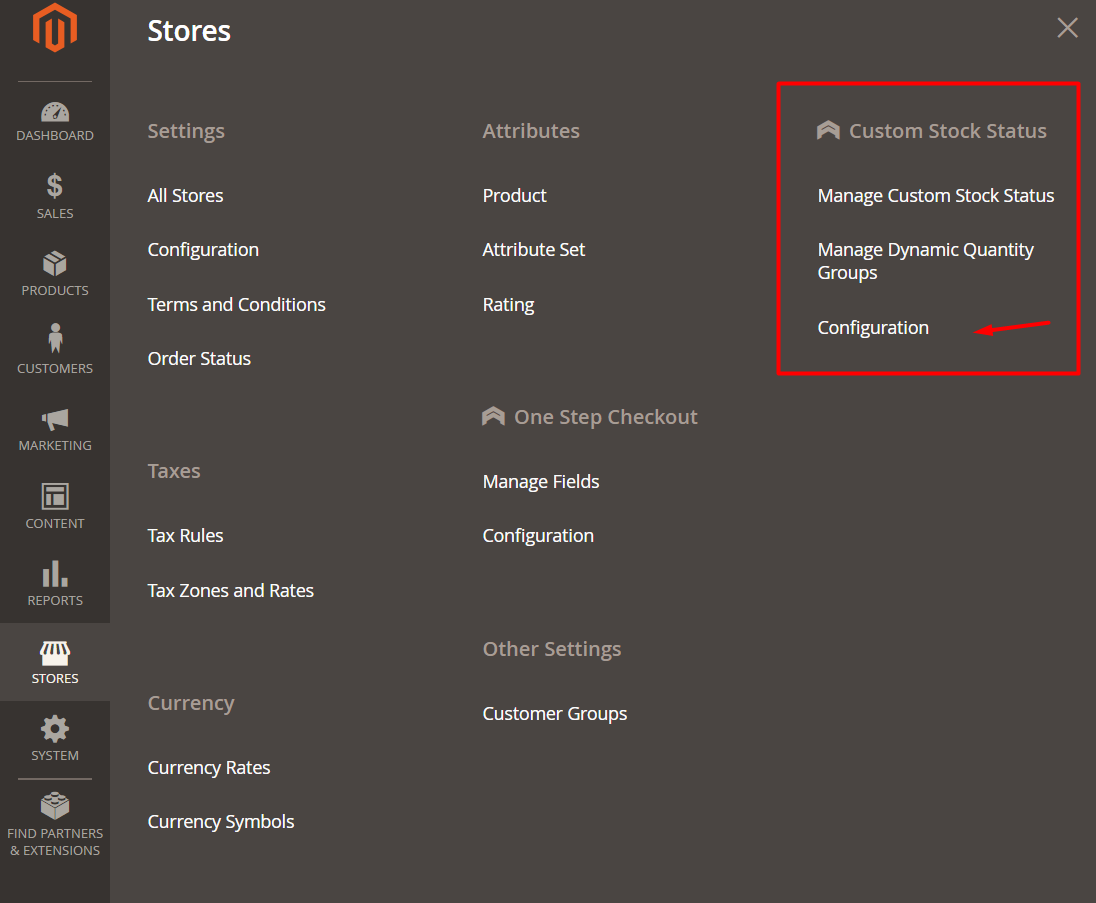
Login to the Admin Magento, choose Stores> Custom Stock Status> Configuration.
1.1. General configuration
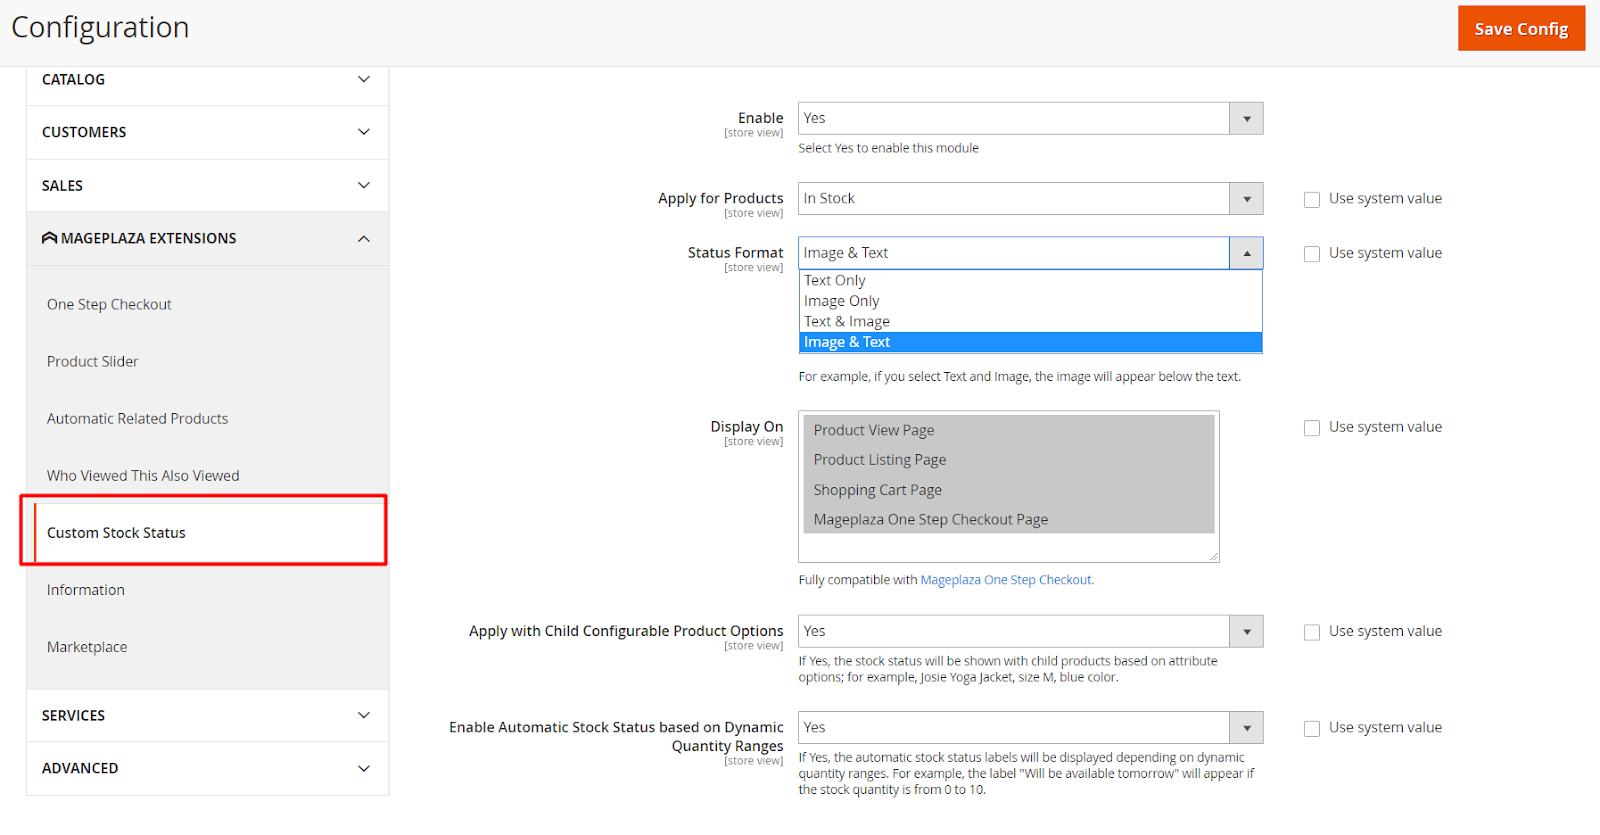
Enable: Select
Yesto turn on the moduleApply for Products: Choose to apply Custom Stock Status to products:
- Instock: only instock products will be applied Custom Stock Status.
- Out of stock: only out of stock products are applied Custom Stock Status.
- Both: apply custom stock status to all products.
Status format: Choose to display the status of the product in Frontend with:
- Image + Text: Show by the order of image then text
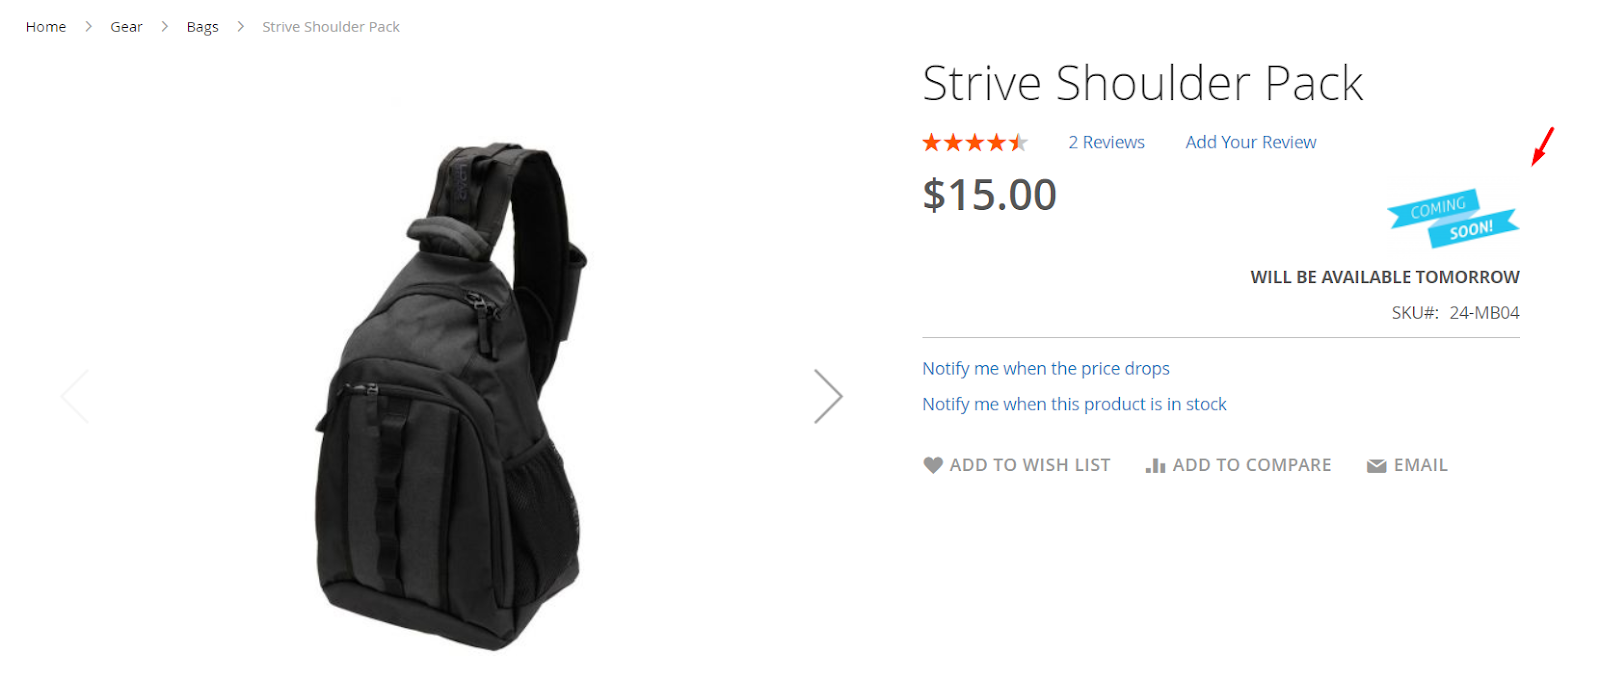
- Image Only: Only show Custom Stock Status with image
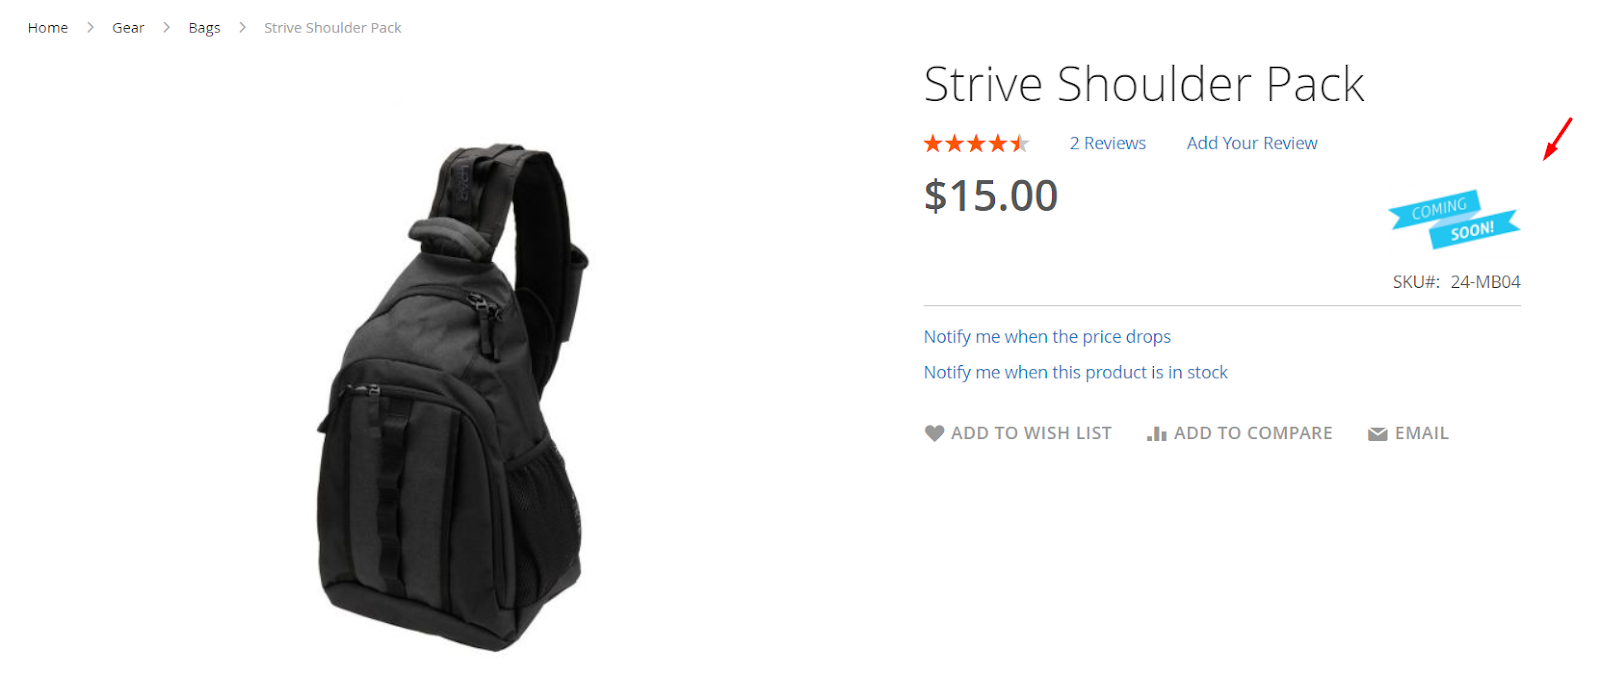
- Text only: Only show Custom Stock Status with text
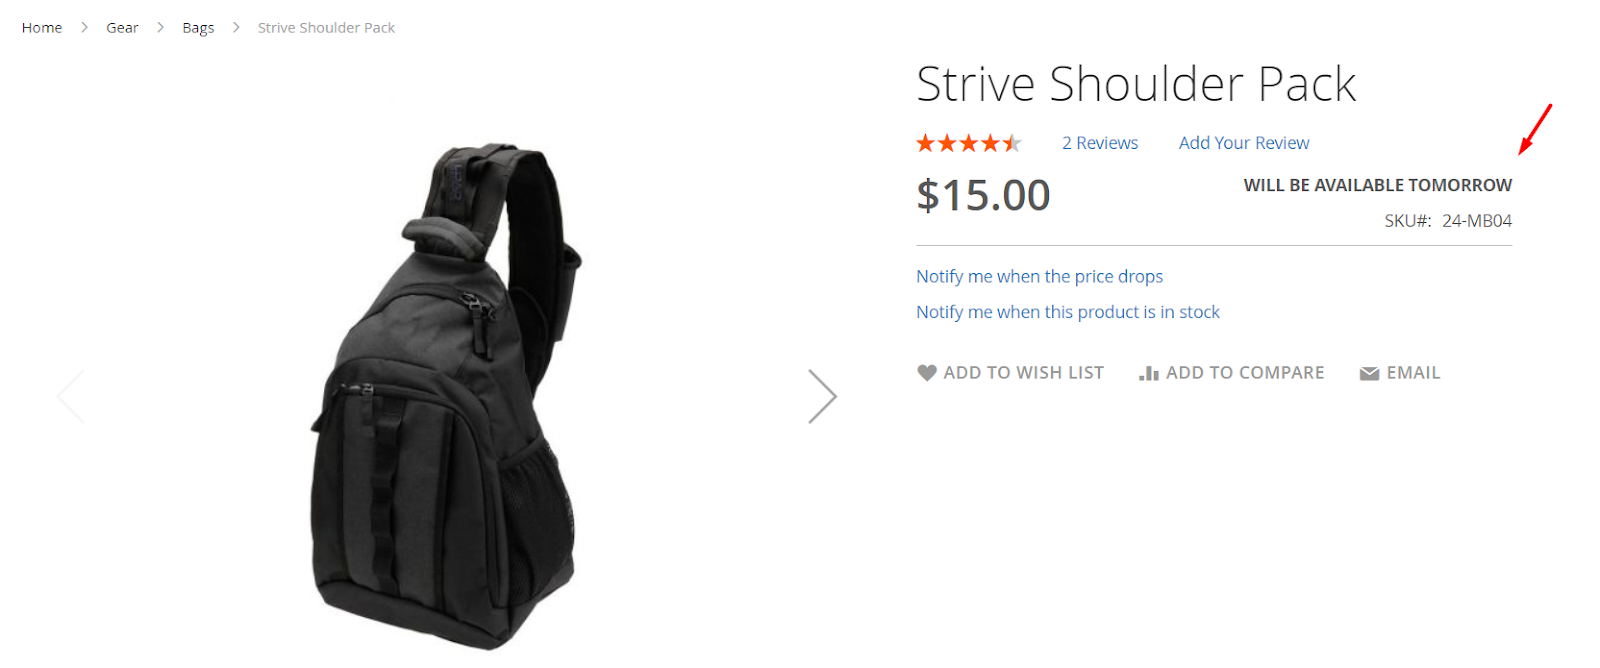
- Text + Image: Show by the order of text then image
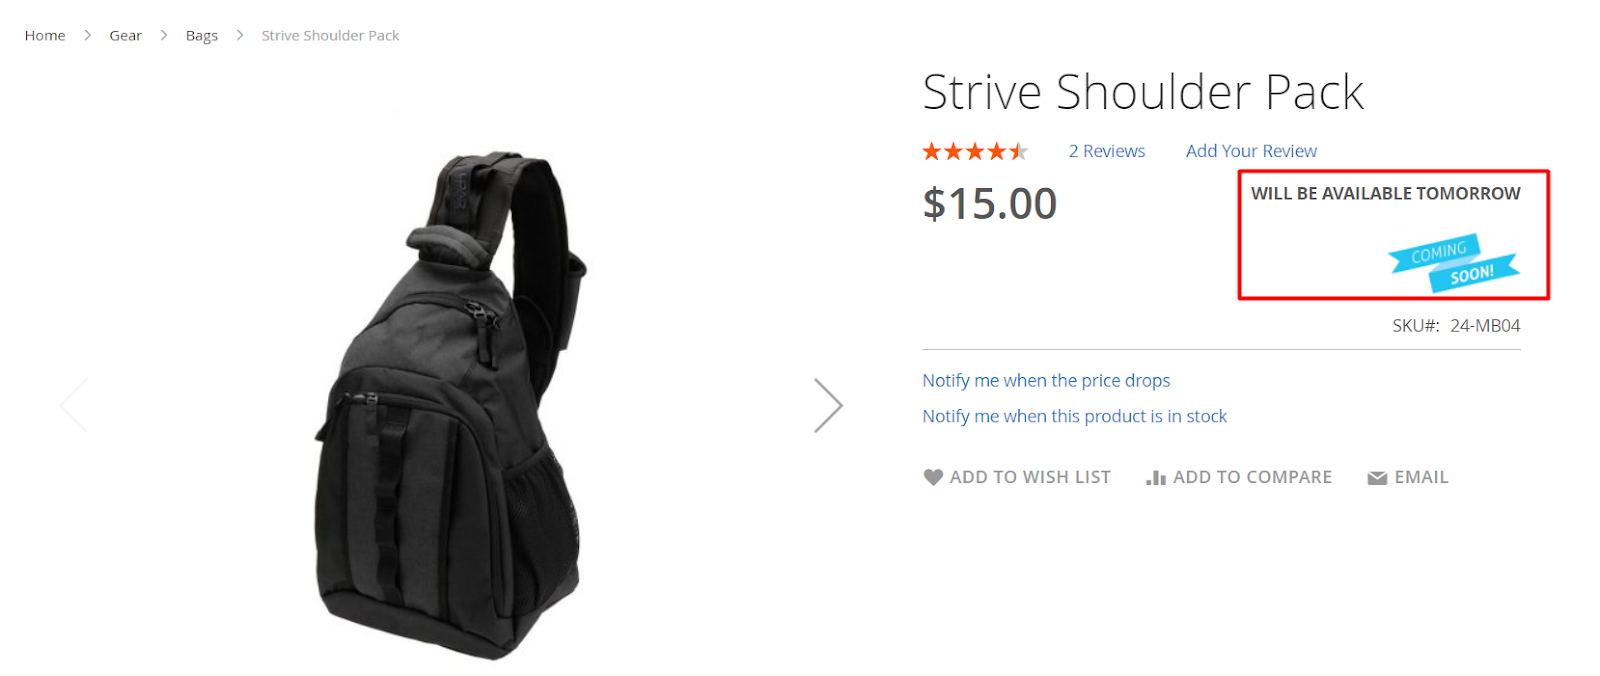
Display On: Choose to display the Custom Stock Status on the page below. You can choose to apply to multiple pages at the same time. Those not selected will not be applied:
- Product Listing Page
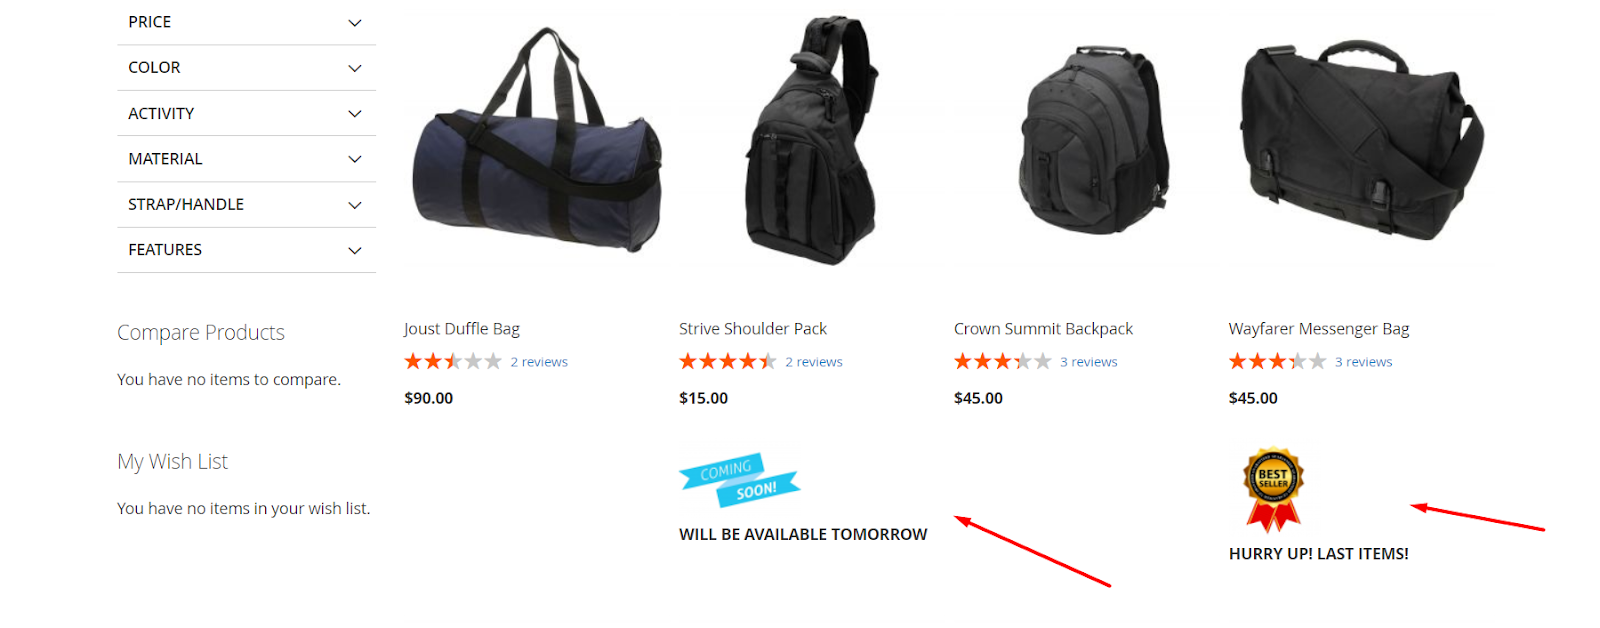
- Product View Page
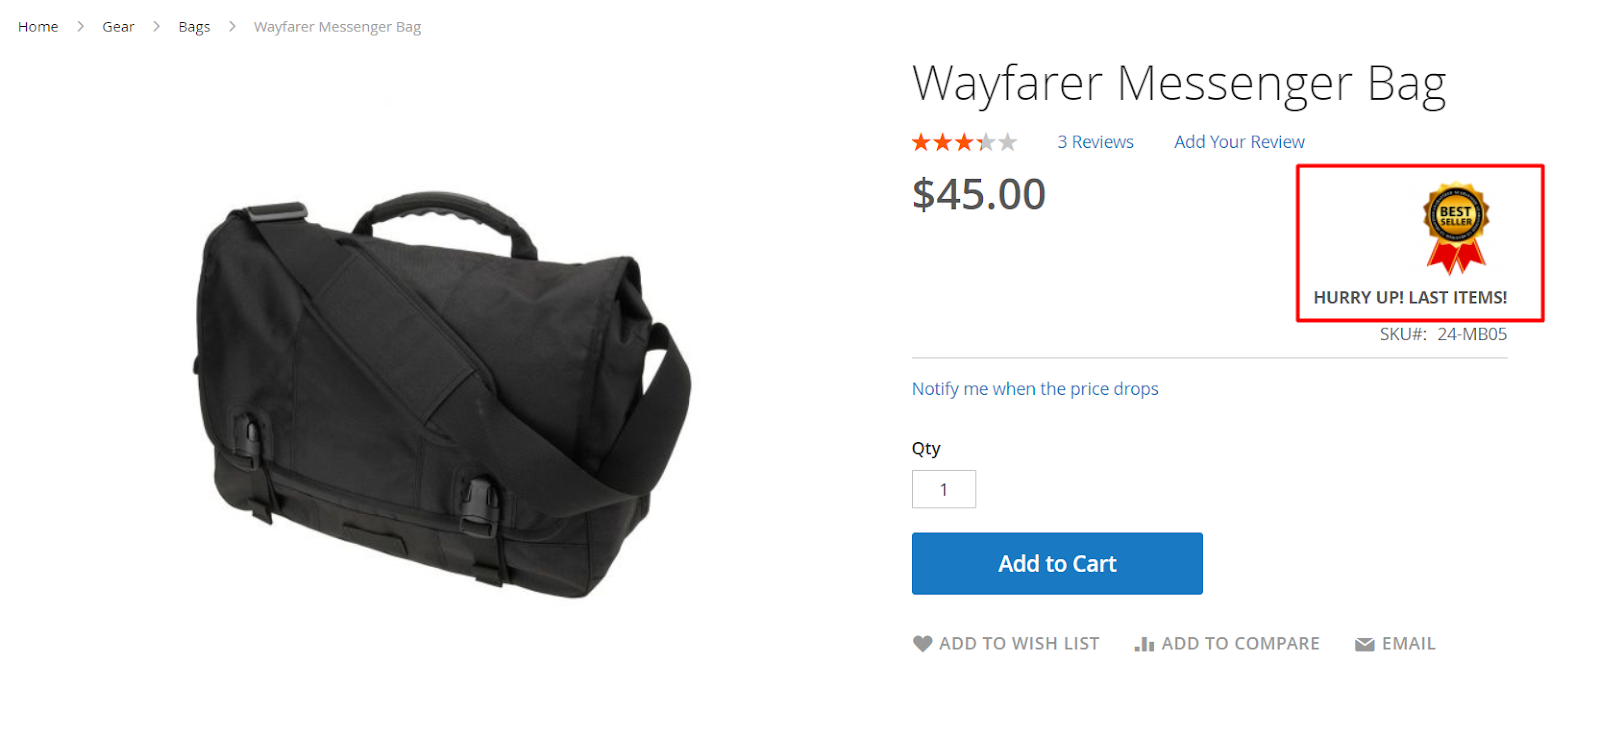
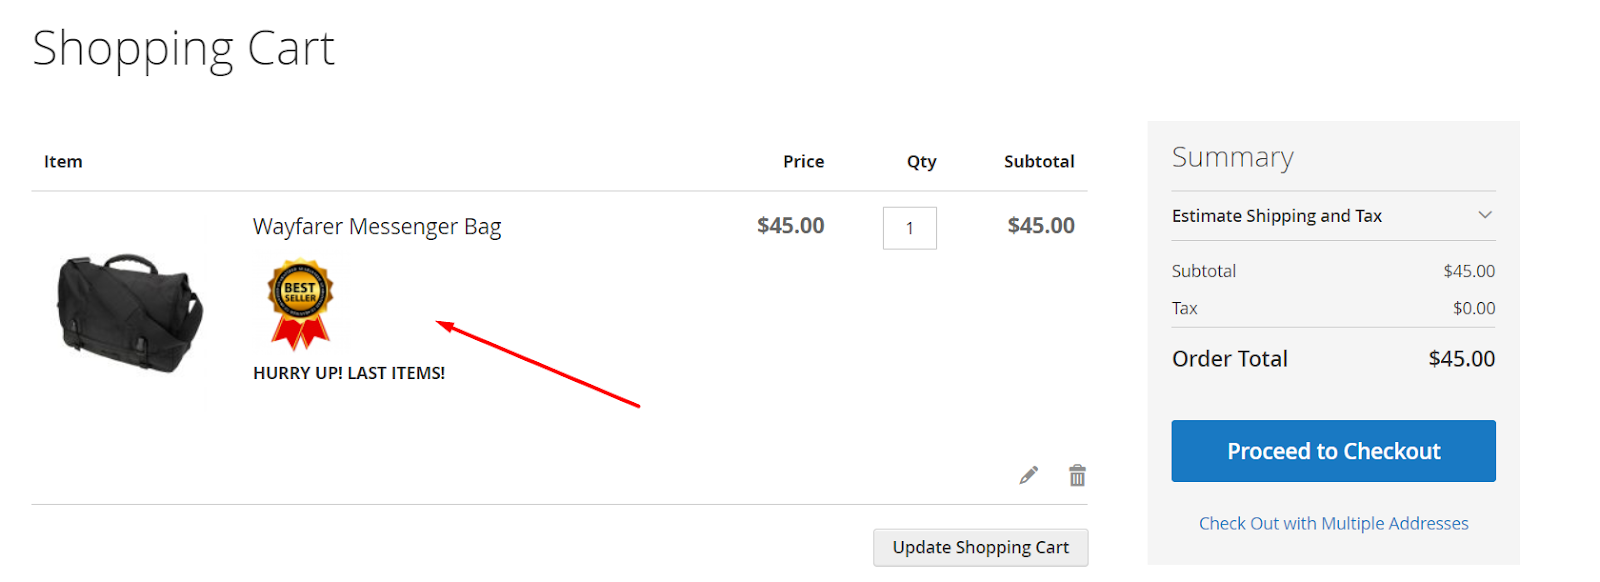
- Shopping Cart Page
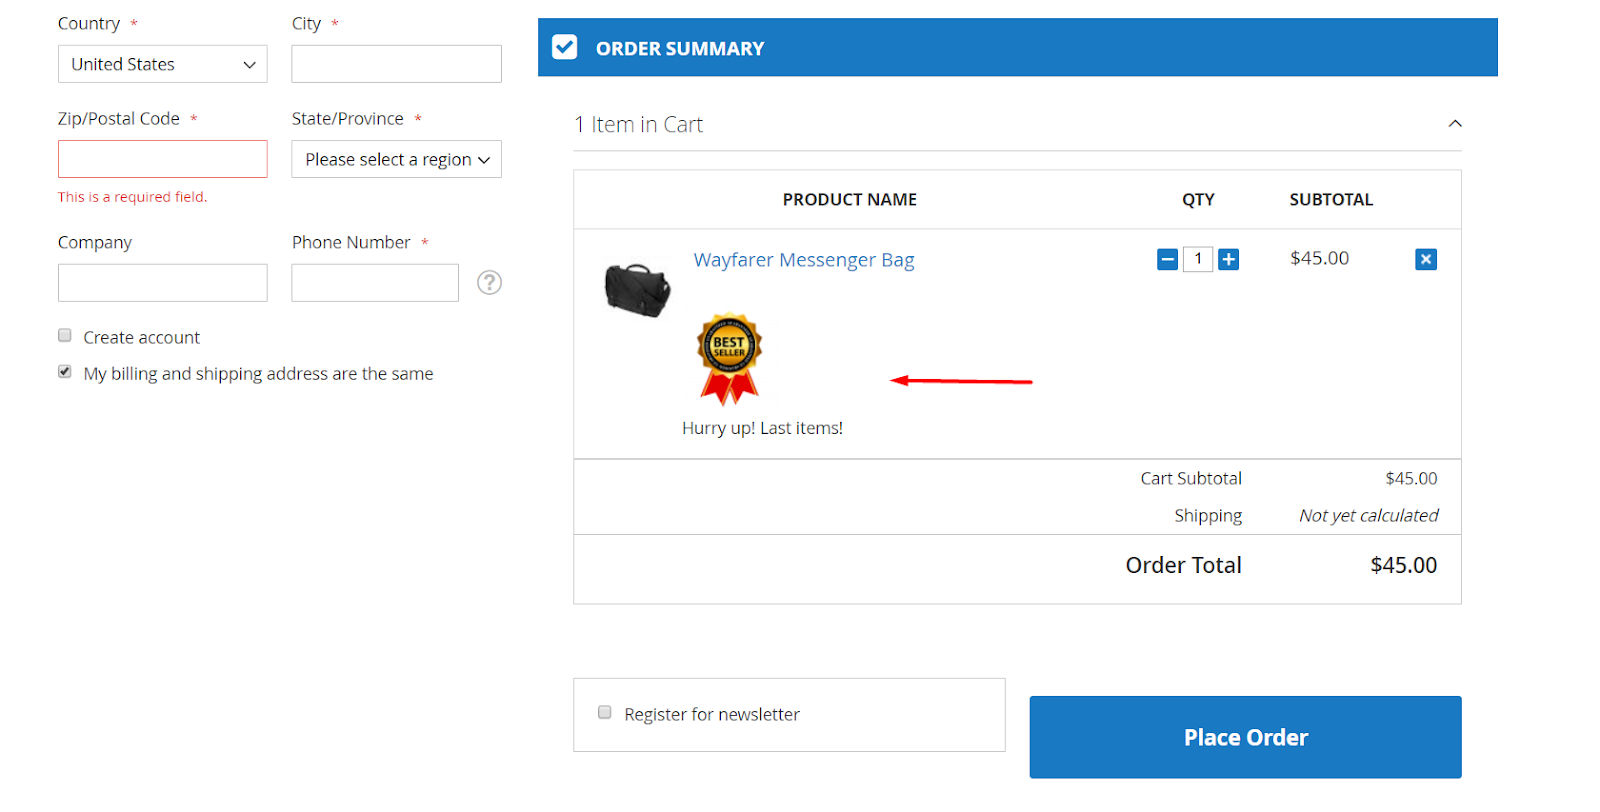
- Mageplaza One Step Checkout: This option only displays Custom Stock Status when you install the Mageplaza's One Step Checkout extension. With this extension integration, you can summarize 6 payment steps in just one page to make it easier for customers to shorten the payment process.
Apply with Child Configurable Product Options:
- Selecting
Yesto display the Custom Stock Status on options such as size, color, ... with the Configurable Product and the sub-products of Group Product, Bundle Product. - Selecting
Nowill not display the Custom Stock Status at any child product type.
- Selecting
Enable Automatic Stock Status based on Dynamic Quantity Ranges:
- Select
Yes, it will enable Automatic Stock Status based on Dynamic Quantity Ranges. If the product satisfies Dynamic Group, it will apply Stock Status with Group Name group. Dynamic Group applies only to Simple Group. - If
Nois selected, it will not apply Dynamic Groups. - In case both the Custom Stock Status and Dynamic Groups are selected and enable, it will prioritize the information in the previous Dynamic Groups field. You can access
Store> Attributes> Productto search with 2 attributes to create additional options for Custom Stock Status and Dynamic Groups.
- Select
2. Manage Custom Stock Status
Login to the Magento Admin, choose Stores > Custom Stock Status > Manage Custom Stock Status. Or you can access to Store > Attributes > Product, find mp_stock_status at Attributes Code.
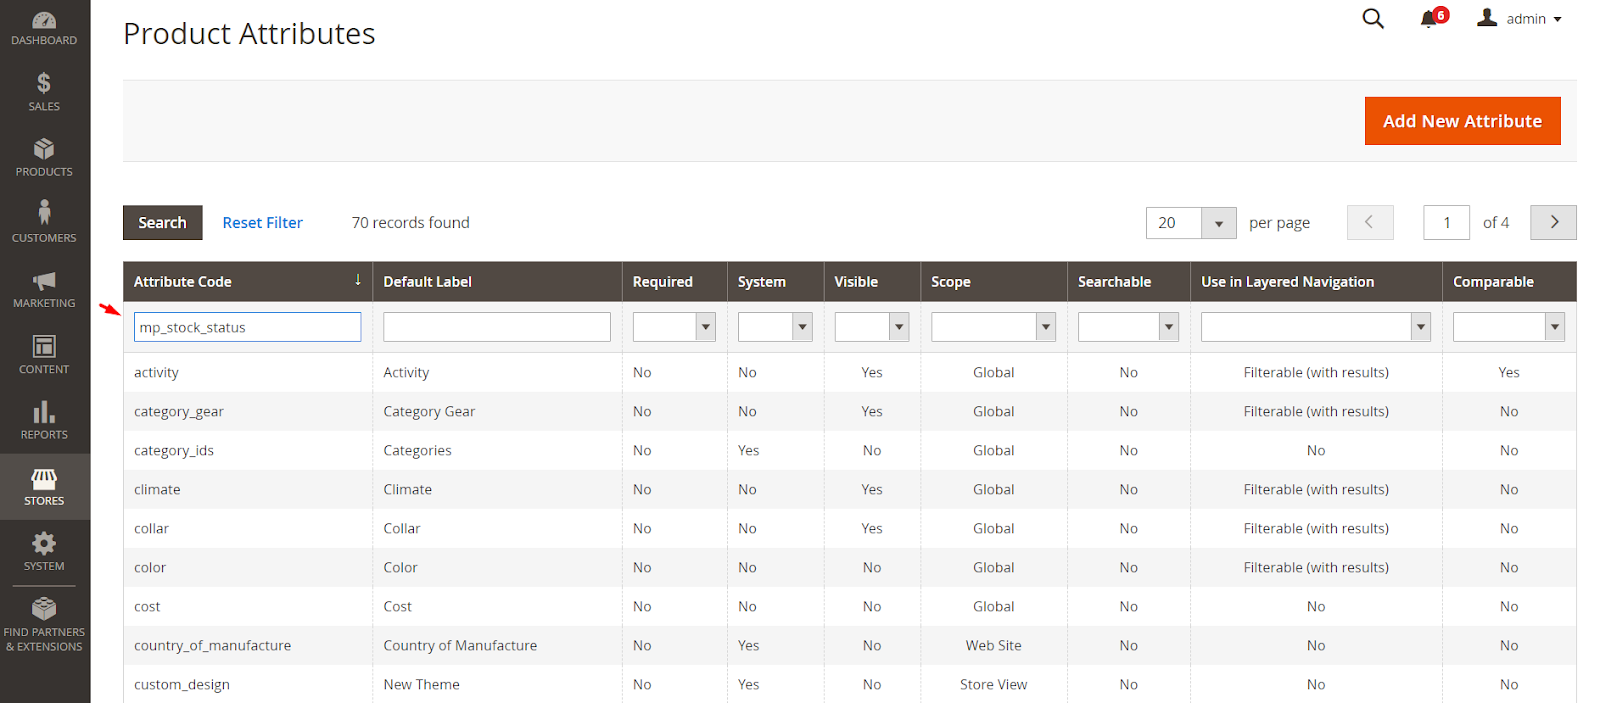
In this section, you can create the option Custom Stock Status attribute when accessing Catalog> Product, edit a product.
2.1. Properties
2.1.1. Attribute Properties
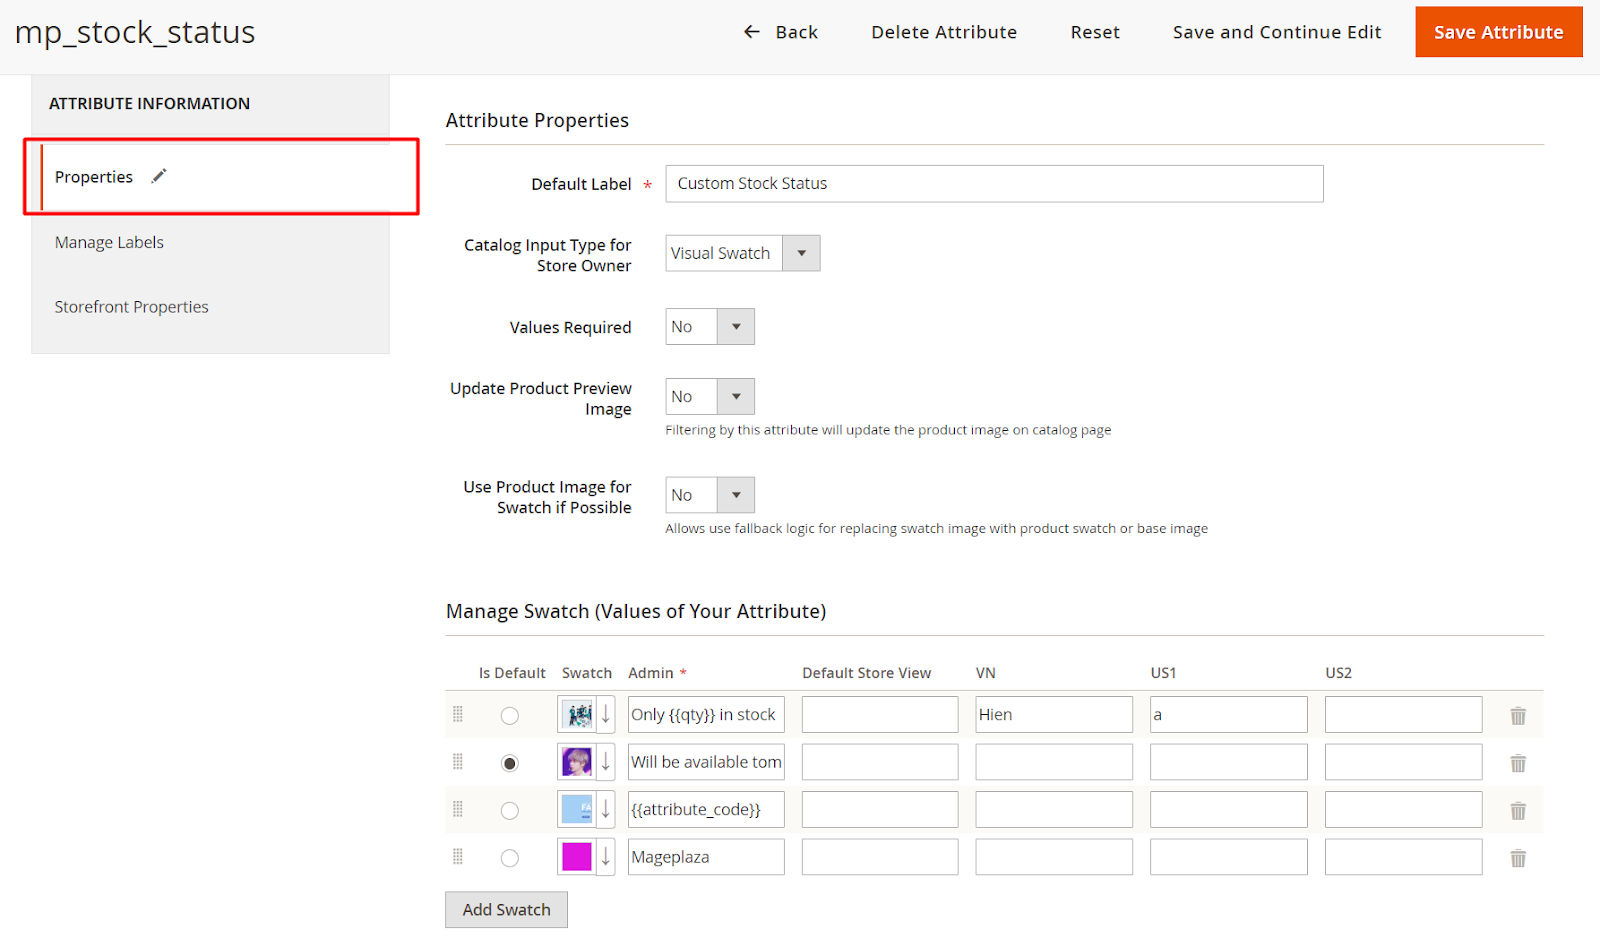
Default Label:
- You can change the name for attributes, the names of these attributes will be displayed in the
Catalog> Productsection, edit a product. - This is a required field.
- You can change the name for attributes, the names of these attributes will be displayed in the
Catalog Input Type for Store Owner:
- Visual Swatch: Create an option of Custom Stock Status attributes in Manage Swatch (Values of Your Attribute) with label and image. You can upload image with .gif, .jpg, .png format. You can enter the replaced name of Custom Stock Status attributes for each store. Here, we support adding the variable in status to the Quantity label of the product. For example: Only {{qty}} in stock, Will be available tomorrow, {{attribute_code}}

Note: If you select the Visual Swatch, you can display both the label and image outside the Frontend for Custom Stock Status, depending on the selection of the Status format field at Configuration.
With Admin is the value you must enter and for each store you can replace the option name of attributes. If the names of the stores are left blank, they will default using Admin values.
- Values Required: Select
Yesmeans that this attributes will be required to select option.
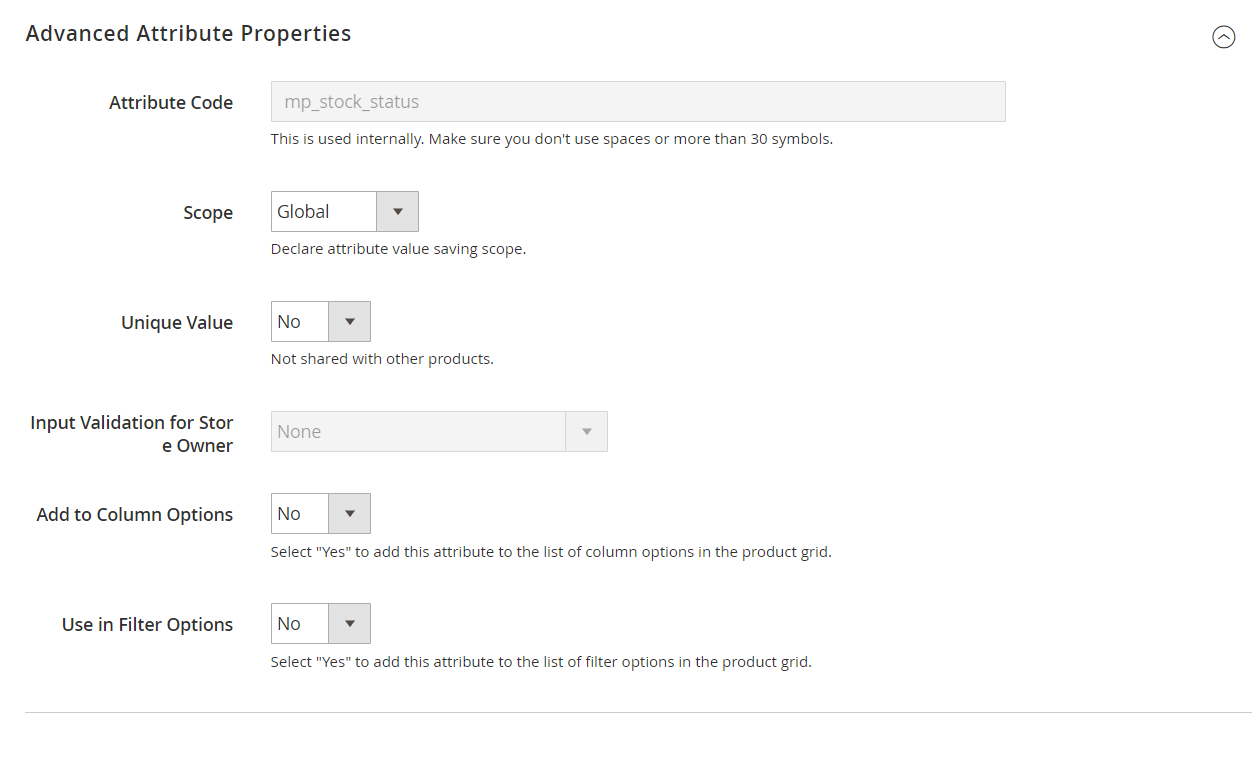
2.1.2. Advanced Attribute Properties
This section you can configure the display position of attributes. The Attribute Code and the Validation Input for Store Owner field is the default value.
2.2. Manage Labels
Fill Titles to replace Custom Stock Status attributes of your storeviews. The title will replace the Attributes name. If left blank, it will default to the attributes name you set in the Default Label field. Example: Custom Stock Status

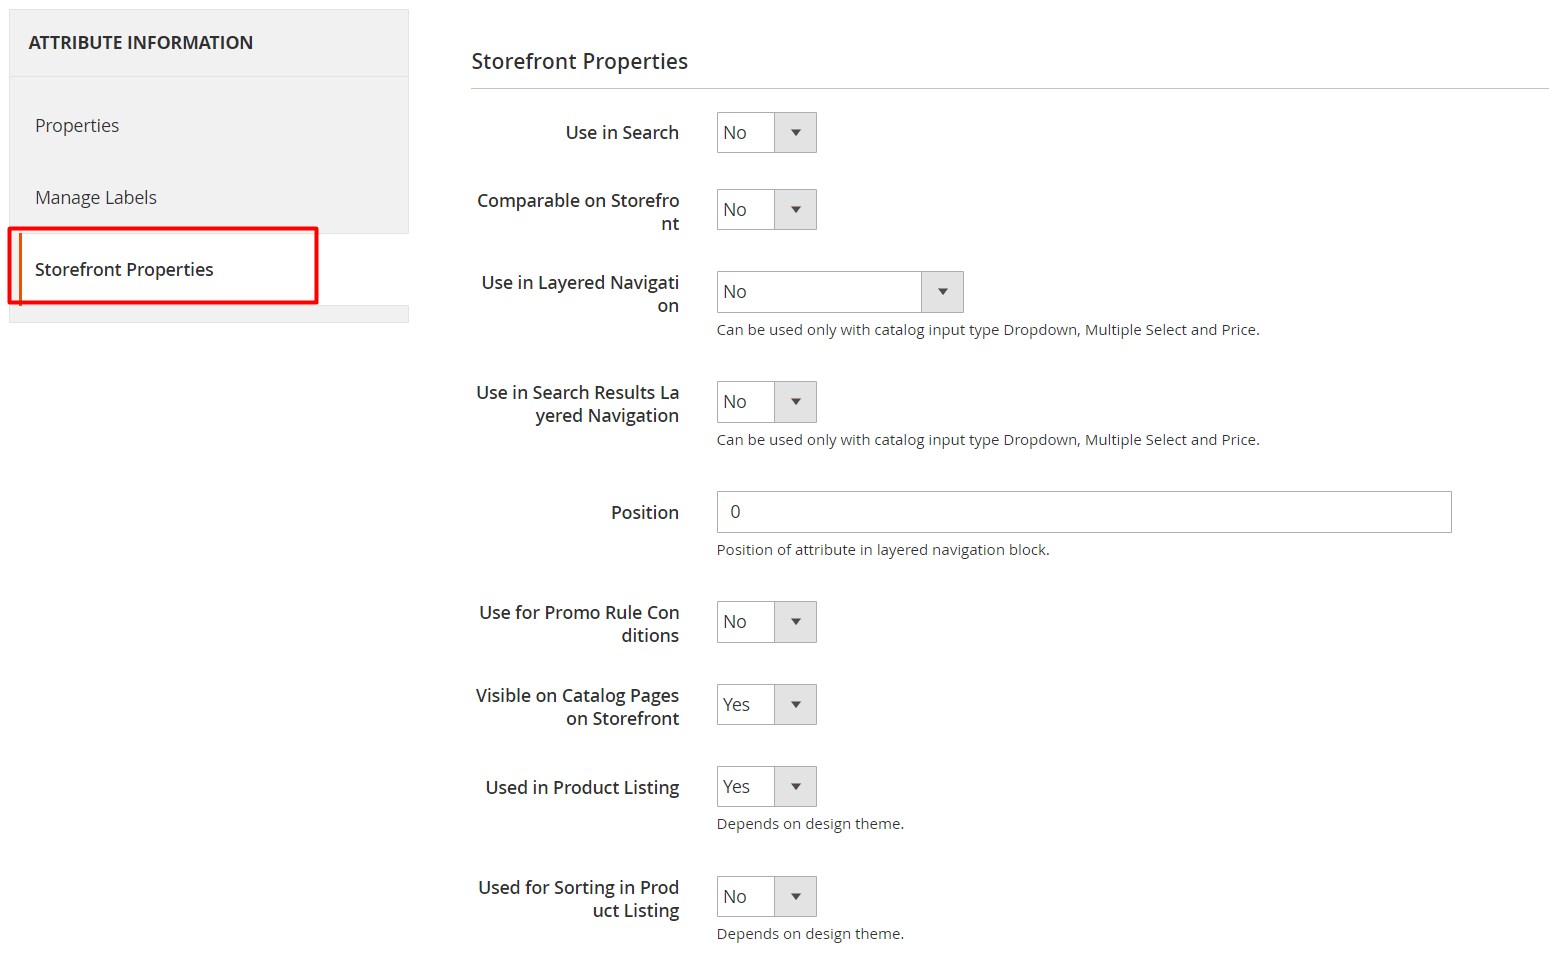
2.3. Storefront Properties
Select Storefront Properties information to display Attributes in the storeviews you want.
3. Manage Dynamic Groups
Login to the Magento Admin, choose
Stores> Custom Stock Status> Manage Dynamic Quantity Groups. Or you can visitStore> Attributes> Product, search in Attributes Code field withmp_dynamic_groups.For Dynamic Group, it only applies to Simple Product and if the product satisfies Dynamic Group, it will give priority to consider or apply Dynamic Group first.
3.1. Properties
3.1.1. Attribute Properties
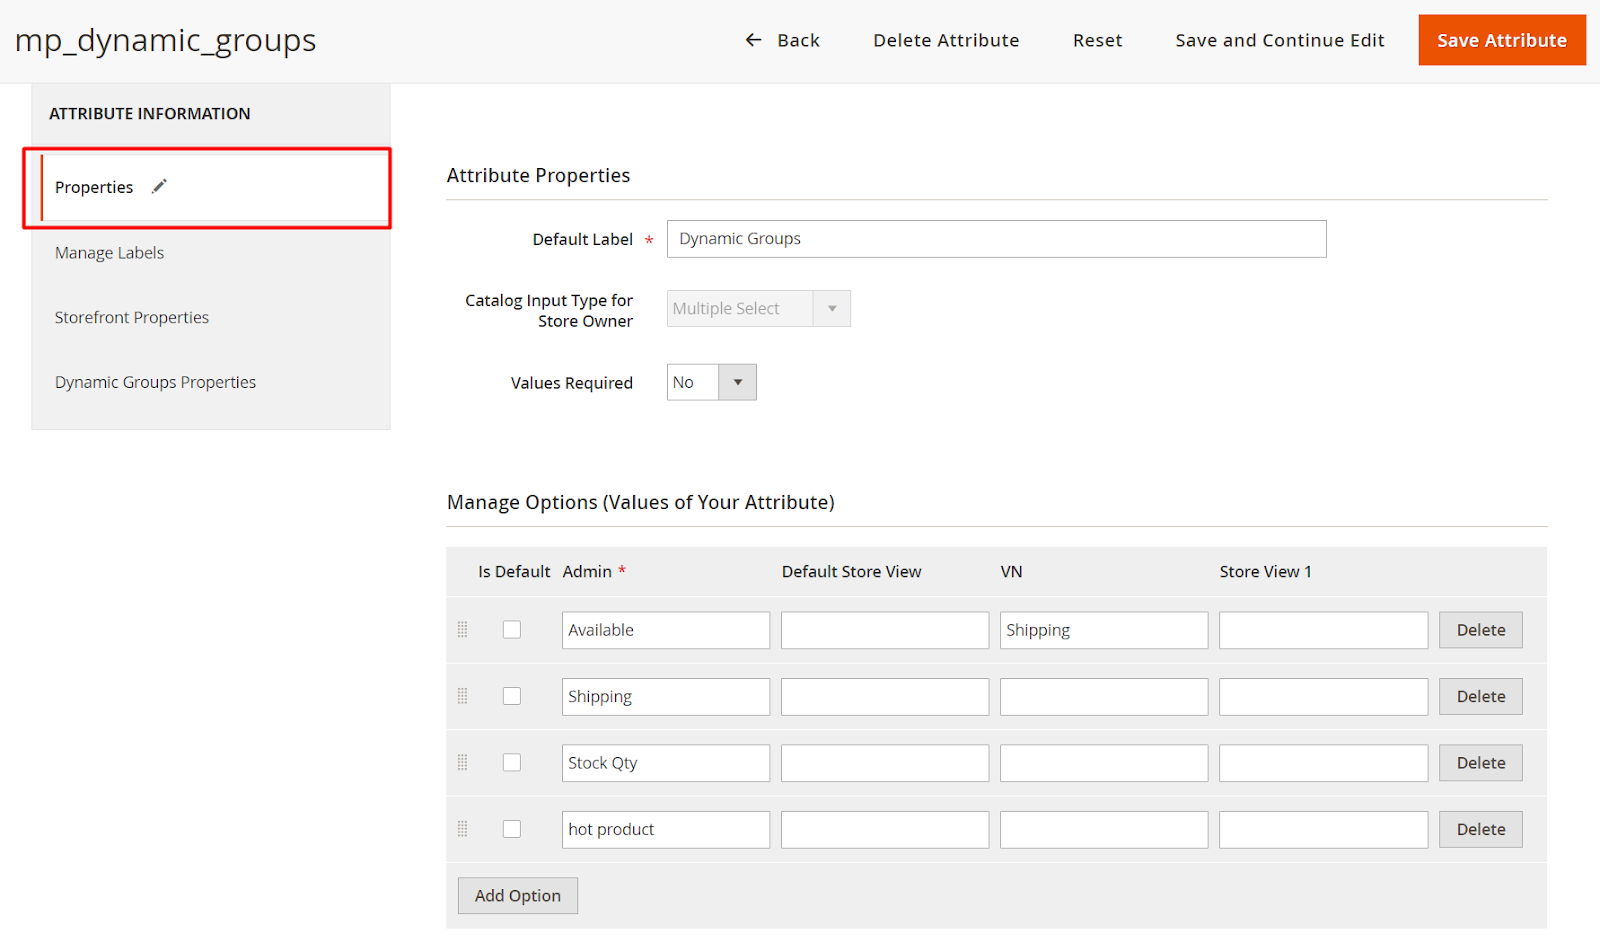
- Default Label:
- You can change the name for attributes, the names of these attributes will be displayed in the
Catalog> Productsection, edit a product. For example: Dynamic Group, ... - This is a required field.
- You can change the name for attributes, the names of these attributes will be displayed in the
- Catalog Input Type for Store Owner: In this field, the default input type is Multiple Select.
- Multiple Select: create a name for Dynamic Group in Manage Options (Values of Your Attribute). If Simple Product satisfies each Dynamic group, then it will apply Stock Status with Dynamic group selected.
3.1.2. Advanced Attribute Properties
- This section is similar to the Custom Stock Status section, you can configure the display position of attributes. With the Attribute Code and the Validation Input type for Store Owner field are both the default value.
- With Manage Labels and Storefront Properties is exactly the same as the ones above we have guided.
3.2. Dynamic Quantity Groups Properties
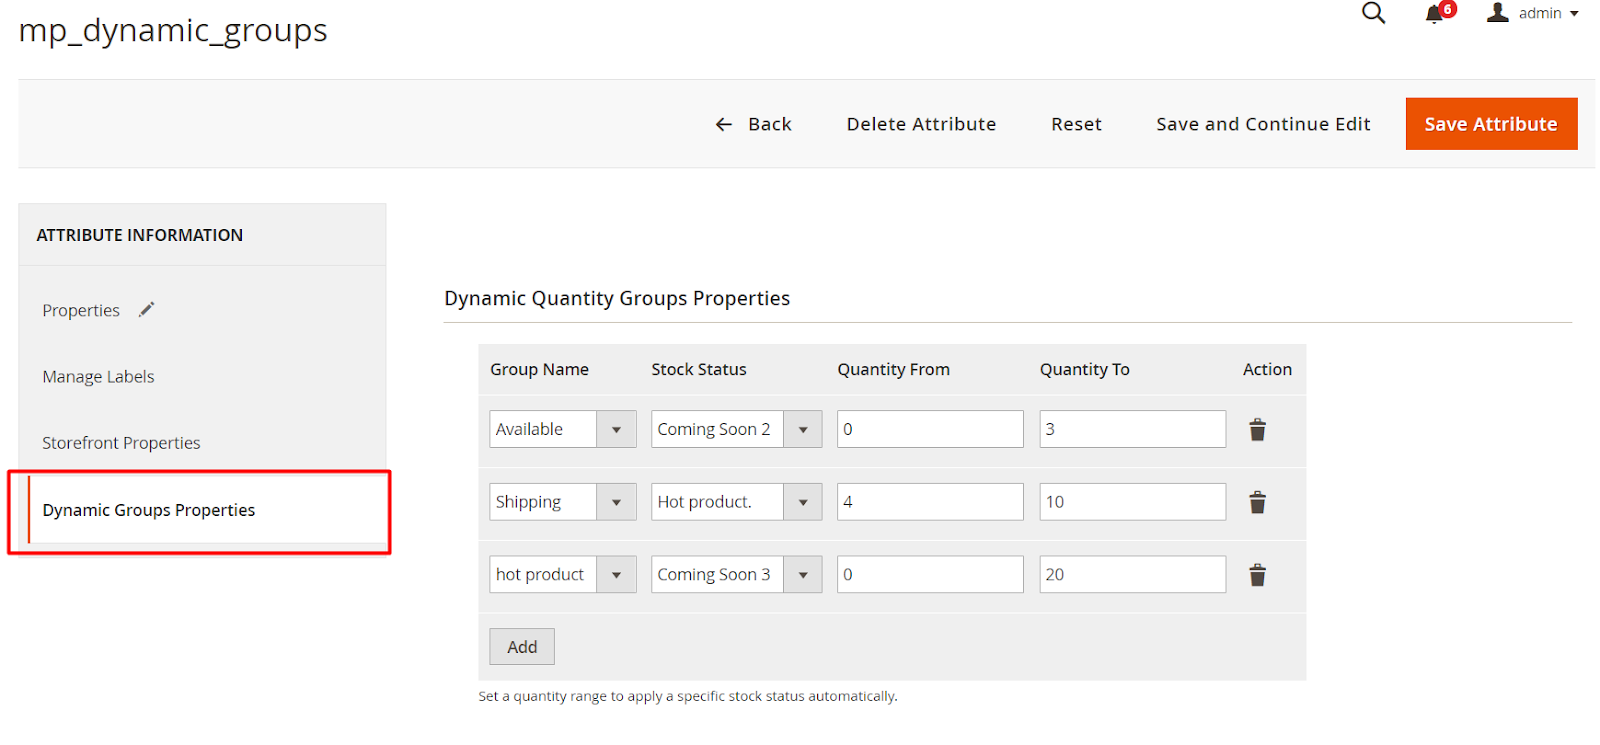
In this section, selecting the Dynamic Group based on qty will apply the selected Stock Status if the field Enable Automatic Stock Status based on Dynamic Quantity Ranges at Configuration is enabled and Dynamic Group applies only to Simple Product
For example, with Group Name is Available, select Stock Status as Coming Soon2(get Stock Status from the Custom Stock Status option you created above) with Quantity From = 0, Quantity To = 3. If the Simple product has quantity within this range will be applied Dynamic Group.
Note: When your product has a satisfactory quantity to apply Dynamic Group, you must also consider that product meets the condition that you have configured at Configuration and you will apply Dynamic Group. If the product selects all Dynamic Groups then the priority will be considered from top to bottom.
4. Edit Product
4.1. Edit Product
Login to the Magento Admin, choose
Catalog> Products.In the Edit product section, Custom Stock Status and Dynamic Groups are added when installing the Custom Stock Status extension of Mageplaza. With the option of these two fields, you have created options attributes in Manage Custom Stock Status and Manage Dynamic Groups
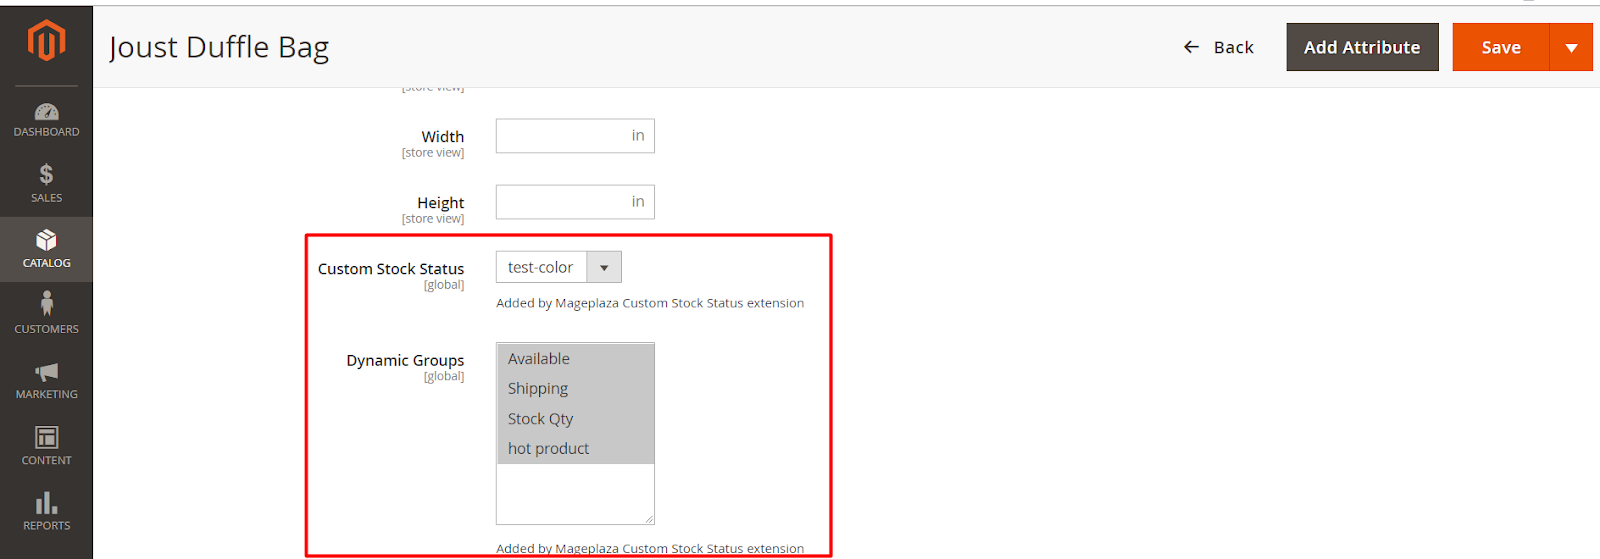
Note: In case if both Custom Stock Status and Dynamic Groups to be selected, then priority will be given to Dynamic Group first. If the product is not satisfied Dynamic group, it will continue to consider applying Custom Stock Status. And if it continue to unsatisfy Custom Custom Status, the default Stock Status will be applied by Magento.
4.2. Product Grid
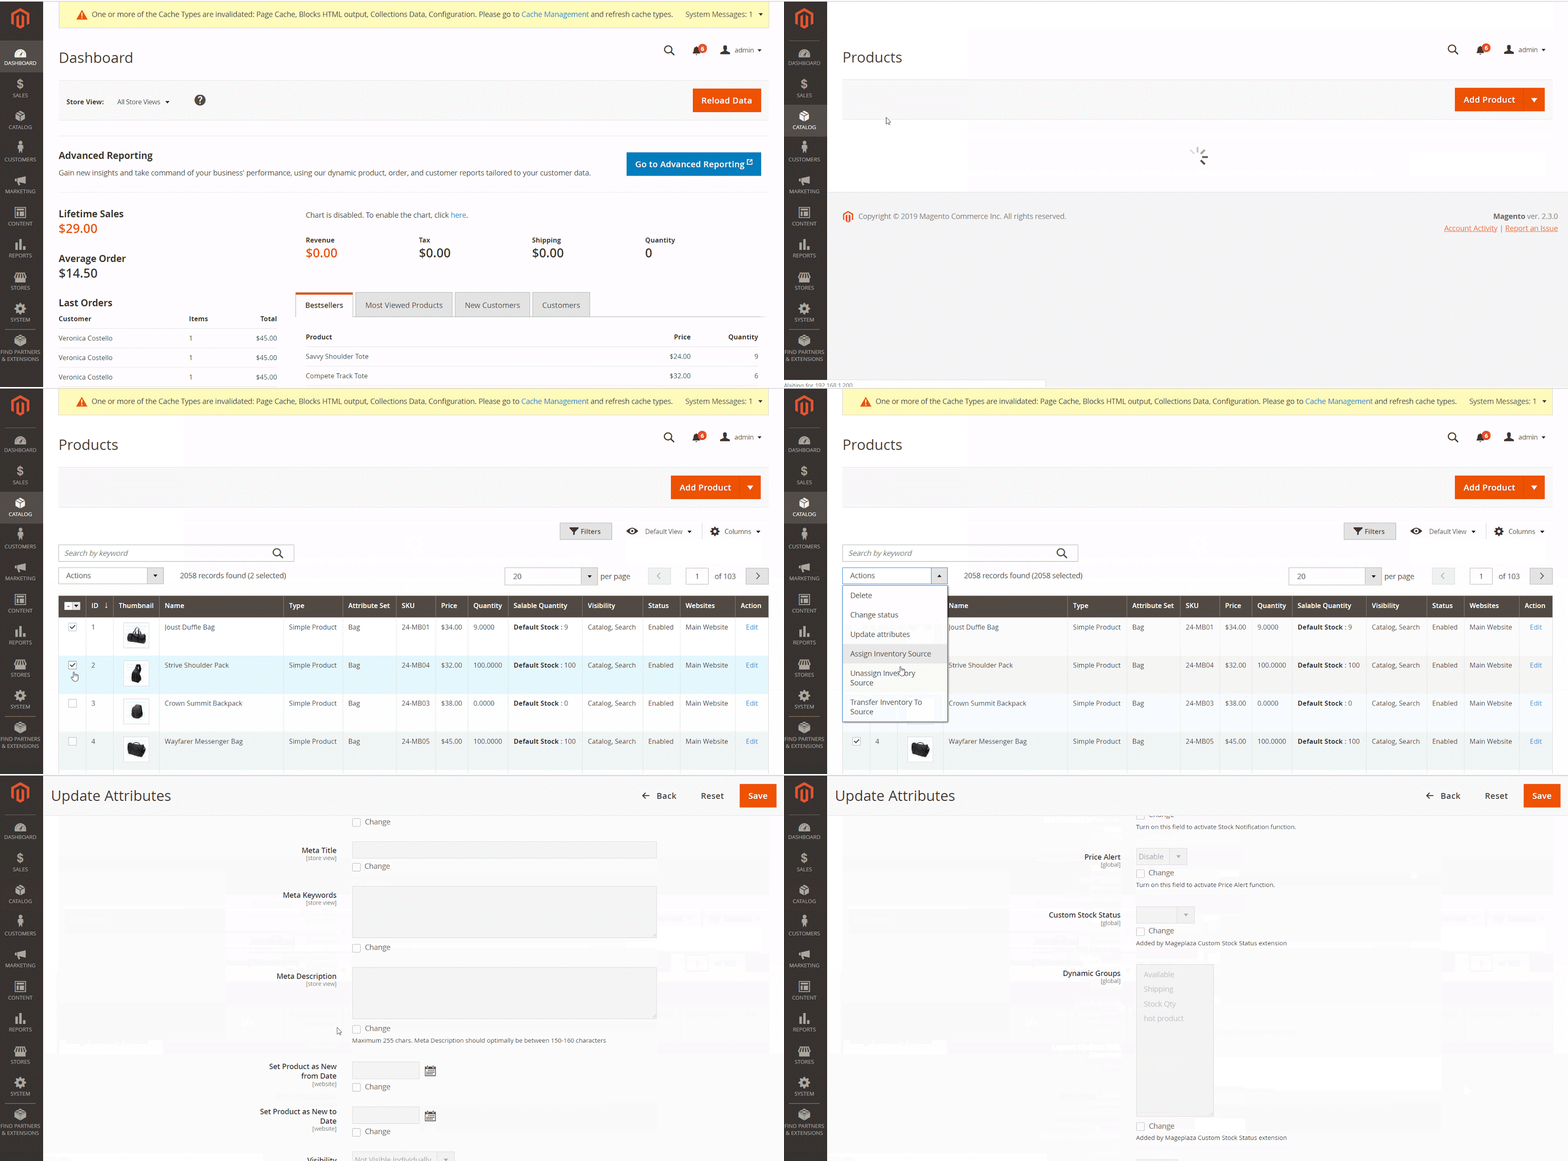
You can edit products for multiple products at the same time to save time. Go to Catalog> Products, on the product page select the products you want to edit the Custom Stock Status and select Actions> Update Attributes.
5. Attention
When you want to remove the extension, you should use composer to run the command:
bin/magento module:uninstall Mageplaza_StockStatusIf you delete the extension manually, you need to delete more the
mp_dynamic_groupsandmp_stock_statusattributes in the database or in the backend.
5.1 Solution 1:
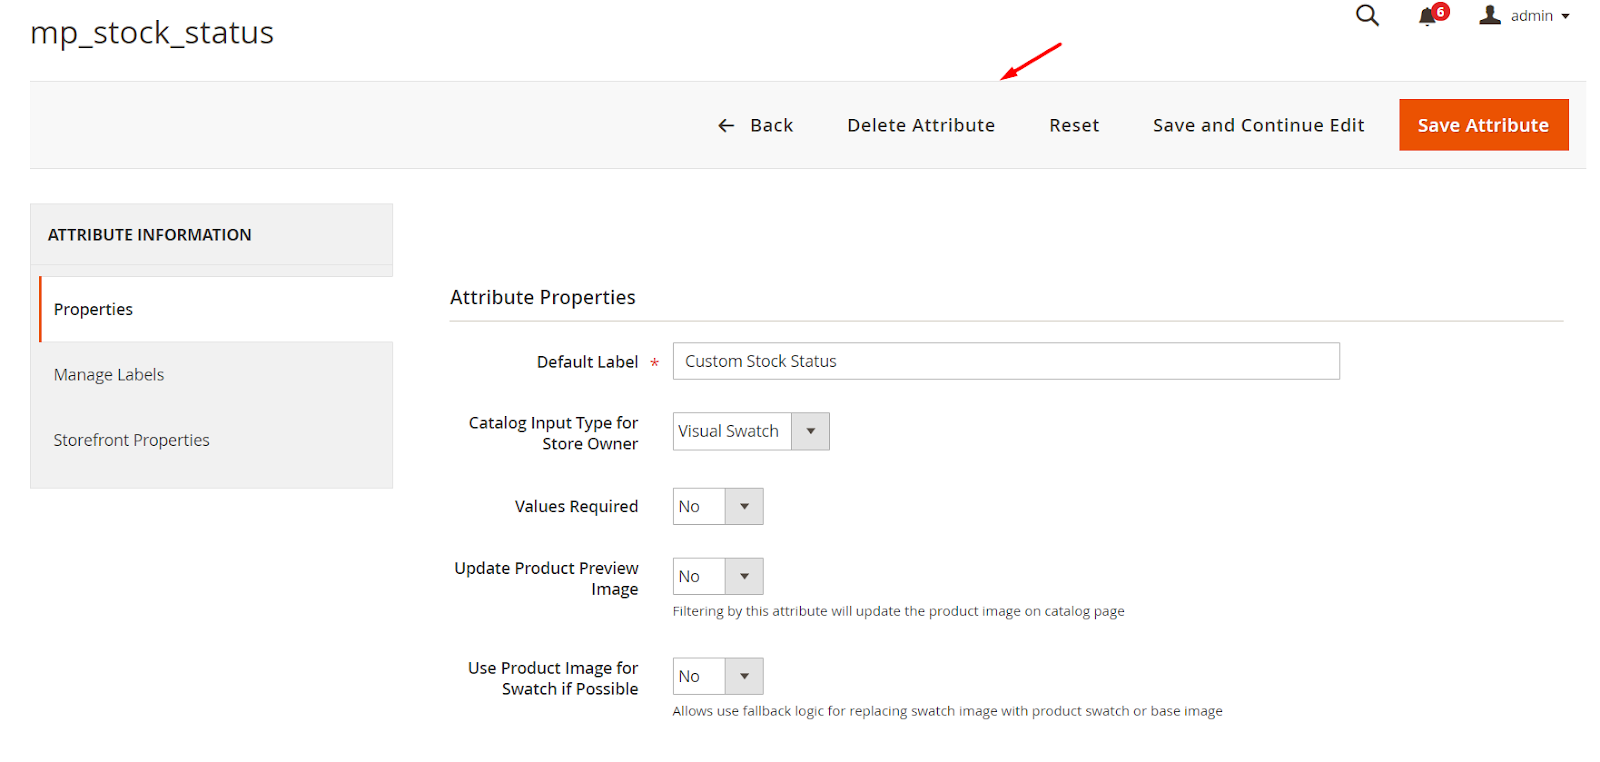
Go to the backend: From the Admin Panel, go to Stores> Attributes> Product. In the Attribute Code column, find the attribute mp_dynamic_groups and mp_stock_status, click and delete
5.2 Solution 2:
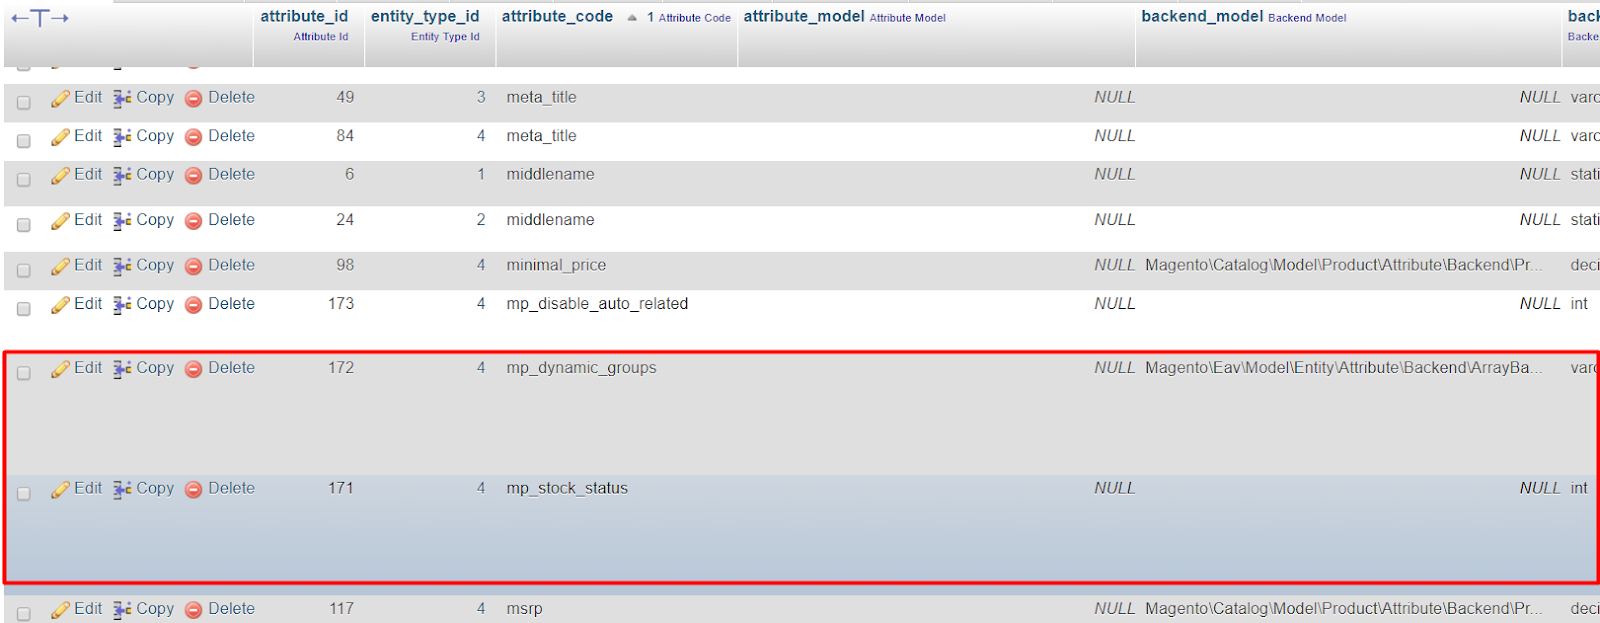
Go to the database to delete: Access to eav_attribute table. In the attribute_code column, you find and delete the attribute mp_dynamic_groups and mp_stock_status
6. Compatible with Mageplaza Extensions
You can install some Mageplaza extensions. They are fully compatible with Custom Stock Status and :
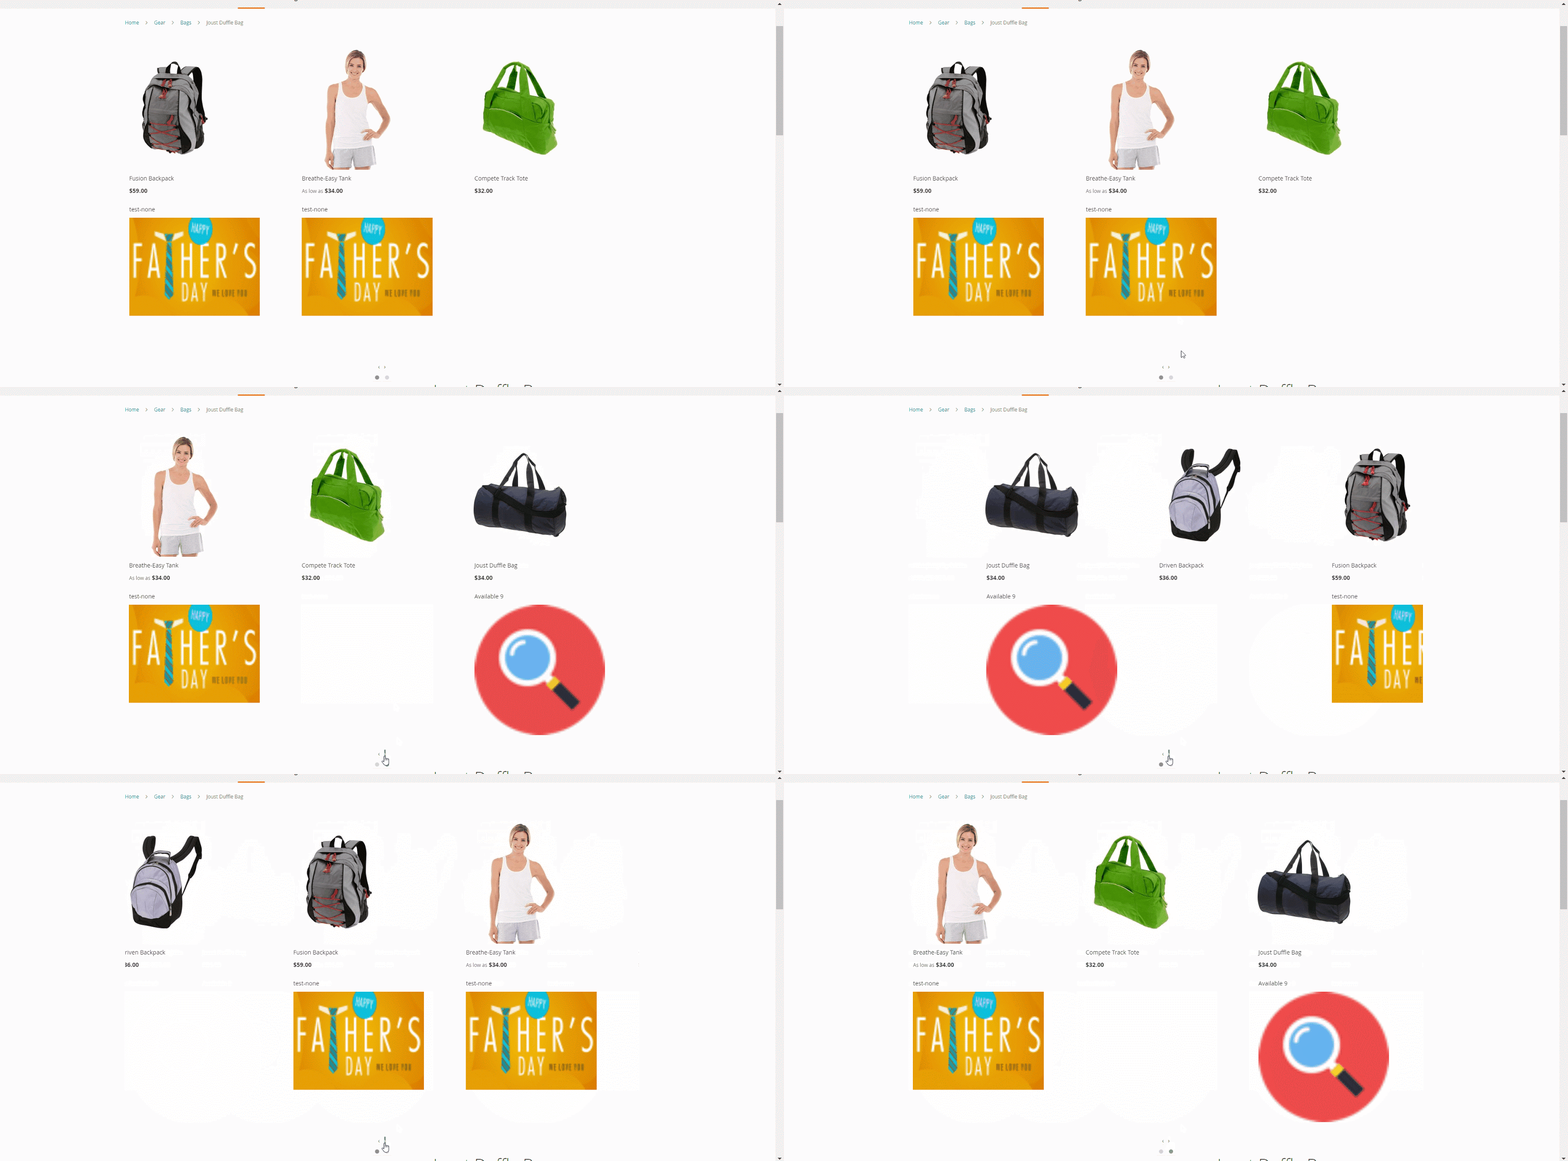
- Product Slider: allows you to easily create many sliders such as featured products, bestselling products, new products, etc. If you install Product Slider, products that apply Custom Stock Status on sliders with image or text or both.
- Automatic Related Products: with this extension you can design for related products displayed on slider and also show image and text of Custom Stock Status on that slider.
- Who Viewed This Also Viewed: Customers are more likely to make a purchase decision when they see a product that other customers have seen. By smart algorithms, the most viewed products will be automatically updated and proposed to customers.
7. API
Mageplaza Custom Stock Status uses Rest API to add product stock status data, display lable, and image. Besides, thanks to Rest API, store admins are able to view and manage product data easily.
View more details here
The instruction to generate Integration tokens can be viewed here
8. GrapQL
Run the following command in Magento 2 root folder:
composer require mageplaza/module-stock-status-graphql
php bin/magento setup:upgrade
php bin/magento setup:static-content:deploy
Custom Stock Status by Mageplaza supports admins to get the information of rules via GraphQL.
Follow steps below to start working with Custom Stock Status GraphQLl in Magento:
- Use Magento 2.3.x. Return your site to developer mode
- View the supported queries here