FAQ extension
Overview
If you are looking for an extension that allows customers easily to find the inquiries, ask and answer the question about their confusing, it's high time to choose FAQ extension.
Developed by Mageplaza for Magento 2 stores, FAQ extension offers an SEO-friendly FAQ page, which helps visitors look for the answer with ease instead of sending the email to the freshdesk page. Therefore, you can save much time for customers; this also makes them satisfied with your service, and of course, they will come back to your online store in the next purchase.
Download & Install
How to use
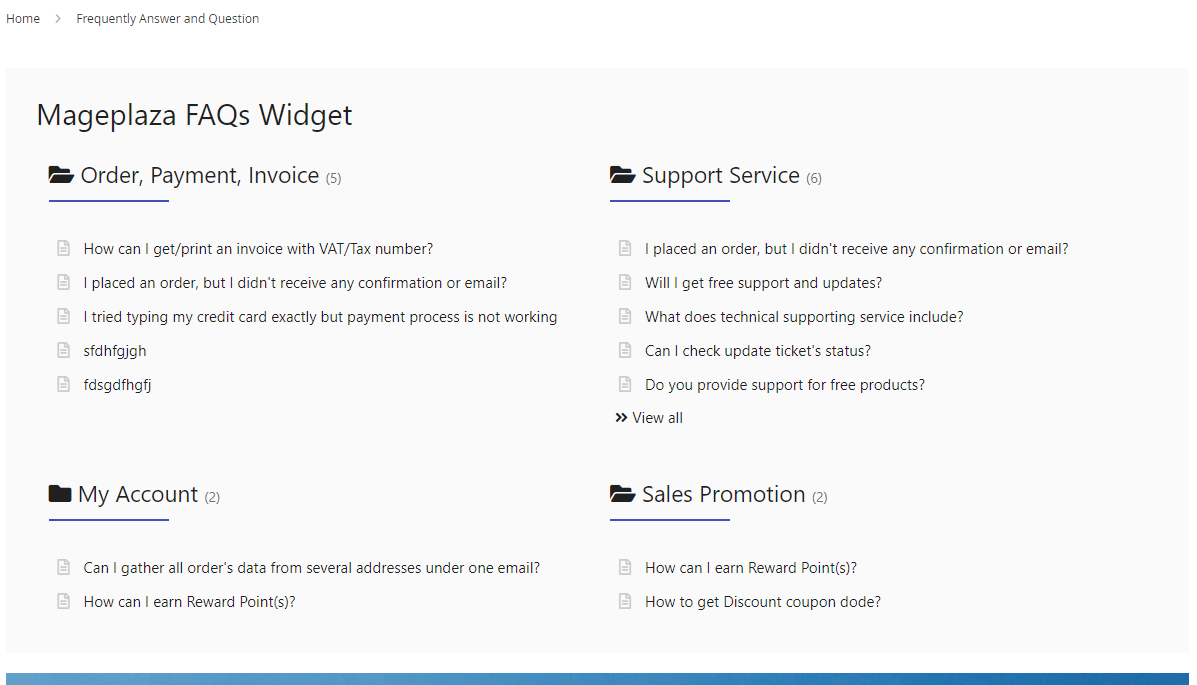
FAQs Homepage
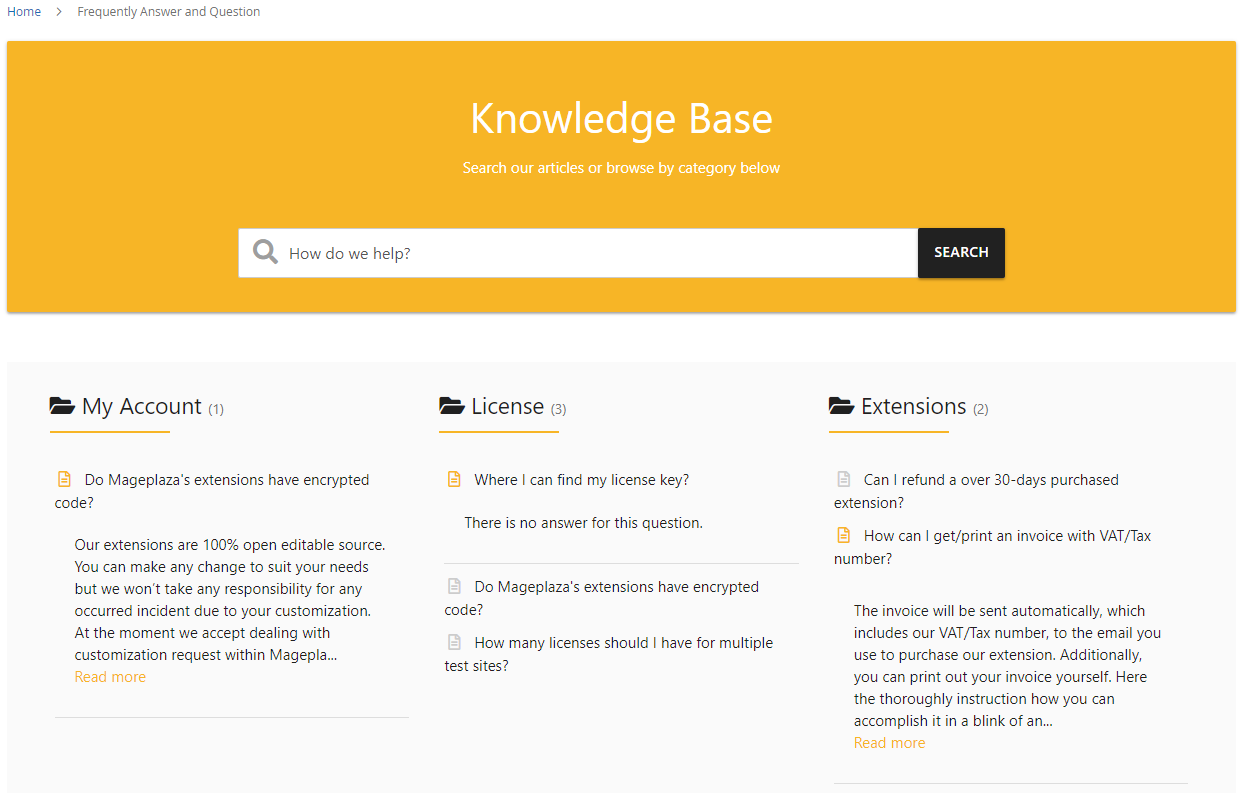
- Allow displaying all categories and dependent question
- Depending on the installation of admins, FAQ Homepage will display Search box or not. Customers can search any question on FAQ Homepage quickly when using Seach box.
- The answer of each question can be displayed when clicking on the question if
Question type = Collapsible
FAQs Category Page
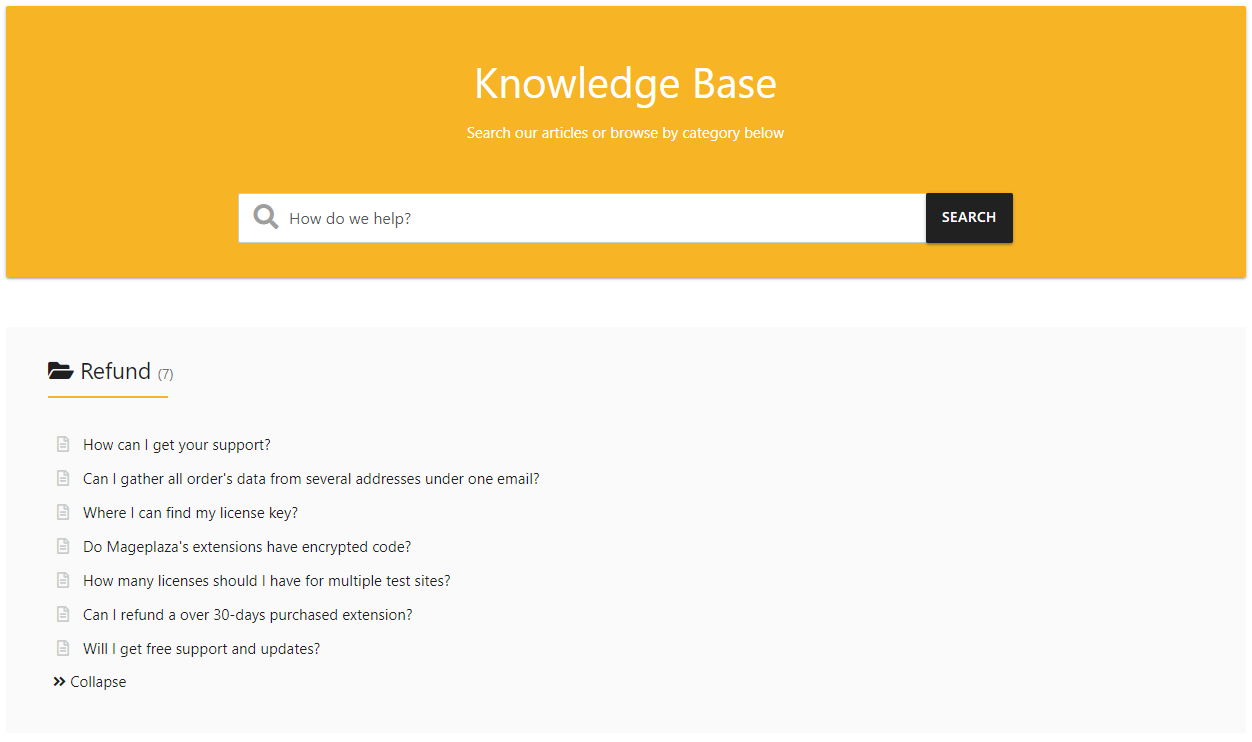
Display all questions of the category
The same as FAQ Homepage, Category page is also displayed on the Search box and performs the function as on FAQ Homepage. When you find by the search box, all satisfied questions (in all categories) will be displayed. To return the current category, you only need to delete the condition that you have just searched.
The answer of each question can be displayed when clicking on the question if
Question type = Collapsible
FAQs Detail Page
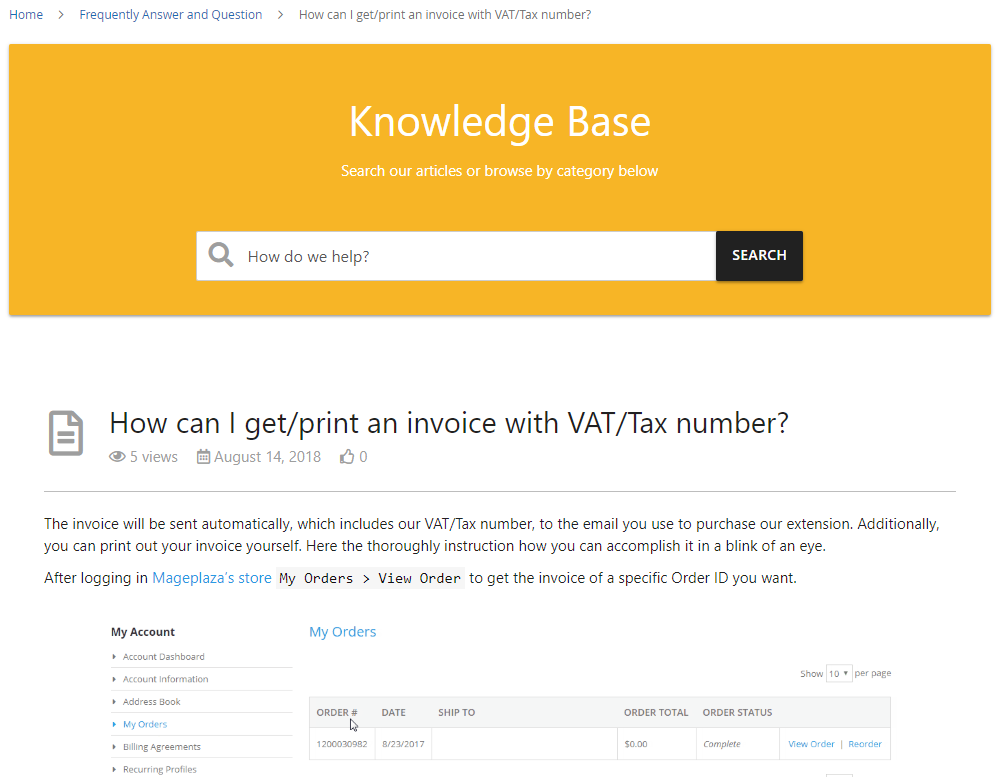
- Display all answer's contents for each question, Pageview, first public dates, positive feedbacks.
- Question Detail Page can display the
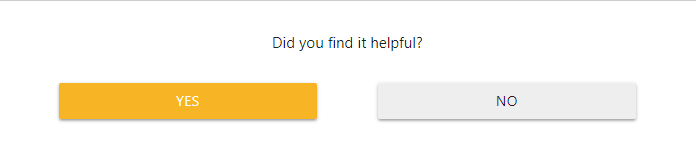
Voting for helpfulnessfield so that customers can respond if this answer is helpful to them or not.
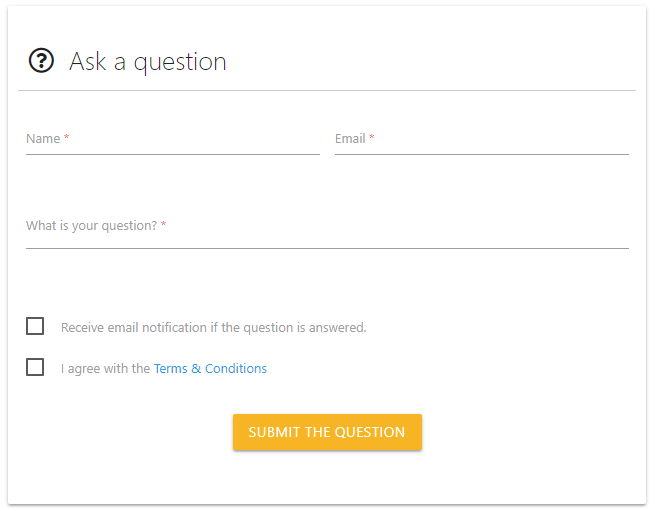
- If getting the allowance of admins, customers can also submit the question at the bottom of each Question Detail page. The notification will be sent to the customer email box when their question is added the answer and public if they tick in the checkbox
Receive email notification. - For the countries don't use the English alphabet (such as Russian, Japanese, Korean, Chinese, Arabic, etc.), questions will not be submitted.
FAQs Product Tab
- Display all questions regarding the product.
- Customers can submit a question here. The question submitted by creating the form in the Product Tab will be auto-displayed in the Product Detail when it's public.
- Similar to the submit form in the Question detail page, we don't support the countries that do not use the English alphabet (such as Russian, Japanese, Korean, Chinese, Arabic, etc.)
How to configure
Login to the Magento Admin, choose Content > FAQs
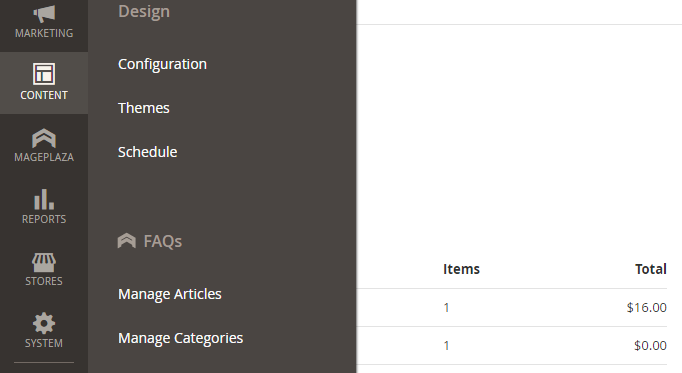
1. Manage Articles
1.1. Management Grid
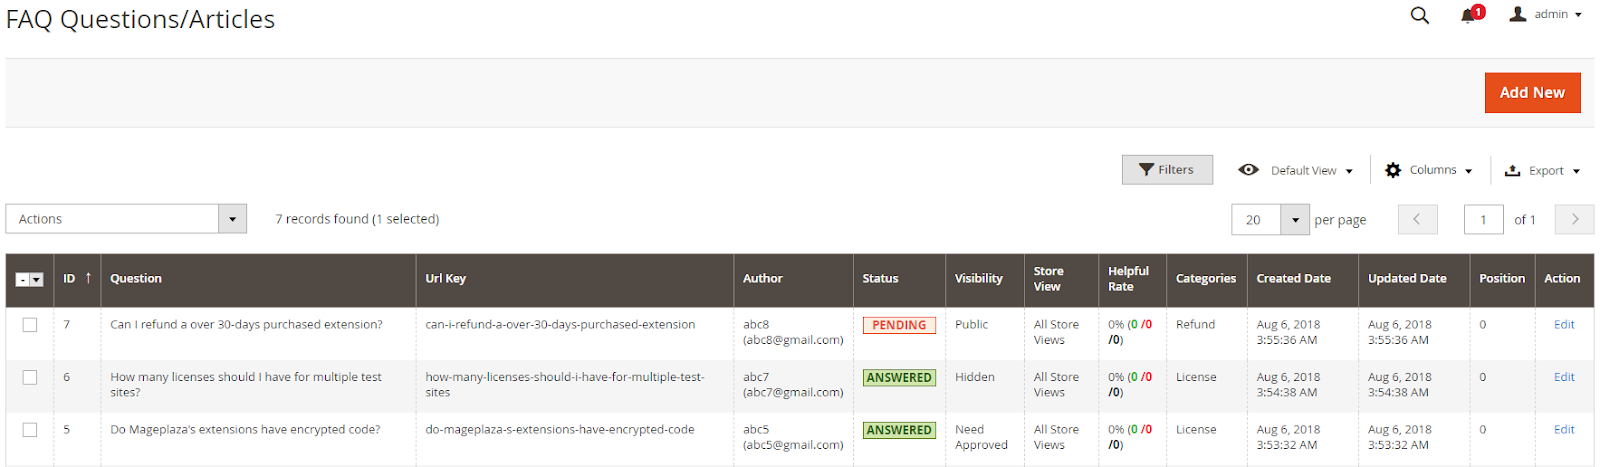
- This is a place to save all required questions. It includes that admins have created and customers have created.
- From the Grid, admins can know all basic information of question as
ID, the content and URL of the question, who created the question, the status of the question (answered or not), Visibility (public, hidden, need approved), displayed store view, Helpful rate, Create date, Update date, Position, and Action. - Admins can perform some actions as the following:
- Delete: Admins need to tick and choose the question that they want to delete, then select Delete in the Action box (in the upper left of the grid) to delete. A confirmation dialog will appear, then choose
OKto continue deleting. - Change Visibility: Admins need to tick and choose the question that you want to change the Visibility, then choose
Change Visibility > Public/Hidden/Need Approvedin the Action box (in the upper left of the Grid) to change the Visibility. Instantly, selected questions will be changed about selected Visibility. - Edit: To edit a rule, admins need to choose
Editin the Action box (the last column on the right of the Grid) - Instant Edit: Admins can edit some fields of the Rule in the Grid by clicking the mouse to the field you want to edit. The Grid will change as the following:
- Delete: Admins need to tick and choose the question that they want to delete, then select Delete in the Action box (in the upper left of the grid) to delete. A confirmation dialog will appear, then choose
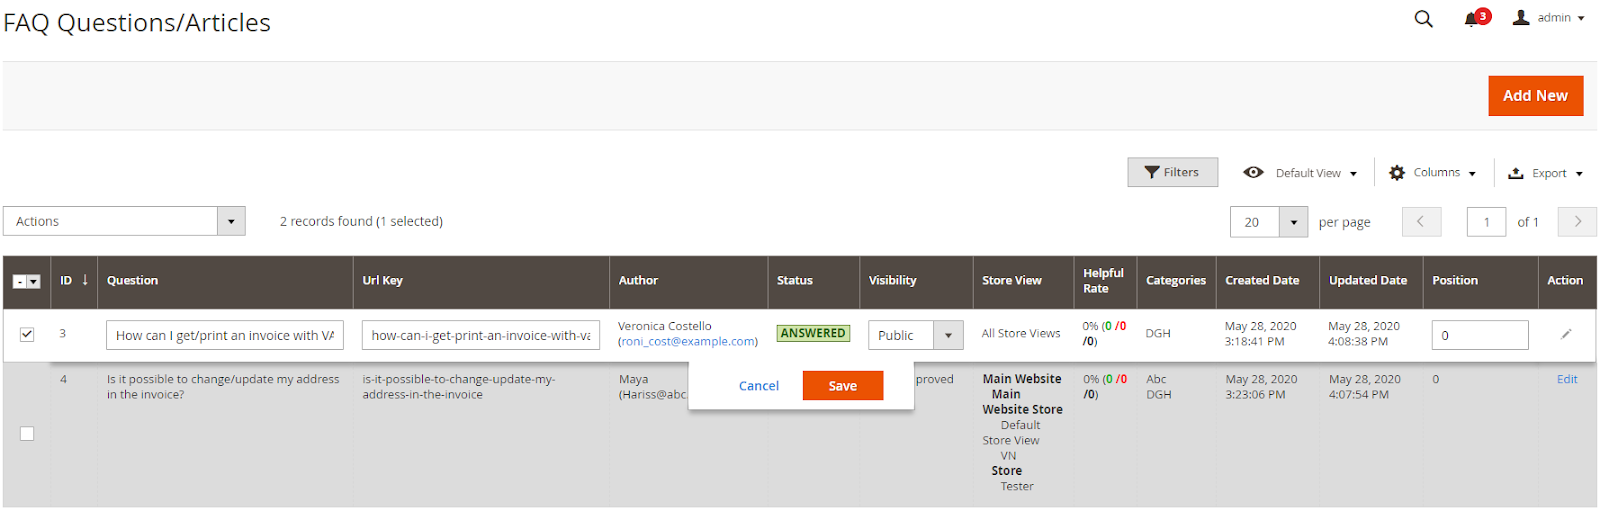
- Also, admins can filter, change Store View, hide/represent the columns or export Grid.
1.2. Add New/Edit Form
1.2.1. General

Statistic
- This is a place to count the view (the detail page view), the total number of actions (counted by times), positive and negative (as a percentage).
- Details about those fields:
- View is counted by numbers of detail question page.
- Action = ratings of Positive + Negative.
- Positive (%) = ratings of Positive/Action.
- Negative (%) = ratings of Negative/Action.
General
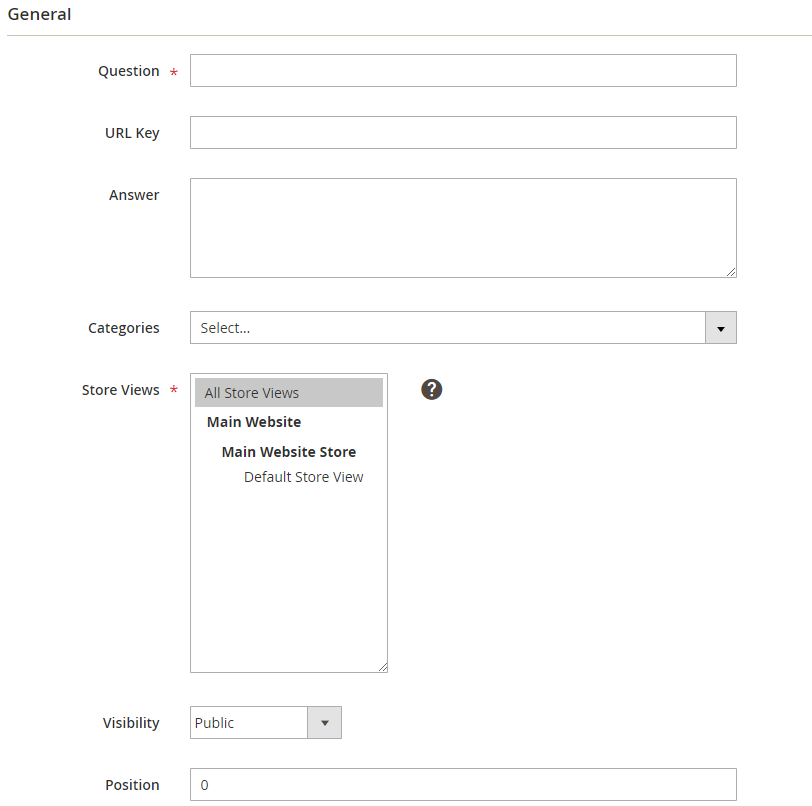
- Question: The question will be filled in this section. It is displayed in the backend and on the frontend (if published)
- URL Key:
- The content entered in this section is the URL of the detail question page.
- To access the detail question page, customers need to click on the
Read morelink under each answer or click on the question when searching. - If you leave this field blank, the system will auto-create URL key for the detail question page.
- Note: With the countries that don't use the English alphabet, URL key won't be created.
- Answer:
- The content entered in this section is the answer to the question as we mentioned above.
- If you leave this field blank, after Saving, the status will be displayed in the Grid, called
PENDING. - In contrast, if the answer field contains the content, the status in the Grid, called
ANSWERED.
- Categories:
A question will belong to a certain field and admins can classify it by adding Category to Question.
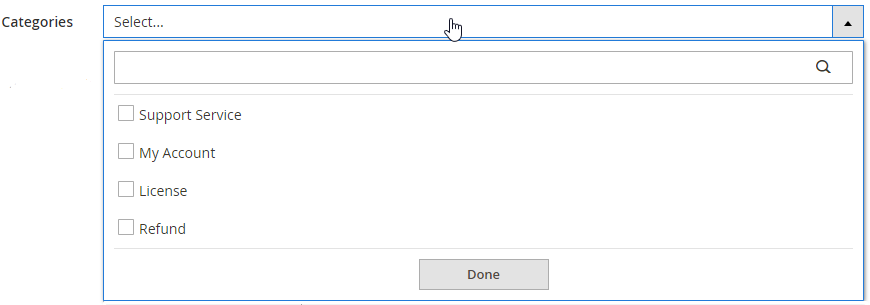
To display the Category, admins need to create it in the
Manage Categoriessection.
- Store Views: A website can have many store views. Questions are only displayed with selected store views.
- Visibility: A question can have 3 visibilities. Real visibilities allow admins to distinguish what questions are public, which questions can be ignored and which questions need to be approved.
- Public: Admins choose Public, this means that the questions will be displayed outside the frontend.
- Hidden: When you choose this option, this means that the questions are removed by admins and will be hidden from the frontend.
- Need Approved: When a question is submitted, or the question that admins don't want to display, they will use this option.
- Position: This field stipulates the order to display the question on FAQs Homepage, FAQs Category, and FAQs Product Tab.
Customer Information
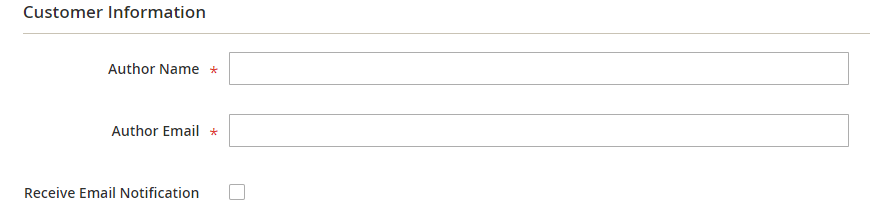
Author Name:
- When a question is submitted, the name of the submitter is also submitted to the backend.
- In case, the name isn't required, the information sent to the backend is Quest.
Author Email:
- When a question is submitted, the email of submitters is also submitted to the backend.
- In case the email isn't required, the information sent to the backend is quest@gmail.com
Receive Email Notification:
- When this section is selected, customers will get the email notification about the answer that they have submitted before.
SEO Config
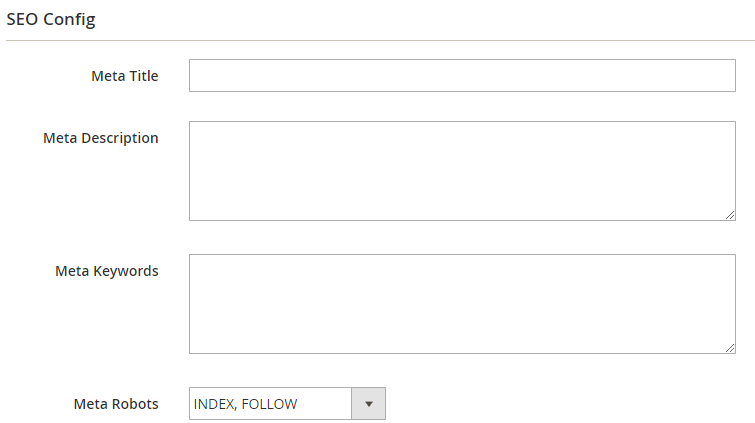
- You can configure the meta that is useful for your better SEO
- Set Meta title for question detail page
- Set Meta description for question detail page
- Set Meta keywords for question detail page
- Set Meta Robots for question detail page
1.2.2. Product
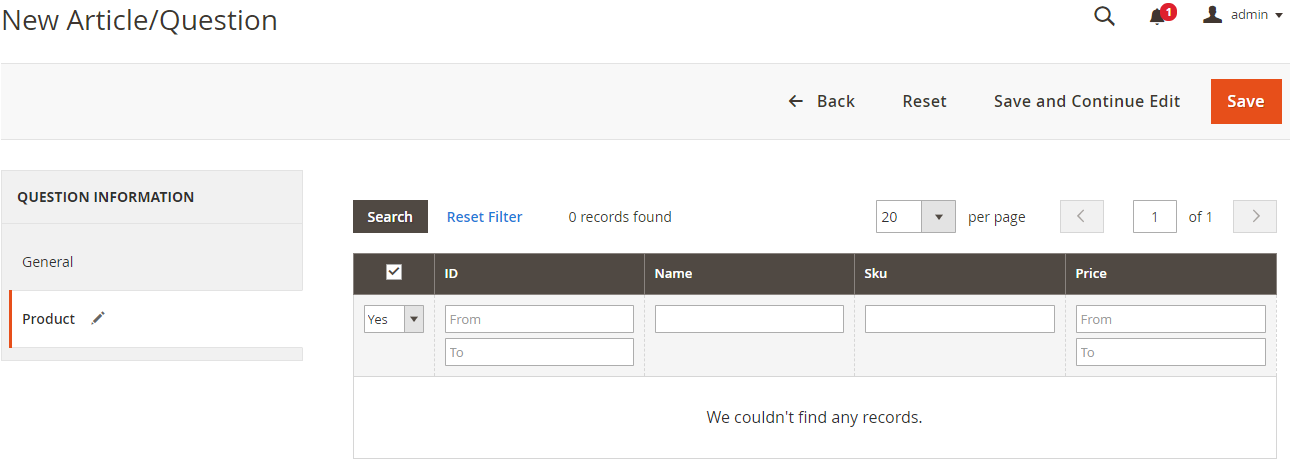
- You can do Assign Products to the Question in the Products tab when you create a new post
- In the list of the available products, mark the checkbox that is next to the products you want to assign
- Tap Save and Continue Edit, then hit Save to finish
2. Manage Categories
2.1. Management Grid
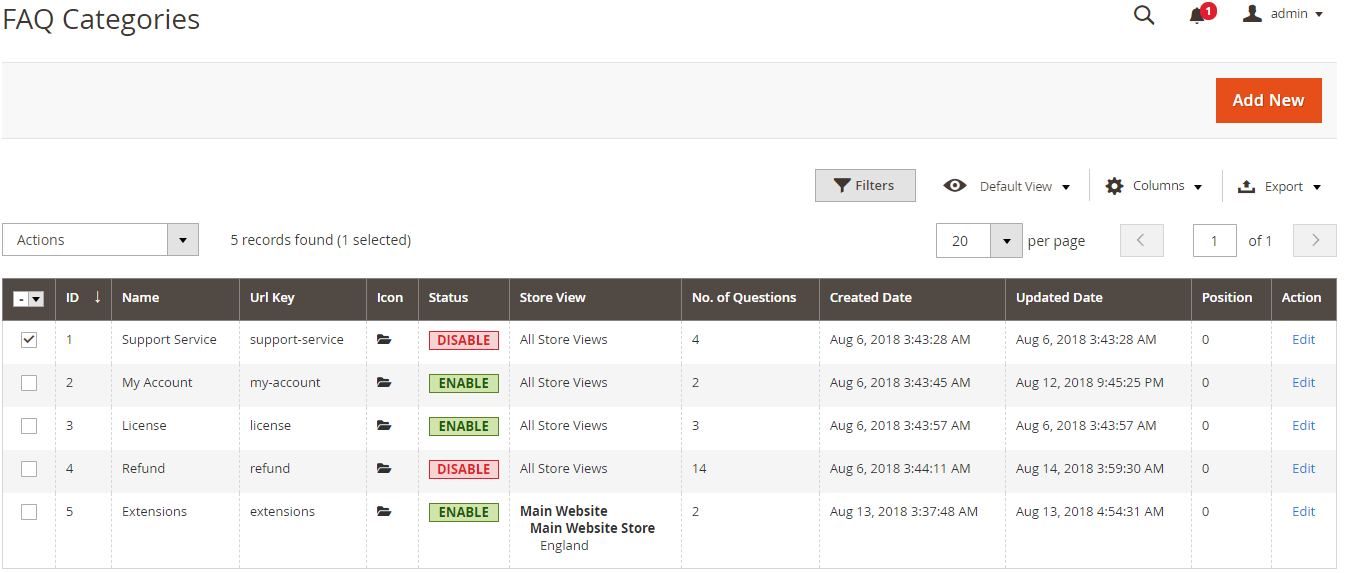
- This is a place to save all categories that admins have created.
- From the Grid, admins can know all basic information of question as
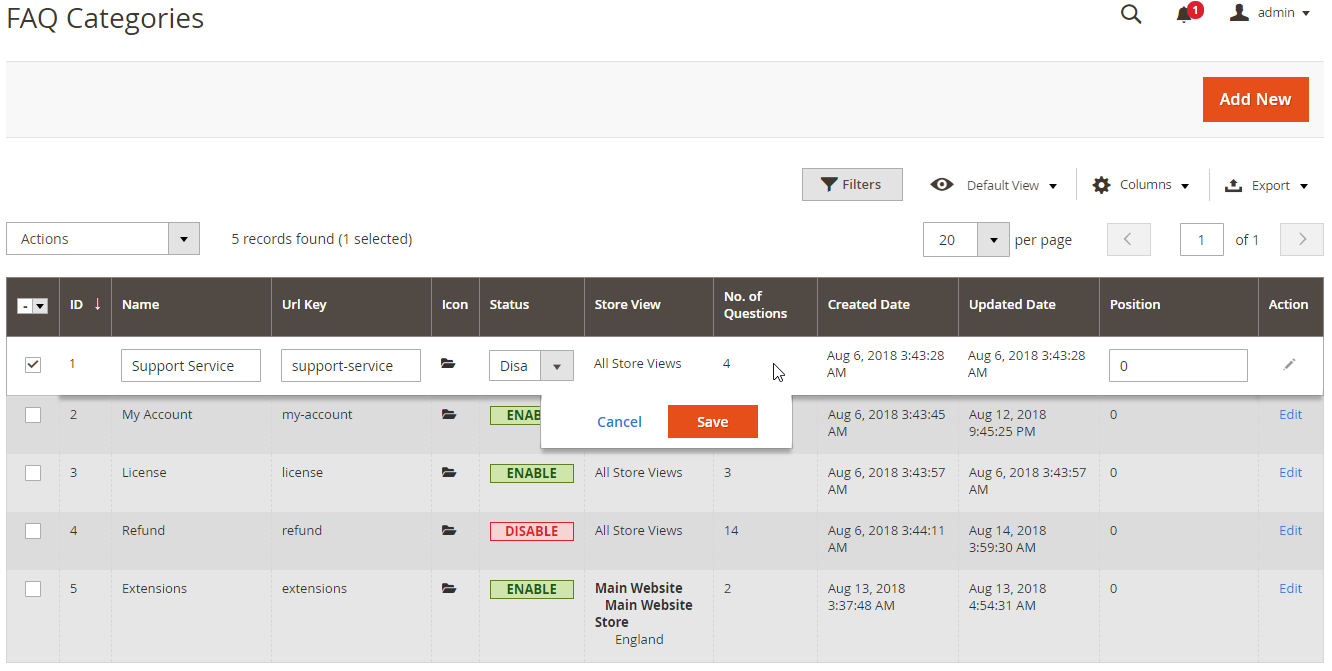
ID, the name and URL of the question, icon of the Category, the status of Category, Store View, the number of questions, Create Date, Update Date, Position, and Action. - Admins can perform some actions as the following:
- Delete: Admins need to tick and choose the question that they want to delete, then select Delete in the Action box (in the upper left of the grid) to delete. A confirmation dialog will appear, then choose
OKto continue deleting. - Change Status: Admins need to choose the category that they want to change the status, then choose
Change Status > Enable/Disablein the Action box (in the upper left of the Grid) to change the Status. Instantly, selected categories will be changed about the selected status. - Edit: To edit a rule, admins need to choose
Editin the Action box (the last column on the right of the Grid) - Instant Edit: Admins can edit some fields of the Rule in the Grid by clicking the mouse to the field you want to edit. The Grid will change as the following:
- Delete: Admins need to tick and choose the question that they want to delete, then select Delete in the Action box (in the upper left of the grid) to delete. A confirmation dialog will appear, then choose
- Also, admins can also filter, change the store view, hide/represent the columns or export the grid.
2.2. Add New/Edit Form
2.2.1. General
General
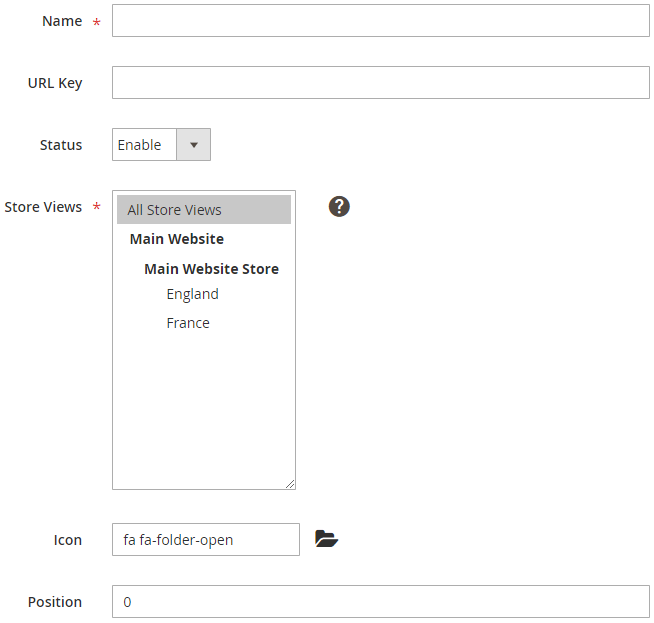
Name: The name of Category entered in this section will be displayed both in the backend and frontend (if enabled and it has the dependent questions)
URL Key:
- The content filled in this field will be URL of the category page
- To access the category page, customers only click on the name of category on the frontend
- If you leave this field blank, the system will auto-create the URL key for category page
Status: You need to enable this field so that the category will be displayed on the frontend when it has the dependent questions.
Store View: A website has many store views. The category will only be displayed with selected store views.
Icon:
- Go to the page: https://fontawesome.com/ to choose the icon of the category you want.
- When you copy class of the icon into the field, immediately, an illustrated icon will be shown.
Position: Stipulate the orders to display the category in FAQs Homepage
SEO Config
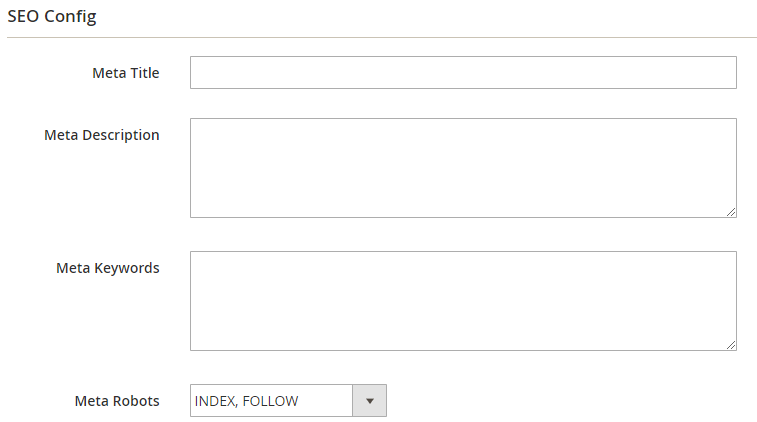
- You can configure the meta that is useful for your better SEO
- Set Meta title for Category page
- Set Meta description for Category page
- Set Meta keywords for Category page
- Set Meta Robots for Category page
2.2.2. Question
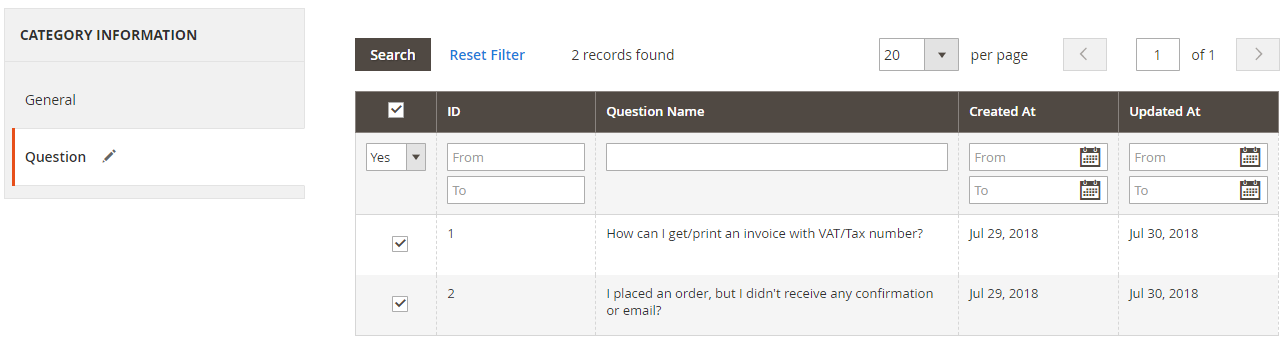
- You can do Assign Question to the Category in the Question tab when you create a new category
- In the list of the available question, mark the checkbox that is next to the question you want to assign
- Tap Save and Continue Edit, then hit Save to finish
3. Configuration
3.1. General
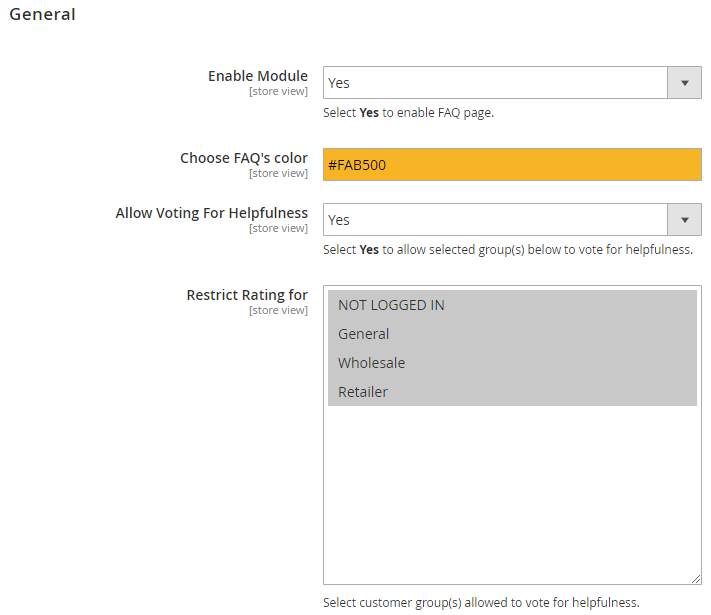
- Enable Module: Choose Yes to enable this module
- Choose FAQ's color: The color that you choose in this section will stipulate the main color of FAQ Page on the frontend
- Allow Voting For Helpfulness: Choose Yes so that customers can rate Positive or Negative for each answer
- Restrict Rating For: Stipulating the customer group can rate the answer quality.
3.1.1. Add Question Config
- It is a part of General Config
- This field stipulates the configuration about adding questions
- The action about adding questions will be displayed in the Question detail page
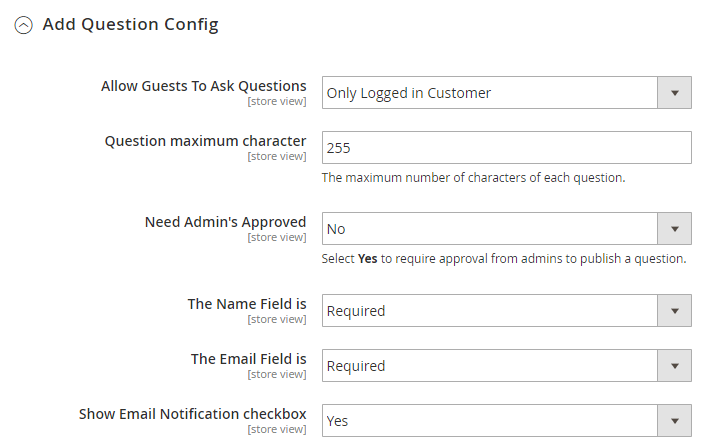
- Allow Guests To Add Questions: There are 3 options to stipulate who can submit the question for admins

- Only Logged In Customer: Only customers who have the account can add the question
- Yes: All customers can add the question
- No: No customers can submit the question. The question is only added by admins in Manage Question
- Question maximum character:
- Limit the maximum character for a question
- If you leave this field blank, the maximum character is 255
- Need Admin’s Approved:
- Any submitted question will not be displayed on the frontend, it will be changed to Manage Question
- Choose
Yesso that the question has the visibility isNeed Approvedwhen changing to the Manage Question - If you choose
No, the visibility of the question isHidden.
- The Name Field is:

No: The name field won't be displayed on the frontend
Optional: The name field will be displayed on the frontend but customers don't need to fill in
Require: The name field will be displayed on the frontend and customers have to fill in this section so that the question is submitted
In case you choose
No and Optional, the default name will be sent to the backend isQuest.The Email Field is:

- No: The email field won't be displayed on the frontend
- Optional: The email name will be displayed on the frontend but customers don't need to fill in
- Require: The email field will be displayed on the frontend and customers must fill in this field so that the question is submitted
- In case you choose
No and Optional, the default name will be sent to the backend isquest@gmail.com - Show Email Notification checkbox:
- Choose
Yesso that the checkbox can receive the email when the answer is added and public - Customers need to tick on the new checkbox to allow receiving the email
- Choose
3.1.2. Question Detail Page Config
- It's a part of General Config
- This section stipulates the configuration about the Question Detail page
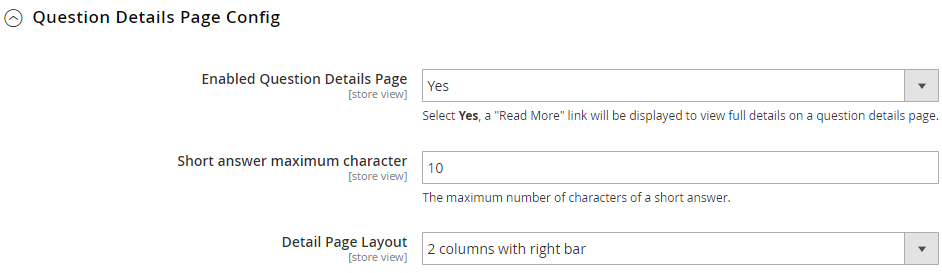
Enable Question Details Page:
- Choose Yes to view the question and answer detail when clicking on
Read More - If choosing No, the answer will be displayed totally and it doesn't include the
Read Morelink. The original URL of the question is also changed to 404 page
- Choose Yes to view the question and answer detail when clicking on
Short answer maximum character:
- Limit the maximum character for each question
- If leaving this field blank, the maximum character is 255
Detail Page Layout:

- Select one of the following layouts to have your checkout page be shown in four different interfaces
- 1 column
- 2 columns with left bar
- 3 columns with right bar
- 3 columns
3.1.3. Search box Config
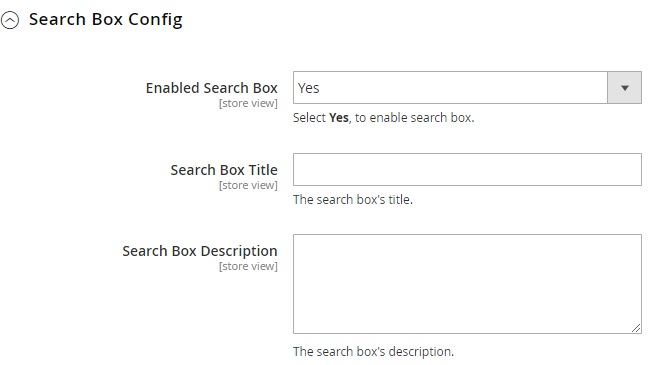
- Enable Search Box: Choose Yes so that Search Box will be displayed on the FAQ homepage, FAQ Category, and FAQ Question Detail.
- Search Box Title:
- Enter the title of the Search Box
- The content of this field will be displayed on the frontend
- Default = Knowledge Base
- Search Box Description:
- Enter the description of the Search Box
- The content of this field will be displayed on the frontend
- Default = Search our articles or browse by category below
3.2. FAQ Schema Markup
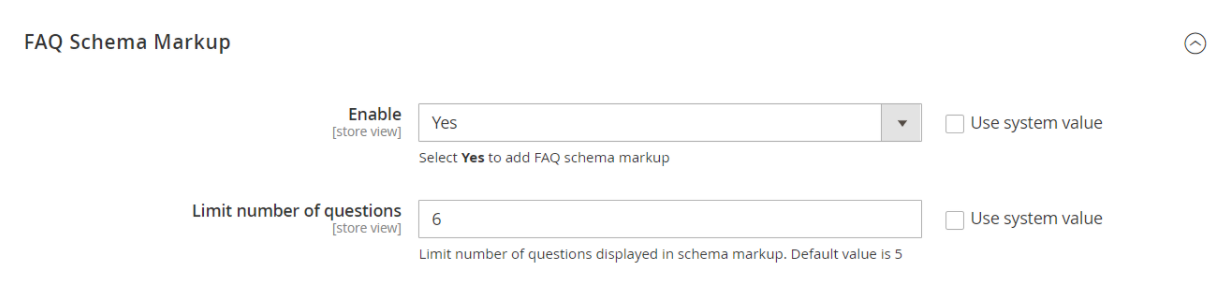
- Enable: Choose Yes to create FAQ Schema Markup for FAQs.
- Limit number of questions:
- Limit the maximum number of questions displayed in the Schema Markup.
- If left blank, the maximum number of questions is 5.
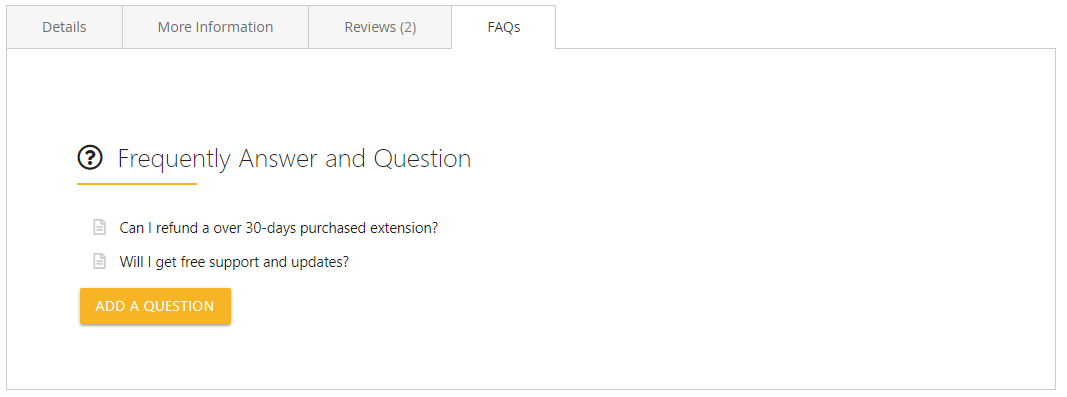
3.3. FAQ Home Page Configuration
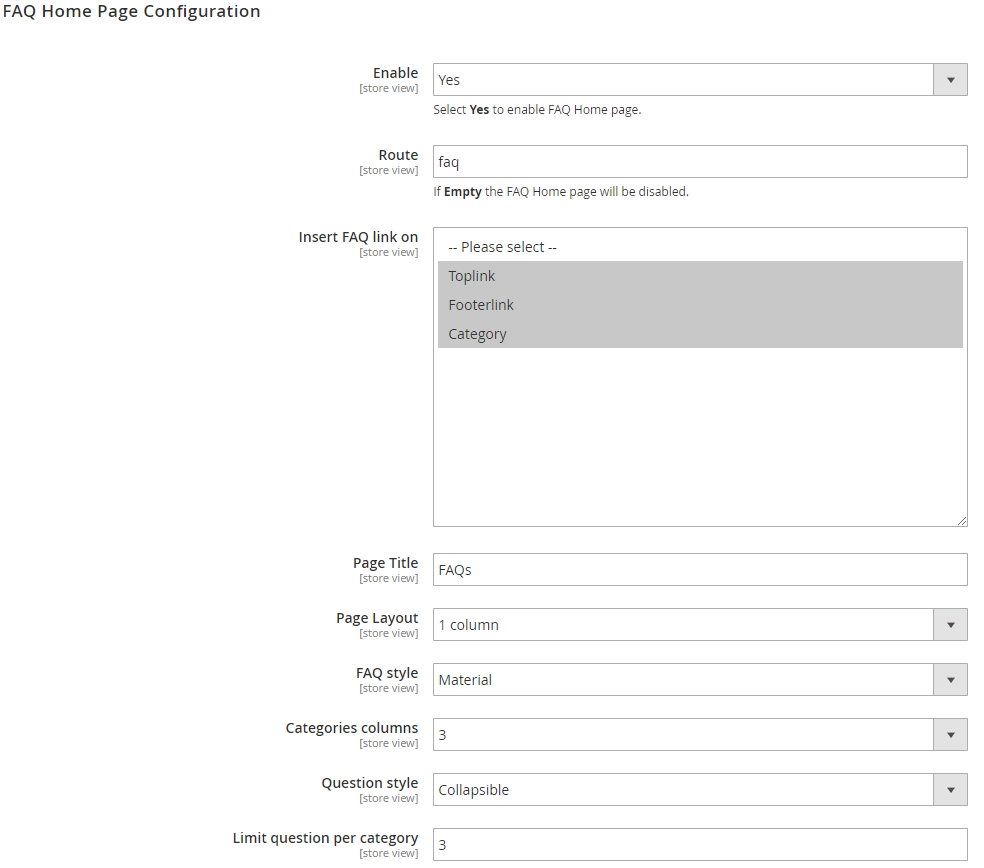
Enable: Choose Yes to enable the FAQ homepage
Route: The route of FAQ Homepage is entered in this field. If leaving it blank, FAQ Homepage will be disabled
Insert FAQ link on:
- Choose the position for displaying the FAQ Homepage
- There're 3 positions to display: Toplink, Footerlink, and Category Menu
- FAQ Homepage link will not be displayed if you choose
Please Select
Page Title:
- Fill in the page title
- If leaving it blank, the default = Frequently Answer and Question
Page Layout:
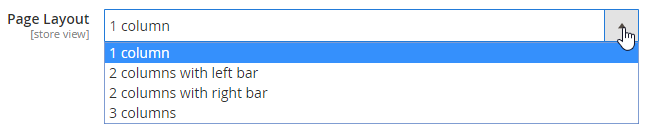
Select one of the following layouts to have your checkout page be shown in four different interfaces
- 1 column
- 2 columns with left bar
- 3 columns with right bar
- 3 columns
FAQ Style: Now we offer one style only is
MaterialCategories Columns: Categories are arranged into 1 or 2 or 3 columns depending on the option that admins choose in this section
Question Style:

- Collapsible: On the FAQ Homepage, the answers will be collapsed with their questions. The answer only will be displayed if customers click on the question, and it will be hidden if the question is clicked again.
- Default: The answer will be displayed under the question and customers cannot collapse the question anymore.
- Limit Question per Category:
- Limit the maximum questions displayed on each category
- If leaving it blank, the maximum questions displayed is 5
3.3.1. SEO Config
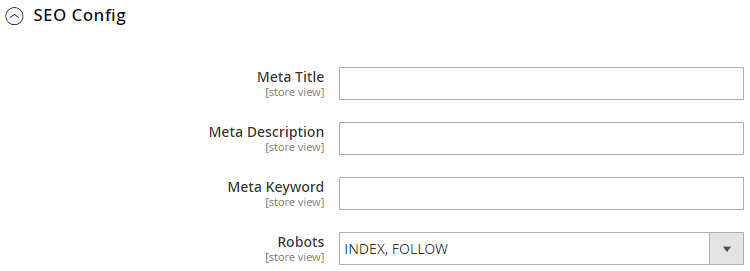
- You can configure the meta that is useful for your better SEO
- Set Meta title for FAQ Homepage
- Set Meta description for FAQ Homepage
- Set Meta keywords for FAQ Homepage
- Set Meta Robots for FAQ Homepage
3.4. Product Tab Configuration
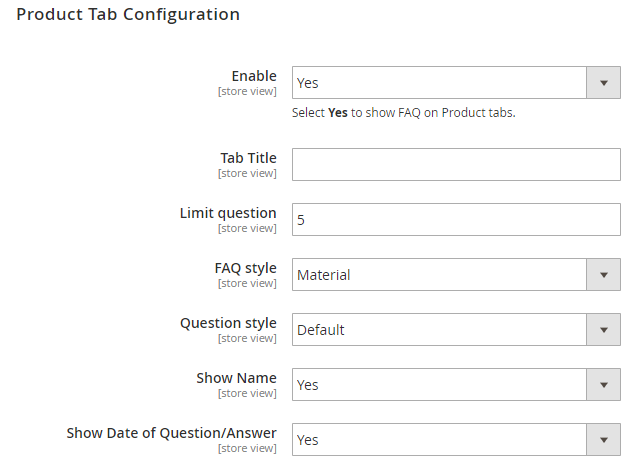
- Enable: Choose Yes so that FAQ Tab can display in the Product Info Detail Box
- Tab Title:
- Fill in the Tab Title
- If leaving it blank, the default = FAQs
- Limit question:
- Limit the maximum questions that displayed on the Product Detail Page
- If leaving it blank, the maximum questions displayed is 5
- FAQ Style: Now we only offer one style,
Material. - Question Style:

- Collapsible: On the homepage, the answers will be collapsed with their questions. The answer will only be displayed if customers click on the question, and it will be hidden if the question is clicked again.
- Default: The answer will be shown under each question and customers cannot collapse the question.
- Show Name: Choose Yes to allow displaying the name of the person who has submitted the question
- Show Date of Question/Answer:
- Choose Yes to display the date that the answer is public
Note: The date will be displayed if the name is shown (Show Name = Yes)
3.5. Terms & Conditions
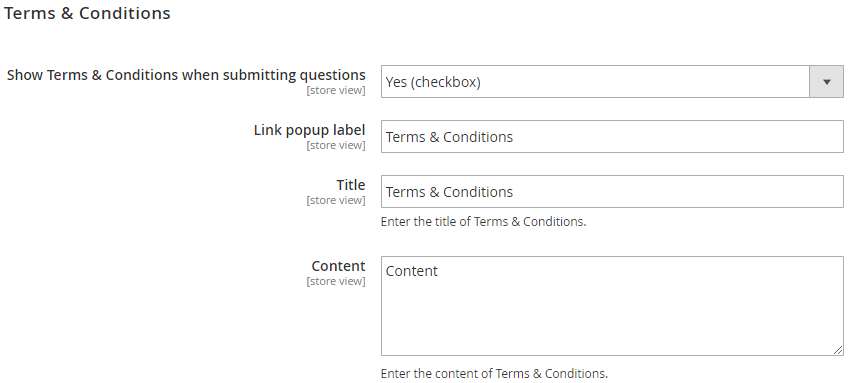
- Show Terms & Conditions when submitting questions:

No: Terms & Conditions will not be displayed on the frontend,
Submit Question FormYes (checkbox): Terms & Conditions will be displayed in the
Submit Question Formunder checkbox form. Customers need to tick on the checkbox, after that the question can be submitted.Yes (hidden): Terms & Conditions will be shown in the
Submit Question formunder the text. At this time, customers default to accept the term & condition of the store ownerLink popup label: The name of popup Terms & Conditions. When clicking on the popup label, the popup that contains the content of Terms $ Conditions will be displayed
Title: Allow filling in the title of the popup
Content: The content will be displayed on the popup. We recommend you should use the HTML language.
3.6. Email Configuration

- Enable: Choose Yes so that the actions regarding the email can be enabled
3.6.1. Email to Customer
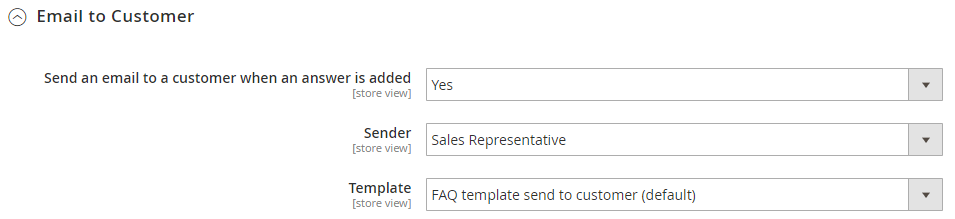
- Send an email to a customer when an answer is added: Choose Yes to email the notification to customers when the answers are public and sent to the registered customers to receive the email
- Sender: Allow choosing one in five senders that Magento offers: General Contact, Sales Representative, Customer Support, Custom Email 1, and Custom Email 2
- Template: The extension is installed an available template to send to customers
3.6.2. Email to Admin
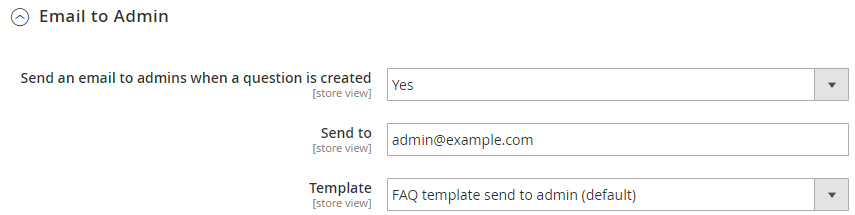
- Send an email to admins when a question is created: Choose Yes to email the notification for admin when a question is submitted by customers.
- Send To: Fill in the email that you want to get the notification when a question is submitted
- Template: The extension is installed an available template to send to customers
4. Widget
- With the widget, you can allow FAQ to display on any page you want.
- To create the widget, you can do the following steps:
Step 1: From the admin panel, choose
Content > Elements > Widget > Add New WidgetStep 2: Choose
Type = Mageplaza FAQs,Design Theme = Magento Luma. After that, select Continue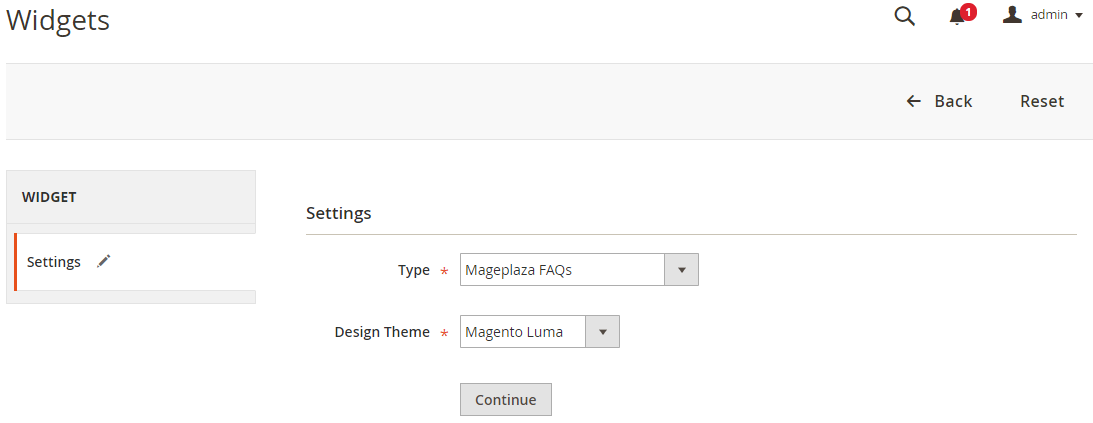
Step 3: Set the name for the widget (displayed in the backend) and choose Store View that you want to allow Widget to display
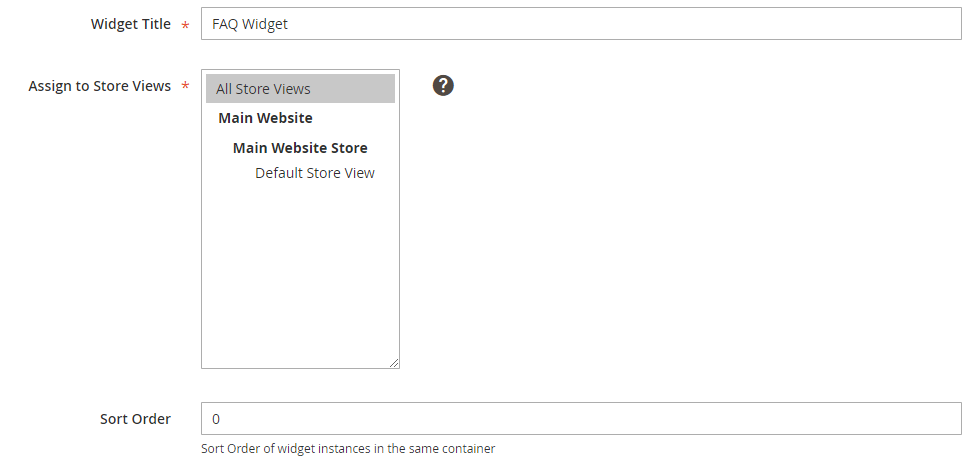
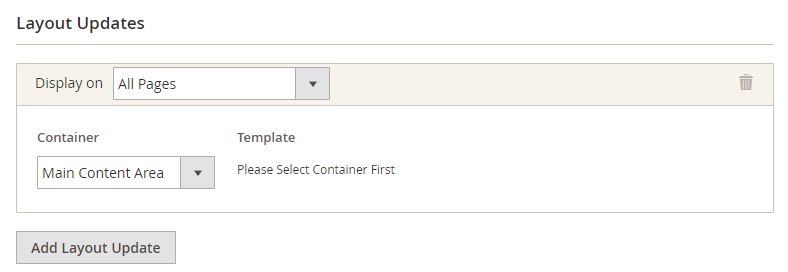
Step 4: Choose the page and the position that you want the FAQ Widget to display
Step 5: Switch to
Widget Optionstab, then set the widget name that you want to display on the frontend.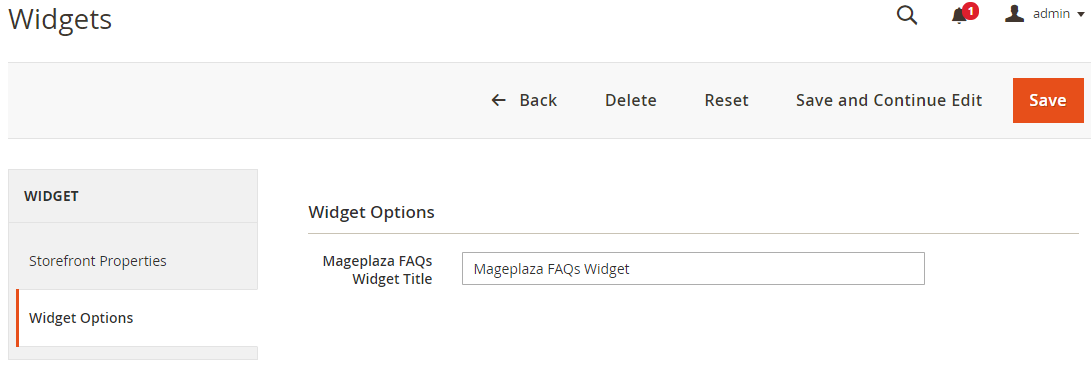
Step 6: Save Widget and check it on the frontend
5. How to import FAQ(s)
At the admin backend, keep track System > Data Transfer: Import
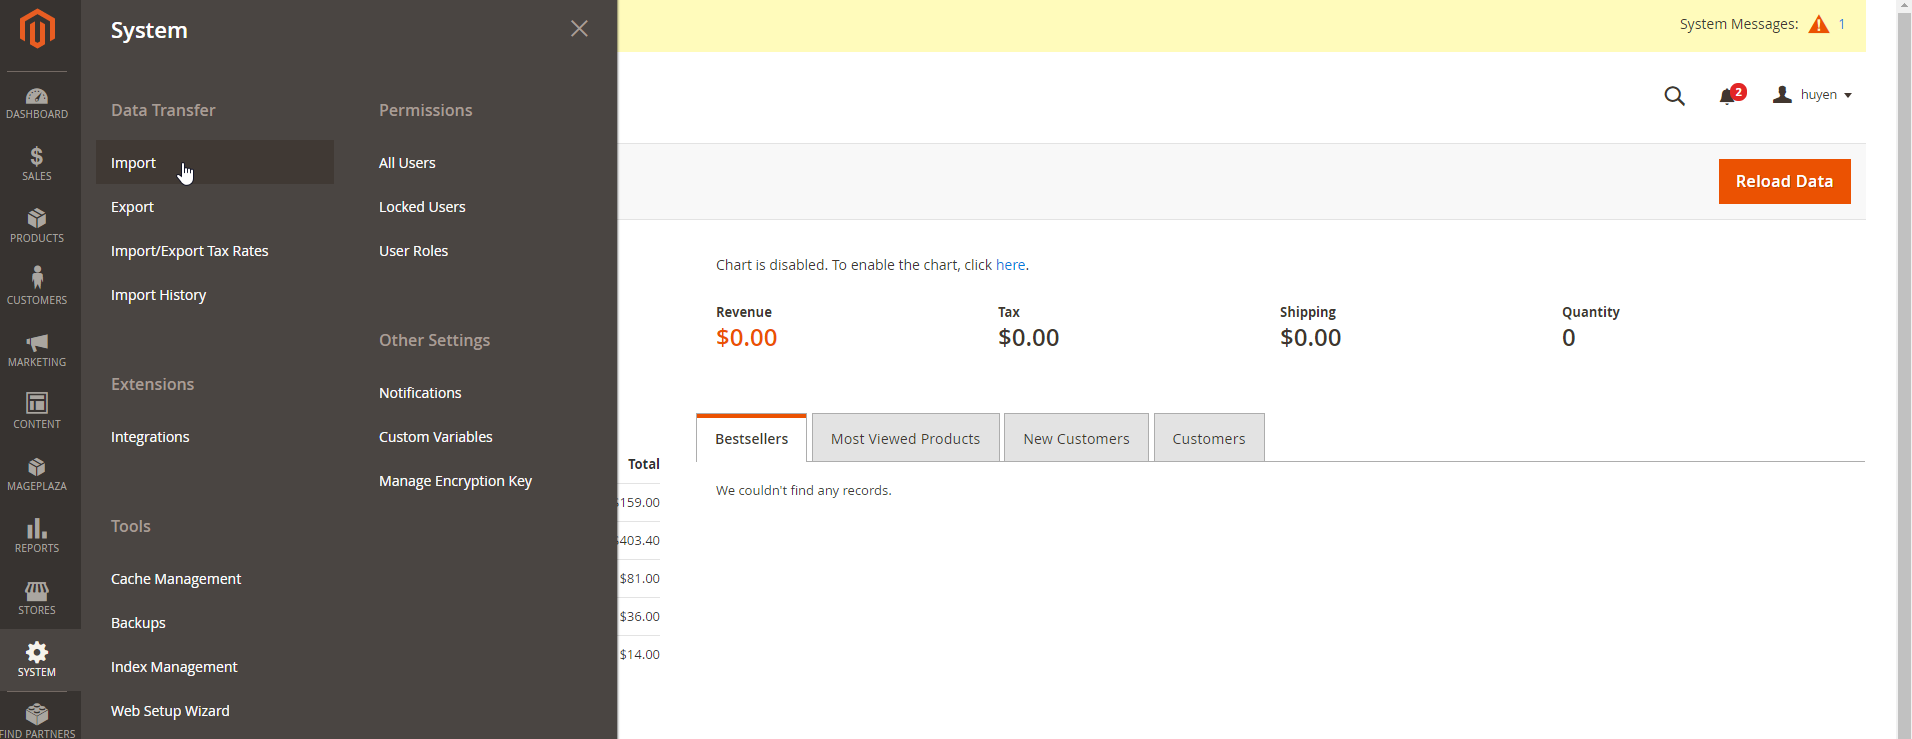
At the Import page, choose the extension you need to input Gift Code(s). At Import Settings, choose Entity Types = Mageplaza FAQ Categories, or Entity Types = MageplazaFAQ Articles. Then the Import Behaviour and File to Import sections will be displayed.

To have a CSV file containing basic information to import FAQ Articles or FAQ Categories, you need to click Download Sample File. Then, edit the content in available columns in the Sample File to have a CSV file quickly. Don’t change the name of columns or there will be errors when Check Data launches.

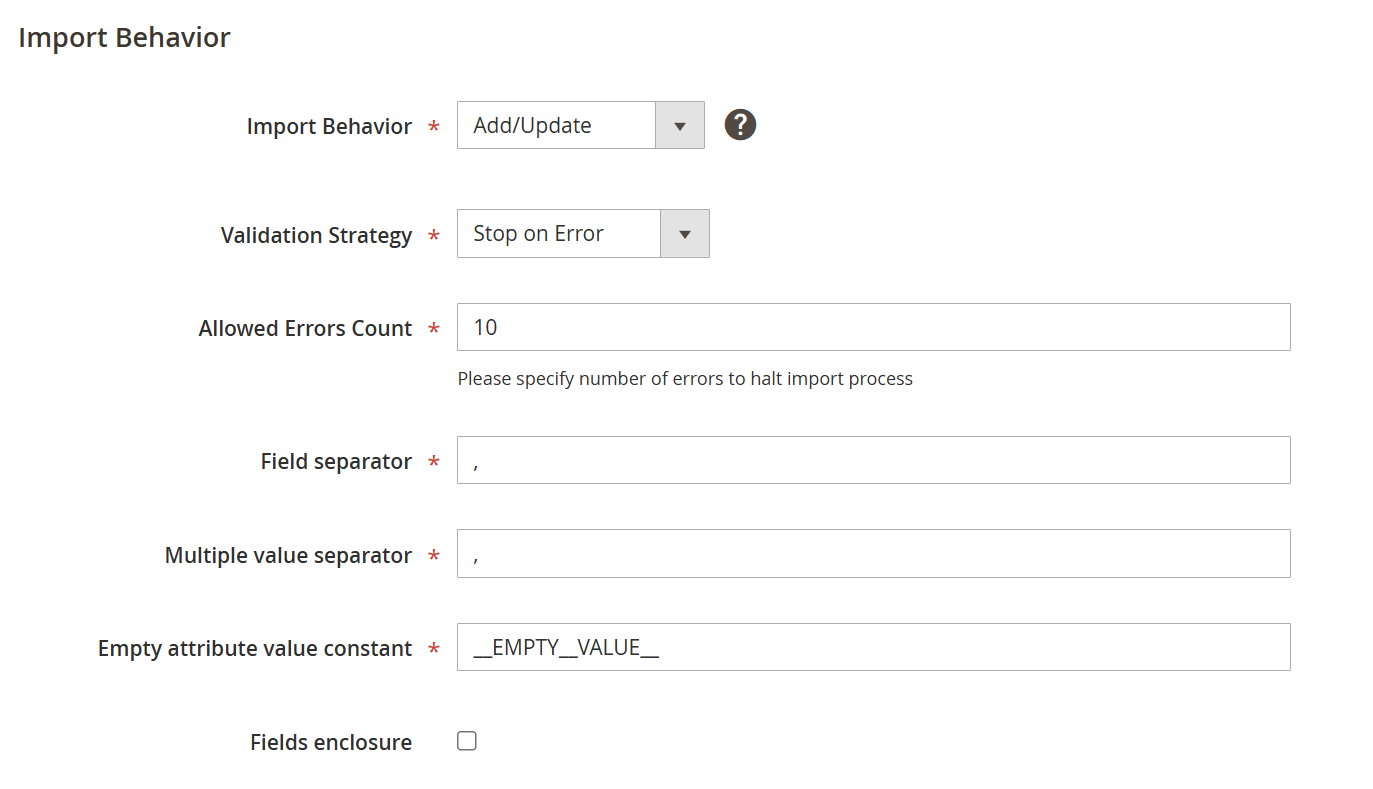
To the next step, we need to choose an Action for Import. In Import Behaviour, choose “Add/Update” so that FAQ(s) will be automatically added.
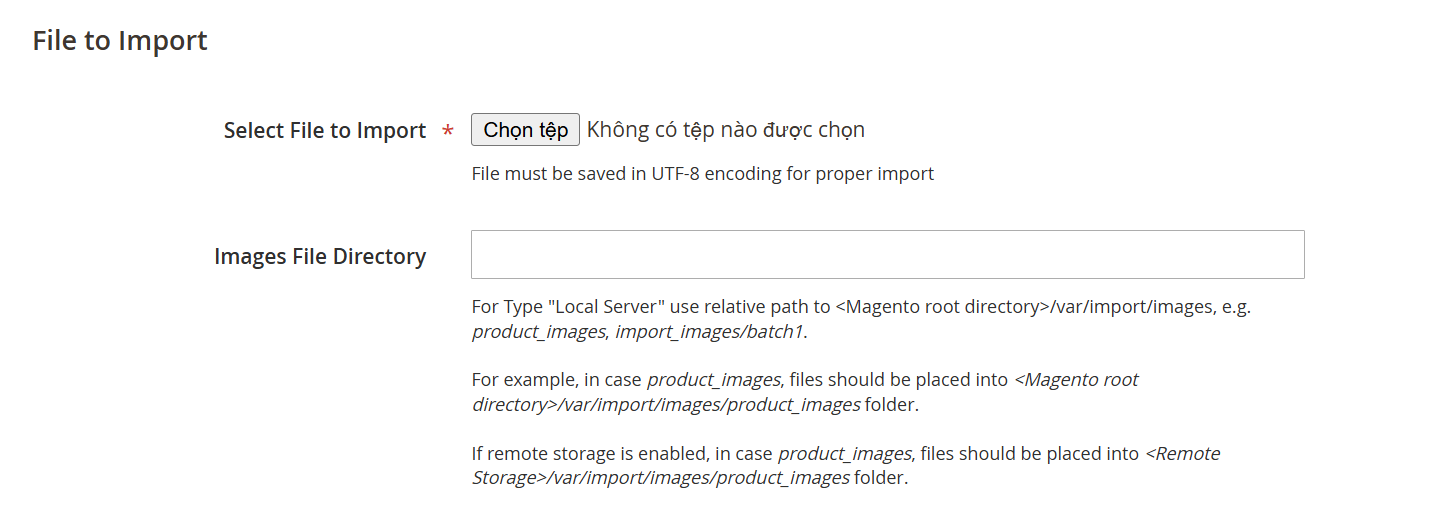
Now, you can select a CSV file to import.
- Choose the file you want to import.
- The importable CSV file needs to meet the above conditions.
To make sure things will work well, click the red
Check databutton. Data in the submitted CSV file will be checked and a message will inform whether it's valid or not. In case of being invalid, admins need to check the CSV file (especially required columns, column’s name, etc.). With the valid case, the Import button will appear along with the message below

Clicking the Import button is the final step!
Note:
- You should run the command: "bin/magento giftcard:uninstall" before you uninstall this extension so that your website doesn't face the error.
6. API
Mageplaza's FAQ extension supports users to use the API to make some requests, such as getting article/category information, creating new categories/article/questions or deleting categories/articles.
7. GraphQL
7.1 How to install
Run the following command in Magento 2 root folder:
composer require mageplaza/module-faqs-graphql
php bin/magento setup:upgrade
php bin/magento setup:static-content:deploy
7.2 How to use
Mageplaza's FAQ extension supports getting categories, articles and creating questions through GraphQL. To start working with FAQs GraphQL in Magento, you need to:
- Use Magento 2.3.x. Return your site to developer mode
- Install chrome extension (currently does not support other browsers)
- Refer the GraphQL requests we supports here.