Sage Pay
Overview
Sage Pay is the leading payment service provider (PSP) in Europe. Mageplaza Sage Pay extension will help you integrate this payment gateway with your store. Sage Pay supports online payment via card and customers can save credit card information at the first payment to save time at the next purchase. Also, customers can manage saved credit card information and delete card information at any time. In particular, the admin will be able to create backend order with Sage Pay.
Your customers can use all debit cards, credit cards, Visa, etc. And also be protected by authorizes, capture and 3D secure as well as AVS/CV2. Stores can choose to redirect customers to Sage Pay Payment page or process all the purchase right on your checkout page.
Mageplaza Sage Pay is fully compatible with our One Step Checkout, Magento Instant Purchase and Reports which helps customers to order, make reports on the sales quickly and conveniently.
How to download and install
- Download Mageplaza Sage Pay
- How to Install
Table of Contents
- How to use Sage Pay
- How to Configure
- 1 Configuration
- 1.1 General Setting
- 1.1.1 Credential
- 1.1.2 Security and Feature
- 1.2 Sage Pay Direct/PI Integration
- 1.3 Sage Pay Form Integration
- 1.4 Sage Pay Server Integration
- 1.1 General Setting
- 2 Manage Transactions
- 3 Admin Order
- 3.1 View Order
- 3.2 Admin Order
- 4 Order Frontend
- 5 Compatible with Instant Purchase
- 6 Refund Order
- 7 Sage Pay Extra Fee
- 1 Configuration
How to use
Register Account on Sage Pay:
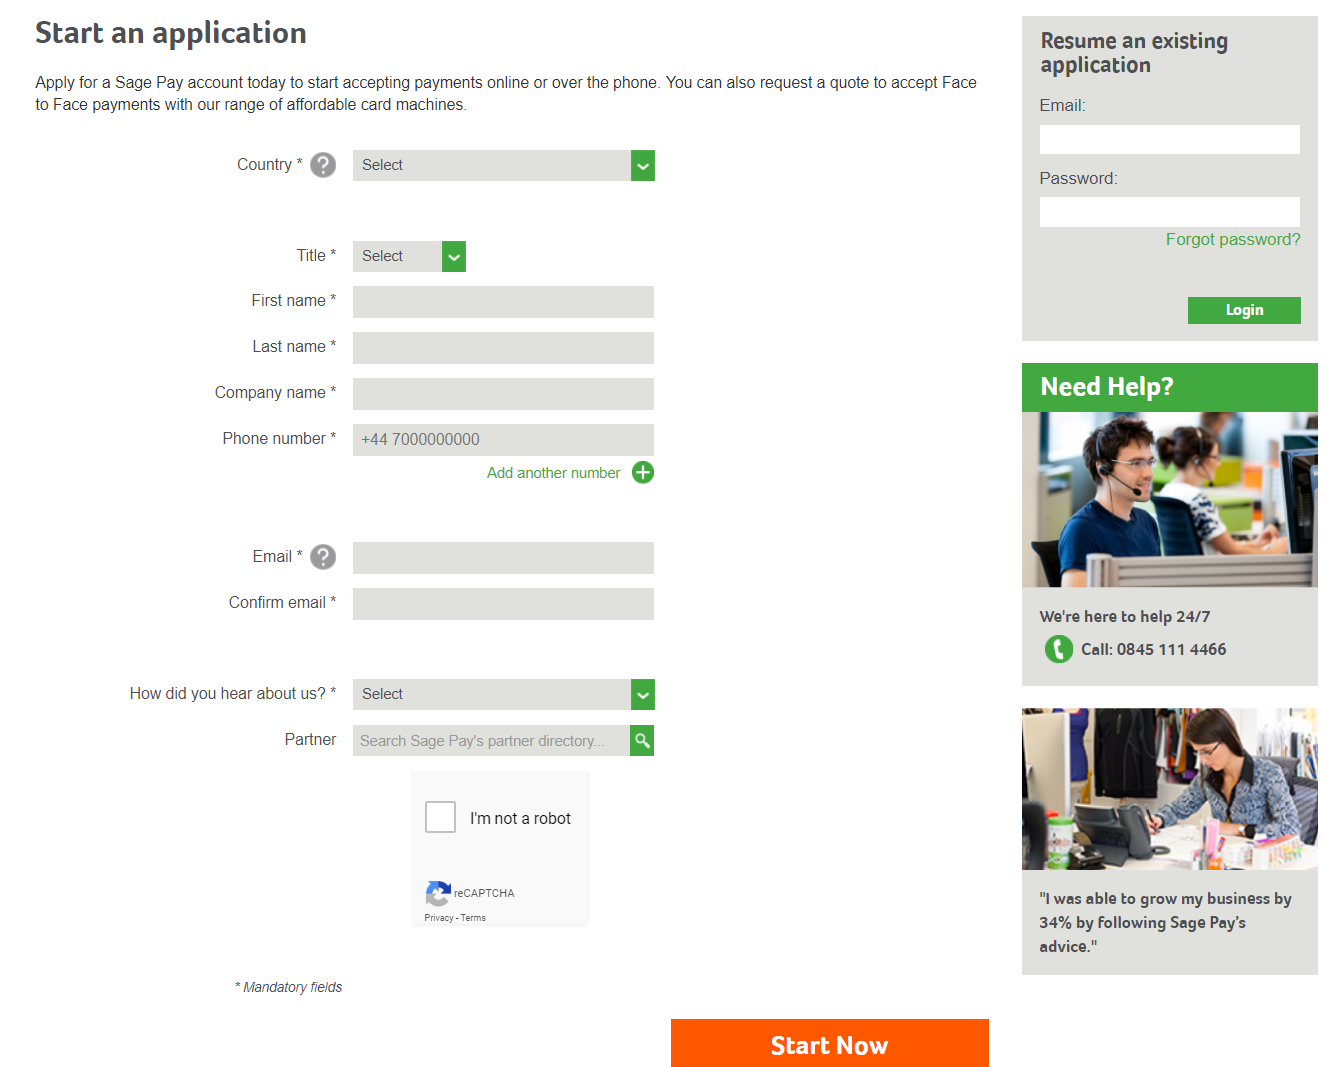
To register for a Sage Pay account, visit this link.
Note: After registering an account, Sage Pay will send mail for authentication and after completing the registration, Sage Pay will send information of Vendor Name, Username, Password. You need to save the above information to connect with Sage Pay.
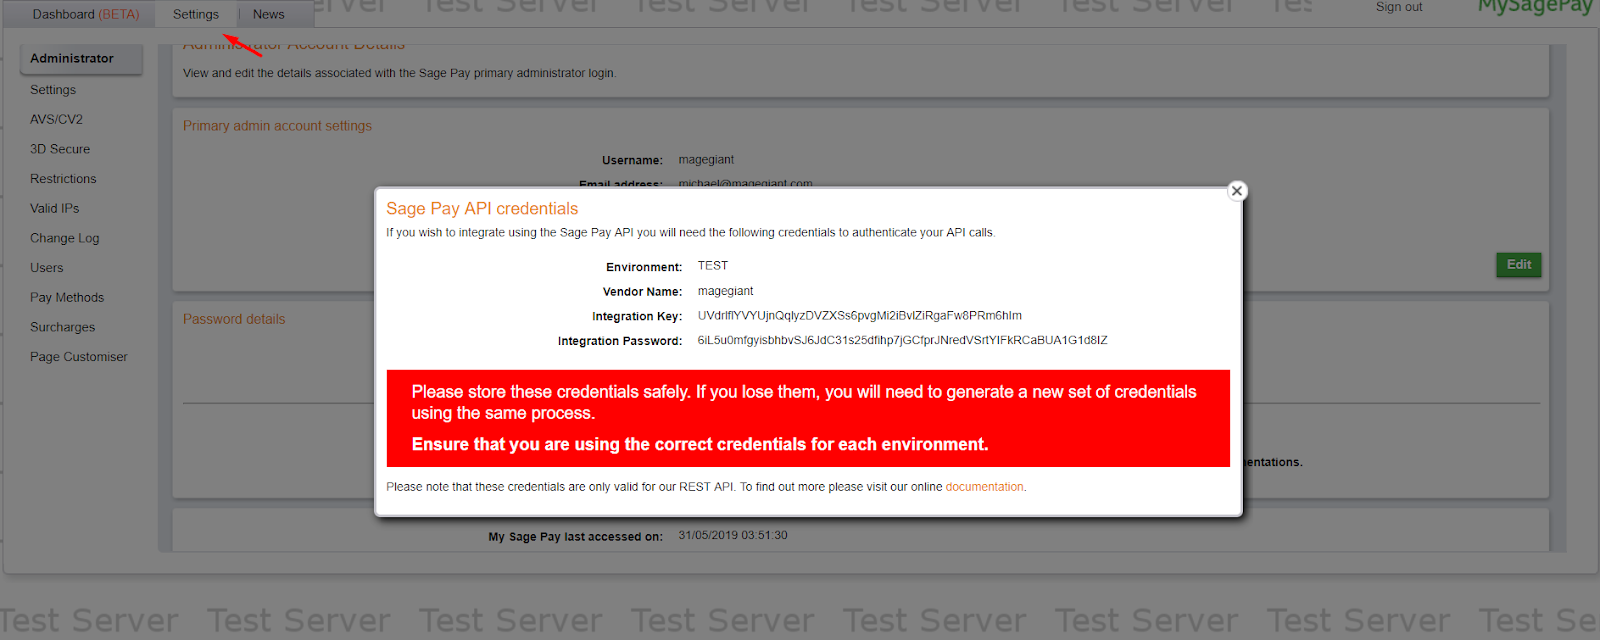
Access to Sage Pay, sign in by the account you registered before. Then go to
Settings > Administrator, stick toI understand that this will create new credentials and may break any existing Sage Pay API implementations.then click Create API credentials button to get the Integration Key, Integration Password. Here, you also can get the information of Form Integration Encryption Password.

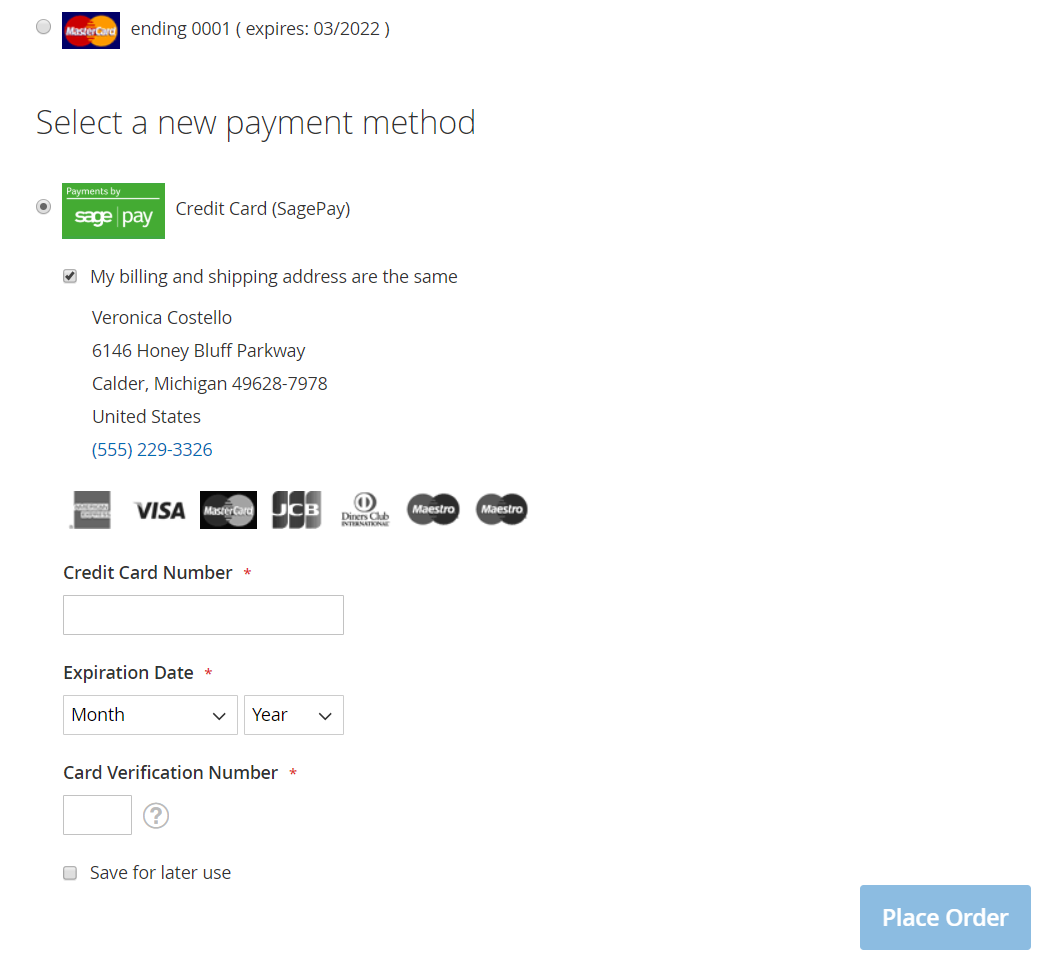
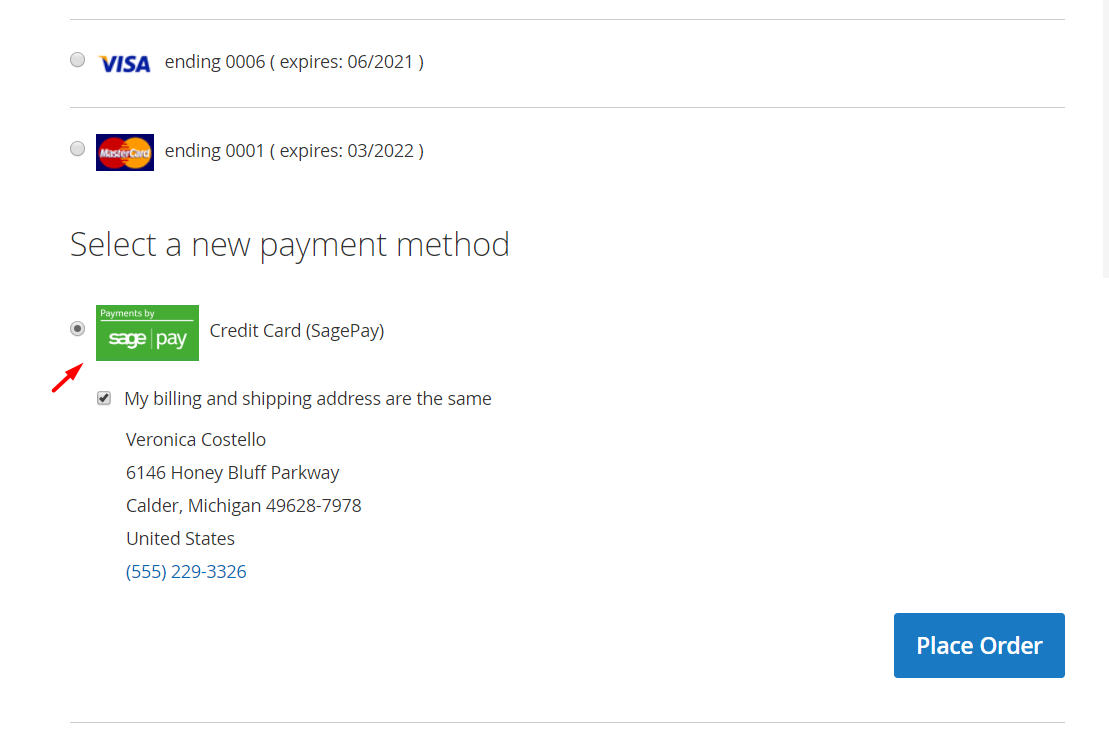
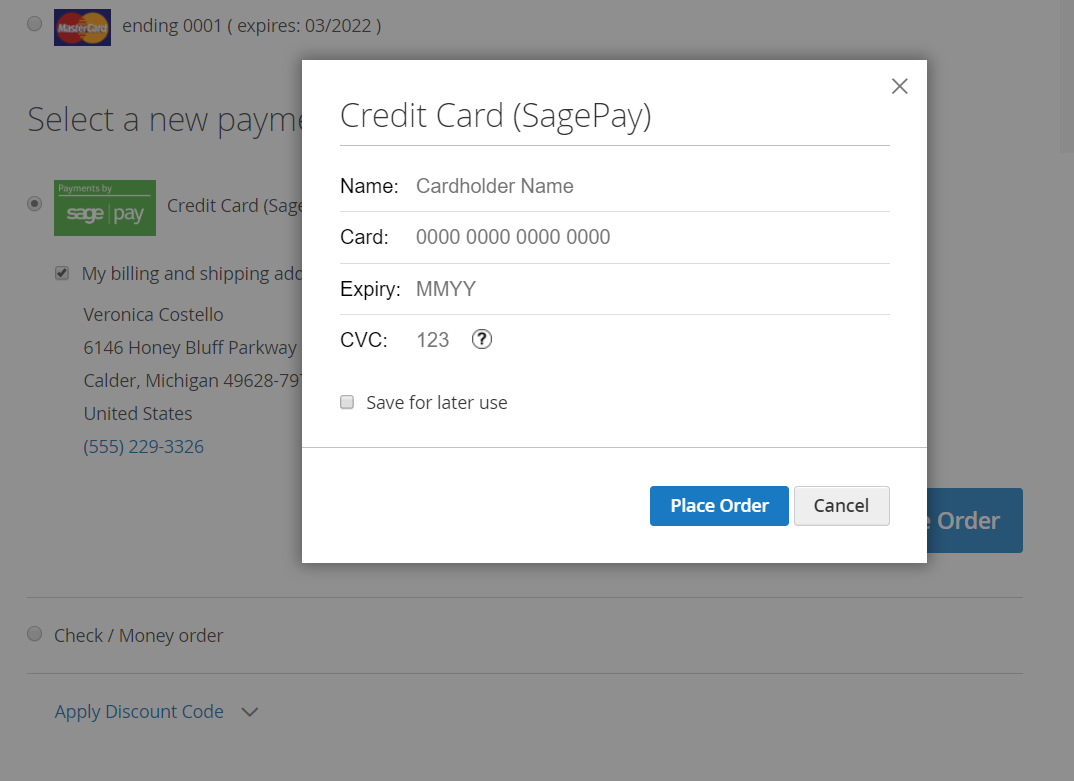
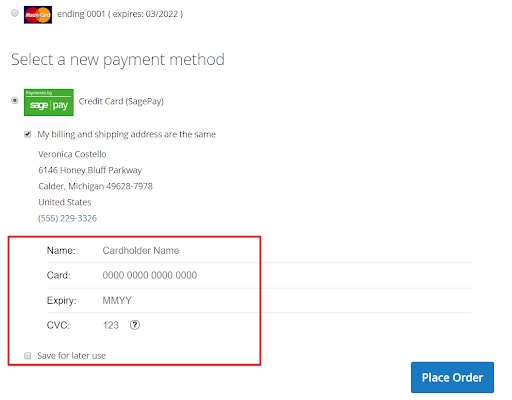
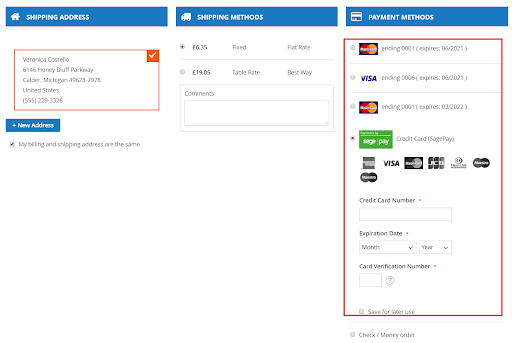
- Checkout page: choose the payment method with Sage Pay. Enter credit card information including Credit Card Number, Expiration Date, Card Verification Number. Here the customer can save credit card information for subsequent payments. Support 3 Sage Pay payment methods including Sage Pay Direct/PI Integration, Sage Pay Form Integration, Sage Pay Server Intergration.

- Magento Default: Displays payment by Sage Pay by default of Magento
Drop-in Checkout: display Sage Pay payment in 2 types:
- Drop-in Checkout Inline: display when Use Pop-up is turned off

- Show Drop-in Checkout Popup: Display popup when Enable Use Pop-up and if you want to display popup at checkout page, then click on Place Order.

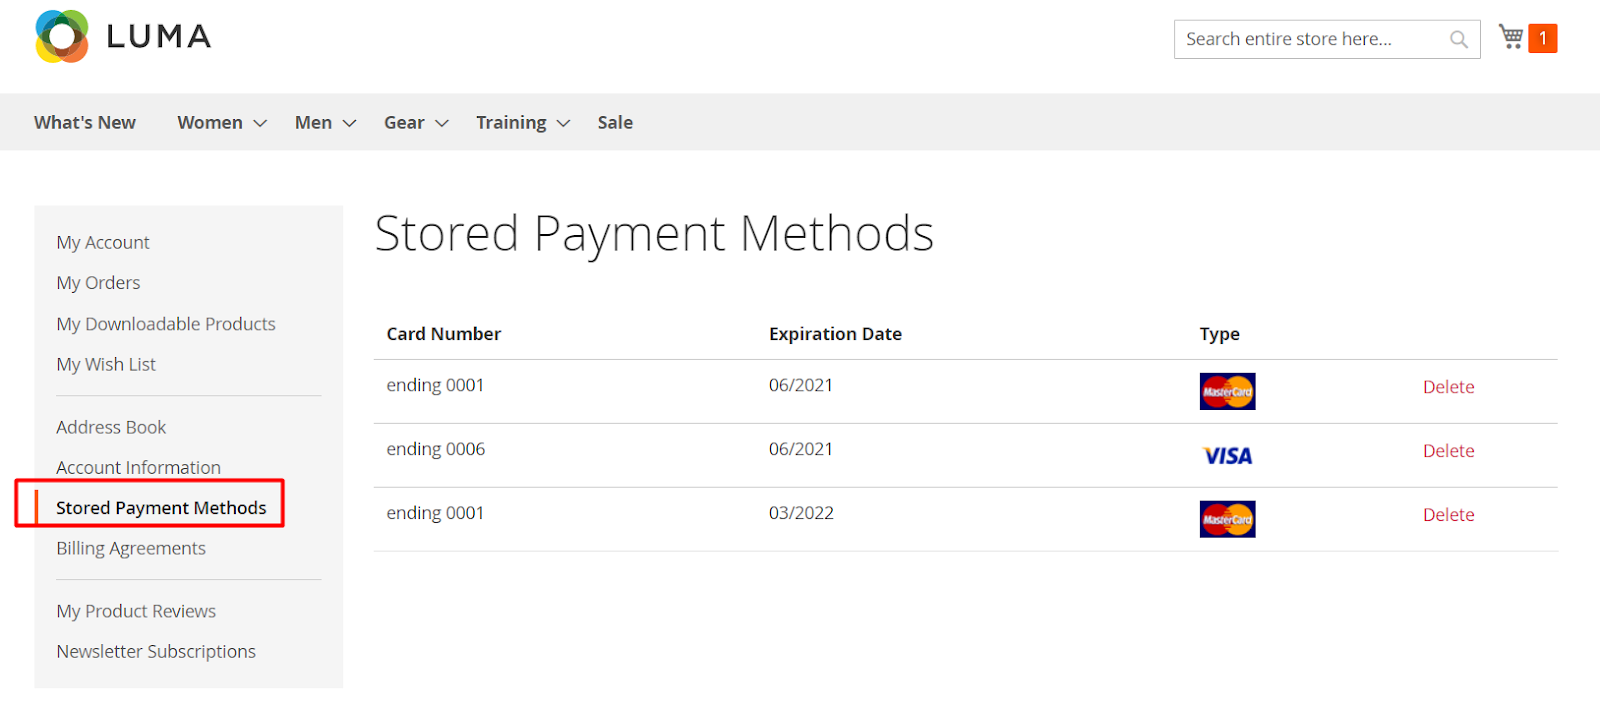
- Stored Payment Methods: Here shown the credit card information that the customer has saved before. If they do not want to save the old or unused credit cards, click Delete
Test card numbers:
Payment Method | Card Number | Card Type | 3-D Secure object status |
Visa | 4929000000006 | Visa | Authenticated |
Visa | 4929000005559 | Visa | CardNotEnrolled |
Visa | 4929000000014 | Visa | IssuerNotEnrolled |
Visa | 4929000000022 | Visa | Error |
Visa Corporate | 4484000000002 | Visa | CardNotEnrolled |
Visa Debit | 4462000000000003 | VisaDebit | Authenticated |
Visa Electron | 4917300000000008 | VisaElectron | Authenticated |
MasterCard | 5404000000000001 | MasterCard | Authenticated |
MasterCard | 5404000000000043 | MasterCard | CardNotEnrolled |
MasterCard | 5404000000000084 | MasterCard | IssuerNotEnrolled |
MasterCard | 5404000000000068 | MasterCard | Error |
Debit MasterCard | 5573470000000001 | DebitMasterCard | Authenticated |
Maestro (UK Issued) | 6759000000005 | Maestro | Authenticated |
Maestro (German Issued) | 6705000000008 | Maestro | Authenticated |
Maestro (Irish Issued) | 6777000000007 | Maestro | Authenticated |
Maestro (Spanish Issued) | 6766000000000 | Maestro | Authenticated |
American Express | 374200000000004 | AmericanExpress | N/A |
Diners Club / Discover | 36000000000008 | Discover | N/A |
JCB | 3569990000000009 | JCB | N/A |
- The securityCode (CV2/CVV) is always: 123
- The billingAddress.address1 is: 88
- The billingAddress.postalCode is: 412
- Any expiryDate can be entered as long as it is in the future
Testing 3-D Secure Authentication
You can use some following sample account to test 3D secure:
- vendorName: sandboxEC
- integrationKey: dq9w6WkkdD2y8k3t4olqu8H6a0vtt3IY7VEsGhAtacbCZ2b5Ud
- integrationPassword: hno3JTEwDHy7hJckU4WuxfeTrjD0N92pIaituQBw5Mtj7RG3V8zOdHCSPKwJ02wAV
To aid the implementation and testing of the 3-D Secure authentication functionality, each card will provide you with a specific 3-D Secure authentication result. This is indicated by the status value in the 3-D Secure object status column.
- To successfully authenticate the transaction, enter password into the password field during the 3-D Secure authentication process.
- You can enter E:N:06 into the password field to simulate the scenario where an error occurred during authentication and you will receive the 3-D Secure status: Error
- You can enter A:D:06 into the password field to simulate the scenario where the cardholder is not enrolled in scheme and you will receive the 3-D Secure status: AttemptOnly
- You can enter U:N:06 into the password field to simulate the scenario where the 3D Secure authentication is not available and you will receive the 3-D Secure status: Incomplete
For more cases and information, please access here
How to Configure
1. Configuration
Login to the Magento Admin, choose Sales > Payment Settings > Payment Method > Sage Pay.

1.1. General Setting
1.1.1. Credential
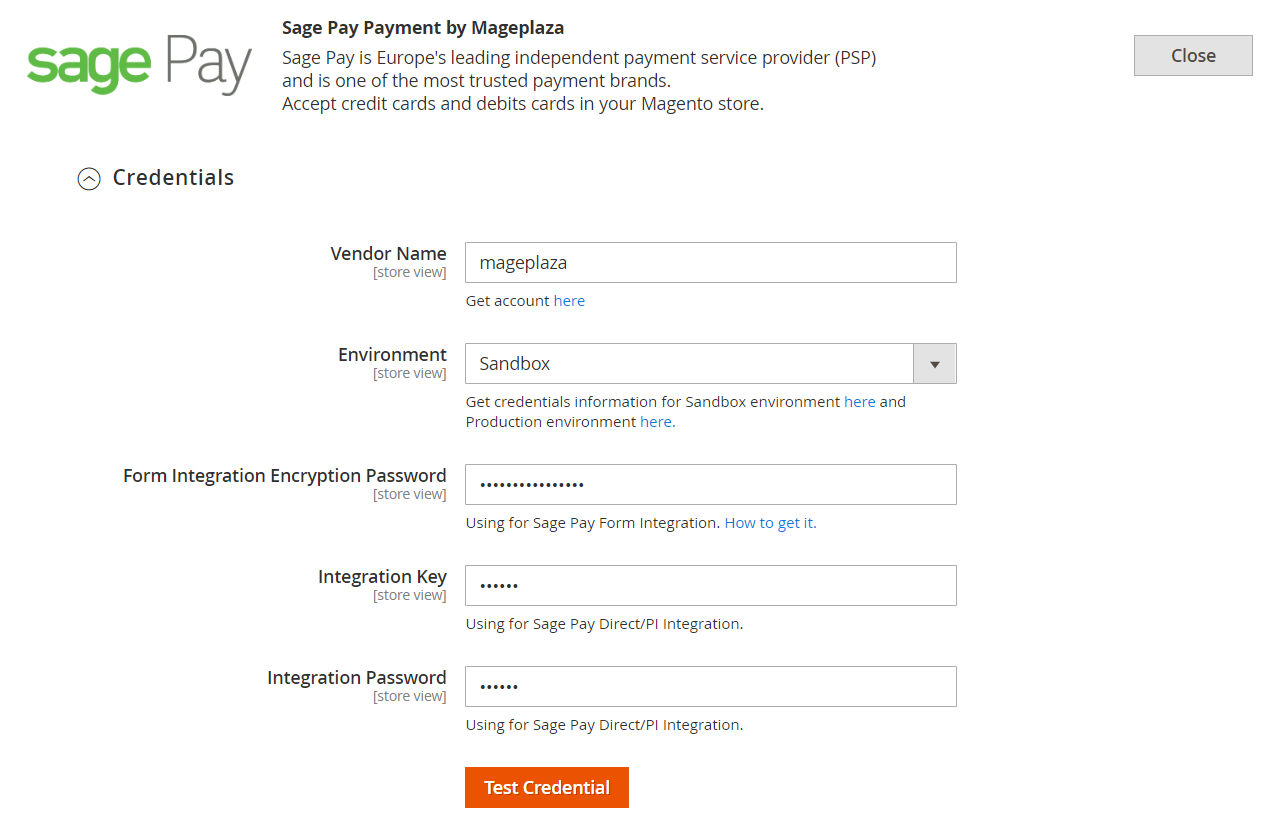
- Vendor Name:
- Enter the registered Sage Pay account name.
- If you leave blank, you cannot use Sage Pay.
- Environment:
- Admin can choose Sandbox environment to test Sage Pay function.
- When you want to apply for online payment, please change to Production.
- Form Integration Encryption Password:
- Enter the password of Sage Pay. Used for Sagepay Form/ Server Integration.
- If left blank or incorrectly entered, it will not integrate with Sage Pay.
- Integration Key:
- Enter the Key received from Sage Pay. It is used for Sagepay PI/ Direction Integration.
- If left blank or incorrectly entered, Sage Pay will not be connected.
- Integration Password:
- Enter the received Password from Sage Pay. Using for Sagepay PI/ Direction Integration.
- If left blank or incorrectly entered, Sage Pay will not be connected to your store.
- Test Credential button: Admin can check Sage Pay connection by clicking the Test Credential button.
1.1.2. Security and Feature
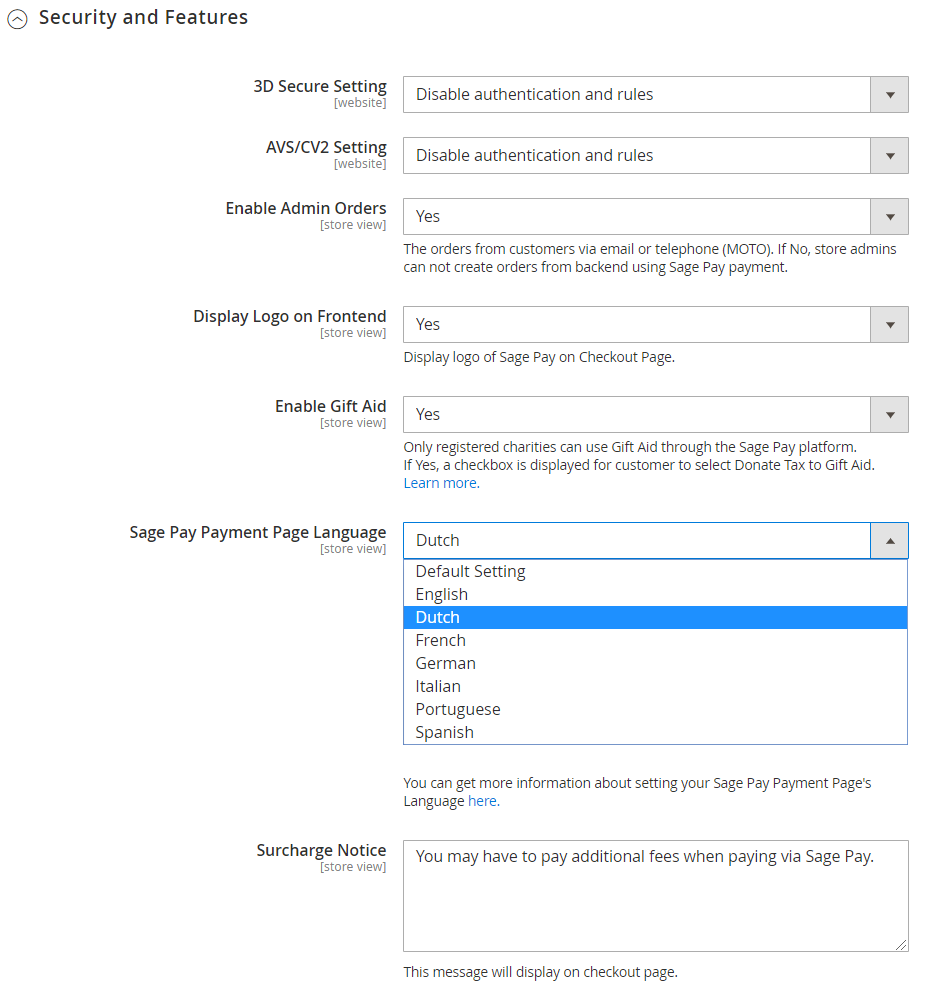
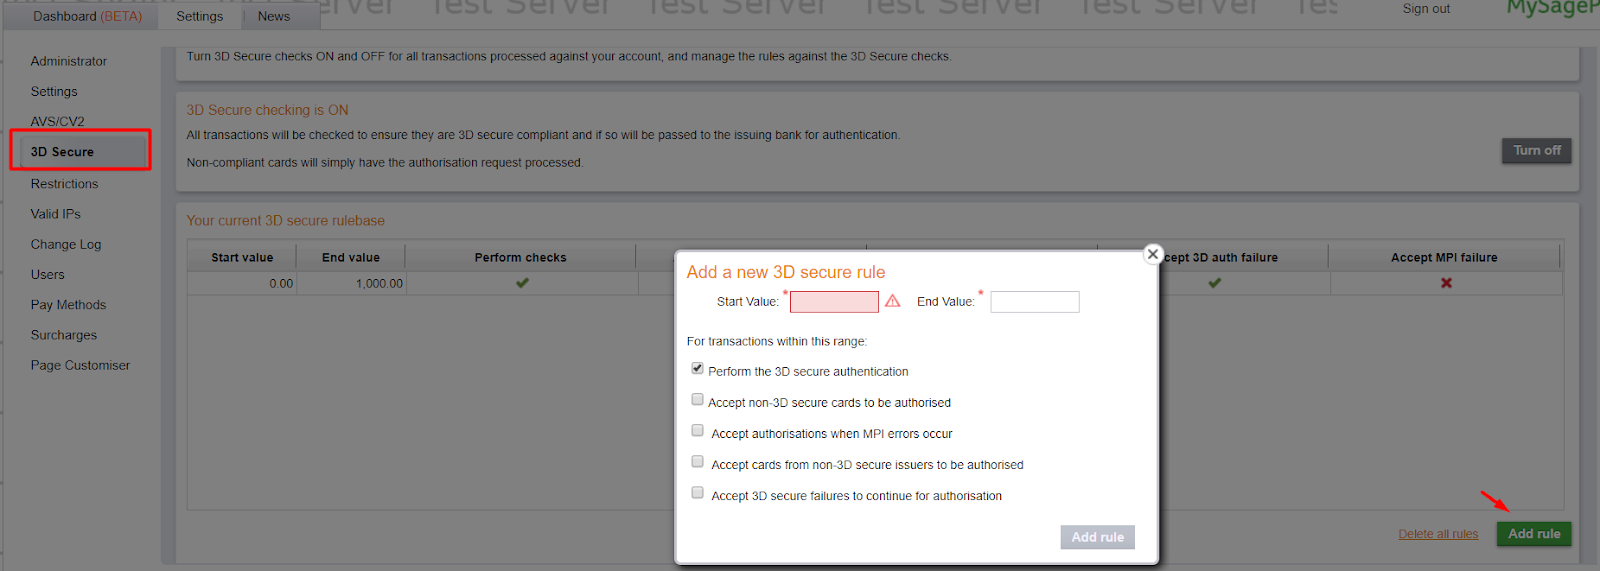
- 3D Secure Setting: Select the authentication type with 3D Secure to verify the card of Customer:
- Use default MySagePay settings: Use 3d Secure by installing my Sagepay by default to verify Customer's card, thereby preventing payment fraud
- Apply authentication even if turned off: Use 3d Secure authentication even when turned off to verify Customer's tags
- Disable authentication and rules: turn off using 3d Secure authentication and ignore rules in the Sage Pay installed to verify Customer's tags
- Apply authentication but ignore rules: authenticate 3d Secure but ignore the rules to verify the card of Customer.
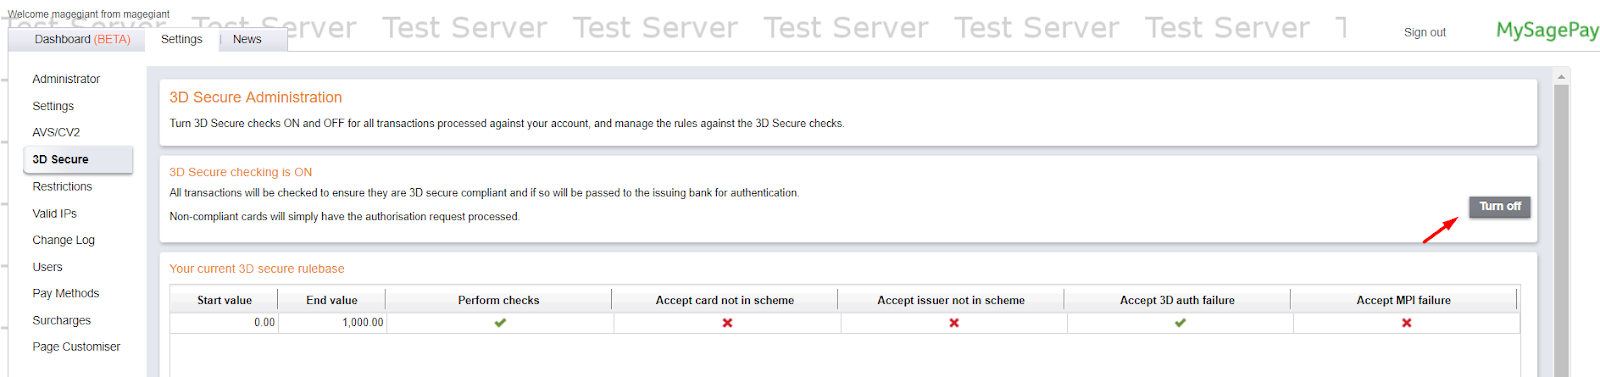
- Note: For rules that can be configured when accessing MySagePay:
Settings > 3D Secure > click Add rule, then select the condition where you want to apply the rule to verify.
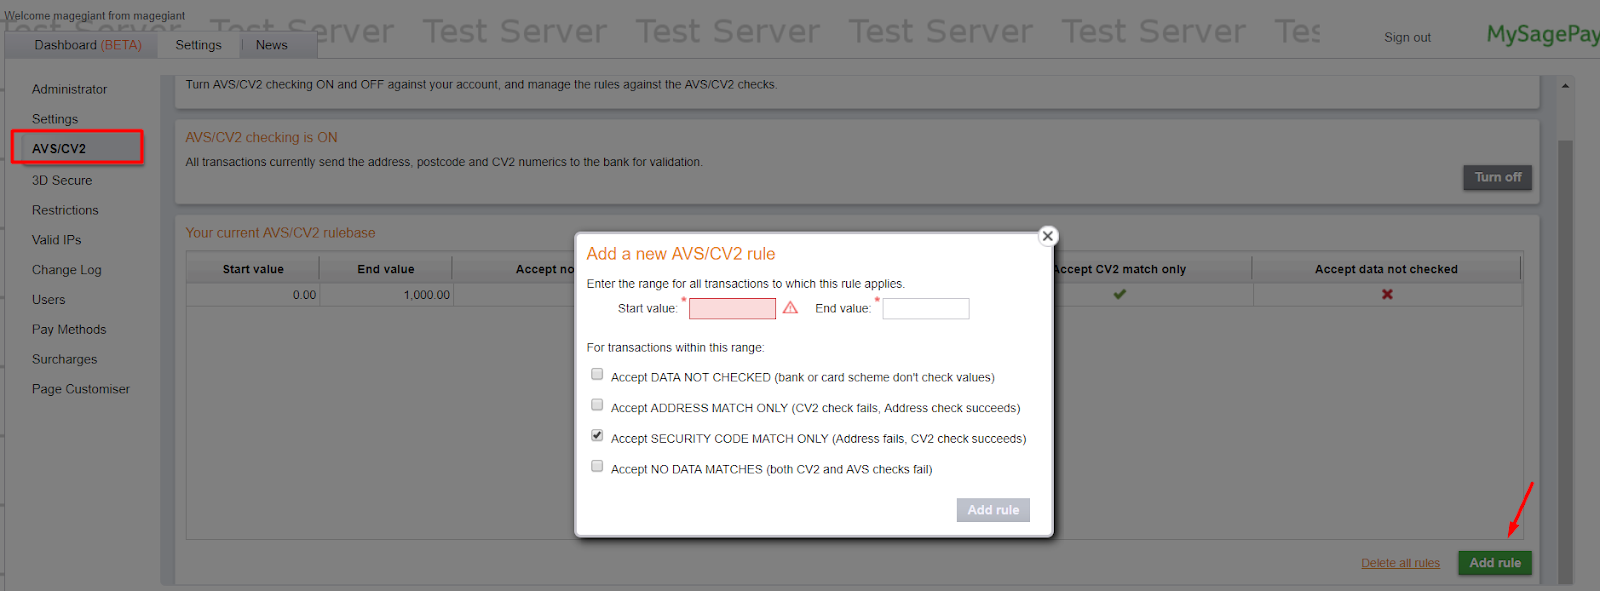
- AVS/CV2 Setting: Choose the AVS/CV2 Verification for payment address of customers:
- Use default MySagePay settings: Use AVS/CV2 verification for payment address as SagePay default setting.
- Apply authentication even if turned off: Use AVS/CV2 verification for payment address even if it is turned off. Access to MySagePay to set up.
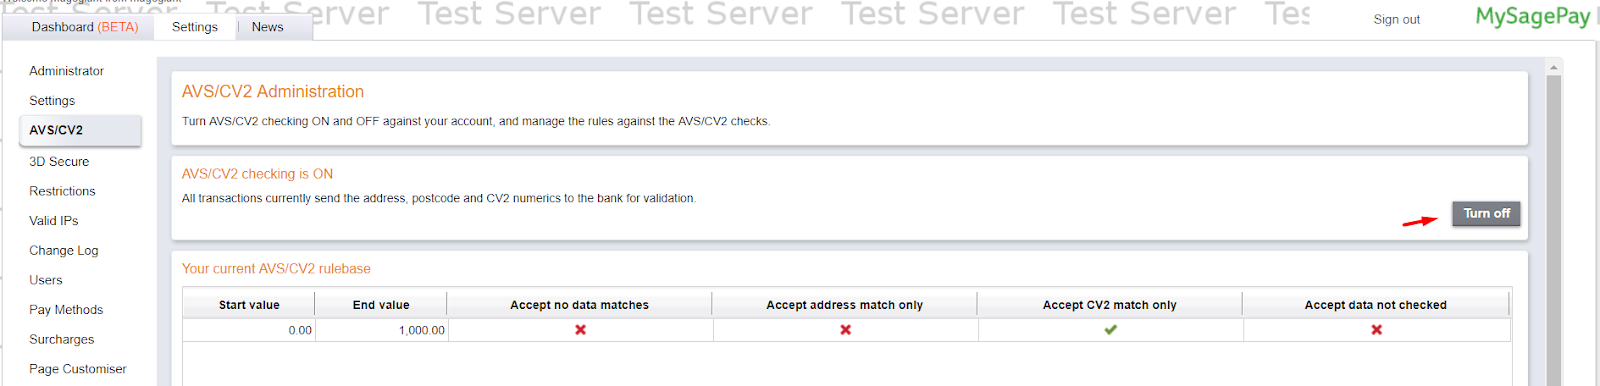
- Disable authentication and rules: Disable AVS/CV2 authentication for payment info and rules configured in Sage Pay.
- Apply authentication but ignore rules: Apply AVS/CV2 authentification for customers payment information but ignore the rules.
- Note: For configuring the rules, you can go to MySagePay page choose
Settings > AVS/CV2 > Add rule,then choose the authentification conditions you want to apply for the rules.
- Enable Admin Orders:
- If you choose Yes admin can create new order Sage Pay.
- Admin can only create an order with the customer who has saved the card information.
- Display Logo on Frontend: Select Yes to display the Sage Pay logo on the Checkout page.
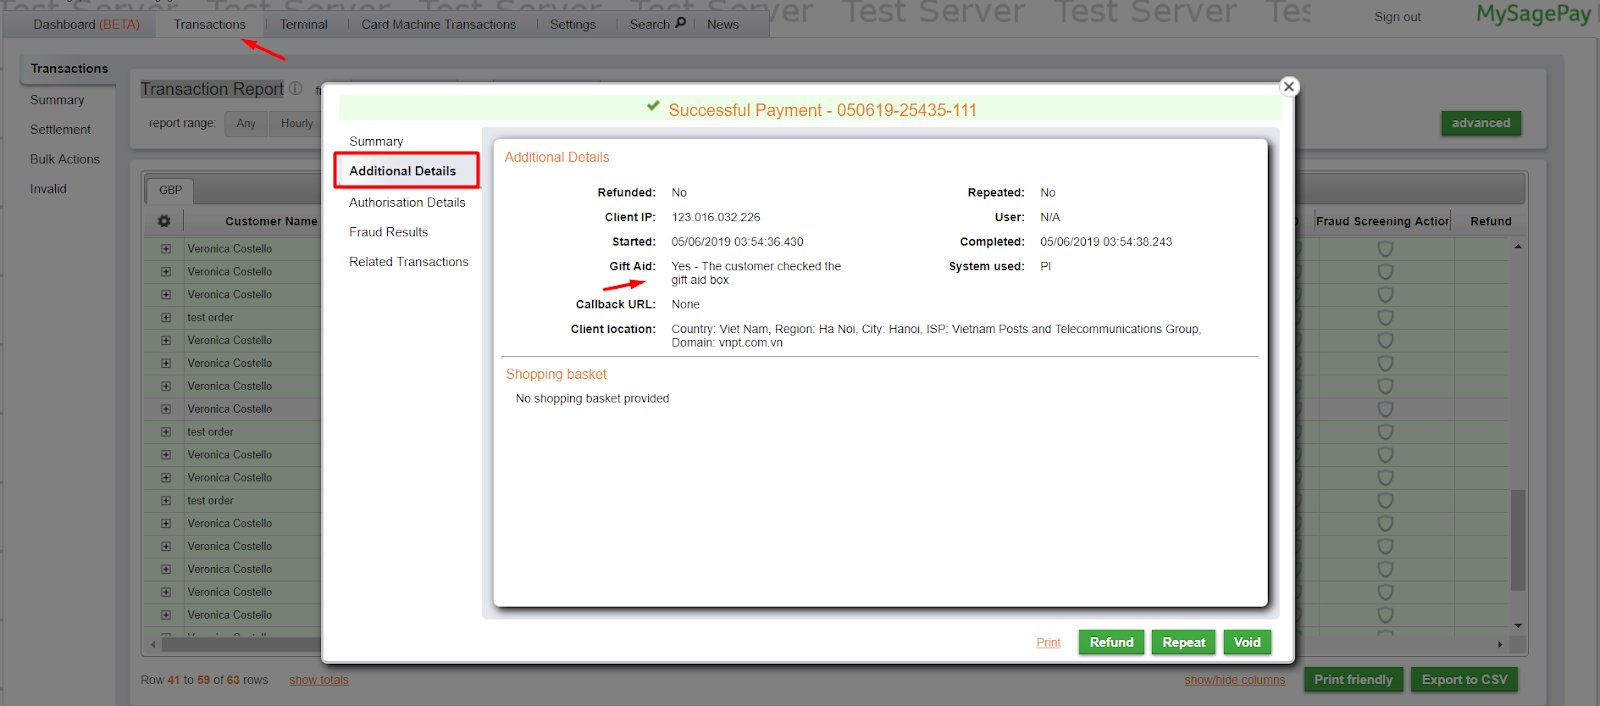
- Enable Gift Aid: If selecting Yes, the checkbox will be displayed to allow the customer to choose Donate Tax to Gift Aid. This feature only works when the Sage Pay account is enabled for Gift Aid. Only registered charities can use Gift Aid through the Sage Pay platform.
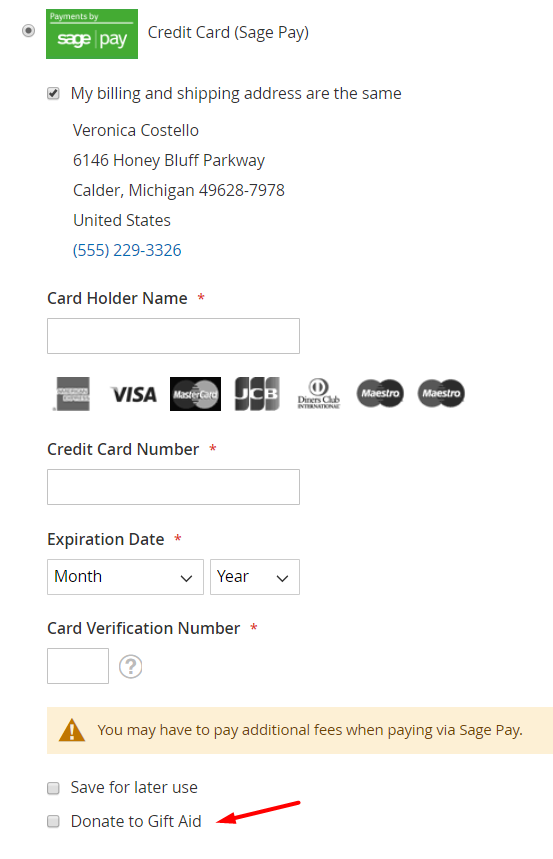
- Note: For Gift Aid, in some countries like the UK, customers can get back some of the tax fee when making payments by donating through Gift Aid, a tax rebate incentive created to benefit organizations and Charity and Community Amateur Sports Club (CASC). Gift Aid Details will be sent to Customer and Store Admin. They can check the information of their Gift Aid at Sage Pay page when access to
Transaction > Transaction Report > Daily, click to the related order and choose Additional Details to view more.
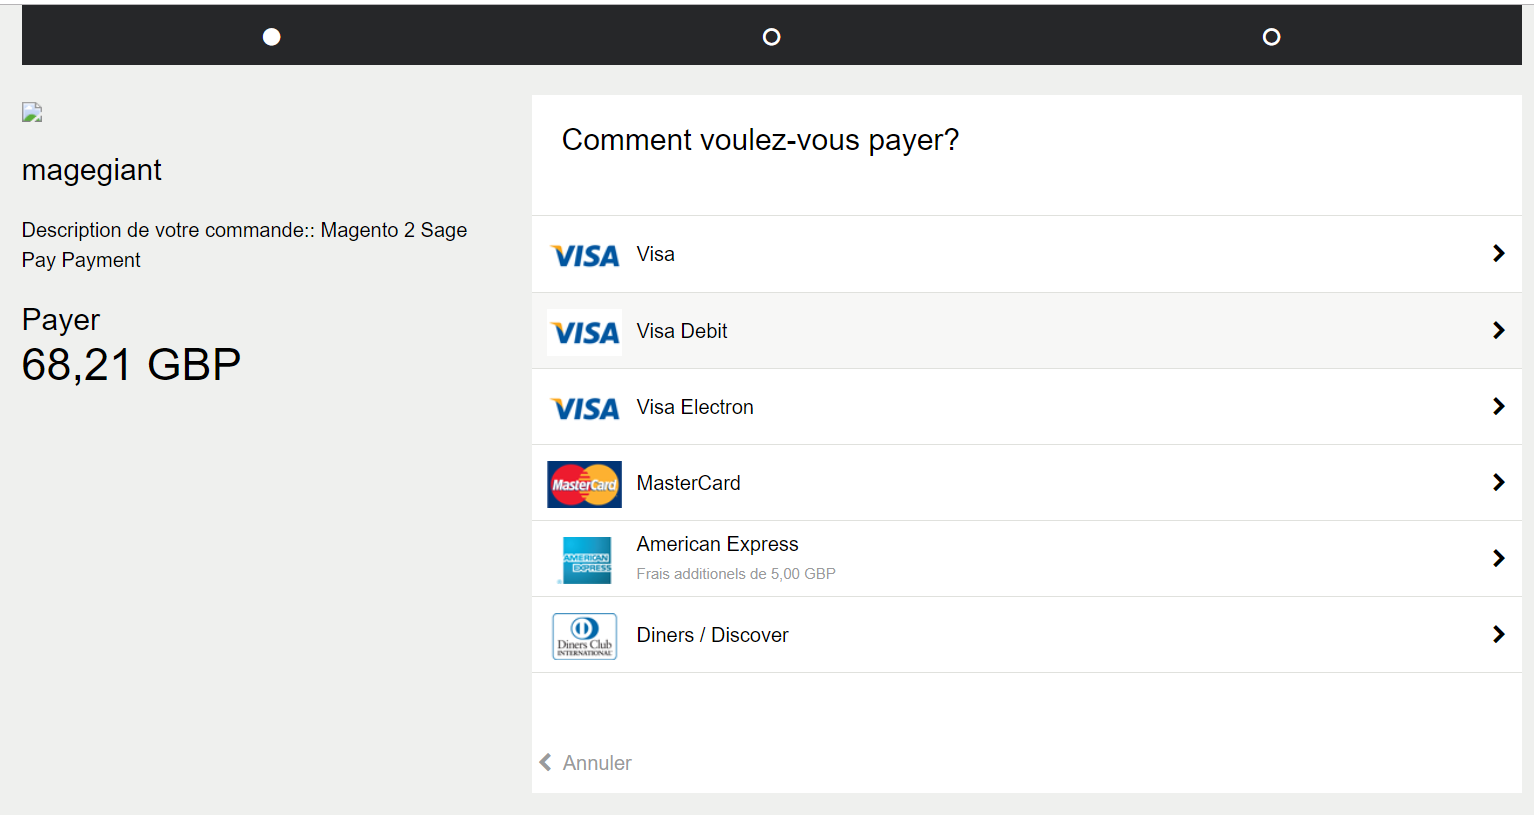
- Sage Pay Payment Page Language: Select the language for Sage Pay page to be able to set the language appropriate for each country to make payment process faster and more convenient.
Example: The following picture shows Sage Pay Payment Page with French language:
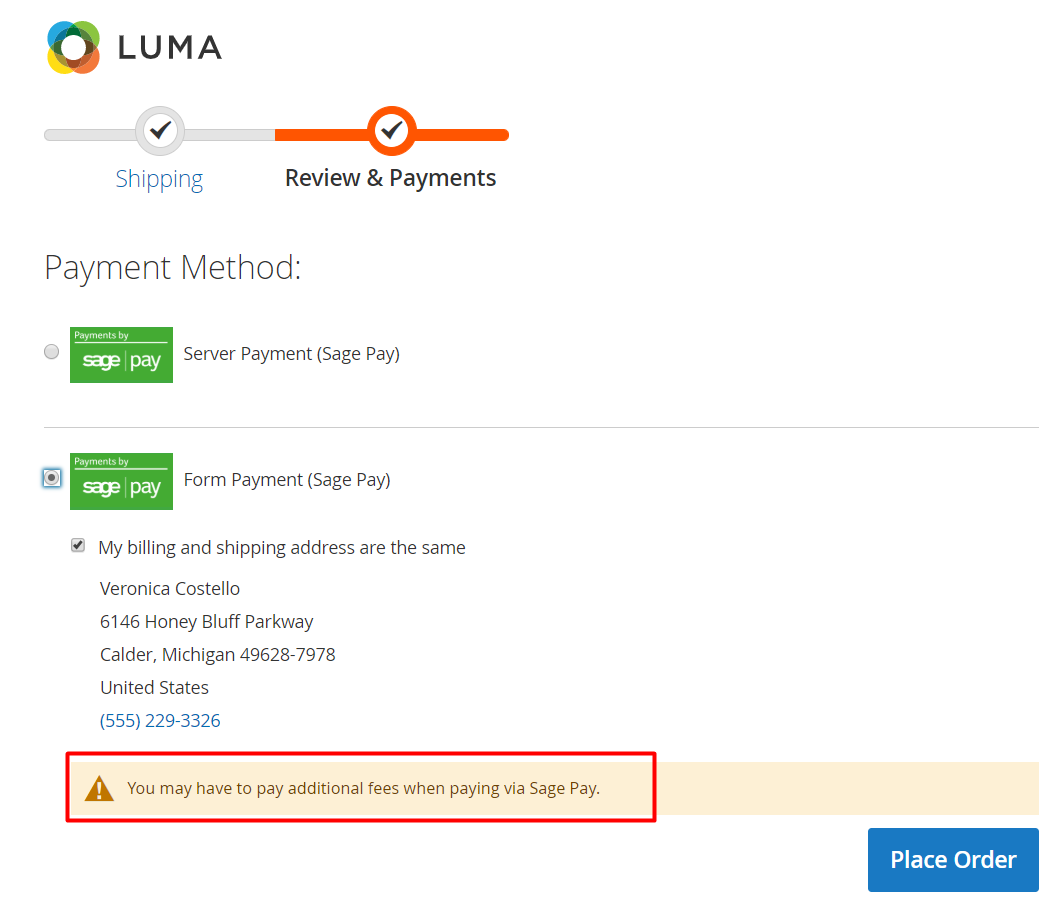
Surcharge Notice:
- Admin sets a notification on checkout page about additional charges when paying via Sage Pay.
- If left blank, the message will not appear on Frontend.
1.2. Sage Pay Direct/ PI Integration
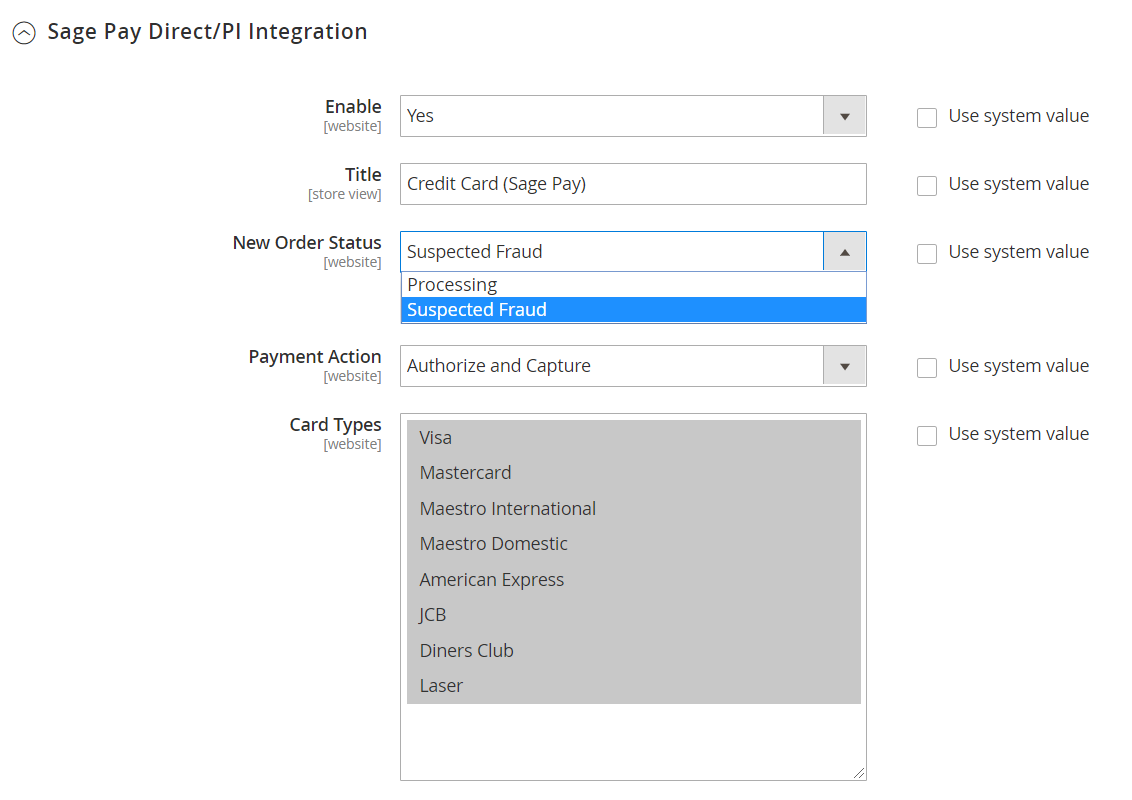
- Enable: Select Yes to use Sage Pay Direct/ PI Integration. See more information of this Integration method here
- Title: Enter the title of the method which is displayed on the checkout page.
- New Order Status: Select status when customer order successfully:
- Processing: Display status with Processing when order is successful. You can change the status in the backend with each order.
- Suspected Fraud: Displays status with Suspected Fraud when order is successful. You can change the status in the backend with each order. With this status, admin can accept payment or reject payment and then transfer status to Processing.
- Payment Action:
- Authorize and Capture: Payment will be captured immediately after the Customer place order successfully. At that moment, the Customer's card will pay for the order and the Invoice will be created
- Authorize: Payment will only be captured when admin creates an Invoice for Customer's order. When the Invoice is successfully created, admin can receive money from Customer's card
Cart Types:
- You can choose one or multiple cart types
- Cards will be verified after customers fill in card ID at checkout page. For other cards not be selected here, there will be an error message of invalid card shown to customers. Also, those cards will not be shown at Checkout page and Backend order.
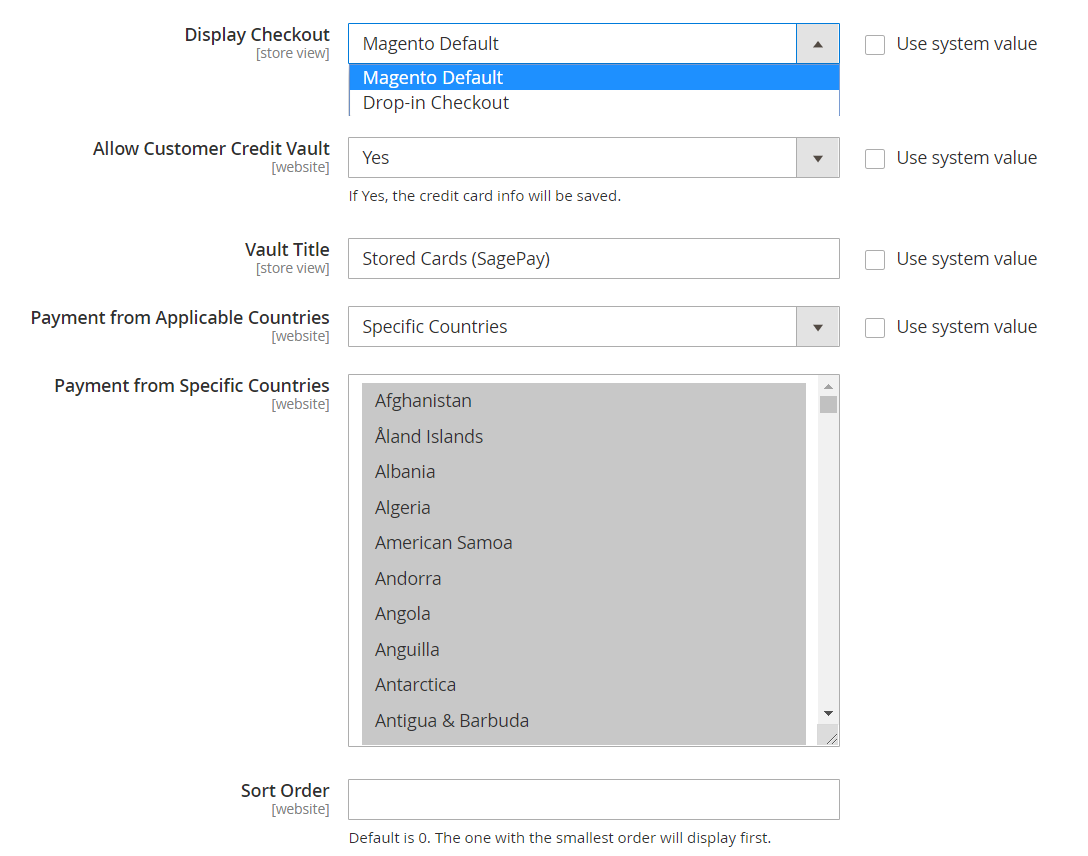
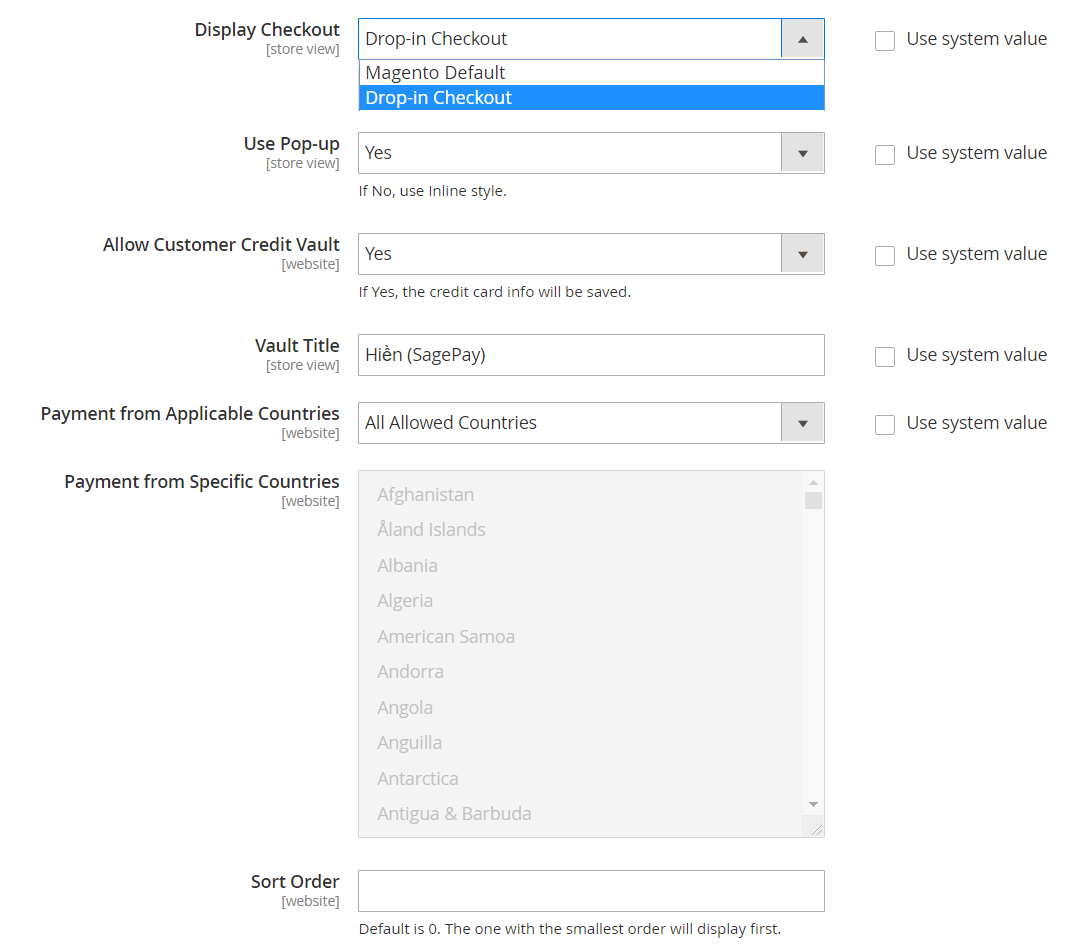
Display Checkout: choose the display type of Sage Pay Payment on checkout page:
- Magento Default: Displays payment by Sage Pay by default of magento
- Drop-in Checkout: Show Sage Pay methods at checkout as Drop-in Checkout type. Choosing this type show the additional field:
Use Pop-up:
- Choose Yes showing SagePay methods in Popup form
- Choose No, showing SagePay methods in Inline form
- Magento Default: Displays payment by Sage Pay by default of magento
Allow Customer Credit Vault:
- If you select Yes, information about the credit card will be saved to the customer account and you can use it for payment instantly. If you want to save the card with your account, please contact Sage Pay.
- Displays the checkbox to check whether you want to save or not. Not applicable for Not Log In account.
Vault Title:
- Enter an alternate name in the Vault Title field. This name will be displayed when customer order is completed and using the previously saved credit card.
- If left blank the default name will be used.
Payment from Applicable Countries:
- Select All Countries to allow Card payment available in all countries
- Select Specific Countries to limit certain countries to use this payment method
- Payment from Specific Countries: the Card payment method will be shown only in the selected countries.
Sort Order:
- Specify the display position of this payment method compared to other payment methods
- 0 is the highest number. The smaller the number, the more priority the method is displayed first.
1.3. Sage Pay Form Integration
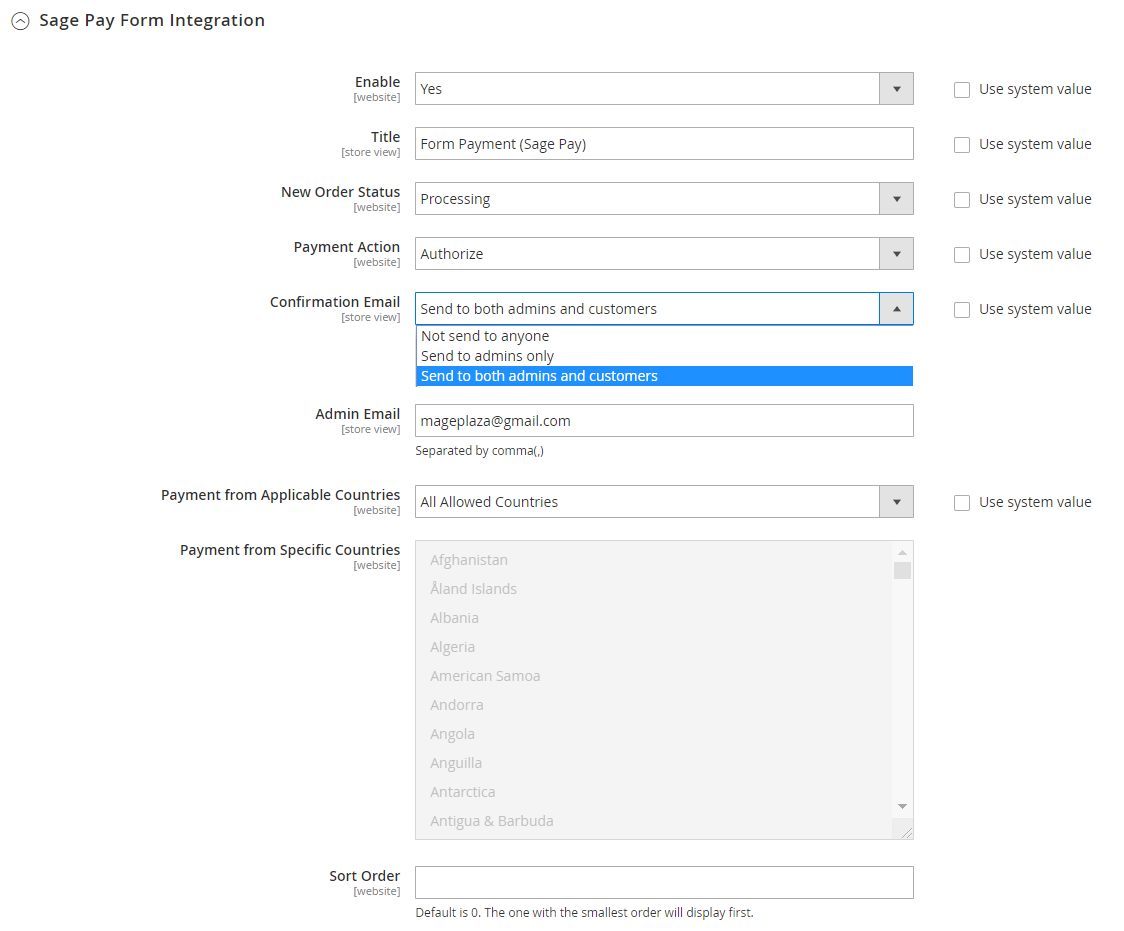
- Enable: Select Yes to enable this payment function and redirect to the payment page of Sage Pay Form Integration. See more information of this Integration method here
- Title: Enter the title of the payment method which is displayed on the Sage Pay Form Integration page.
- New Order Status: Select status when customer order successfully:
- Processing: Display status with Processing when order is successful. You can change the status in the backend with each order.
- Suspected Fraud: Displays status with Suspected Fraud when order is successful. You can change the status in the backend with each order. With this status admin can accept payment or reject payment and then transfer status to Processing.
- Payment Action:
- Authorize and Capture: Payment will be captured immediately after the Customer place order successfully. At that moment, the Customer's card will pay for the order and the Invoice will be created
- Authorize: Payment will only be captured when admin creates an Invoice for Customer's order. When the Invoice is successfully created, admin can receive money from Customer's card
- Payment from Applicable Countries:
- Select All Countries to allow Card payment available in all countries
- Select Specific Countries to limit certain countries to use this payment method
- Payment from Specific Countries: the Card payment method will be shown only in the selected countries.
- Confirmation Email: Select the Confirmation Email sent to:
- Send to both admins and customers: Will send Confirmation Email to both customer and admin when customers pay via Sage Pay Form Integration page
- Not sending to anyone: do not send Email Confirmation when customer pays via Sage Pay From Integration
- Send to admins only: send Confirmation Email to admin only when customer pays via Sage Pay Form Integration.
- Admin Email:
- Enter the admin email receiver to send the confirmation email to them when customers pay via Sage Pay.
- Allow multiple emails to send at once and they must be separated by comma (,).
- Sort Order:
- Specify the display position of this Sage Pay Form Integration compared to other payment methods
- 0 is the highest number. The smaller the number, the more priority the method is displayed first.
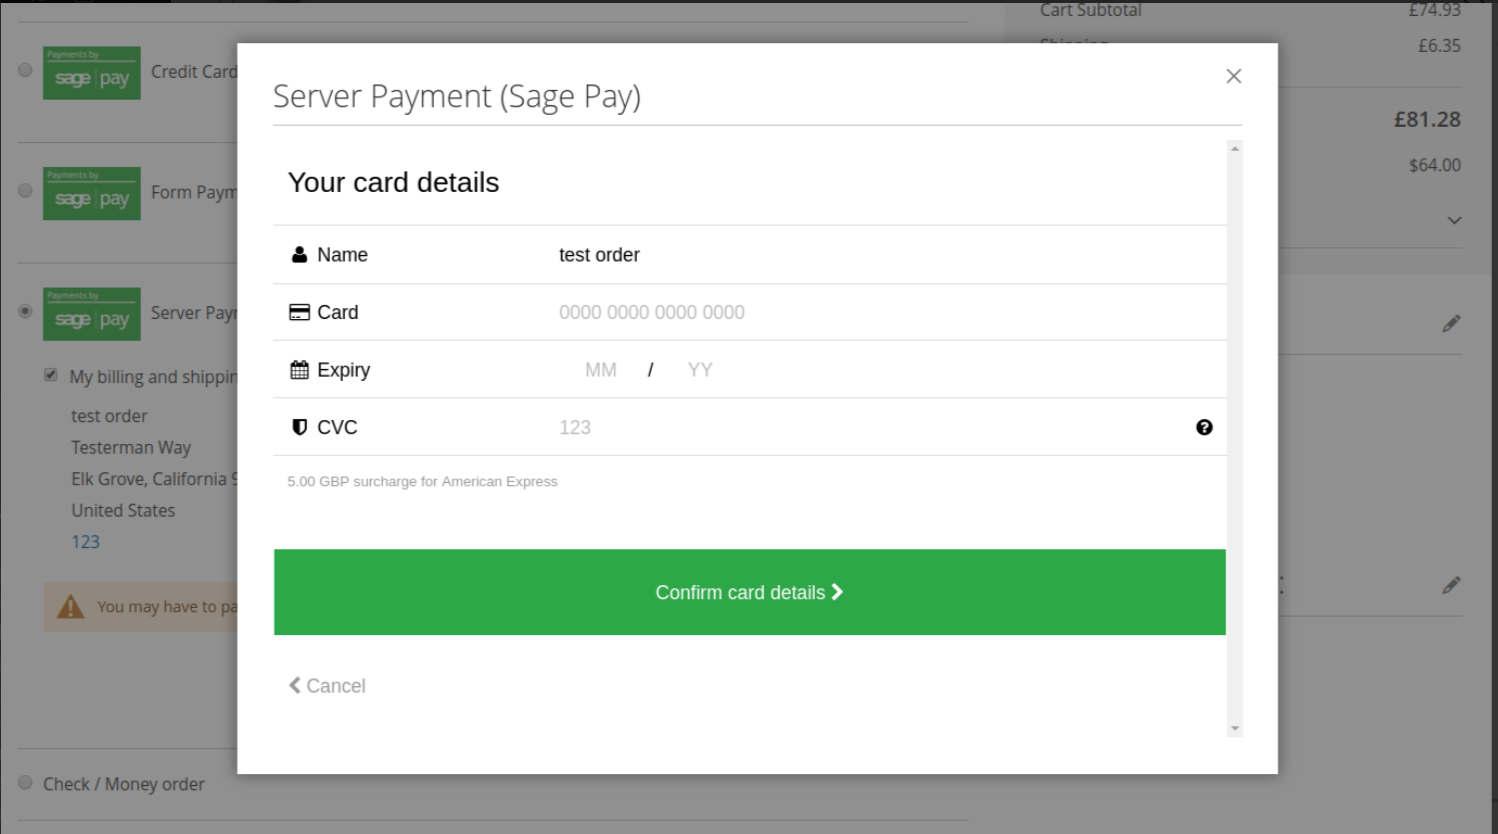
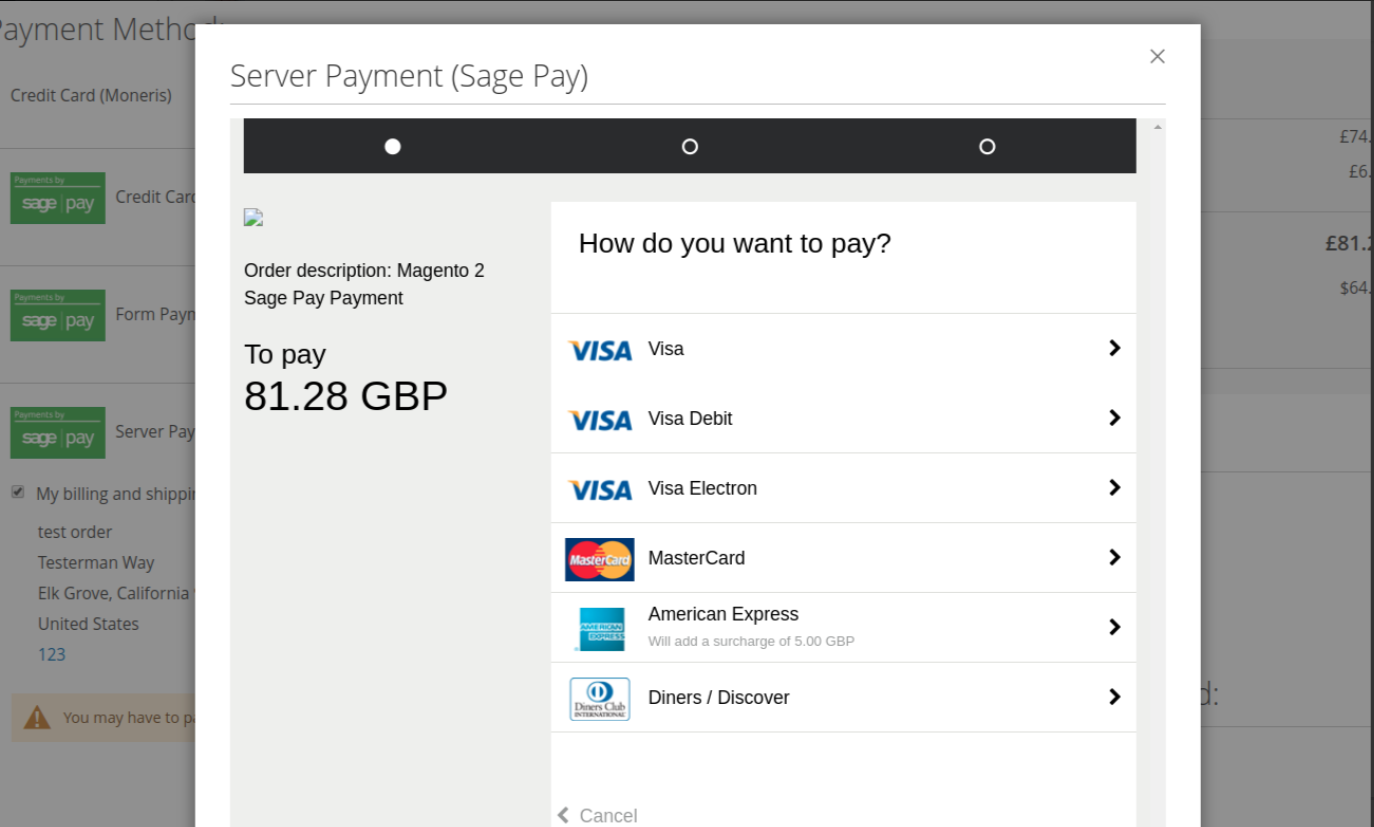
1.4 Sage Pay Server Integration
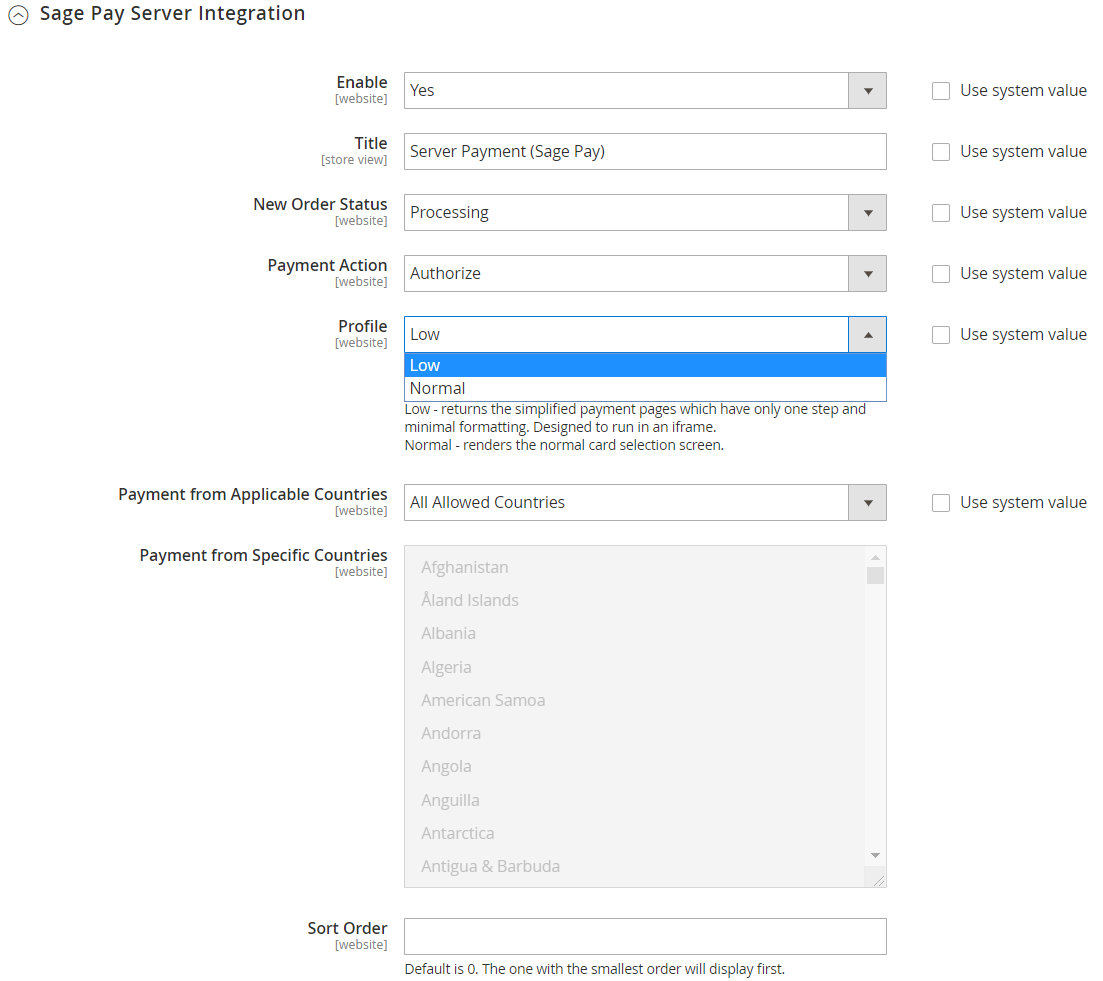
Enable: Select Yes to enable this payment function and redirect to the payment page of Sage Pay Server Integration. See more information of this Integration method here
Title: Enter the title of the payment method which is displayed on the Sage Pay Server Integration page.
New Order Status: Select status when customer order successfully:
- Processing: Display status with Processing when order is successful. You can change the status in the backend with each order.
- Suspected Fraud: Displays status with Suspected Fraud when order is successful. You can change the status in the backend with each order. With this status admin can accept payment or reject payment and then transfer status to Processing.
Payment Action: - Authorize and Capture: Payment will be captured immediately after the Customer place order successfully. At that moment, the Customer's card will pay for the order and the Invoice will be created
- Authorize: Payment will only be captured when admin creates an Invoice for Customer's order. When the Invoice is successfully created, admin can receive money from Customer's card
Profile: Select the payment type of Sage Pay, click on Place Order will show popup with 2 types:
- Low: redirect to simple payment pages with only one step and minimal format which is designed to run in iframe.
- Normal: Displays the normal card selection page
Payment from Applicable Countries:
- Select All Countries to allow Sage Pay Server Integration available in all countries
- Select Specific Countries to limit certain countries to use this payment method
- Payment from Specific Countries: the Sage Pay Server Integration method will be shown only in the selected countries.
Sort Order:
- Specify the display position of Sage Pay Server Integration method compared to other payment methods
- 0 is the highest number. The smaller the number, the more priority the method is displayed first.
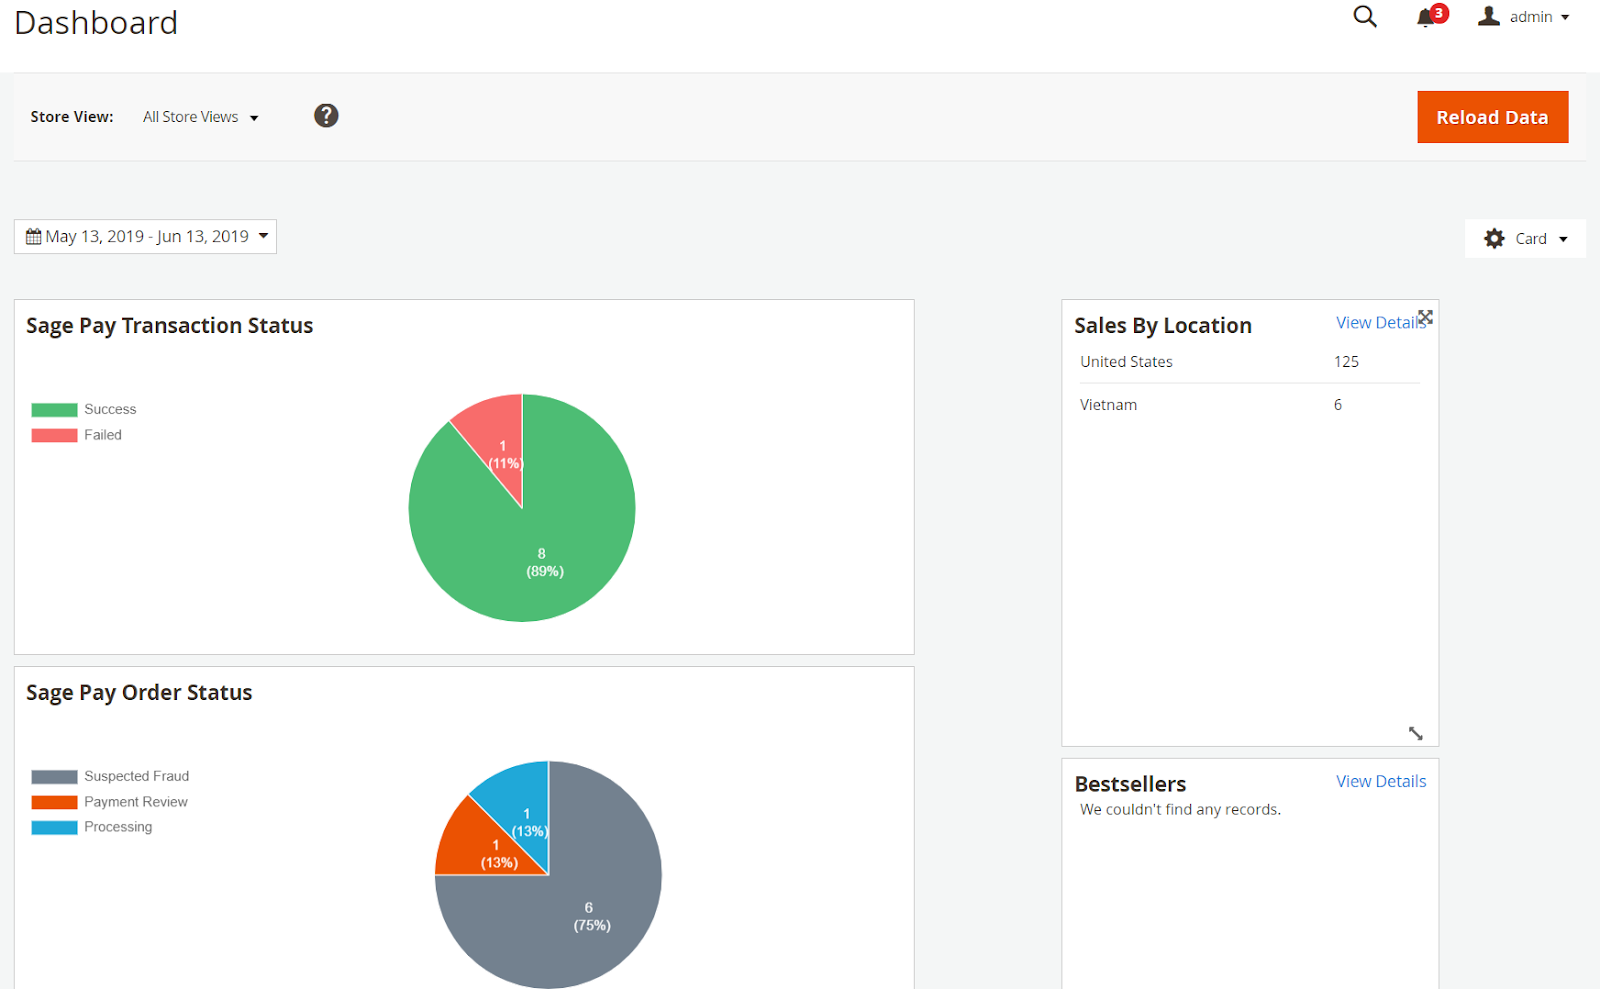
2. Manage Transactions
This section records the customer or admin orders information and the customers' card information (including the order with the new card or the previous card saved at the Integration Type field. Here, Statistics Status and Order Status will be reported when customer order with Sage Pay payment methods.
- View Transaction: Record card information of customer or admin orders.
- Click View Order: Redirect to the view order page to see the information and card of paid orders.
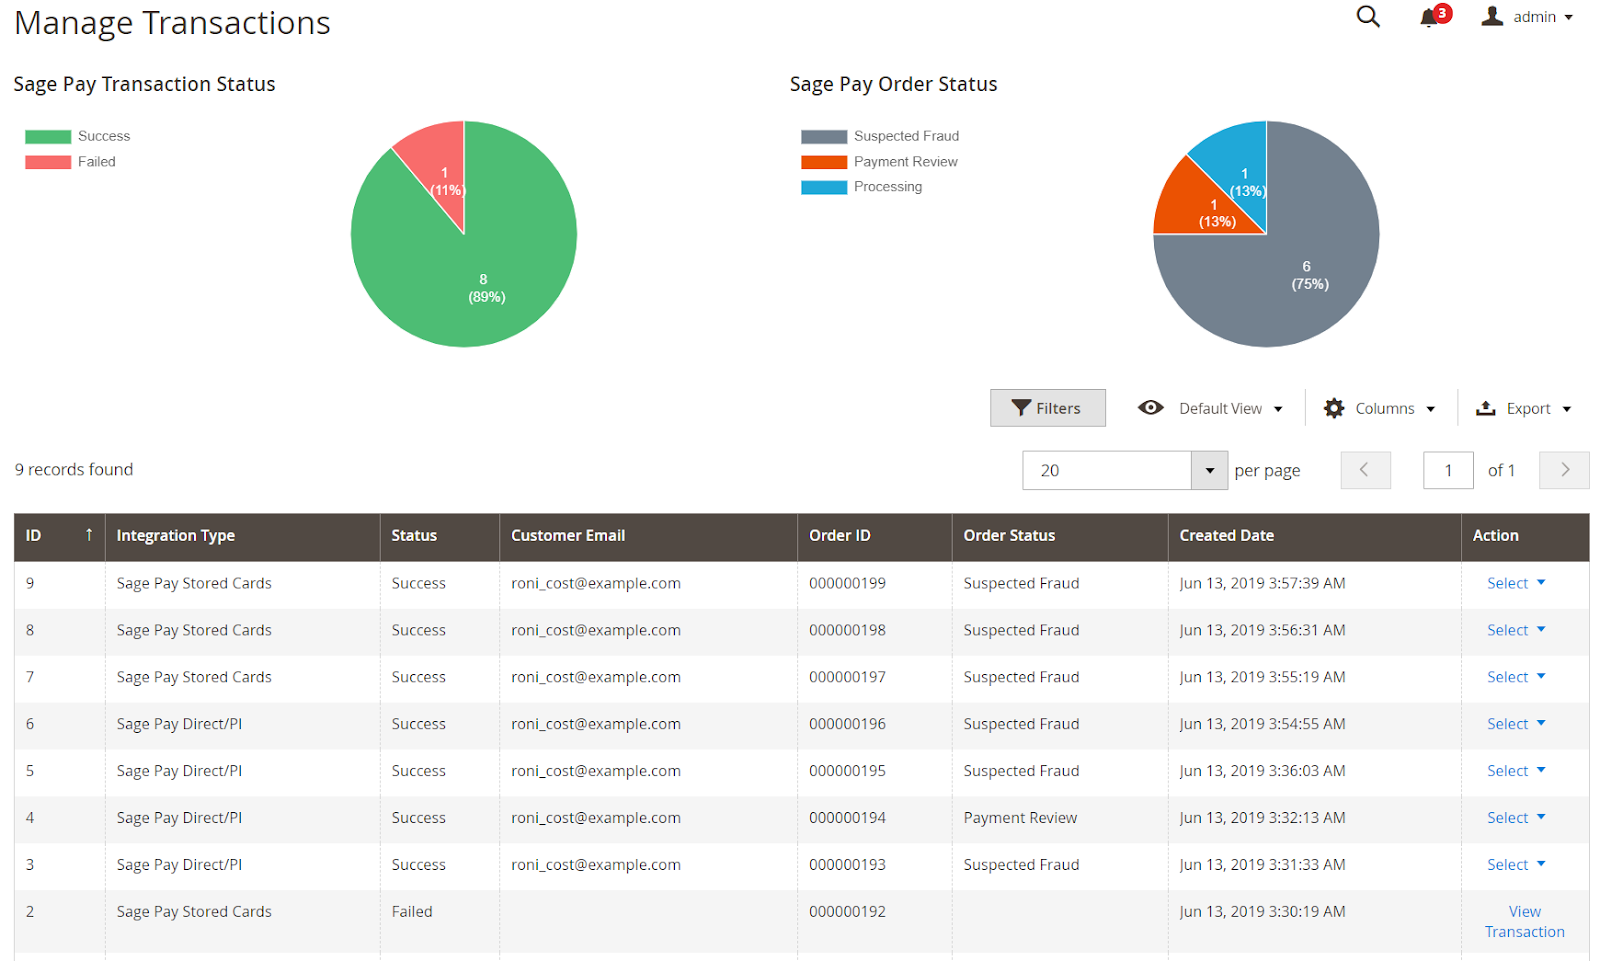
- Compatible with Mageplaza Reports extension: Support additional Reports of Order Status and Transaction Status in the filterable time.
3. Admin order
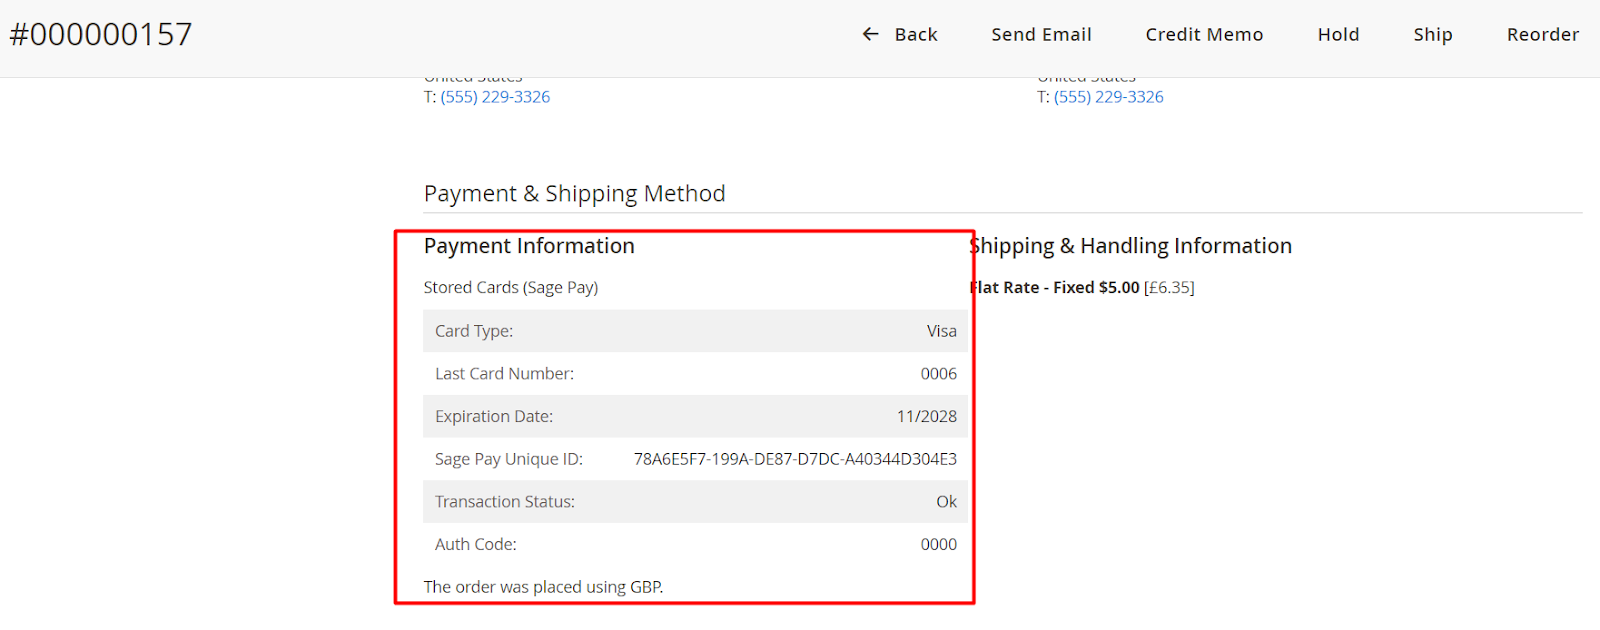
3.1. View Order
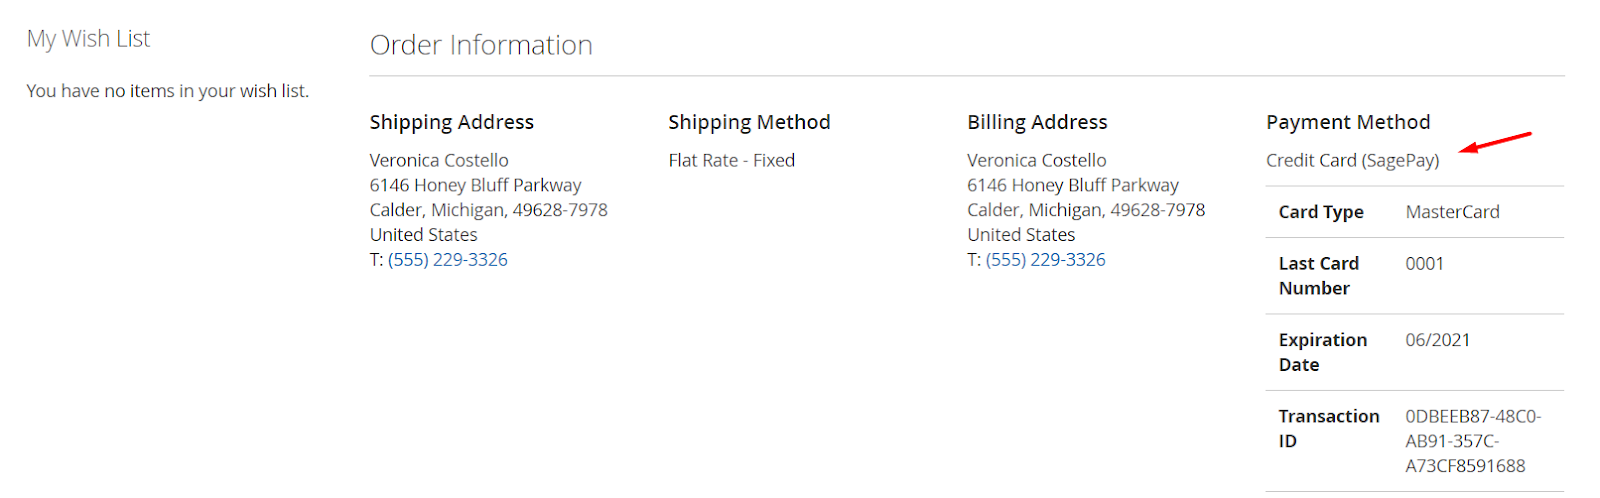
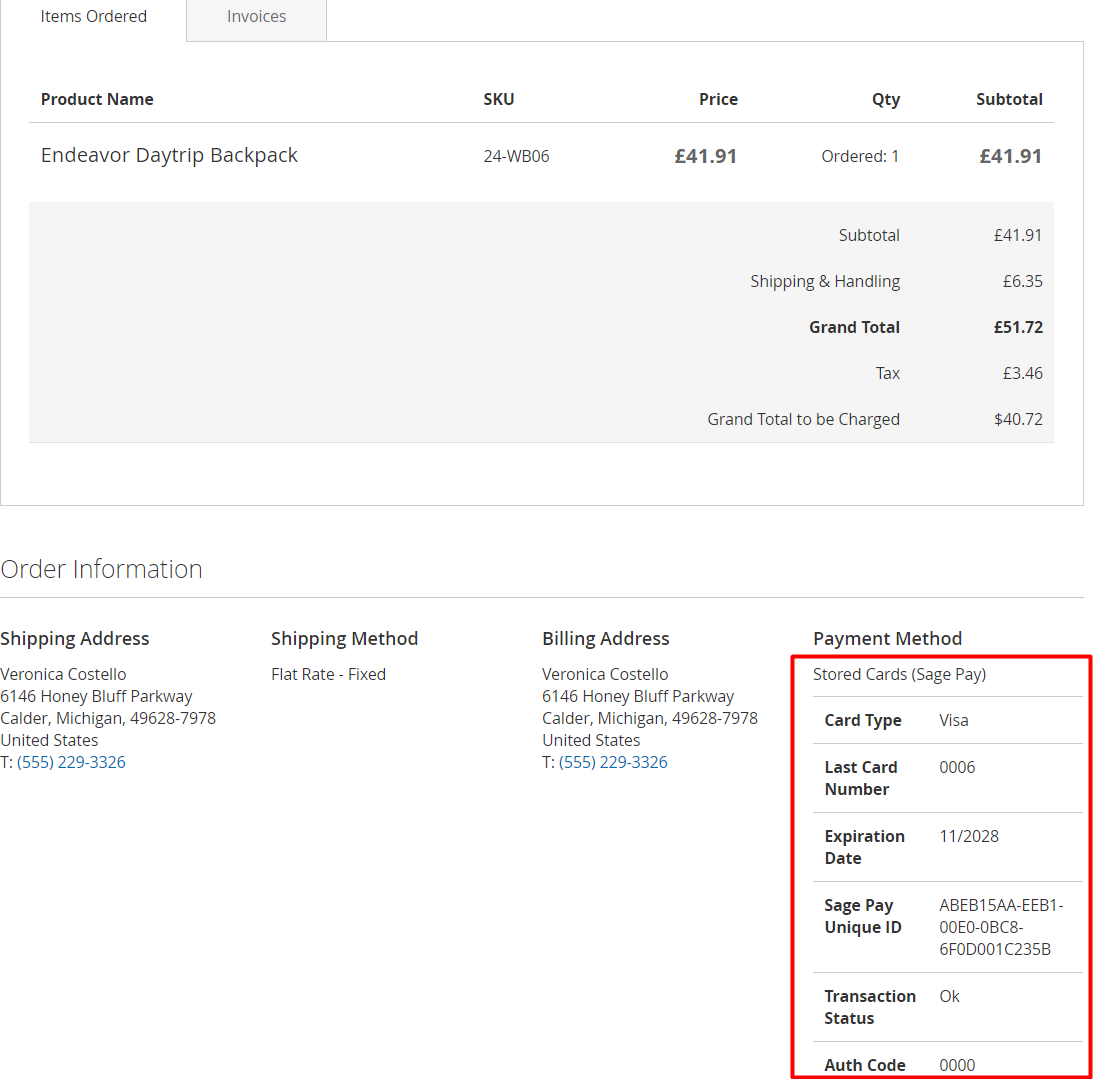
This section records the information of Credit Card (Sage Pay) that customers have ordered and paid.
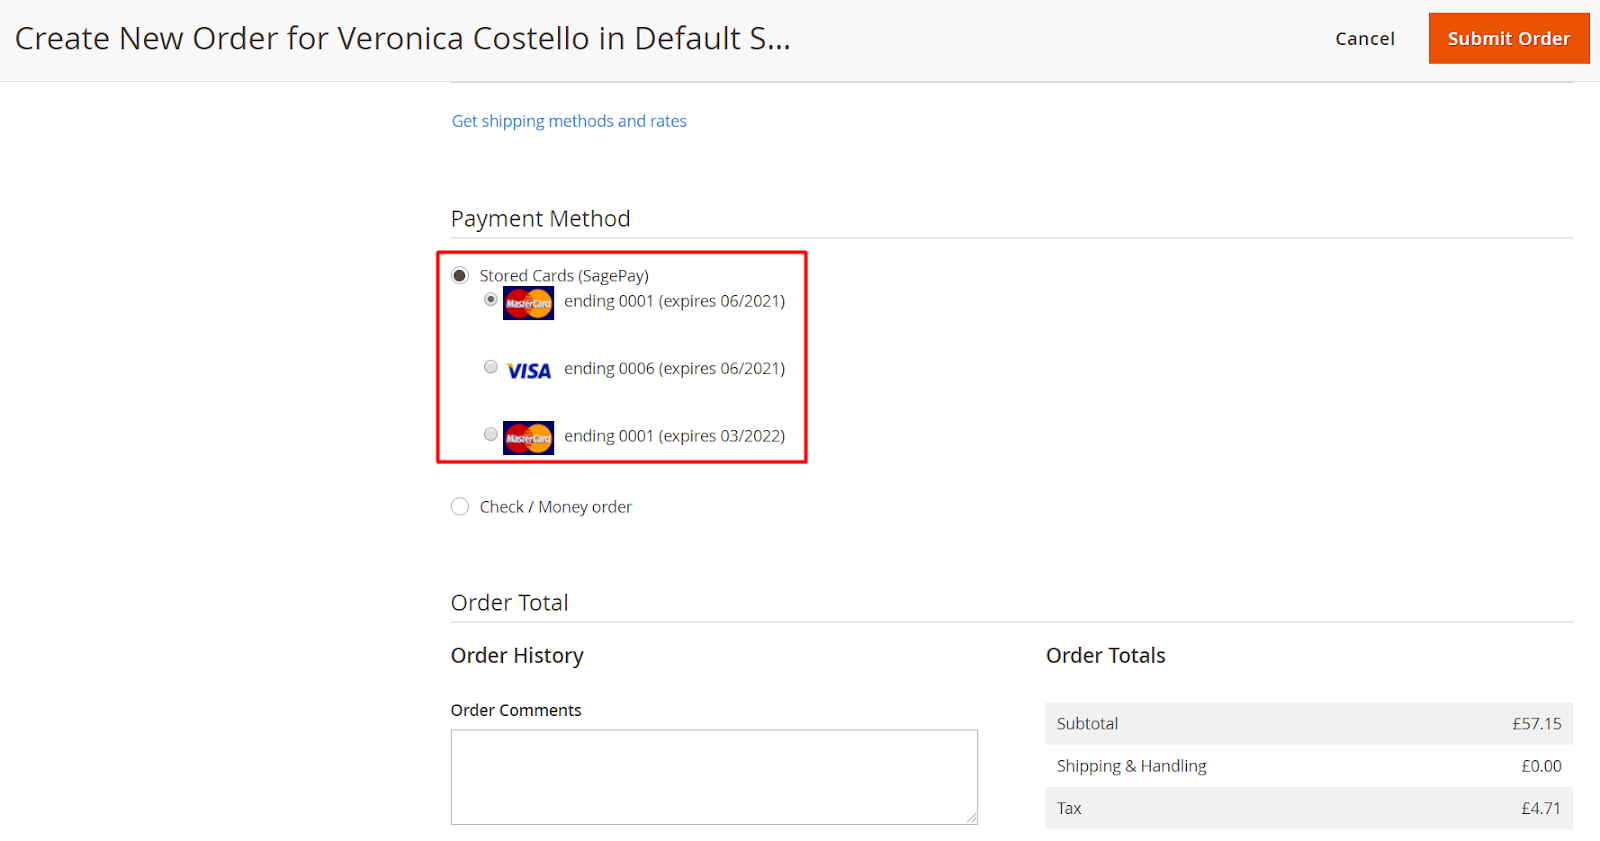
3.2. Admin Order
Admin can order by Sage Pay method with the cards that customer has saved.
4. Order Frontend
This section saves the card information that the customer has ordered.
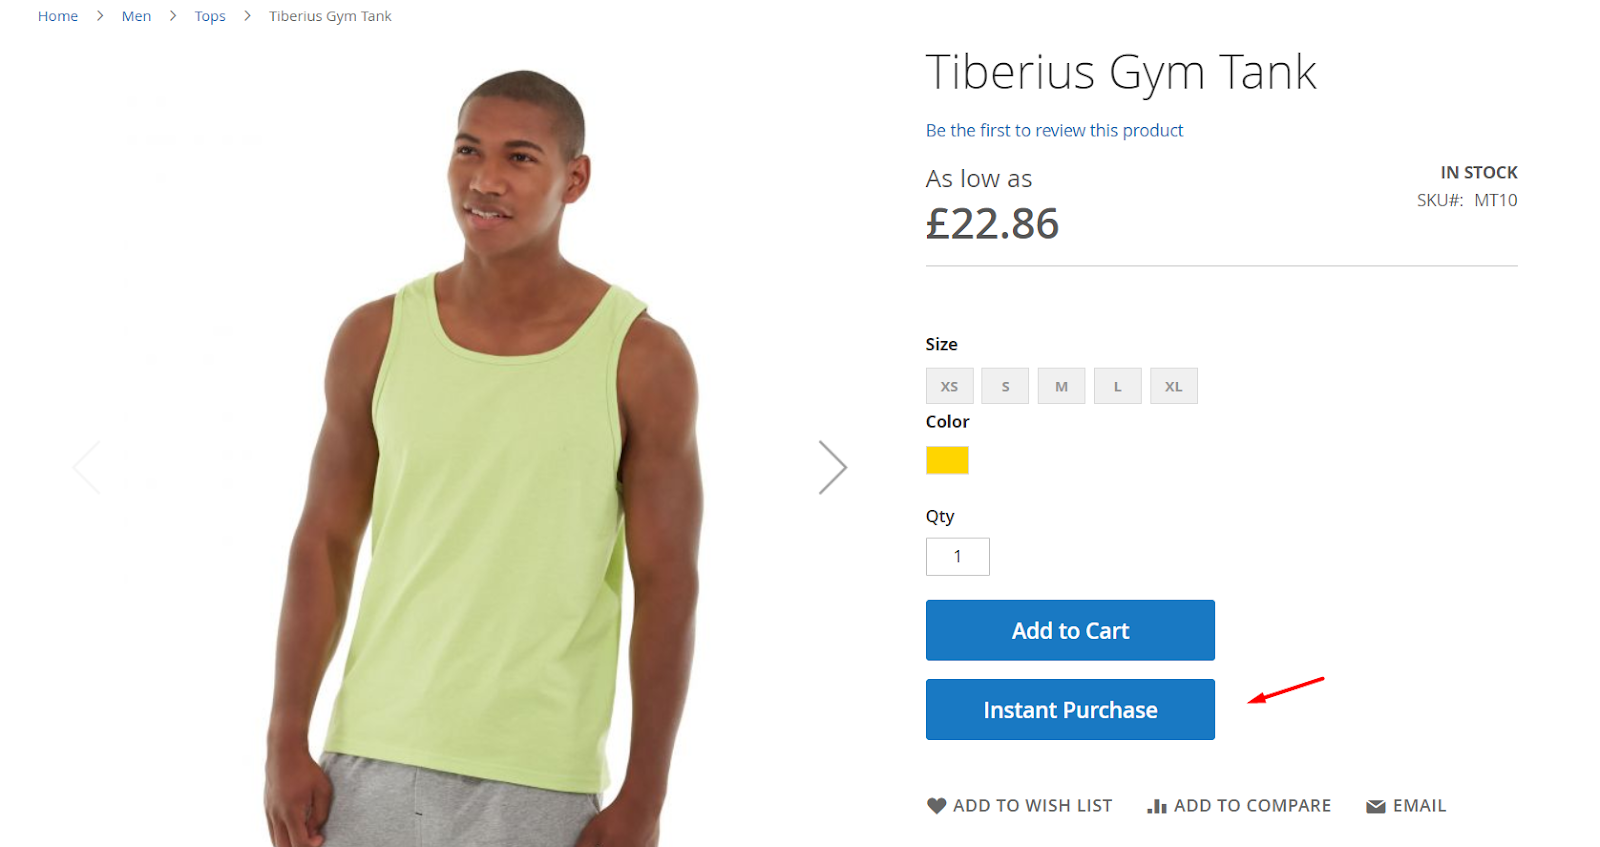
5. Compatible with Instant Purchase
This customer part can use Instant Purchase to execute orders conveniently and quickly
Note: Instant Purchase only shows when you have saved the payment cards. Also, to use Instant Purchase, you should turn off 3D Secure because the card verification was done during customer save and fill in the payment card information.
Compatible with One Step Checkout
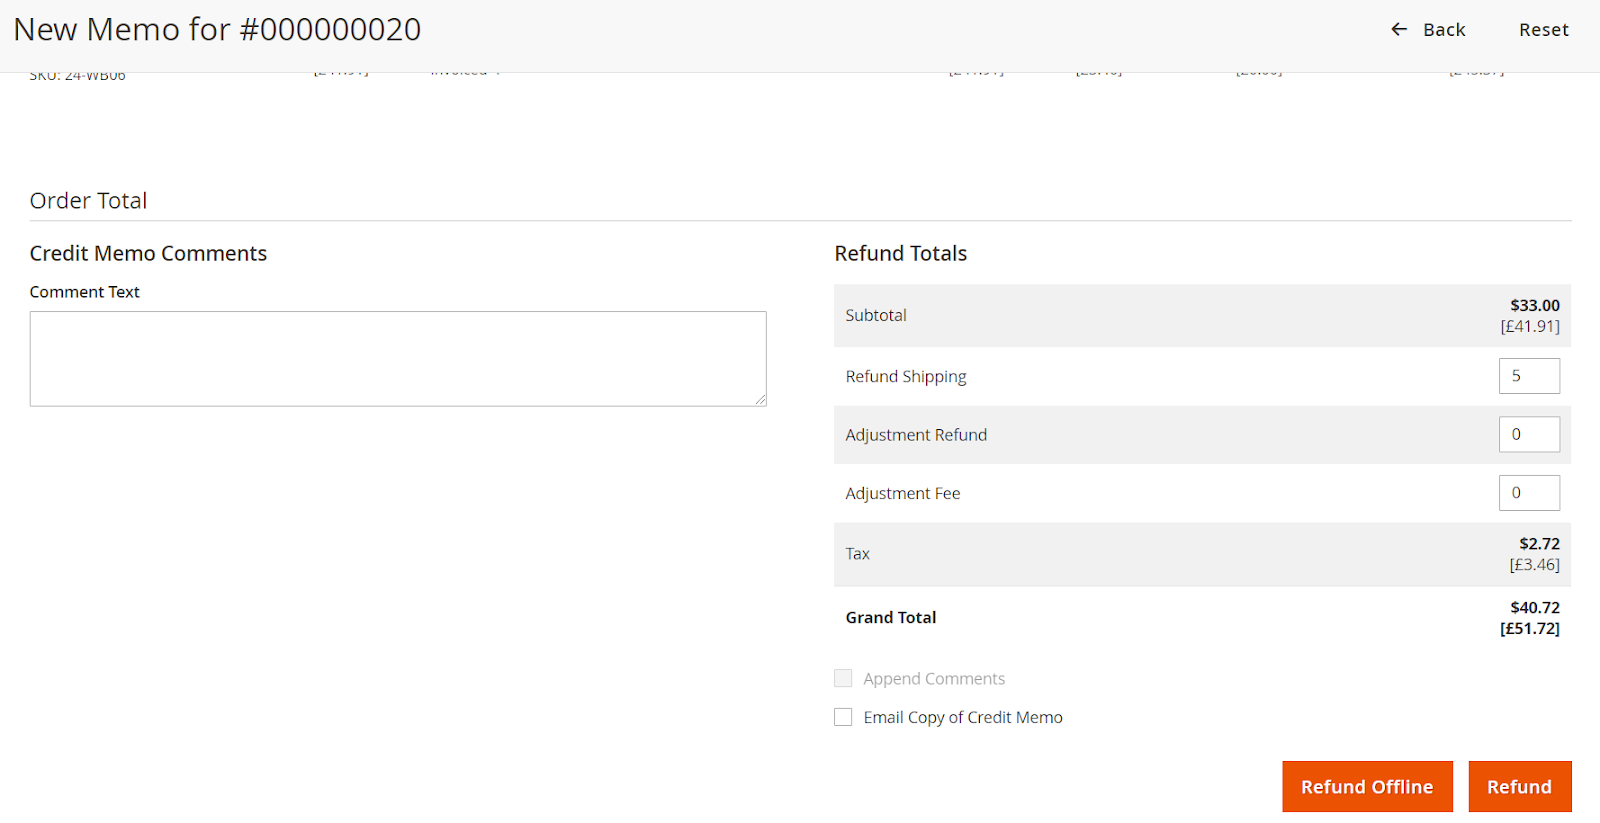
6. Refund Order
Here admin can Refund Online/ Offline all order or an individual one.
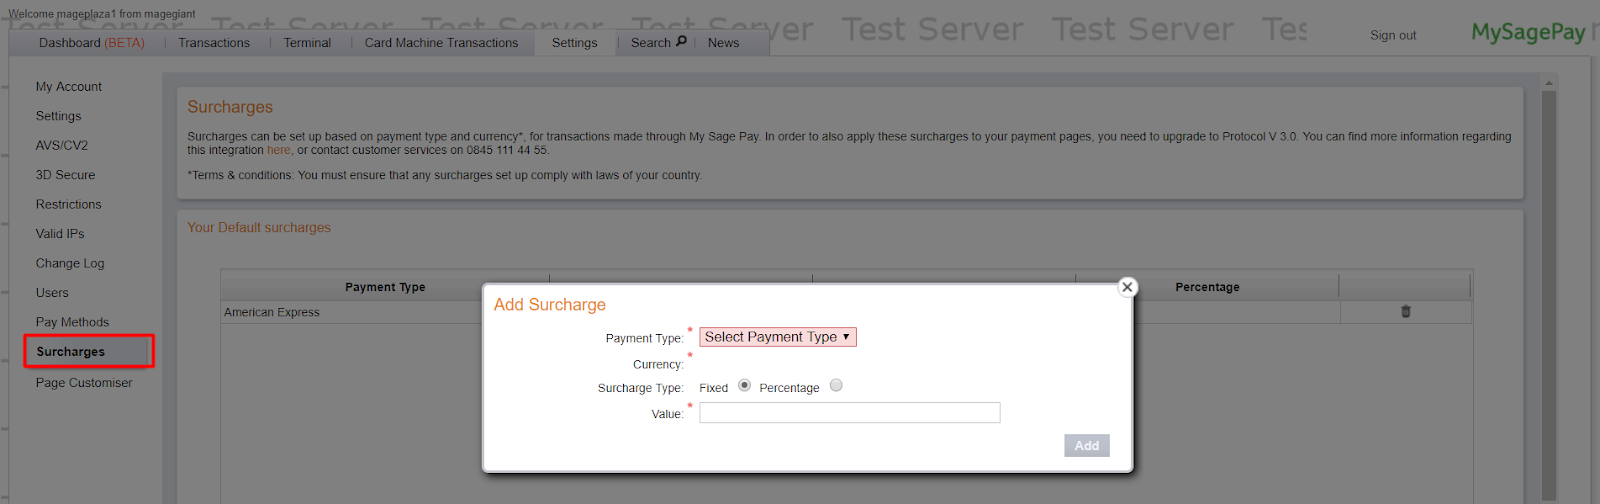
7. Sage Pay Extra Fee
When paying via Sage Pay with some cards like American Express, customer will have to pay an extra fee. Sage Pay extra fee is displayed at the view order page when customer order is completed.
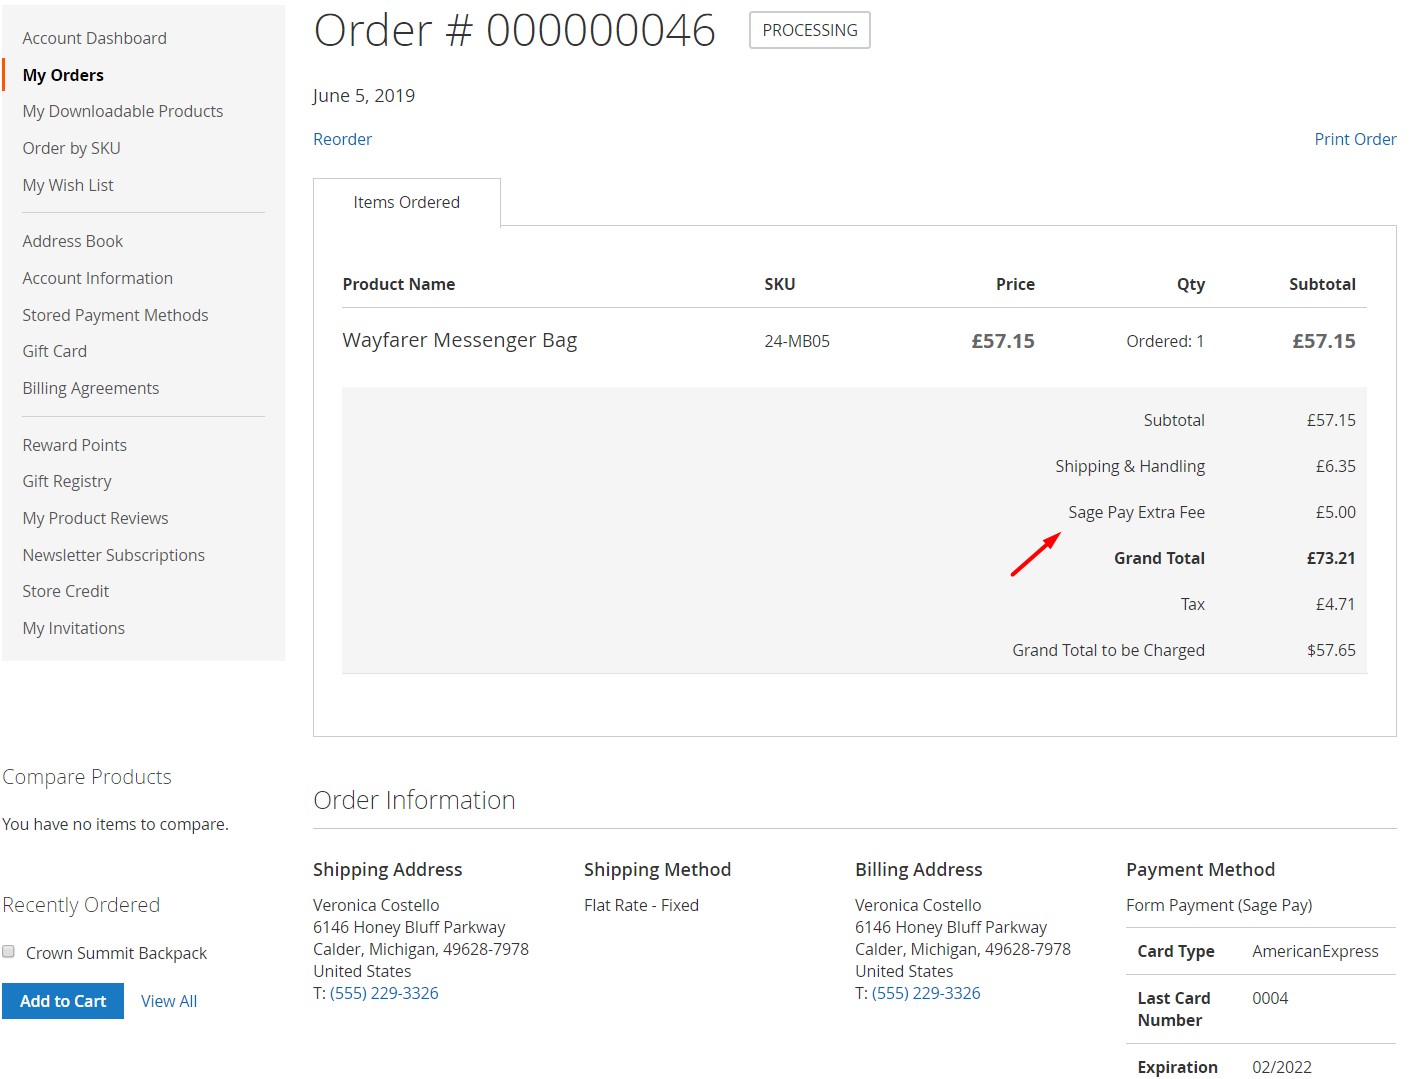
Admin needs to install Surcharge at MySagePay page to add extra fee for each card type. Visit MySagePay and go to Settings > Surcharges, click Add button to install Surcharge with each card.