SMTP
Mageplaza SMTP will assist you to resolve email sending issues. By available popular email server providers, our extension absolutely would like to help you in sending email with a huge amount of quantity, faster along with high secure authentication. Hence, Mageplaza SMTP will also provide you a log diary which archive all the detail sent emails, makes it easier to keep track and checking problems. Be ready to say goodbye to Spam box issue.
Download & Install
You can download from the following resouces:
Install via composer (recommend)
Run the following command in Magento 2 root folder:
composer require mageplaza/module-smtp
php bin/magento setup:upgrade
php bin/magento setup:static-content:deploy
Here we go how to know detail in instructions and configuration in extension’s backend.
How to config
Login to the Magento admin, choose Stores > Settings > Configuration > Mageplaza > SMTP
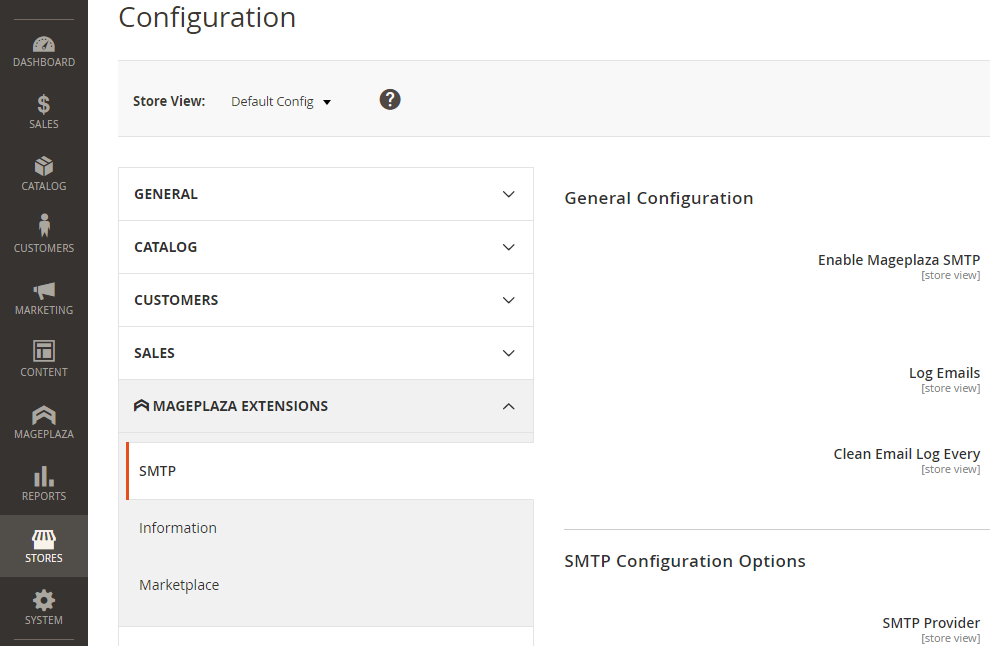
Follow the guide below to complete SMTP configuration
- Emails Log
- General Configuration
- SMTP Configuration Options
- Developer
1. Email logs
This can be accessed by the following Mageplaza > SMTP > Email Logs. From here you can look back all the sent email from the server to customers.
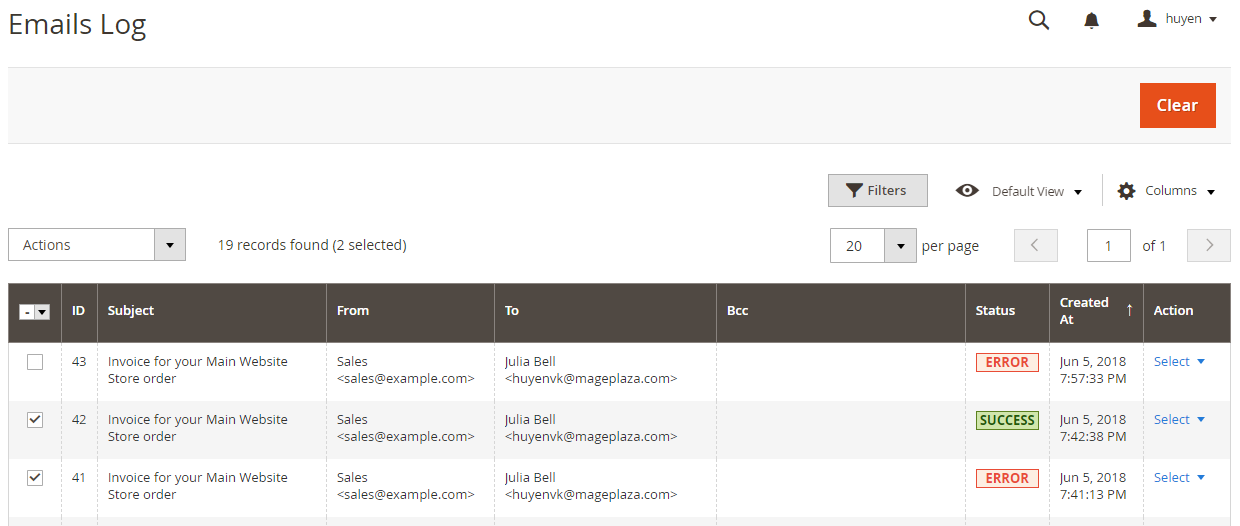
At here, you can view all information as ID, Subject, From, To, Bcc, Status, Created At as well as allow admins to take some actions for emails that are sent from the server to customers. At the same time, you also delete all emails by clicking on the Clear button.
Some actions can be taken:
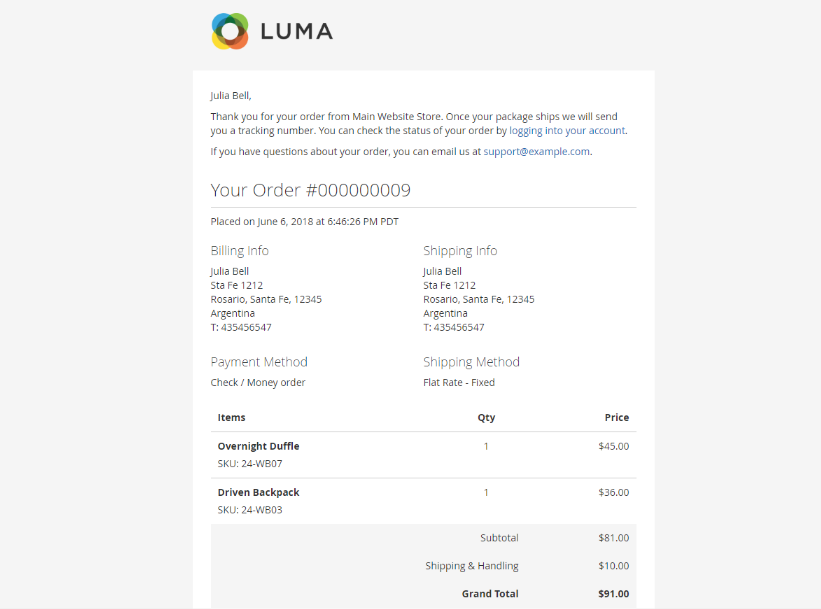
- View: To review the content of the email that is saved in the Emails Log. Admin can review by clicking
Select > Viewin theActioncolumn.
Below is the content of an email after you click on the View button
Resend:
In the
Actioncolumn, chooseSelect > Resend. This means that the selected email will be resent once and that Email Resend is also logged, which enables admins to know if the Email Resend is sent successfully or failed.The
Resendfeature can work well even if you disable the module. The Resend Email will apply the Provider of SMTP, however, it won’t be logged in the Emails Log.To resend lots of emails at once, you only need to tick, then choose
Actionat the upper left of the Grid, and selectResend.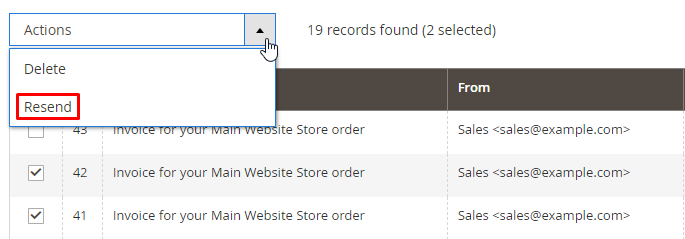
Delete:
In the
Actioncolumn, clickSelect > Delete: This means that the selected email will be removed from the grid.To Delete many emails at once, you only need to tick, then choose
Actionat the upper left of the Grid, and chooseDelete.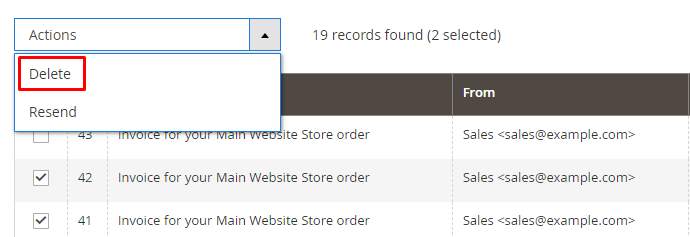
2. Configuration
2.2.1 General Configuration
Be sure you’re at Admin Panel, for general configuration Stores > Settings > Configuration > Mageplaza > SMTP. Choose General Configuration sections.

In the Enable Mageplaza SMTP field, select “Yes” to enable Mageplaza SMTP extension.
Log Email provides two modes:
- Yes: Sent emails will be saved in the Emails Log, you can preview it and have it clean up to follow the fixed schedule.
- No: Sent emails won’t be archived.
Clean Email Log Every: This field limits the storage time for the email you sent. After that limited number of days, Email will be auto-deleted. If you do not want to delete the emails, leave the field blank.
Blacklist: Enter the regular expression (regex) for email patern in this field, meaning that emails with the same pattern as the patern here will not receive any mail from the system.
- Regex is written between two right slashes /../. Basic regex:
[0-9]: digits from 0 to 9[a-z]: lowercase letters from a to z[A-Z]: uppercase letters from A to Zabc: letter. For example:/abc/correspond to "abc" string in the defaut pattern string “abcdefgh”123: number. For example:/123/correspond to "123" string in the defaut pattern string “abc123”\d: any number from 0 to 9\w: a letter\s: white space (space, tab, new line, ...)\D: non-numeric character\W: non-letter characters\S: character not white space.: any character except the new line. For example:.{3}will correspond to any string with 3 characters+: indecates the element appears >= 1 time*: indicates that the element appears >= 0 times (may not appear)?: indicates the element appears 0 or 1 time^: represents the first element of the string. For example:^acorresponds to the letter "a" in the string "abc"$: matches the last character of the string. For example,c$matches the character "c" in the string "abc"?: matches 0 or 1 times the character preceding it. For example:a?will be able to match "abc" or "bc" in the target string "abcdbc"a|b: corresponds to a or b.{x}: corresponds to x times. For example:{3}corresponds to 3 characters{x,}: at least x times. For example,{2,}corresponds to at least 2 characters{x,y}: from x to y times. For example,{2,6}corresponds to 2 to 6 characters- To use special characters, use the
\before that character. For example:/\.\+\*/corresponds to..+*
- Regex is written between two right slashes /../. Basic regex:
For example, the pattern of an email is: /^[0-9][a-z0-9\$\%\&]+@[a-z]+\.[a-z]{2,}$/
^[0-9]: start with a number between 0 and 9[a-z0-9\$\%\&]: the rest of the email may contain multiple digits, letters, characters $, %, &@: ending email address with the @ character[a-z]+: domain names include lowercase characters\.[a-z]{2,}$: End with top-level domain: begins with dot, followed by only lowercase characters, and requires at least 2 characters,$sign indicates end of string.
2.2.2 SMTP Configuration Options
Still from the same structure with SMTP General Configuration, go to Stores > Settings > Configuration > Mageplaza > SMTP, then choose SMTP Configuration Options sections.
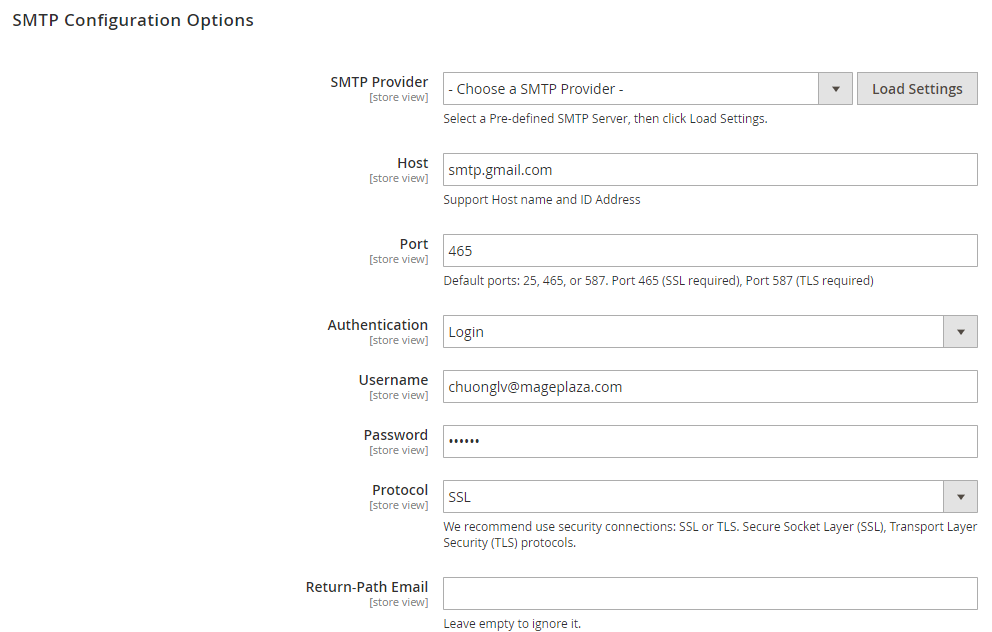
In the Host field: This is a field that allows you to fill in the Support Host name and ID address. If you click on Load Settings button, a popup about SMTP Providers will be displayed. Admins can choose SMTP Provider that they want and the system will auto-fill some fields as Host, Port, and Protocol.
In the Port field: This is a specific gate that emails will be sent through. You can also pass this step if you had chosen Load Settings from the first place. In general, there will be 3 kinds of Default Port:
- Port 25: Emails sent by Protocol other than SSL, TLS will be sent via this portal
- Port 465: Emails sent by Protocol SSL will be sent via this portal
- Port 587: Emails sent by Protocol TLS will be sent via this portal
In the Protocol field: This is a place allowing you to choose the protocol to send the email. If you had click Autofill button, please ignore this field. You can choose one of the providing protocols below:
- None: When you choose Protocol = None, this means that you accept all risks that can occur with your sent emails
- SSL stands for Secure Socket Layer. This protocol ensures that all data exchanged between the web server and the browser is secure and stay safe.
- TLS means Transport Layer Security. This protocol can secure data or messages and validate the integrity of messages through message authentication codes.
In the Authentication field: This is a field that enables you to choose the authentication method. There are 3 methods:
- Login: Authentication by login to the account through Username and Password that will be filled in the next field. Most of providers will require this method.
- Plain
- CRAM-MD5
In the Username field: This field allows you to fill in the Account name according to SMTP Provider format that you have selected.
In the Password field: This field enables you to fill the Password of Username that you have filled. After saving, Password will be encrypted into **
Note:
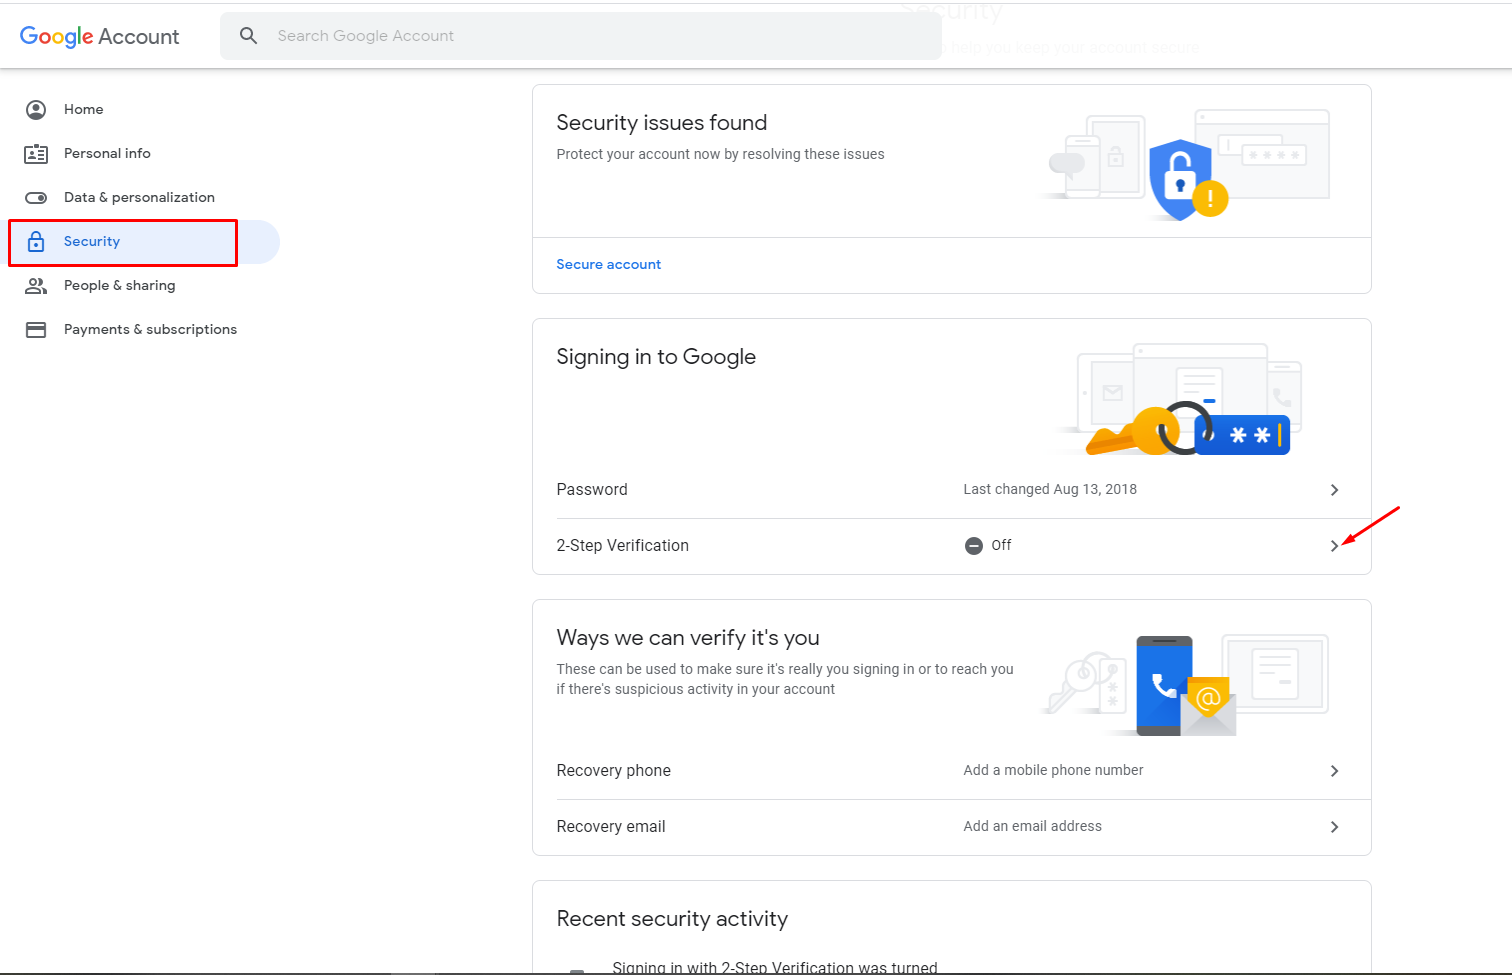
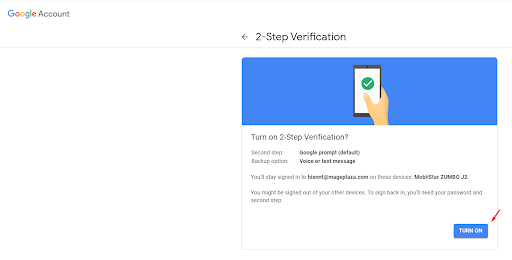
When using Email to fill into Username and Password, the email has to be varified by 2-Step Verification, to do this, click here.
After clicking on the link, go to Security and choose 2-Step Varification
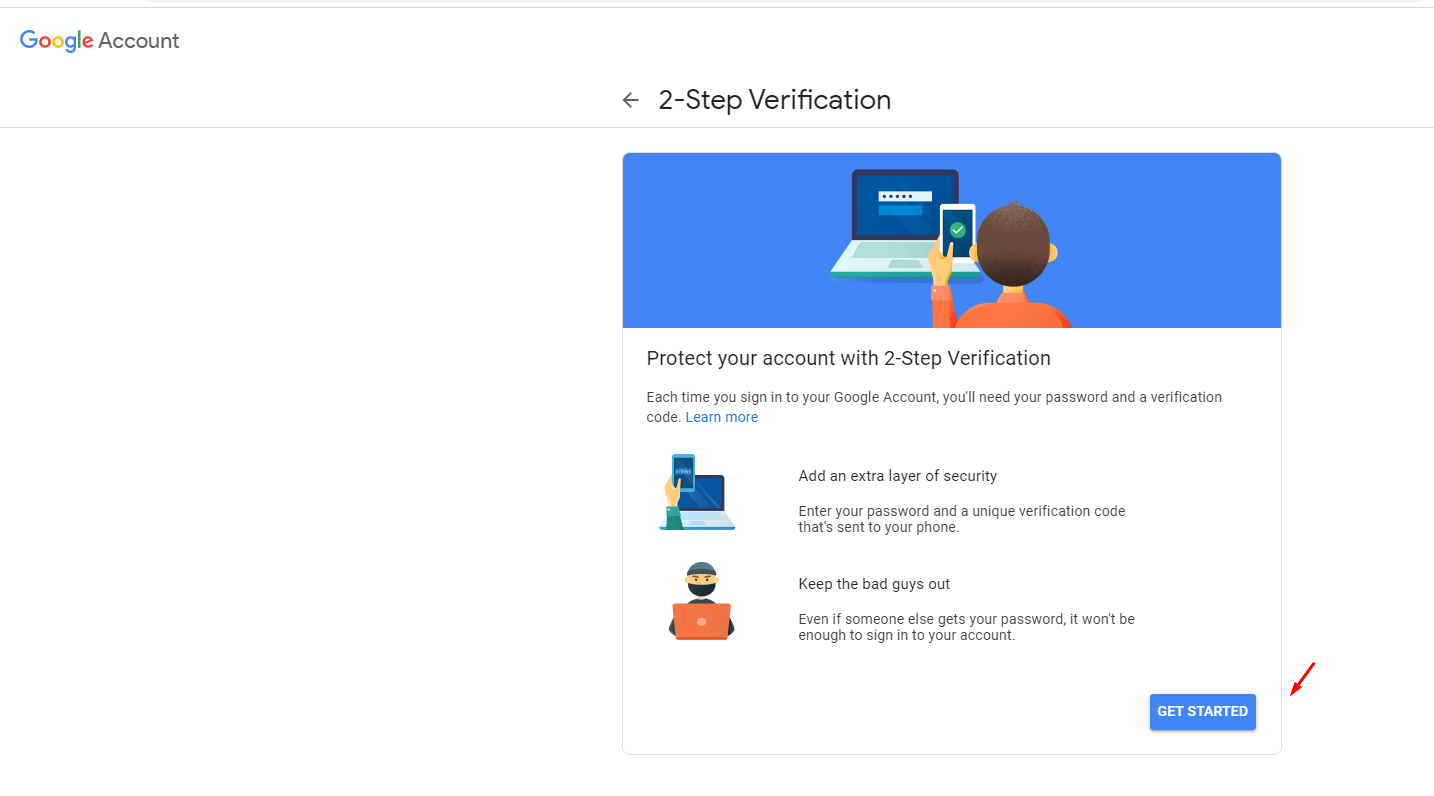
Click Turn on to complete this step
- Next, you have to crease Passwords to sign-in Google accounts from app that do not support 2-Step Varification. So, Choose the apps and click on Generate
- In the Return-path email field: Leave it empty if you want to ignore this.
- In the Send Test Email: This is a field for you to test the operation of the extension.
- Send From: Admins can choose one of the five Email Sender of Magento.
- Send To: Allow entering the email address that admins want to test the email.
- To test the email, you need to fill the email address in the
Send Tofield, then clickTest Nowbutton.
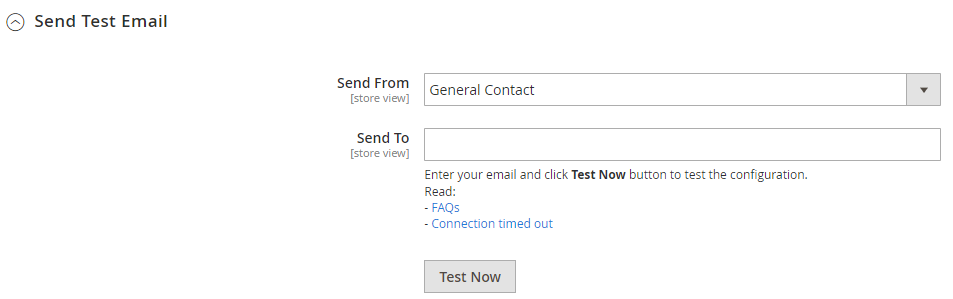
If the information you filled out is valid, a successful email message will be sent from Username to Email Test. That email has the following content:

2.2.3 Abandoned Carts Grid
From the Admin Panel, go to Sales > Abandoned Carts:
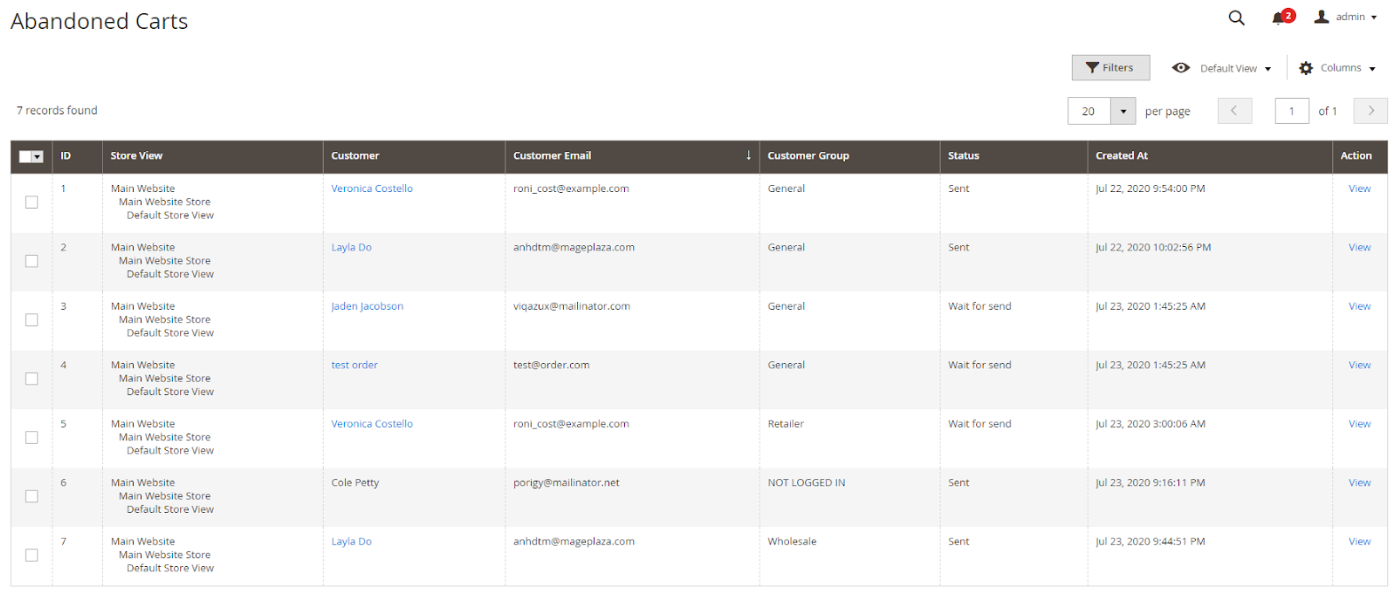
- This is where customer's abandoned cart information is shown.
- From Abandoned Carts, admins can have information such as ID, Store View, Customer, Customer Email, Customer Group, Status, Created At, Action.
- Action: The View section allows admins to view details of an abandoned cart.
- In addition, admins can filter and change the store views as well as show or hide columns.
View Abandoned Cart:
From the Admin Panel, go to Stores > SMTP > Abandoned Carts, then click View at Action:
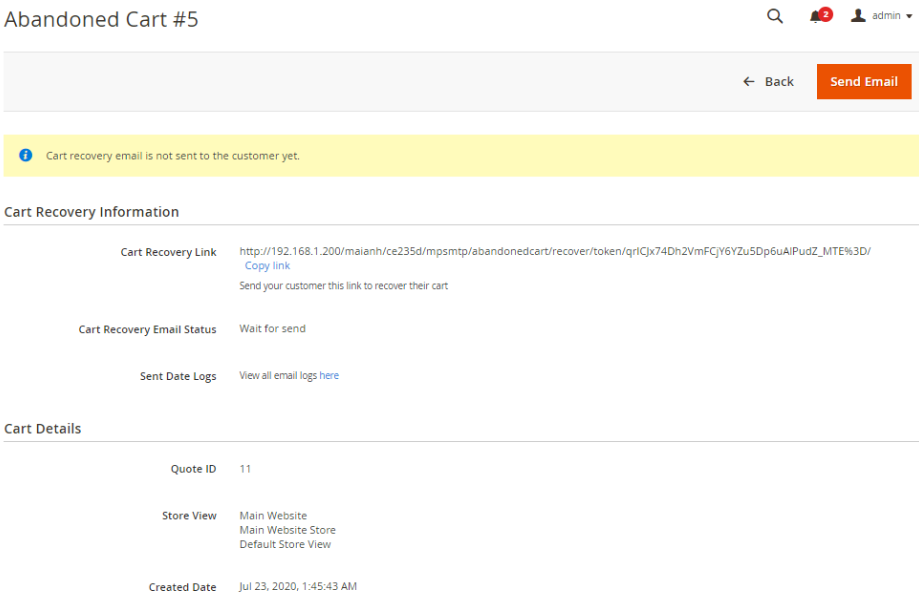
Detailed information of an abandoned cart will be displayed:
- Cart Recovery:
- Cart Recovery Link: Send your customer this link to recover their cart
- Cart Recovery Status:
- Wait for send: Have not sent emails to customers
- Sent: Sent emails to customers
- Sent Date Logs: Show date and time when emails are sent to the customers
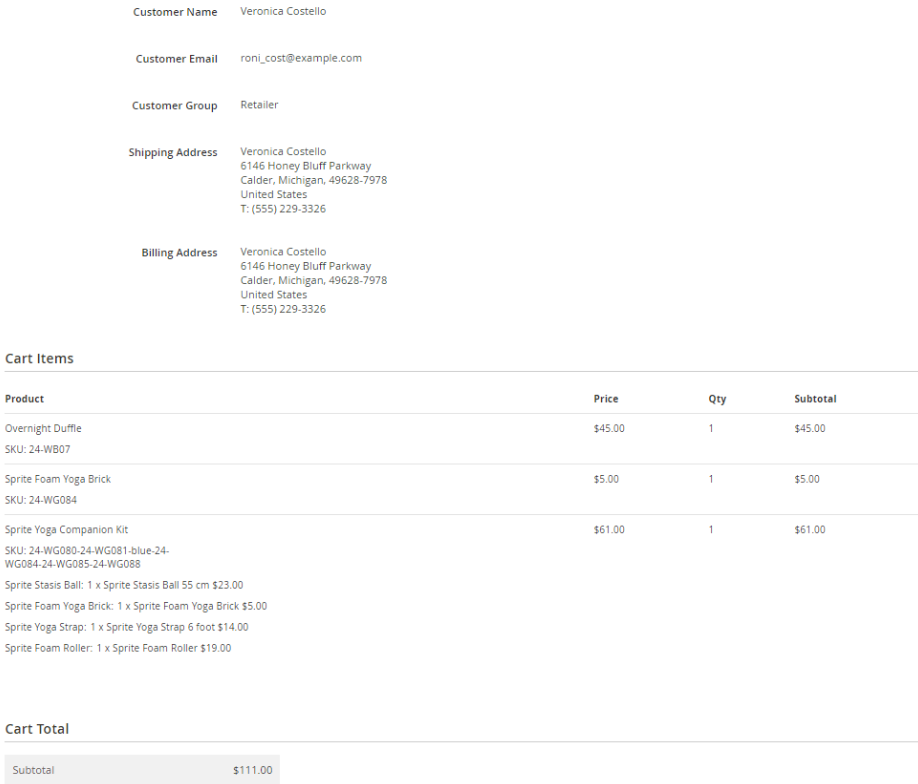
- Cart Details: Show details including Quote ID, Store View, Created Date, Customer Name, Customer Email, Customer Group, Shipping Address, Billing Address.
- Cart Items: Show all products that customers abandoned.
- Cart Total: Show the total of the cart.
- Send Email:
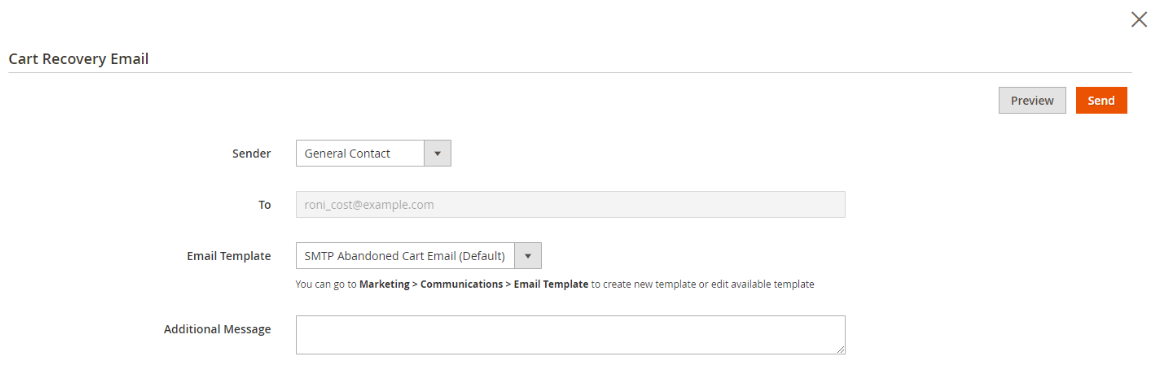
- Sender: Select the email sender
- To: Customers' emails
- Email Template:
- Set the email when customers have abandoned carts.
- Go to
Marketing > Email Templates, select Add New Templates to create new email templates. - Please find the guide to reate a new template here
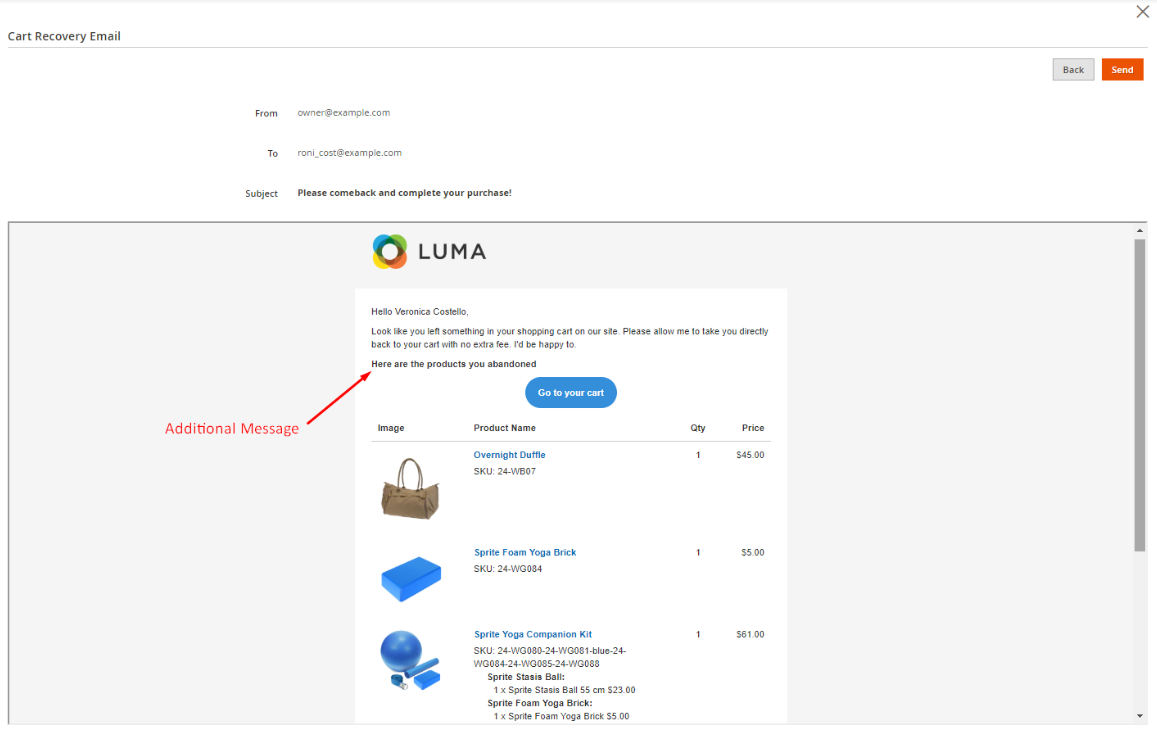
- Additional Message: Admins can add extra messages
- Preview: View the email that will be sent to customers.
2.2.4 Developer mode
From the Admin Panel, go to Stores > Settings > Configuration > Mageplaza > SMTP, choose Developer sections.

- Developer Mode:
- Yes: Magento will not deliver any email to the receiver
- No: Magento will deliver email to the receiver
Must-have extensions for your Magento stores
- Increase website traffic: SEO
- Build leads
- Increase conversion rates: One Step Checkout, Layered Navigation
- We believe that you can sell more: Gift Cards, Auto Related Products, Frequently Bought Together, Free shipping bar, Daily Deal , Product Feed
- Keep customers return: Reward Points
- Let your customer become raving fans
- Optimize your stores: PDF Invoice, Custom Order Number, Stop return items issue