Reward Points Ultimate
Overview
In order to improve Magento 2 Reward Points extension as well as bring the most interesting features to the customers, Mageplaza has developed Reward Points Ultimate extension. This is an advanced version of Professional version that comes with tons of powerful functions for admins in managing their online stores.
Outstanding Features
| Ultimate | Outstanding Features | Description |
|---|---|---|
| 1 | Custom Point Earning Rules | Allow store owners to set up different rules and conditions for earning points. Customers can earn points from actions such as purchases. In addition, the module supports defining rules for earning points based on different criteria such as order value, product category, or customer group. These help store owners turn infrequent customers into loyal customers through an effective reward program. Customized Earning Rules: Admins can set up an exciting loyalty program with flexible reward points rules depending on the product, catalog or shopping cart rules that the customer adds. |
| 2 | Enhance customer experience in purchasing and using reward points | Customers can redeem points for discounts. The module provides options to configure point values and redemption thresholds. Spend sliders enhance the customer experience. By simply dragging the slider, customers can easily apply the desired amount of points to their purchases, making the checkout process faster and more convenient. Additionally, store owners can enable a one-click redemption option, allowing customers to easily use all their reward points at checkout. This streamlined functionality saves valuable time and enhances the overall customer experience, promoting a seamless and user-friendly interaction with the rewards program. Customized Spending Rules: Admins can set up a loyalty program by creating a rule to use reward points according to the shopping cart rule. Customers who use previously earned points will receive a custom discount. This encourages customers to use previously earned reward points to increase their purchase rate. |
| 3 | Optimize reward points management | Admins can manage, add and subtract customer reward points across multiple stores from a single admin dashboard. Admins can set expiration dates for reward points to encourage customers to use points promptly and maintain engagement. Additionally, sending automated emails to notify customers of earned points, upcoming expirations, and redemption opportunities will increase customer purchase rates. |
| 4 | Advanced Promotions and Advertising Programs | Milestone Program: This program makes customers feel motivated to spend more to reach the reward points milestones, as this helps them receive attractive offers and rewards. Also, when customers try to reach higher point milestones, they tend to buy more products in each order. This helps create customer loyalty to the store and increase the store's revenue. Sell by Points: Allows customers to use points to make purchases. This increases customer motivation to shop because it helps store owners create attractive offers when customers can reduce their shopping costs and save money by using reward points. Points can be converted into monetary value and deducted from the total amount payable, while the remainder can be paid using other payment methods. Referral Program: This is a system that encourages customers to refer a store or product to their friends, relatives or colleagues. When the referrer or the referred person performs a specific action (such as making a purchase or registering an account), both parties receive a reward or bonus points. Customer referrals help build the store's brand and reputation through positive word of mouth. In addition, because the cost of a Referral Program is often lower than that of traditional marketing methods, it is highly effective in attracting new customers for store owners. |
| 5 | Reporting and Analysis | Detailed reporting helps provide detailed reports on reward point usage, promotions, and campaign effectiveness. It also helps track and analyze the effectiveness of reward point programs for adjustment and optimization. |
Installation Guide
We offer two methods for installing our plugins: the Copy & Paste method and the Composer method. Please follow the detailed instructions provided below.
Method 1: Installation via Copy & Paste
To install our plugins using the Copy & Paste method, kindly follow the instructions at the link below:
How to Install Magento 2 Extension via Copy & Paste
Method 2: Installation via Composer
Composer name: mageplaza/module-reward-points-ultimate
To install our extensions using Composer, please refer to the comprehensive guide at the link below:
How to Install Magento Extension via Composer
By following these guides, you can ensure that the installation process is handled correctly, allowing you to fully utilize the features and benefits of our plugins.
Module Update Guide
Keeping your module updated ensures optimal performance. Follow one of these steps to update your module:
- By Account Dashboard: Log in to your
Mageplaza account > go to the My Licenses section > click on the Download button > choose the latest version from the popup. - By composer: Kindly use the following commands to update the module via composer
composer require mageplaza/mageplaza/module-reward-points-ultimate
php bin/magento setup:upgrade
php bin/magento setup:di:compile
Updating a module by Composer ensures efficient dependency management, version control, and integration with development tools, making the process faster and more reliable.
Guide to install the library
Please run the below command to install the module library:
composer require liquid/liquid
How to use
I. For customers
- Earning Point(s) of the product can be depended on Customer Group, Earning Rate, Catalog Earning Rules, and Shopping Cart Earning Rules which are configured in the backend.
- Spending Point(s) customer use is depended on Spending Rate and Shopping Cart Spending Rule
Customers can earn reward point(s) and use them perfectly on the following pages:
1.1. The checkout page
- Customers can use their earned reward point(s) to discount the order.
- This page also displays the earning point(s) customers will receive when they place the order.
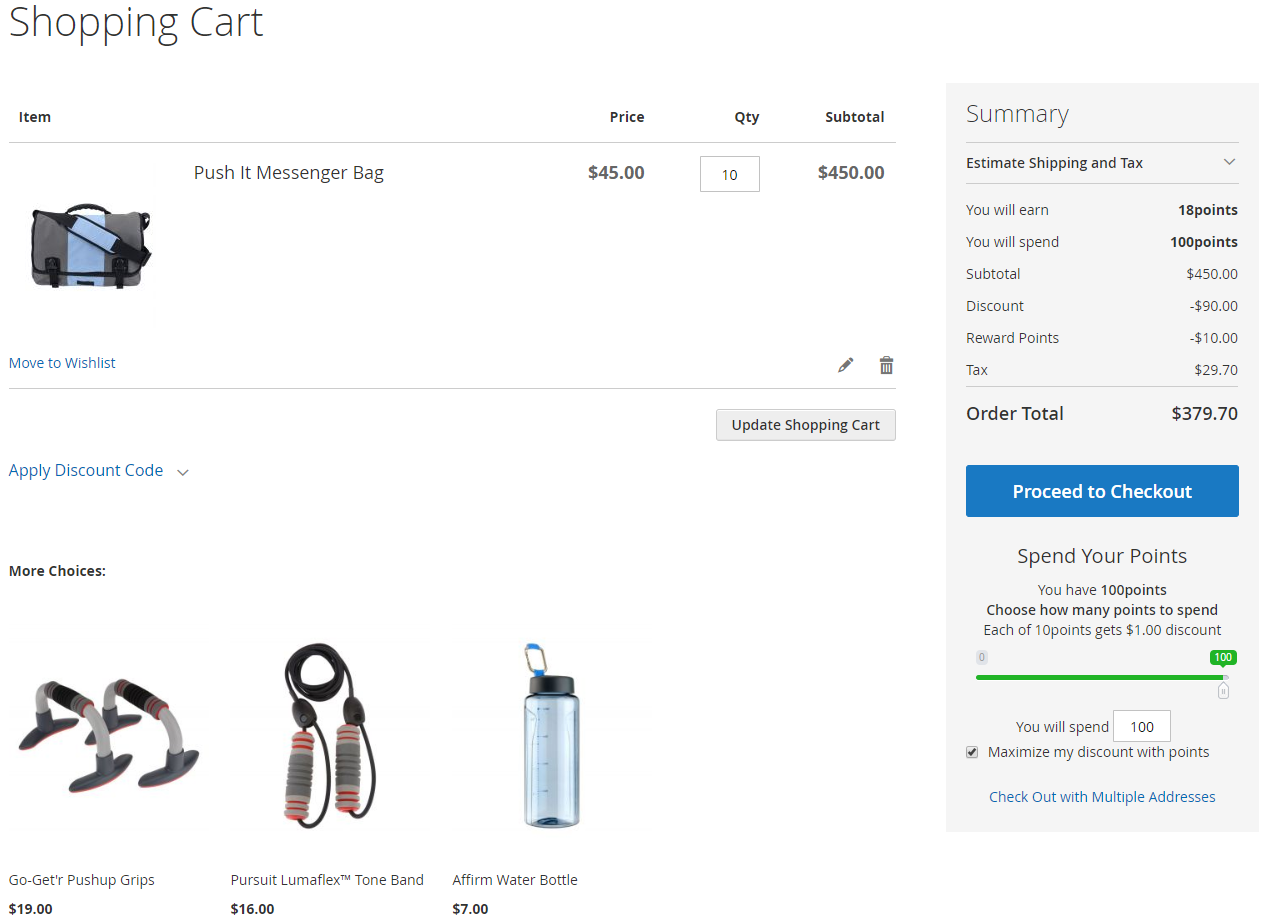
1.2. View Cart Page (Shopping Cart)
- This is familiar to the checkout page.
- However, Earning Point(s) can’t be shown on this page if admins disable the field Display Earning Points on Shopping Cart in the backend.
- Notice: Earning Point(s) can be different depend on Customer Group and Earning Rate which are configured in the backend.
1.3. Purchase the products by points
When you reach the number of specific points, customers can purchase the products by points instead of paying the money as usual. The price of products based on points will display when the Balance of customers has a larger point than the Product's point price.
Note: If the cart has the products that are sold by points, customers cannot use points to discount for the cart.
1.4. Some ways to earn points
Customers can perform the following actions to earn points:
- Place the order and complete it
- Create a new account
- Subscribe to the newsletter
- Write a review
- Send the email to refer the products to the friends
- Add the birthday
- Like the page by Facebook account
- Share the page by Twitter account
- Share the purchase by Facebook or Twitter account
- Refer to the friends
II. For admins (store owners)
- Admins can create and manage Earning Rate, Spending Rate and Transaction, as well as configure the Reward Points extension generally in the backend.
- Admins can change reward point(s) in the customer’s account in the backend.
- Admins are not supported to use reward point(s) when creating a new order at the moment.
How to configure
Log in to your backend, then go to Marketing > Reward Points and follow the instructions below to configure Reward Points extension
- Earning
- Spending
- Transactions
I. Earning
1.1. Earning Rate
Admins can set, check and edit customer point earning rates depending on the website or customer group. In addition, admins can set up point earning rules based on product categories, and shopping cart rules. This helps store owners set up policies on point exchange rates to the corresponding amount of money to encourage customers to buy to receive more bonus points.
Go to Marketing > Reward Points: Earning Rate
1.1.1 General Management
This is the place where admins can store Earning Rates created.
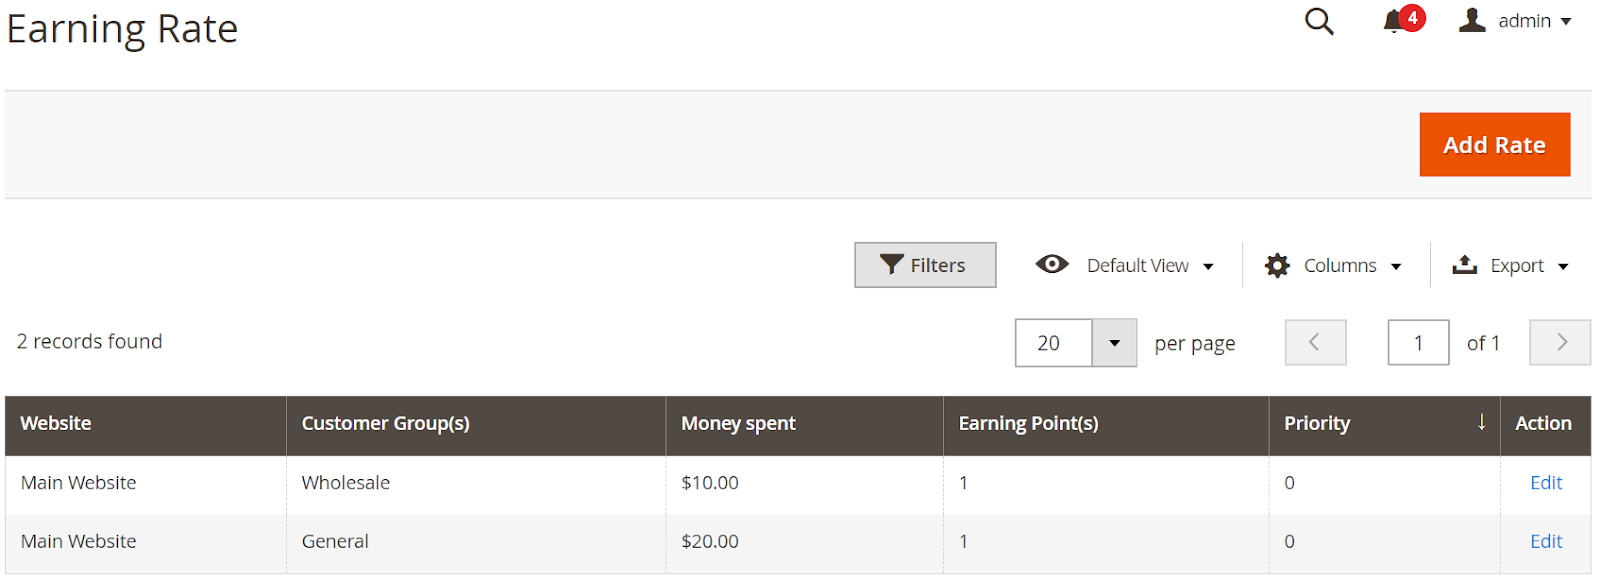
- From the grid view, admins can acknowledge some fundamental information of Earning Rate such as ID, Website, Customer Group, Money Spent, Earning Point and Priority. Also, admins are able to:
- To edit an earning rate, choose “Edit” in the Action column.
- Admins can filter, hide or display Column or export rates.
1.1.2. Add/Edit New Earning Rate
After entering the Earning Rate section, click on Add New Rate to create a new earning rate. Then, click Save and Continue Edit, the page will automatically switch to the Edit Rate page.
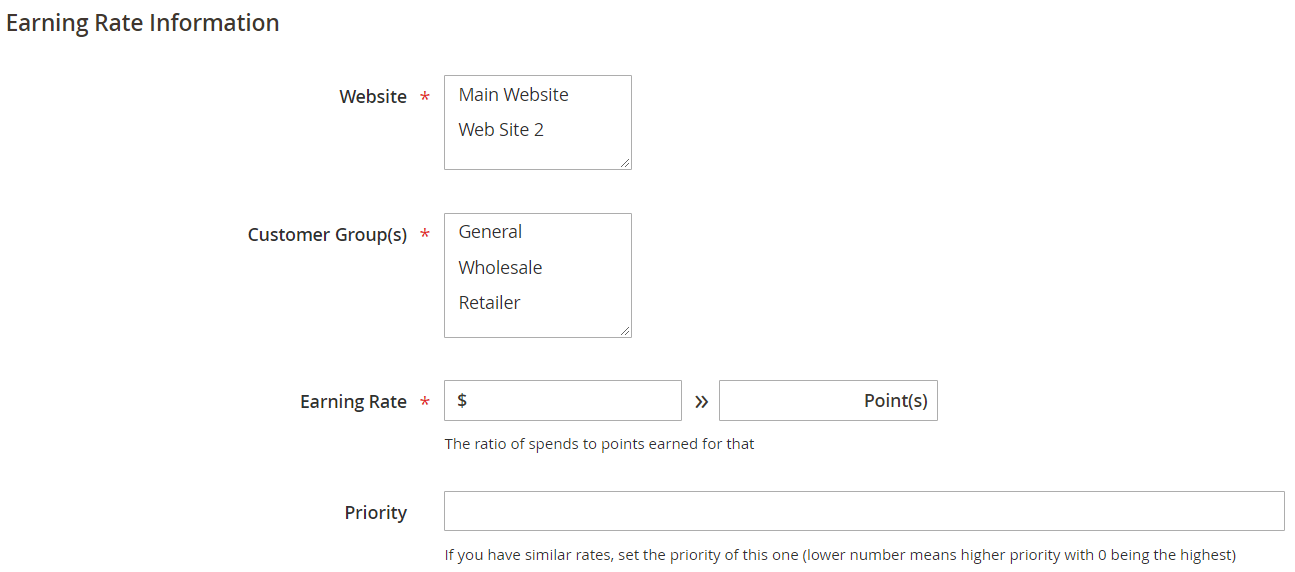
- In the Website field: Choose website(s) you want to apply the earning rate.
- In the Customer Group(s) field:
- Only customers who belong to this group can be entitled to this earning rate.
- Customers who belong to different groups can receive different earning rates even when they purchase the same product.
- In the Earning Rate field
- Define the conversion rate from X (currency) to Y (point)
- Admins can fill out the appropriate rate here. However, decimal numbers are not approved. If admins enter a decimal number, they will be rounded following the rule
>= 0.5 to 1, or< 0.5 to 0.
- In the Priority field:
- Indicates the priority of this earning rate compared to other earning rates.
- 0 indicates the highest priority. The higher the number, the lower the priority.
- If there are many earning rates that have similar priorities, rules will apply to the rate that has a smaller ID first.
1.2. Catalog Earning Rules
Admins can add new or edit Catalog Earning Rules in this section. Customers can receive points if they buy the right product or the price of the product.
1.2.1. General Management
This is the place where admins can store the Catalog Earning Rules that have been created.
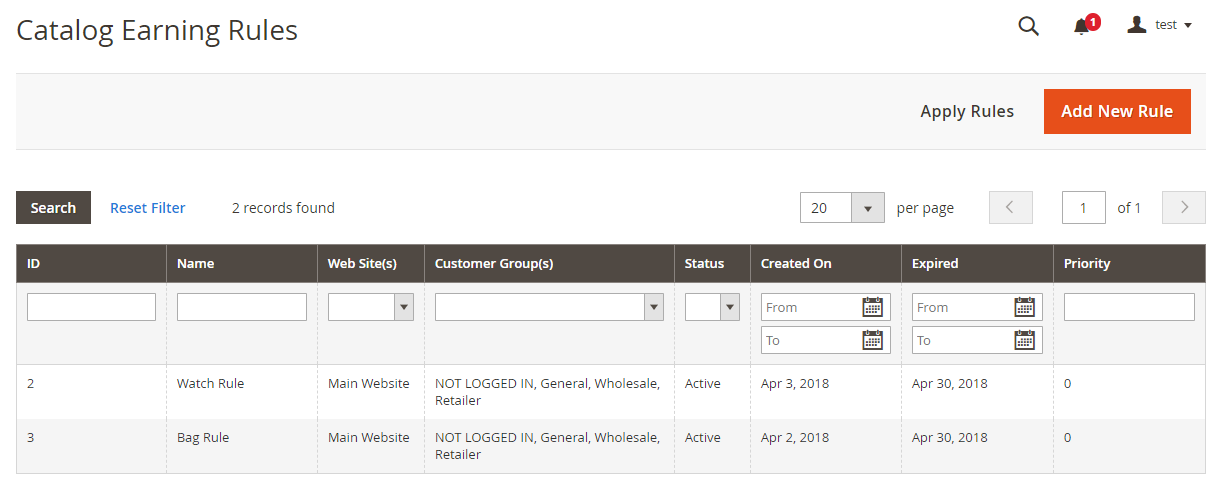
- From the grid view, admins can acknowledge some fundamental information of a catalog earning rules such as ID, Name, Website, Customer Group, Status, Create On, Expired, and Priority.
- Admins can filter to search for a specific rule.
- After making some modifications to the rule, click
Apply Ruleto enable it immediately.
1.2.2. Add New Rule (Edit Rule)
- Admins choose
Add New Ruleat the right-above corner to create a new catalog rule, after clickingSave and Continue Edit, the page will be directed to the Edit Rate page - At the Add New Rule page, click on
Save and Applyto apply the new rule. - Add New Rule page has 3 tabs
- Rule Information
- Conditions
- Actions
1.2.2.1. Rule Information
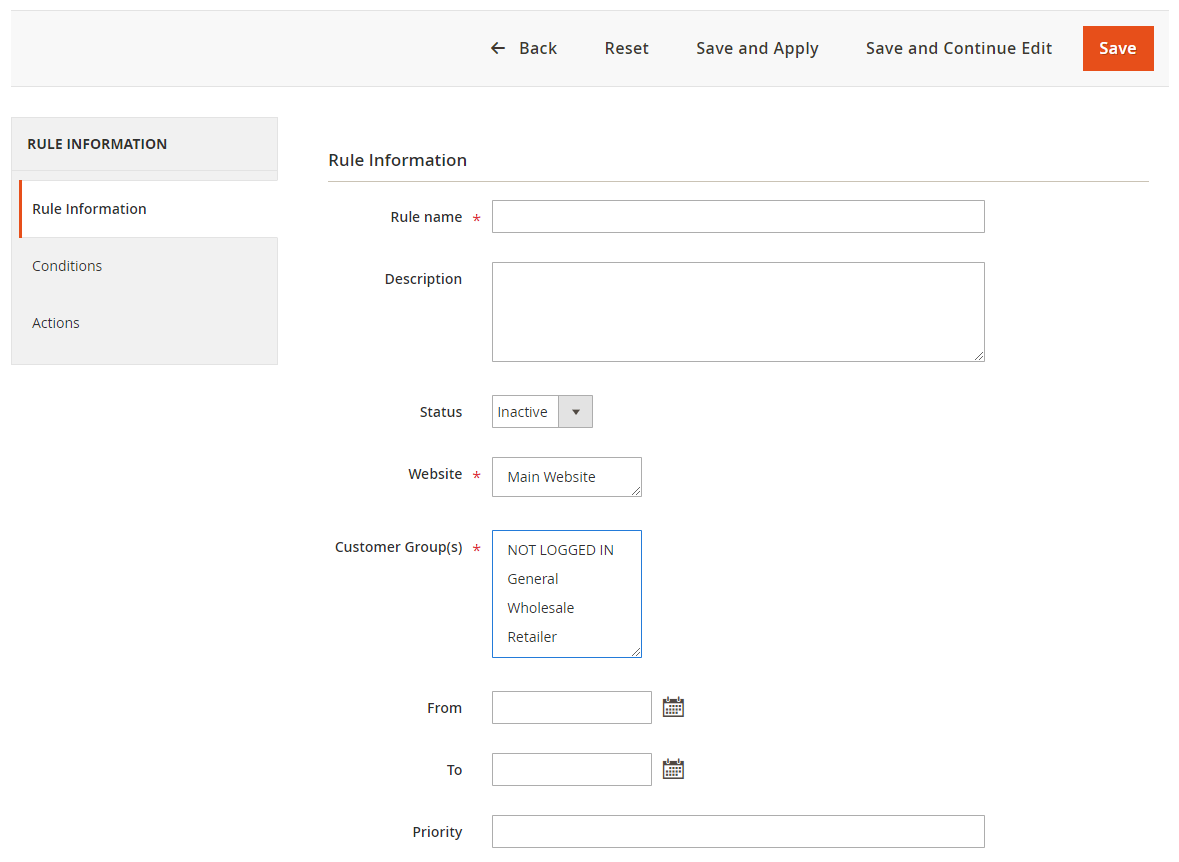
- In the Rule Name field
- Enter the rule name, which will be displayed in the backend.
- This is required information. There will be an error message if you leave it blank.
- In the Description field: You can note some descriptions of the rule. This field can be left blank.
- In the Status field: Choose "Active" to apply the rule.
- In the Website field: Choose website place(s) you want to apply the rule.
- In the Customer Group field:
- Choose group(s) of customer you want to apply for them.
- If the rule applies to Not Logged In customers, they still can learn the earning point(s) of each product, but point(s) won't be added unless they sign in or sign up on your store.

- In the From field: You can set up the start time to use the rule; please note the difference in time zones.
- In the To field: You can set up the end time to disable the rule.
- In the Priority field:
- Identifies the usage priority of this catalog earning Rule compared to others.
- 0 is the highest priority. The higher number represents the lower priority.
- If two catalog earning rules have the same priority, the rule with a smaller ID will be applied.
1.2.2.2. Conditions
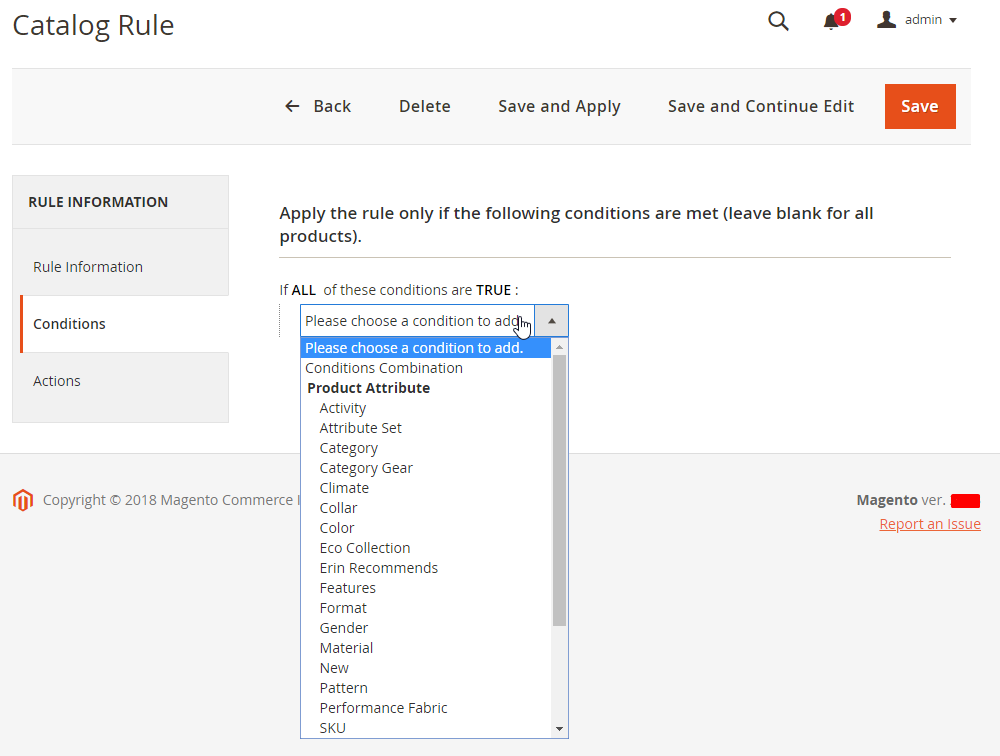
Choose a condition to apply the rule. Only Product pages that meet those conditions will be applied.
1.2.2.3. Action
Catalog Earning Rule includes 3 actions:
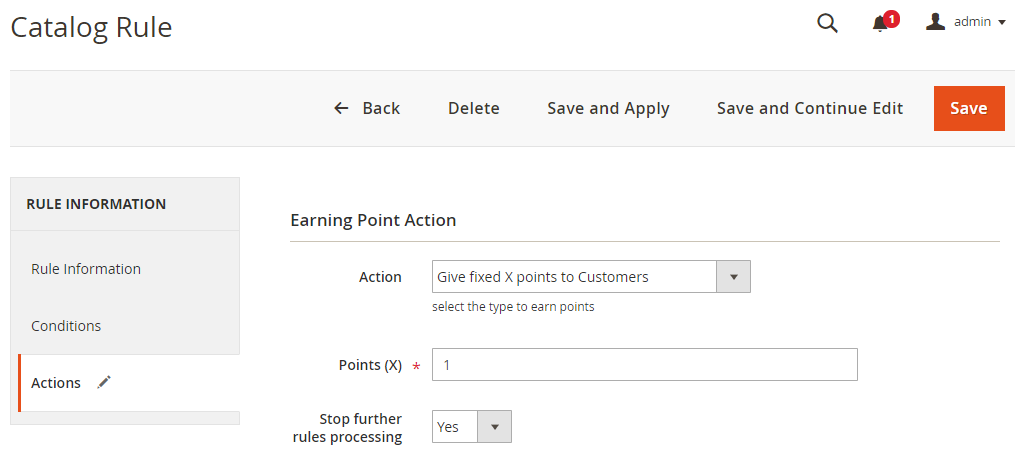
- Give fixed X points to Customers
- Customers will receive a fixed X point(s) for a product in their cart.
- In the Point X field: Enter fixed point(s) you want to set for customers.
- E.g: If Point X = 5, customers will receive 5 points per product they add to their cart. 2 items will be 10 points, no matter how pricing is.
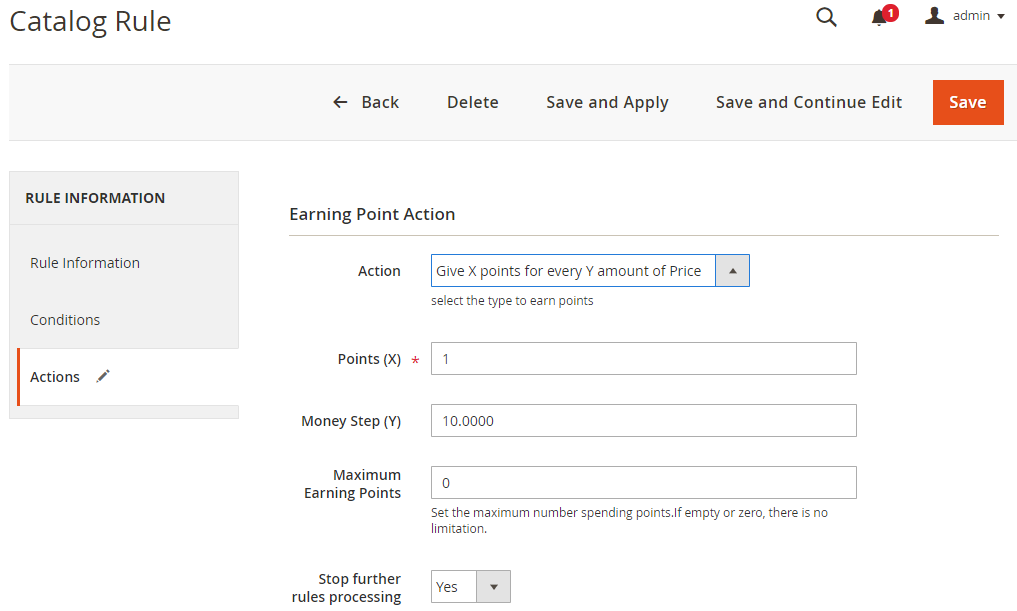
- Give X points for every Y amount of Price
- The point(s) will be calculated based on product's Regular Price (on Special Price if the product has)
- In the Point X field: Enter X point(s) customer will receive for every Y amount of price.
- In the Money Step field: Enter the minimum Y amount so that customer can receive X points. Pricing will be rounded following
Rounding Methodof the configuration. - In the Maximum Earning Points field: Set the maximum earning point customer can get from this rule.
- E.g: Point (X) = 1, Money Step (Y) = 20, and Maximum Earning Point = 5 which mean
- When the customer purchases a product that costs $40, he will earn 2 points
- When the customer purchases a product that costs more than $100, he will only earn 5 points
- On the other hand, A product has Regular Price=$40, Special Price=$20, they will earn 1 point only
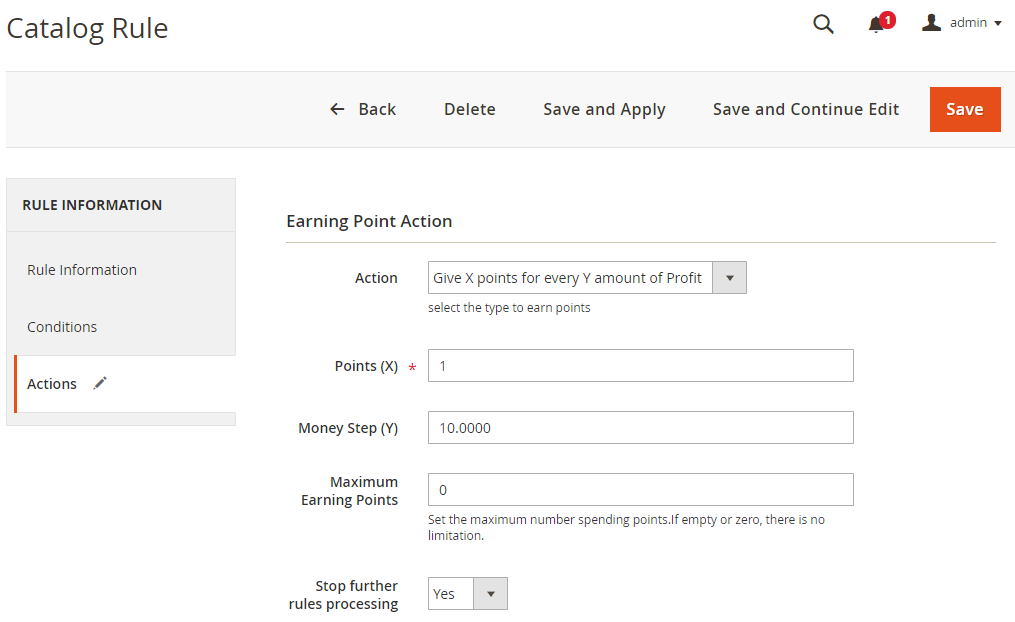
- Give X points for every Y amount of Profit
- For some products, admins enter cost as the price entered into that product. Profit is calculated by the sale price minus the cost. Action Give X points for every Y amount of Profit will transfer the difference to Point. If the product is not filled Cost, Profit is equal to Price.
- In the Point X field: Enter X point(s) customer will receive for every Y amount of regular price (profit).
- In the Money Step Y field: Enter the minimum Y amount so that customer can receive X points. Pricing will be rounded following
Rounding Methodof the configuration - In the Maximum Earning Points field: Set the maximum earning point customer can get from this rule.
- E.g: Product A has Regular Price = $40, Special Price = 20$, cost = 25$, Point (X) = 1, Money Step (Y) = 20, and Maximum Earning Points = 5 which mean when the customer purchase Product A, point(s) will be based on (40$ - 25$ = 15$) and he will earn 1 points
- Stop further rule processing: Choose "Yes" to restrict the number of catalog earning rules applied to a product.
- E.g: Let's say there are 4 Cataloging Earning Rules created in turn, Rule 1, Rule 2, Rule 3, Rule 4, and priorities are 0, 5, 3, 3.
- All rules choose Stop further rules processing = No: 4 rules will be applied and points are accumulated. The customer will receive points from the summation of 4 rules.
- Rule 3 has Stop further rules processing = Yes: After applying, rule 1 will be applied (since it has higher priority) and rule 3. Rules 2 and 4 won't be applied because they have smaller priorities.
- E.g: Let's say there are 4 Cataloging Earning Rules created in turn, Rule 1, Rule 2, Rule 3, Rule 4, and priorities are 0, 5, 3, 3.
1.3. Shopping Cart Earning Rules
Admins can add new or edit Shopping Cart Earning Rules in this section. Customers can receive points if the shopping cart value meets the conditions set by admins.
1.3.1. General Management
This is the place where admins can store Shopping Cart Earning Rules created
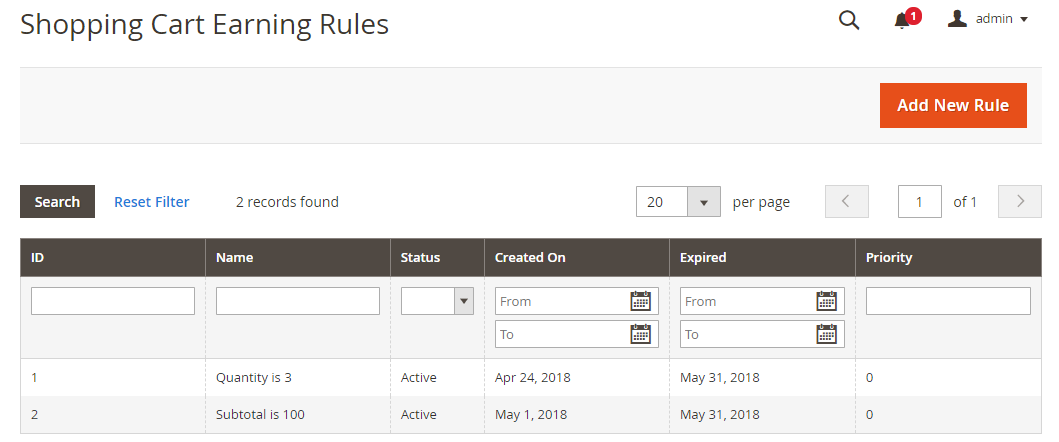
- From the grid view, admins can acknowledge some fundamental information of a Shopping Cart Earning rule such as ID, Name, Status, Create On, Expired, and Priority.
- Admins can filter to search for a specific rule.
1.3.2. Add New Rule (Edit Rule)
- Admins choose
Add New Ruleat the right-above corner to create a new shopping cart earning rule, after clickingSave and Continue Edit, the page will be directed to the Edit Rate page - The Add New Rule page has 3 tabs
- Rule Information
- Conditions
- Actions
1.3.2.1. Rule Information
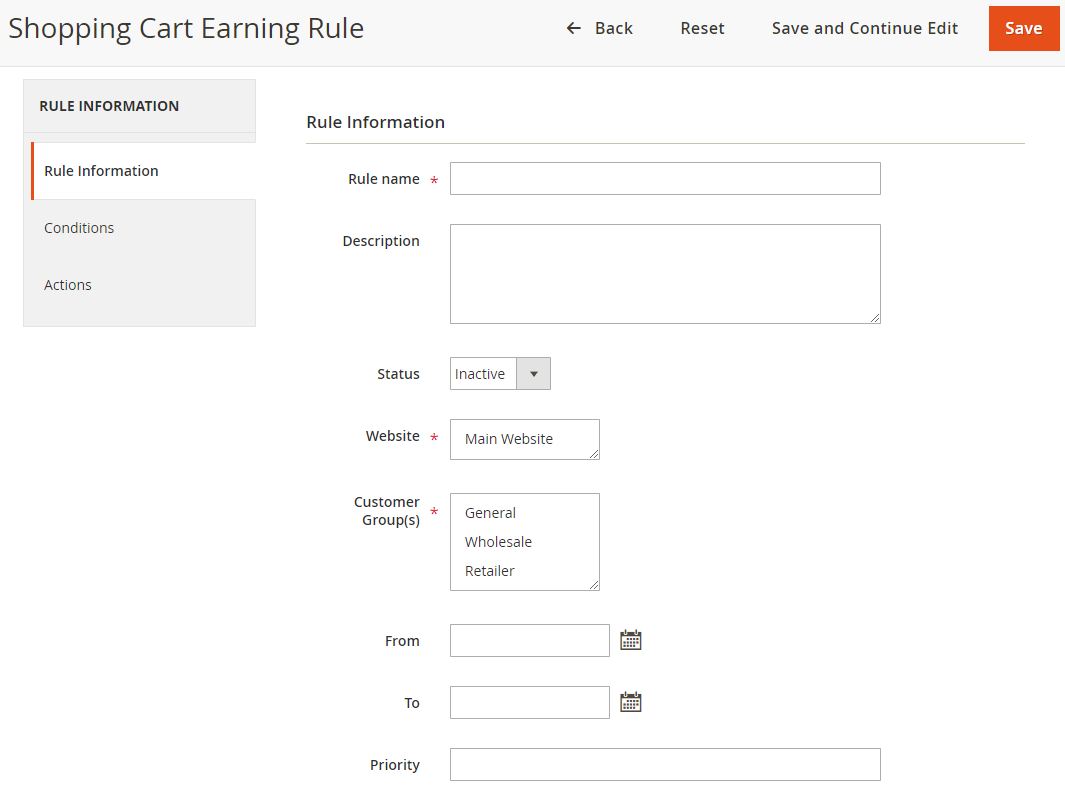
- In the Rule Name field
- Enter the rule name, which will be displayed in the backend.
- This is required information. There will be an error message if you leave it blank.
- In the Description field: You can note some rule descriptions. This field can be left blank.
- In the Status field: Choose "Active" to apply the rule.
- In the Website field: Choose website place(s) you want to apply the rule.
- In the Customer Group field:
- Choose group(s) of customer you want to apply for them.
- Shopping Cart Earning Rule doesn't apply to NOT LOGGED IN CUSTOMER.
- In the From field: You can set up the start time to use the rule; please note the difference in time zones.
- In the To field: You can set up the end time to disable the rule.
- In the Priority field:
- Identifies the usage priority of this shopping cart earning rule compared to others.
- 0 is the highest priority. The higher number represents the lower priority.
- If two shopping cart earning rules have the same priority, the rule with a smaller ID will be applied.
1.3.2.2. Conditions
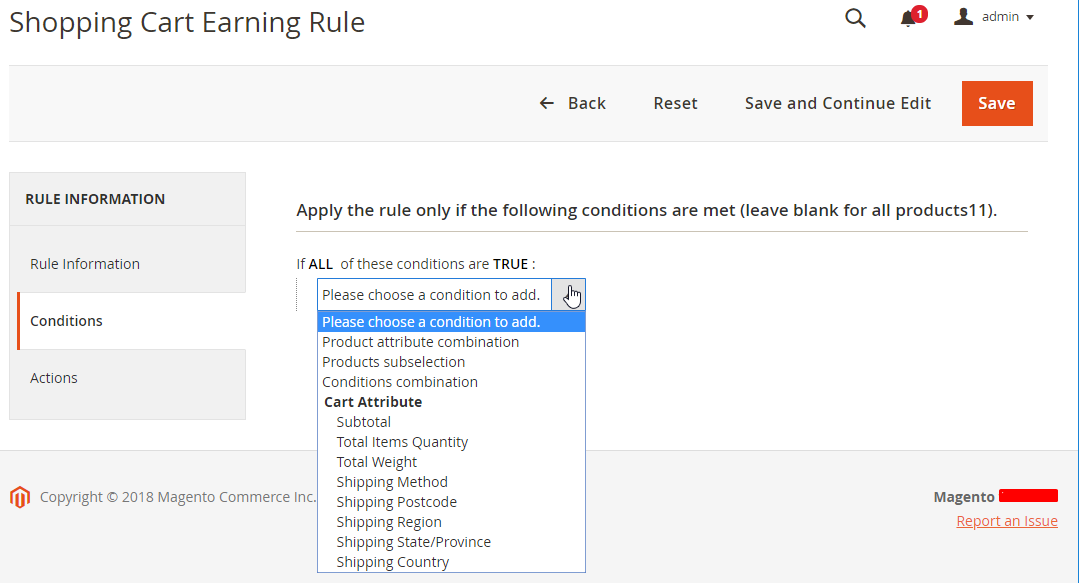
Choose condition to apply the rule. Only the cart which meets those conditions will be applied.
1.3.2.3. Actions
Shopping Cart Earning Rule includes 3 actions:
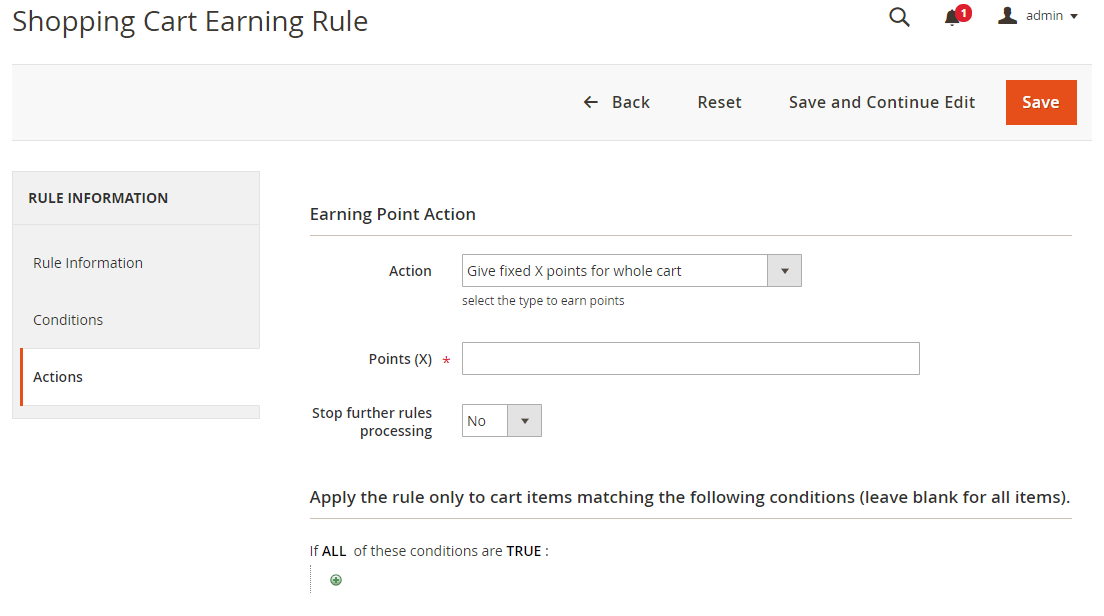
- Give fixed X points for whole cart:
- Customer will receive a fixed amount of point(s) based on a purchased cart.
- In the Point (X) field: Enter point(s) customer can earn. This is the required field.
- E.x: Point (X) = 5 which means no matter how many products in the customer cart, they will only earn 5 points.
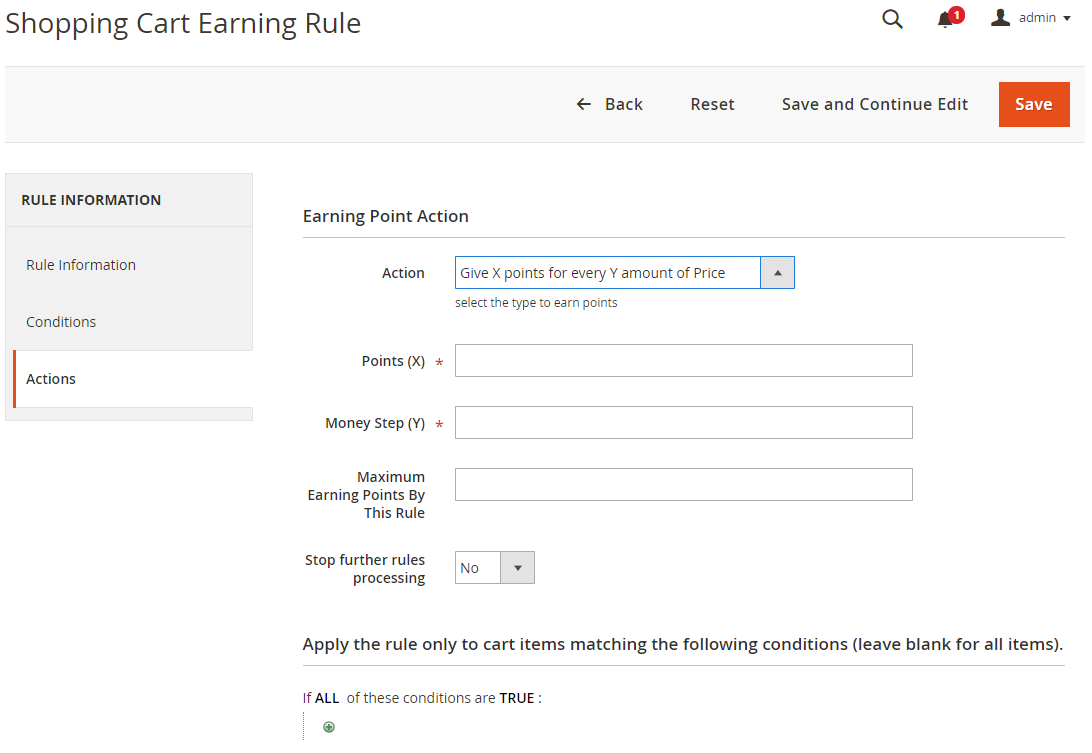
- Give X points for every Y amount of Price
- The point(s) will be calculated based on the cart's Subtotal
- In the Point X field: Enter X point(s) customer will earn for every Y amount of price.
- In the Money Step field: Enter the minimum Y amount so that customer can receive X points. Pricing will be rounded following
Rounding Methodof the configuration. - In the Maximum Earning Points field: Set the maximum earning point customer can earn from this rule.
- E.g: Point (X) = 1, Money Step (Y) = 20, and Maximum Earning Point = 5 which mean
- When the customer purchases a cart which has Subtotal = $40, he will earn 2 points
- When the customer purchases a cart that has Subtotal of more than $100, he will earn only 5 points
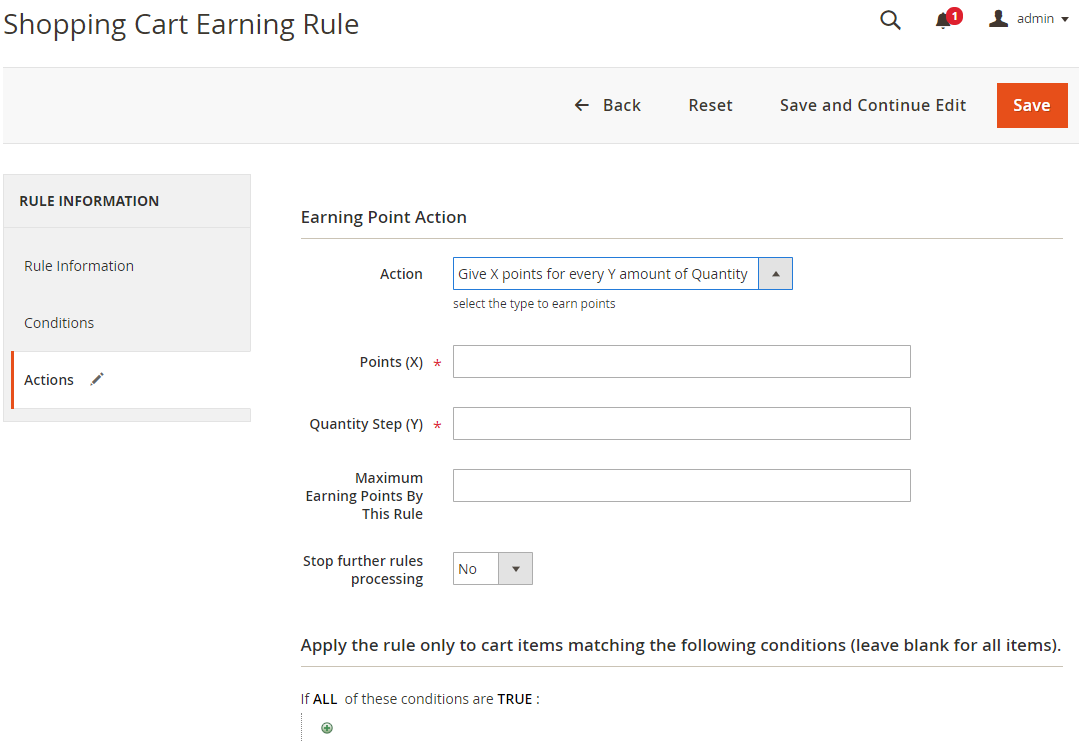
- Give X points for every Y amount of Quantity:
- The point(s) will be calculated based on product's quantity
- In the Point (X) field: Enter X point(s) customer will earn for every Y quantity
- In the Money Step field: Enter the minimum Y amount so that customer can receive X points. Pricing will be rounded following
Rounding Methodof the configuration. - In the Maximum Earning Points field: Set the maximum earning point customer can earn from this rule.
- E.g: Point (X) = 5, Quantity Step (Y) = 1, and Maximum Earning Points = 5 which mean:
- When the customer place order a cart which has 6 products, he will earn 6 points.
- When the customer place order a cart which has more than 15 products, he will earn 5 points only.
- Stop further rule processing: Choose "Yes" to restrict the number of catalog earning rules applied to a product.
- E.g: Let's say there are 4 Cataloging Earning Rules created in turn, Rule 1, Rule 2, Rule 3, Rule 4, and priorities are 0, 5, 3, 3.
- All rules choose Stop further rules processing = No: 4 rules will be applied and points are accumulated. The customer will receive points from the summation of 4 rules.
- Rule 3 has Stop further rules processing = Yes: After applying, rule 1 will be applied (since it has higher priority) and rule 3. Rule 2 and 4 won't be applied because they have smaller priorities.
- E.g: Let's say there are 4 Cataloging Earning Rules created in turn, Rule 1, Rule 2, Rule 3, Rule 4, and priorities are 0, 5, 3, 3.
- Apply the rule only to cart items matching the following conditions (leave blank for all items)
Only when the product(s) in the cart meet these conditions, the rule will be applied.
1.4. Behavior Rules
Go to Marketing > Reward Points > Earning > Behavior Rules
1.4.1. Basic management Interface
This is a place storing all Behavior Rules that shop owners have created.
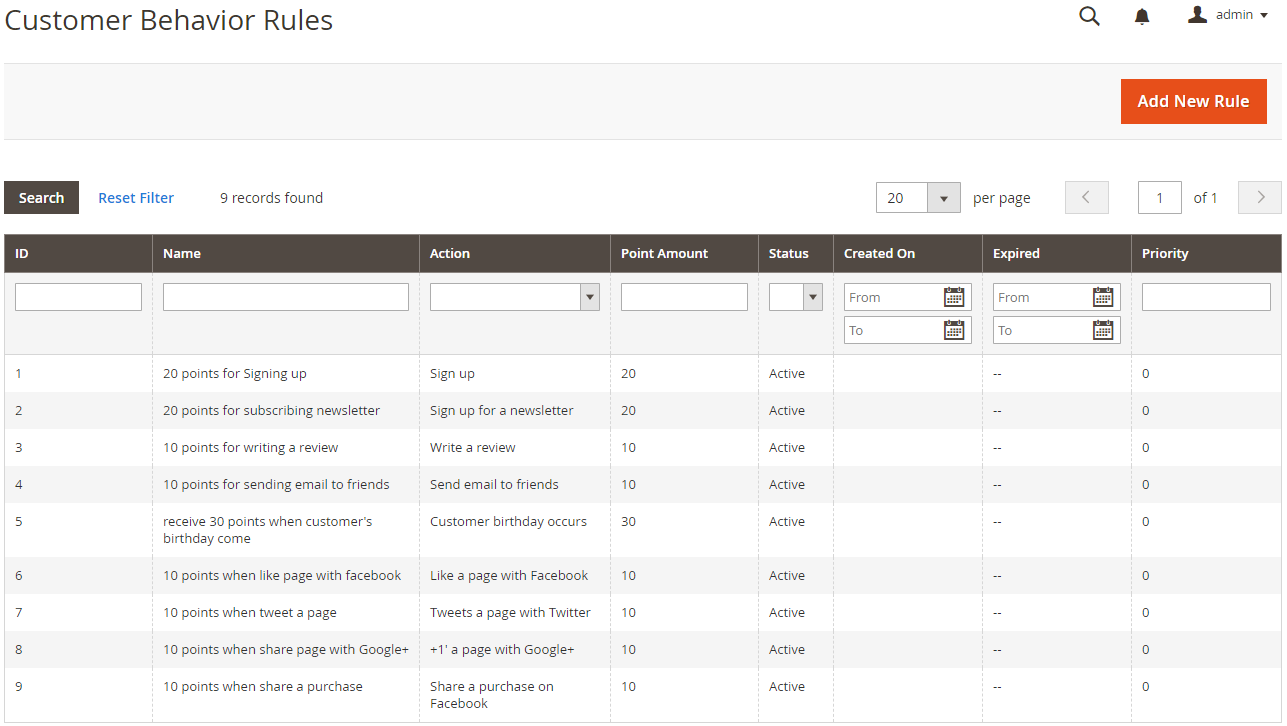
From the Grid, admins can know all basic information of Behavior Rules as ID, Name, Action, Point Amount, Status, Create On, Expired, Priority.
Admins can filter to find the rule on the Grid.
1.4.2. Add New Rule
- After going to the Behavior Rules page, admins can choose
Add New Ruleto create a new Behavior Rule. After choosingSave and Continue Edit, the page will auto-redirect to theEdit Ratepage. - The Add New Rule page includes 3 main tabs:
- Rule Information
- Conditions
- Actions
1.4.2.1. Rule Information
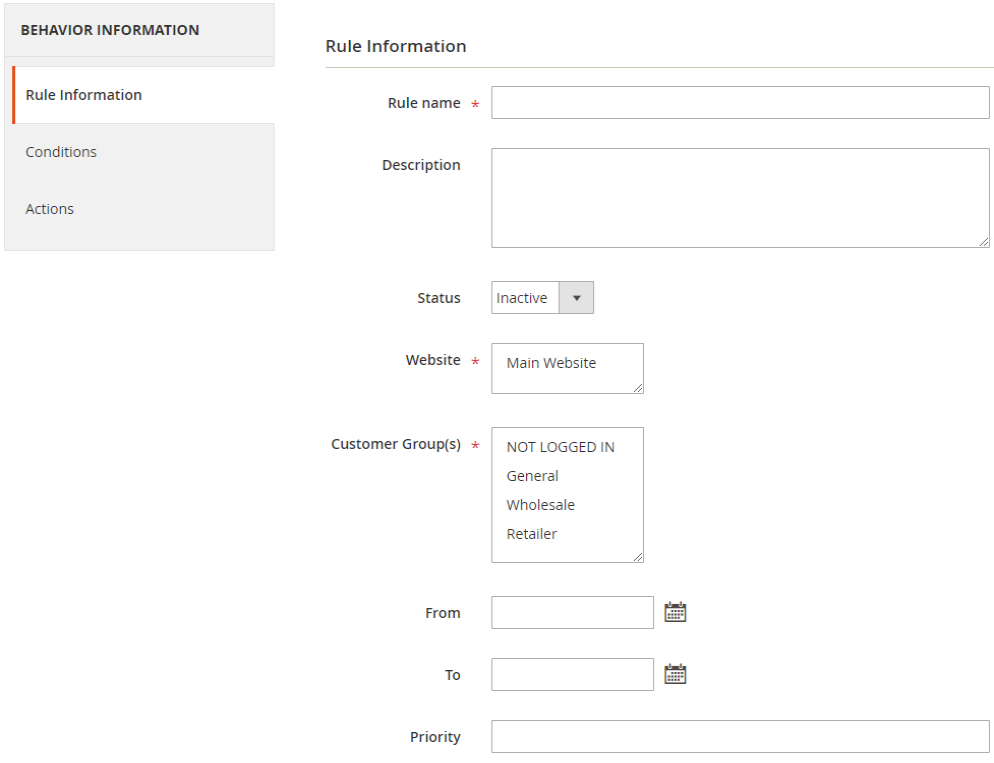
Rule Information shows the basic information of the rule. This information will be displayed outside the grid.
Rule Name:- This is the name of the rule. This name will only show in the backend, it is used to distinguish with other Behavior Rules
- This is a required field. It will notify the error if you leave it blank
Description:- This field allows admins to describe the effect of the rule
- You can leave this field blank
Status: Choose Active so that the rule can workWebsite: Choose Website that the rule is appliedCustomer Group:- Choose Customer Group that the rule is applied
- A rule can be applied to many Customer Group
- Only some Behavior Rules are applied for
NOT LOGGED IN CUSTOMER
From: Set the start day using the Behavior Rule. Please note the timezone's differenceTo: Set the finish day using Behavior RulePriority:- Indicates the priority used by this Behavior Rule against other Behavior Rules.
- 0 is the highest priority. The bigger the number, the smaller the priority
- When two Behavior Rules have the same priority, the rule that has a smaller ID will be prioritized (the rule is created first).
1.4.2.2. Conditions
After customers perform the action set here, they will receive a certain amount of points that admins set in the
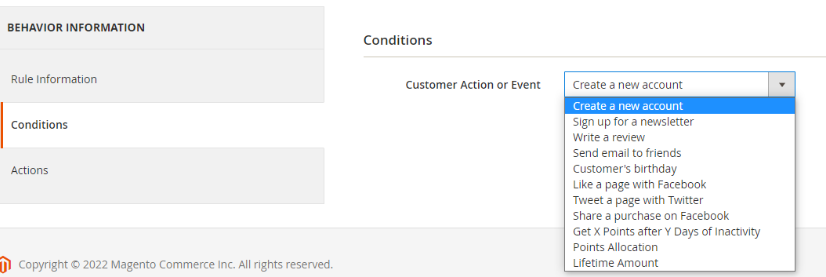
ActionsectionThe actions/events that can be plus points, including:
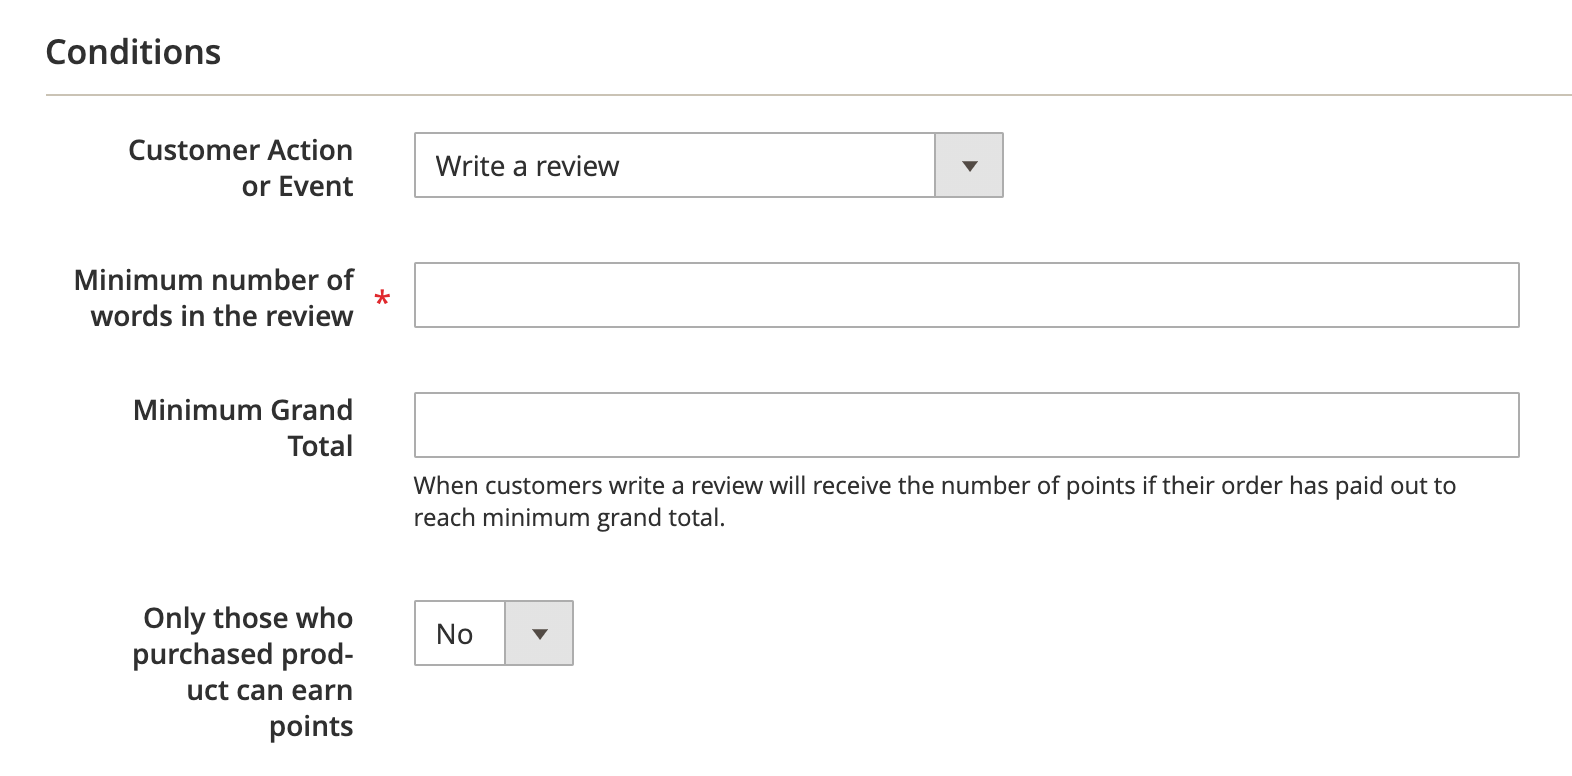
Create a new account: The customers receive the point when they register the accountSign up for a newsletter: When the customers subscribe to the newsletter, they will be plused points. Note that only one point is given for this action. After you cancel, then resigter again, you won't get the point.Write a review: When customers write a review for the product and it is approved, the point will be added. However, the review needs to meet the word count requirement. At the same time, customers may need to purchase the product before reviewing or the number of their paid orders must reach a minimum value for getting the point.
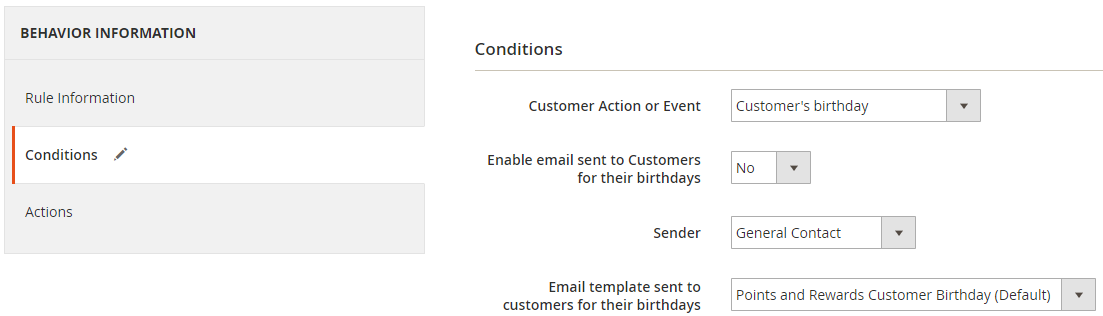
Send email to friends: Plus the points when customers send an email to refer the products to friendsCustomer's birthday: Plus points on the customer's birthday occasion. Admins can set the notification for customers or not; at the same time, admins can also change the Sender and the email template if they want
Like a page with Facebook: Plus points when customers like a page via Facebook account. To limit spam, admins can set the minimum time between two likes of an account

Tweet a page with Twitter: Similar toLike a page with Facebook, but this action is to share the page on Twitter

Share a purchase on Facebook: When customers place an order completely, customers can share the products, including in the order, on Facebook or Twitter to get the points. For Facebook, admins need to App Id so that the rule can work well

Get X Points after Y days of Inactivity: After a certain number of days of being Inactive, customers will receive points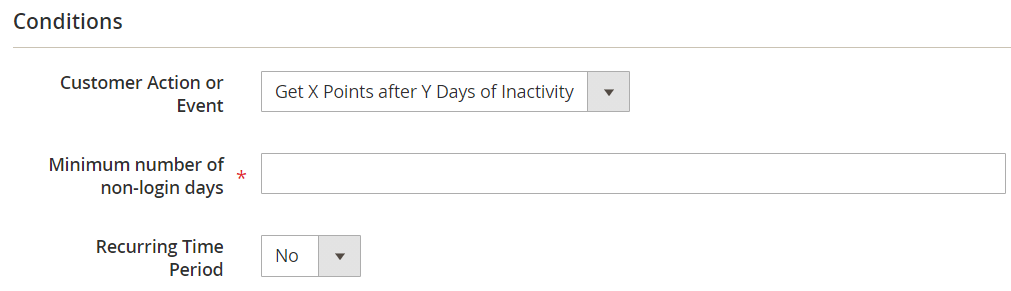
Points Allocation: Points will be added for customers every week on the start day (Actions tab)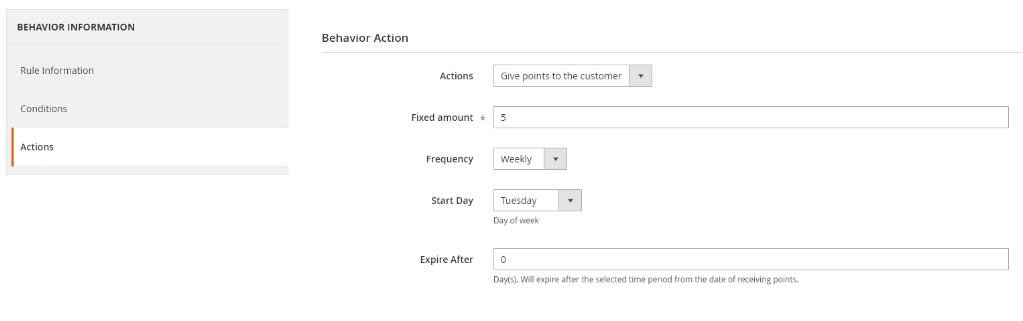
Lifetime Amount: When reaching a certain Invoice Amount, customers will earn points.
1.4.2.3. Actions
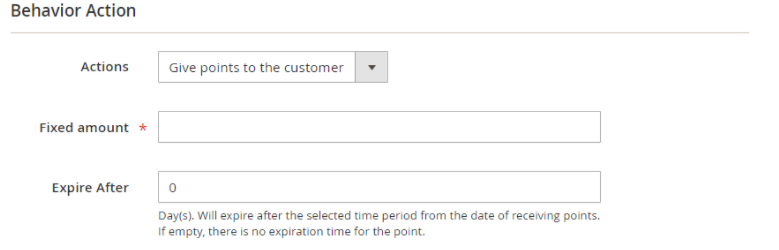
- For actions as Create a new account, Sign up for a newsletter, Send email to friends, Customer birthday occurs, admins only need to set the amount of points that customers receive when performing each action.
- Expire After: Select the expiration date since receiving points. When customers take actions such as Create a new account, Sign up for a newsletter, Customer birthday occurs, they will get points and these points will expire after the selected time since the receiving date. If left empty, there is no expiration of the points.
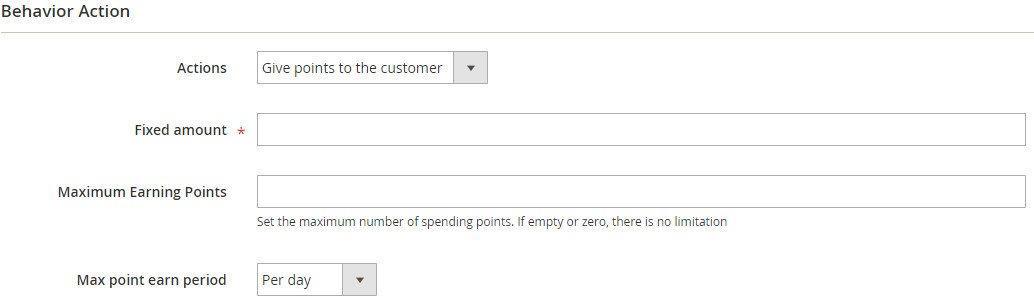
- For the remaining actions, admins can limit the number of points that Customers receive in a given time period (per day, per month, per year or lifetime).
II. Spending
Follow the way Marketing > Reward Points: Spending Rate
2.1. Spending Rate
Admins can set, check and edit customer point usage rates depending on the website or customer group. This helps store owners set up policies on point usage rates corresponding to the appropriate amount to increase sales without affecting store revenue.
2.1.1. General Management.
This is the place where admins can store Spending Rates created.
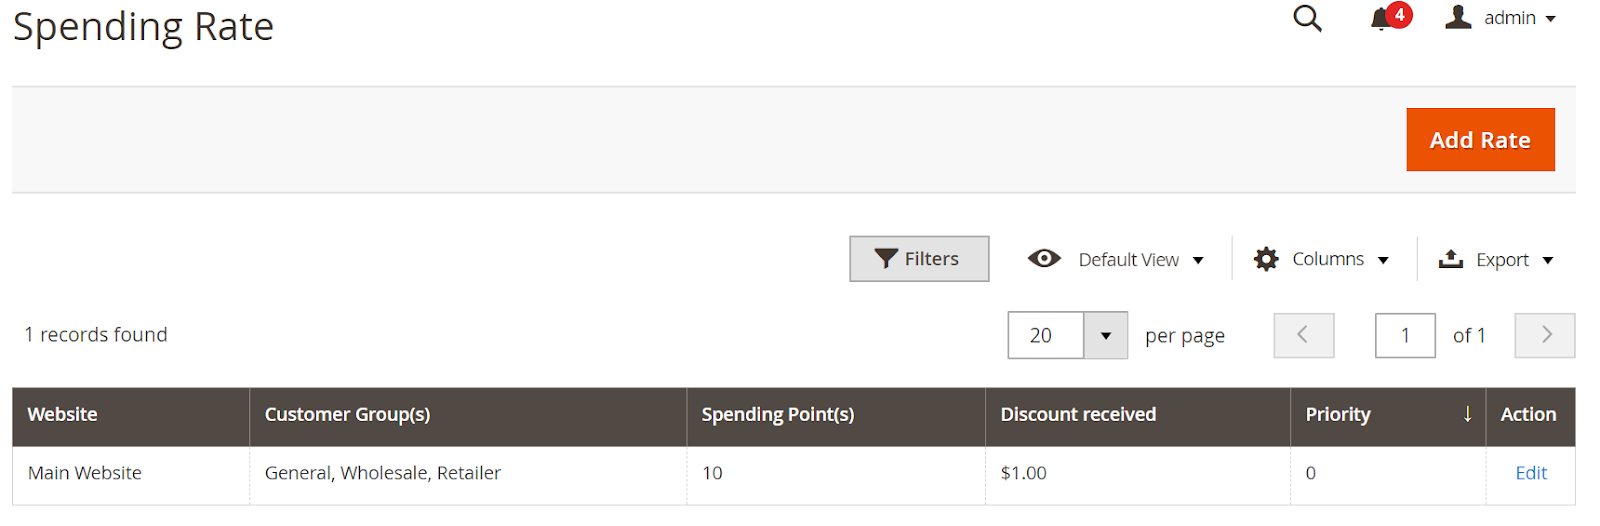
- From the grid view, admins can acknowledge some fundamental information of a spending rate such as ID, Website, Customer Group, Spending Point, Discount Received and Priority. Also, admins can:
- To edit a spending rate, choose “Edit” in the Action column.
- Admins can filter, hide or display Column or export rates.
2.1.2 Add/Edit New Spending Rate.
After entering the Spending Rate interface, select Add New Rate to create a new spending rate. Then, click Save and Continue Edit, the page will automatically switch to the Edit Rate page.

- In the Website field: Choose website(s) you want to apply the spending rate.
- In Customer Group(s) field
- Only customers who belong to this group can use their point(s) following this spending rate.
- Customers who belong to different groups use different spending rates even when they purchase the same product.
- In Spending Rate field
- Indicates the conversion rate from X (point) to Y (currency)
- Admins can fill out an appropriate rate here. However, decimal numbers are not approved. If admins enter a decimal number, they will be rounded following the rule
>= 0.5 to 1, or< 0.5 to 0.
- In Min Point field: set the minimum point that can be spent when order
- In Priority field
- Indicates the priority of this spending rate compared to other spending rates.
- 0 indicates the highest priority. The higher the number, the lower the priority.
- If there are many spending rates that have similar priorities, rules will apply to the rate that has a smaller ID.
2.2. Shopping Cart Spending Rule
Admins can add new or edit Shopping Cart Spending Rules in this section. Customers can receive discounts if they use the points they have earned. The percentage or amount of discount is suitable for the conditions set by admins. This encourages customers to interact with the store and use the points earned for new orders to boost store sales.
2.2.1. General Management
This is the place where admins can save all Shopping Cart Spending rules.
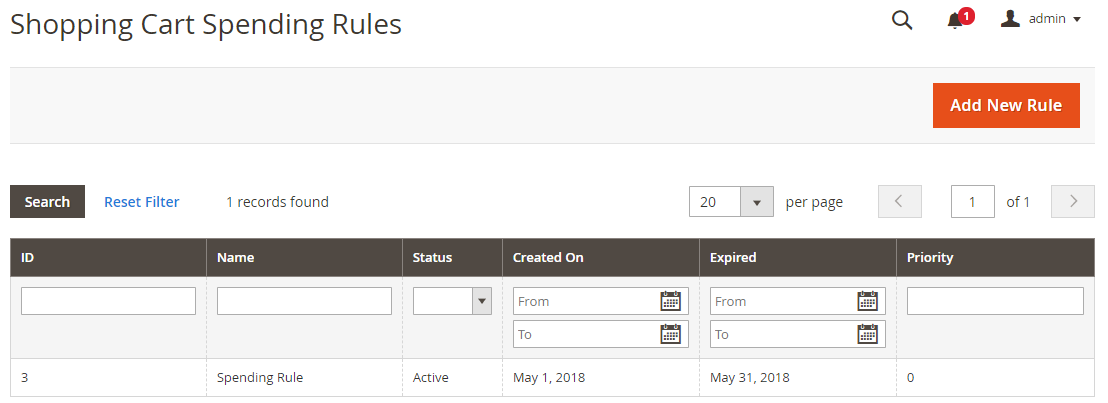
- From the grid view, admins can acknowledge some fundamental information of a Shopping Cart Spending Rule such as ID, Name, Status, Create On, Expired, and Priority.
- Admins can filter to search for a specific rule.
2.2.2. Add New Rule (Edit Rule)
- Admins choose
Add New Ruleat the right-above corner to create a new shopping cart earning rule, after clickingSave and Continue Edit, the page will be directed to the Edit Rate page - The Add New Rule page has 4 tabs
- Rule Information
- Conditions
- Actions
- Labels
2.2.2.1. Rule Information

- In the Rule Name field
- Enter the rule name, which will display in the backend to distinguish from other rules
- This is required information. There will be an error message if you leave it blank.
- In the Description field: You can note some descriptions of the rule. This field can be left blank.
- In the Status field: Choose "Active" to apply the rule.
- In the Website field: Choose website place(s) you want to apply the rule.
- In the Customer Group field:
- Choose group(s) of customer you want to apply for them.
- Shopping Cart Spending Rule doesn't apply to NOT LOGGED IN CUSTOMER.
- In the From field: You can set up the start time to use the rule; please note the difference in time zones.
- In the To field: You can set up the end time to disable the rule.
- In the Priority field:
- Identifies the usage priority of this shopping cart spending rule compared to others.
- 0 is the highest priority. The higher number represents the lower priority.
- If two shopping cart spending rules have the same priority, the rule with a smaller ID will be applied first.
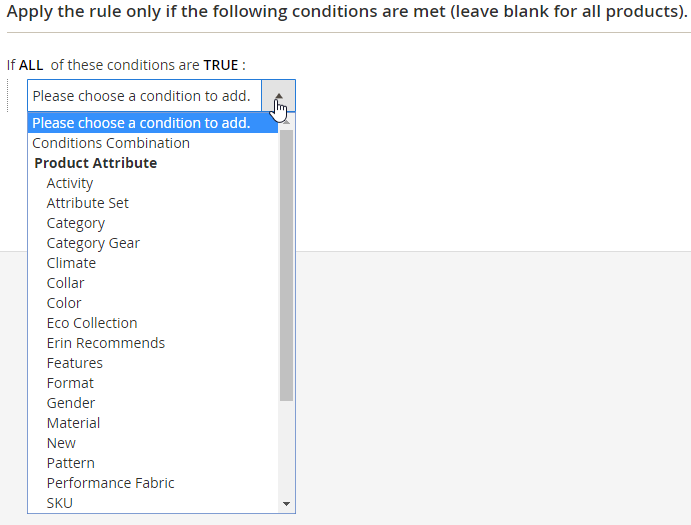
2.2.2.2. Conditions
Conditions of Shopping Cart Spending Rule is divided into 2 parts:
- Conditions: Only the cart that meets the chosen conditions can be applied.
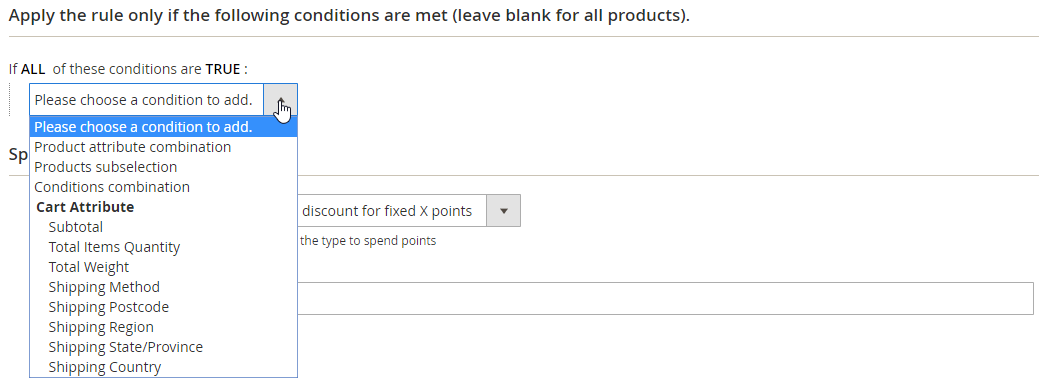
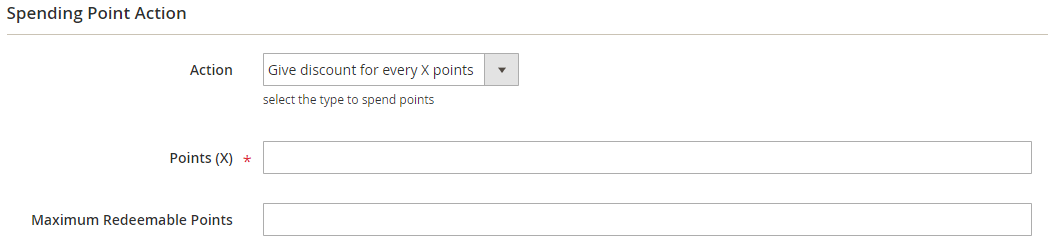
- Spending Point Action:
- In the Action field: There're 2 options:
- Give discount for fixed X points: Customers can spend a fixed point(s) that admin set in this section.
- Give a discount for every X points: Customer can spend point(s) to use X points to get a discount for every Y amount (Y will be set up in the Action tab). The applicable X points cannot be exceeded Maximum Redeemable Points.
- In the X Point field: Enter the number of point(s) you want to set for the above conditions.
- In the Action field: There're 2 options:
2.2.2.3. Actions
Admins configure Discount Amount corresponding to X Point, which is set in the Conditions tab. There's 2 types of action:
- Give a fixed discount amount for the whole cart: Discount Amount is set fixedly for every X point(s).

- Give a percent discount amount for the whole cart: Discount Amount is calculated based on percent of Order Total.

- E.x: Discount Amount = 10 in the Action tab. In Conditions tab, choose
Action = Give discount for every X pointsand X = 1. When a customer places an order which costs $500:- The customer will be discounted $10 for every 1 point spending if in the backend, the admin chooses
Action = Give a fixed discount amount for the whole cart. Particularly, he spends 1 point and only needs to pay $490 for the order (which doesn't include the Shipping Fee and Tax). - The customer will be discounted 10% for every 1 point spending if in the backend, the admin chooses
Action = Give a percent discount amount for the whole cart. Particularly, he spends 1 point and only needs to pay $450 for the order (which hasn't been included Shipping Fee and Tax)
- The customer will be discounted $10 for every 1 point spending if in the backend, the admin chooses
Besides, admins can configure more conditions to apply the rule properly.
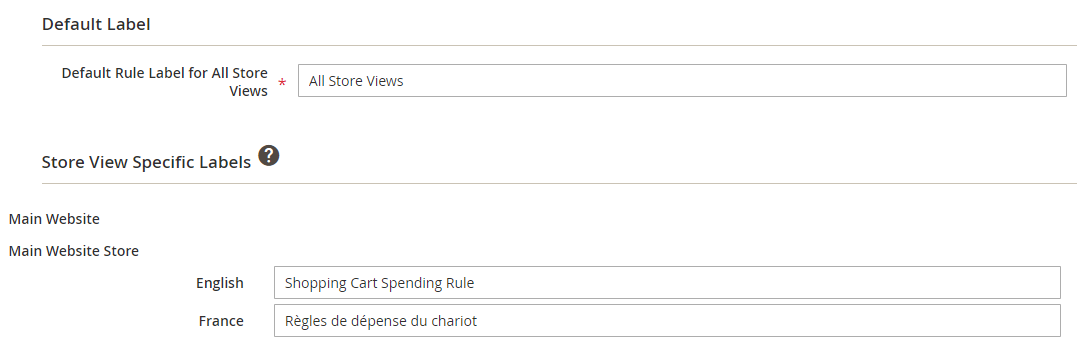
2.2.2.4. Labels
This is where admins configure the label for the rule in every Store View of a store. If it's left blank, the default label will be displayed on the front end.
III. Referrals
It is a system that encourages customers to refer a store or product to their friends, relatives or colleagues. When the referrer or the referred person performs a specific action (such as making a purchase or registering an account), both parties receive rewards or points. The store owner can configure the referral program by setting up rules and conditions to encourage existing customers to make purchases and increase the number of new customers. In addition, admins can check each customer's referral history on the dashboard.
Go to Marketing > Reward Points > Referrals
3.1. Rules
3.1.1. Basic management interface
It stores all Referrals Rules that store owners have created
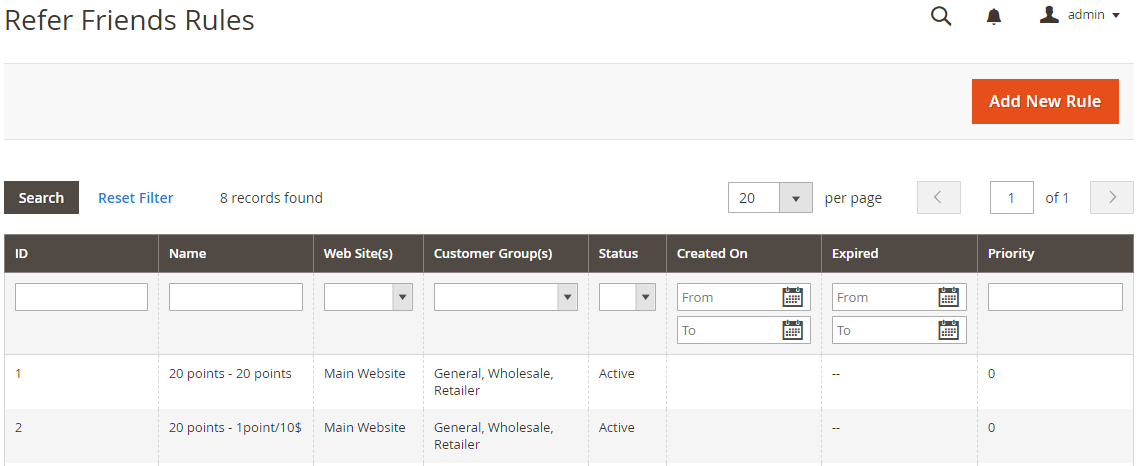
- From the Grid, admins can know all basic information of Referrals Rules as ID, Name, Website(s), Customer Group(s), Status, Created On, Expired, Priority
- Admins can also filter to find the rule on the Grid
3.1.2. Add New Rule (Edit Rule)
- After entering the Rules page, admins select
Add New Ruleto create a new Refer Rule. After theSave and Continue Edit, the page will automatically switch to theEdit Ratepage - The
Add New Rulepage consists of three main tabs:- Rule Information
- Conditions
- Actions
3.1.2.1. Rule Information
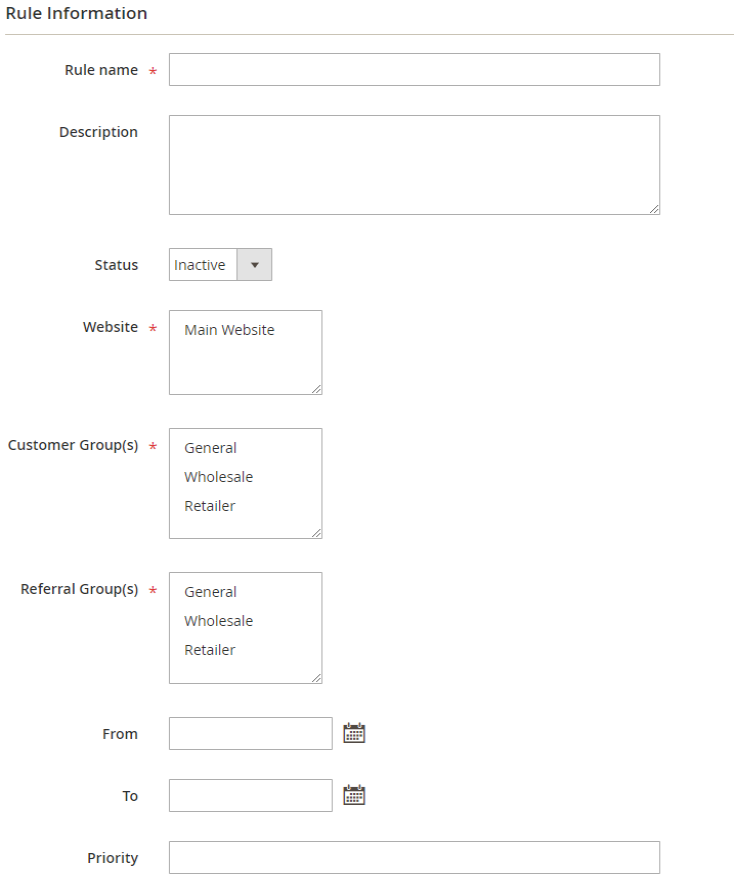
Rule Information shows the basic information of the rule. This information will be displayed outside the grid.
Rule Name:- This is the name of the rule. This name will only show in the backend, it is used to distinguish from other Refer Rules
- This is a required field. It will notify the error if you leave it blank
Description:- This field allows admins to describe the effect of the rule
- You can leave this field blank
Status: Choose Active so that the rule can workWebsite: Choose Website that the rule is appliedCustomer Group:- Choose Customer Group that the rule is applied
- A rule can be applied for many Customer Group
- Only accounts of the selected group are applied for this rule
Referral Group(s):- Choose Customer Group that the rule is applied
- A rule can be applied for many Customer Group
- Only the accounts of this group have the Refer code applied the rule
For example: Refer code of the account A is 123, Refer code of account B is abc. A is in General Customer. B is in Retailed Customer. Rule has Customer Group as General, Referral Group as General.
- When A and B send the code at the same time to C as General Customer, only the code of A works.
- When A and B send the code to D as Wholesale Customer, both the code A and B don't work
From: Set the start day using the Refer Rule. Please note about the timezone's differenceTo: Set the finish day using Refer RulePriority:- Indicates the priority used by this Refer Rule against other Behavior Rules.
- 0 is the highest priority. The bigger the number, the smaller the priority
- When two Refer Rules have the same priority, the rule that has a smaller ID will be prioritized (the rule is created first).
3.1.2.2. Conditions
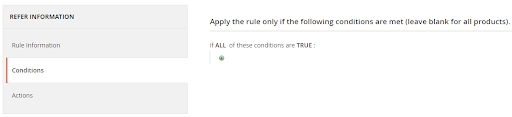
This section allows admins to choose the conditions for the carts. The rule is applied only to carts that meet the selected conditions.
3.1.2.3. Actions
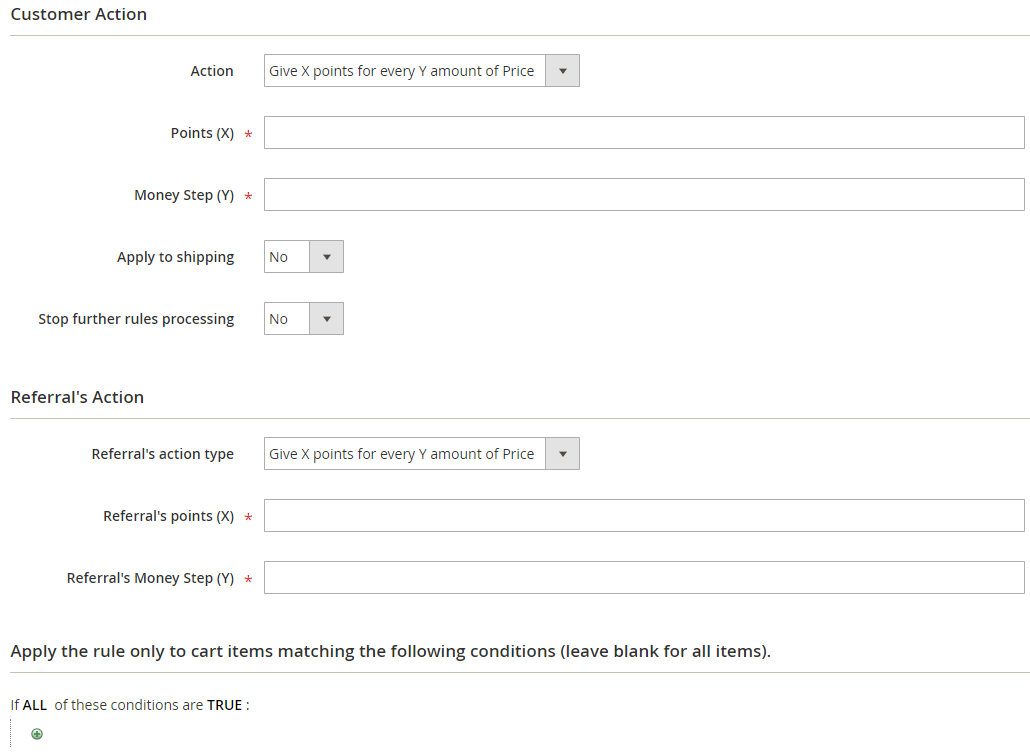
Customer Action:Set the point or discount that customers can get access to refer link to place order for each order
There are 4 actions that admins can choose:
Give fixed points to Customers: No matter how much Order Total, Customer can get X points- Give X points for every Y amount of price: Based on Order Total to calculate the number of points that Customer can receive in a certain proportion.
- Give a fixed discount to Customer: No matter how much Total Order, Customer can receive a certain amount of discount. Customer will receive discount for whole cart instead of receiving point
- Give percent discount to Customer: No matter how much Order Total, Customer can receive a percentage discount. Customers will receive the discount for whole cart instead of receiving the point
Admins can apply the rule for shipping fee or select
Stop further rulesprocessing to limit the number of refer rules applied
Referral's Action- Set the amount of points that Customer - who sent refer - can receive when the customers whom they send refer link to order and complete the order
- There are 2 actions that admins can choose:
Give fixed X points to Referer: Regardless of how much the refer link user order, the referer still receives a fixed amount X point.Give X points for every Y amount of Price: The number of points that referers can receive depends on the total order ordered by the referrer.
Note: Each customer uses one the refer link only. Referral get reward points for referee's first order only.
3.2. Invitation History
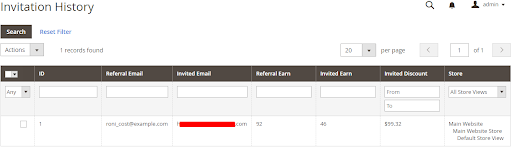
- As soon as Customer uses a referral link to place a successful order, Invitation History will log the basic information such as ID, Referral Email, Invitation Email, Referral Earn, Invited Earn, Invited Discount, Store.
- This information will be synchronized with
My referralof the referer. - The amount of
Invited Earn and Invited Discountapplies to referral users as soon as they place the order - The amount of
Referral earnis only added to the referers when the order is complete
IV. Transactions.
Admins can manage and check customers' point earning or point usage transactions. In addition, they can add or subtract bonus points according to each customer's situation.
The right path is Marketing > Reward Points: Transaction.
4.1. General Management.
This is the place where admins can create and manage transactions. By entering this interface, admins can add/minus customer’s reward point(s).
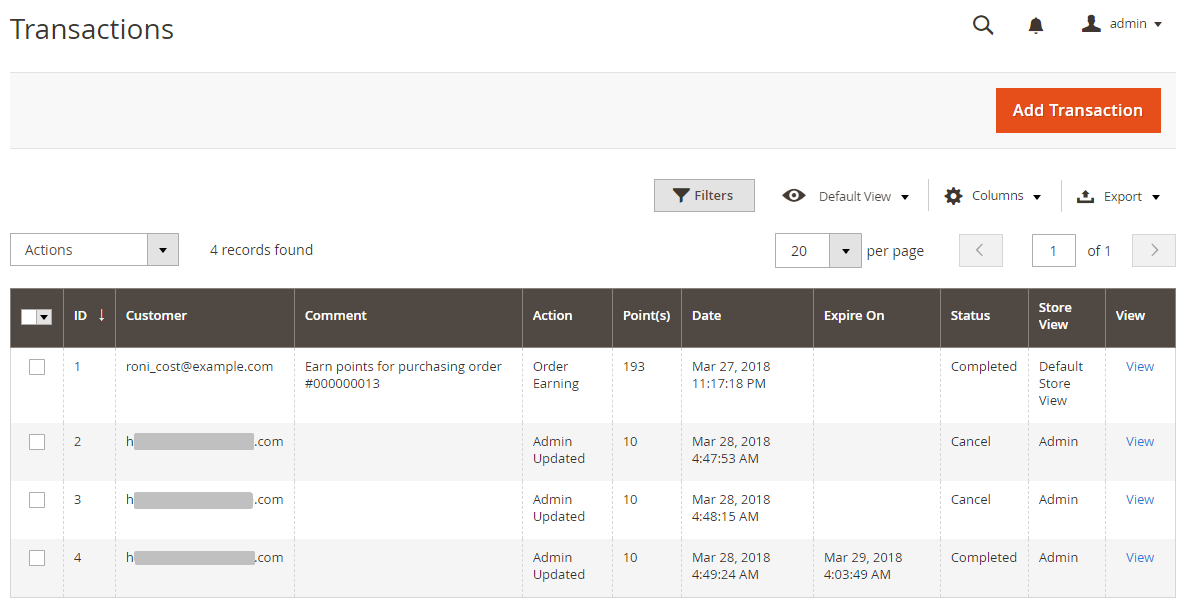
- From the grid view, admins can acknowledge some fundamental information of created transactions such as ID, Customer, Action, Point(s), Expire On, Date, Status. Also, admins can:
- View: To review a transaction, choose “View” in the Action column.
- Cancel: To cancel a created transaction (in case its expiration date hasn’t come yet), select the transaction and choose “Cancel” in the Action box (at the left of the grid).
- Expired: Admins need to take this action if a transaction isn’t expired automatically. At this point, take the same action when admins view/cancel a transaction, choose “Expired” then process with the
OKbutton.
- Admins can filter, hide/display Column or export rates.
4.2. Add new transaction.
After entering Transaction tab, choose Add new transaction to generate a new transaction. Next, click Save and Continue Edit, the page will direct to the View Rate page.
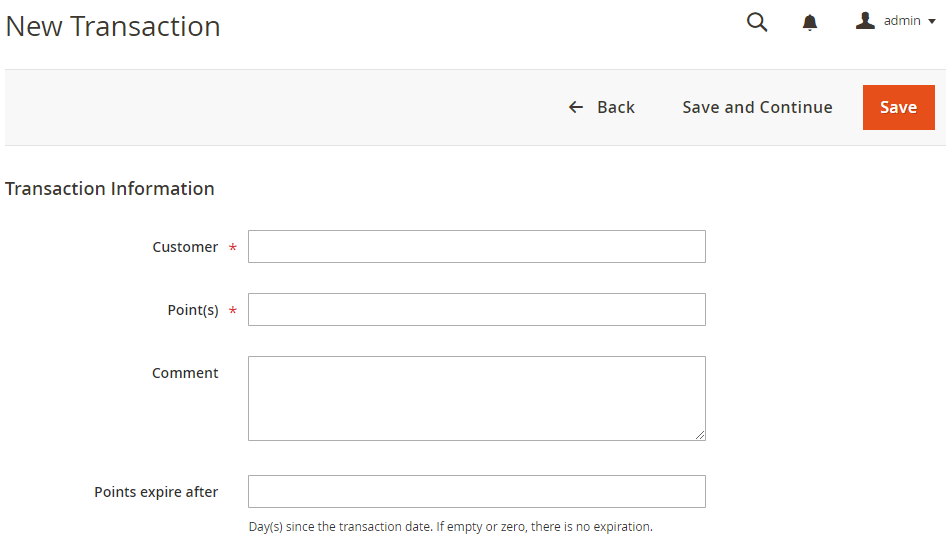
- In the Customer field
- Click this section to display the store’s customer list in the popup form. Admins can only choose 1 from this customer list.
- Name of the chosen customer will be added reward point(s) to her/his account.
- If you leave this field blank, there will be an error message.
- In the Points field
- Enter the number of point(s) you want to add for the chosen customer.
- If you enter negative numbers or leave it blank, there will be an error message.
- If you enter a decimal number, it will be rounded down (E.x: 1.8 = 1.1 = 1)
- In the Comment field
- Enter the comment that will be sent along with the added point(s) to the chosen customer.
- You can leave this field blank.
- In the Points expire after field
- The added point(s) of this transaction will expire after X day(s) from the time you create this transaction.
- Admins have the right to add higher point(s) than the maximum point of the amount that a customer can accumulate (E.x: max point = 1000, admins can add 1100 points or even more to the customer balance).
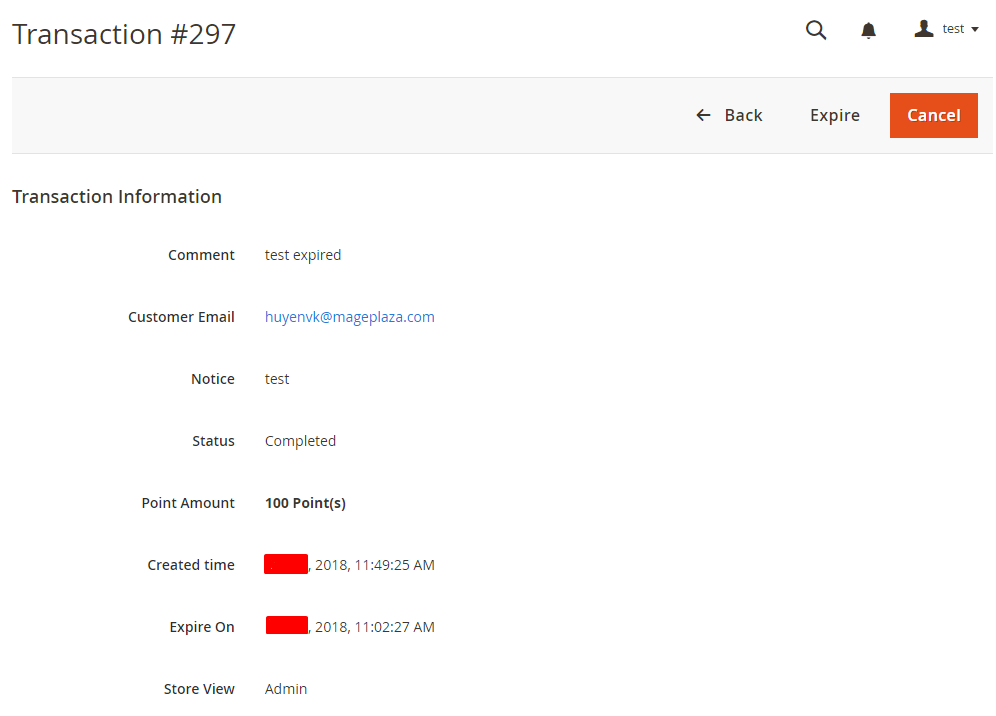
4.3. View Transaction.
Admins can review or expire a transaction on the View Transaction page.
V. Milestones
A milestone or goal that customers need to achieve to receive a reward or promotion. This is part of the reward point system, which helps encourage customers to continue shopping and stick with the store. In this section, the admin can set up tiers and benefits for each tier as well as manage customer information such as ID, Name, Last Name, Email, Group, and Gender. You can also search for information in the table.
Go to Marketing > Reward Points > Milestone
5.1 Grid

In Milestone grid, you will see Milestone Tier information such as ID, Name, Status, Customer Group (s), Website, Number of Customer. Also, on the grid, you can use the mass action to change the status or delete the tier you have created
Click Add Milestone Tier to add a new Tier
5.2 Add Milestone Tier
Store owners can set up reward points levels or tiers with specific criteria that customers need to achieve. Each reward points tier comes with different rewards or incentives, such as discounts, gifts, or free services.
5.2.1 General Tab
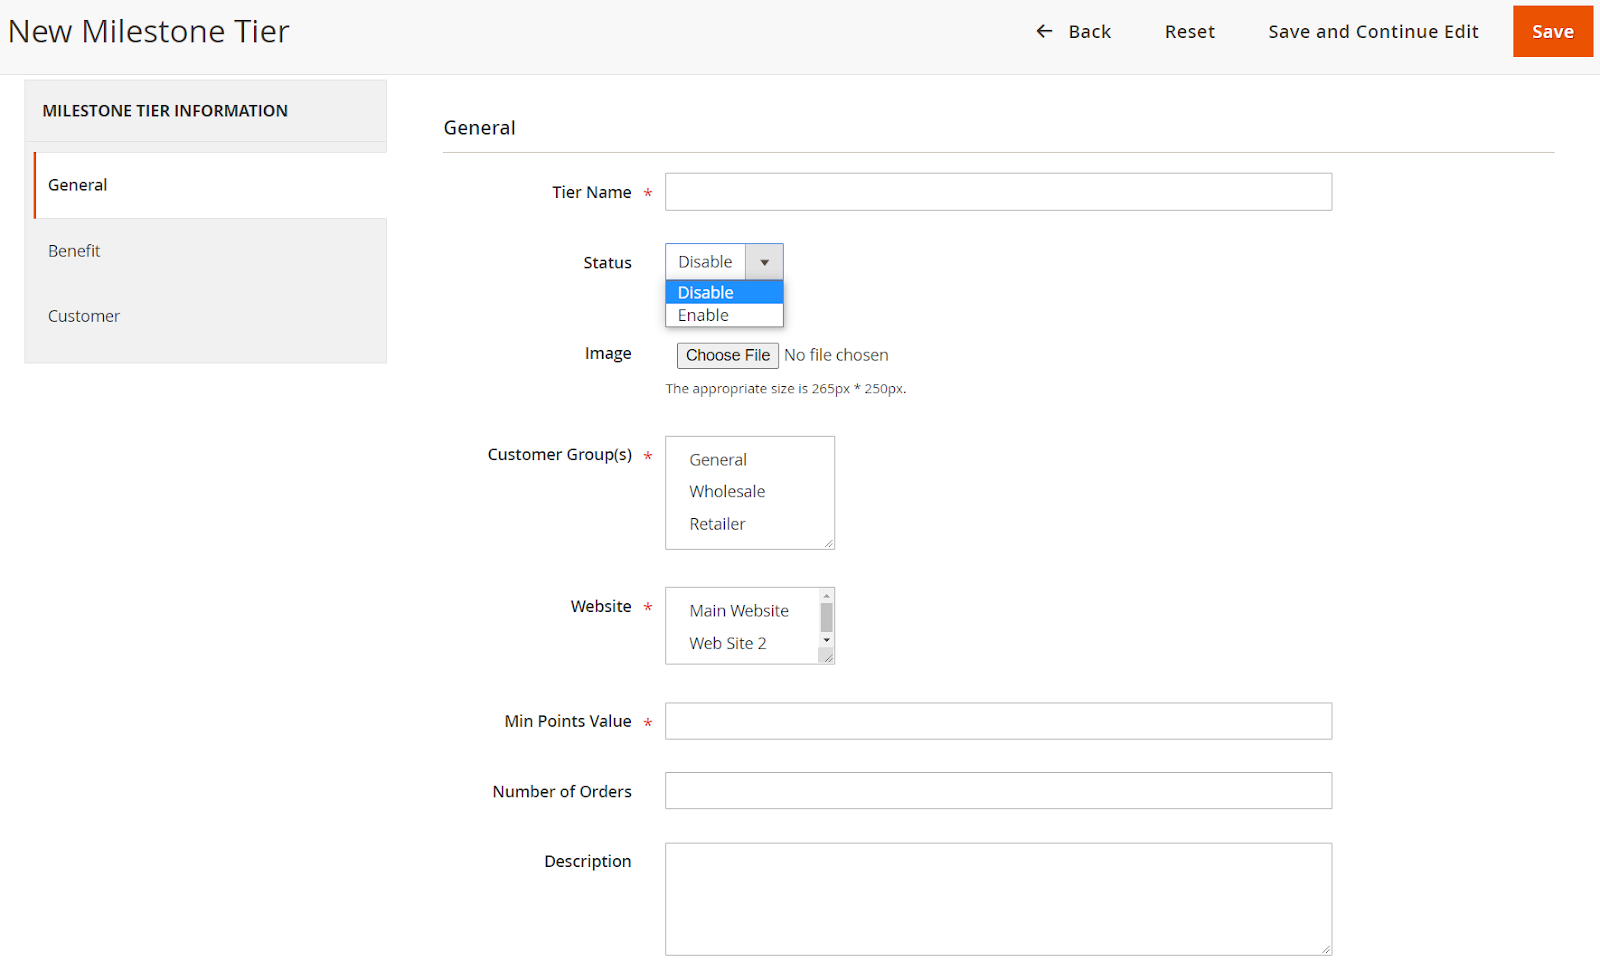
- Tier Name: fill in the name for milestone tier
- Status: set up status for tier. There 2 statuses: Enable and Disable
- Image: click on Choose File button to select image logo for tier
- Customer Group(s): select Customer Groups that can use tier program. You can select multiple groups
- Website: select website to apply tier. You can select multiple websites
- Min Points Value: set the minimum point customer must reach to join Milestone Tier Program
- Number of Orders: the number of orders that customer must buy to join the Milestone Tier
- Description: fill in the description for Milestone Tier
5.2.2 Benefit Tab

Increase Earning Points: the percentage increase in points applicable to Earn Rate, Catalog Rules, and Shopping Cart Rules when the customer joins the milestone. For example, a customer's order has a total of $50, with a earning rate of 1 $ for every $ 1 and Increase Earning Points is 10, the number of points the customer will receive will be 50 + 50 * 10% = 55 points
Fixed Points: the number of points will be added when the milestone customer implements the Behavior Rules. For example: Fixed Points is 1, with the setting at Behavior Rule is Write a Review, the normal customer receives 4 points, the customer of Milestone will receive 4 + 1 = 5 points when writing the review for a product.
Decrease Spending Points: the percentage of spending points reduced if customer belongs to Milestone.
- For example: the Spending Rate is $1 per 10 points, the Decrease Spending Points is 20. A customer belongs to Milestone, the spent point will be reduced 10 * 20% = 2, that is, customer using 10-2 = 8 points will get a $1 discount
5.2.3 Customer Tab

This grid shows all Milestone Customers. It contains customer information such as ID, First Name, Last Name, Email, Group, Gender. Besides, you can search for information in the grid.
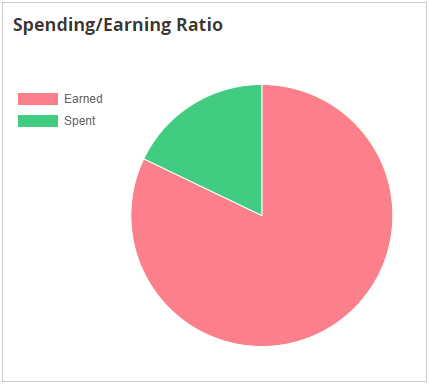
VI. Report
Record all actions that lead to additional customers earning points and using reward points. The report is presented in a chart format to help store owners easily manage and analyze customers' need to earn points or spend points.
Go to Reports > Reward Points Reports
- Reward Points Ultimate offers 2 Report dashboards that are compatible with Mageplaza Reports.
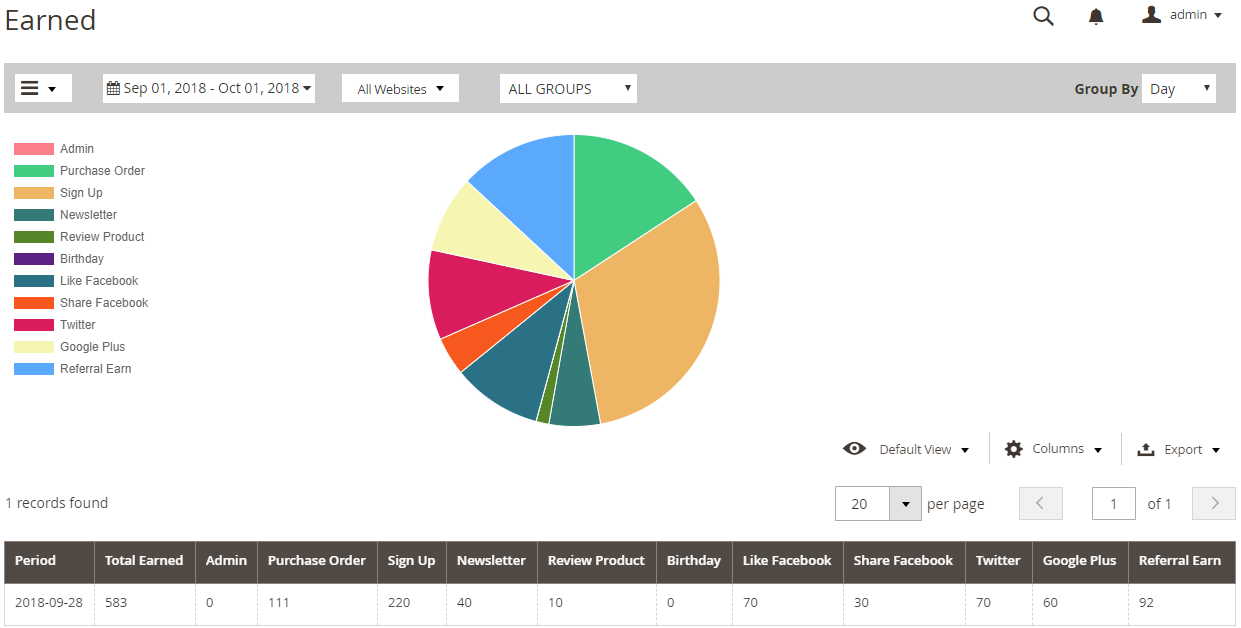
Earned:- Record all actions leading to customers being added to the point
- Shown as a chart if Mageplaza Reports is installed
- This chart can also be displayed in the Dashboard
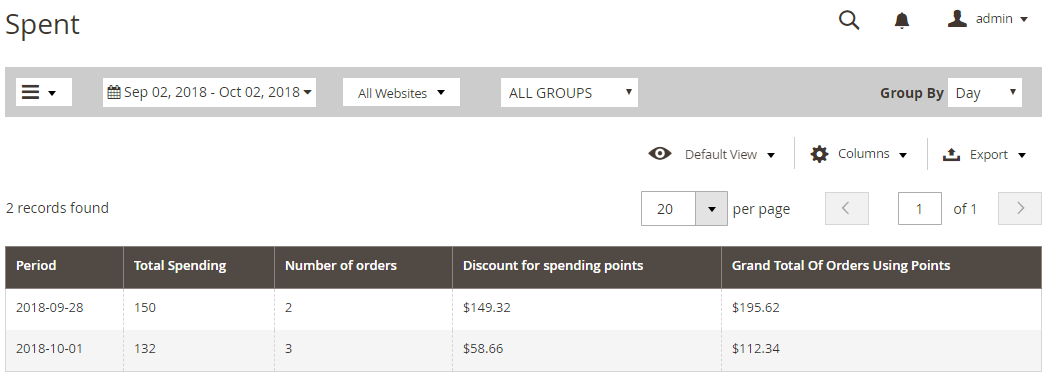
Spent:- Record all actions leading to customers being added to the point
- When installing Mageplaza Reports, the dashboard will display a graph showing the ratio between Spending Point and Earning Point
VII. Configuration
In this section, admins can enable or disable the module, set conditions for earning and using points, as well as set up email notifications about point changes and bonus point expiration dates.
Follow in the backend Store > Settings > Configuration. At the left panel, choose Mageplaza > Reward Points
7.1. General Configuration.
This general configuration can apply to the whole module.
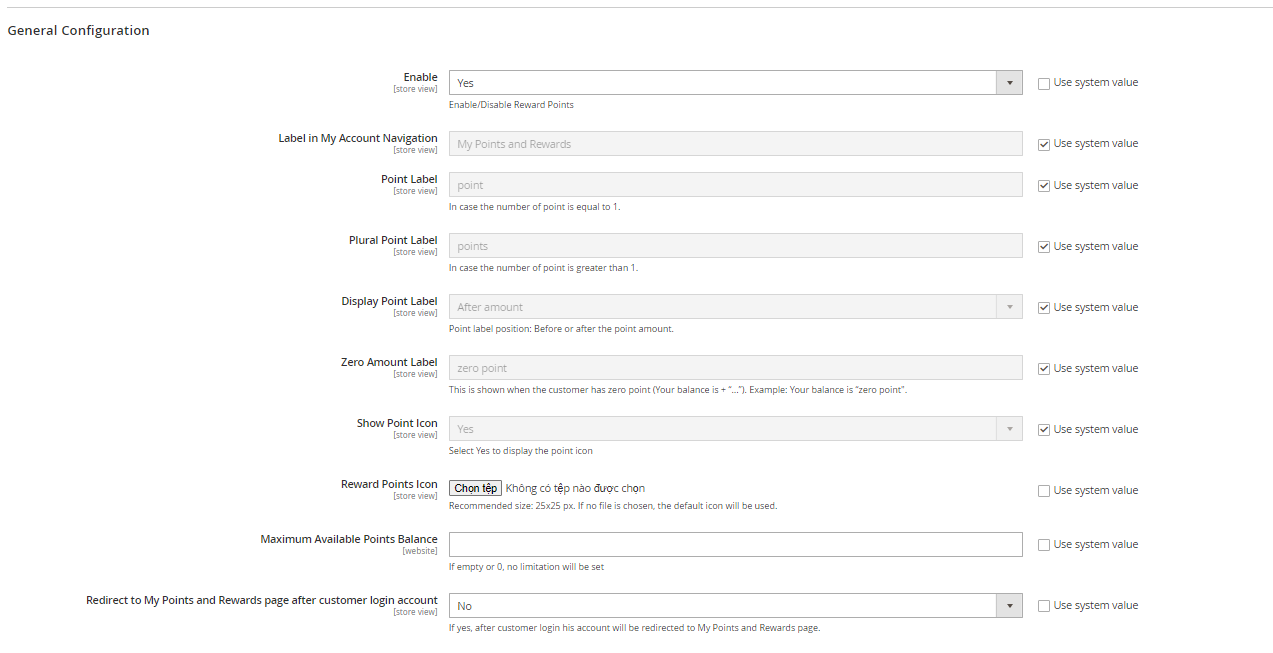
In the Enable field: Choose “Yes” to activate the Reward Point extension from Mageplaza.
In the Label in My Account Navigation field: Enter the name of Tab Reward Point displayed on the frontend at the My Account > Reward Point section.
In the Point Label field:
- This label will be displayed on the frontend.
- If you leave it blank, there will be an error message.
In the Plural Point Label field:
- If the balance is greater than 1, this label will be displayed on the frontend.
- If you leave it blank, there will be an error message.
In the Display Point Label field:
- Select After Amount to display the point label after number (ex: 5 points).
- Select Before Amount to display the number label before number (ex: points 5).
In the Zero Point Label field:
- Enter the label when the customer's account balance is equal to 0.
- If you leave it blank, there will be an error message.
In the Show Point Icon field: Choose “Yes” to display the point icon on the frontend.
In the Reward Point Icon field:
- The upload image will be used as the point icon and shown on the frontend.
- JPG, PNG or GIF files are accepted. There will be an error message if the input file is invalid.
- If you leave it blank, the default icon will be used
 .
.
In the Maximum Available Point Balance field
- Set the maximum number of point(s) that the customer can accumulate by purchasing.
- If customer's account balance reaches this number, there will be no more points awarded to the balance, and reward point(s) indicators will not be shown on the frontend.
- Admins can add point(s) to an account balance without being aware of this value.
- If the field is left blank or 0, there will be no restriction for the maximum points
In Redirect to My Points and Rewards page after customer login account field: Select Yes to redirect customers to My Points and Rewards page right after customer logs in or creates an account.
Landing Page

- Choose Landing Page: Select a page to show when clicking on the Landing Page link.
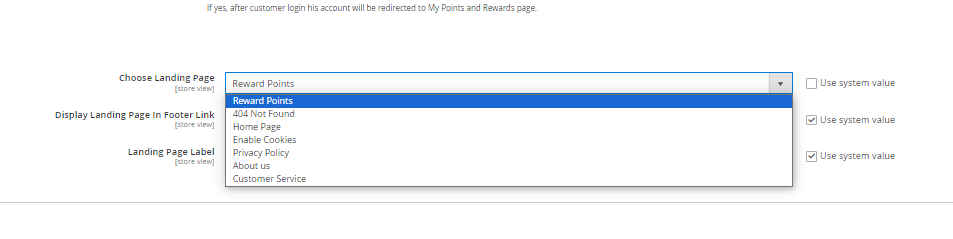
- Display Landing Page On Footer Link: Select Yes to show Landing Page Link in the Footer.
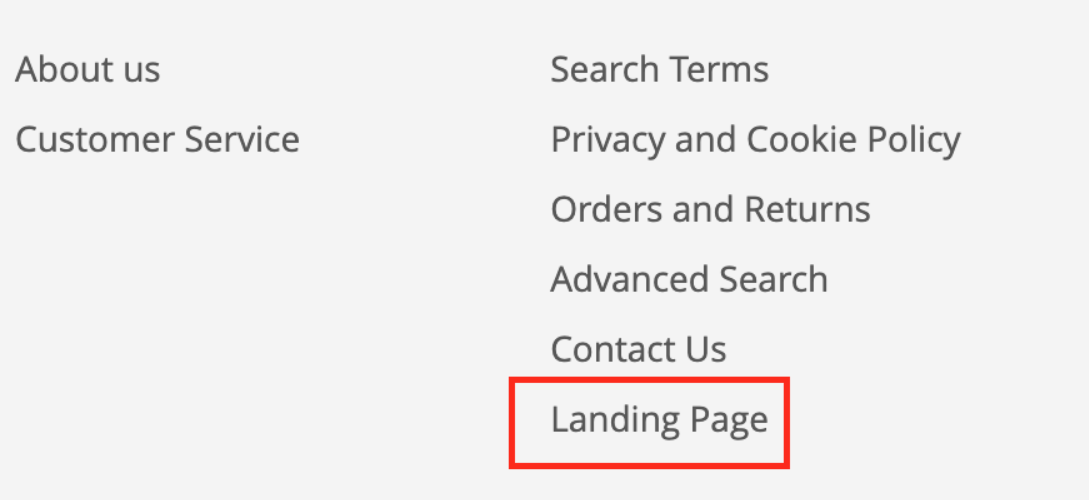
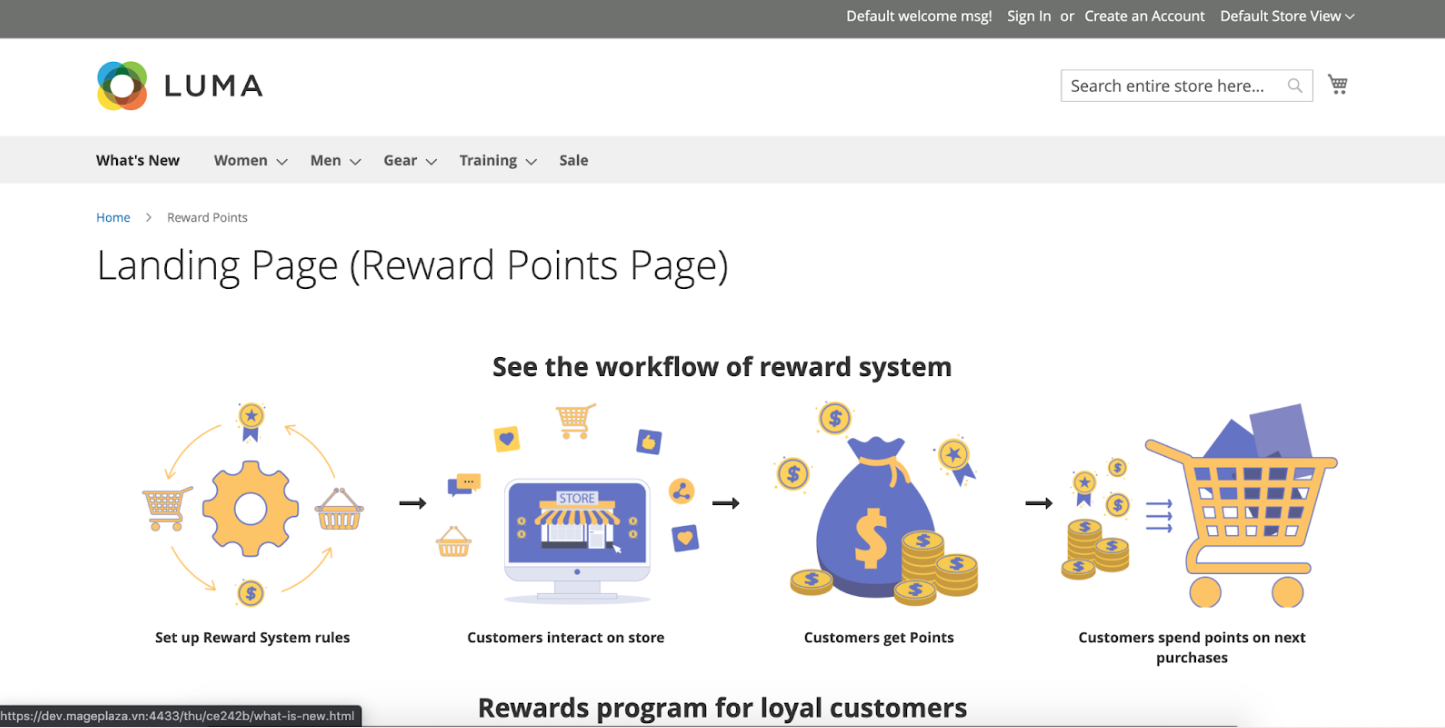
- Landing Page Label: Enter the label to show Landing Page link in the Footer.
Highlight Point on Storefront:
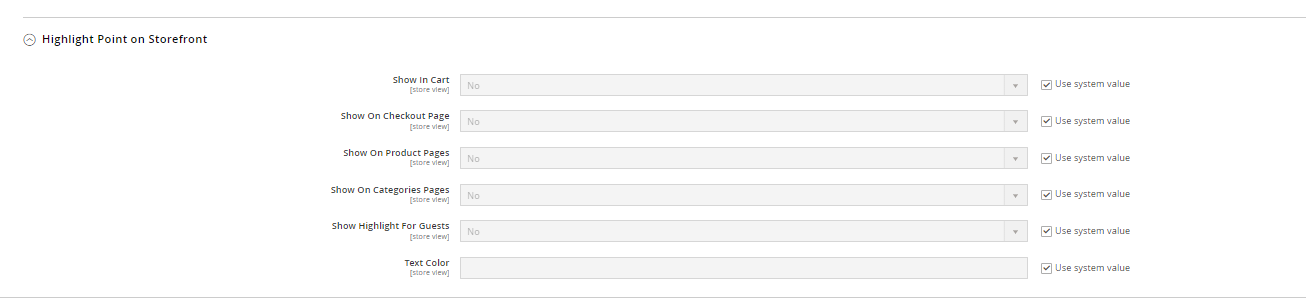
- Show in Cart: Choose Yes to enable highlight point in Shopping Cart page > summary cart
- Show on Checkout Page: Choose Yes to enable highlight point on Checkout page
- Show on Product Pages: Choose Yes to enable highlight point on Product Detail page
- Show on Categories Pages: Choose Yes to enable highlight point on Category page
- Show highlight for Guests: Choose Yes to enable highlight point for non-login customers
- Text Color: Choose color for highlight point
7.2. Earning Configuration.
In this section, admins can set up rules for earning points from taxes or limit the maximum amount of points that customers can earn, the time customers can receive bonus points or the expiration time of bonus points. This helps the admin manage and create appropriate policies for providing bonus points to customers.
7.2.1. General
This displays general configurations regarding earning point(s)
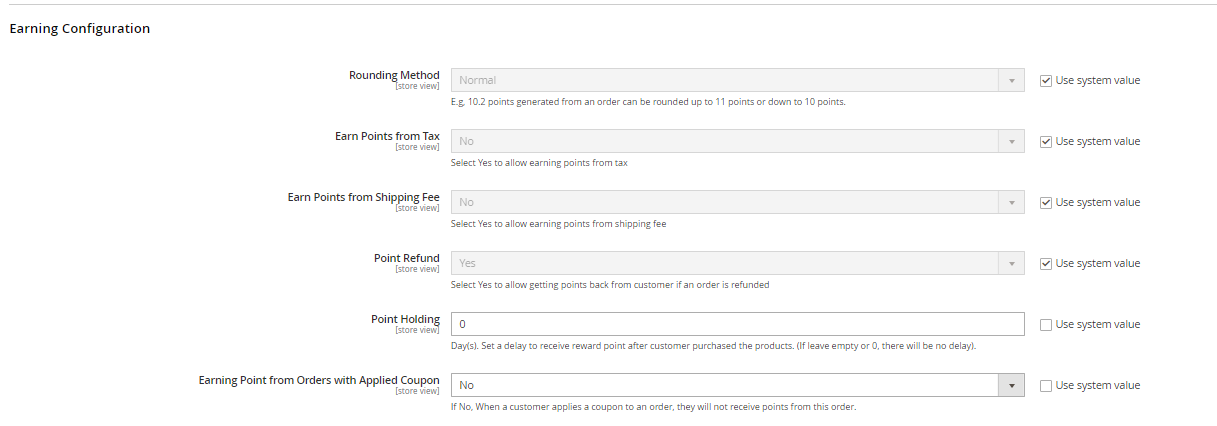
In the Rounding Method field: There are 3 options for rounding
- Normal: The number of points converted from the currency (USD, EUR, ...) will be rounded according to the normal rule. E.x: 10.2 rounded to 10; 10.8 rounded to 11.
- Rounding Up: The number of points converted from the currency (USD, EUR, ...) will be rounded up. E.x: 10.2 or 10.8 is rounded to 11.
- Rounding Down: The number of points converted from the currency (USD, EUR, ...) will be rounded down. Ex: 10.2 or 10.8 is rounded to 10.
In the Points Earning From Tax field: Select “Yes” so the tax can be converted to earning point(s)
In the Earn points from shipping fee: Select “Yes” to allow Shipping Fee to be converted to point(s).
In the Point Refund field: When the customer places an order, they will receive a certain amount of earning points. The shop owner selects “Yes” in this section to retrieve the points when customer refunds the order.
In the Point Holding field:
- Set the number of days delay that customers need to wait to receive points after purchasing
- If the value is 0: there are no delay date, customers can receive the points right after purchasing.
In the Earning Point from Orders with Applied Coupon field: If No, when a customer applies a coupon to an order, they will not receive points from this order.
7.2.2. Sales Earning Process.

In the Earning Points after Invoice created field:
- Select “Yes” to allow adding earning point(s) to the customer's account right after the invoice is created.
- Select “No” to allow adding earning point(s) after the order is completed.
In the Points Expired After field
- The number entered here is the expiration day of point(s); it starts to count from the day point(s) is (are) added.
- If this field is blank, point(s) will be used indefinitely.
7.3. Spending Configuration.
In this section, admins can set up rules for using points related to taxes or limit the amount of points that customers can use, the time customers can receive bonus points or the expiration time of bonus points. This helps the admin manage the use of bonus points by customers, both stimulating customers to buy and creating revenue for the store while limiting losses when selling a product with bonus points.
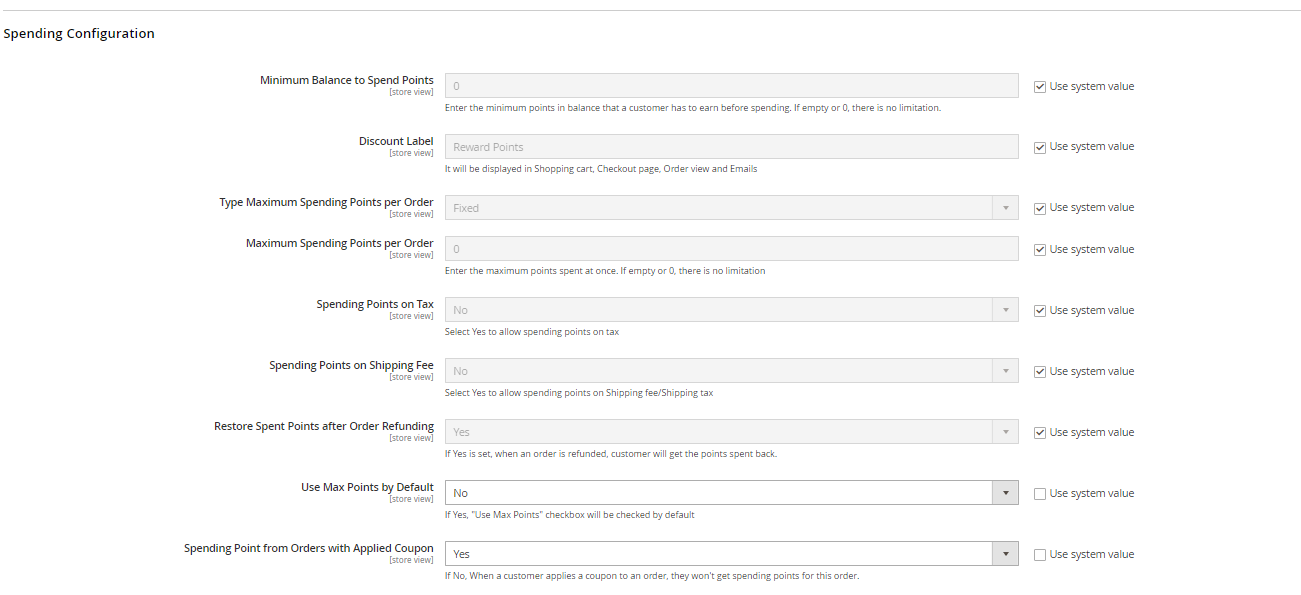
In the Minimum spending points per order field
- Set the minimum number of point(s) that customers must have in their balances as a condition to spend points on discounting orders.
- If the number of point(s) in the customer's balance is less than the minimum spending point, the Reward Points slider will not appear on the View Page or Checkout Page.
- If you leave it blank or 0, the default minimum point is 0.
In the Discount Label field: Discount Label displayed on the frontend will change according to the content of this section.
In Type Maximum Spending Points per Order: Select how to set the maximum number of points allowed per order
- Type Maximum Spending Points per Order = Fixed: the maximum number of points used for each order with a fixed value set in Maximum spending points per order field
- Type Maximum Spending Points per Order = Percent: the maximum number of points used for each order is set as a percentage of the total shopping cart value, set the maximum value in Maximum spending points per order field
In the Maximum spending points per order field:
- Set the maximum number of point(s) that customers can use on an order.
- If you leave it blank or 0, the maximum number of point(s) customers can spend is unlimited (it can be the maximum number of points they own or the maximum number of points which can be converted by SubTotal of Cart).
In the Spending Points on Shipping: Select “Yes” to allow customers to use their point(s) to reduce the shipping cost.
In the Restore spent points after order refunding field: When customers place an order, they can apply a certain amount of their reward point(s). Admins select “Yes” in this section to return point(s) to customers if their orders are refunded.
In the Use Max Point By Default field: Select “Yes” to set the customer's spending point(s) to the maximum number that they can use.
In the Spending Point from Orders with Applied Coupon field: If No, When a customer applies a coupon to an order, they won't get spending points for this order.
7.4. Display Configuration.
The points displayed on the minicart are the points the customer will receive when placing an order to help the customer easily know how many points they will receive. This section also includes accumulated points on Top Link that help customers easily track their current points without going to another page to check. This makes customers' payment easier, faster and more convenient.

- In the Display Total Points on Top Links field: Select “Yes” to display the total number of reward point(s) that customer has on Top Link.

In the Hide Total Points on Top Link if the Reward Points balance is empty or equals to zero: Select Yes to hide the total points of customer on the Top Link if the Reward Points balance is null or equals to zero.
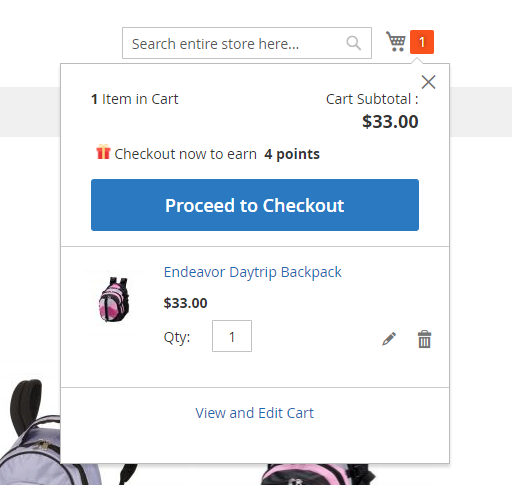
In the Display Earning Points on Minicart field, Select “Yes” to show the total number of earning point(s) customers can receive when checking out the cart on the Minicart page.
7.5. Email Configuration.
Admins can set up email notifications about changes in each customer's reward points as well as the expiration date of the reward points. This helps customers update their current reward points as well as the expiration date of the points. This can encourage customers to use the points, promoting the purchasing process quickly.

In the Enable Notification Email field: Select “Yes” to allow notification emails to be sent to customers.
In the Subscribe customers by default field: When a new customer subscribes to a store, receiving no emails is set as default. Select “Yes” in this section so that when their first transaction is made (by purchasing or by admin), Reward Points Notification will be checked immediately.
In the Sender Email field: Admins can choose one of the 5 available Magento Senders: General Contact, Sales Representative, Customer Support, Customer Email 1, Customer Email 2
In the Update Point Balance Email Template field
- Pre-installed email configuration that customers can receive the notification mail when there are changes in their balance.
- To change Email Template, admins can create another one under
Marketing > Email Template. - The instructions to create a new Email Template can be found here.

In the Points expiration Email Template field:
- Pre-installed email configuration that customers can receive notification emails when their reward point(s) is (are) about to expire.
- To change the Gift Card Email template, admins can create another one under
Marketing > Email Template. - The instructions to create a new Email Template can be found here.

7.6. Social behavior
7.6.1. Like via Facebook
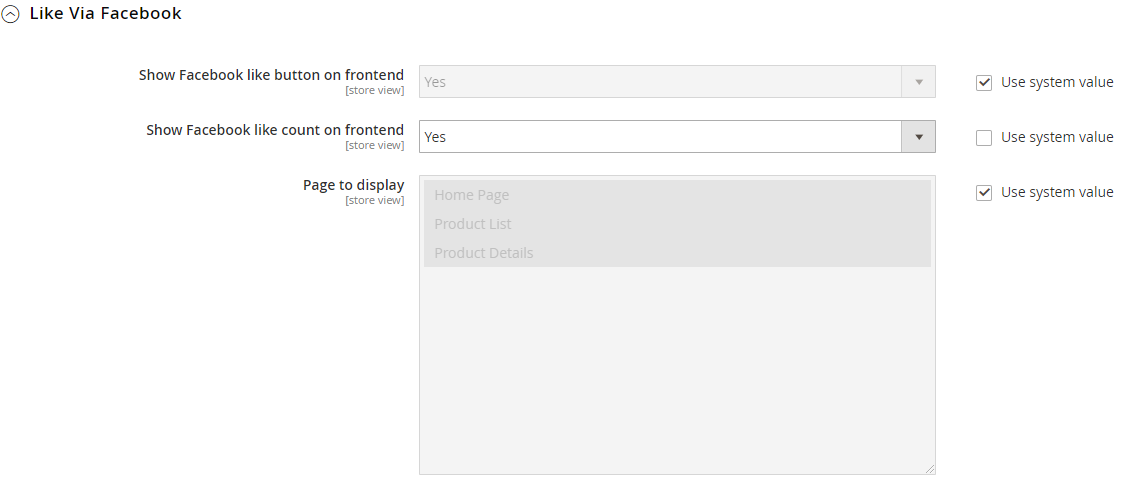
Show Facebook like button on frontend: Choose Yes so that the Facebook like button can show on the frontendShow Facebook like count on frontend: Select yes to display the total number of Facebook like that the page is receivedPage to display: Select the pages where the admins want the Facebook like button to be displayed
7.6.2. Tweet Via Twitter
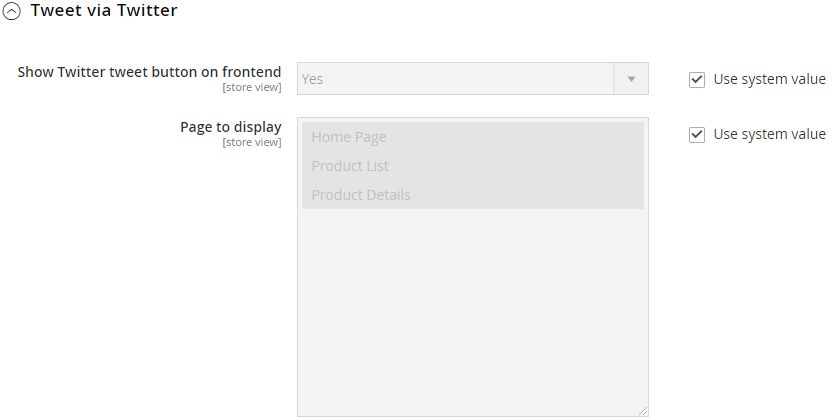
Show Twitter tweet button on frontend: Choose Yes to show the Tweet button of Twitter on the frontendPage to display: Choose the pages that admins want the Tweet button to be displayed
7.7. Customer referrals
7.7.1. General

Invitation Email:- The email is sent when customers want to refer to their friends
- Admins can change the template as they want by go to
Marketing > Email Template - You can refer how to create a new Email Template here
Default Refer URL:- When customers is referred, click on the refer link, it will be shipped to the page that has the URL filled in here
- If you leave this field blank, the default is homepage
7.7.2. Url Key

Use Param:- Choose how to encode refer link
Url Param: The refer link has the formathttp://example.com/?code=123Hash: The refer link has the formathttp://example.com/#code123
Prefix:- Choose the prefix for the refer code
- Default =
code
7.8 Milestones
In this section, admins can turn on/off the milestone program as well as the source of earning points, accumulation time and email template to notify customers about milestones tier automatically. This helps customers quickly update milestone tiers as well as the benefits they can receive.
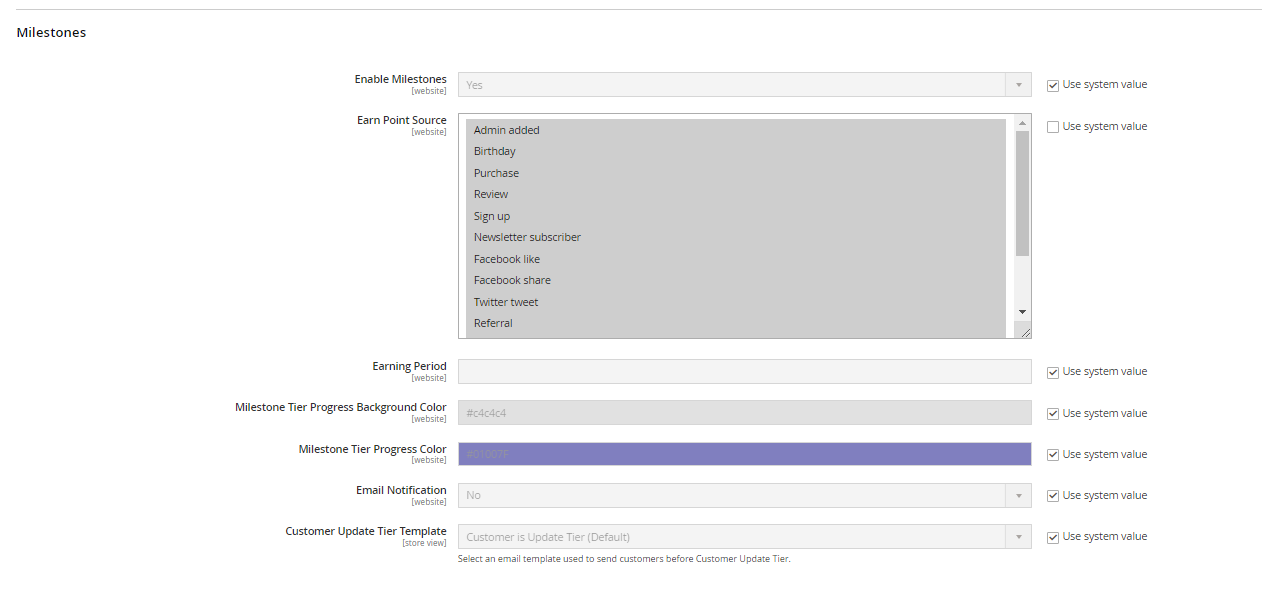
- Enable Milestone: Select Yes to enable the Milestone function
- Earn Point Source: Select a source for calculating points for Milestone, you can choose many options. For example, choose Admin added and Purchase, the number of points to calculate for milestone will only get the points earned when admin adds points or and the customer purchases to receive points.
- Earning Period: Enter the number of days to calculate earning points for Milestone. Example: Entering Earning Period = 10, the number of points to calculate for milestone will be caculated from activities of previous 10 days from the present time..
- Milestone Tier progress background color: select the color background for the Milestones Progress Bar
- Milestone Tier progress color: select the color for the progress on the bar
- Email Notification: Select Yes so customers can receive email notifications each time they join a certain milestone
- Customer Update Tier Template: Select an email template used to send customers before Customer Update Tier.
VIII. Manage Reward Point in Admin Customer
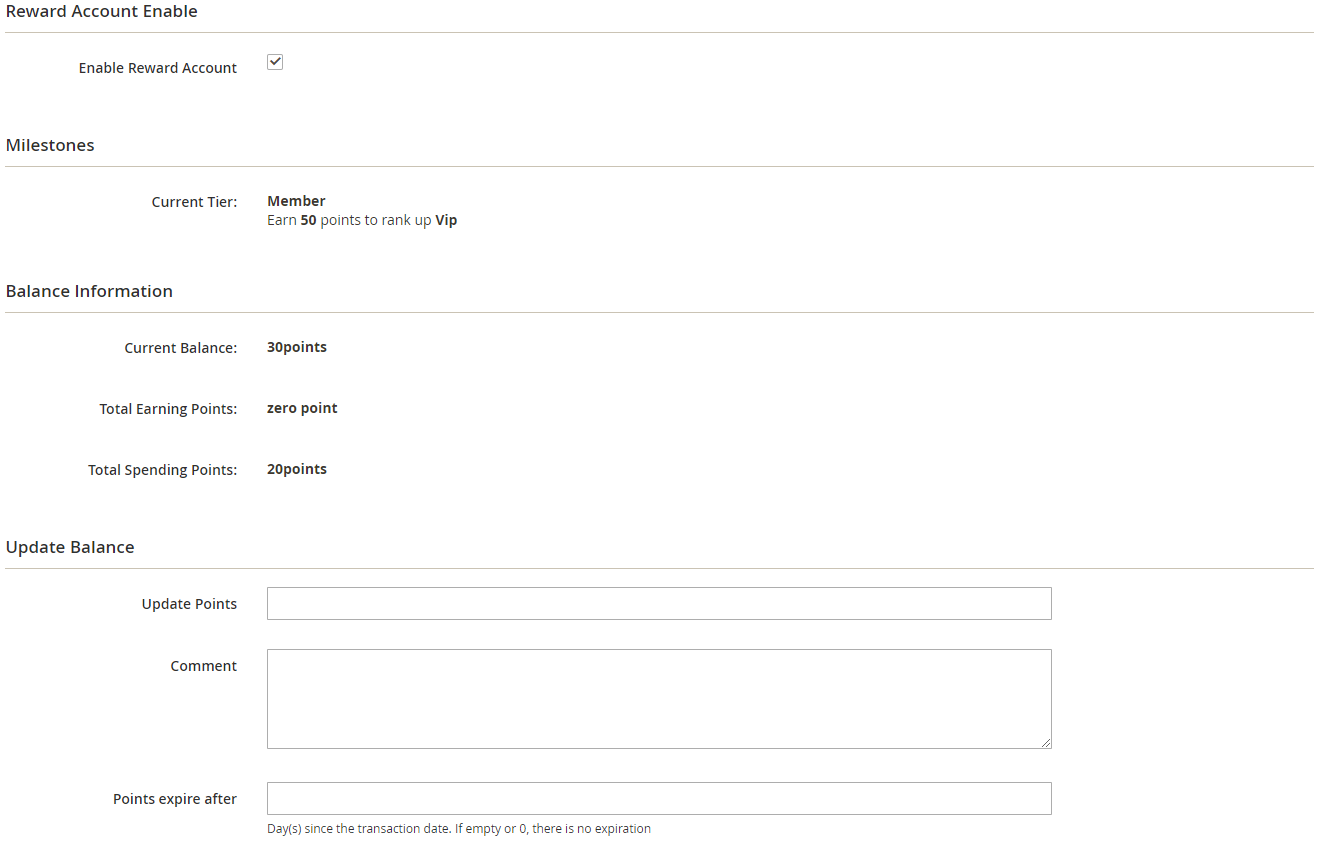
Admins can manage Reward Points Balance, Transactions and Notification of customers by going to Customer > Edit Customer > Reward Points.
- In the Reward Acount Enable field: tick on the checkbox to activate Reward Account for customer
- In the Milestones field: Show information of the current Milestones Tier of customer and the number of points needed to reach the next-level tier
- Balance Information tab lets admin know:
- Current Balance: the total number of Reward Points that customer has.
- Total Earning Points: The total number of Reward Points that customer can order.
- Total Spending Points: The total number of Reward Points that the customer has used.
- Update Balance tab: Allow Admin to change the Balance by filling in Update Point and setting the usage time of that amount of Points. Admin can also enter the reason for the change in the Comment field.
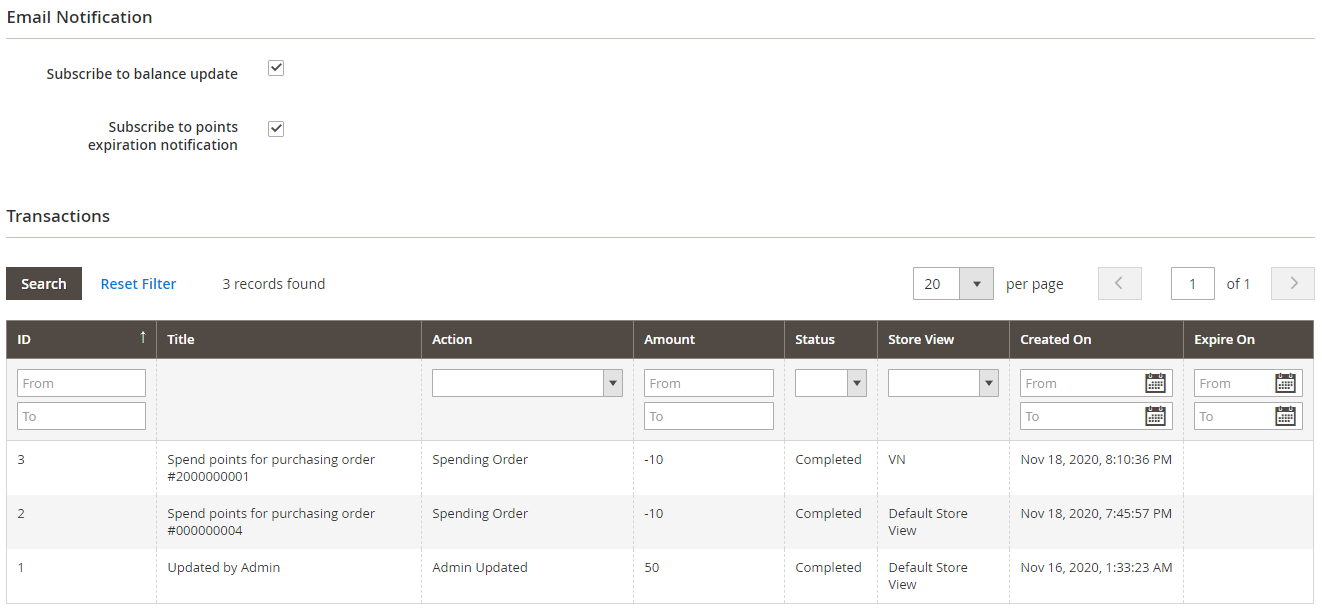
- Email Notification tab: Allow Admin to change the customer who register or turn off notification emails when Balance is updated or Point is about to expire.
- Transactions tab: Displays information related to Reward Points of Customer including ID, Title, Action, Amount, Status, Store View, Created On, Expire On.
- Information about Milestones, Balance, Notification and Transaction in Admin will sync with the My Account / My Points & Reward in the frondend
IX. Refund Spent Points
For orders that can be discouted by Reward Points, when refunding, the point can be returned by admin.

Tick on the Refund Order to Points checkbox to refund points. The Reward Point Refund field will be displayed
- Reward Point Refund: Enter the number of points refunded, this value must be less than the Spent Points used for the order
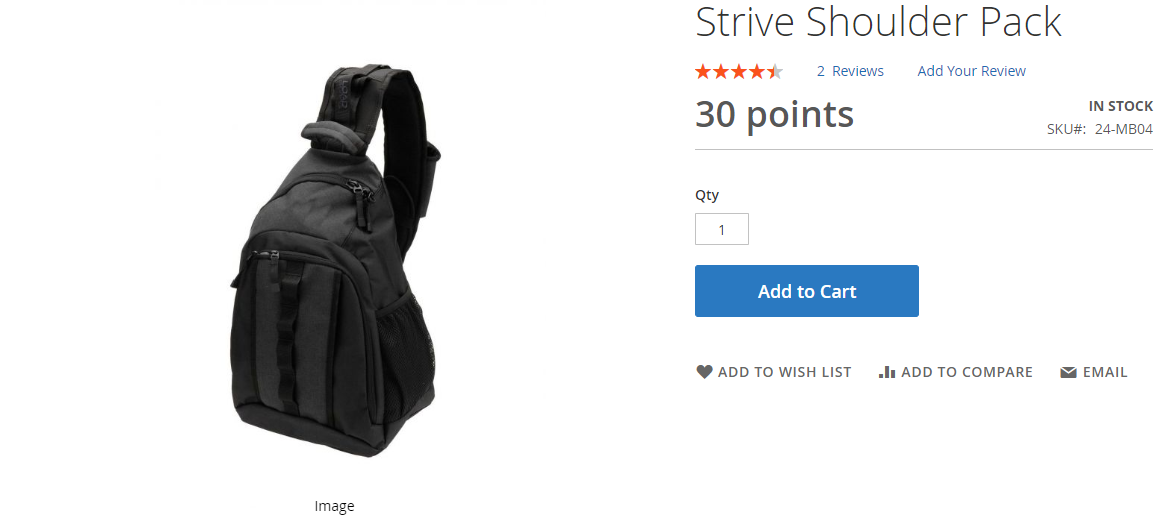
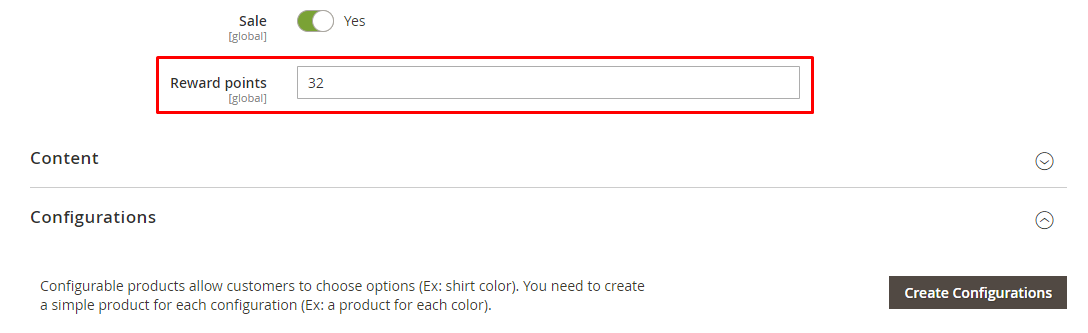
X. Add the price based on points for products
Go to Catalog > Products, admins can see that in the Grid, Reward Points column represent the price by the point of the Product

To set the price by Point for Product, admins need to Edit Product and enter the amount of points converted from the price that you want to sell, then Save Product.
XI. Import
To assist customers in backing up Reward Point data when switching systems, we have added the Import feature of Account and Transaction Reward.
11.1. Import Reward Account
From the Admin Panel, go to Sytem> Data Tranfer> Import, select Entity Type = Mageplaza Reward Account
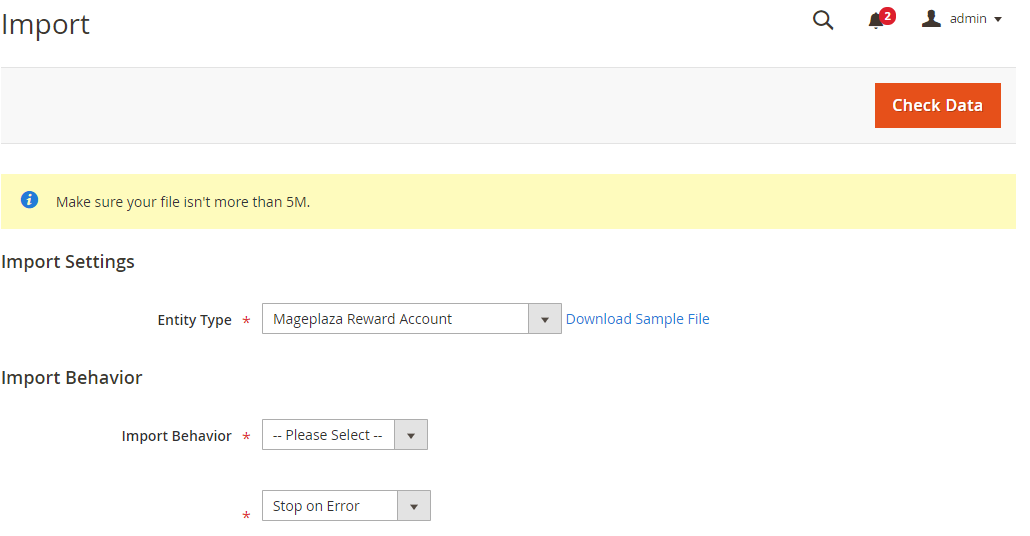
Step 1: Choose Entity Type = Mageplaza Reward Account
Step 2: Choose import action: Add/Update account or Delete account
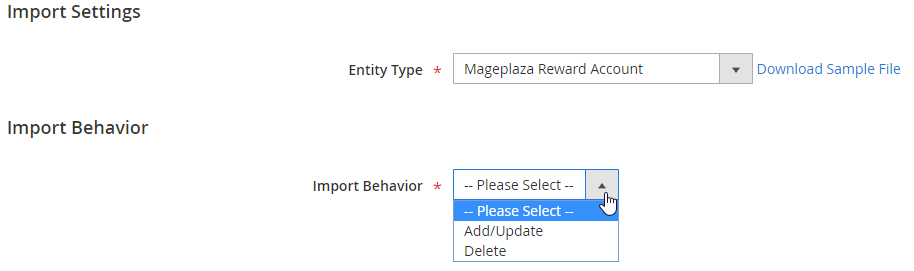
Step 3: Download the file imported from the computer. If you don't know what the import file format is and what data you need to fill in, you can click on the link Download Sample File to view the sample file
Step 4: Check Data and import data
11.2 Import Reward Transaction
From the Admin Panel, go to Sytem > Data Tranfer > Import, choose Entity Type = Mageplaza Reward Transaction
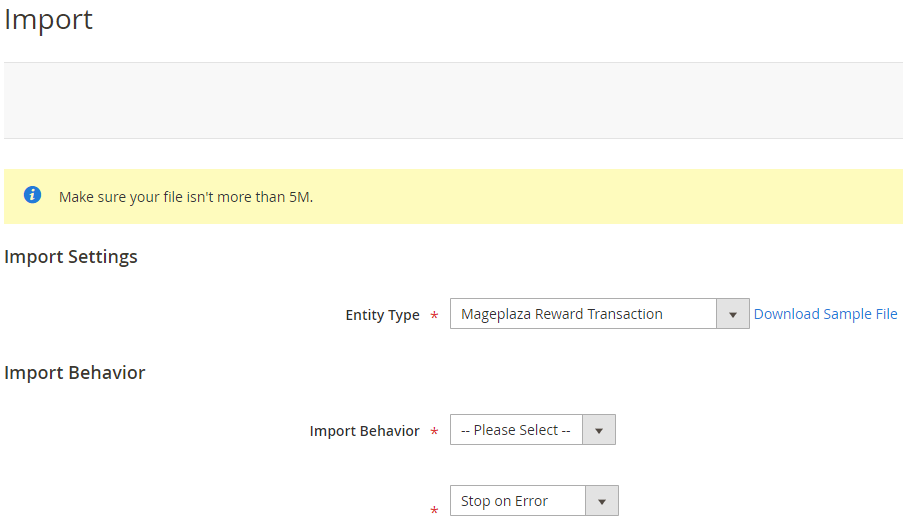
Step 1: Choose Entity Type = Mageplaza Reward Account
Step 2: Choose import action: Add transaction

Step 3: Download the file imported from the computer. If you don't know what the import file format is and what data you need to fill in, you can click on the link Download Sample File to view the sample file
Step 4: Check Data and import data
XII. Customer Frontend.
12.1. Create New Account
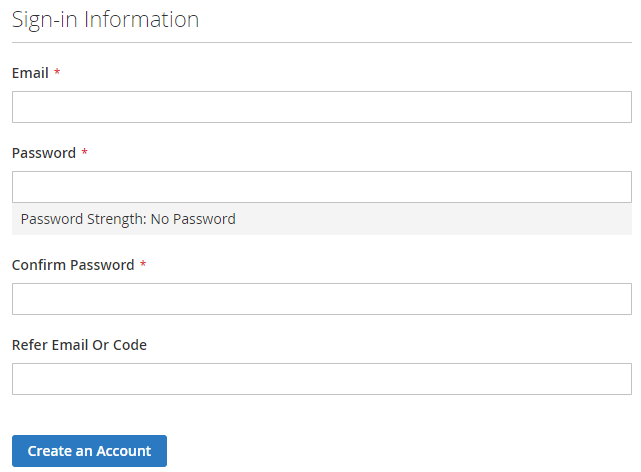
- Mageplaza Reward Point offers the function Refer email or Refer Code to receive incentives
- Customers can get refer code information or the email of refereers, they can completely fill in the Refer Email Or Code, then
Create an Accountand place order and get point/discount. - For customers who have an account, they need to have the correct link to access, login and use the refer code
12.2. My Account > My Points & Reward
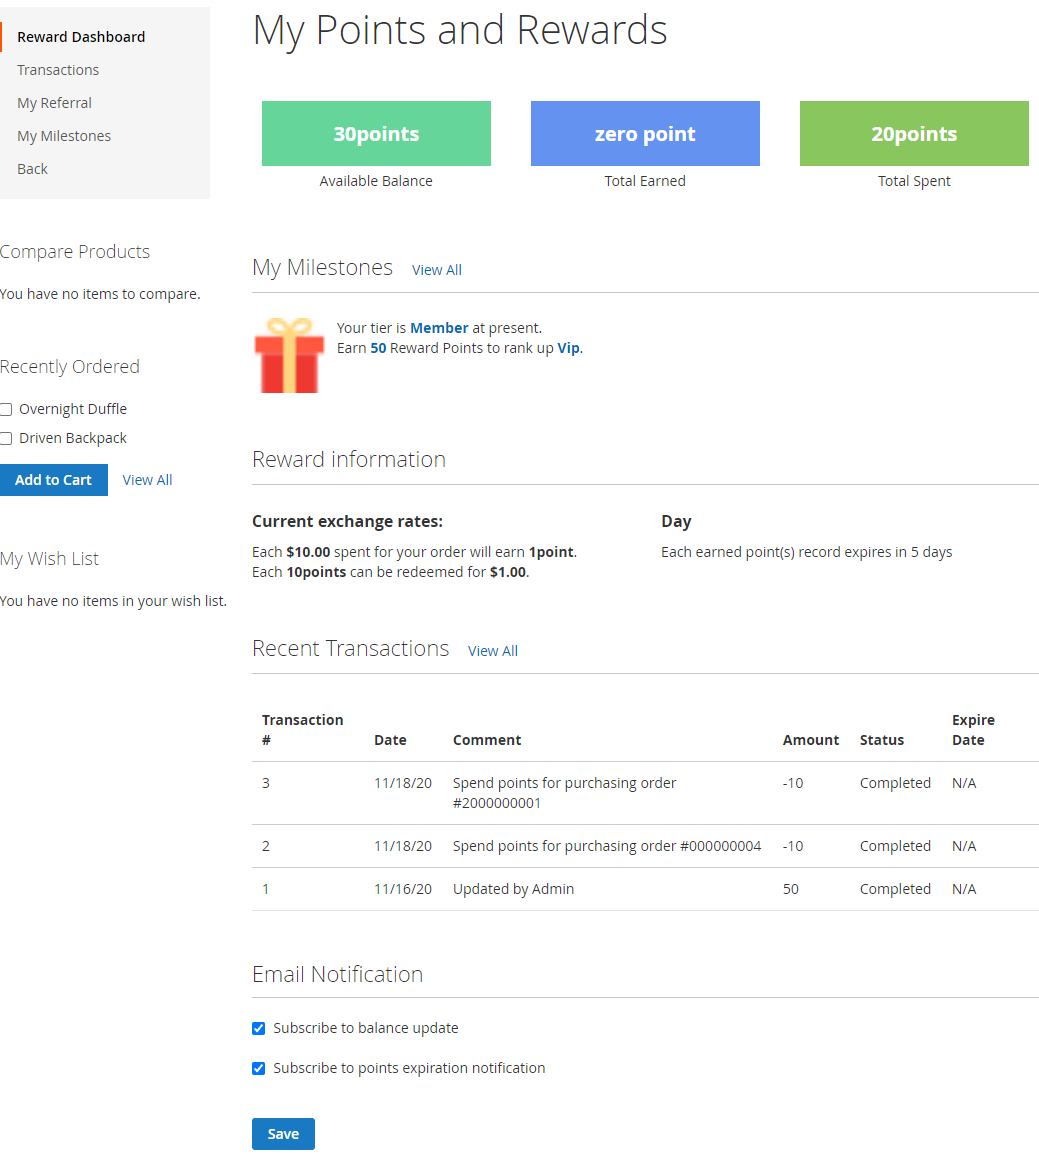
12.2.1. Reward Dashboard
Customers can check the Reward Point information in this section after logging in:
- Available Balance: the curent available points of customer, equivalent to Current Balance in the backend.
- Total Earned: the number of points that added when place an order, equivalent to Total Earning Points in the backend.
- Total Spent: the number of points that customer has used, equivalent to Total Spending Points check in the backend.
- My Milestones: the customer's current Milestone information and the number of points needed to earn to achieve the next tier levels.
- Reward Information indicates
- Earning Rate and Spending Rate that customer is entitled (according to his Customer Group and Website set in the backend).
- The maximum number of points that the customer's balance can receive from orders.
- The maximum number of days that point(s) can be used since that customer receives point(s).
- Recent Transactions: Customer knows the detailed history of transactions that have occurred, including the following information:
- The reason the transaction happened.
- Number of points change.
- The date and time of the transaction.
- Point expiration date.
- Transaction status.
- They can also sign up to receive notifications when Balance changes or when Points are about to expire.
- All information here is synchronized in the backend Customer / Reward Points.
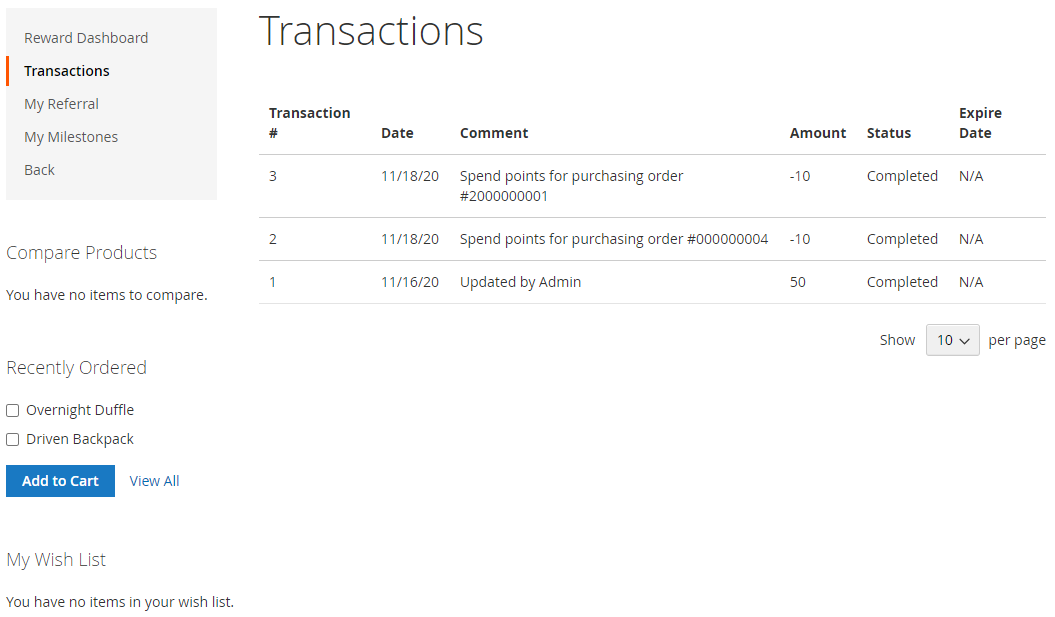
12.2.2. Transactions
At Transaction History: Customer can know the transaction history in detail
12.2.3. My Referral
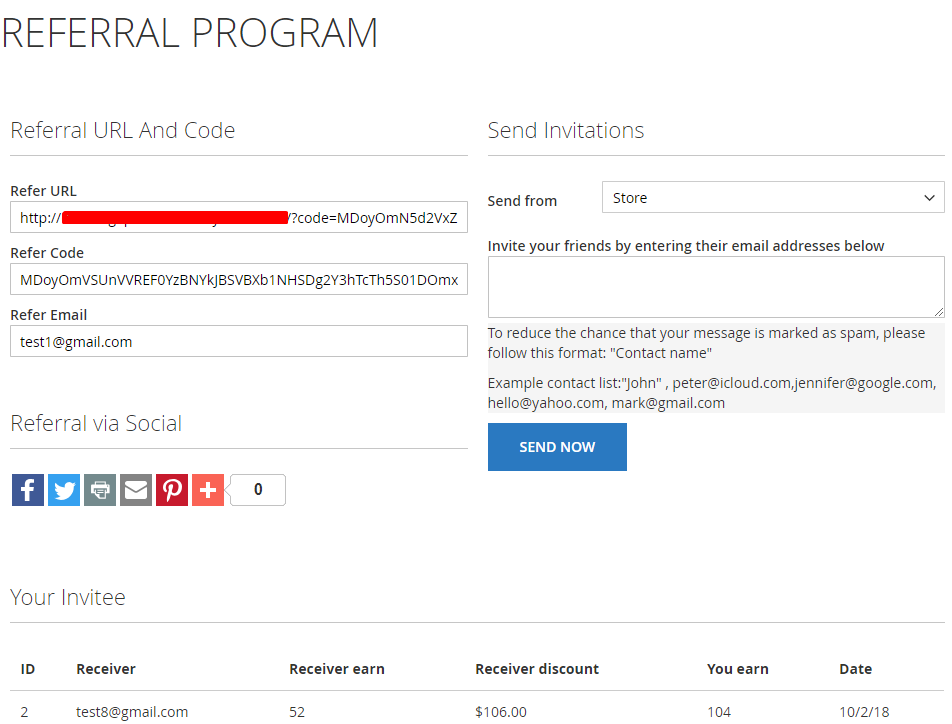
- Manage the Referral URL and Code of an account
- When using
Send Invitationsor referral via Social, Refer URL will be sent to the email - Your Invitee saves the information about the referral action that they did when the referrer performed a successful place order
- When the order is completed, Customers will receive a point equal to the amount of points
You Earn
12.2.4. My Milestones
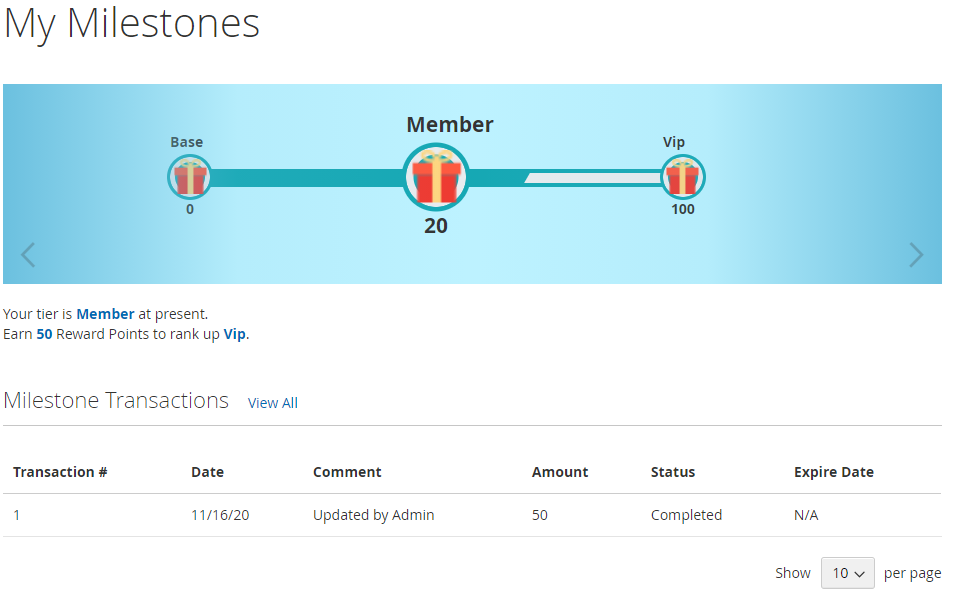
- Customer Milestone details including:
- The Milestone progress bar, showing the tiers that the customer can reach
- The customer's current milestone Tier and the number of points needed to reach the next tier level
- Information on transactions where points are earned from those transactions
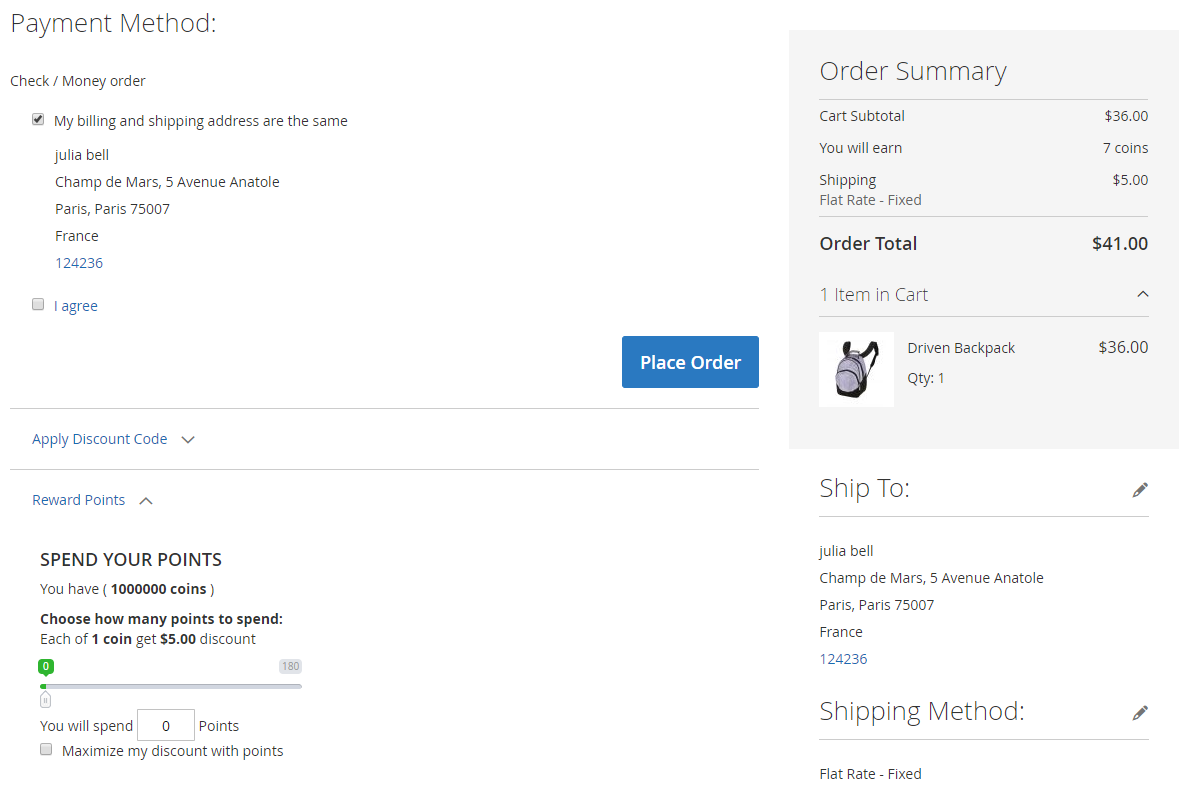
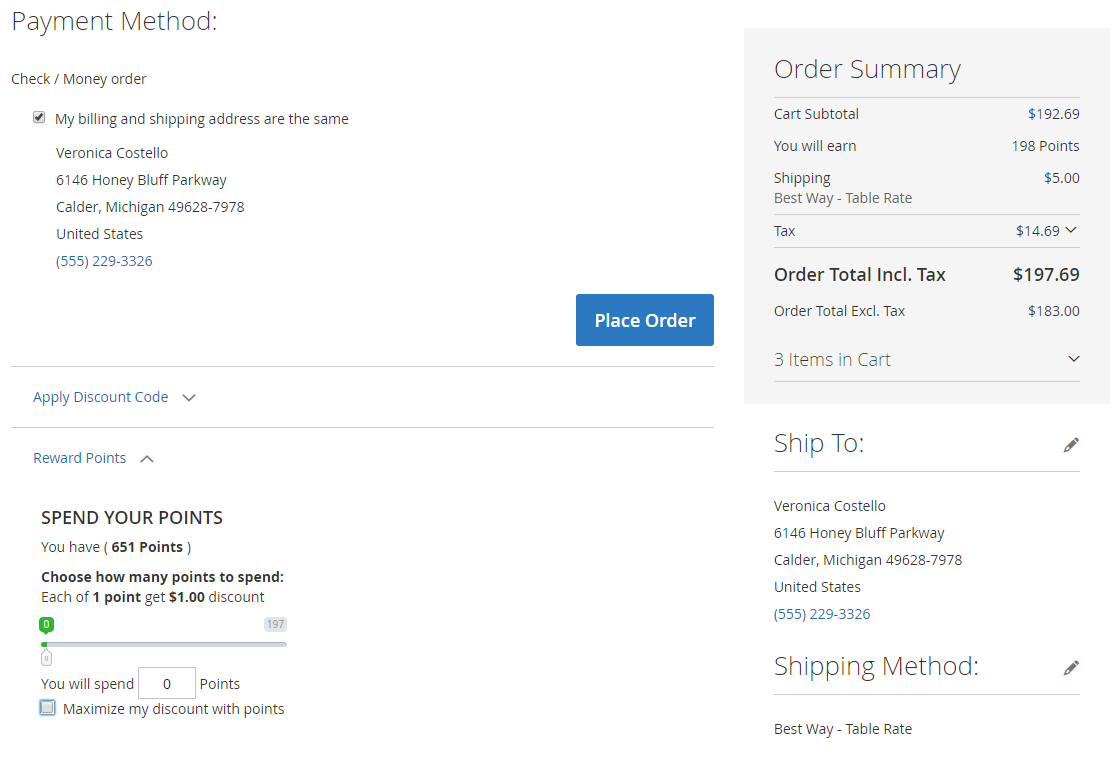
12.3. Checkout Page
- Customers can use the slider or text box to select the amount of reward point(s) they want to spend.
- Used reward point(s) can be limited to a range.
- Customers are only allowed to use their point(s) within this range.
- If Subtotal has a value less than the minimum value of the limited value range, the Apply Reward Point section will not be displayed.
- Tick the checkbox Maximize my discount with Point to use all available points at once. The amount of points can be
- The total points that customer has if Total Point(s) < Max Point for per Order and Subtotal.
- Max Point if Max Point < Total Point and Subtotal.
- The number of point(s) which is equal to Subtotal if that amount < Max Point and Total Point.
- The Order Summary box will display more sections about reward points to make the calculation easier.
- Spending Point can be used for Tax, Shipping Fee if it’s configured in the backend.
- The conversion rate between Reward Point and Spending Point depends on the Spending Rate configuration in the backend.
12.4. Other additional frontends.
- Top link: Displays the point(s) that customer has.

- MiniCart: Displays the earning point(s) of all products in the cart.
- View Cart Page (Shopping Cart): Displays Apply Reward Point on the checkout page, and also displays the Earning Point, Spending Point and Reward Point.

REST API
- Mageplaza Reward Points Ultimate supports the use of REST API to perform requests related to Invitations, Referral Rules, Behavior Rules.
- Details of the Mageplaza Reward Points Ultimate endpoints can be found here
- Mageplaza Reward Points Ultimate fully supports endpoints of Mageplaza Reward Points Standard and Mageplaza Reward Points Pro.
- See the Magento 2 REST API tutorial here. See the token generation instructions here.
GraphQL
How to install
Run the following command in Magento 2 root folder:
composer require mageplaza/module-reward-points-graphql
php bin/magento setup:upgrade
php bin/magento setup:static-content:deploy
How to use
To start working with Reward Points GraphQL in Magento, you need to:
- Use Magento 2.3.x. or higher. Return your site to developer mode
- Set GraphpQL endpoints as
http://<magento2-server>/graphqlin url box (e.g. http://dev.site.com/graphql) - The queries and mutations that Mageplaza support helps to see details of Transaction, Invitation, etc. through customer query, view Spending Point information, create Invite Email, and so on. More details can be found here.
FAQs
Support and Assistance
1. Customer Support
For any assistance, please visit our Support page or email us at cs@mageplaza.com/ sales@mageplaza.com
2. Create a Ticket
If you have technical issues, please open a ticket at this link.
Operating Hours
Our support team is available during the following hours:
- Monday to Friday: 8:00 AM - 23:59 PM
- Saturday: 8:00 AM - 12:00 PM
- Sunday: Closed
Refund Policy
We understand that sometimes things don't go as planned. Please review our refund policy for detailed information: Refund Policy Link
Frequently Asked Questions (FAQ)
For quick answers to common questions, please visit our FAQ page: FAQ Page Link